logologo
เริ่มต้น
คู่มือ
การพัฒนา
ปลั๊กอิน
API
หน้าหลัก
English
简体中文
日本語
한국어
Español
Português
Deutsch
Français
Русский
Italiano
Türkçe
Українська
Tiếng Việt
Bahasa Indonesia
ไทย
Polski
Nederlands
Čeština
العربية
עברית
हिन्दी
Svenska
เริ่มต้น
คู่มือ
การพัฒนา
ปลั๊กอิน
API
หน้าหลัก
logologo
ภาพรวม

API

คีย์ API
เอกสาร API
กรณีการใช้งาน
SSO

เวิร์กโฟลว์

Webhook
คำขอ HTTP
แหล่งข้อมูลภายนอก

เนื้อหาแบบฝัง

บล็อก Iframe
การฝัง
Previous Pageแหล่งข้อมูลภายนอก
Next Pageการฝัง
TIP

เอกสารนี้แปลโดย AI หากมีข้อมูลที่ไม่ถูกต้อง โปรดดูเวอร์ชันภาษาอังกฤษ

#บล็อก Iframe

This feature is provided by the plugin «บล็อก: iframe»

#บทนำ

บล็อก Iframe ช่วยให้คุณสามารถฝังหน้าเว็บหรือเนื้อหาภายนอกเข้ามาในหน้าปัจจุบันได้ครับ/ค่ะ ผู้ใช้สามารถผสานรวมแอปพลิเคชันภายนอกเข้ากับหน้าเว็บได้อย่างง่ายดาย เพียงแค่กำหนดค่า URL หรือแทรกโค้ด HTML โดยตรง เมื่อใช้หน้า HTML ผู้ใช้จะสามารถปรับแต่งเนื้อหาได้อย่างยืดหยุ่น เพื่อตอบสนองความต้องการในการแสดงผลเฉพาะทาง วิธีนี้เหมาะอย่างยิ่งสำหรับสถานการณ์ที่ต้องการการแสดงผลแบบกำหนดเอง เพราะสามารถโหลดทรัพยากรภายนอกได้โดยไม่ต้องเปลี่ยนหน้า ซึ่งช่วยยกระดับประสบการณ์ผู้ใช้และเพิ่มประสิทธิภาพการโต้ตอบของหน้าเว็บครับ/ค่ะ

#การติดตั้ง

เป็นปลั๊กอินที่มาพร้อมกับระบบอยู่แล้ว ไม่จำเป็นต้องติดตั้งเพิ่มเติมครับ/ค่ะ

#การเพิ่มบล็อก

20240408220259

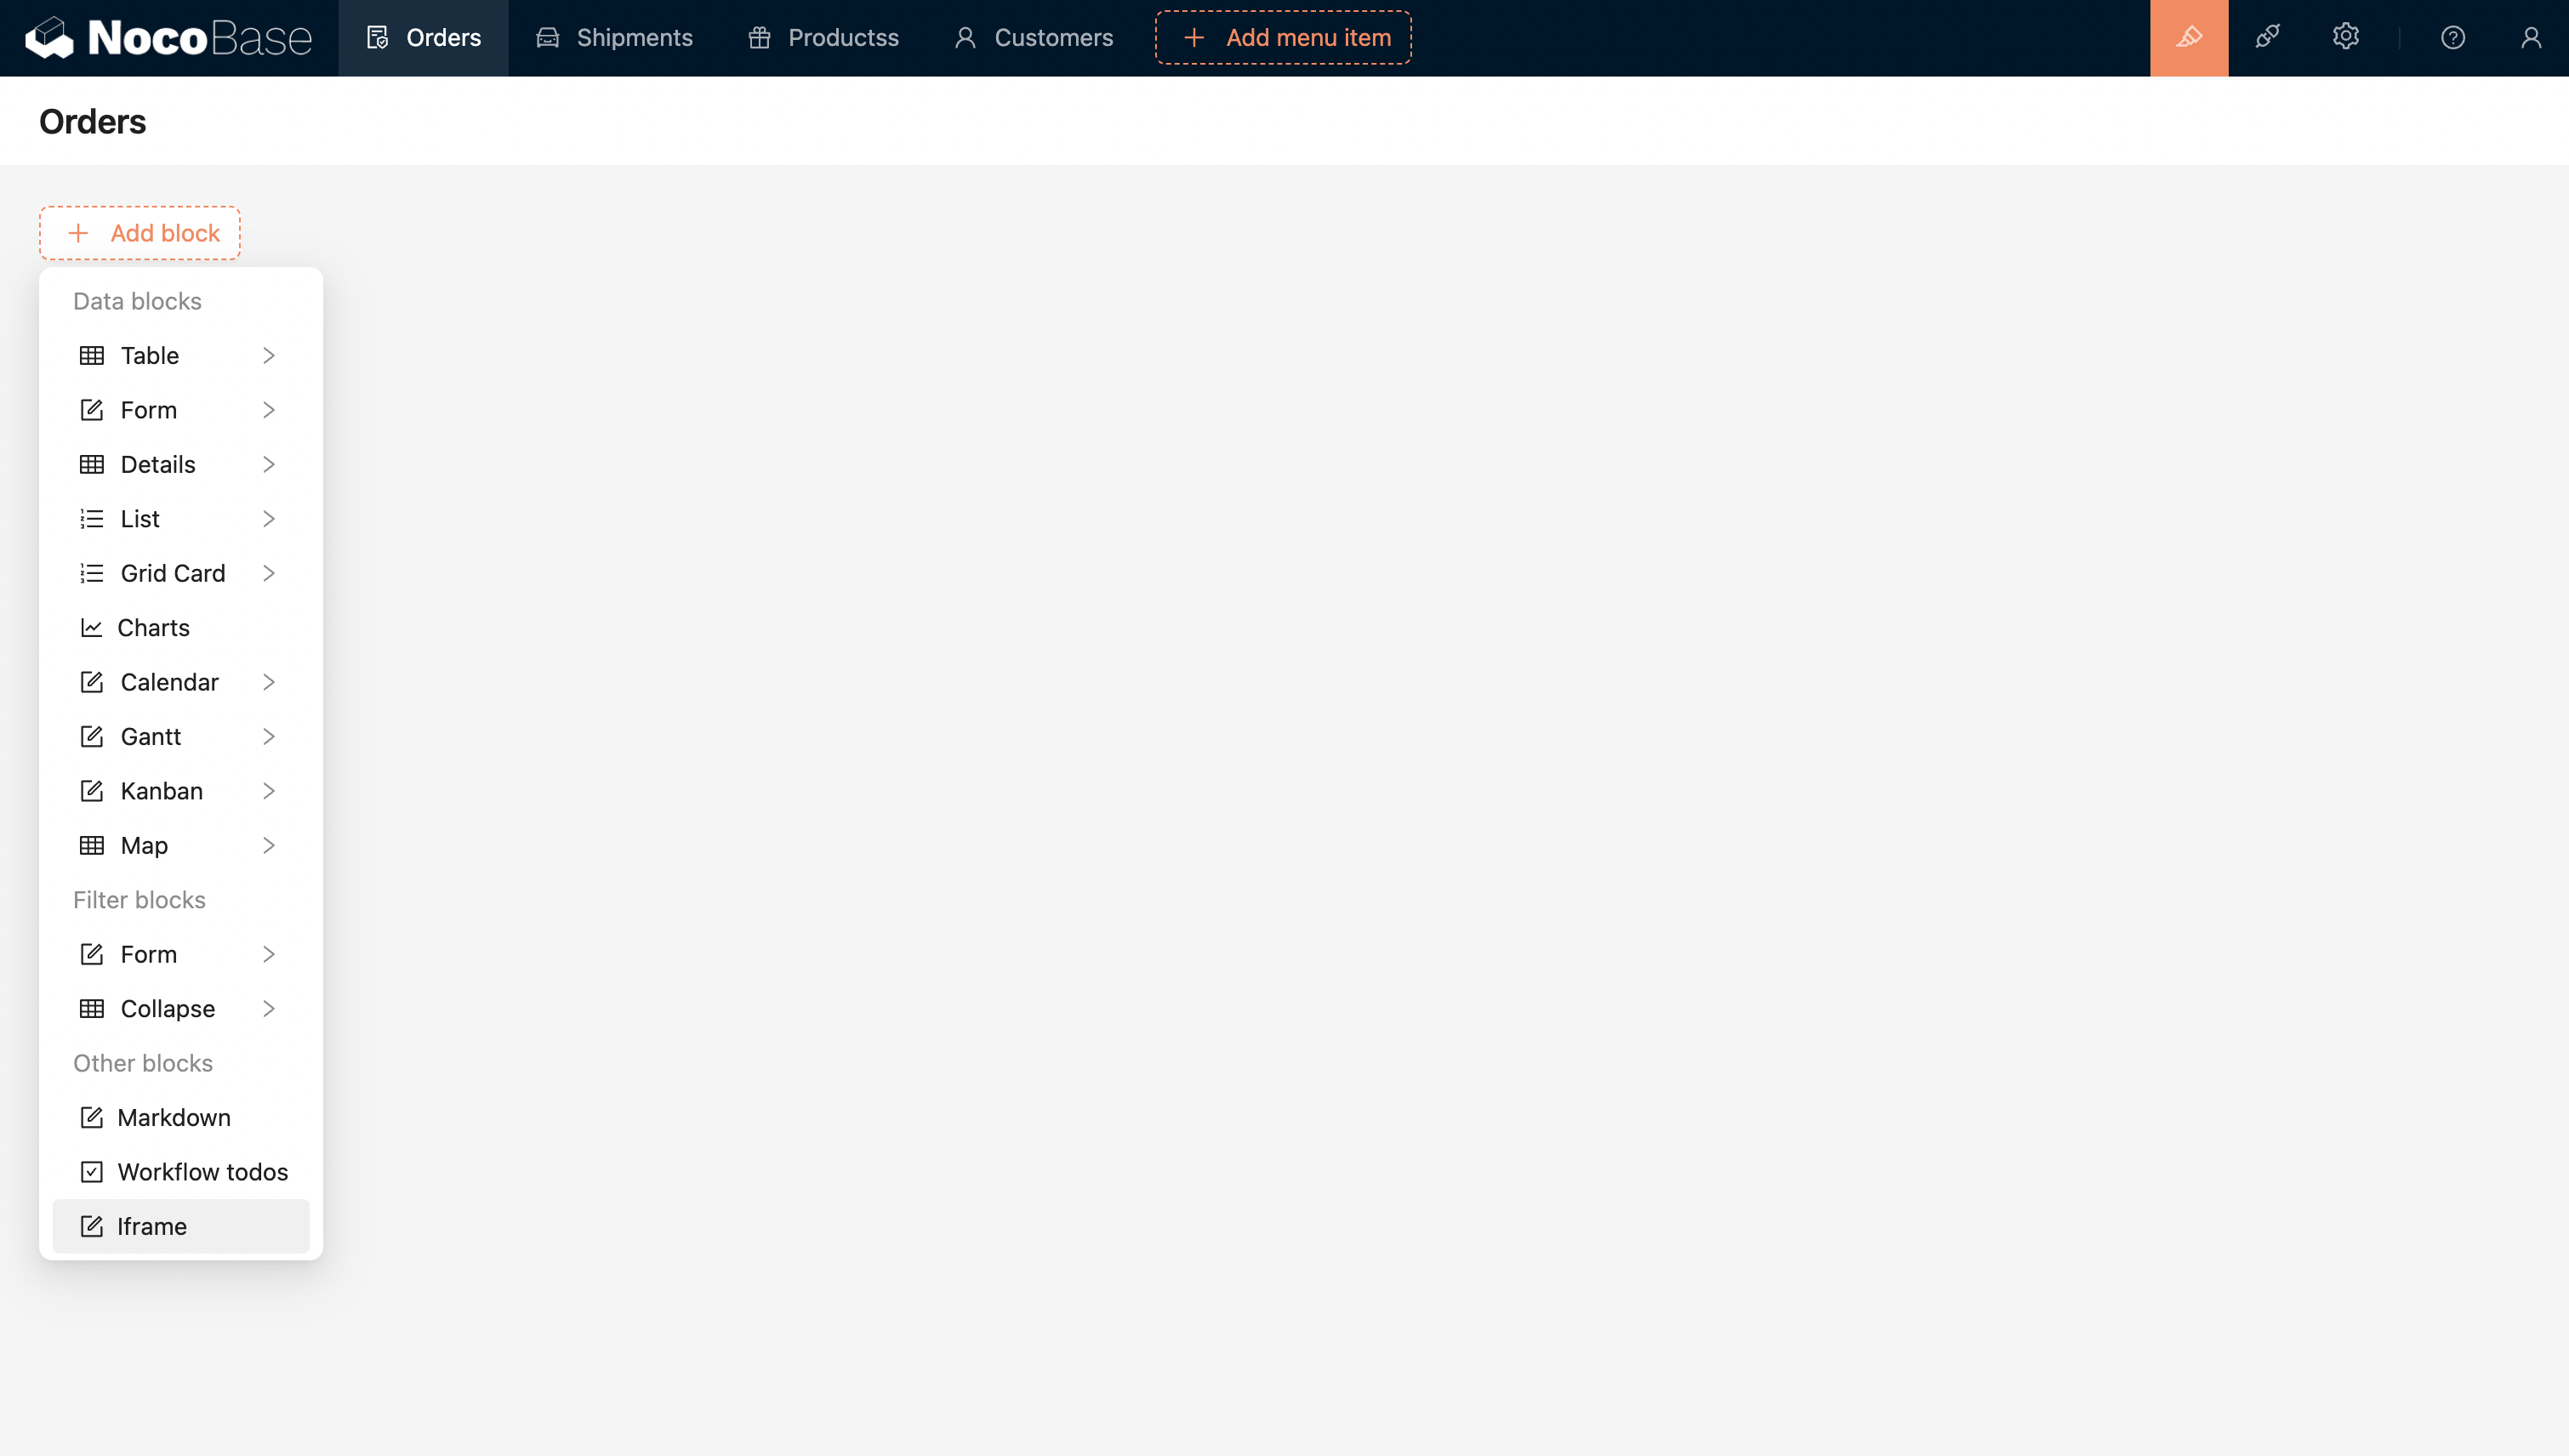
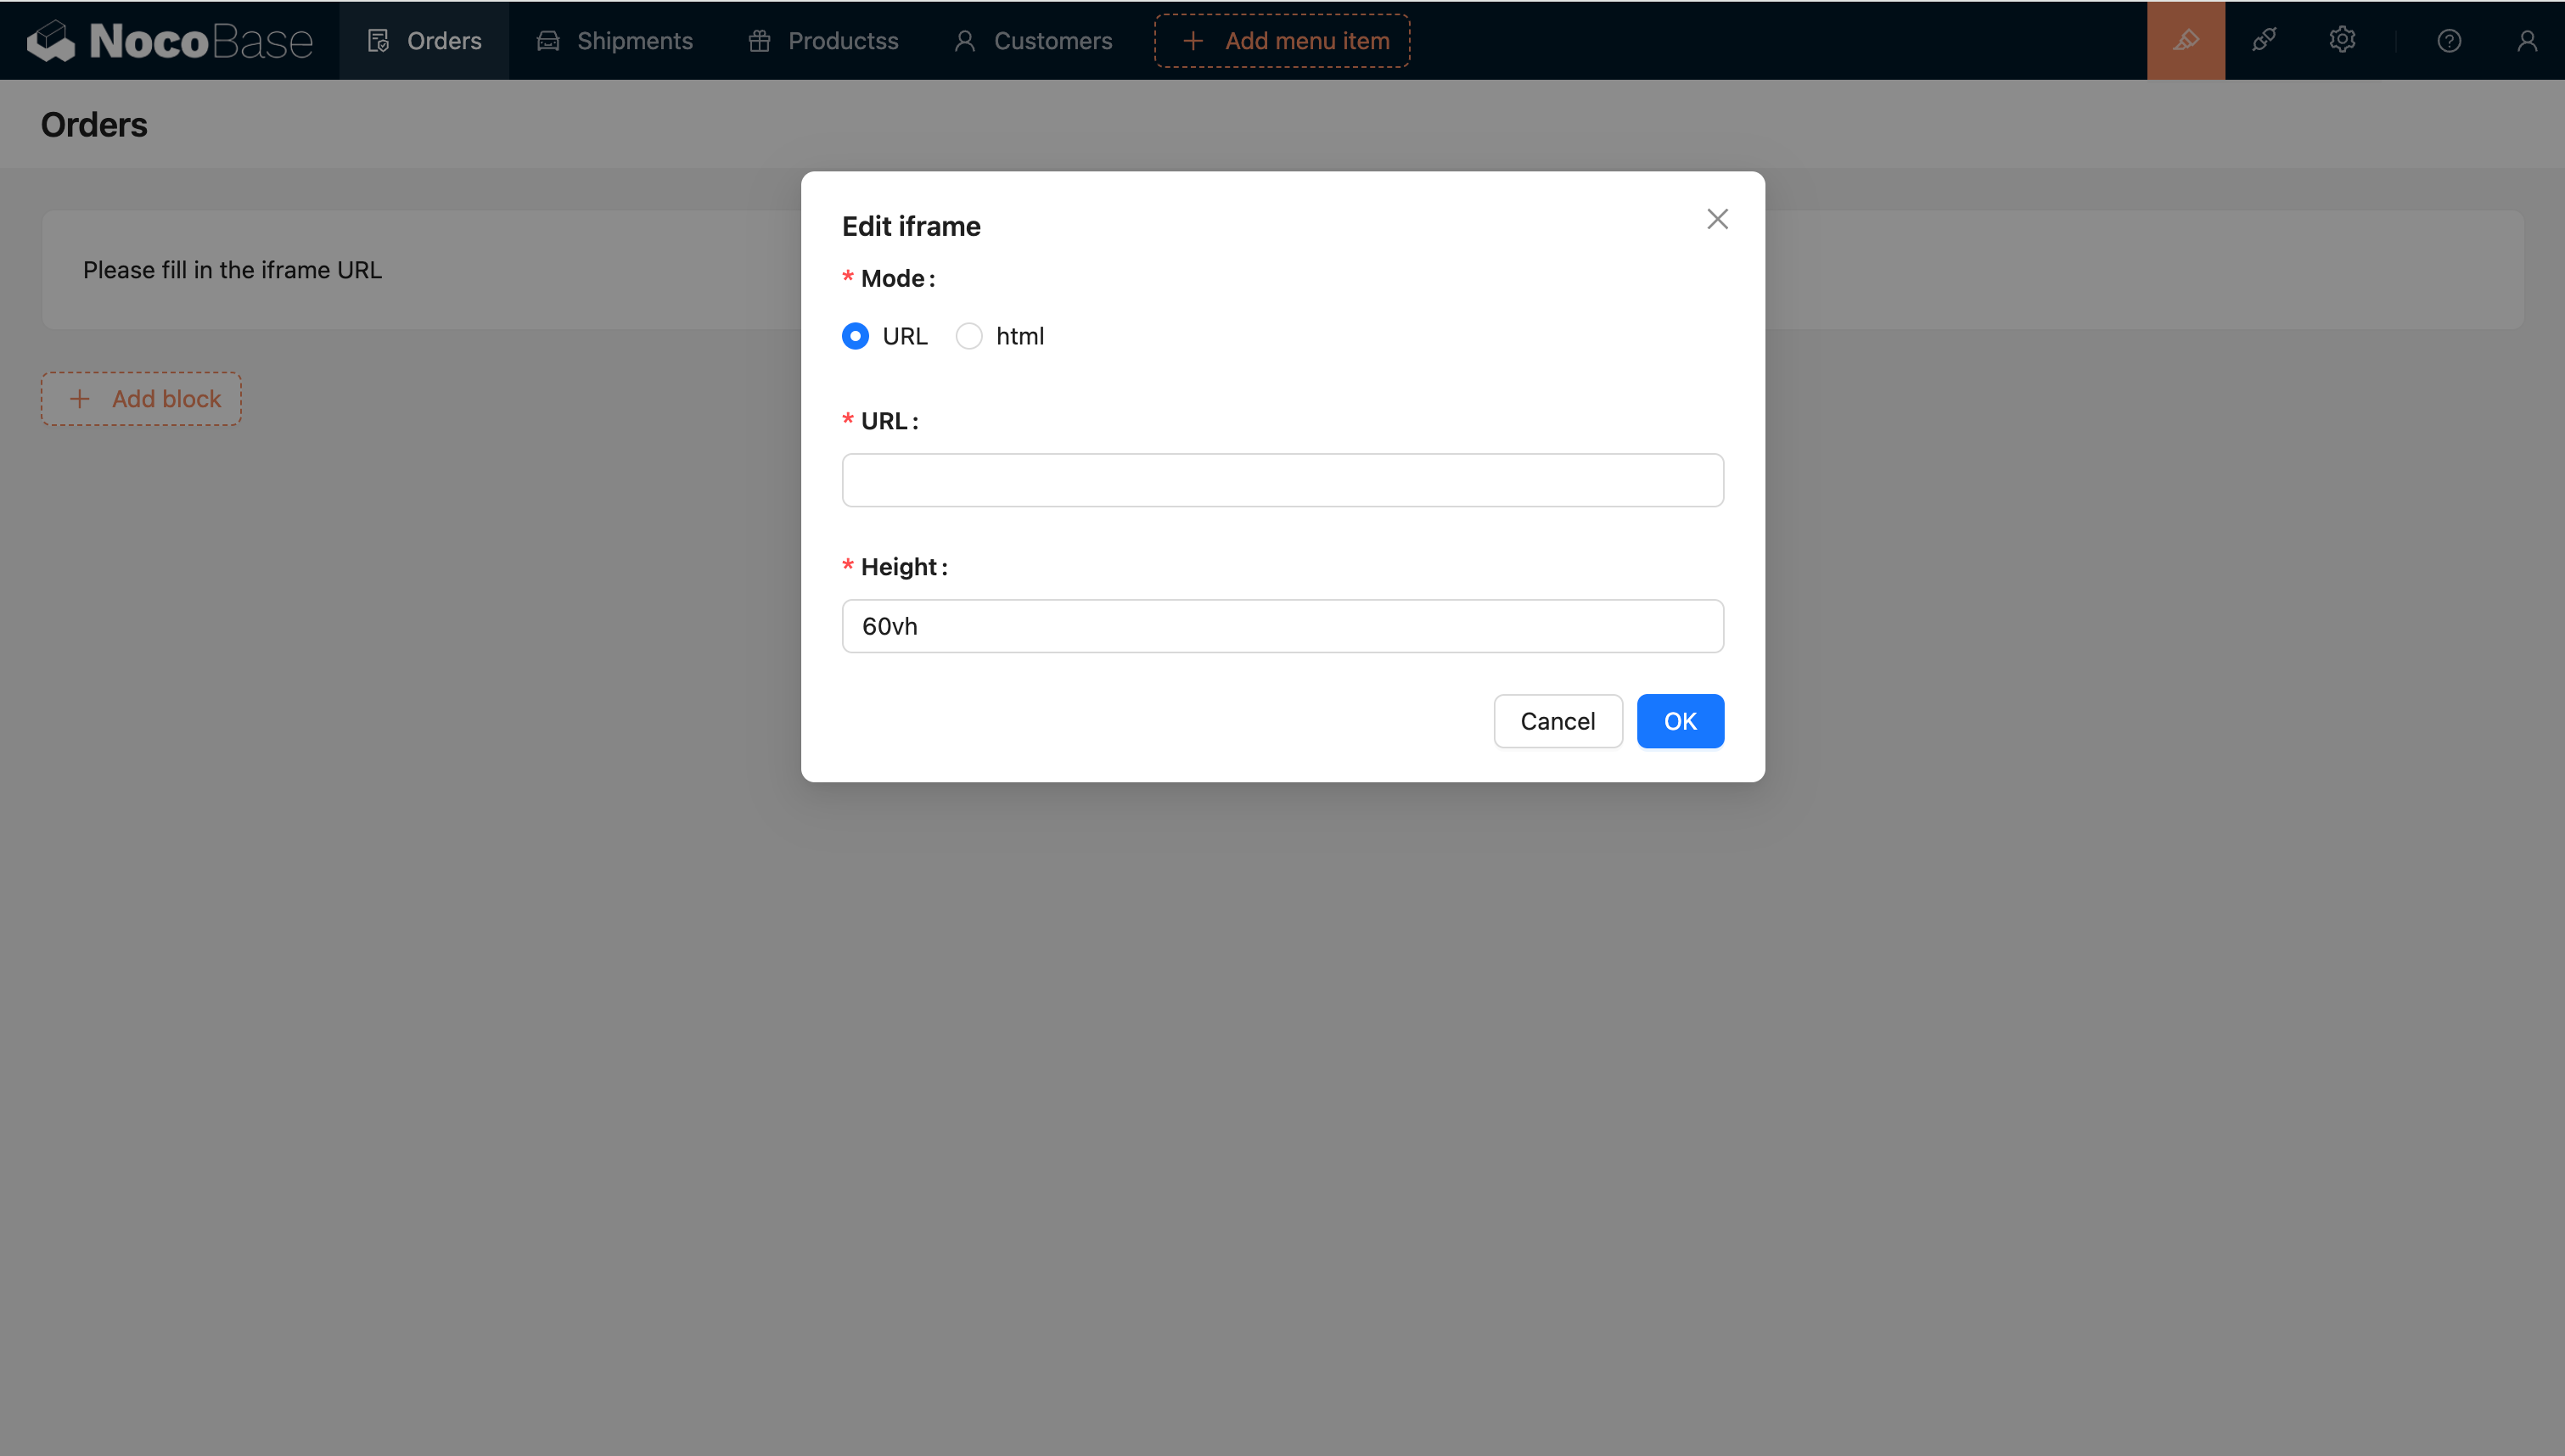
กำหนดค่า URL หรือโค้ด HTML เพื่อฝังแอปพลิเคชันภายนอกได้โดยตรงครับ/ค่ะ
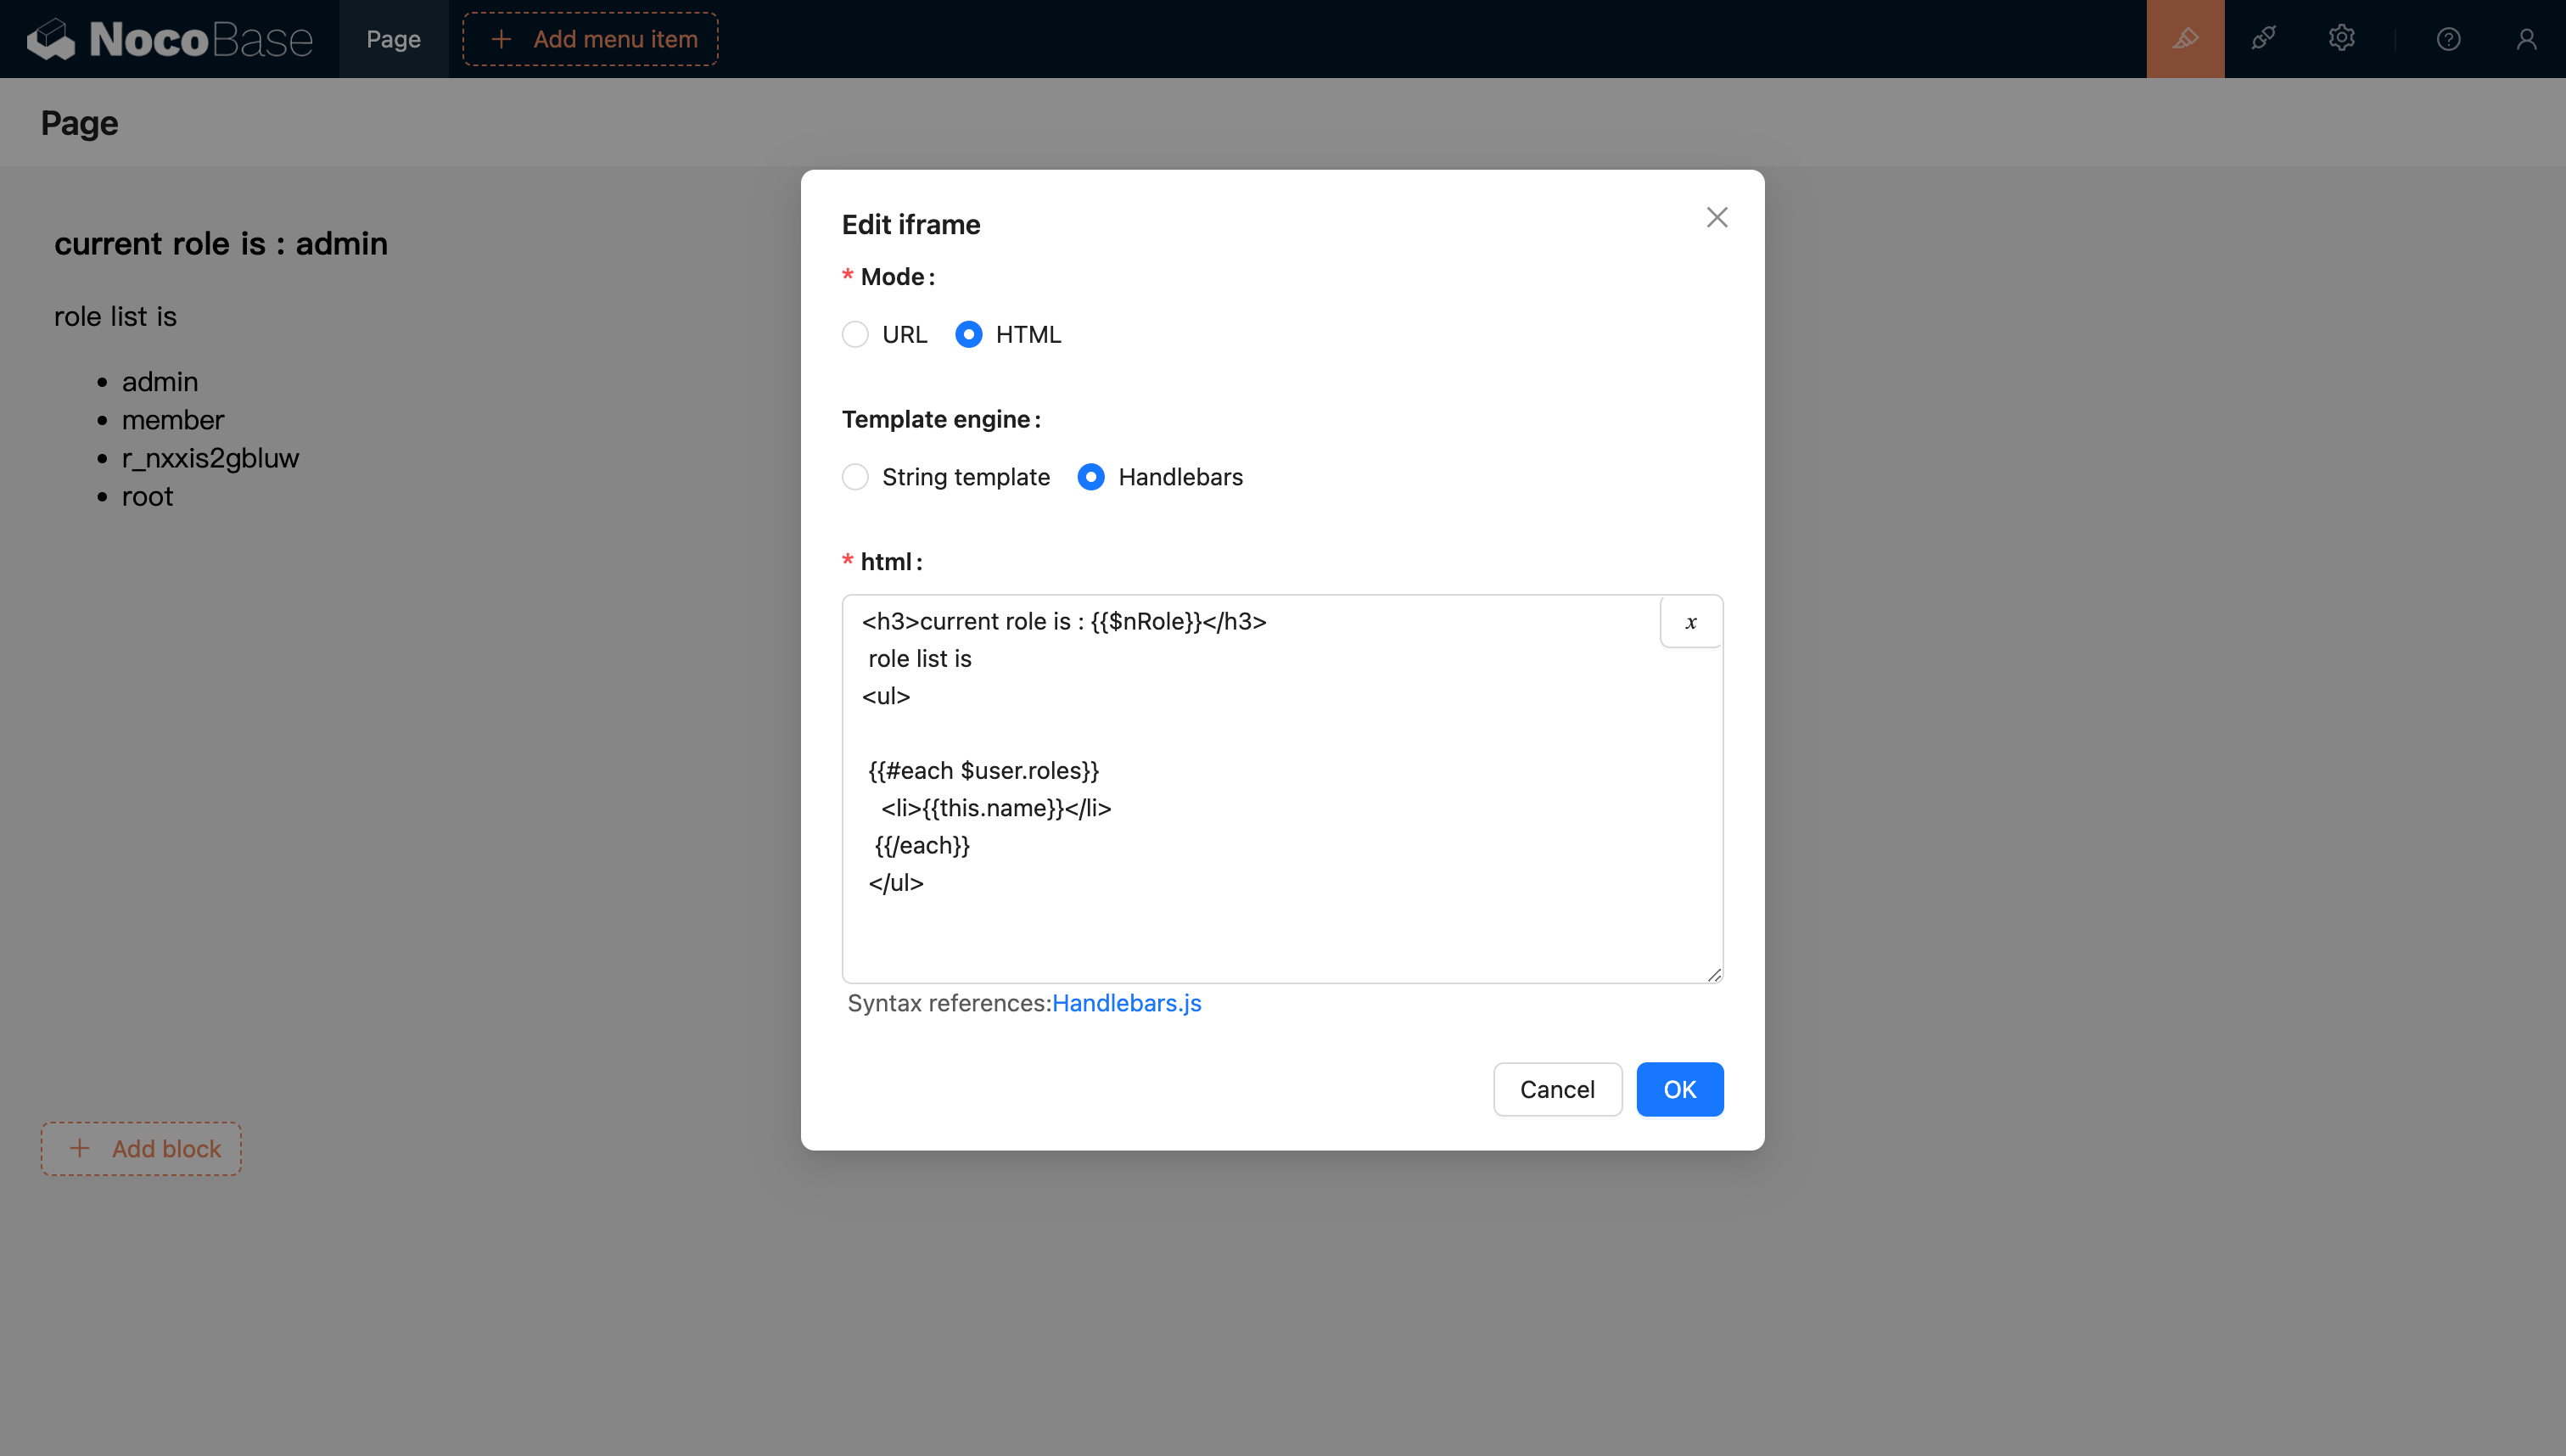
20240408220322

#เทมเพลตเอนจิน

#เทมเพลตสตริง

เป็นเทมเพลตเอนจินเริ่มต้นครับ/ค่ะ

#Handlebars

20240811205239

สำหรับข้อมูลเพิ่มเติม โปรดดูเอกสารประกอบเทมเพลตเอนจิน Handlebars ครับ/ค่ะ
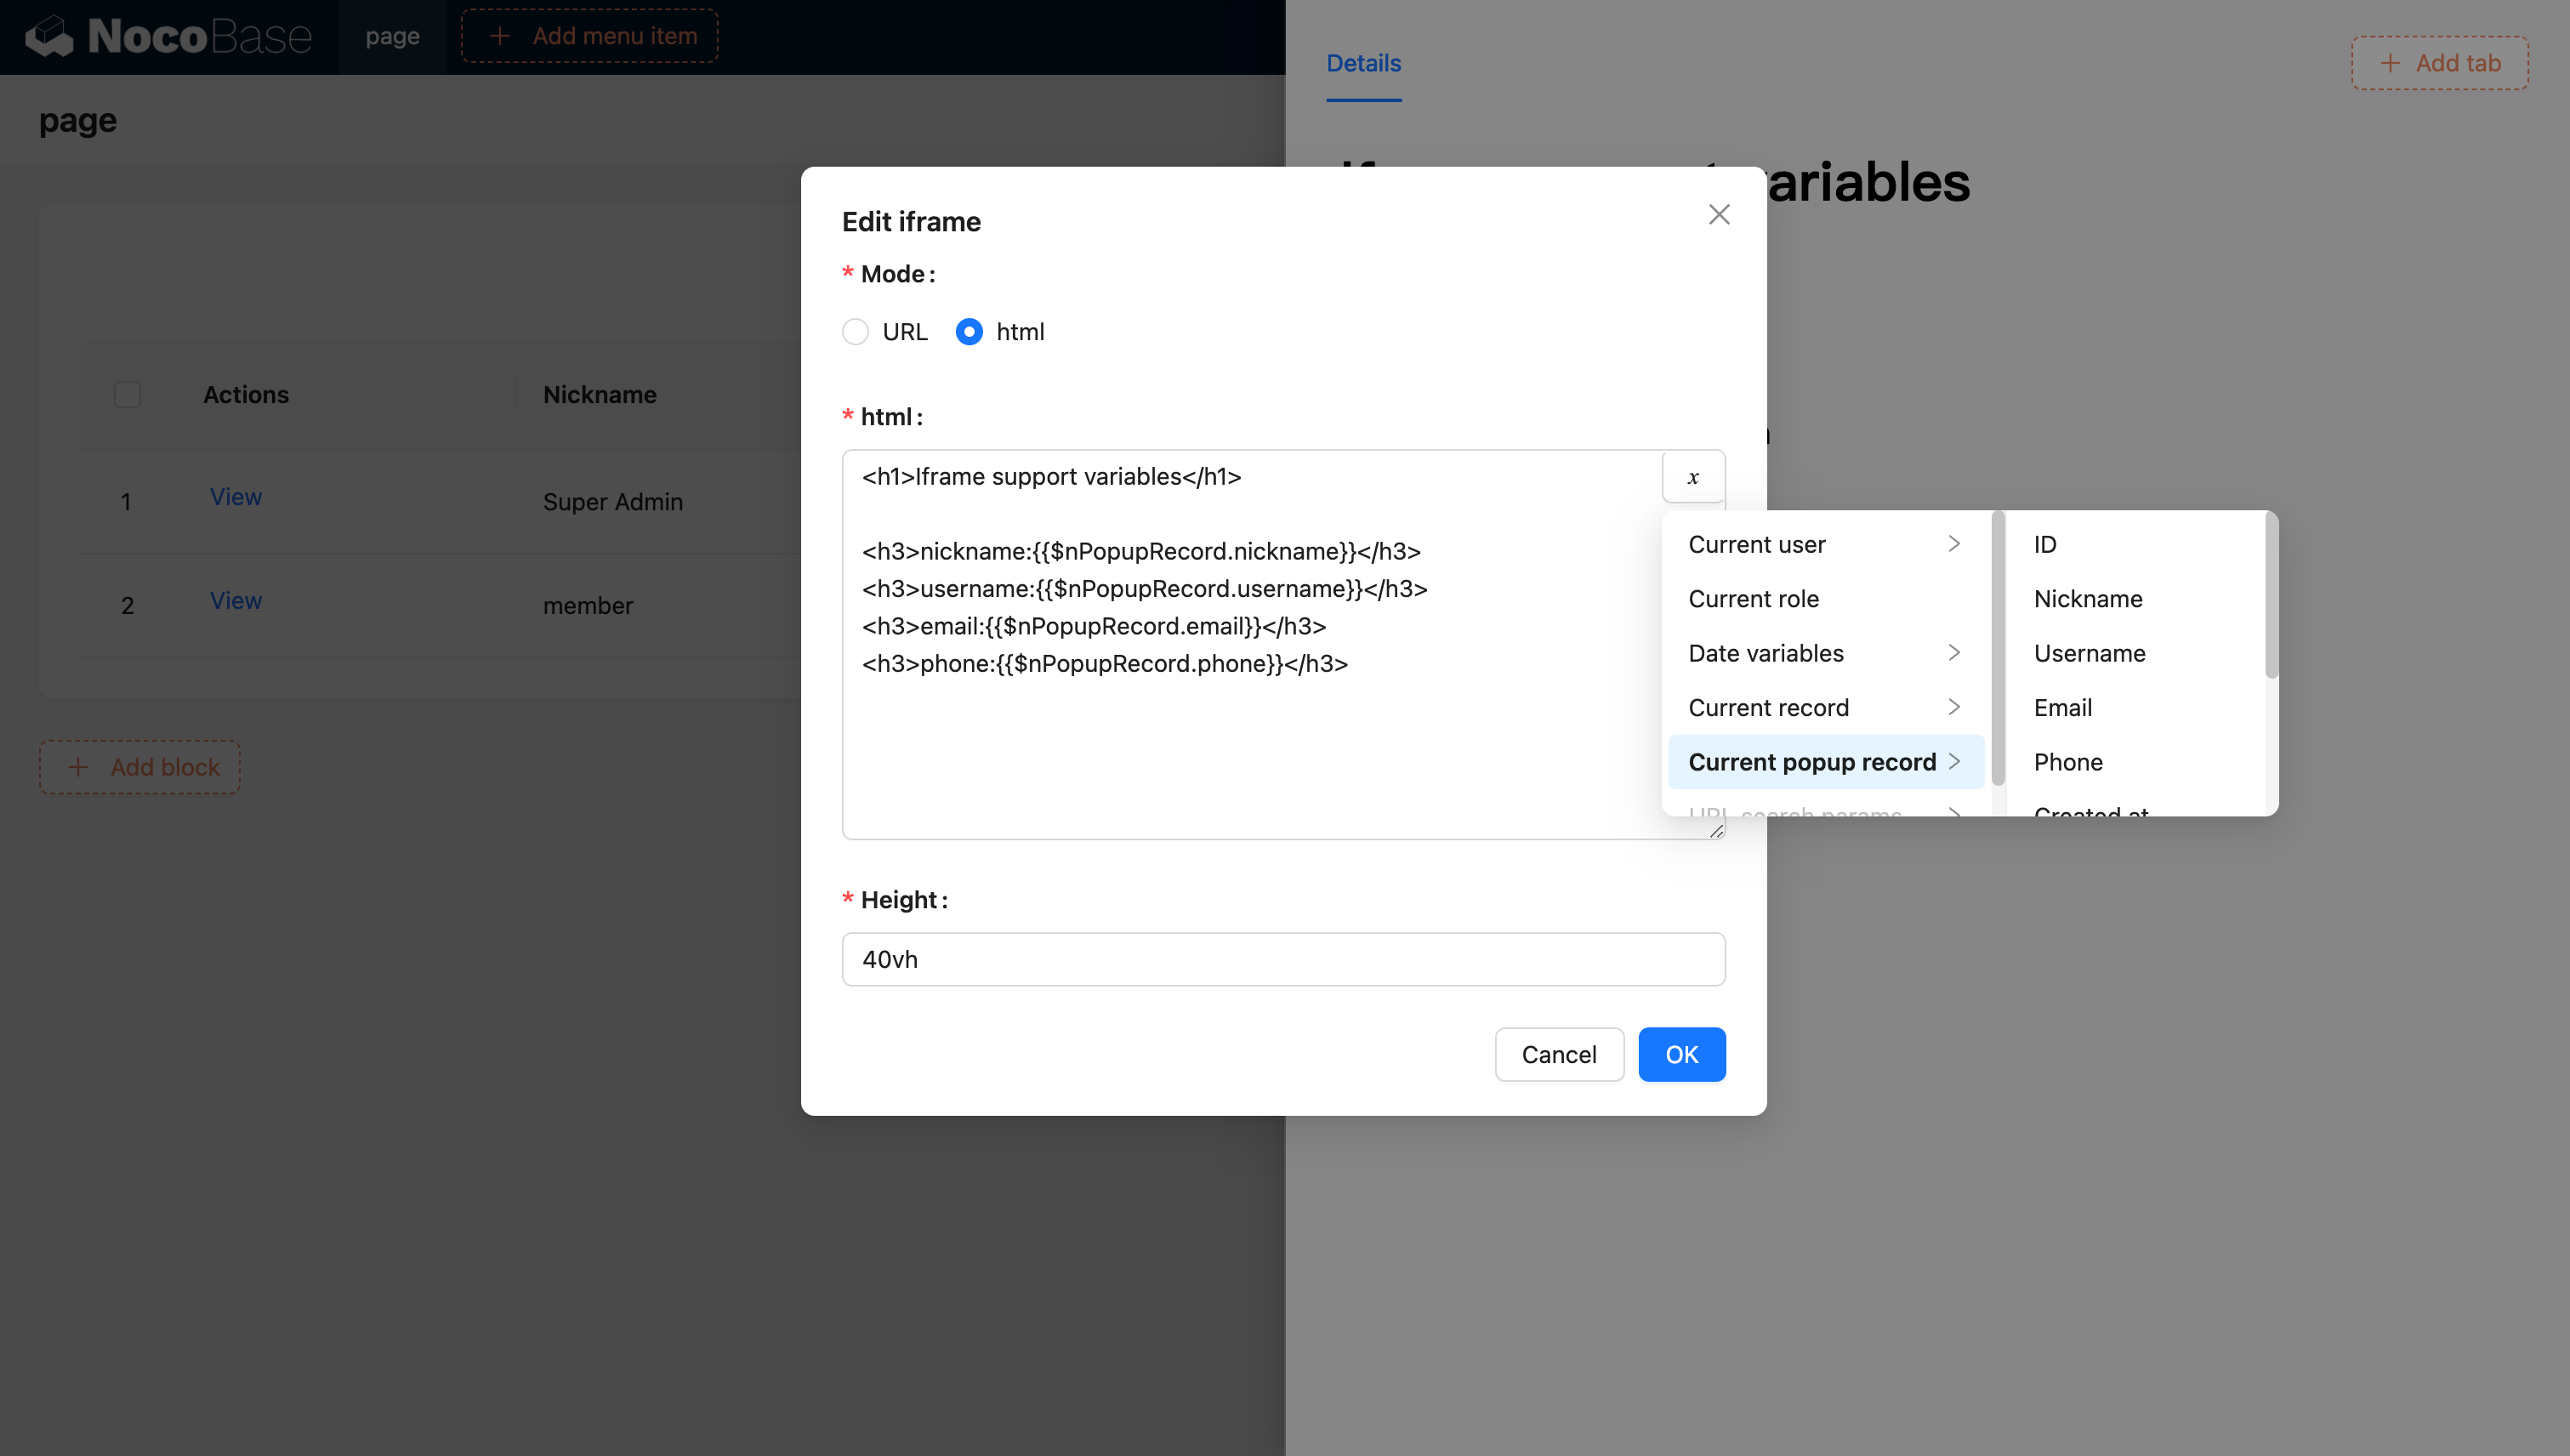
#การส่งผ่านตัวแปร

#HTML รองรับการแยกวิเคราะห์ตัวแปร

#รองรับการเลือกตัวแปรจากตัวเลือกตัวแปรในบริบทของบล็อกปัจจุบัน

20240603120321

20240603120629

#รองรับการแทรกตัวแปรเข้าสู่แอปพลิเคชันและใช้งานผ่านการเขียนโค้ด

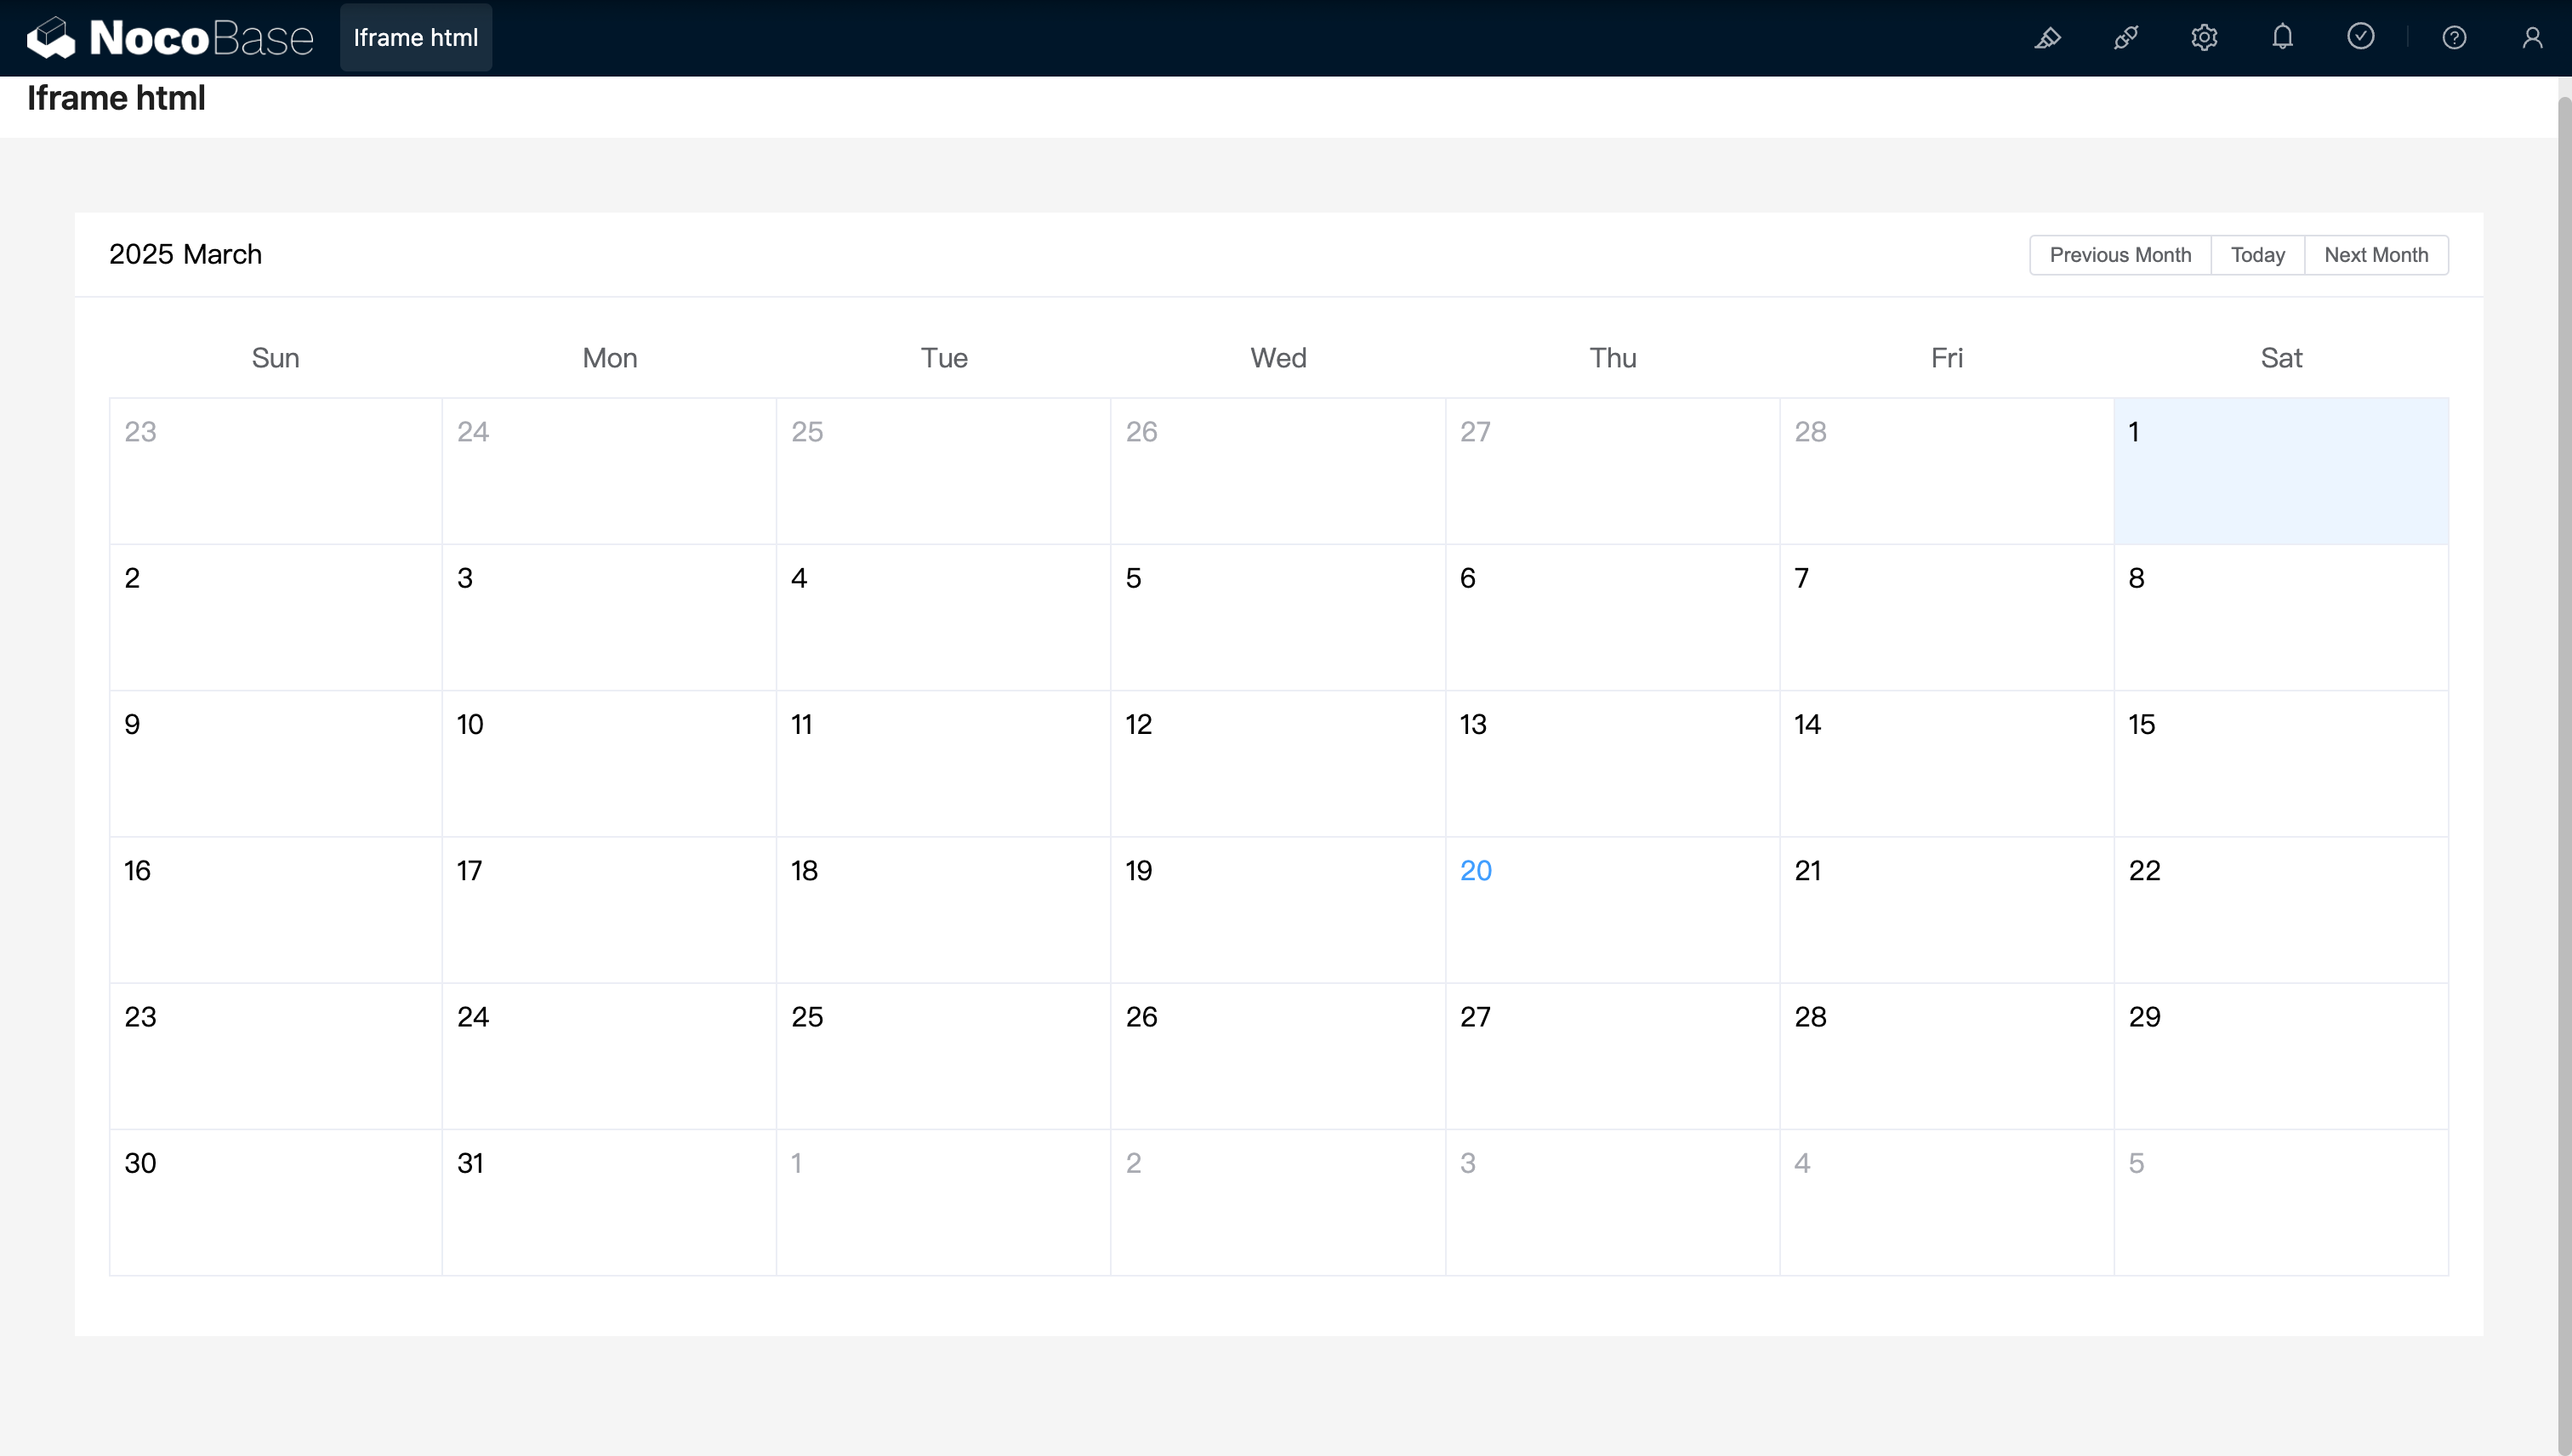
นอกจากนี้ คุณยังสามารถแทรกตัวแปรที่กำหนดเองเข้าไปในแอปพลิเคชันผ่านโค้ด และนำไปใช้ใน HTML ได้ครับ/ค่ะ ตัวอย่างเช่น การสร้างแอปพลิเคชันปฏิทินแบบไดนามิกโดยใช้ Vue 3 และ Element Plus:

<!doctype html>
<html lang="zh">
  <head>
    <meta charset="UTF-8" />
    <meta name="viewport" content="width=device-width, initial-scale=1.0" />
    <title>Vue3 CDN Example</title>
    <script src="https://cdn.bootcdn.net/ajax/libs/vue/3.5.9/vue.global.prod.js"></script>
    <script src="https://unpkg.com/element-plus"></script>
    <script src="https://unpkg.com/element-plus/dist/locale/zh-cn"></script>
    <link
      rel="stylesheet"
      href="https://unpkg.com/element-plus/dist/index.css"
    />
  </head>
  <body>
    <div id="app">
      <el-container>
        <el-main>
          <el-calendar v-model="month">
            <div class="header-container">
              <div class="action-group">
                <span class="month-display">{{ month }}</span>
                <el-button-group>
                  <el-button
                    type="primary"
                    :loading="loading"
                    @click="changeMonth(-1)"
                    >Last month</el-button
                  >
                  <el-button
                    type="primary"
                    :loading="loading"
                    @click="changeMonth(1)"
                    >Next month</el-button
                  >
                </el-button-group>
              </div>
            </div>
          </el-calendar>
        </el-main>
      </el-container>
    </div>
    <script>
      const { createApp, ref, provide } = Vue;
      const app = createApp({
        setup() {
          const month = ref(new Date().toISOString().slice(0, 7));
          const loading = ref(false);

          const changeMonth = (offset) => {
            const date = new Date(month.value + '-01');
            date.setMonth(date.getMonth() + offset);
            month.value = date.toISOString().slice(0, 7);
          };
          provide('month', month);
          provide('changeMonth', changeMonth);
          return { month, loading, changeMonth };
        },
      });
      app.use(ElementPlus);
      app.mount('#app');
    </script>
  </body>
</html>

20250320163250

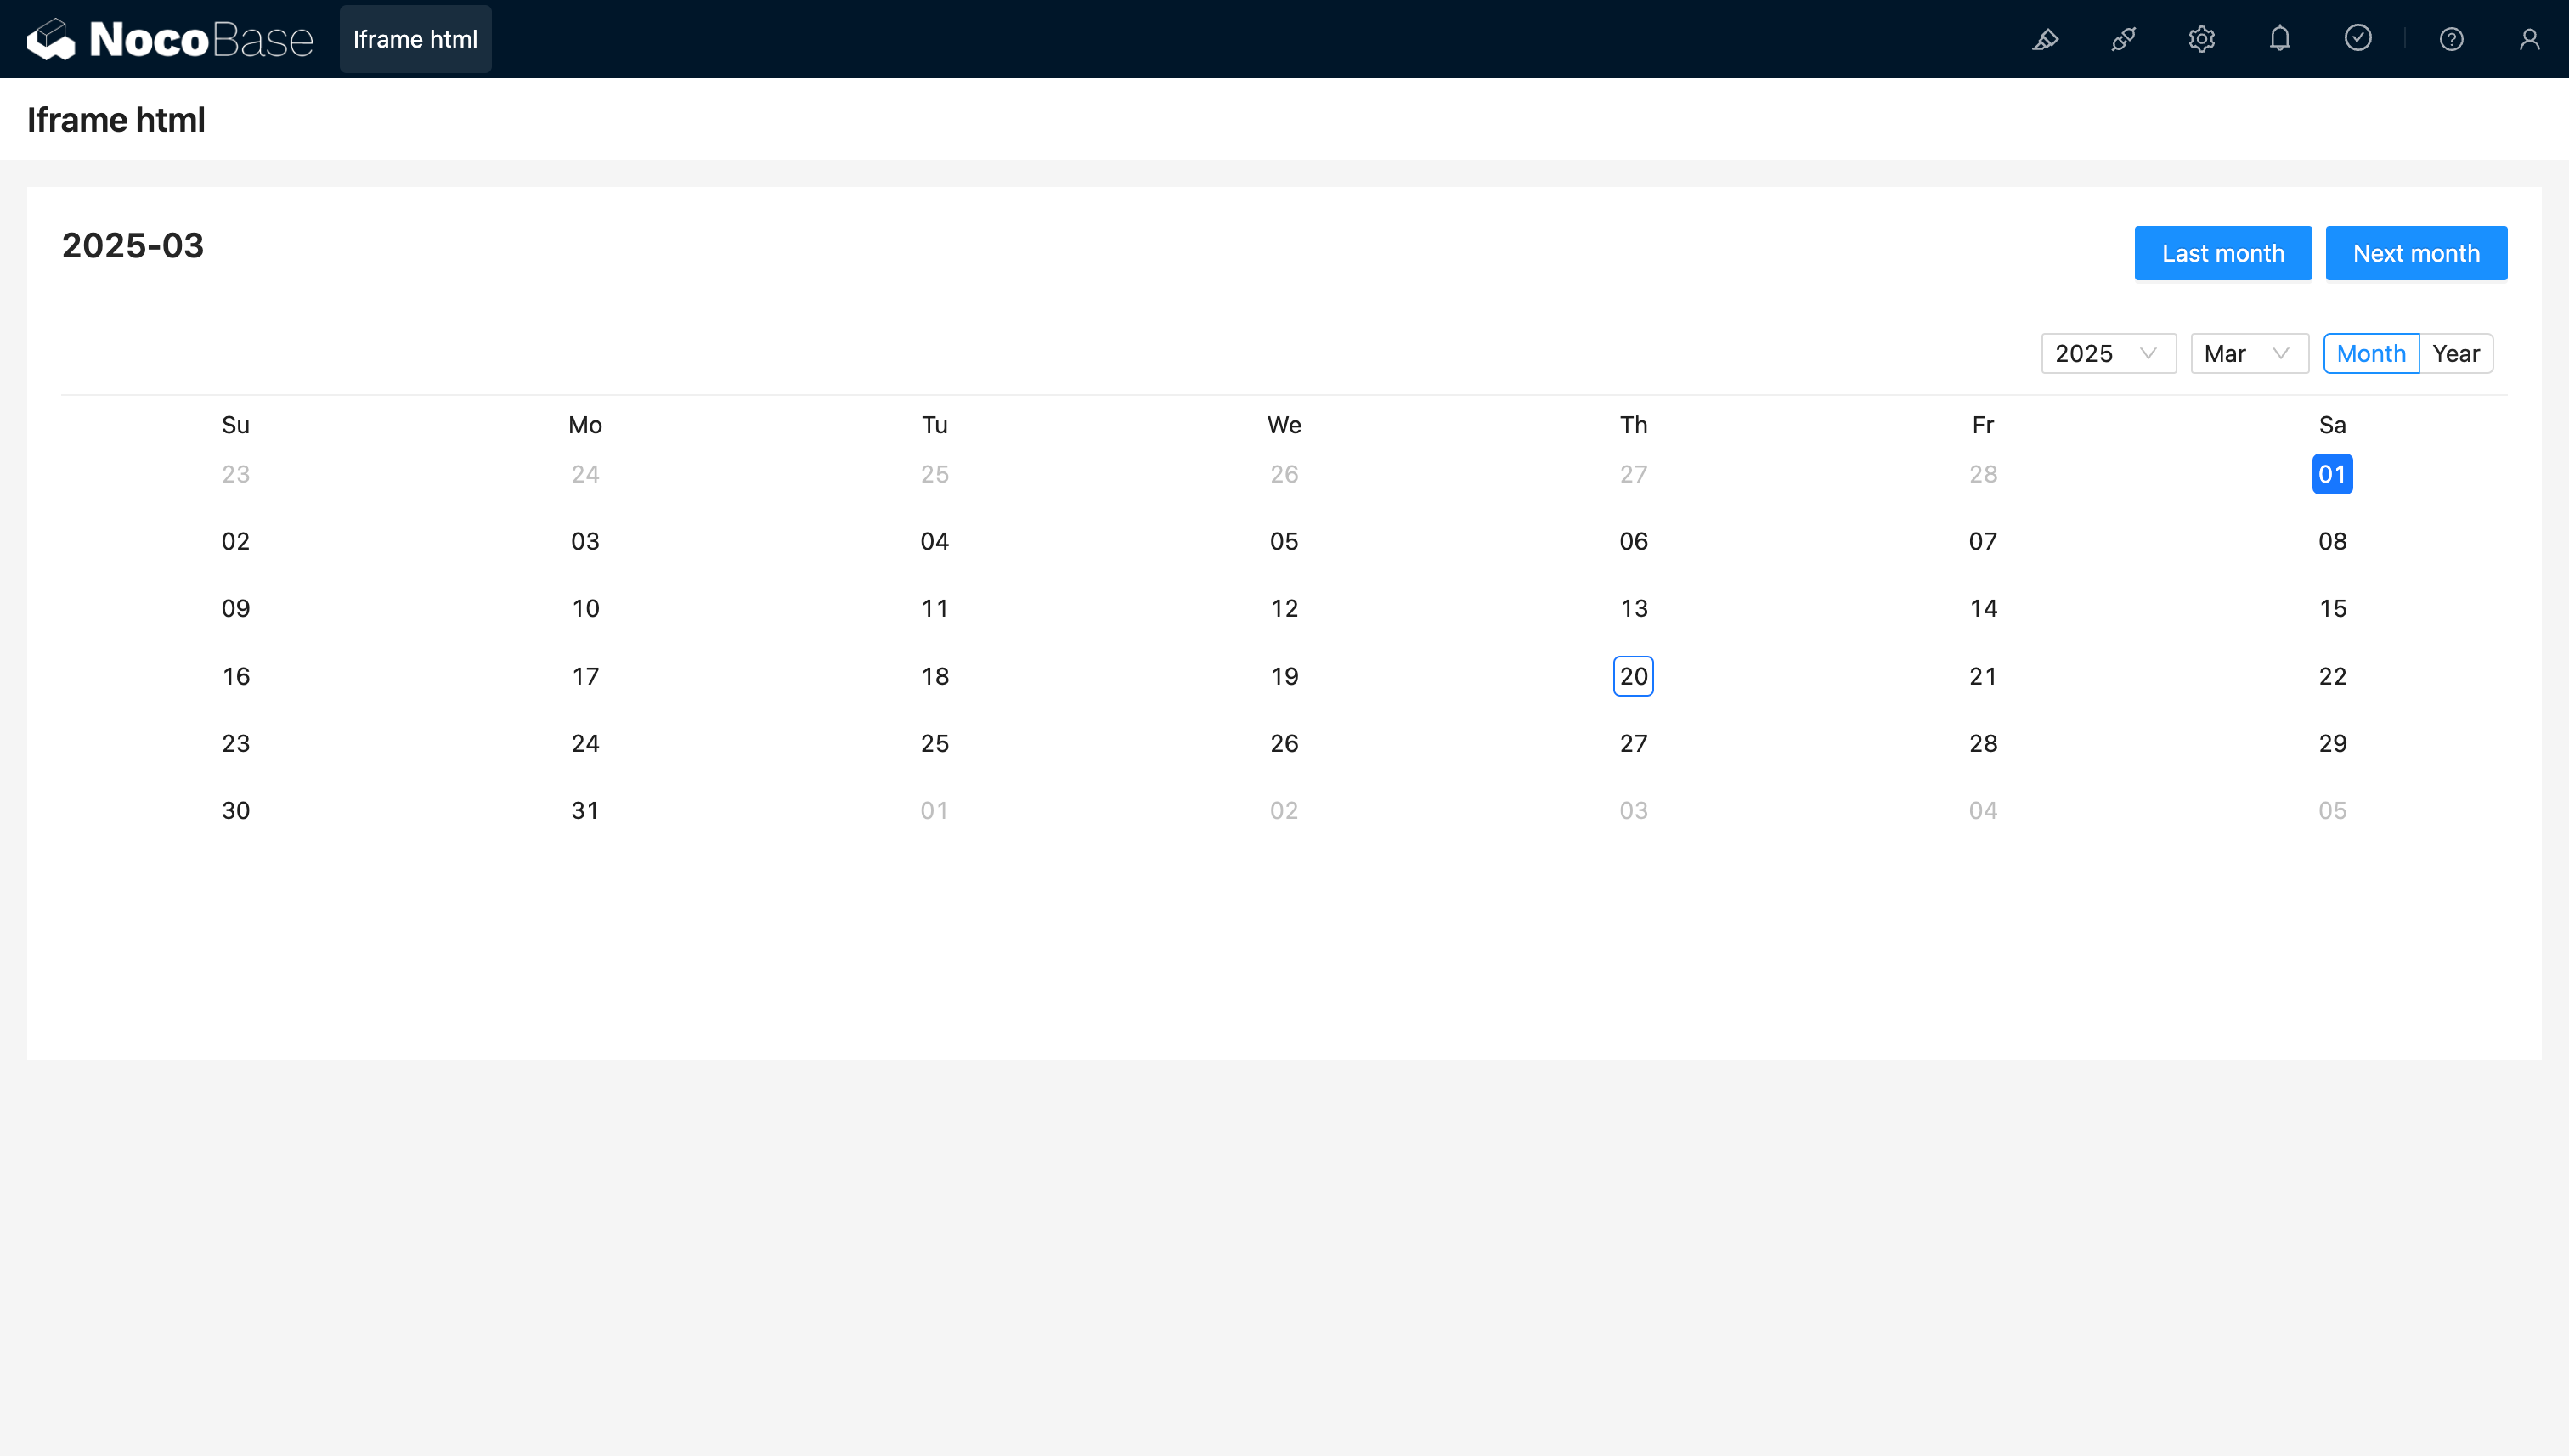
ตัวอย่าง: คอมโพเนนต์ปฏิทินอย่างง่ายที่สร้างด้วย React และ Ant Design (antd) โดยใช้ dayjs ในการจัดการวันที่

<!doctype html>
<html lang="zh">
  <head>
    <meta charset="UTF-8" />
    <meta name="viewport" content="width=device-width, initial-scale=1.0" />
    <title>React CDN Example</title>
    <script src="https://unpkg.com/react@18/umd/react.production.min.js"></script>
    <script src="https://unpkg.com/react-dom@18/umd/react-dom.production.min.js"></script>
    <link
      rel="stylesheet"
      href="https://cdn.jsdelivr.net/npm/antd/dist/antd.min.css"
    />
    <script src="https://unpkg.com/dayjs/dayjs.min.js"></script>
  </head>
  <body>
    <div id="app"></div>
    <script src="https://cdn.jsdelivr.net/npm/antd/dist/antd.min.js"></script>
    <script>
      document.addEventListener('DOMContentLoaded', function () {
        const { useState } = React;
        const { Calendar, Button, Space, Typography } = window.antd;
        const { Title } = Typography;
        const CalendarComponent = () => {
          const [month, setMonth] = useState(dayjs().format('YYYY-MM'));
          const [loading, setLoading] = useState(false);
          const changeMonth = (offset) => {
            const newMonth = dayjs(month)
              .add(offset, 'month')
              .format('YYYY-MM');
            setMonth(newMonth);
          };
          return React.createElement(
            'div',
            { style: { padding: 20 } },
            React.createElement(
              'div',
              {
                style: {
                  display: 'flex',
                  justifyContent: 'space-between',
                  alignItems: 'center',
                  marginBottom: 16,
                },
              },
              React.createElement(Title, { level: 4 }, month),
              React.createElement(
                Space,
                null,
                React.createElement(
                  Button,
                  { type: 'primary', loading, onClick: () => changeMonth(-1) },
                  'Last month',
                ),
                React.createElement(
                  Button,
                  { type: 'primary', loading, onClick: () => changeMonth(1) },
                  'Next month',
                ),
              ),
            ),
            React.createElement(Calendar, {
              fullscreen: false,
              value: dayjs(month),
            }),
          );
        };
        ReactDOM.createRoot(document.getElementById('app')).render(
          React.createElement(CalendarComponent),
        );
      });
    </script>
  </body>
</html>

20250320164537

#URL รองรับตัวแปร

20240603142219

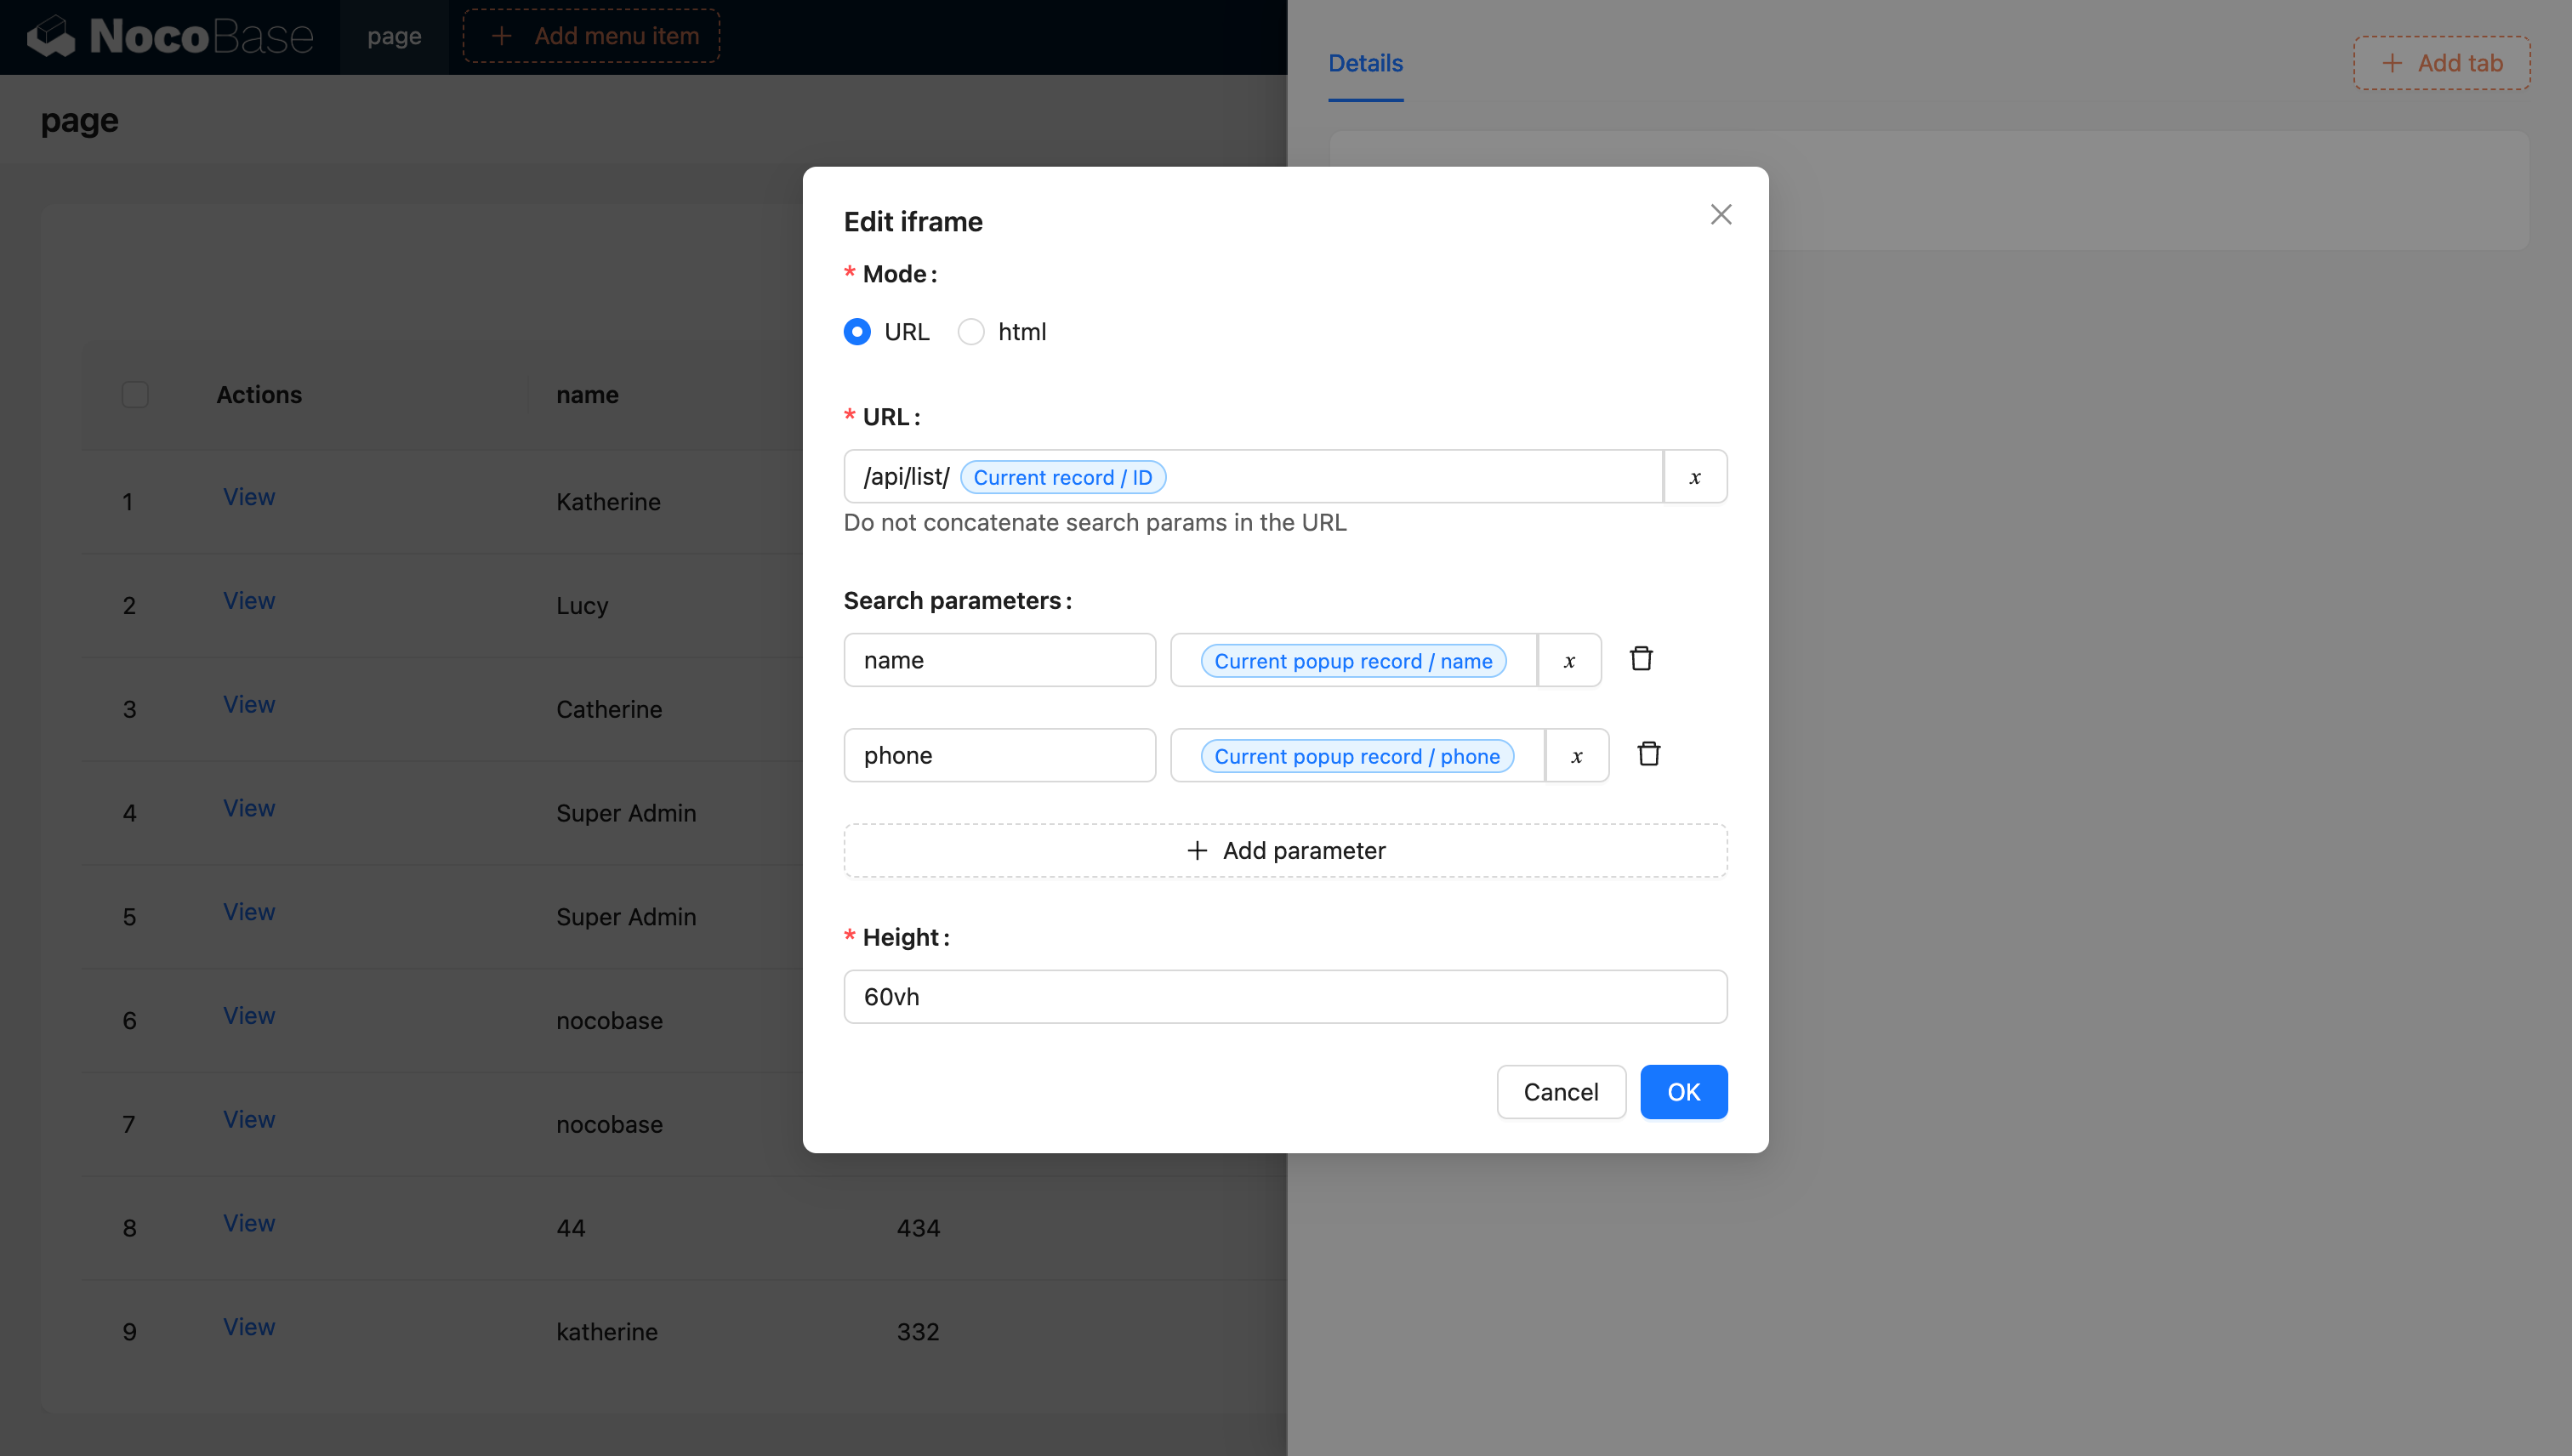
สำหรับข้อมูลเพิ่มเติมเกี่ยวกับตัวแปร โปรดดูเอกสารประกอบเรื่องตัวแปรครับ/ค่ะ

#การสร้าง Iframe ด้วยบล็อก JS (NocoBase 2.0)

ใน NocoBase 2.0 คุณสามารถใช้บล็อก JS เพื่อสร้าง iframe แบบไดนามิกได้ ซึ่งจะช่วยให้คุณควบคุมการทำงานได้มากขึ้นครับ/ค่ะ วิธีนี้ให้ความยืดหยุ่นที่ดีกว่าในการปรับแต่งพฤติกรรมและสไตล์ของ iframe

#ตัวอย่างพื้นฐาน

สร้างบล็อก JS และใช้โค้ดต่อไปนี้เพื่อสร้าง iframe ครับ/ค่ะ

// สร้าง iframe ที่จะเติมเต็มพื้นที่ของคอนเทนเนอร์บล็อกปัจจุบัน
const iframe = document.createElement('iframe');
iframe.src = 'https://example.com';
iframe.setAttribute('sandbox', 'allow-scripts allow-same-origin');
iframe.style.width = '100%';
iframe.style.height = '100%';
iframe.style.border = 'none';

// แทนที่ child element ที่มีอยู่เดิม เพื่อให้ iframe เป็นเนื้อหาเดียว
ctx.element.replaceChildren(iframe);

#ประเด็นสำคัญ

  • ctx.element: คือ DOM element ของคอนเทนเนอร์บล็อก JS ปัจจุบัน
  • sandbox attribute: ใช้ควบคุมข้อจำกัดด้านความปลอดภัยสำหรับเนื้อหาใน iframe
    • allow-scripts: อนุญาตให้ iframe รันสคริปต์ได้
    • allow-same-origin: อนุญาตให้ iframe เข้าถึงต้นทาง (origin) ของตัวเองได้
  • replaceChildren(): ใช้แทนที่ child element ทั้งหมดของคอนเทนเนอร์ด้วย iframe

#ตัวอย่างขั้นสูงพร้อมสถานะการโหลด

คุณสามารถปรับปรุงการสร้าง iframe ให้ดียิ่งขึ้นได้ด้วยการจัดการสถานะการโหลดและการจัดการข้อผิดพลาดครับ/ค่ะ

// แสดงข้อความสถานะการโหลด
ctx.message.loading('กำลังโหลดเนื้อหาภายนอก...');

try {
  // สร้าง iframe
  const iframe = document.createElement('iframe');
  iframe.src = 'https://example.com';
  iframe.setAttribute('sandbox', 'allow-scripts allow-same-origin');
  iframe.style.width = '100%';
  iframe.style.height = '100%';
  iframe.style.border = 'none';

  // เพิ่ม event listener สำหรับการโหลดเสร็จสิ้น
  iframe.addEventListener('load', () => {
    ctx.message.success('โหลดเนื้อหาสำเร็จ');
  });

  // เพิ่ม event listener สำหรับข้อผิดพลาดในการโหลด
  iframe.addEventListener('error', () => {
    ctx.message.error('ไม่สามารถโหลดเนื้อหาได้');
  });

  // แทรก iframe เข้าไปในคอนเทนเนอร์
  ctx.element.replaceChildren(iframe);
} catch (error) {
  ctx.message.error('เกิดข้อผิดพลาดในการสร้าง iframe: ' + error.message);
}

#ข้อควรพิจารณาด้านความปลอดภัย

เมื่อใช้งาน iframe โปรดพิจารณาแนวทางปฏิบัติที่ดีที่สุดด้านความปลอดภัยต่อไปนี้ครับ/ค่ะ

  1. ใช้ HTTPS: ควรโหลดเนื้อหา iframe ผ่าน HTTPS เสมอ หากเป็นไปได้
  2. จำกัดสิทธิ์ Sandbox: เปิดใช้งานสิทธิ์ sandbox เท่าที่จำเป็นเท่านั้น
  3. นโยบายความปลอดภัยเนื้อหา (Content Security Policy): กำหนดค่าส่วนหัว CSP ที่เหมาะสม
  4. นโยบายต้นทางเดียวกัน (Same-Origin Policy): โปรดระวังข้อจำกัดของการเข้าถึงข้ามโดเมน
  5. แหล่งที่มาที่เชื่อถือได้: โหลดเนื้อหาจากโดเมนที่เชื่อถือได้เท่านั้น