

Using the "Template Print" Feature to Generate Supply and Purchase Contracts
In supply chain or trading scenarios, it is often necessary to quickly generate a standardized "Supply and Purchase Contract" and dynamically fill in content based on information from data sources such as buyers, sellers, and product details. Below, we will use a simplified "Contract" use case as an example to show you how to configure and use the "Template Print" feature to map data information to placeholders in contract templates, thereby automatically generating the final contract document.
1. Background and Data Structure Overview
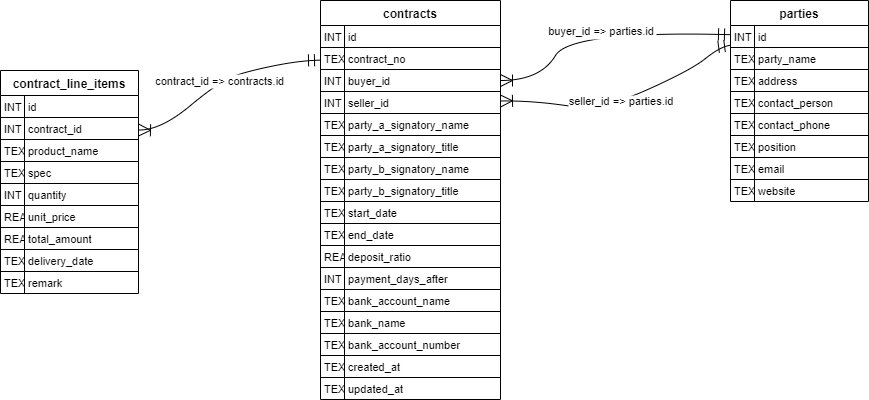
In our example, there are roughly the following main collections (omitting other irrelevant fields):
- parties: Stores information about Party A/Party B units or individuals, including name, address, contact person, phone, etc.
- contracts: Stores specific contract records, including contract number, buyer/seller foreign keys, signatory information, start/end dates, bank account, etc.
- contract_line_items: Stores multiple items under the contract (product name, specification, quantity, unit price, delivery date, etc.)
Since the current system only supports printing single records, we will click "Print" on the "Contract Details" page, and the system will automatically retrieve the corresponding contracts record, as well as associated parties and other information, and fill them into Word or PDF documents.
2. Preparation
2.1 Plugin Preparation
Note that our "Template Print" is a commercial plugin that needs to be purchased and activated before printing operations can be performed.
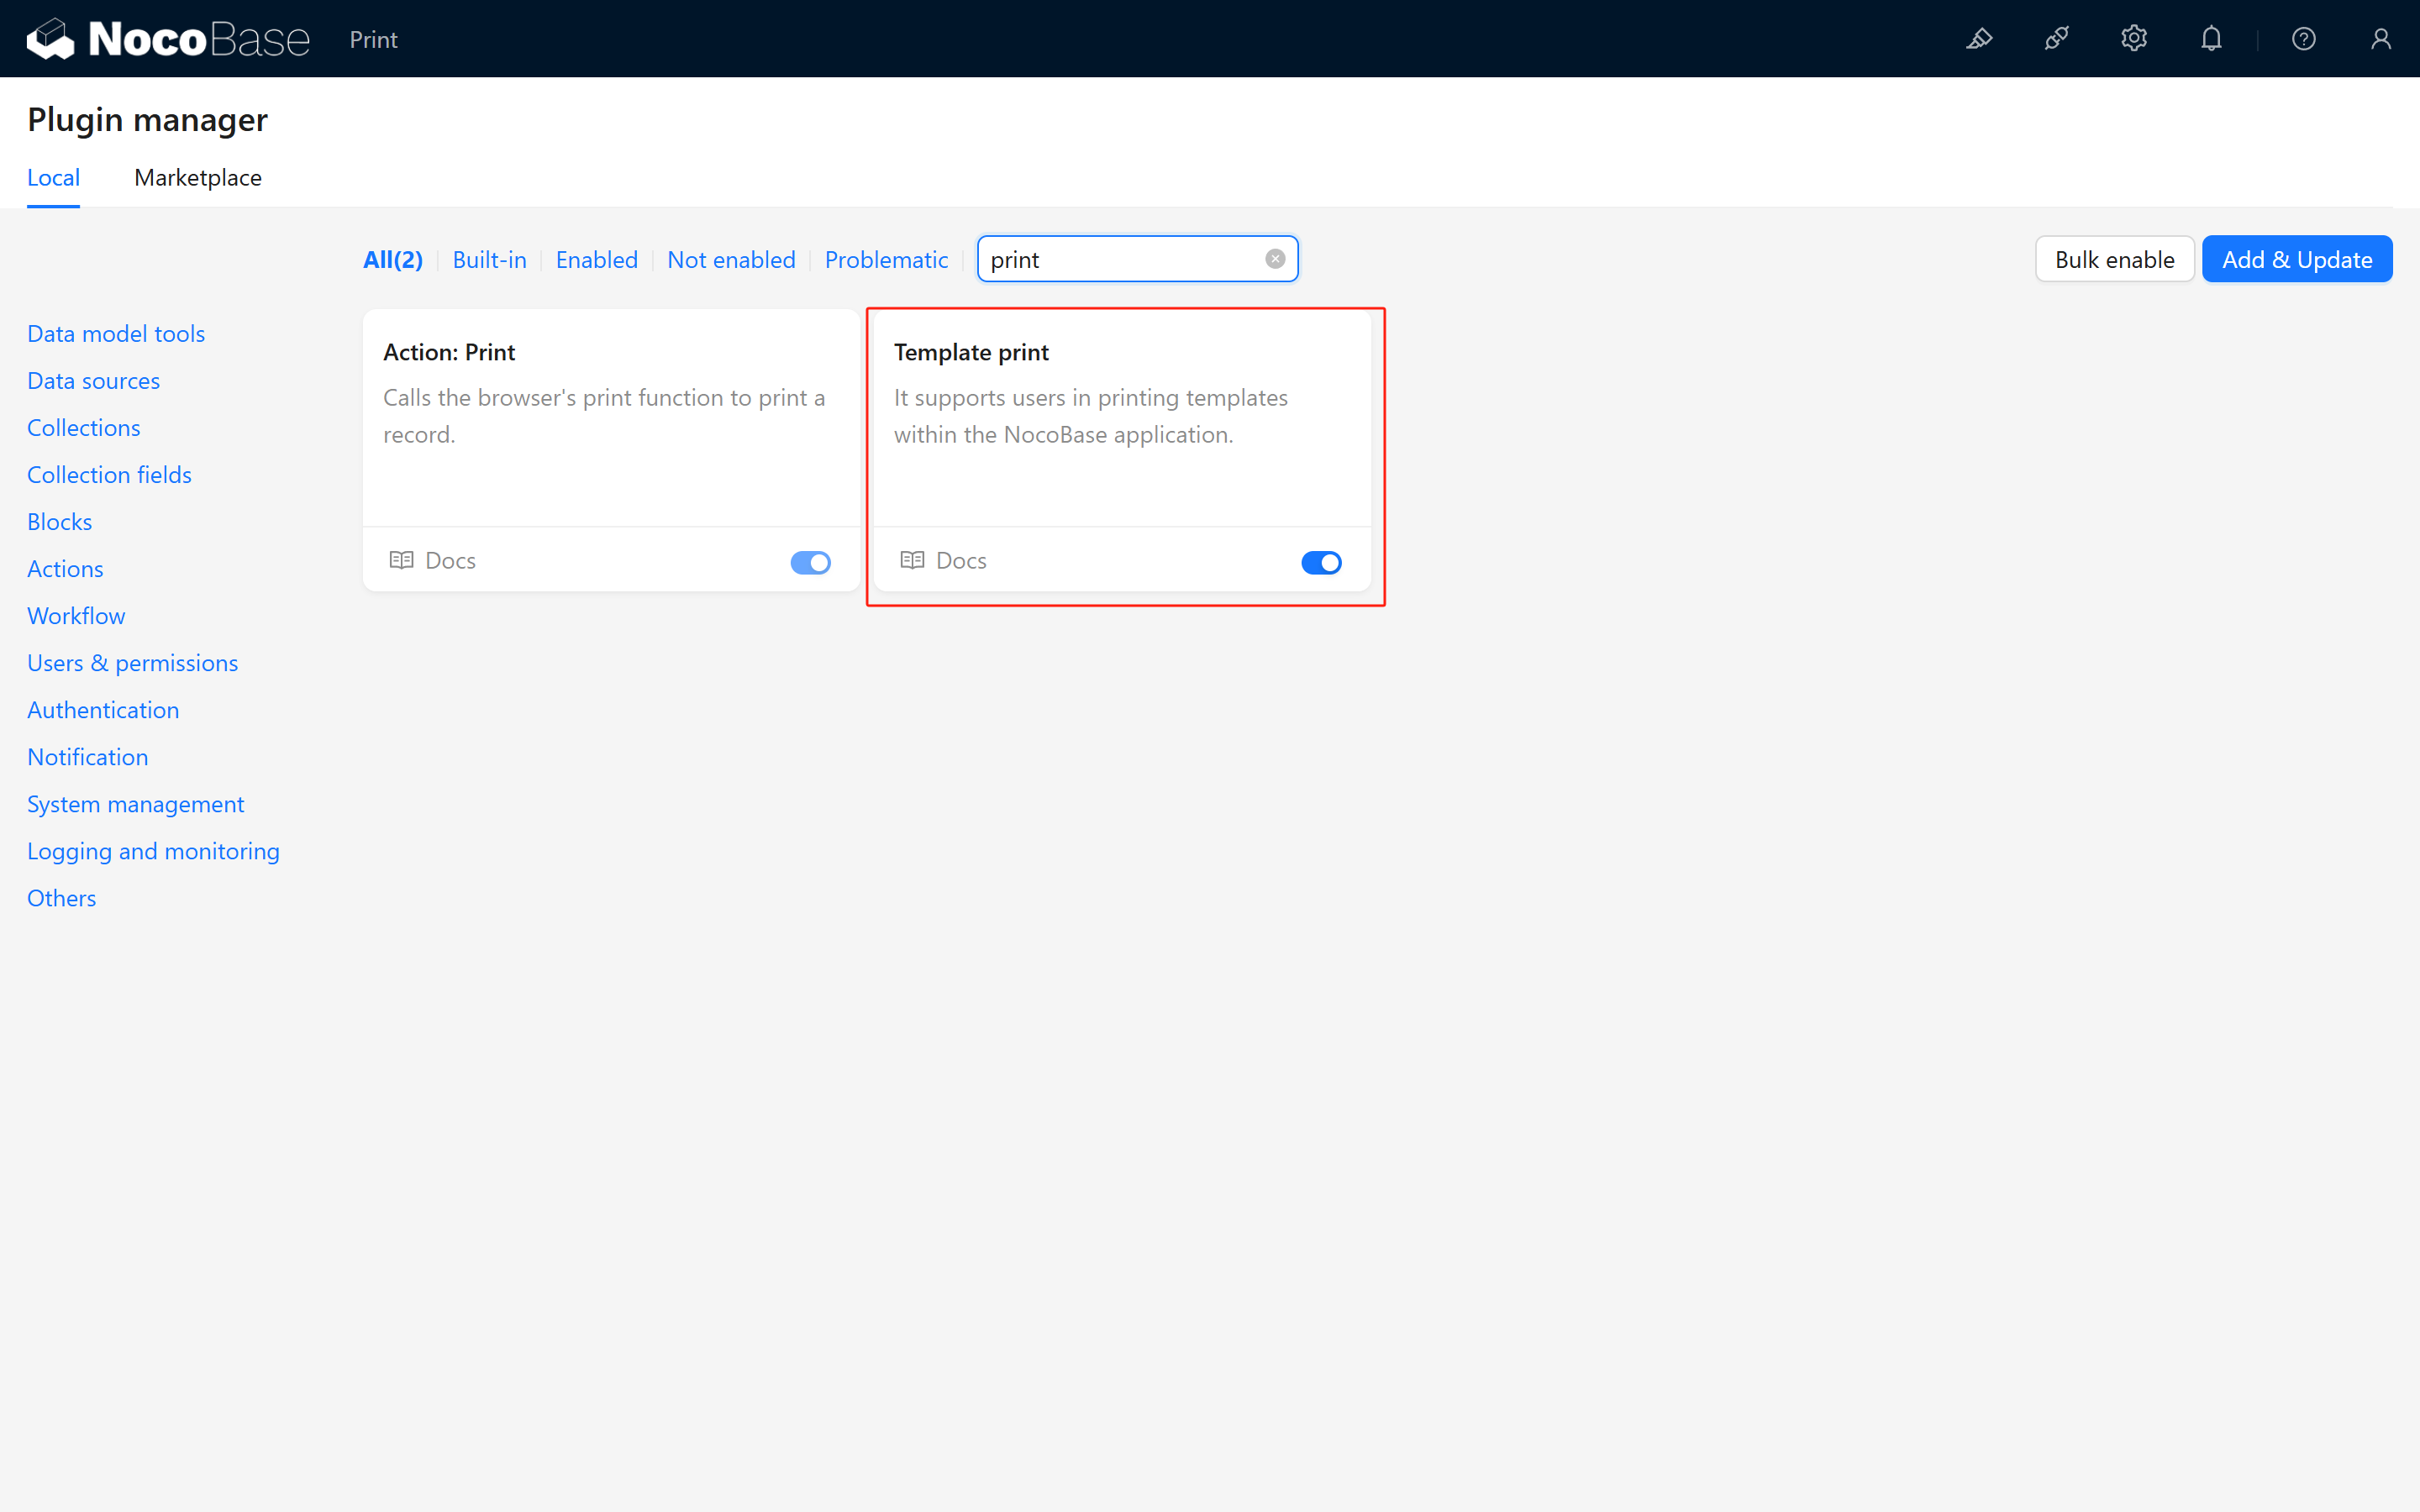
Confirm Plugin Activation:
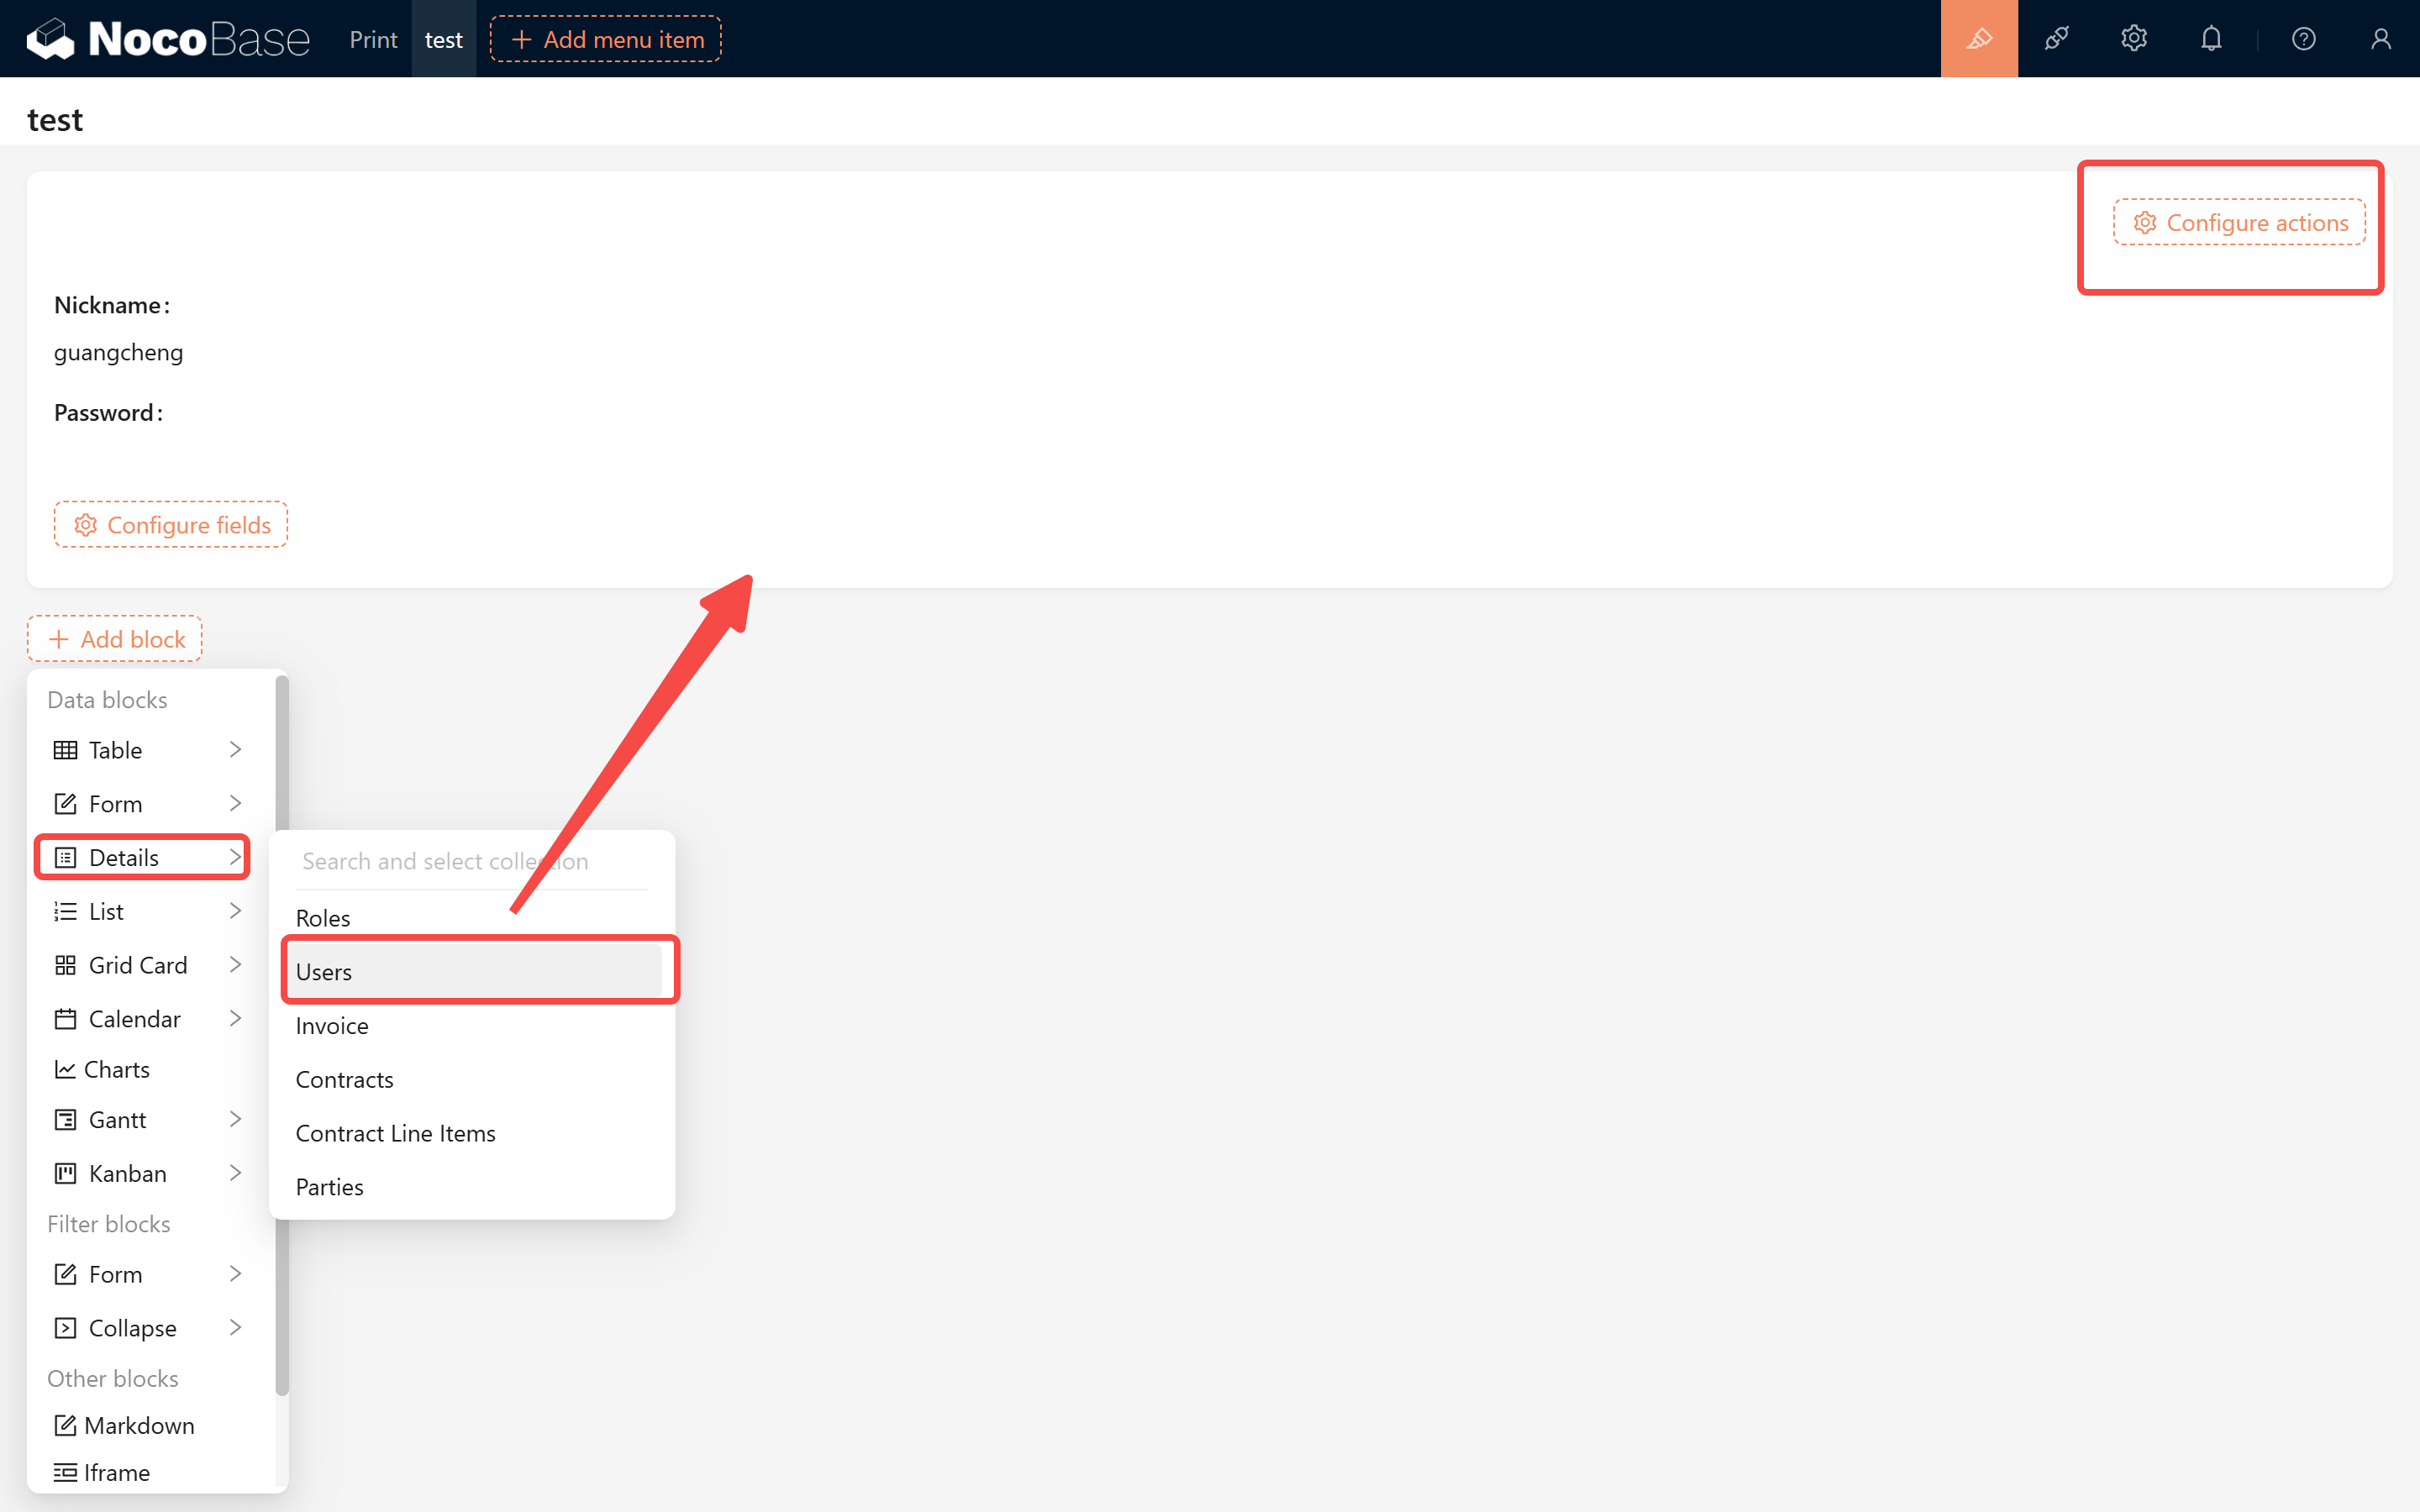
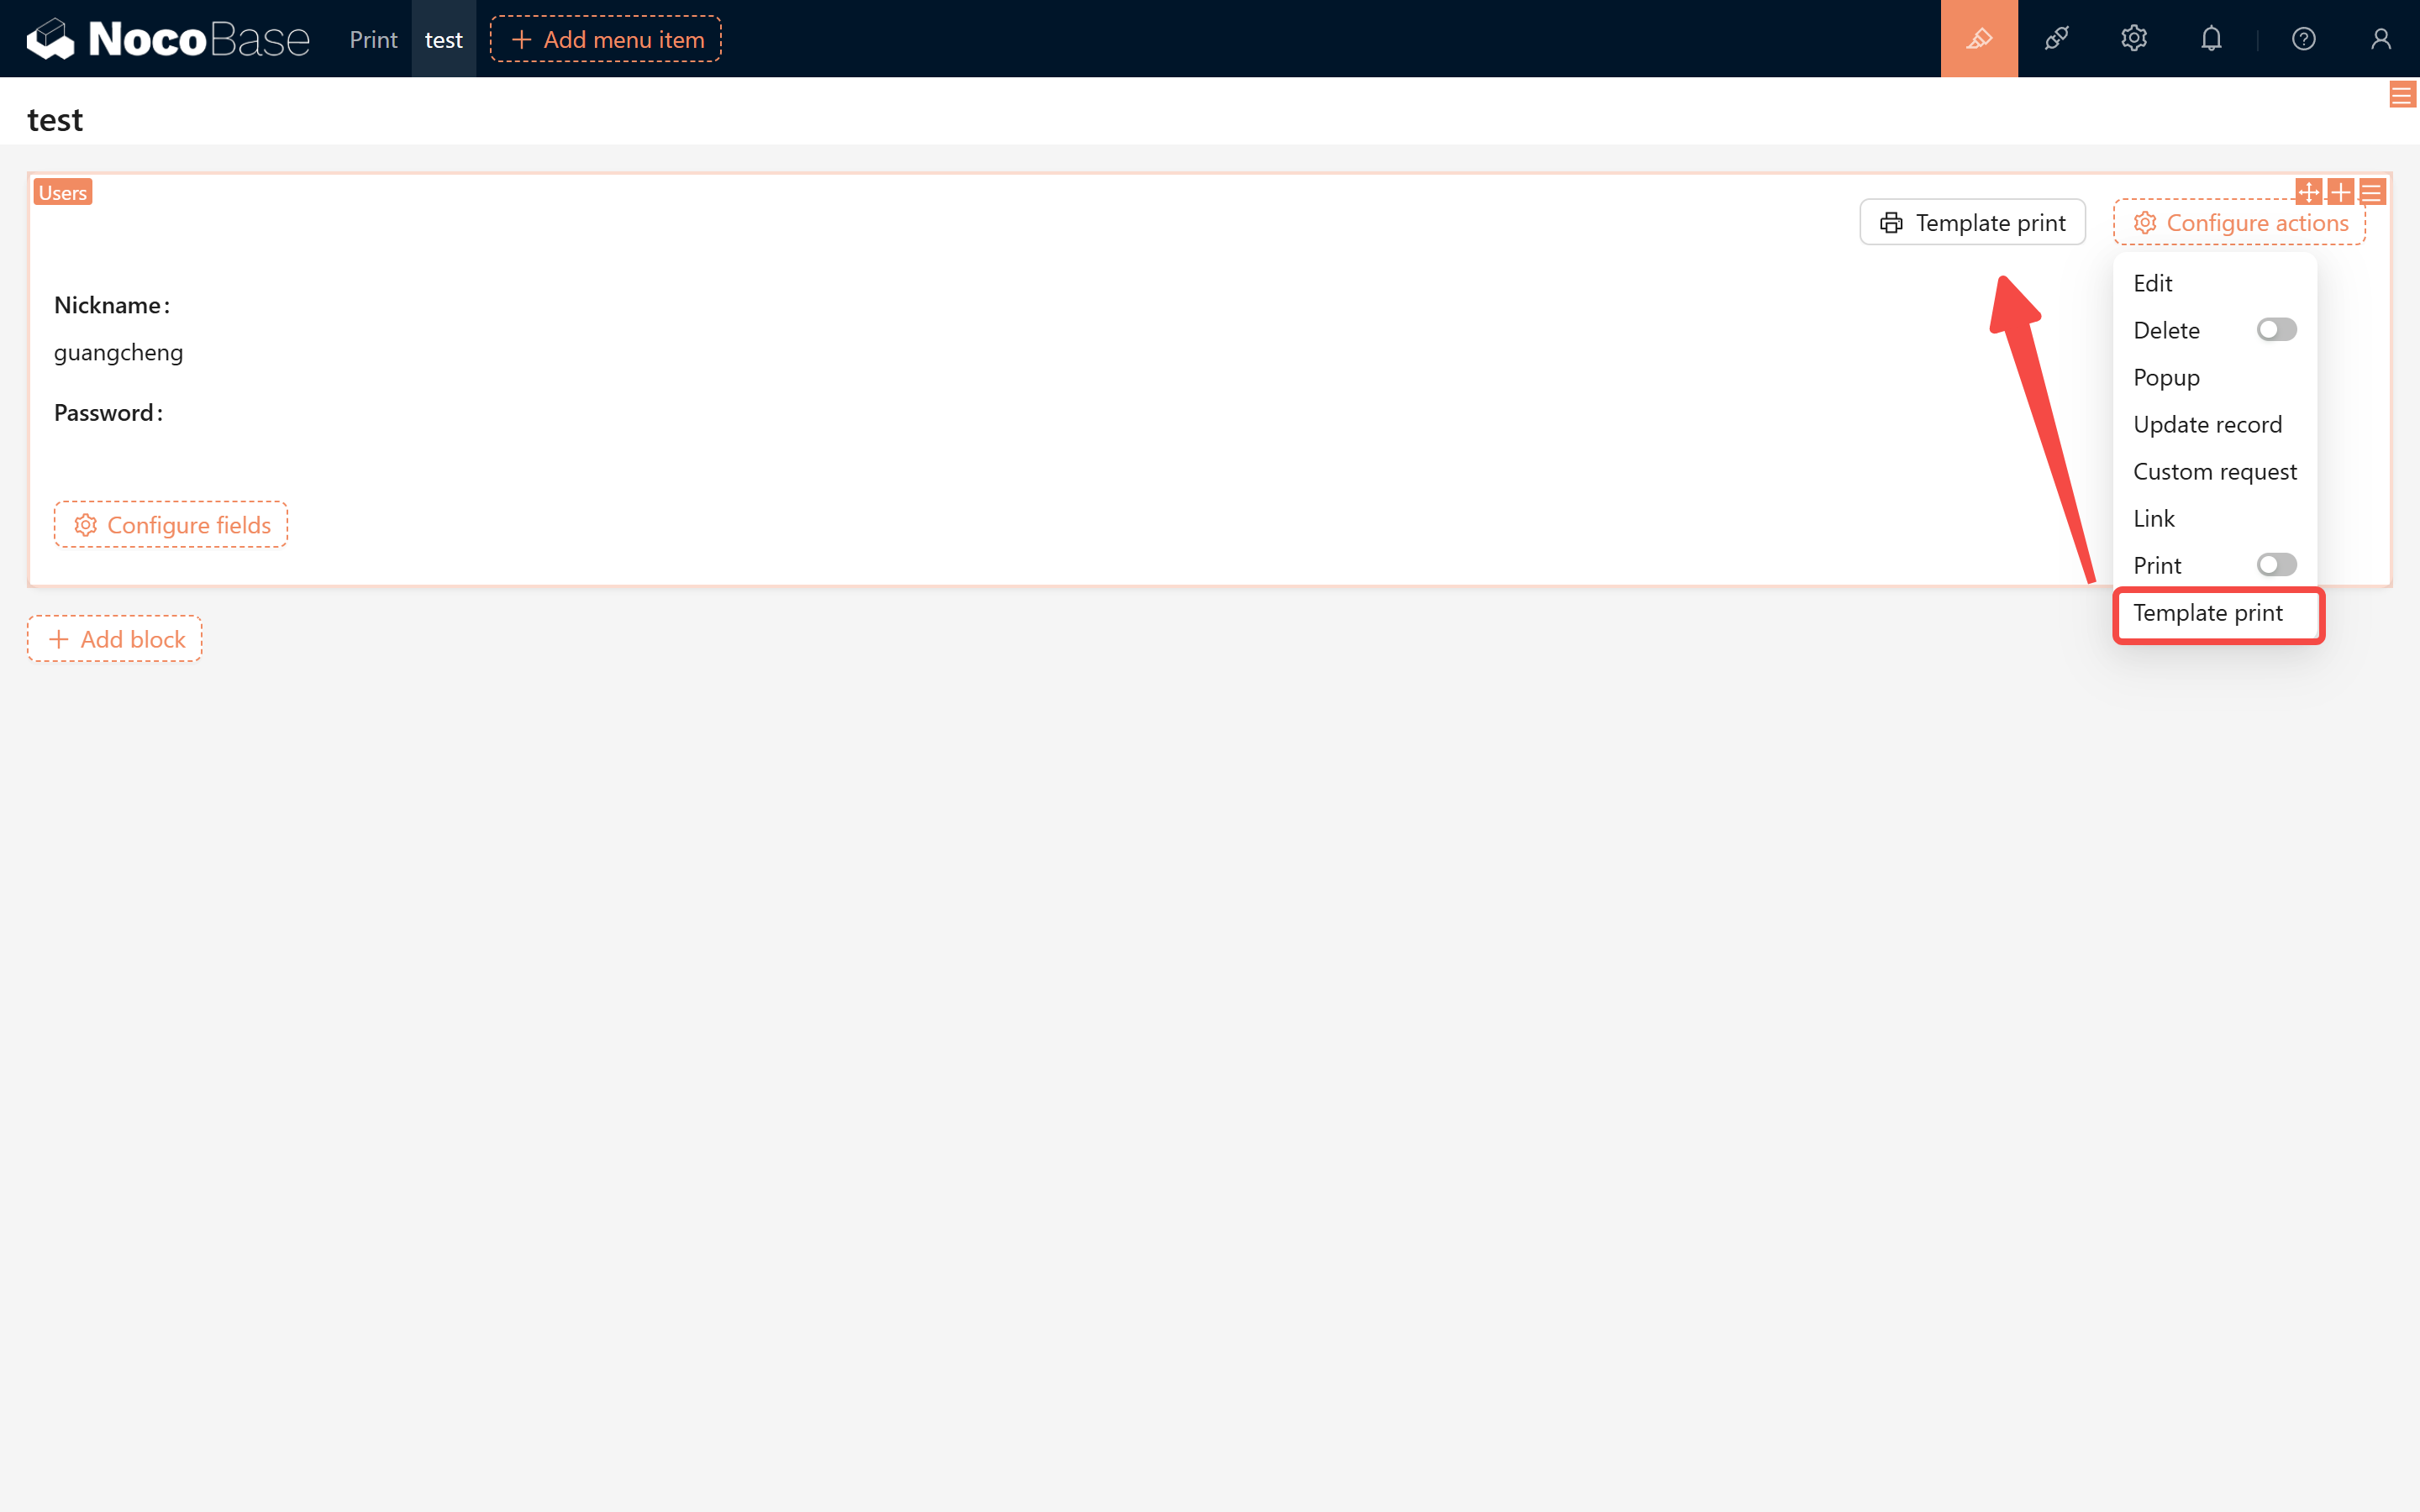
On any page, create a details block (such as users) and check if there is a corresponding template configuration option in the action configuration:
2.2 Collection Creation
Create the main entity collection, contract collection, and product item collection designed above (select core fields).
Contracts Collection
| Field Category | Field Display Name | Field Name | Field Interface |
|---|---|---|---|
| PK & FK Fields | |||
| ID | id | Integer | |
| Buyer ID | buyer_id | Integer | |
| Seller ID | seller_id | Integer | |
| Association Fields | |||
| Contract Items | contract_items | One to many | |
| Buyer (Party A) | buyer | Many to one | |
| Seller (Party B) | seller | Many to one | |
| General Fields | |||
| Contract Number | contract_no | Single line text | |
| Delivery Start Date | start_date | Datetime (with time zone) | |
| Delivery End Date | end_date | Datetime (with time zone) | |
| Deposit Ratio (%) | deposit_ratio | Percent | |
| Payment Days After Delivery | payment_days_after | Integer | |
| Bank Account Name (Beneficiary) | bank_account_name | Single line text | |
| Bank Name | bank_name | Single line text | |
| Bank Account Number (Beneficiary) | bank_account_number | Single line text | |
| Total Amount | total_amount | Number | |
| Currency Codes | currency_codes | Single select | |
| Balance Ratio (%) | balance_ratio | Percent | |
| Balance Days After Delivery | balance_days_after | Integer | |
| Delivery Place | delivery_place | Long text | |
| Party A Signatory Name | party_a_signatory_name | Single line text | |
| Party A Signatory Title | party_a_signatory_title | Single line text | |
| Party B Signatory Name | party_b_signatory_name | Single line text | |
| Party B Signatory Title | party_b_signatory_title | Single line text | |
| System Fields | |||
| Created At | createdAt | Created at | |
| Created By | createdBy | Created by | |
| Last Updated At | updatedAt | Last updated at | |
| Last Updated By | updatedBy | Last updated by |
Parties Collection
| Field Category | Field Display Name | Field Name | Field Interface |
|---|---|---|---|
| PK & FK Fields | |||
| ID | id | Integer | |
| General Fields | |||
| Party Name | party_name | Single line text | |
| Address | address | Single line text | |
| Contact Person | contact_person | Single line text | |
| Contact Phone | contact_phone | Phone | |
| Position | position | Single line text | |
| Website | website | URL | |
| System Fields | |||
| Created At | createdAt | Created at | |
| Created By | createdBy | Created by | |
| Last Updated At | updatedAt | Last updated at | |
| Last Updated By | updatedBy | Last updated by |
Contract Line Items Collection
| Field Category | Field Display Name | Field Name | Field Interface |
|---|---|---|---|
| PK & FK Fields | |||
| ID | id | Integer | |
| Contract ID | contract_id | Integer | |
| Association Fields | |||
| Contract | contract | Many to one | |
| General Fields | |||
| Product Name | product_name | Single line text | |
| Specification / Model | spec | Single line text | |
| Quantity | quantity | Integer | |
| Unit Price | unit_price | Number | |
| Total Amount | total_amount | Number | |
| Delivery Date | delivery_date | Datetime (with time zone) | |
| Remark | remark | Long text | |
| System Fields | |||
| Created At | createdAt | Created at | |
| Created By | createdBy | Created by | |
| Last Updated At | updatedAt | Last updated at | |
| Last Updated By | updatedBy | Last updated by |
2.3 Interface Configuration
Enter Sample Data:
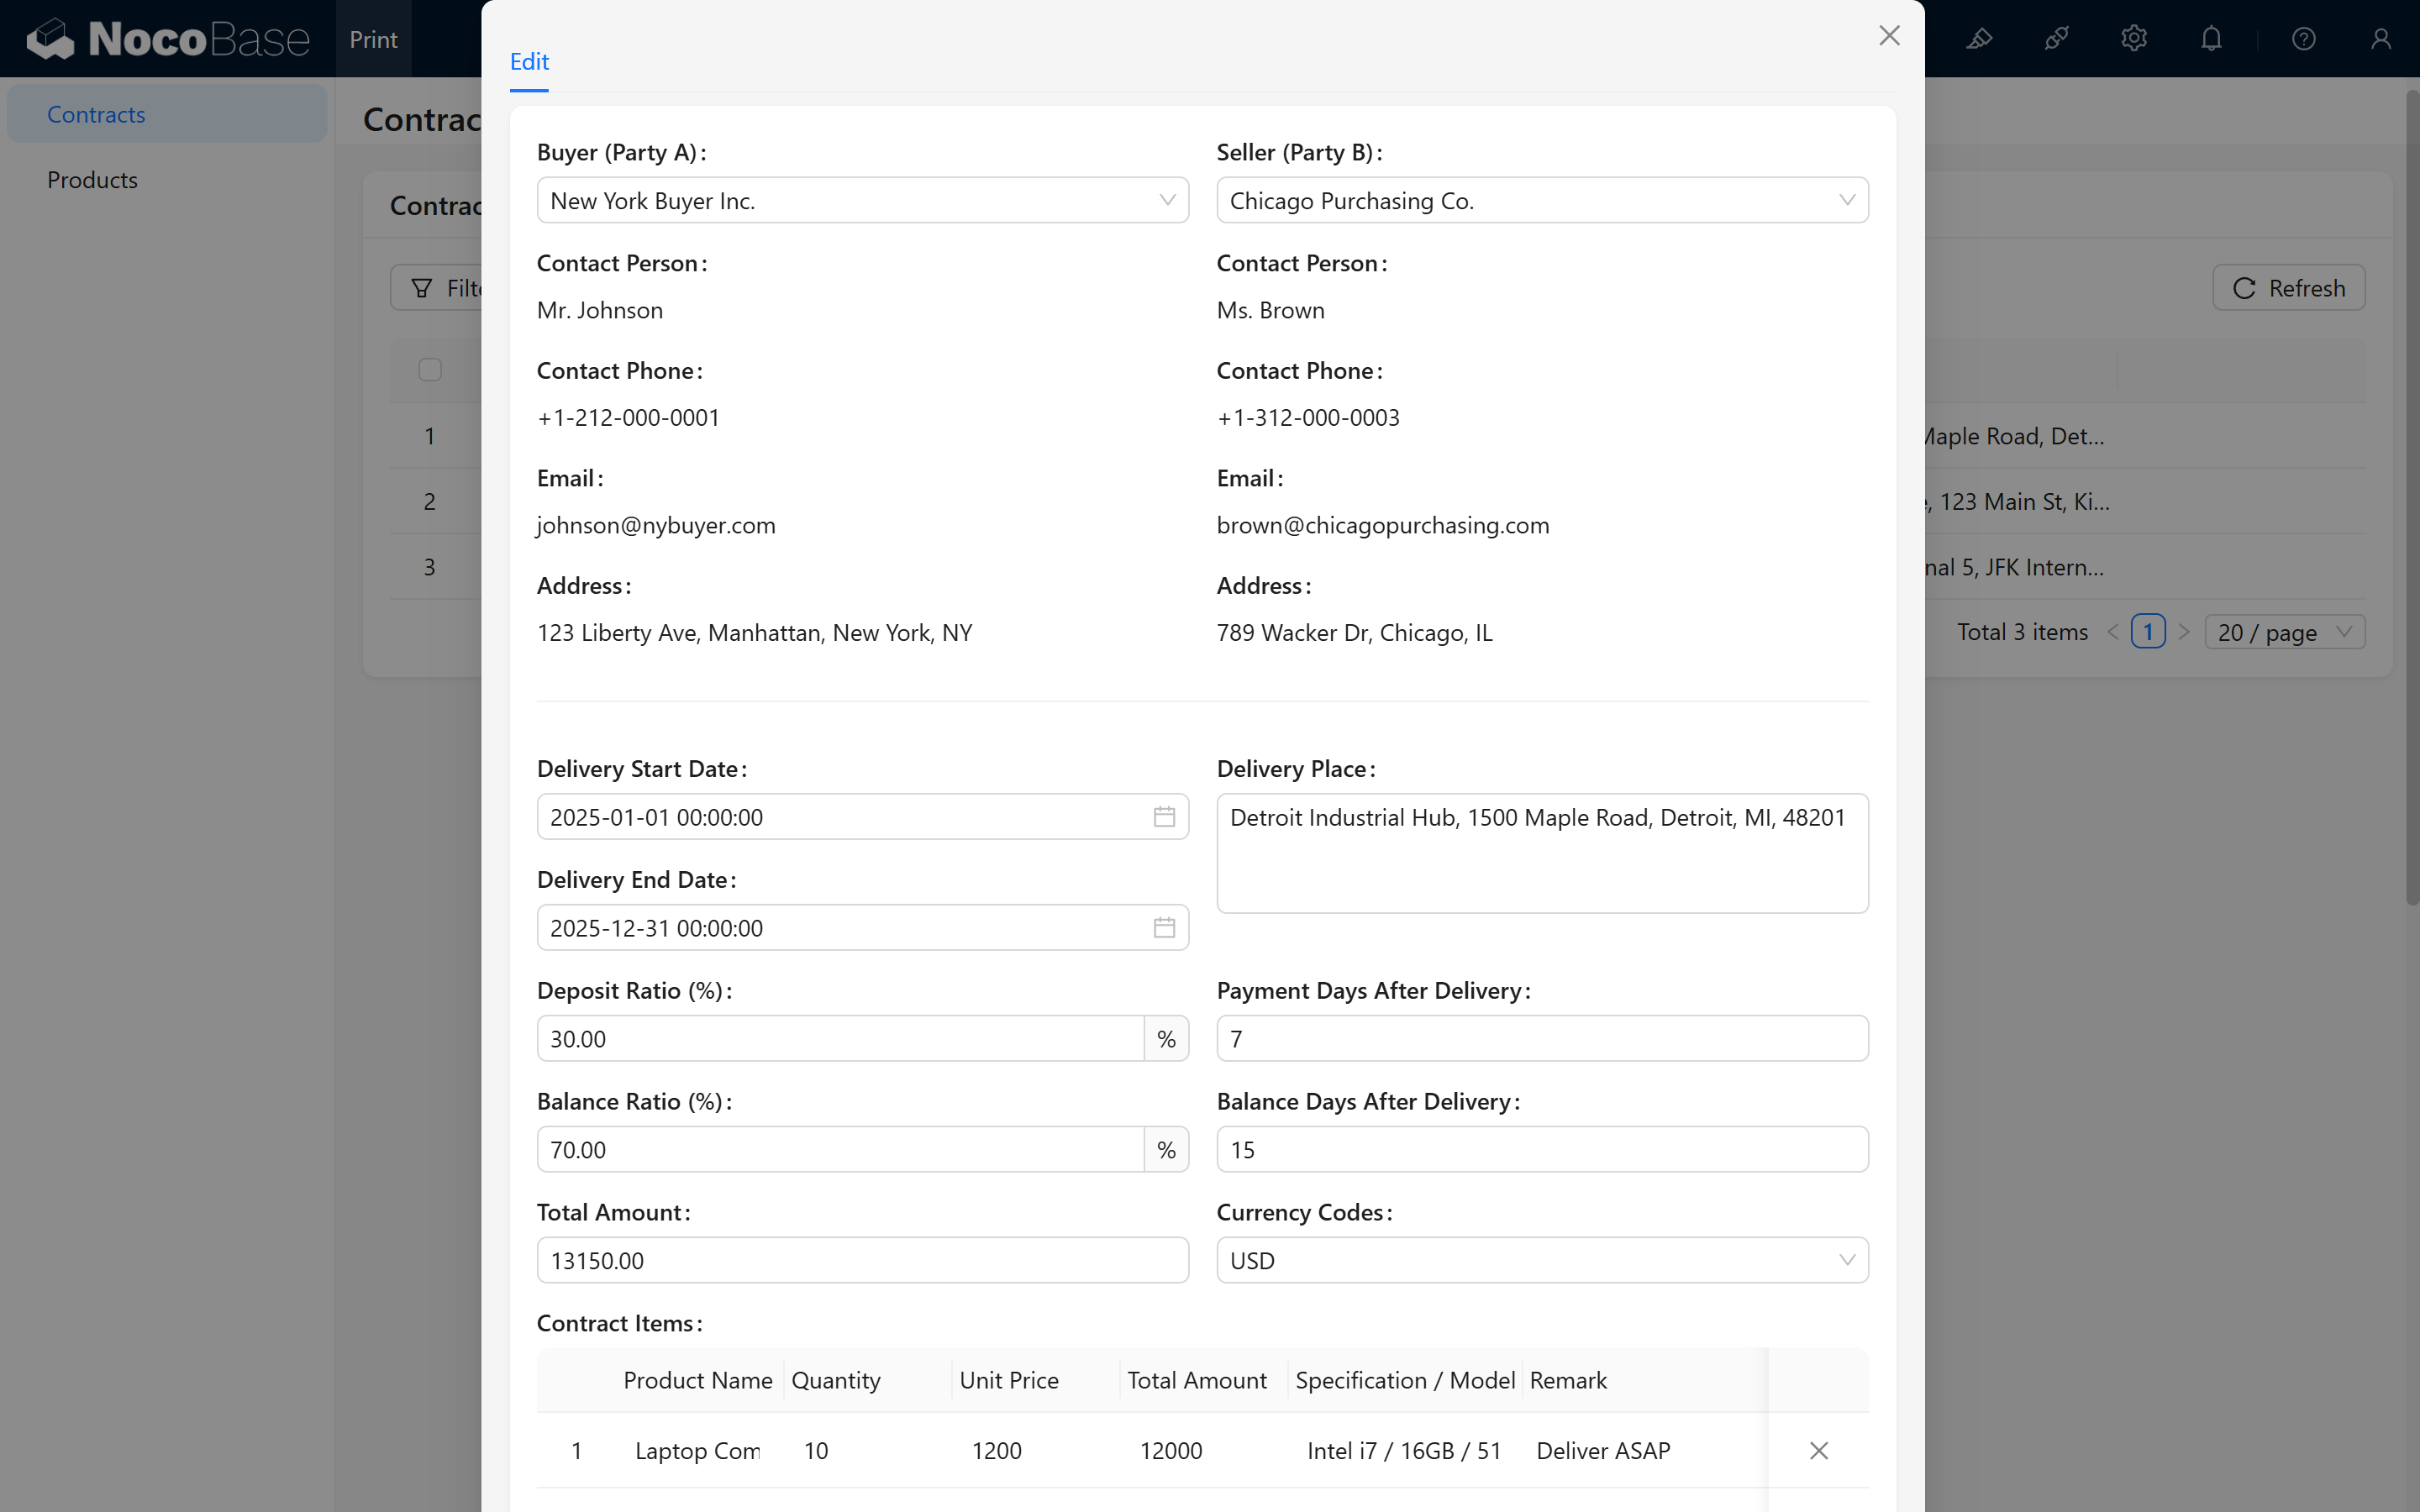

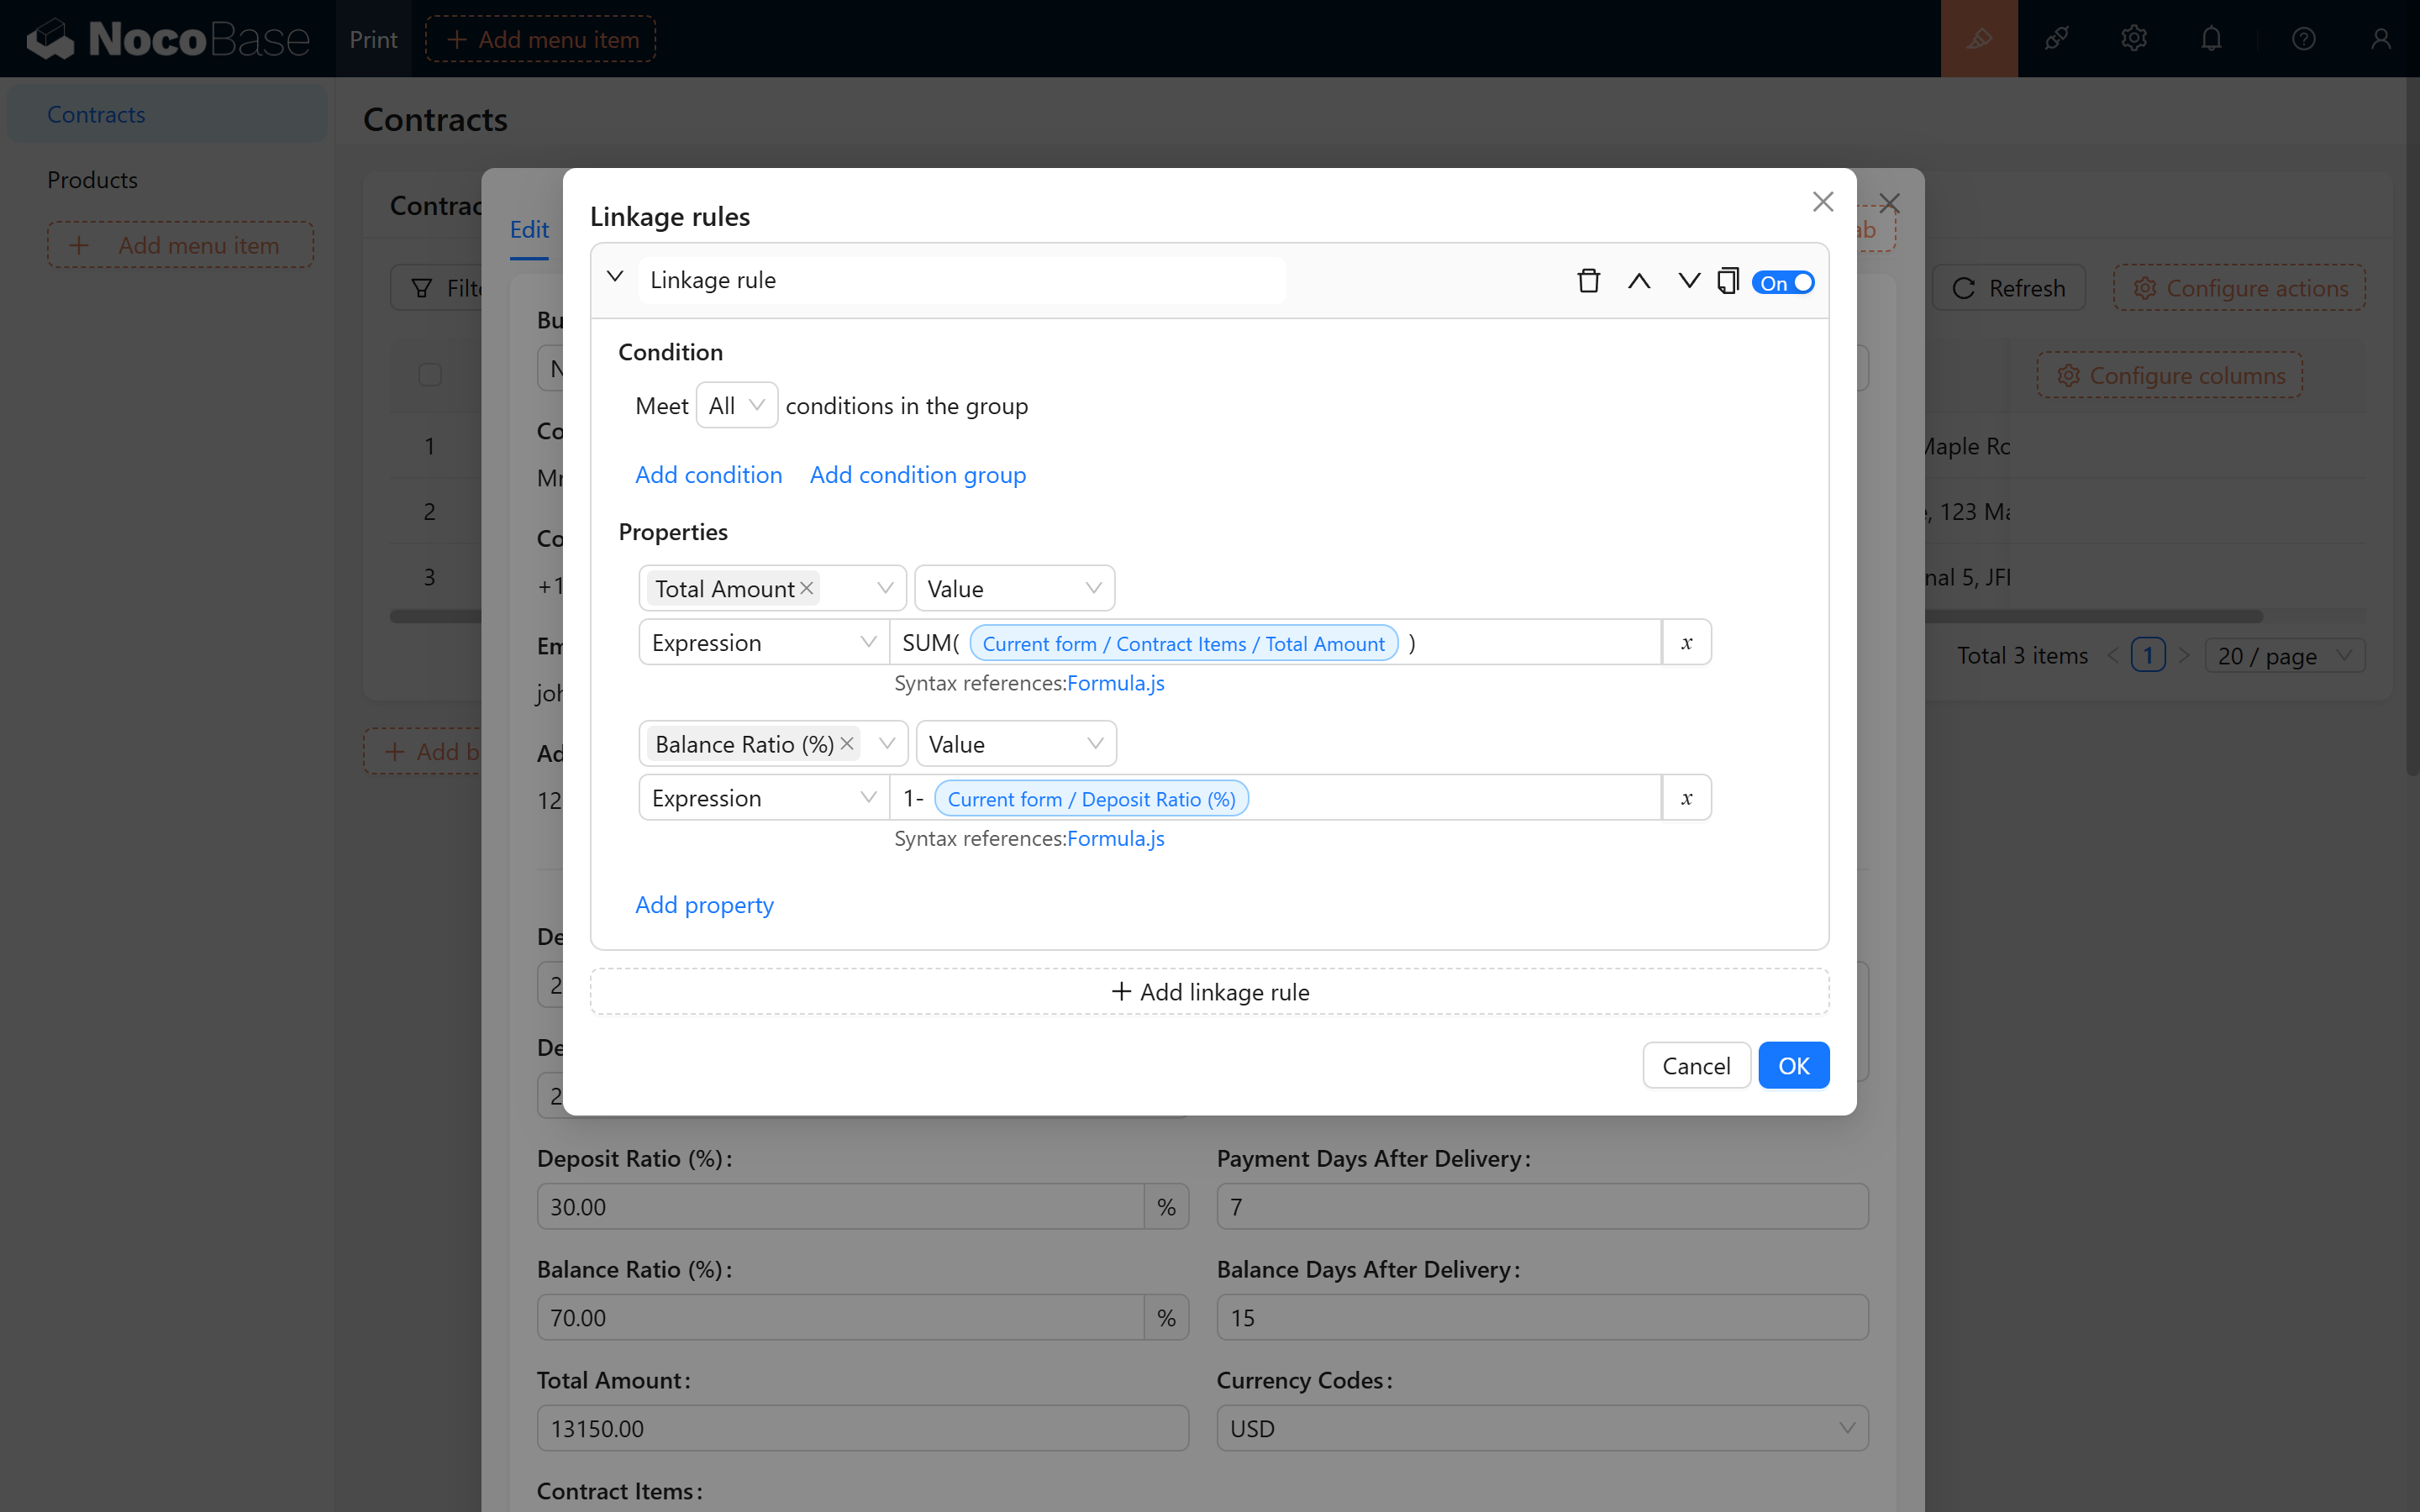
Configure linkage rules to automatically calculate total price and balance payment:
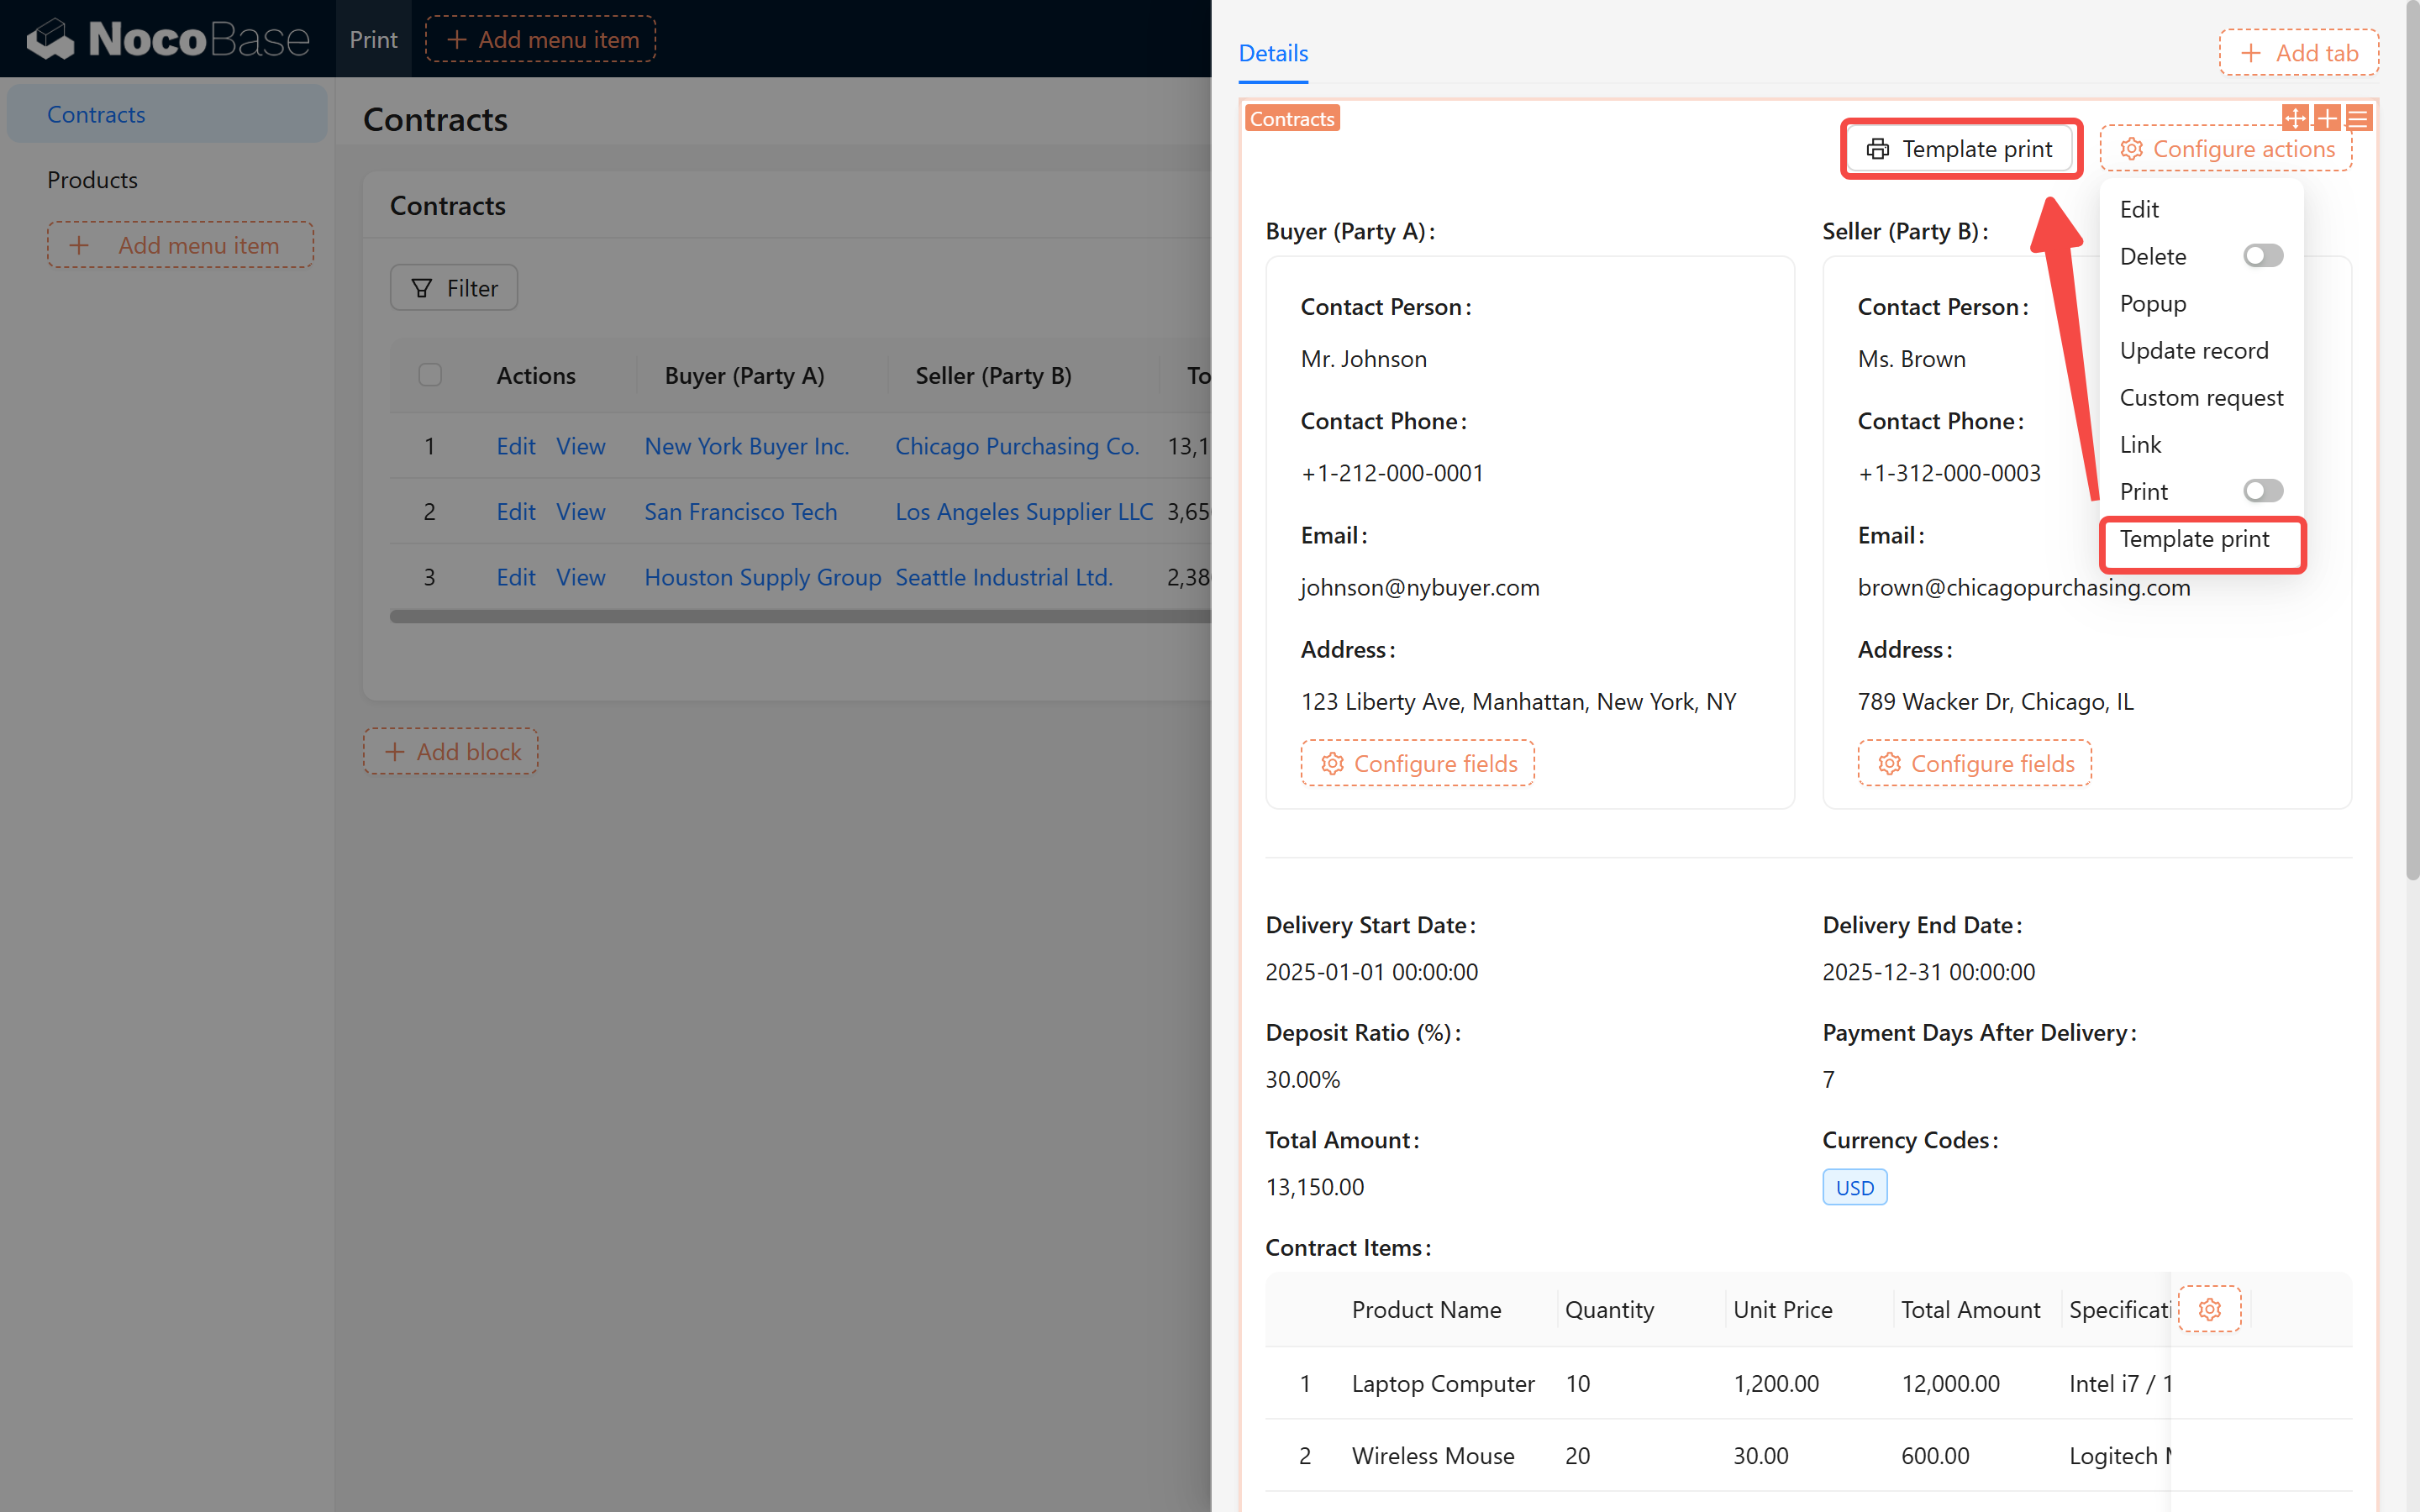
Create a view block, confirm the data, and enable the "Template Print" action:
2.4 Template Print Plugin Configuration
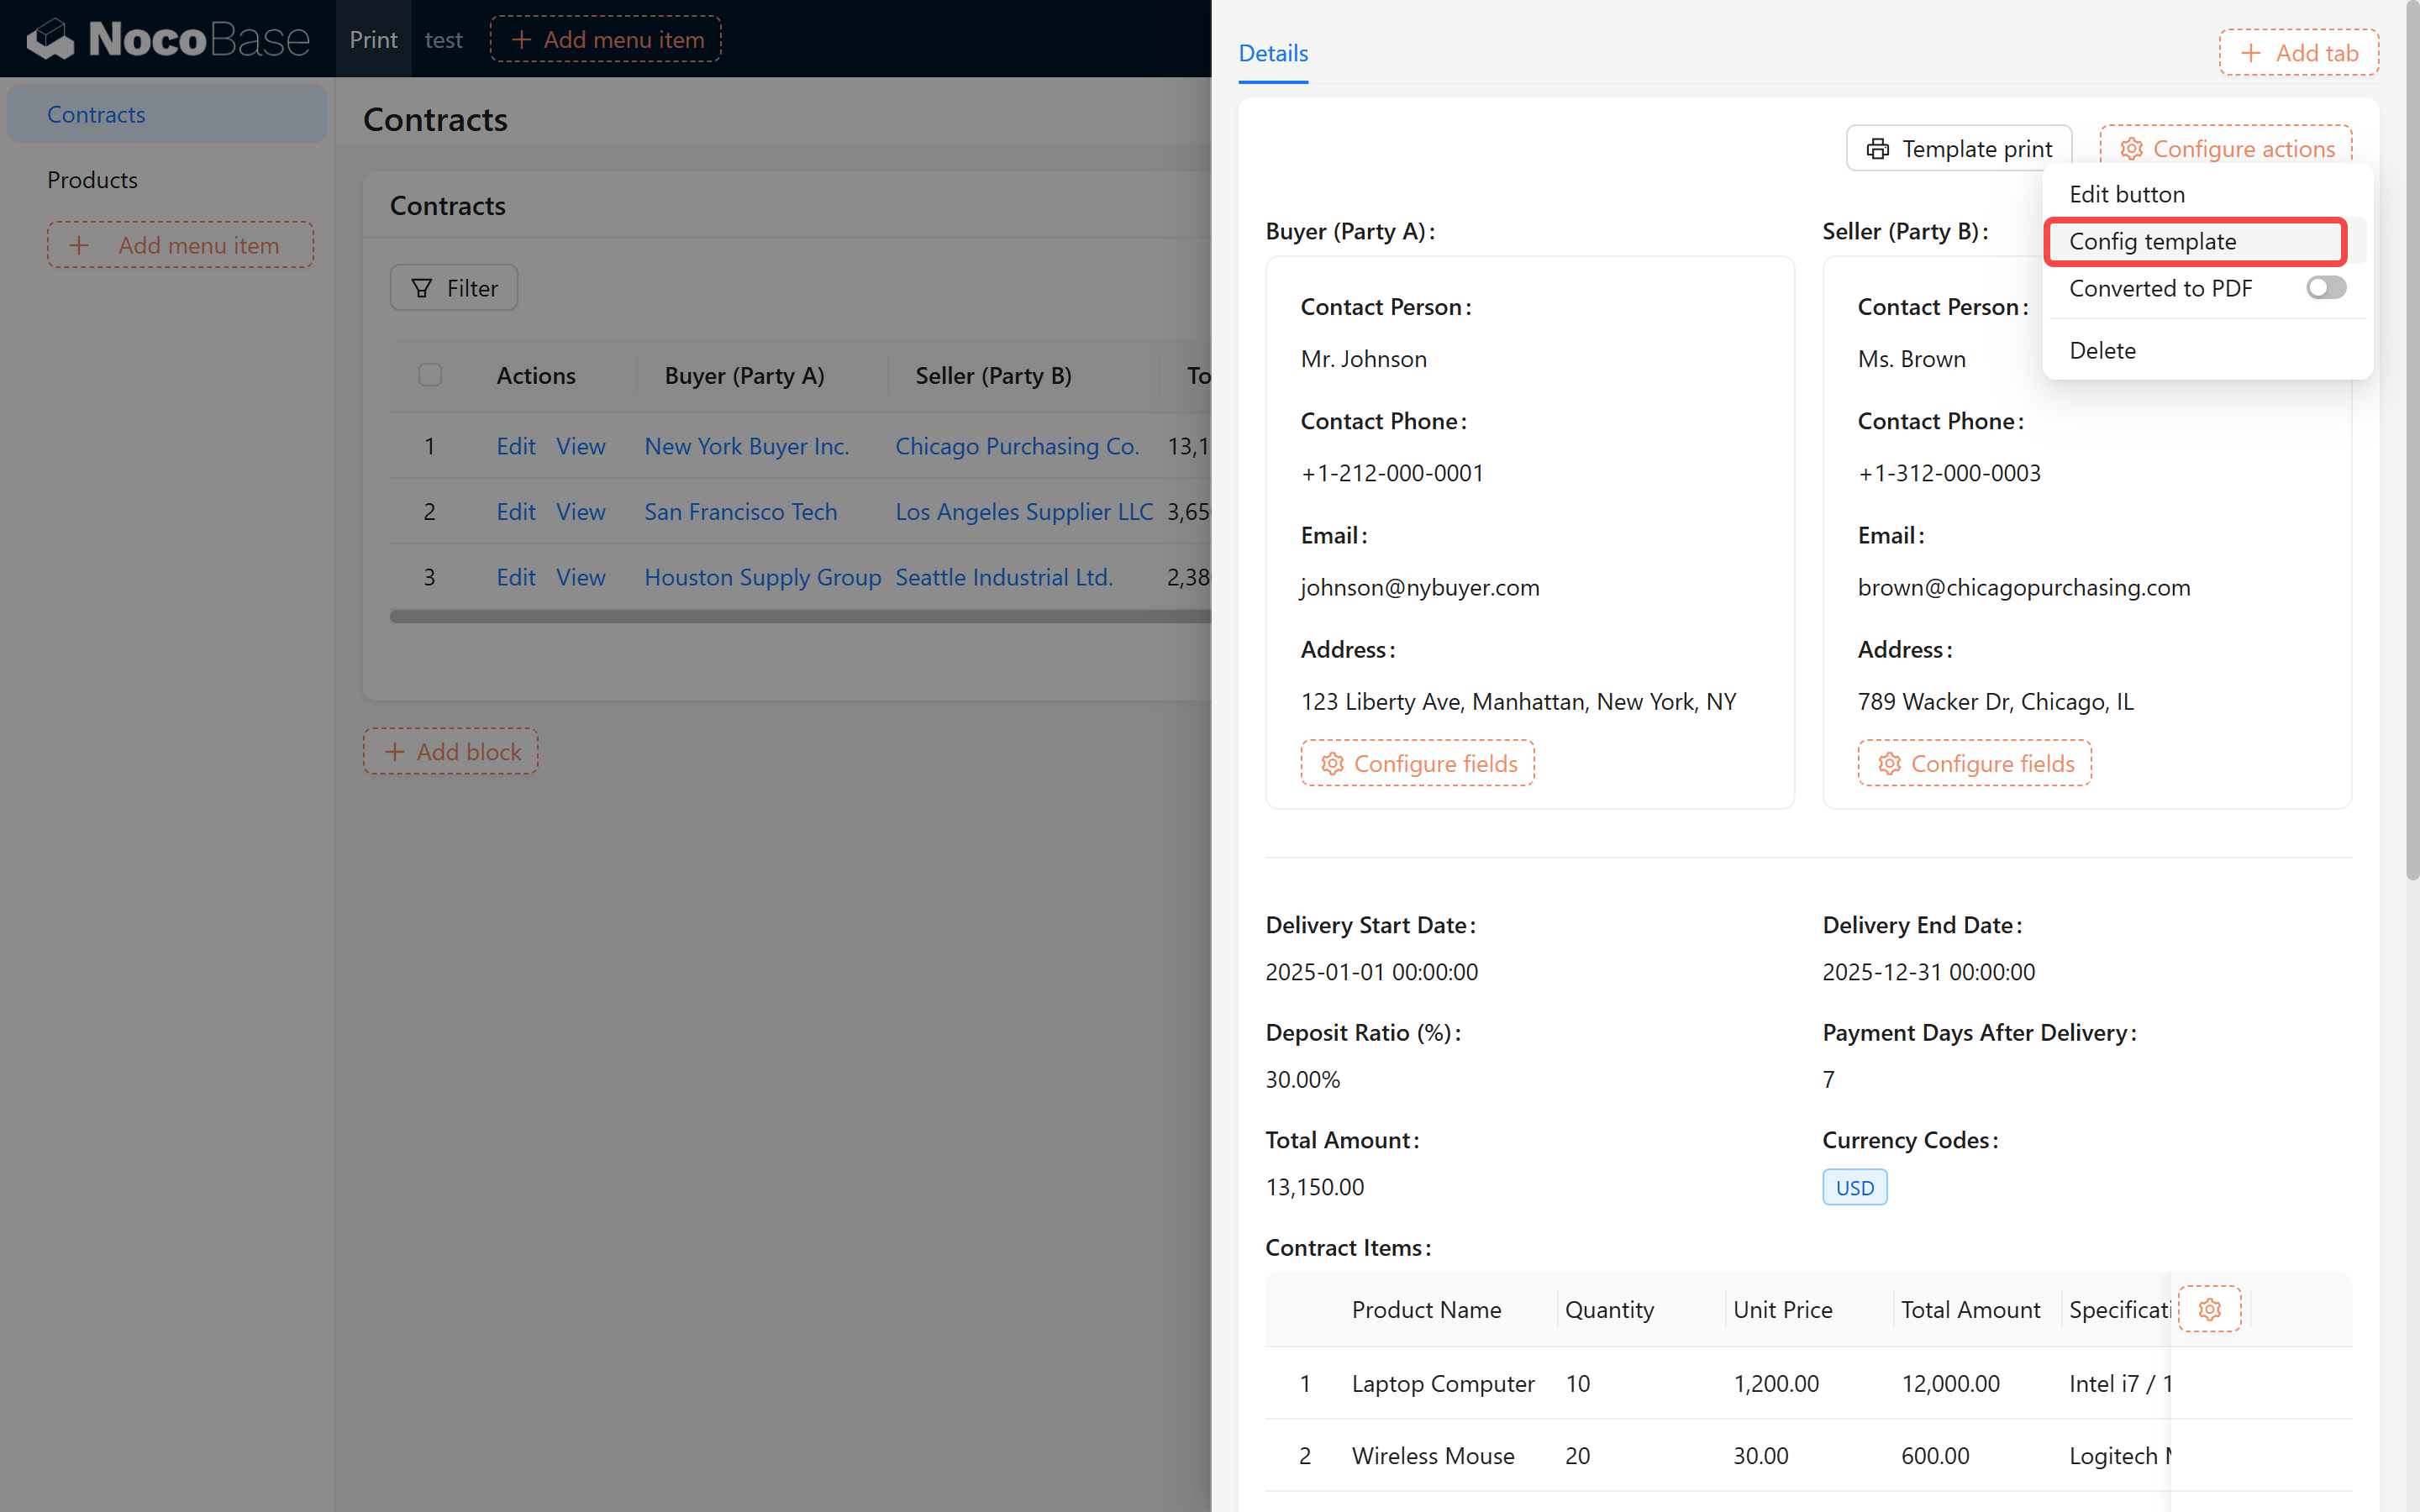
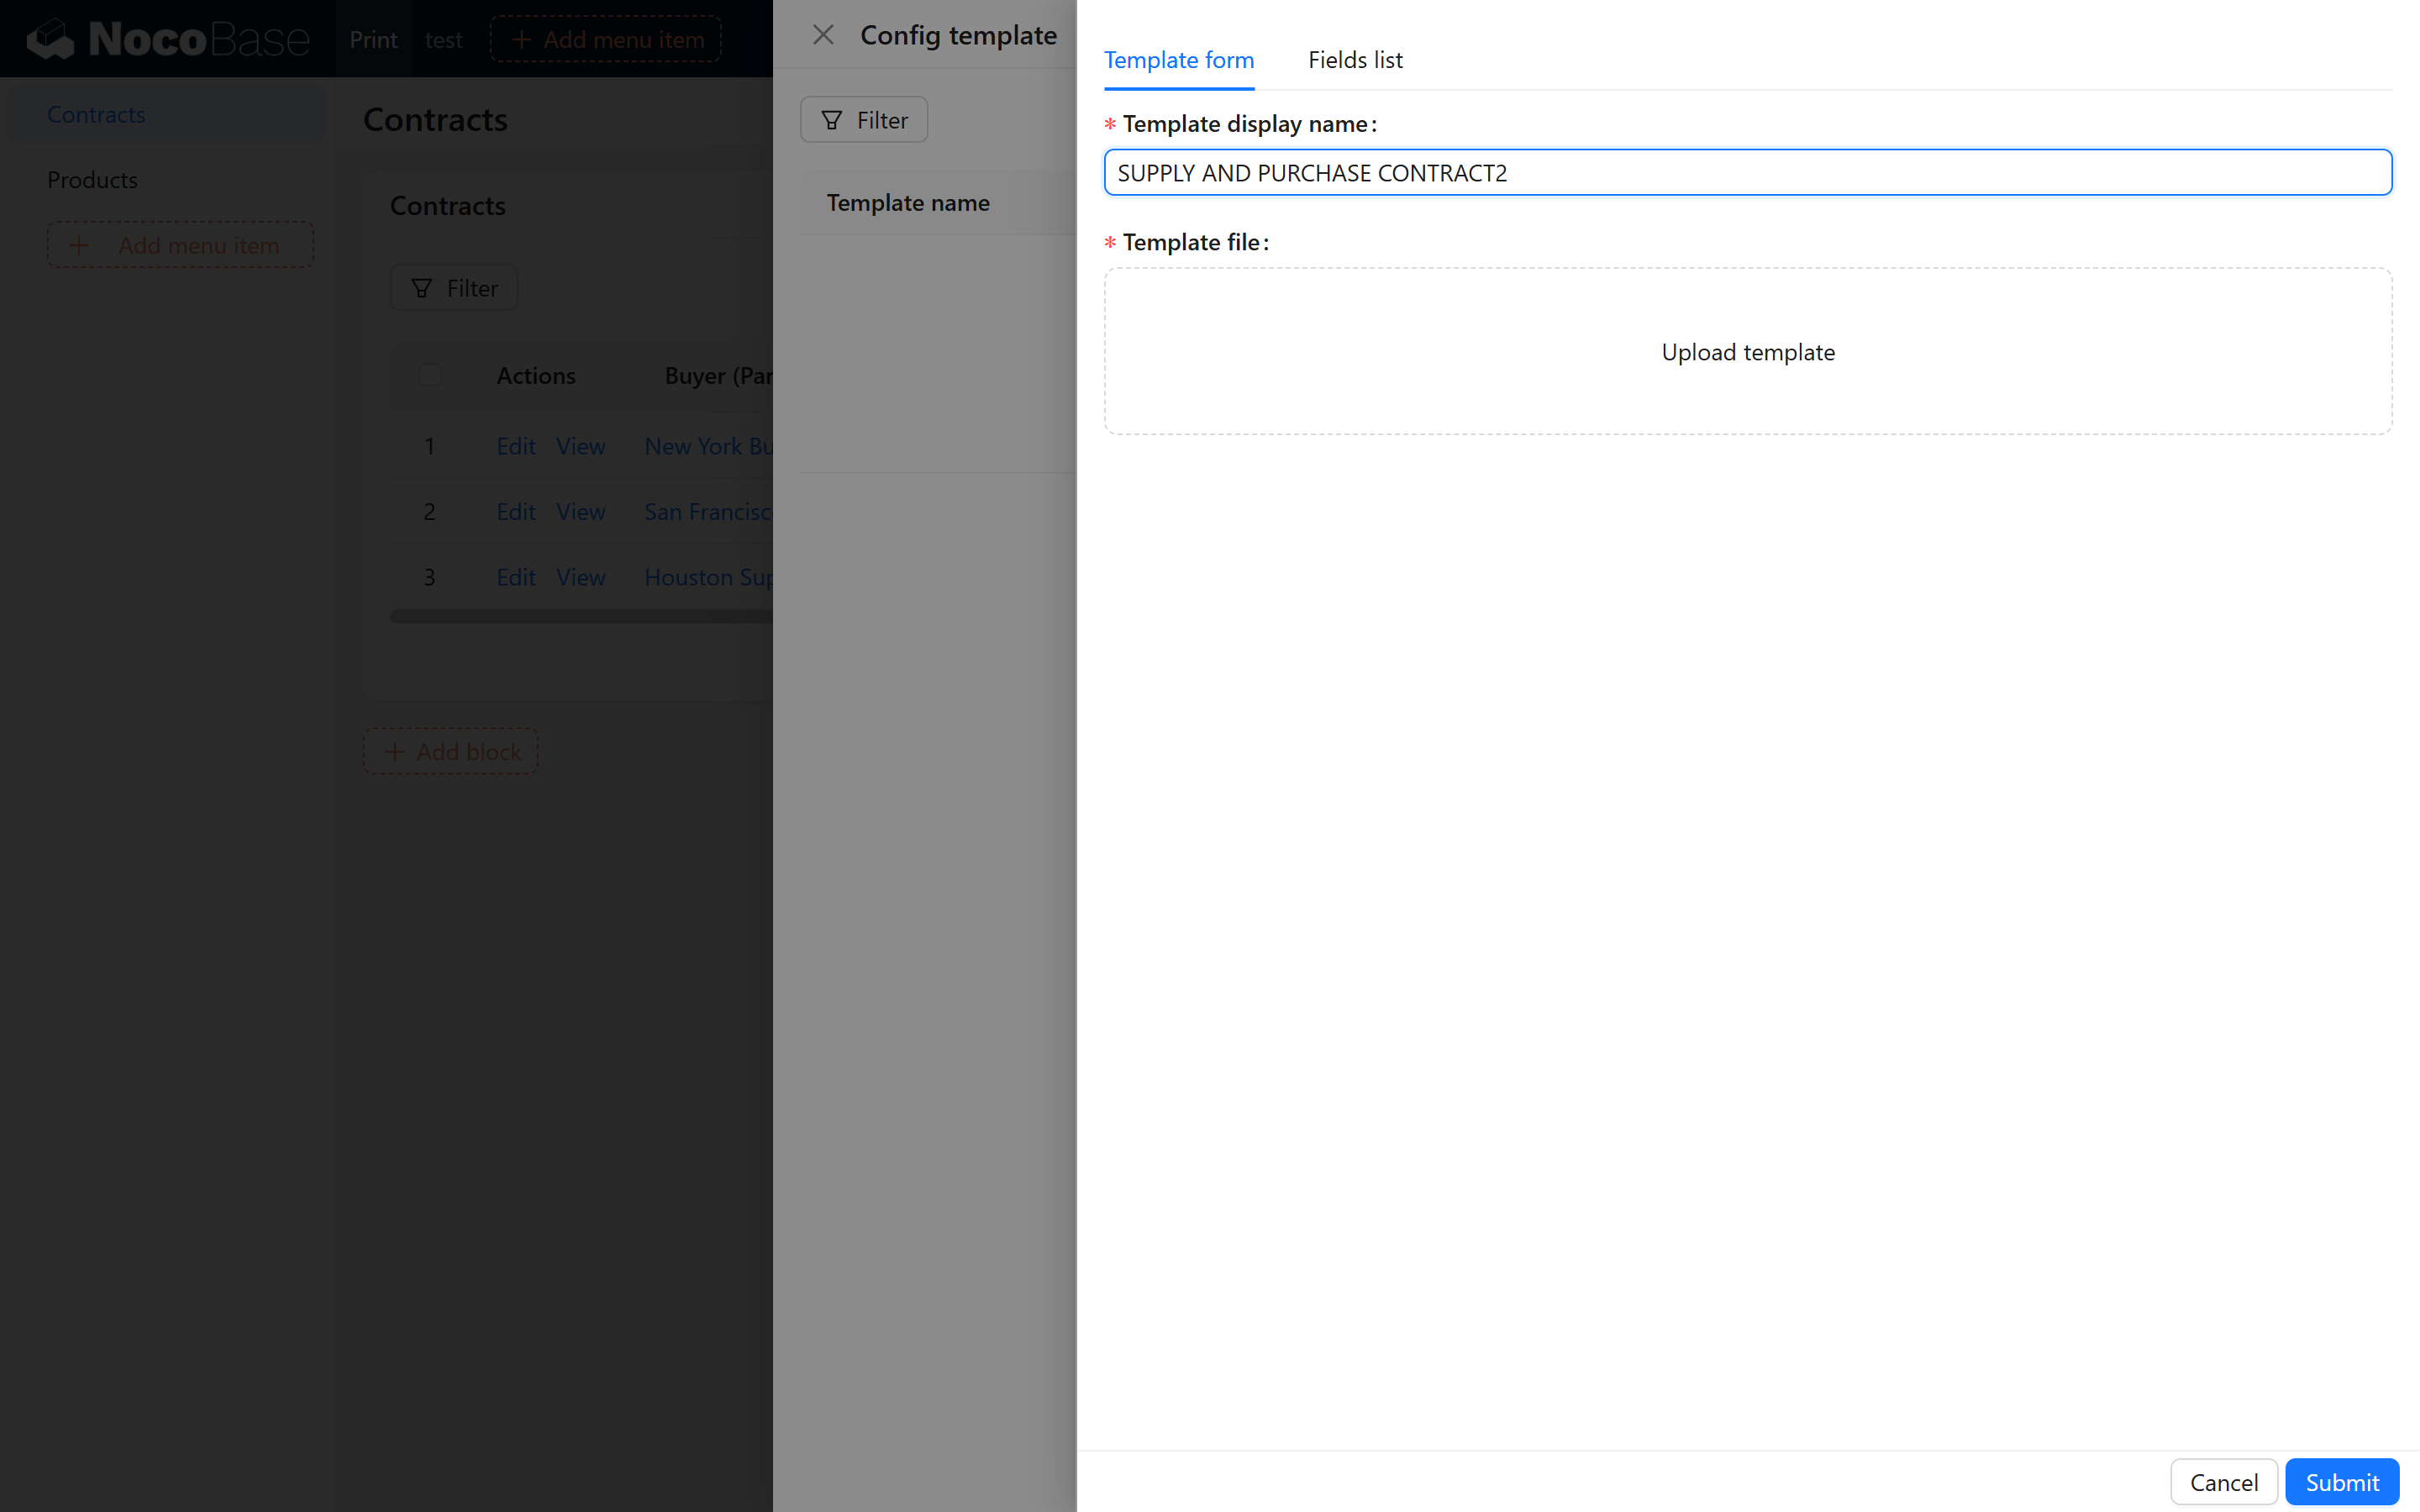
Add a template configuration, such as "Supply and Purchase Contract":
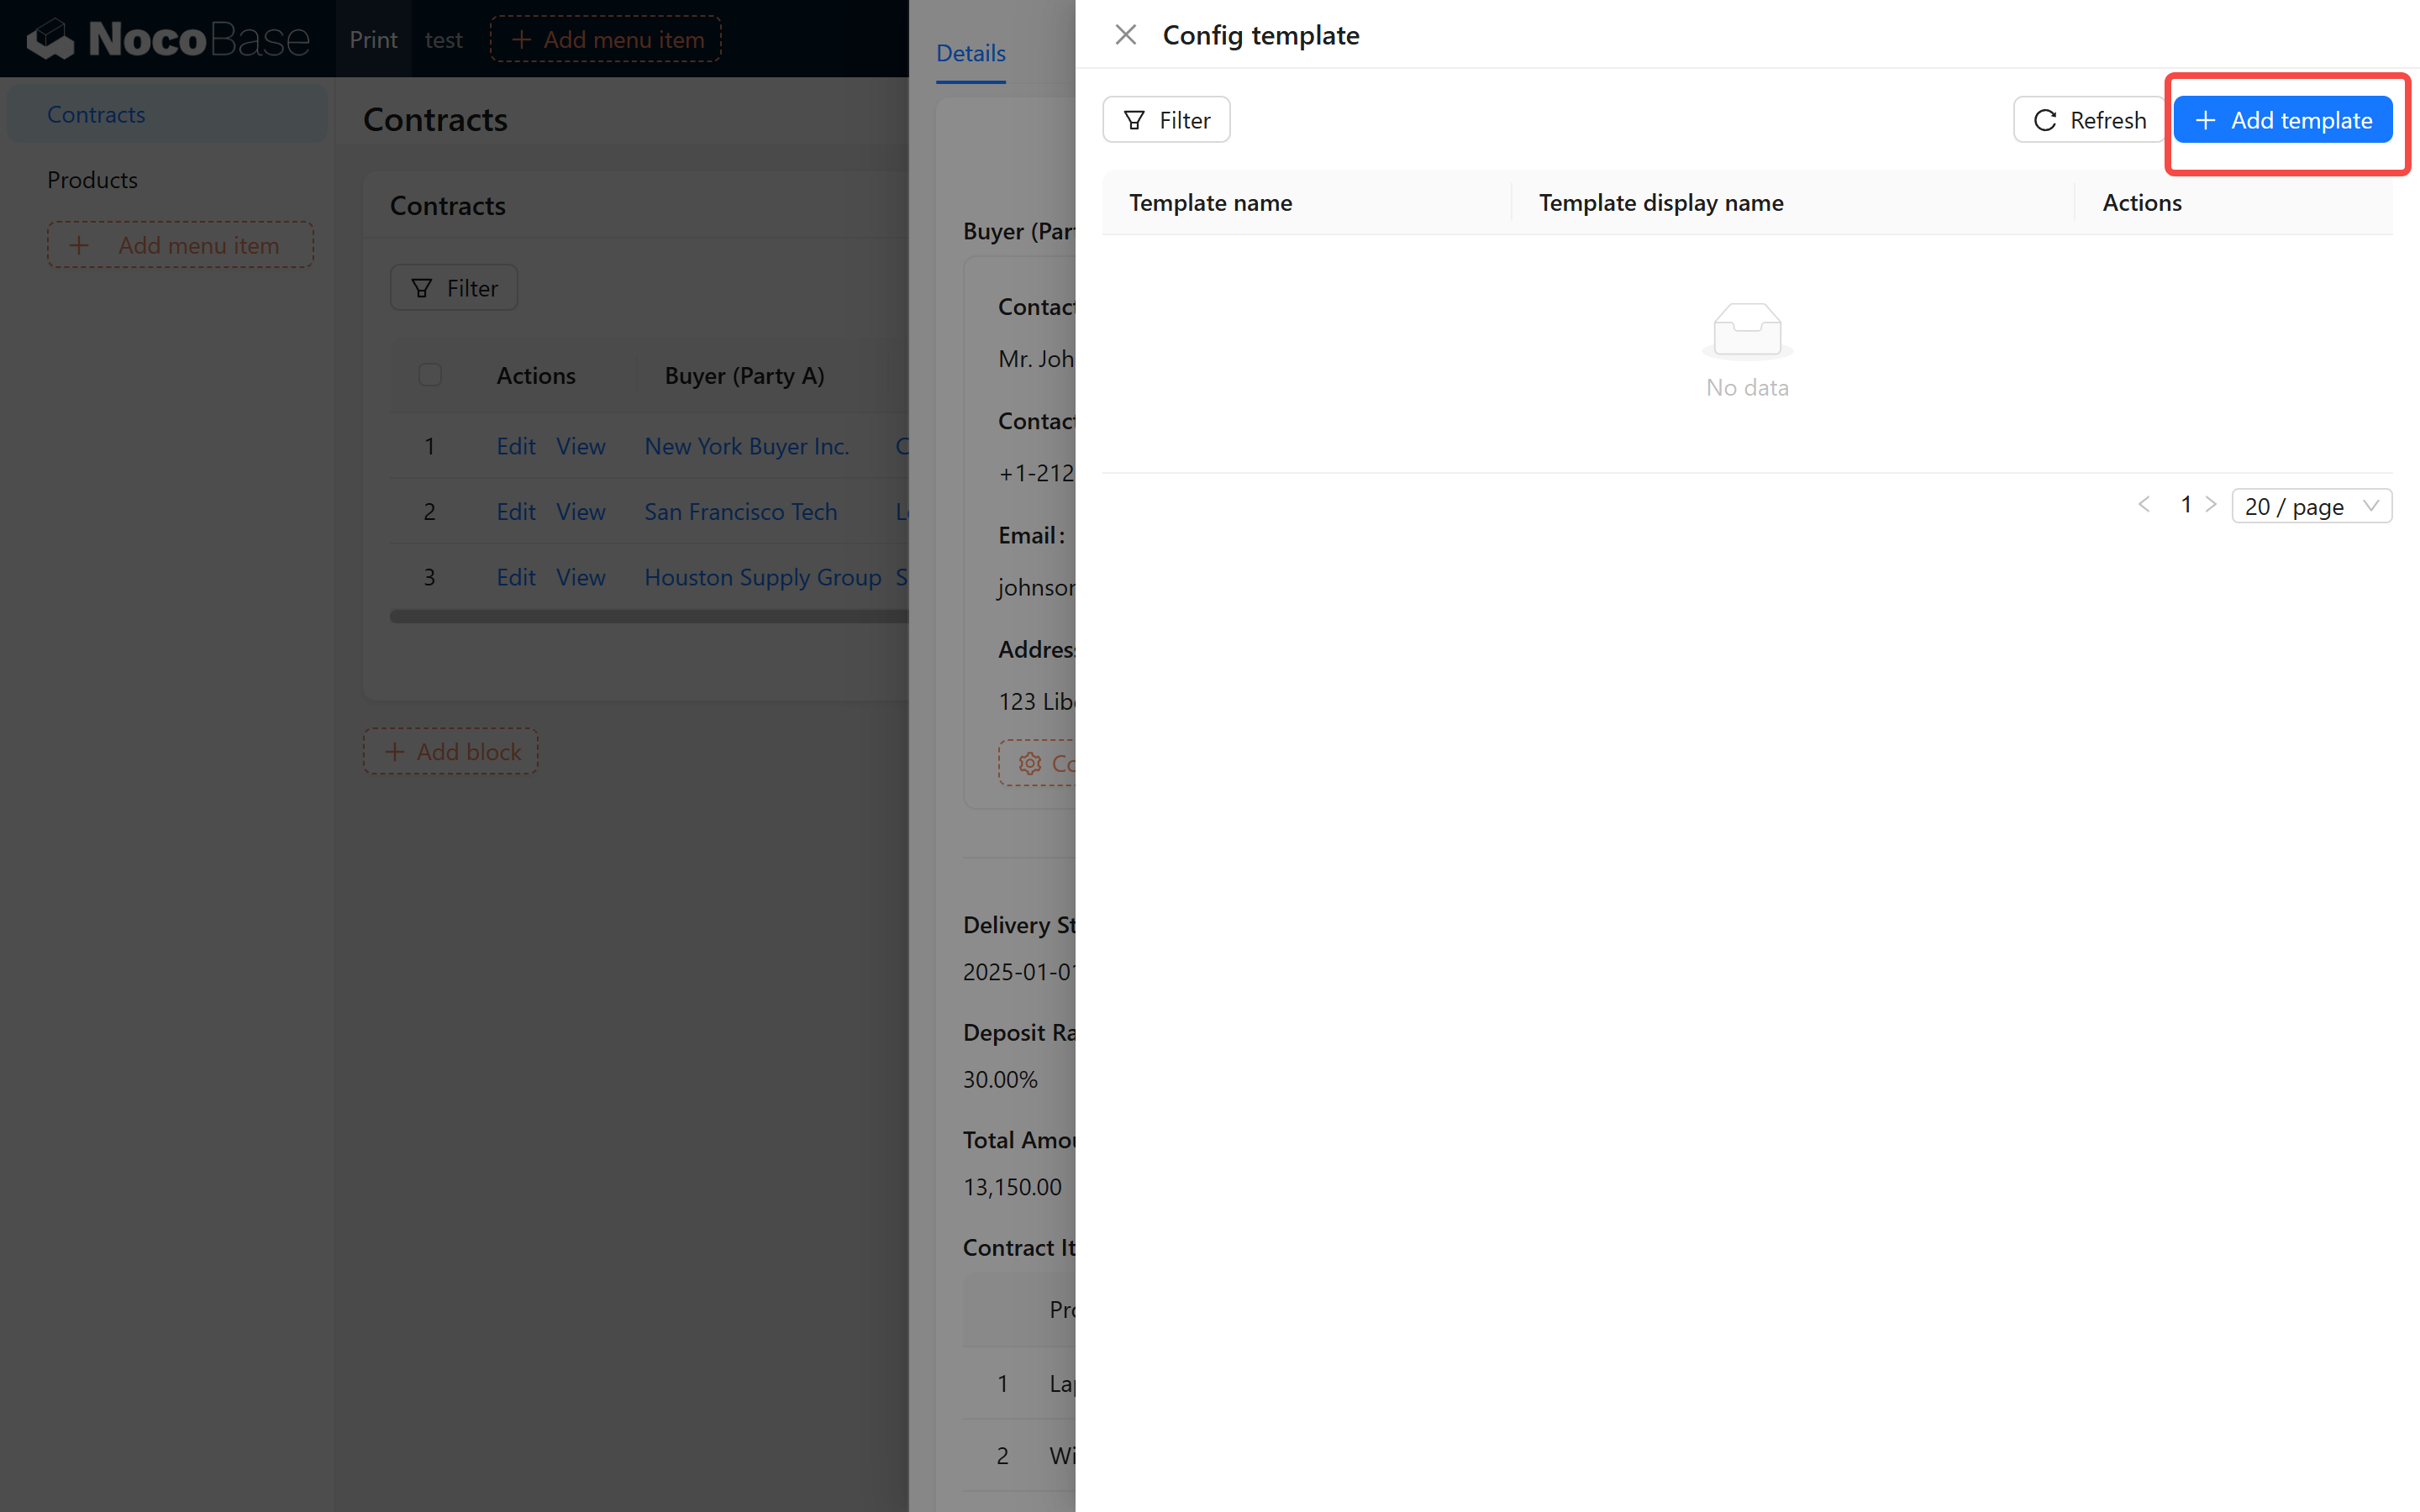
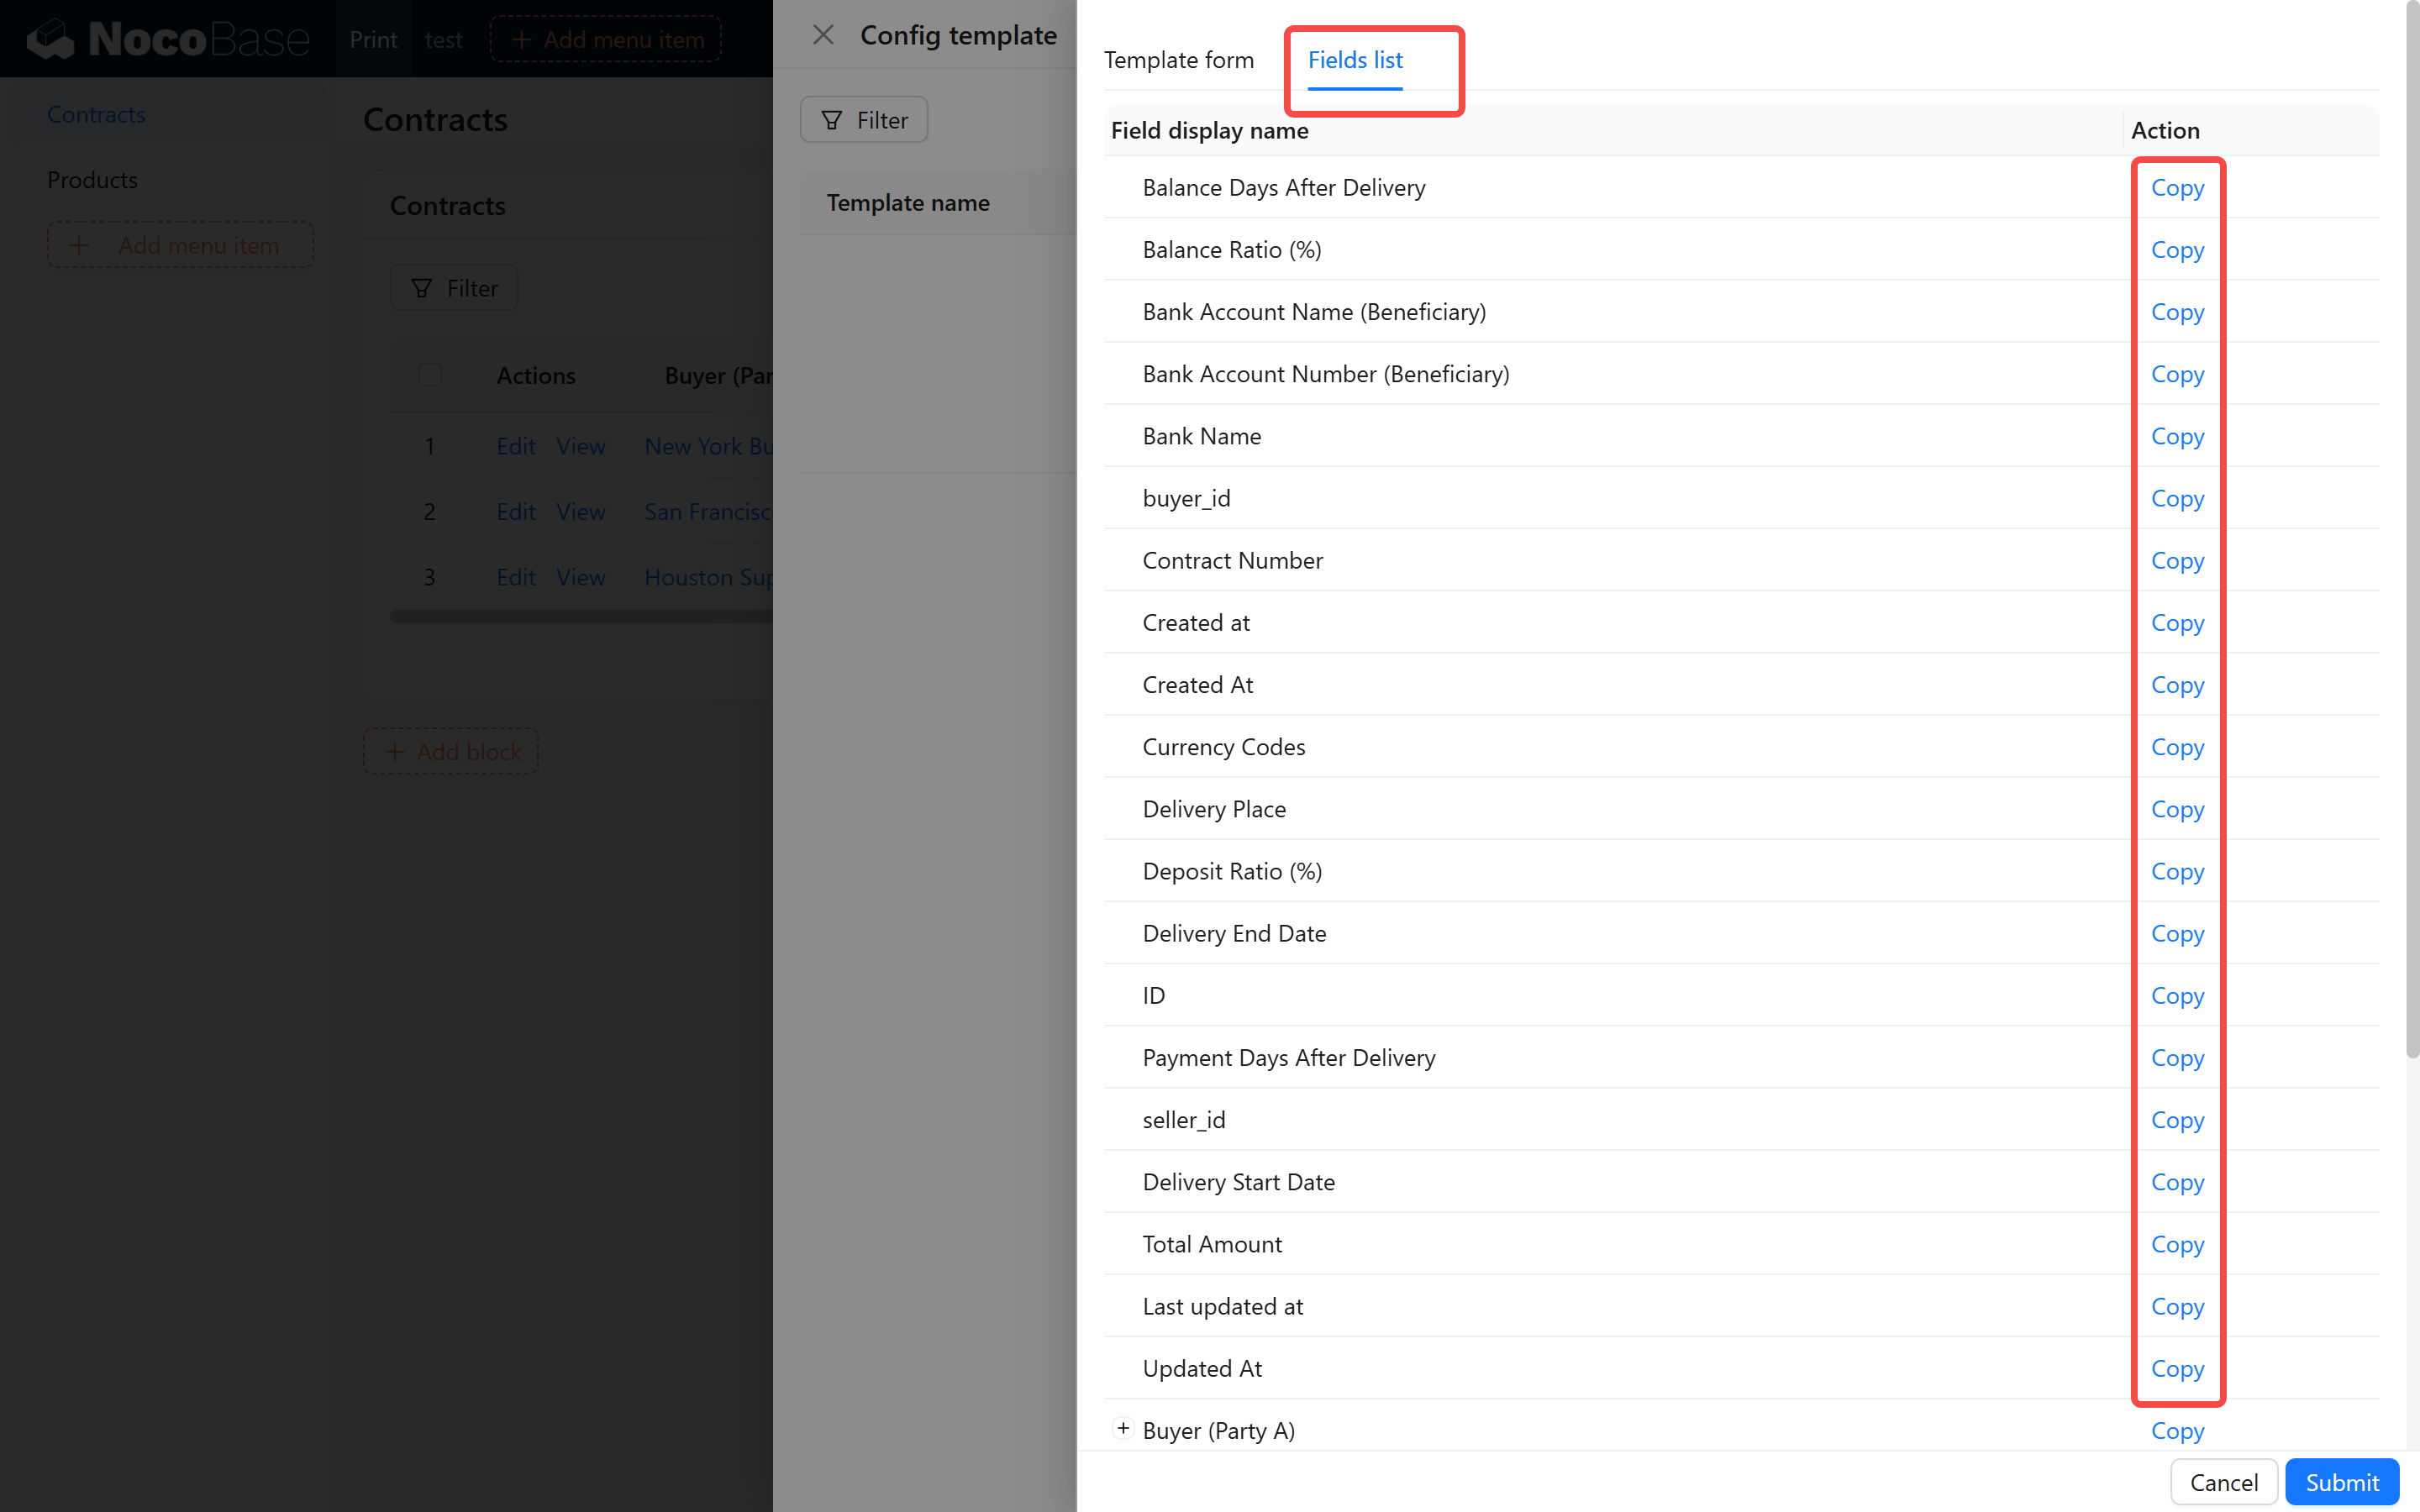
Next, we go to the Fields List tab, where we can see all the fields of the current object. After clicking "Copy", we can start filling in the template.
2.5 Contract File Preparation
Word Contract Template File
Prepare the contract template (.docx file) in advance, for example: SUPPLY AND PURCHASE CONTRACT.docx
In this example, we provide a simplified version of "Supply and Purchase Contract", which contains sample placeholders:
{d.contract_no}: Contract number{d.buyer.party_name},{d.seller.party_name}: Buyer and seller names{d.total_amount}: Total contract amount- And other placeholders such as "contact person", "address", "phone", etc.
Next, you can copy and paste the fields from your collection into Word.
3. Template Variable Tutorial
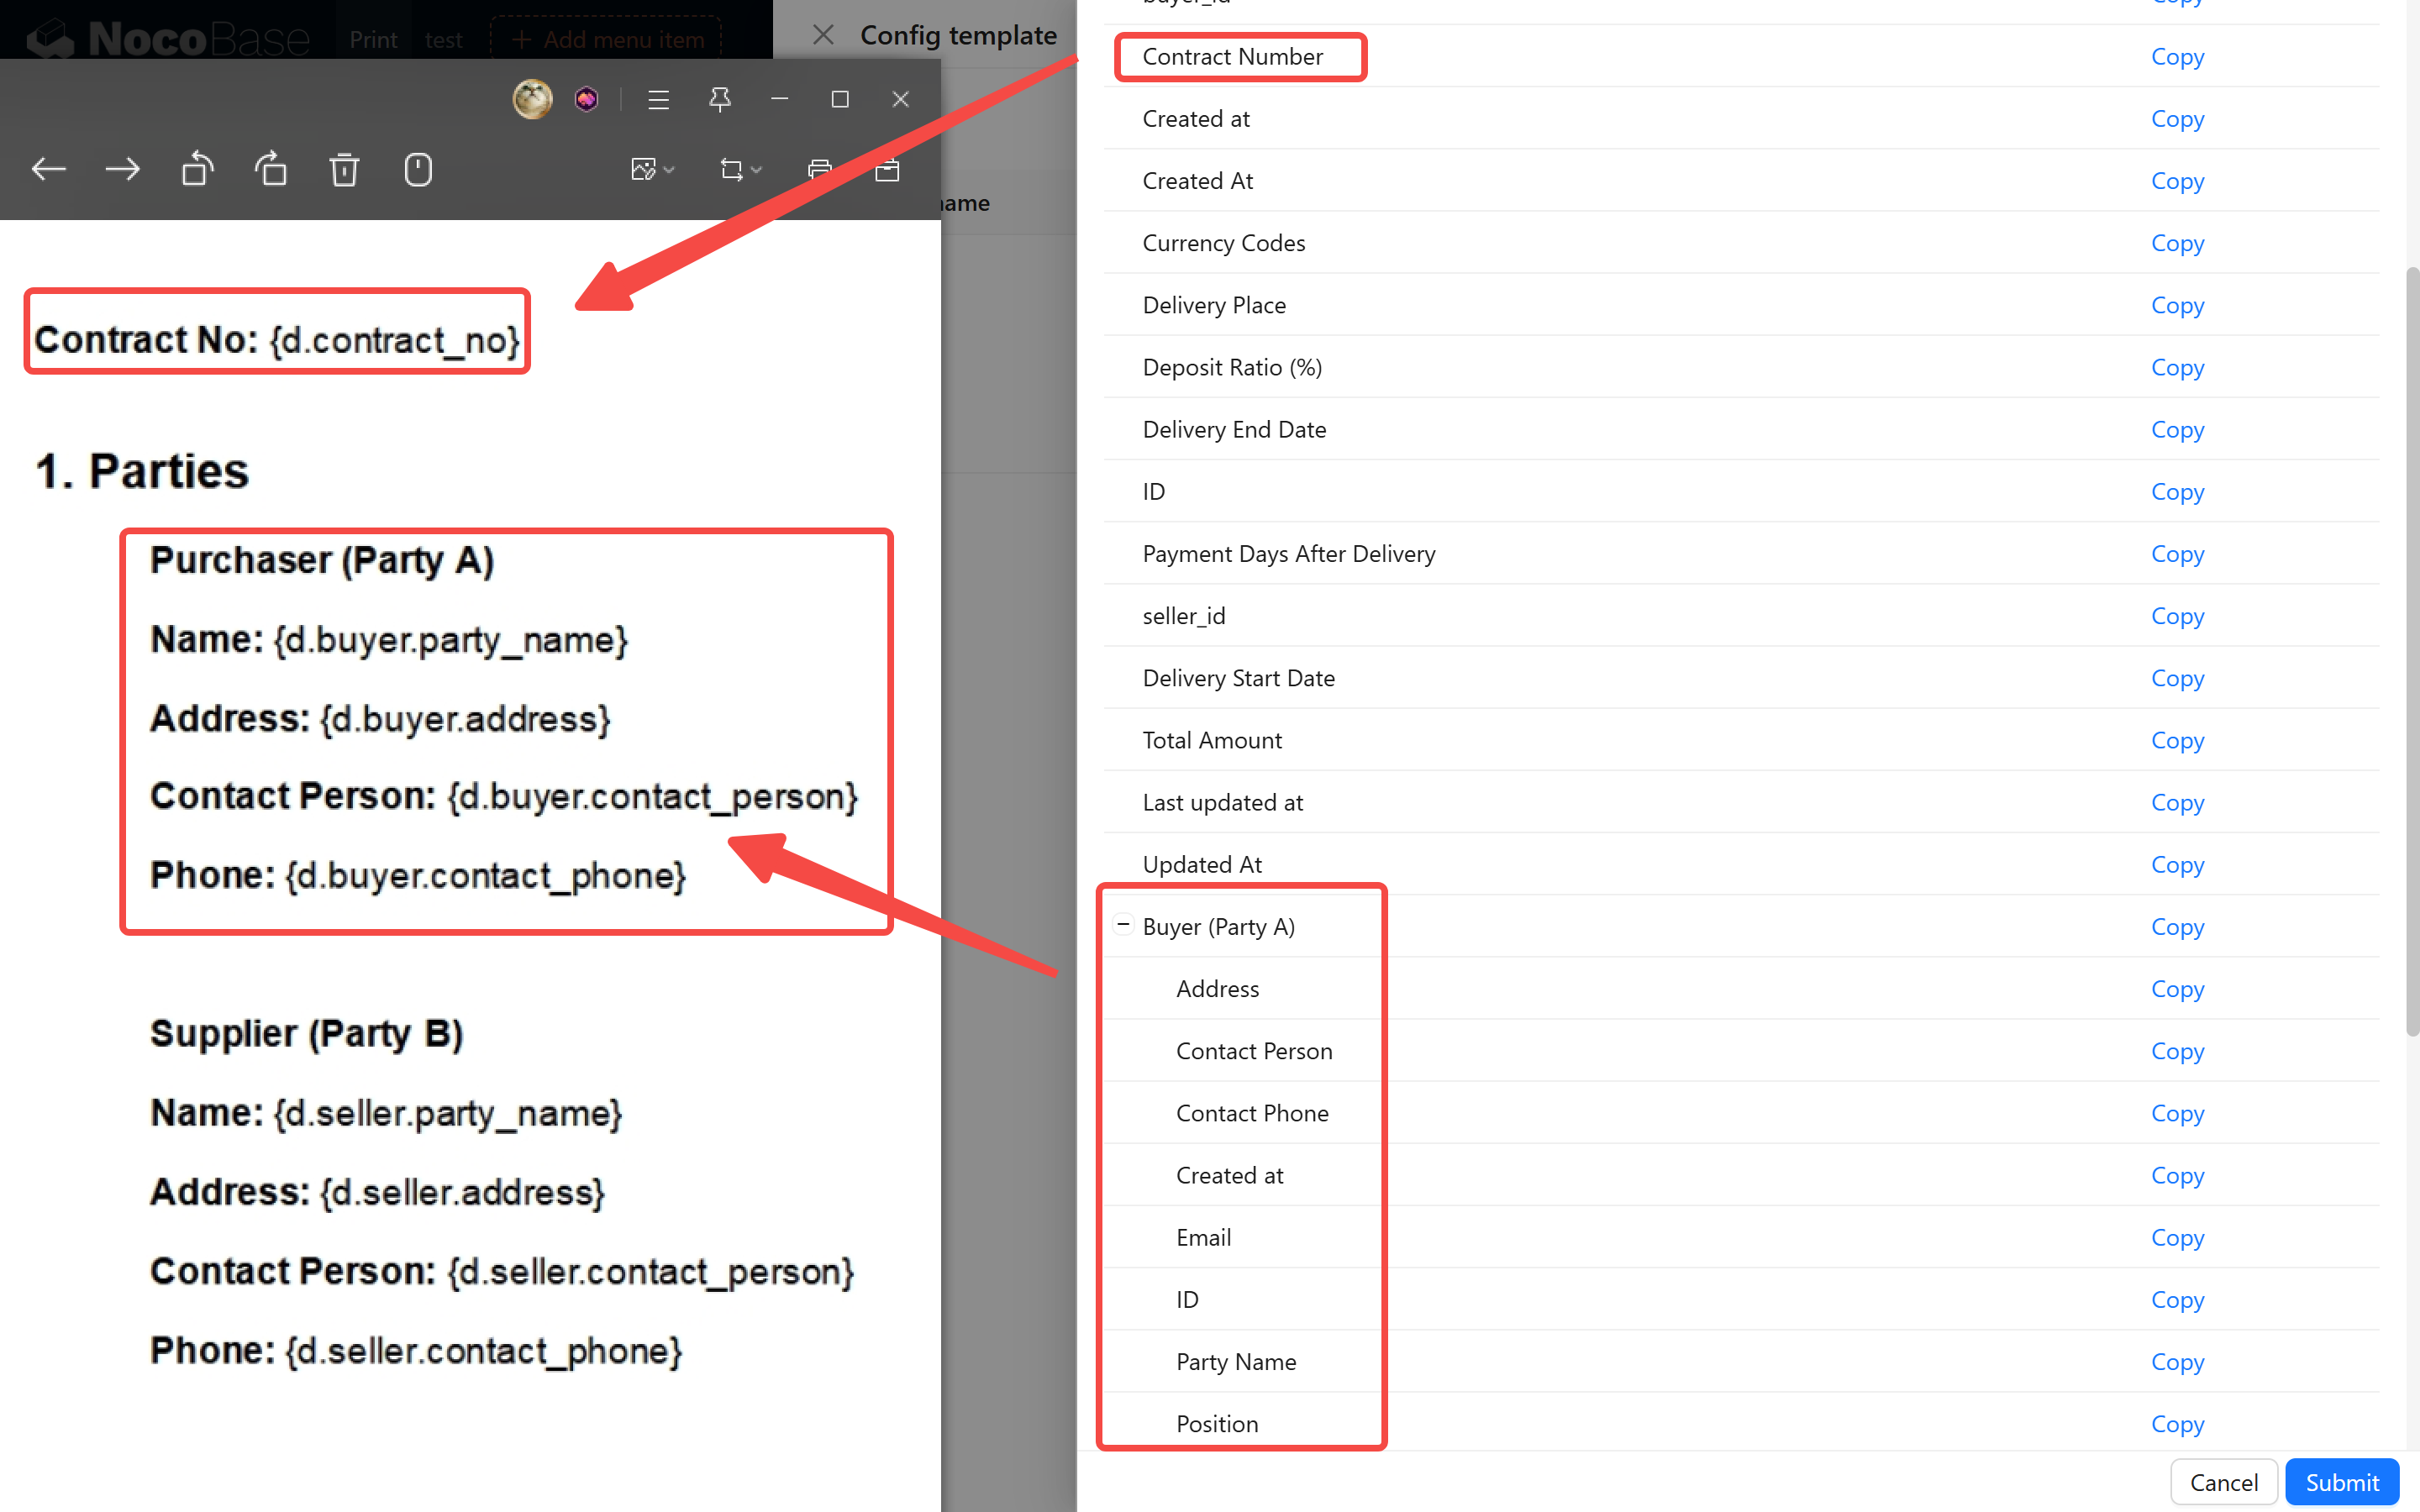
3.1 Basic Variables and Association Object Property Filling
Basic Field Filling:
For example, the contract number at the top, or the contract signing entity object. We click copy and paste it directly into the corresponding blank space in the contract.
3.2 Data Formatting
Date Formatting
In templates, we often need to format fields, especially date fields. The date format copied directly is usually long (such as Wed Jan 01 2025 00:00:00 GMT), and needs to be formatted to display the style we want.
For date fields, you can use the formatD() function to specify the output format:
Example:
For example, if the original field we copied is {d.created_at}, and we need to format the date to 2025-01-01 format, then modify this field to:
Common Date Formatting Styles:
YYYY- Year (four digits)MM- Month (two digits)DD- Day (two digits)HH- Hour (24-hour format)mm- Minutesss- Seconds
Example 2:
Number Formatting
Suppose there is an amount field, such as {d.total_amount} in the contract. We can use the formatN() function to format numbers, specifying decimal places and thousands separator.
Syntax:
- decimal_places: You can specify how many decimal places to keep. For example,
2means two decimal places - thousands_separator: Specify whether to use thousands separator, usually
trueorfalse
Example 1: Format amount with thousands separator and two decimal places
This will format d.amount to two decimal places and add a thousands separator.
Example 2: Format amount to integer without decimal places
This will format d.amount to an integer and add a thousands separator.
Example 3: Format amount with two decimal places but no thousands separator
This disables the thousands separator and only keeps two decimal places.
Other Amount Formatting Needs:
- Currency Symbol: Carbone itself does not directly provide currency symbol formatting functions, but you can add currency symbols directly in data or templates. For example:
String Formatting
For string fields, you can use :upperCase to specify text format, such as case conversion.
Syntax:
Common Conversion Methods:
upperCase- Convert to all uppercaselowerCase- Convert to all lowercaseupperCase:ucFirst- Capitalize first letter
Example:
3.3 Loop Printing
How to Print Child Object Lists (such as Product Details)
When we need to print a table containing multiple sub-items (such as product details), we usually need to use loop printing. This way, the system will generate a row of content for each item in the list until all items are traversed.
Suppose we have a product list (for example, contract_items), which contains multiple product objects. Each product object has multiple attributes, such as product name, specification, quantity, unit price, total amount, and remarks.
Step 1: Fill in Fields in the First Row of the Table
First, in the first row of the table (not the header), we directly copy and fill in the template variables. These variables will be replaced by the corresponding data and displayed in the output.
For example, the first row of the table is as follows:
| Product Name | Specification / Model | Quantity | Unit Price | Total Amount | Remark |
|---|---|---|---|---|---|
| {d.contract_items[i].product_name} | {d.contract_items[i].spec} | {d.contract_items[i].quantity} | {d.contract_items[i].unit_price} | {d.contract_items[i].total_amount} | {d.contract_items[i].remark} |
Here, d.contract_items[i] represents the i-th item in the product list, and i is an index representing the order of the current product.
Step 2: Modify the Index in the Second Row
Next, in the second row of the table, we modify the field index to i+1 and fill in only the first attribute. This is because during loop printing, we need to retrieve the next item of data from the list and display it in the next row.
For example, the second row is filled in as follows:
| Product Name | Specification / Model | Quantity | Unit Price | Total Amount | Remark |
|---|---|---|---|---|---|
| {d.contract_items[i+1].product_name} |
In this example, we changed [i] to [i+1], so we can get the next product data in the list.
Step 3: Automatic Loop Printing During Template Rendering
When the system processes this template, it will operate according to the following logic:
- The first row will be filled in according to the fields you set in the template
- Then, the system will automatically delete the second row and start extracting data from
d.contract_items, loop filling each row in the format of the table until all product details are printed
The i in each row will increment, ensuring that each row displays different product information.
4. Upload and Configure Contract Template
4.1 Upload Template
- Click the "Add template" button, and enter the template name, such as "Supply and Purchase Contract Template"
- Upload the prepared Word contract file (.docx), which already contains all placeholders
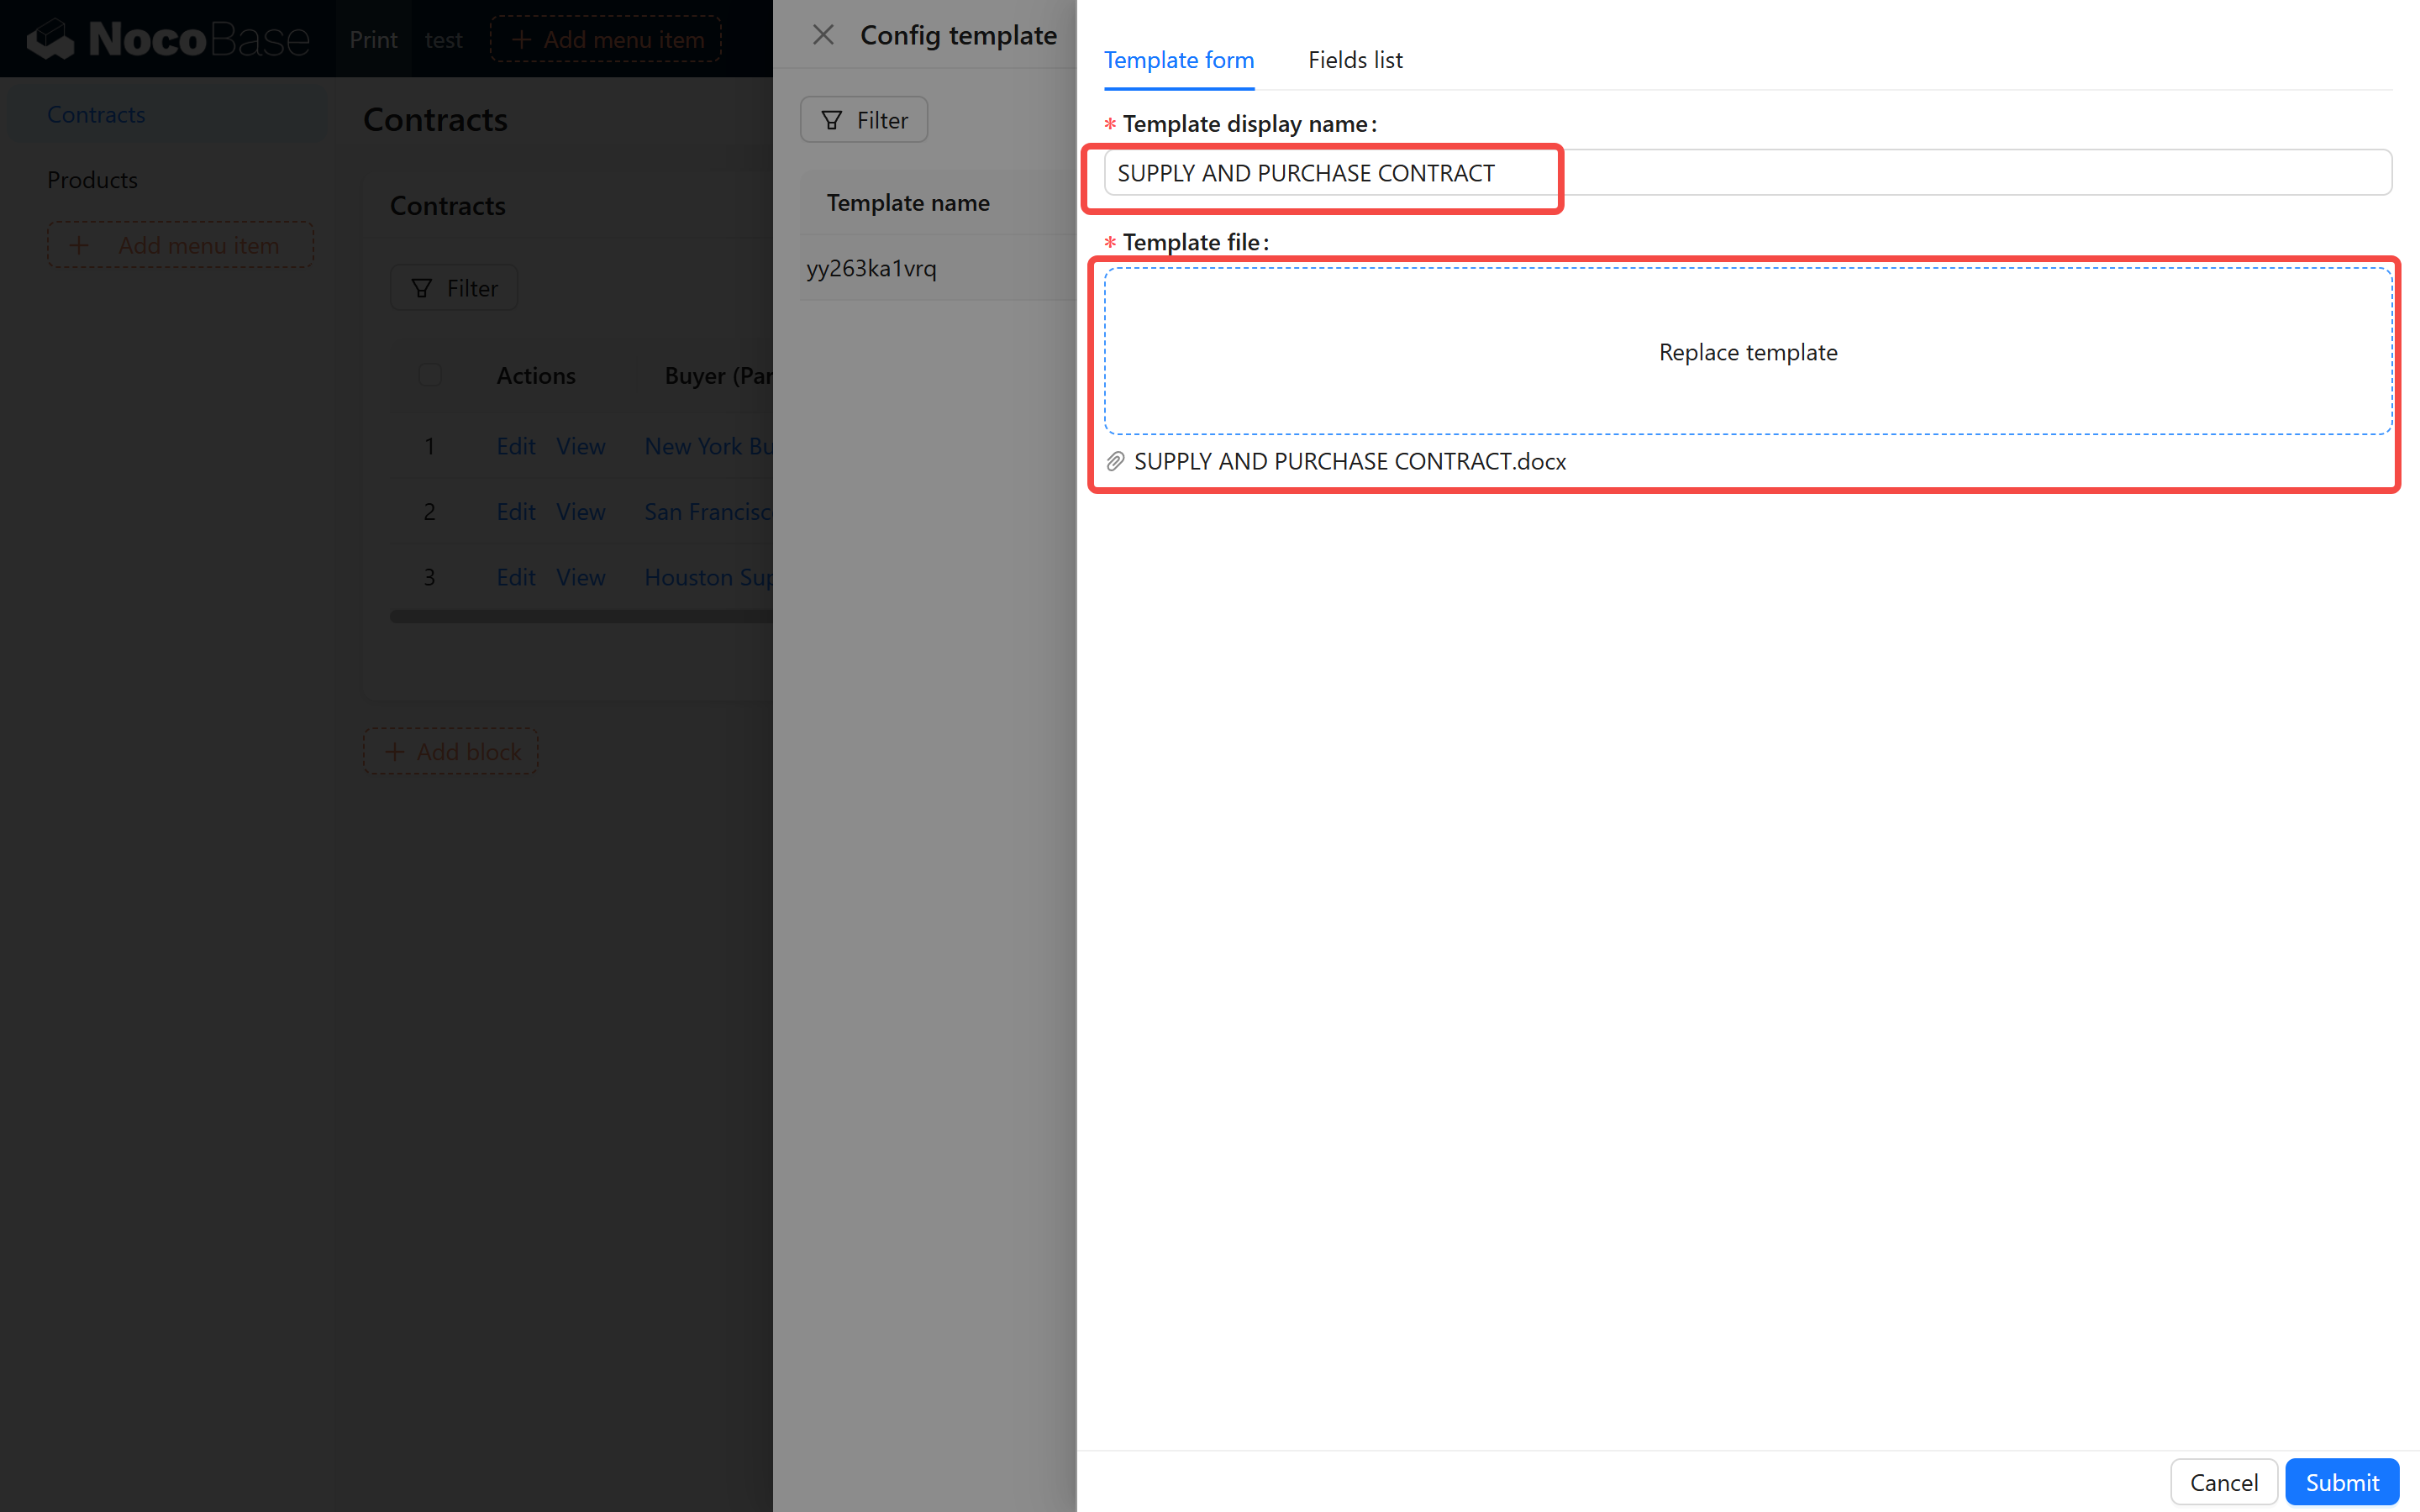
- After completion, the system will list the template in the optional template list for future use
- We click "Use" to activate this template
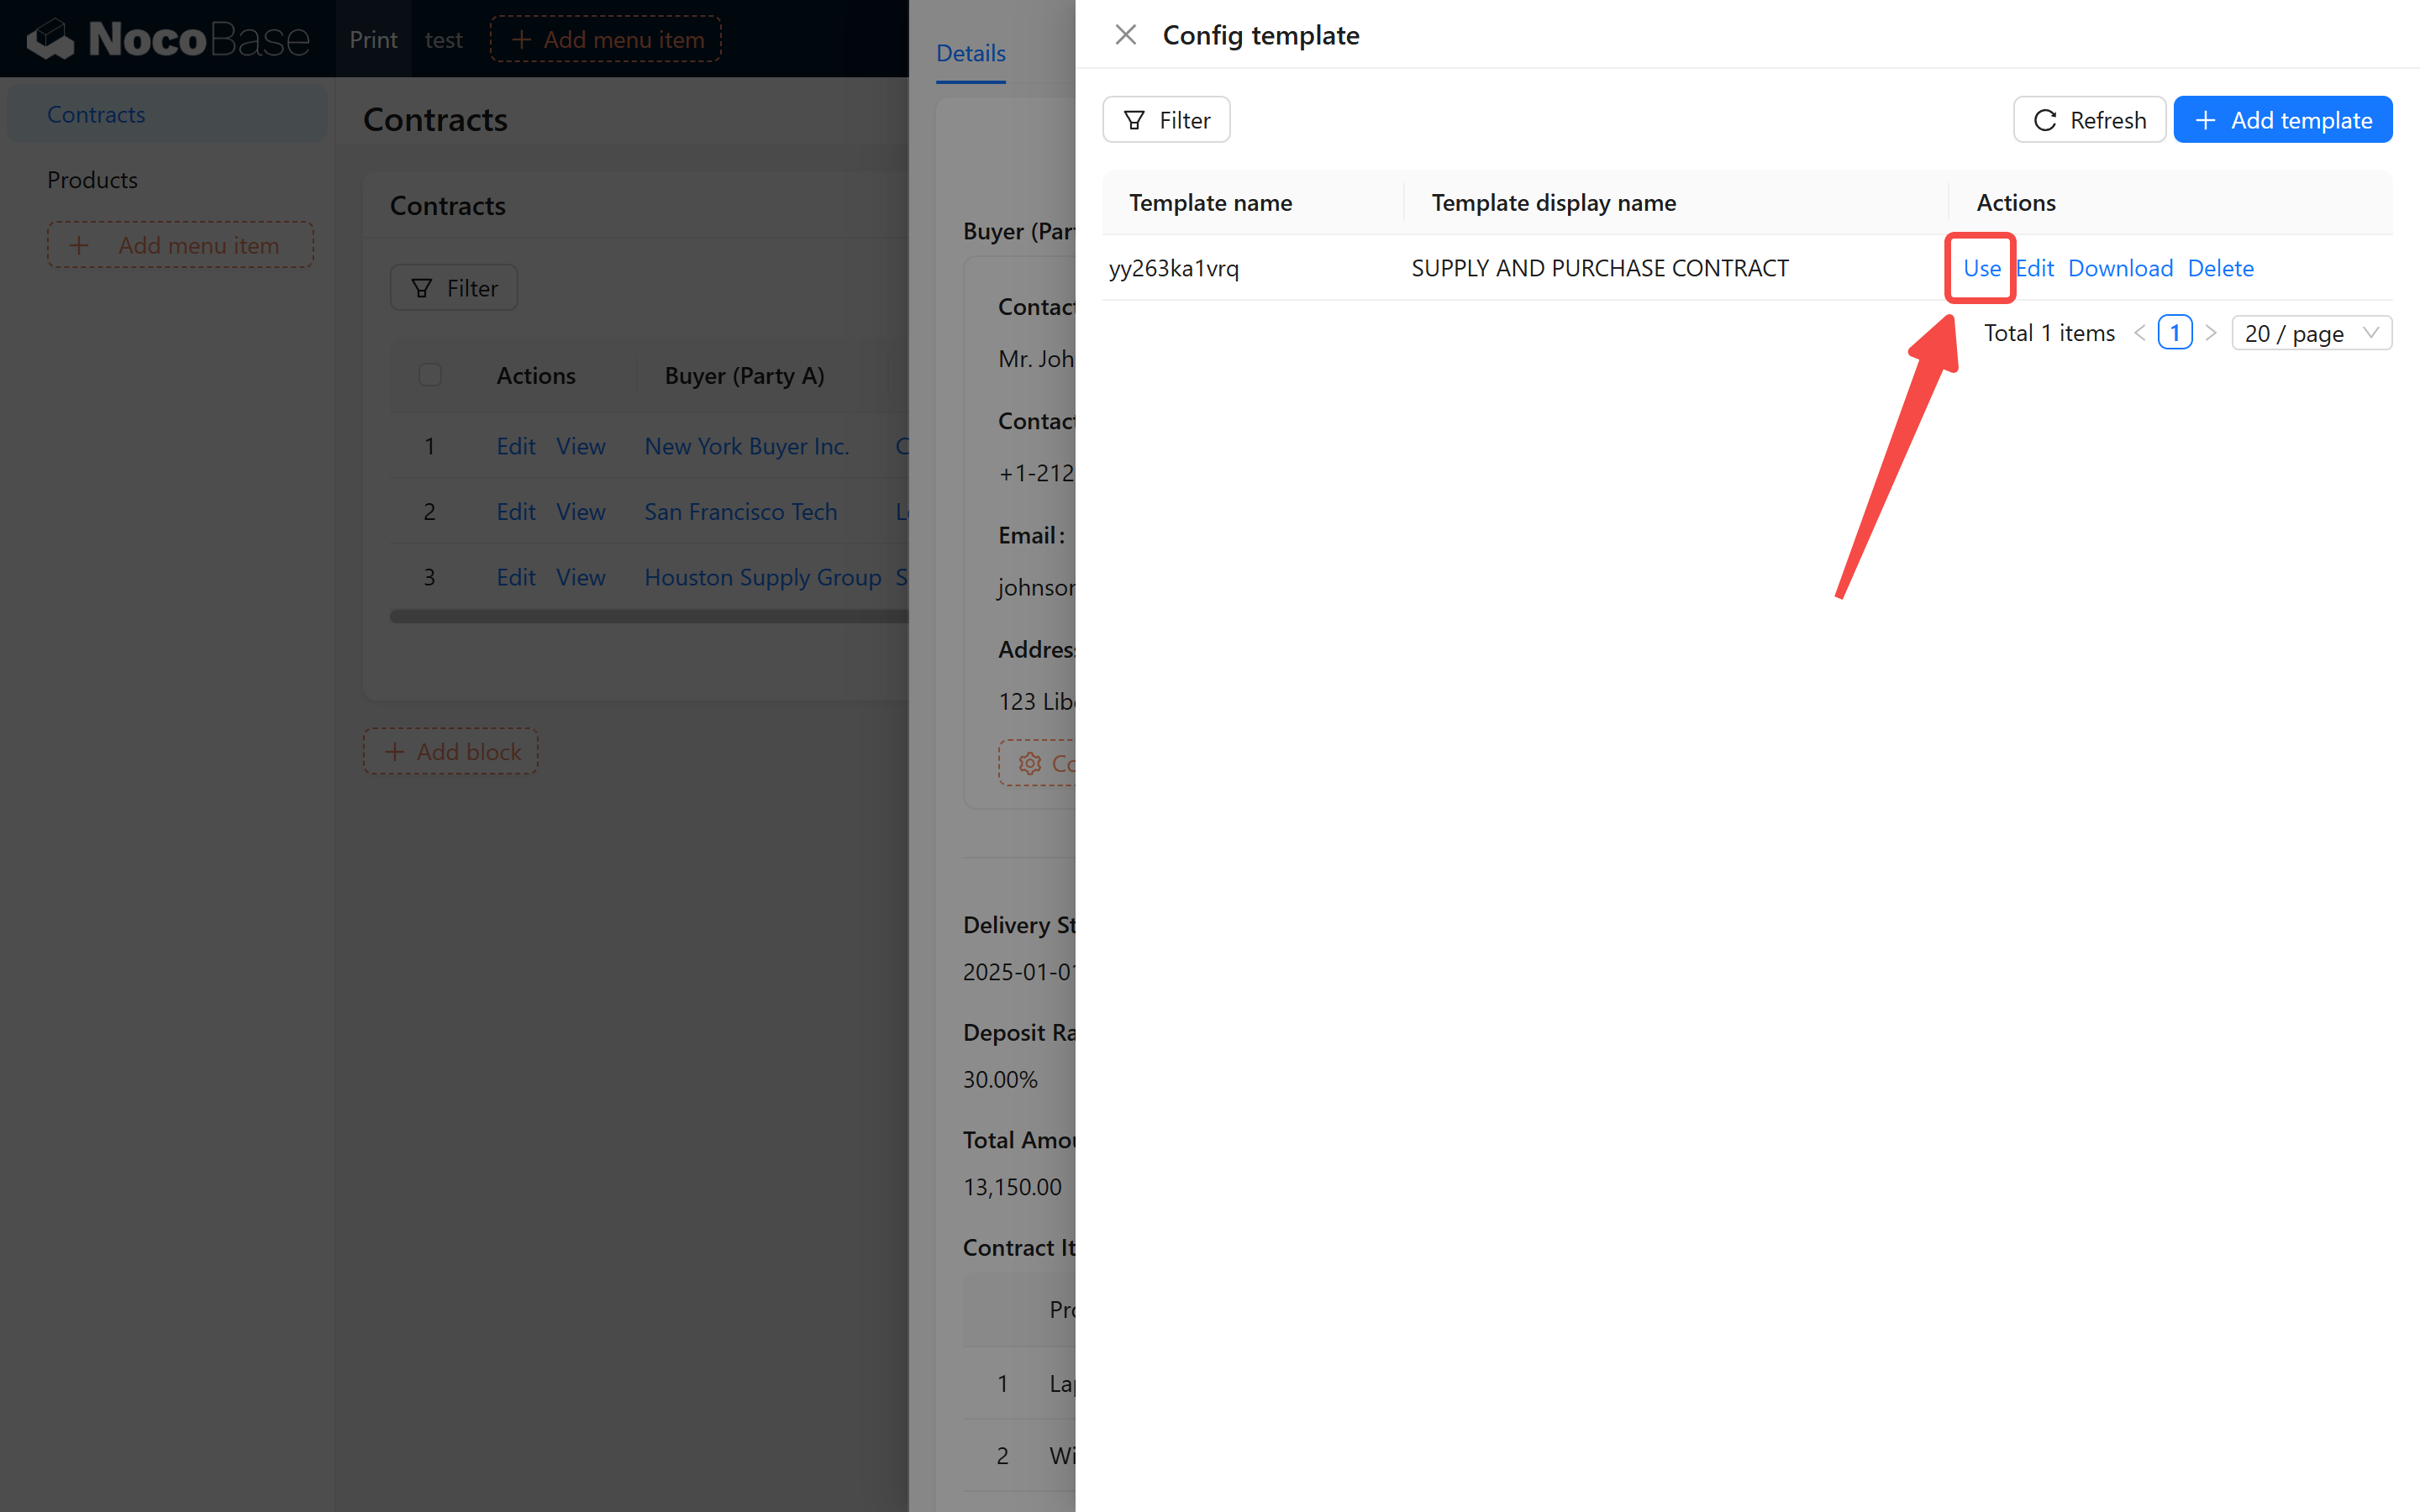
At this point, exit the current popup and click download template to get the generated complete template.
Tips:
- If the template uses
.docor other formats, it may need to be converted to.docx, depending on plugin support - In Word files, be careful not to split placeholders into multiple paragraphs or text boxes to avoid rendering exceptions
With the "Template Print" feature, you can greatly save repetitive work in contract management, avoid manual copy-paste errors, and achieve standardized and automated contract output.