Avis de traduction IA
Cette documentation a été traduite automatiquement par IA.
Extension des types de canaux de notification
NocoBase vous permet d'étendre les types de canaux de notification selon vos besoins, par exemple pour les notifications par SMS ou les notifications push d'applications.
Client
Enregistrement du type de canal
L'interface de configuration des canaux et des messages côté client est enregistrée via la méthode registerChannelType fournie par le client du plugin de gestion des notifications :
import PluginNotificationManagerClient from '@nocobase/plugin-notification-manager/client';

class PluginNotificationExampleClient extends Plugin {
  async afterAdd() {}

  async beforeLoad() {}

  async load() {
    const notification = this.pm.get(PluginNotificationManagerClient);
    notification.registerChannelType({
      title: 'Example SMS', // Nom du type de canal
      type: 'example-sms', // Identifiant du type de canal
      components: {
        ChannelConfigForm, // Formulaire de configuration du canal
        MessageConfigForm, // Formulaire de configuration du message
      },
    });
  }
}

export default PluginNotificationExampleClient;
Serveur
Extension de la classe abstraite
Le cœur du développement côté serveur consiste à étendre la classe abstraite BaseNotificationChannel et à implémenter la méthode send. Cette méthode contient la logique métier pour l'envoi de notifications via le plugin d'extension.
import { BaseNotificationChannel } from '@nocobase/plugin-notification-manager';
export class ExampleSever extends BaseNotificationChannel {
async send(args): Promise<any> {
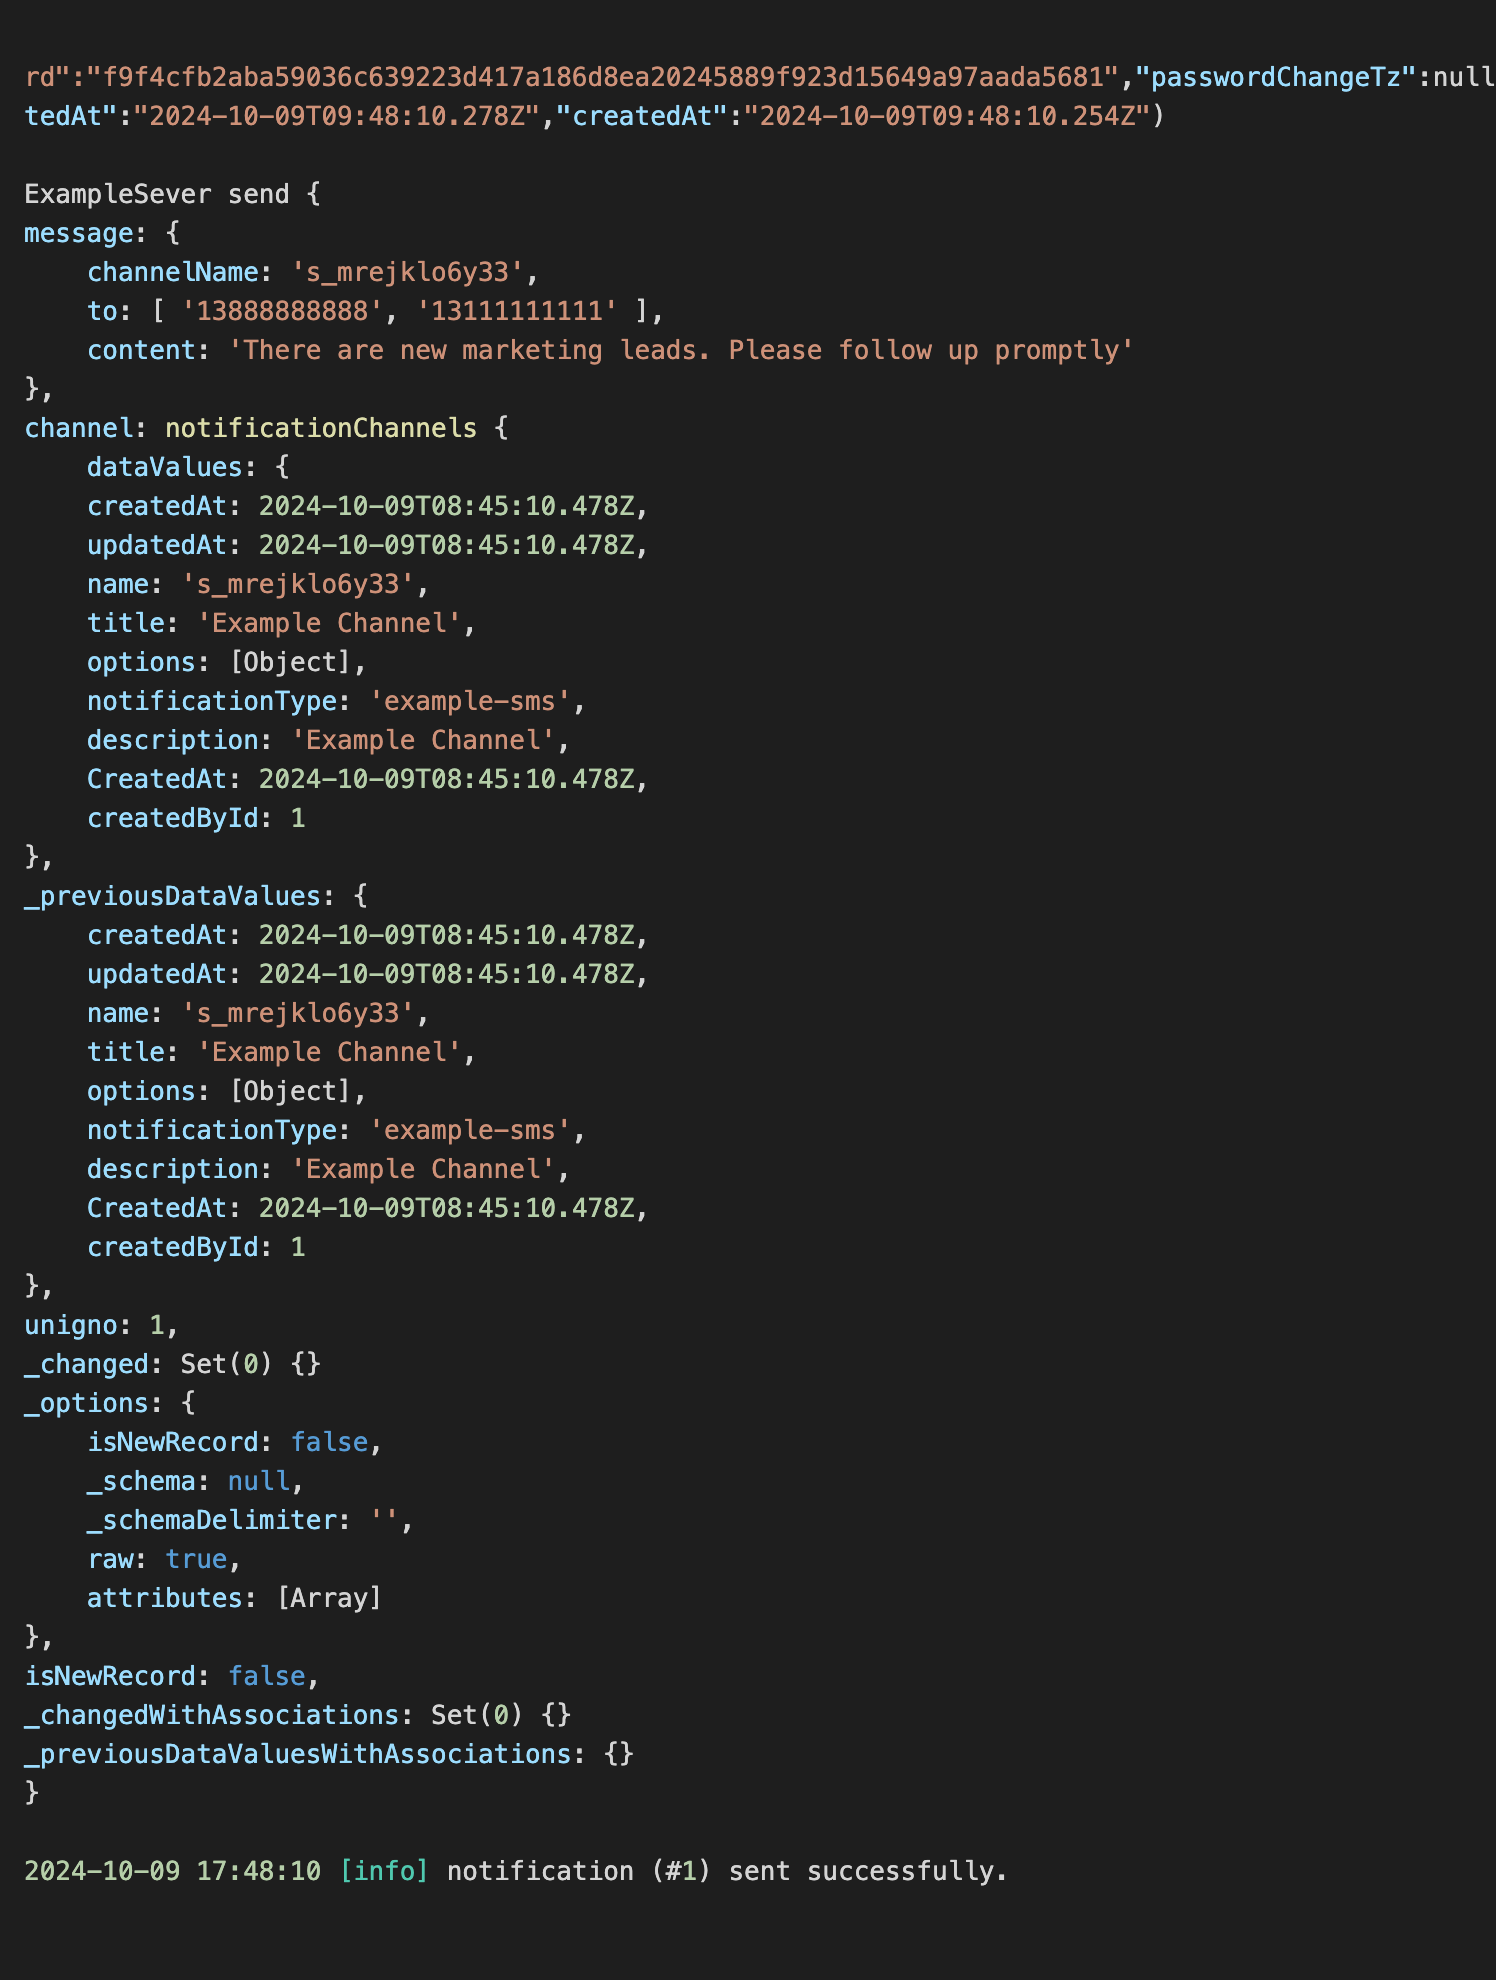
console.log('ExampleSever send', args);
return { status: 'success', message: args.message };
}
}
Enregistrement côté serveur
Vous devez ensuite appeler la méthode registerChannelType du cœur du serveur de notifications pour enregistrer la classe d'implémentation côté serveur que vous avez développée :
import PluginNotificationManagerServer from '@nocobase/plugin-notification-manager';
import { Plugin } from '@nocobase/server';
import { ExampleSever } from './example-server';
export class PluginNotificationExampleServer extends Plugin {
  async load() {
    const notificationServer = this.pm.get(PluginNotificationManagerServer) as PluginNotificationManagerServer;
    notificationServer.registerChannelType({ type: 'example-sms', Channel: ExampleSever });
  }
}

export default PluginNotificationExampleServer;
Exemple complet
Voici un exemple complet d'extension de notification pour vous montrer en détail comment développer un plugin d'extension. Imaginons que nous souhaitions ajouter une fonctionnalité de notification par SMS à NocoBase en utilisant la passerelle SMS d'une plateforme spécifique.
Création du plugin
- Exécutez la commande suivante pour créer le plugin :
yarn pm add @nocobase/plugin-notification-example
Développement côté client
Pour la partie client, nous devons développer deux composants de formulaire : ChannelConfigForm (formulaire de configuration du canal) et MessageConfigForm (formulaire de configuration du message).
Pour envoyer des SMS via une plateforme, une clé API (apiKey) et un secret (secret) sont nécessaires. Notre formulaire de configuration du canal inclura donc ces deux éléments. Créez un nouveau fichier ChannelConfigForm.tsx dans le répertoire src/client. Son contenu est le suivant :
import React from 'react';
import { SchemaComponent } from '@nocobase/client';
import useLocalTranslation from './useLocalTranslation';

const ChannelConfigForm = () => {
  const t = useLocalTranslation();
  return (
    <SchemaComponent
      scope={{ t }}
      schema={{
        type: 'object',
        properties: {
          apiKey: {
            'x-decorator': 'FormItem',
            type: 'string',
            title: '{{t("Transport")}}',
            'x-component': 'Input',
          },
          secret: {
            'x-decorator': 'FormItem',
            type: 'string',
            title: '{{t("Transport")}}',
            'x-component': 'Input',
          },
        },
      }}
    />
  );
};

export default ChannelConfigForm;
Le formulaire de configuration des messages inclut principalement la configuration des destinataires (receivers) et du contenu du message (content). Créez un nouveau fichier MessageConfigForm.tsx dans le répertoire src/client. Ce composant reçoit variableOptions comme paramètre de variable. Le formulaire de contenu est configuré dans le nœud du flux de travail et doit généralement consommer les variables de ce nœud. Voici le contenu du fichier :
import React from 'react';
import { SchemaComponent } from '@nocobase/client';
import useLocalTranslation from './useLocalTranslation';

const MessageConfigForm = ({ variableOptions }) => {
  const { t } = useLocalTranslation();
  return (
    <SchemaComponent
      scope={{ t }}
      schema={{
        type: 'object',
        properties: {
          to: {
            type: 'array',
            required: true,
            title: `{{t("Receivers")}}`,
            'x-decorator': 'FormItem',
            'x-component': 'ArrayItems',
            items: {
              type: 'void',
              'x-component': 'Space',
              properties: {
                sort: {
                  type: 'void',
                  'x-decorator': 'FormItem',
                  'x-component': 'ArrayItems.SortHandle',
                },
                input: {
                  type: 'string',
                  'x-decorator': 'FormItem',
                  'x-component': 'Variable.Input',
                  'x-component-props': {
                    scope: variableOptions,
                    useTypedConstant: ['string'],
                    placeholder: `{{t("Phone number")}}`,
                  },
                },
                remove: {
                  type: 'void',
                  'x-decorator': 'FormItem',
                  'x-component': 'ArrayItems.Remove',
                },
              },
            },
            properties: {
              add: {
                type: 'void',
                title: `{{t("Add phone number")}}`,
                'x-component': 'ArrayItems.Addition',
              },
            },
          },
          content: {
            type: 'string',
            required: true,
            title: `{{t("Content")}}`,
            'x-decorator': 'FormItem',
            'x-component': 'Variable.RawTextArea',
            'x-component-props': {
              scope: variableOptions,
              placeholder: 'Hi,',
              autoSize: {
                minRows: 10,
              },
            },
          },
        },
      }}
    />
  );
};

export default MessageConfigForm
Enregistrement des composants client
Une fois les composants de configuration du formulaire développés, vous devez les enregistrer dans le cœur de la gestion des notifications. Si nous supposons que le nom de notre plateforme est "Example", le contenu du fichier src/client/index.tsx modifié sera le suivant :
import { Plugin } from '@nocobase/client';
import PluginNotificationManagerClient from '@nocobase/plugin-notification-manager/client';
import { tval } from '@nocobase/utils/client';
import ChannelConfigForm from './ChannelConfigForm';
import MessageConfigForm from './MessageConfigForm';

class PluginNotificationExampleClient extends Plugin {
  async afterAdd() {}

  async beforeLoad() {}

  async load() {
    const notification = this.pm.get(PluginNotificationManagerClient);
    notification.registerChannelType({
      title: tval('Example SMS', { ns: '@nocobase/plugin-notification-example' }),
      type: 'example-sms',
      components: {
        ChannelConfigForm,
        MessageConfigForm,
      },
    });
  }
}

export default PluginNotificationExampleClient;
À ce stade, le développement côté client est terminé.
Développement côté serveur
Le cœur du développement côté serveur consiste à étendre la classe abstraite BaseNotificationChannel et à implémenter la méthode send. Cette méthode contient la logique métier permettant au plugin d'extension d'envoyer des notifications. Puisqu'il s'agit d'un exemple, nous allons simplement afficher les arguments reçus. Dans le répertoire src/server, ajoutez un fichier nommé example-server.ts dont le contenu est le suivant :
import { BaseNotificationChannel } from '@nocobase/plugin-notification-manager';

export class ExampleSever extends BaseNotificationChannel {
  async send(args): Promise<any> {
    console.log('ExampleSever send', args);
    return { status: 'success', message: args.message };
  }
}
Ensuite, enregistrez le plugin d'extension côté serveur en appelant la méthode registerChannelType du cœur du serveur de notifications. Le contenu du fichier src/server/plugin.ts modifié est le suivant :
import PluginNotificationManagerServer from '@nocobase/plugin-notification-manager';
import { Plugin } from '@nocobase/server';
import { ExampleSever } from './example-server';
export class PluginNotificationExampleServer extends Plugin {
  async load() {
    const notificationServer = this.pm.get(PluginNotificationManagerServer) as PluginNotificationManagerServer;
    notificationServer.registerChannelType({ type: 'example-sms', Channel: ExampleSever });
  }
}

export default PluginNotificationExampleServer;
Enregistrement et activation du plugin
- Exécutez la commande d'enregistrement :
yarn pm add @nocobase/plugin-notification-example
- Exécutez la commande d'activation :
yarn pm enable @nocobase/plugin-notification-example
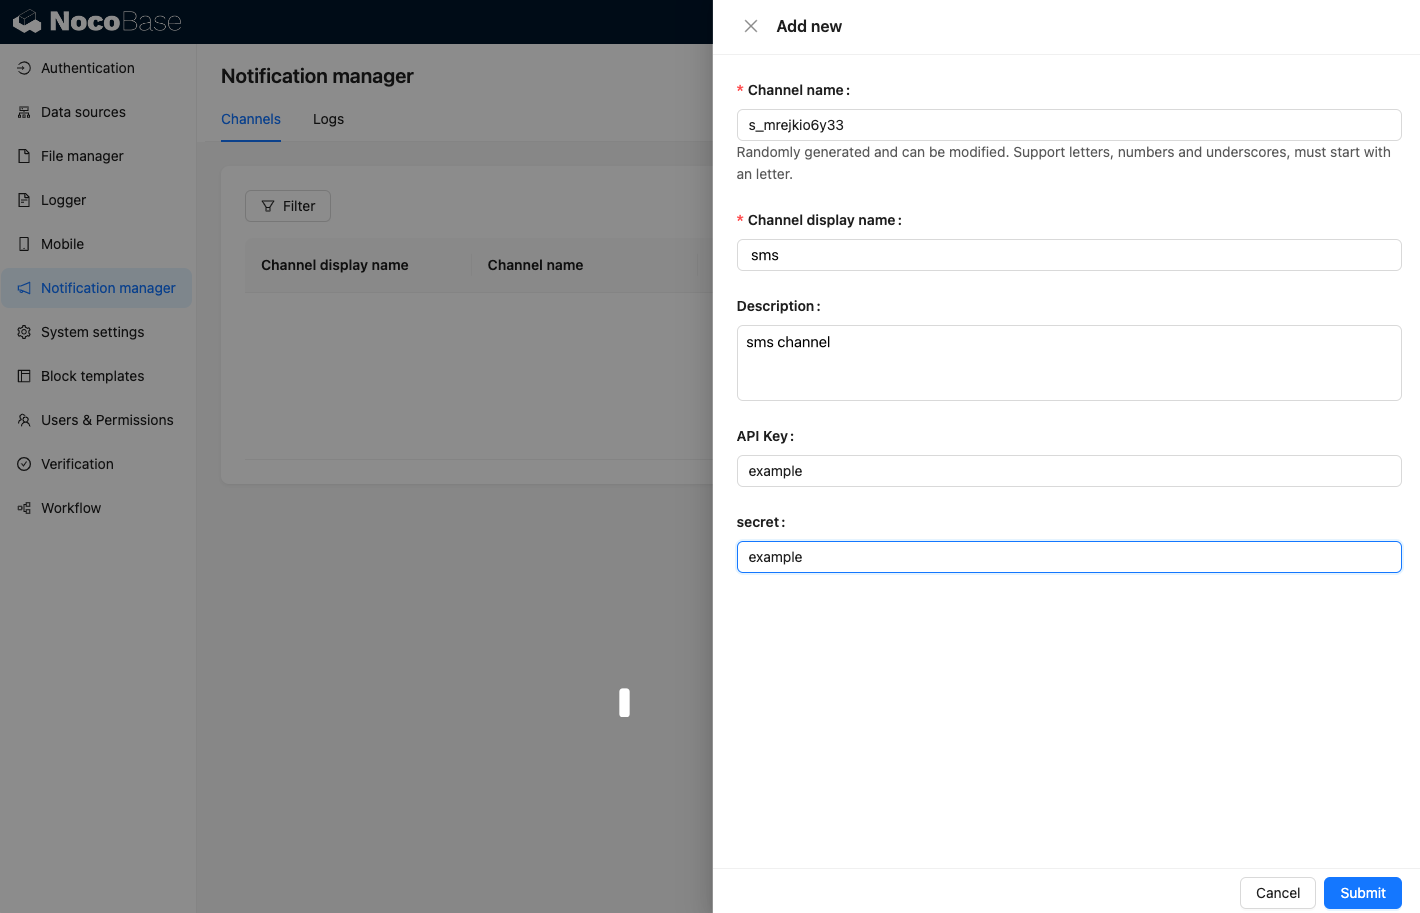
Configuration du canal
En visitant la page des canaux de gestion des notifications, vous pouvez constater que le canal Example SMS a été activé.
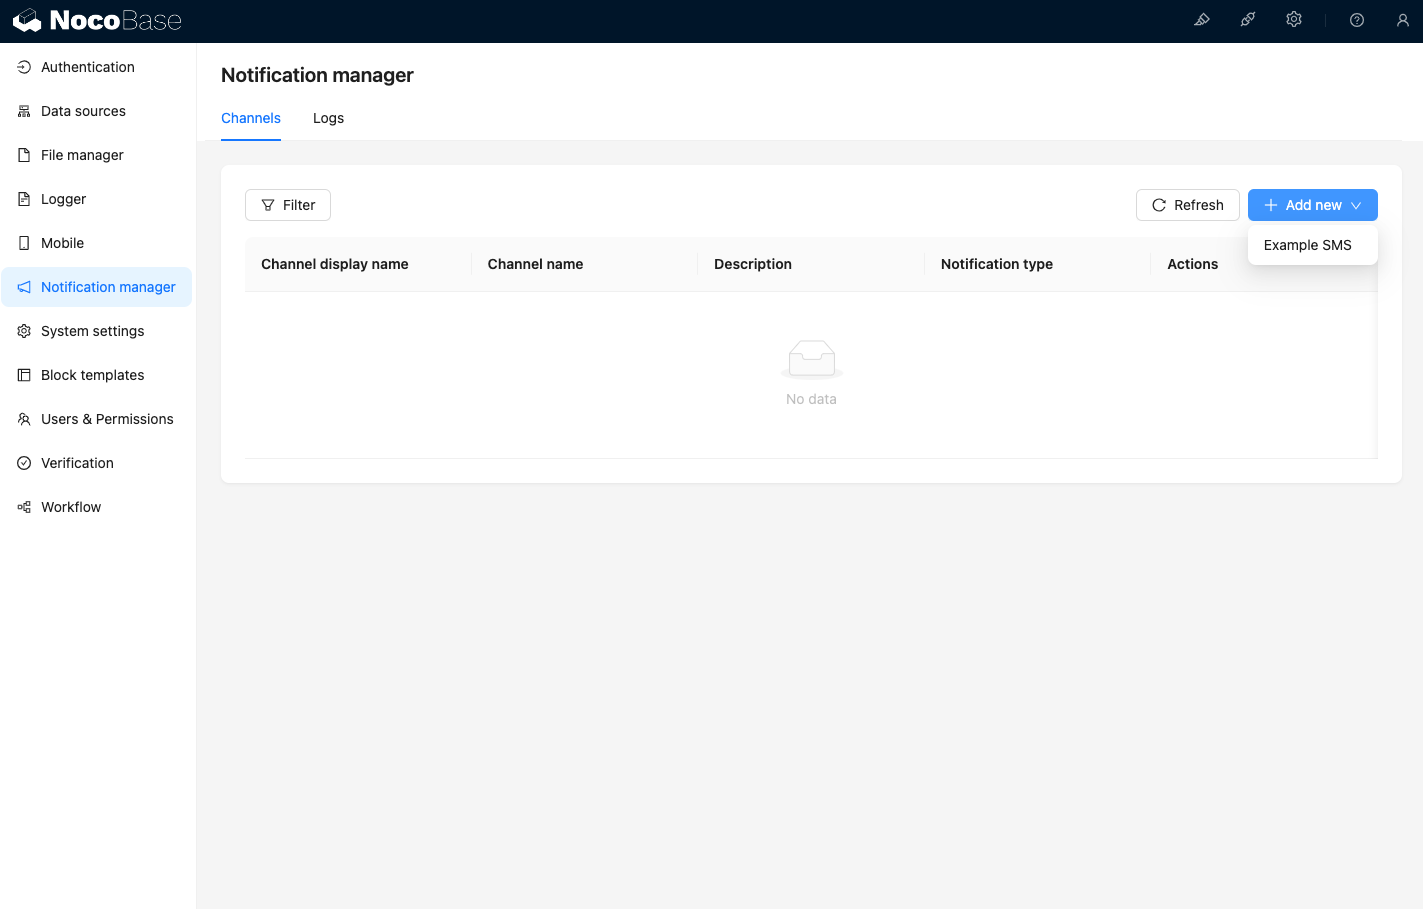
Ajoutez un canal d'exemple.
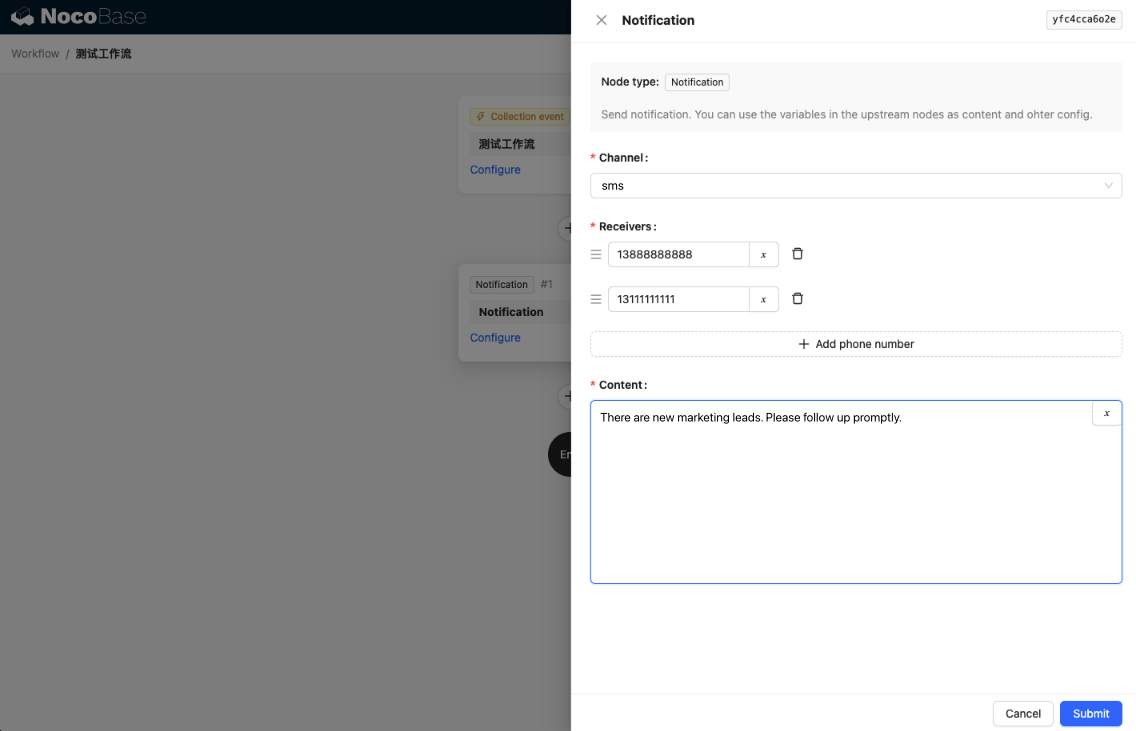
Créez un nouveau flux de travail et configurez le nœud de notification.
Déclenchez l'exécution du flux de travail pour visualiser les informations suivantes dans la console.