logologo
시작
가이드
개발
플러그인
API
English
简体中文
日本語
한국어
Deutsch
Français
Español
Português
Русский
Italiano
Türkçe
Українська
Tiếng Việt
Bahasa Indonesia
ไทย
Polski
Nederlands
Čeština
العربية
עברית
हिन्दी
Svenska
시작
가이드
개발
플러그인
API
logologo
개요

알림 채널

앱 내 메시지
이메일
WeCom

개발 가이드

알림 채널 유형 확장
알림 API 확장
Previous PageWeCom
Next Page알림 API 확장
TIP

이 문서는 AI로 번역되었습니다. 부정확한 내용이 있을 경우 영어 버전을 참조하세요

#알림 채널 유형 확장하기

NocoBase는 필요에 따라 SMS 알림, 앱 푸시 알림 등 다양한 알림 채널 유형을 확장할 수 있도록 지원합니다.

#클라이언트

#채널 유형 등록

클라이언트의 채널 설정 및 메시지 설정 화면은 알림 관리 플러그인 클라이언트가 제공하는 registerChannelType 인터페이스를 통해 등록됩니다.

import PluginNotificationManagerClient from '@nocobase/plugin-notification-manager/client';

class PluginNotificationExampleClient extends Plugin {
  async afterAdd() {}

  async beforeLoad() {}

  async load() {
    const notification = this.pm.get(PluginNotificationManagerClient);
    notification.registerChannelType({
      title: 'Example SMS', // 채널 유형 이름
      type: 'example-sms', // 채널 유형 식별자
      components: {
        ChannelConfigForm, // 채널 설정 폼
        MessageConfigForm, // 메시지 설정 폼
      },
    });
  }
}

export default PluginNotificationExampleClient;

#서버

#추상 클래스 상속

서버 개발의 핵심은 추상 클래스인 BaseNotificationChannel을 상속받아 send 메서드를 구현하는 것입니다. send 메서드 내부에는 확장 플러그인이 알림을 보내는 비즈니스 로직이 포함됩니다.

import { BaseNotificationChannel } from '@nocobase/plugin-notification-manager';

export class ExampleServer extends BaseNotificationChannel {
  async send(args): Promise<any> {
    console.log('ExampleServer send', args);
    return { status: 'success', message: args.message };
  }
}

#서버 등록

이제 알림 서버 코어의 registerChannelType 메서드를 호출하여 개발된 서버 구현 클래스를 코어에 등록해야 합니다.

import PluginNotificationManagerServer from '@nocobase/plugin-notification-manager';
import { Plugin } from '@nocobase/server';
import { ExampleServer } from './example-server';
export class PluginNotificationExampleServer extends Plugin {
  async load() {
    const notificationServer = this.pm.get(PluginNotificationManagerServer) as PluginNotificationManagerServer;
    notificationServer.registerChannelType({ type: 'example-sms', Channel: ExampleServer });
  }
}

export default PluginNotificationExampleServer;

#전체 예시

이제 알림 확장 플러그인 예시를 통해 확장 플러그인을 개발하는 방법을 자세히 설명해 드리겠습니다. NocoBase에 특정 플랫폼의 SMS 게이트웨이를 사용하여 SMS 알림 기능을 추가한다고 가정해 봅시다.

#플러그인 생성

  1. 플러그인 생성 명령 yarn pm add @nocobase/plugin-notification-example을 실행합니다.

#클라이언트 개발

클라이언트 부분에서는 ChannelConfigForm (채널 설정 폼)과 MessageConfigForm (메시지 설정 폼) 두 가지 폼 컴포넌트를 개발해야 합니다.

#ChannelConfigForm

특정 플랫폼에서 SMS를 보낼 때 API 키와 시크릿이 필요합니다. 따라서 채널 폼의 주요 내용은 이 두 가지 항목을 포함합니다. src/client 디렉터리에 ChannelConfigForm.tsx 파일을 새로 생성하며, 파일 내용은 다음과 같습니다.

import React from 'react';
import { SchemaComponent } from '@nocobase/client';
import useLocalTranslation from './useLocalTranslation';

const ChannelConfigForm = () => {
  const t = useLocalTranslation();
  return (
    <SchemaComponent
      scope={{ t }}
      schema={{
        type: 'object',
        properties: {
          apiKey: {
            'x-decorator': 'FormItem',
            type: 'string',
            title: '{{t("Transport")}}',
            'x-component': 'Input',
          },
          secret: {
            'x-decorator': 'FormItem',
            type: 'string',
            title: '{{t("Transport")}}',
            'x-component': 'Input',
          },
        },
      }}
    />
  );
};

export default ChannelConfigForm;

#MessageConfigForm

메시지 설정 폼은 주로 수신자(receivers)와 메시지 내용(content)을 설정합니다. src/client 디렉터리에 MessageConfigForm.tsx 파일을 새로 생성합니다. 이 컴포넌트는 variableOptions를 변수 파라미터로 받으며, 현재 내용 폼은 워크플로우 노드에 설정되고 일반적으로 워크플로우 노드 변수를 사용해야 합니다. 구체적인 파일 내용은 다음과 같습니다.

import React from 'react';
import { SchemaComponent } from '@nocobase/client';
import useLocalTranslation from './useLocalTranslation';

const MessageConfigForm = ({ variableOptions }) => {
  const { t } = useLocalTranslation();
  return (
    <SchemaComponent
      scope={{ t }}
      schema={{
        type: 'object',
        properties: {
          to: {
            type: 'array',
            required: true,
            title: `{{t("Receivers")}}`,
            'x-decorator': 'FormItem',
            'x-component': 'ArrayItems',
            items: {
              type: 'void',
              'x-component': 'Space',
              properties: {
                sort: {
                  type: 'void',
                  'x-decorator': 'FormItem',
                  'x-component': 'ArrayItems.SortHandle',
                },
                input: {
                  type: 'string',
                  'x-decorator': 'FormItem',
                  'x-component': 'Variable.Input',
                  'x-component-props': {
                    scope: variableOptions,
                    useTypedConstant: ['string'],
                    placeholder: `{{t("Phone number")}}`,
                  },
                },
                remove: {
                  type: 'void',
                  'x-decorator': 'FormItem',
                  'x-component': 'ArrayItems.Remove',
                },
              },
            },
            properties: {
              add: {
                type: 'void',
                title: `{{t("Add phone number")}}`,
                'x-component': 'ArrayItems.Addition',
              },
            },
          },
          content: {
            type: 'string',
            required: true,
            title: `{{t("Content")}}`,
            'x-decorator': 'FormItem',
            'x-component': 'Variable.RawTextArea',
            'x-component-props': {
              scope: variableOptions,
              placeholder: 'Hi,',
              autoSize: {
                minRows: 10,
              },
            },
          },
        },
      }}
    />
  );
};

export default MessageConfigForm

#클라이언트 컴포넌트 등록

폼 설정 컴포넌트 개발이 완료되면 알림 관리 코어에 등록해야 합니다. 플랫폼 이름이 'Example'이라고 가정하면, 수정된 src/client/index.tsx 파일 내용은 다음과 같습니다.

import { Plugin } from '@nocobase/client';
import PluginNotificationManagerClient from '@nocobase/plugin-notification-manager/client';
import { tval } from '@nocobase/utils/client';
import ChannelConfigForm from './ChannelConfigForm';
import MessageConfigForm from './MessageConfigForm';

class PluginNotificationExampleClient extends Plugin {
  async afterAdd() {}

  async beforeLoad() {}

  async load() {
    const notification = this.pm.get(PluginNotificationManagerClient);
    notification.registerChannelType({
      title: tval('Example SMS', { ns: '@nocobase/plugin-notification-example' }),
      type: 'example-sms',
      components: {
        ChannelConfigForm,
        MessageConfigForm,
      },
    });
  }
}

export default PluginNotificationExampleClient;

이것으로 클라이언트 개발이 완료되었습니다.

#서버 개발

서버 개발의 핵심은 추상 클래스인 BaseNotificationChannel을 상속받아 send 메서드를 구현하는 것입니다. send 메서드 내부에는 확장 플러그인이 알림을 보내는 비즈니스 로직이 포함됩니다. 여기서는 예시이므로, 받은 인수를 간단히 출력합니다. src/server 디렉터리에 example-server.ts 파일을 새로 추가하며, 파일 내용은 다음과 같습니다.

import { BaseNotificationChannel } from '@nocobase/plugin-notification-manager';

export class ExampleServer extends BaseNotificationChannel {
  async send(args): Promise<any> {
    console.log('ExampleServer send', args);
    return { status: 'success', message: args.message };
  }
}

다음으로, 알림 서버 코어의 registerChannelType 메서드를 호출하여 서버 확장 플러그인을 등록해야 합니다. 수정된 src/server/plugin.ts 파일 내용은 다음과 같습니다.

import PluginNotificationManagerServer from '@nocobase/plugin-notification-manager';
import { Plugin } from '@nocobase/server';
import { ExampleServer } from './example-server';
export class PluginNotificationExampleServer extends Plugin {
  async load() {
    const notificationServer = this.pm.get(PluginNotificationManagerServer) as PluginNotificationManagerServer;
    notificationServer.registerChannelType({ type: 'example-sms', Channel: ExampleServer });
  }
}

export default PluginNotificationExampleServer;

#플러그인 등록 및 시작

  1. 등록 명령 yarn pm add @nocobase/plugin-notification-example을 실행합니다.
  2. 활성화 명령 yarn pm enable @nocobase/plugin-notification-example을 실행합니다.

#채널 설정

이제 알림 관리의 채널 페이지를 방문하면 Example SMS 채널이 활성화된 것을 확인할 수 있습니다.
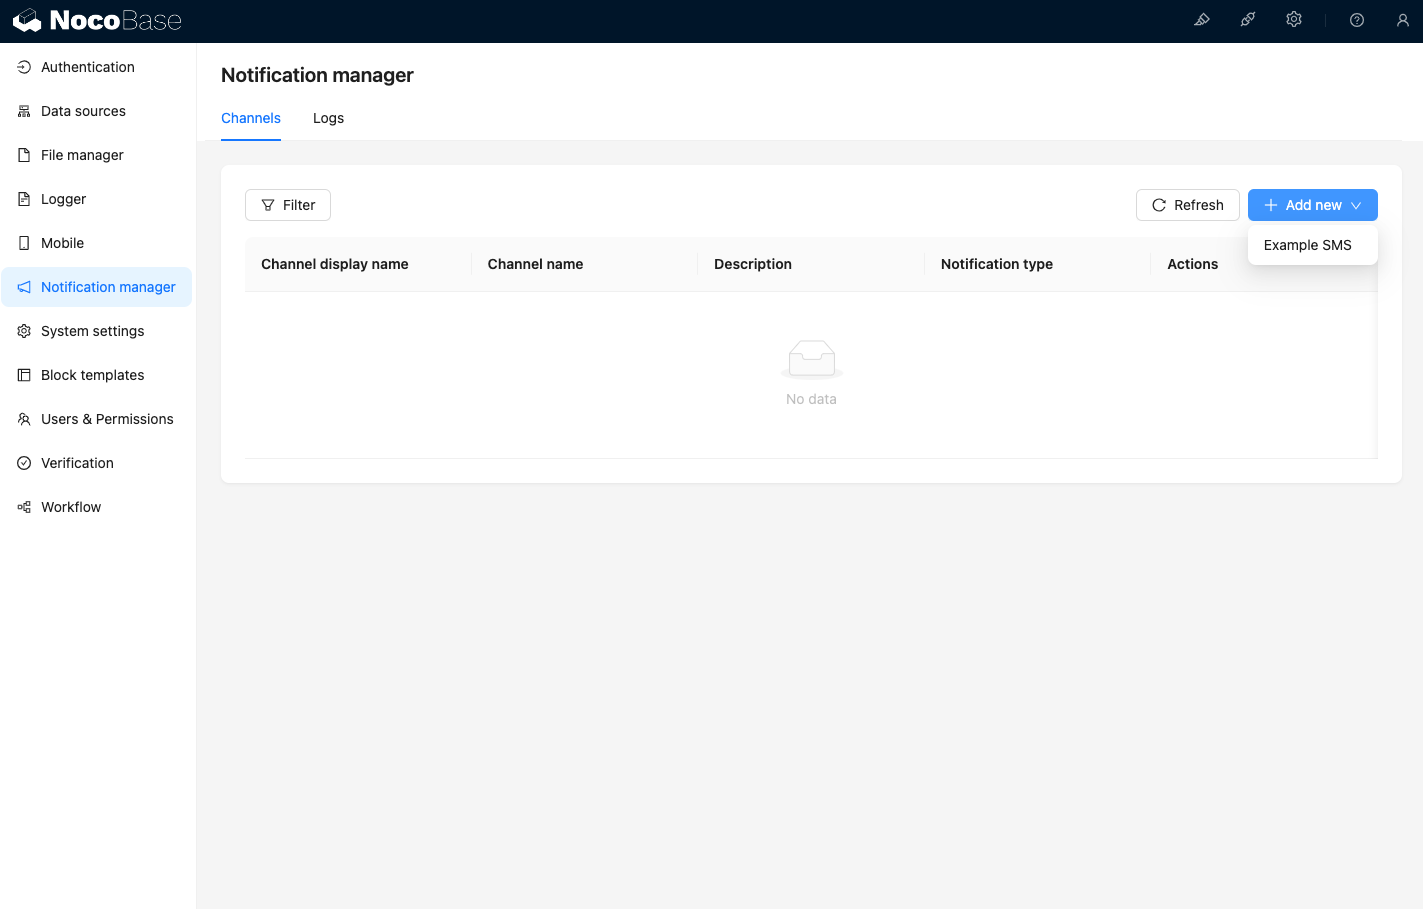
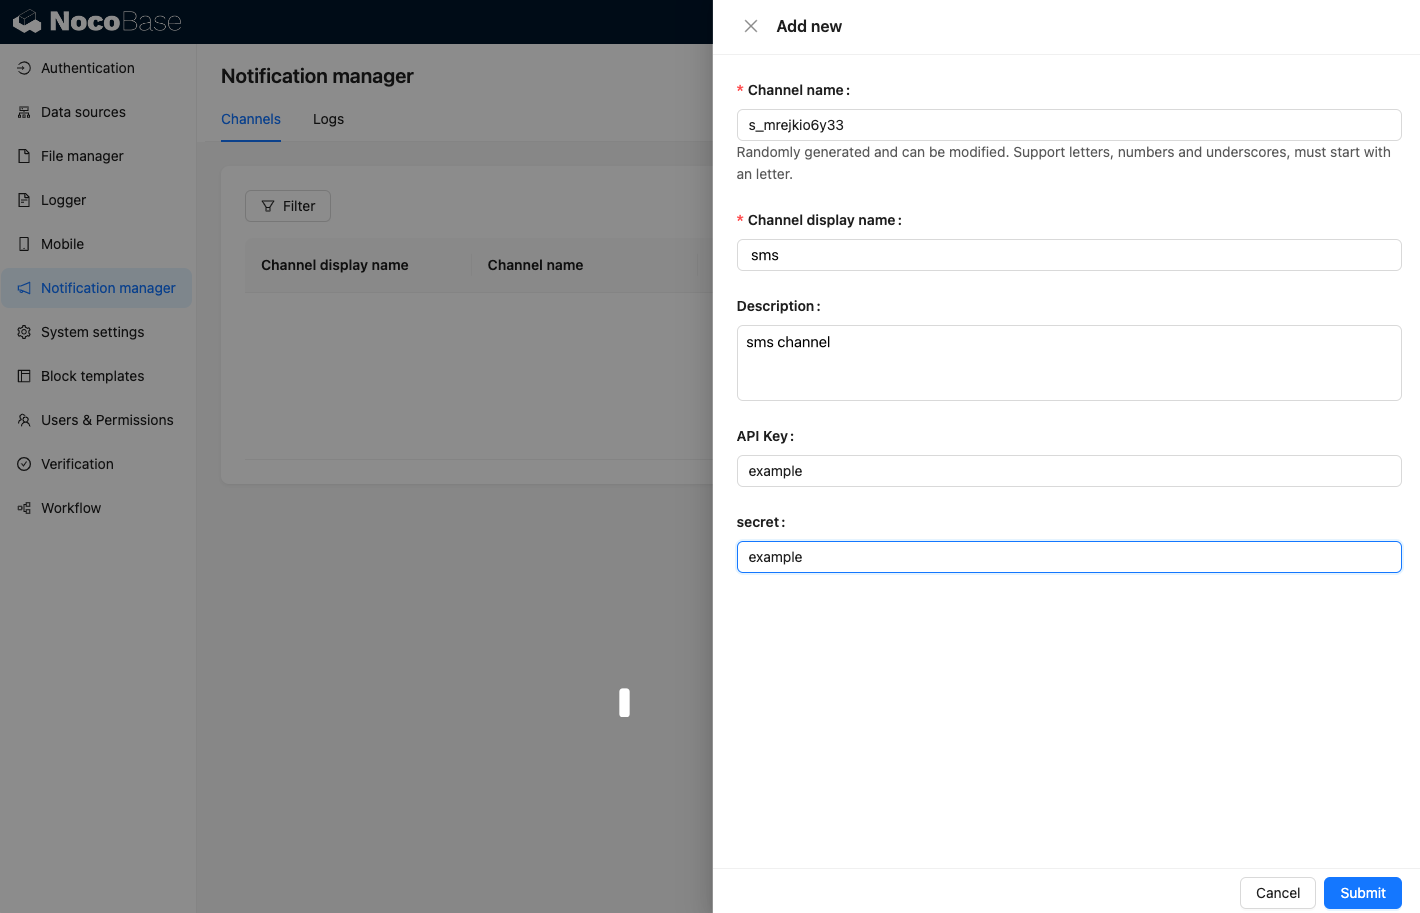
 20241009164207-2024-10-09-16-42-08

새로운 예시 채널을 추가합니다. 20250418074409-2025-04-18-07-44-09

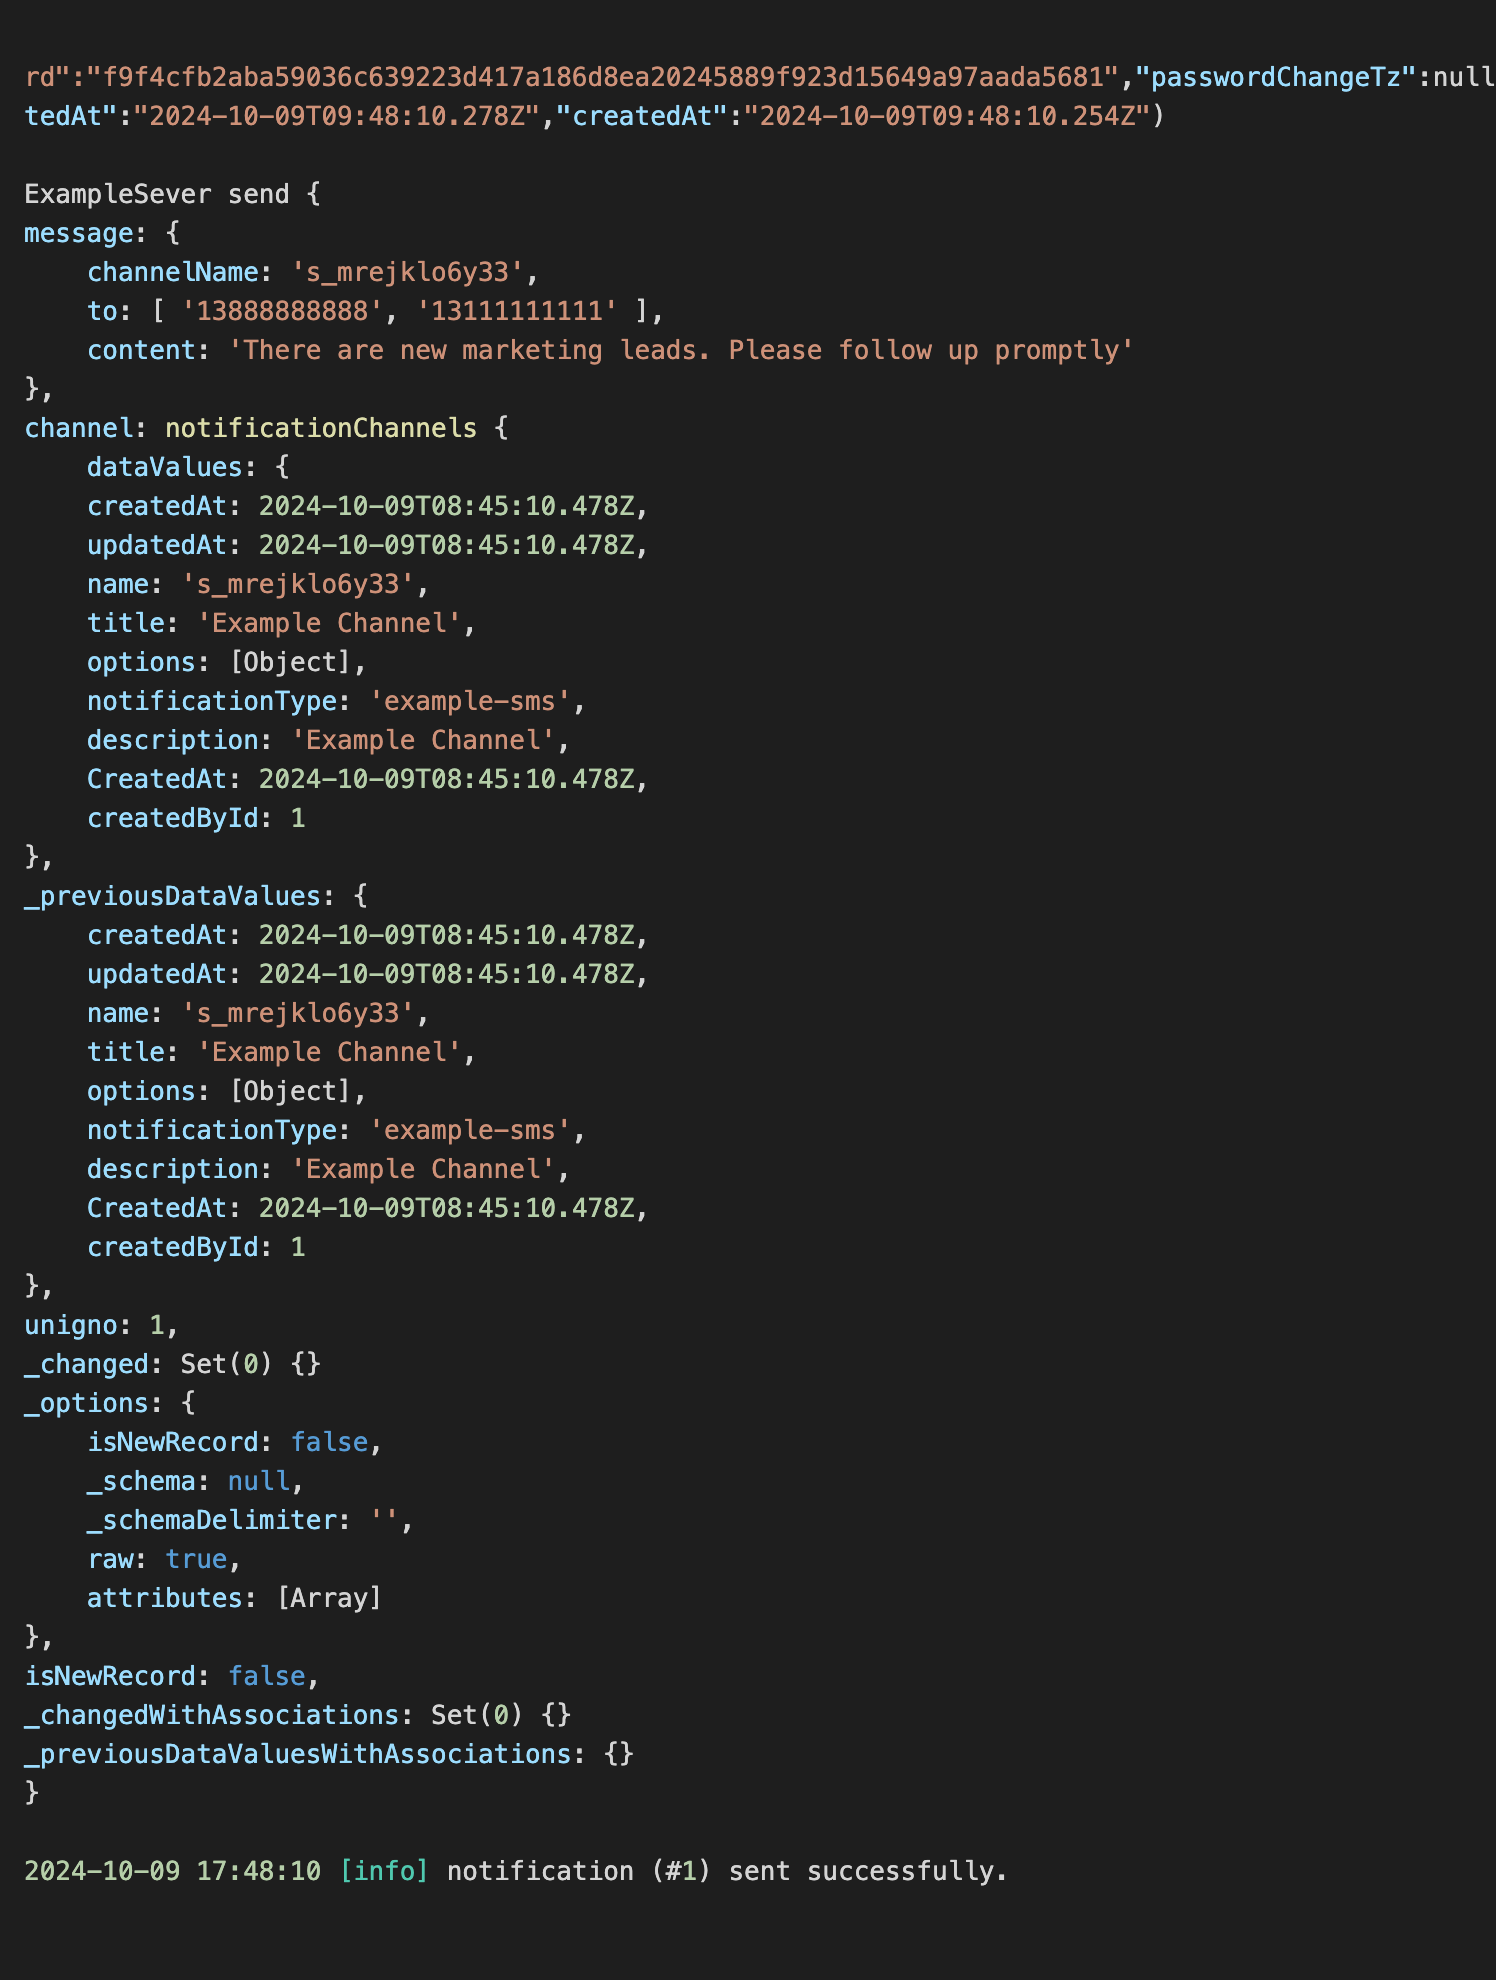
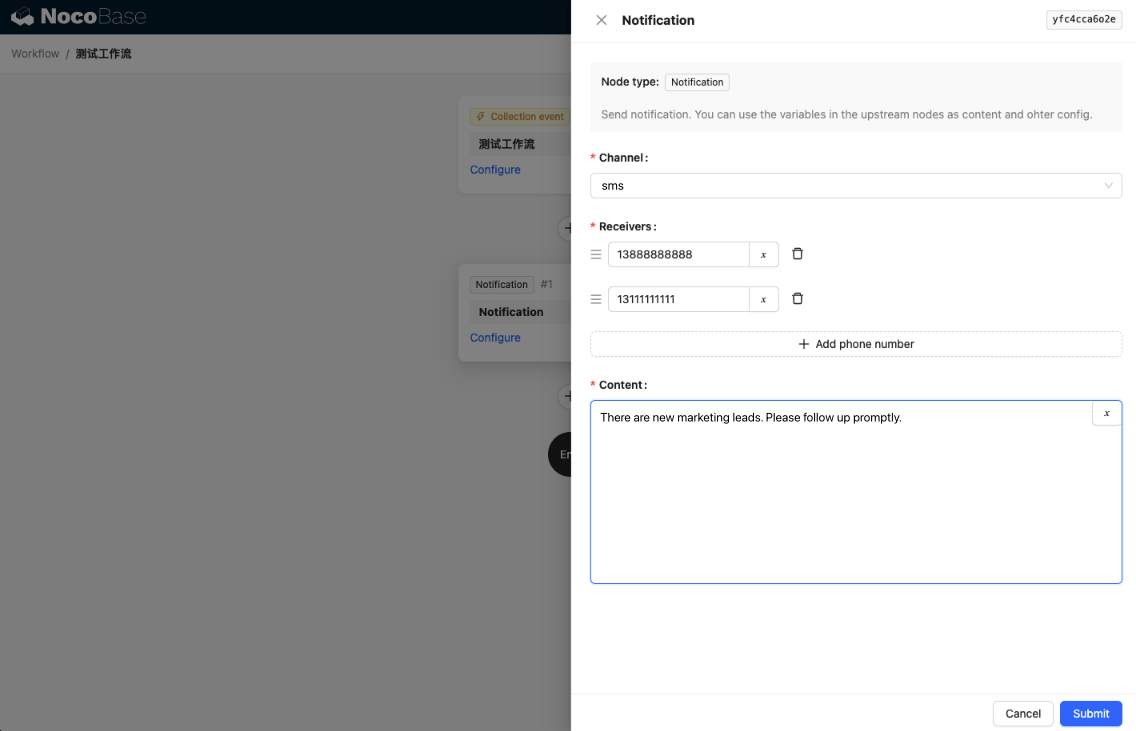
새로운 워크플로우를 생성하고 알림 노드를 설정합니다. 20250418074832-2025-04-18-07-48-32

워크플로우 실행을 트리거하면 콘솔에 다음과 같은 정보가 출력되는 것을 볼 수 있습니다. 20250418081746-2025-04-18-08-17-48