logologo
시작
가이드
개발
플러그인
API
English
简体中文
日本語
한국어
Deutsch
Français
Español
Português
Русский
Italiano
Türkçe
Українська
Tiếng Việt
Bahasa Indonesia
ไทย
Polski
Nederlands
Čeština
العربية
עברית
हिन्दी
Svenska
시작
가이드
개발
플러그인
API
logologo

소개

FlowEngine이란?
FlowEngine과 플러그인의 관계
빠른 시작
학습 로드맵

가이드

FlowModel 등록
FlowModel 생성
FlowModel 렌더링
FlowModel 이벤트 플로우 & 구성
FlowModel 영속성
FlowModel 생명주기
FlowModel 컨텍스트 시스템
반응형 메커니즘: Observable
FlowModel vs React.Component

Definitions

ModelDefinition
FlowDefinition
EventDefinition
ActionDefinition
StepDefinition
Previous PageFlowEngine과 플러그인의 관계
Next Page학습 로드맵
TIP

이 문서는 AI로 번역되었습니다. 부정확한 내용이 있을 경우 영어 버전을 참조하세요

#빠른 시작: 오케스트레이션 가능한 버튼 컴포넌트 구축하기

React에서는 일반적으로 다음과 같이 버튼 컴포넌트를 렌더링합니다:

import { Button } from 'antd';

export default function App() {
  return <Button type="primary">Primary Button</Button>;
}

위 코드는 간단하지만, 정적 컴포넌트에 해당하여 노코드 플랫폼에서 요구하는 구성 가능성 및 오케스트레이션 기능을 충족할 수 없습니다.

NocoBase의 FlowEngine에서는 FlowModel + FlowDefinition을 통해 구성 및 이벤트 기반 컴포넌트를 빠르게 구축하여 더욱 강력한 노코드 기능을 구현할 수 있습니다.


#첫 번째 단계: FlowModel을 사용하여 컴포넌트 렌더링하기

#🧠 핵심 개념

  • FlowModel은 FlowEngine의 핵심 컴포넌트 모델로, 컴포넌트 로직, 렌더링 및 구성 기능을 캡슐화합니다.
  • 모든 UI 컴포넌트는 FlowModel을 통해 인스턴스화되고 통합 관리될 수 있습니다.

#📌 구현 단계

#1. 사용자 정의 모델 클래스 생성

class MyModel extends FlowModel {
  render() {
    return <Button {...this.props} />;
  }
}

#2. 모델 인스턴스 생성

const model = this.flowEngine.createModel({
  uid: 'my-model',
  use: 'MyModel',
  props: {
    type: 'primary',
    children: 'Primary Button',
  },
});

#3. <FlowModelRenderer />를 사용하여 렌더링

<FlowModelRenderer model={model} />

#두 번째 단계: PropsFlow를 추가하여 버튼 속성 구성 가능하게 만들기

#💡 PropsFlow를 사용하는 이유

정적 props 대신 Flow를 사용하면 다음과 같은 속성을 구현할 수 있습니다:

  • 동적 구성
  • 시각적 편집
  • 상태 재생 및 영속화

#🛠 주요 변경 사항

#1. 버튼 속성 Flow 정의


const buttonSettings = defineFlow({
  key: 'buttonSettings',
  
  title: '버튼 설정',
  steps: {
    general: {
      title: '일반 구성',
      uiSchema: {
        title: {
          type: 'string',
          title: '버튼 제목',
          'x-decorator': 'FormItem',
          'x-component': 'Input',
        },
        type: {
          type: 'string',
          title: '유형',
          'x-decorator': 'FormItem',
          'x-component': 'Select',
          enum: [
            { label: '기본', value: 'primary' },
            { label: '보조', value: 'default' },
            { label: '위험', value: 'danger' },
            { label: '점선', value: 'dashed' },
            { label: '링크', value: 'link' },
            { label: '텍스트', value: 'text' },
          ],
        },
        icon: {
          type: 'string',
          title: '아이콘',
          'x-decorator': 'FormItem',
          'x-component': 'Select',
          enum: [
            { label: '검색', value: 'SearchOutlined' },
            { label: '추가', value: 'PlusOutlined' },
            { label: '삭제', value: 'DeleteOutlined' },
            { label: '편집', value: 'EditOutlined' },
            { label: '설정', value: 'SettingOutlined' },
          ],
        },
      },
      defaultParams: {
        type: 'primary',
      },
      // 단계 핸들러 함수, 모델 속성 설정
      handler(ctx, params) {
        ctx.model.setProps('children', params.title);
        ctx.model.setProps('type', params.type);
        ctx.model.setProps('icon', params.icon ? React.createElement(icons[params.icon]) : undefined);
      },
    },
  },
});

MyModel.registerFlow(buttonSettings);

#2. 정적 props 대신 stepParams 사용

const model = this.flowEngine.createModel({
  uid: 'my-model',
  use: 'MyModel',
- props: {
-   type: 'primary',
-   children: 'Primary Button',
- },
+ stepParams: {
+   buttonSettings: {
+     general: {
+       title: 'Primary Button',
+       type: 'primary',
+     },
+   },
+ },
});

✅ stepParams를 사용하는 것이 FlowEngine에서 권장하는 방식이며, 직렬화할 수 없는 데이터(예: React 컴포넌트) 문제를 방지할 수 있습니다.

#3. 속성 구성 인터페이스 활성화

- <FlowModelRenderer model={model} />
+ <FlowModelRenderer model={model} showFlowSettings />

#세 번째 단계: 버튼 이벤트 Flow (EventFlow) 지원

#🎯 시나리오: 버튼 클릭 후 확인 대화 상자 표시

#1. onClick 이벤트 리스닝

비침해적인 방식으로 onClick 추가

const myPropsFlow = defineFlow({
  key: 'buttonSettings',
  steps: {
    general: {
      // ... 생략
      handler(ctx, params) {
        // ... 생략
+       ctx.model.setProps('onClick', (event) => {
+         ctx.model.dispatchEvent('click', { event });
+       });
      },
    },
  },
});

#2. 이벤트 Flow 정의

const myEventFlow = defineFlow({
  key: 'clickSettings',
  on: 'click',
  title: '버튼 이벤트',
  steps: {
    confirm: {
      title: '확인 작업 구성',
      uiSchema: {
        title: {
          type: 'string',
          title: '팝업 알림 제목',
          'x-decorator': 'FormItem',
          'x-component': 'Input',
        },
        content: {
          type: 'string',
          title: '팝업 알림 내용',
          'x-decorator': 'FormItem',
          'x-component': 'Input.TextArea',
        },
      },
      defaultParams: {
        title: '작업 확인',
        content: '버튼을 클릭했습니다. 확인하시겠습니까?',
      },
      async handler(ctx, params) {
        // 팝업
        const confirmed = await ctx.modal.confirm({
          title: params.title,
          content: params.content,
        });
        // 메시지
        await ctx.message.info(`버튼을 클릭했습니다. 확인 결과: ${confirmed ? '확인됨' : '취소됨'}`);
      },
    },
  },
});
MyModel.registerFlow(myEventFlow);

추가 설명:

  • 이벤트 Flow (EventFlow)를 사용하면 팝업, 메시지, API 호출 등 Flow를 통해 버튼의 동작을 유연하게 구성할 수 있습니다.
  • 다양한 이벤트(예: onClick, onMouseEnter 등)에 대해 여러 이벤트 Flow를 등록하여 복잡한 비즈니스 요구 사항을 충족할 수 있습니다.

#3. 이벤트 Flow 매개변수 구성

모델 생성 시 stepParams를 통해 이벤트 Flow의 기본 매개변수를 구성할 수 있습니다:

const model = this.flowEngine.createModel({
  uid: 'my-model',
  use: 'MyModel',
  stepParams: {
    buttonSettings: {
      general: {
        title: 'Primary Button',
        type: 'primary',
      },
    },
    clickSettings: {
      confirm: {
        title: '작업 확인',
        content: '버튼을 클릭했습니다. 확인하시겠습니까?',
      },
    },
  },
});

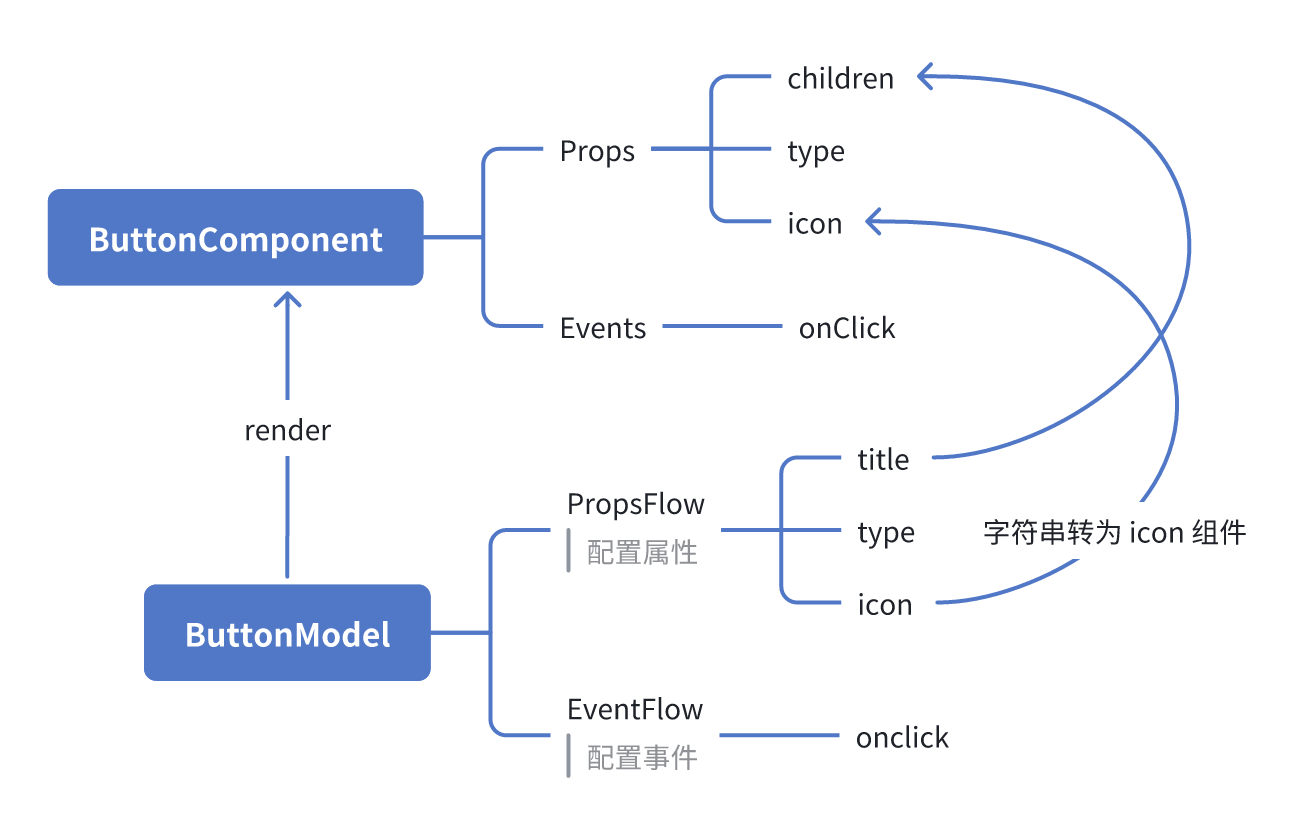
#모델 비교: ReactComponent vs FlowModel

Flow는 컴포넌트의 구현 방식을 변경하지 않습니다. 단지 ReactComponent에 PropsFlow 및 EventFlow 지원을 추가하여 컴포넌트의 속성과 이벤트를 시각적으로 구성하고 오케스트레이션할 수 있도록 합니다.

#ReactComponent

graph TD
  Button[ButtonComponent]
  Button --> Props[Props]
  Button --> Events[Events]
  Props --> title[title]
  Props --> type[type]
  Props --> icon[icon]
  Events --> onClick[onClick]

#FlowModel

graph TD
  Button[ButtonModel]
  Button --> Props[PropsFlow]
  Button --> Events[EventFlow]
  Props --> title[title]
  Props --> type[type]
  Props --> icon[icon]
  Events --> onClick[onClick]

#요약

위 세 단계를 통해 구성 및 이벤트 오케스트레이션을 지원하는 버튼 컴포넌트를 완성했으며, 다음과 같은 장점을 가집니다:

  • 🚀 속성 시각적 구성 (예: 제목, 유형, 아이콘)
  • 🔄 Flow에 의해 이벤트 응답 제어 가능 (예: 클릭 시 팝업)
  • 🔧 향후 확장 지원 (예: 조건부 로직, 변수 바인딩 등)

이러한 패턴은 폼, 목록, 차트 등 모든 UI 컴포넌트에도 적용할 수 있습니다. NocoBase의 FlowEngine에서는 모든 것을 오케스트레이션할 수 있습니다.