logologo
开始
手册
开发
插件
API
English
简体中文
开始
手册
开发
插件
API
English
简体中文
logologo

简介

什么是 FlowEngine?
FlowEngine 与插件的关系
快速开始
学习路线图

指南

注册 FlowModel
创建 FlowModel
渲染 FlowModel
FlowModel 事件流与配置化
FlowModel 持久化
FlowModel 生命周期
FlowModel 的上下文体系
响应式机制:Observable
FlowModel vs React.Component

Definitions

ModelDefinition
FlowDefinition
EventDefinition
ActionDefinition
StepDefinition
Previous PageFlowEngine 与插件的关系
Next Page学习路线图

#快速开始:构建可编排的按钮组件

在 React 中,我们通常这样渲染一个按钮组件:

import { Button } from 'antd';

export default function App() {
  return <Button type="primary">Primary Button</Button>;
}

上述代码虽然简单,但属于静态组件,无法满足无代码平台对可配置性和编排能力的需求。

在 NocoBase 的 FlowEngine 中,我们可以通过 FlowModel + FlowDefinition 快速构建支持配置和事件驱动的组件,实现更强大的无代码能力。


#第一步:使用 FlowModel 渲染组件

#🧠 关键概念

  • FlowModel 是 FlowEngine 中的核心组件模型,封装组件逻辑、渲染和配置能力。
  • 每个 UI 组件都可以通过 FlowModel 进行实例化并统一管理。

#📌 实现步骤

#1. 创建自定义模型类

class MyModel extends FlowModel {
  render() {
    return <Button {...this.props} />;
  }
}

#2. 创建 model 实例

const model = this.flowEngine.createModel({
  uid: 'my-model',
  use: 'MyModel',
  props: {
    type: 'primary',
    children: 'Primary Button',
  },
});

#3. 使用 <FlowModelRenderer /> 渲染

<FlowModelRenderer model={model} />

#第二步:添加 PropsFlow,使按钮属性可配置

#💡 为什么要用 PropsFlow?

使用 Flow 而非静态 props,可以实现属性的:

  • 动态配置
  • 可视化编辑
  • 状态回放与持久化

#🛠 关键改造点

#1. 定义按钮属性的 Flow


const buttonSettings = defineFlow({
  key: 'buttonSettings',
  
  title: '按钮设置',
  steps: {
    setProps: {
      title: '通用配置',
      uiSchema: {
        title: {
          type: 'string',
          title: '按钮标题',
          'x-decorator': 'FormItem',
          'x-component': 'Input',
        },
        type: {
          type: 'string',
          title: '类型',
          'x-decorator': 'FormItem',
          'x-component': 'Select',
          enum: [
            { label: '主要', value: 'primary' },
            { label: '次要', value: 'default' },
            { label: '危险', value: 'danger' },
            { label: '虚线', value: 'dashed' },
            { label: '链接', value: 'link' },
            { label: '文本', value: 'text' },
          ],
        },
        icon: {
          type: 'string',
          title: '图标',
          'x-decorator': 'FormItem',
          'x-component': 'Select',
          enum: [
            { label: '搜索', value: 'SearchOutlined' },
            { label: '添加', value: 'PlusOutlined' },
            { label: '删除', value: 'DeleteOutlined' },
            { label: '编辑', value: 'EditOutlined' },
            { label: '设置', value: 'SettingOutlined' },
          ],
        },
      },
      defaultParams: {
        type: 'primary',
      },
      // 步骤处理函数,设置模型属性
      handler(ctx, params) {
        ctx.model.setProps('children', params.title);
        ctx.model.setProps('type', params.type);
        ctx.model.setProps('icon', params.icon ? React.createElement(icons[params.icon]) : undefined);
      },
    },
  },
});

MyModel.registerFlow(buttonSettings);

#2. 使用 stepParams 替代静态 props

const model = this.flowEngine.createModel({
  uid: 'my-model',
  use: 'MyModel',
- props: {
-   type: 'primary',
-   children: 'Primary Button',
- },
+ stepParams: {
+   buttonSettings: {
+     general: {
+       title: 'Primary Button',
+       type: 'primary',
+     },
+   },
+ },
});

✅ 使用 stepParams 是 FlowEngine 推荐方式,可避免不可序列化数据(如 React 组件)的问题。

#3. 启用属性配置界面

- <FlowModelRenderer model={model} />
+ <FlowModelRenderer model={model} showFlowSettings />

#第三步:支持按钮事件流(EventFlow)

#🎯 场景:点击按钮后弹出确认框

#1. 监听 onClick 事件

使用无入侵的方式,添加 onClick

const myPropsFlow = defineFlow({
  key: 'buttonSettings',
  steps: {
    general: {
      // ... 省略
      handler(ctx, params) {
        // ... 省略
+       ctx.model.setProps('onClick', (event) => {
+         ctx.model.dispatchEvent('click', { event });
+       });
      },
    },
  },
});

#2. 定义事件流

const myEventFlow = defineFlow({
  key: 'clickSettings',
  on: 'click',
  title: '按钮事件',
  steps: {
    confirm: {
      title: '确认操作配置',
      uiSchema: {
        title: {
          type: 'string',
          title: '弹窗提示标题',
          'x-decorator': 'FormItem',
          'x-component': 'Input',
        },
        content: {
          type: 'string',
          title: '弹窗提示内容',
          'x-decorator': 'FormItem',
          'x-component': 'Input.TextArea',
        },
      },
      defaultParams: {
        title: '确认操作',
        content: '你点击了按钮,是否确认?',
      },
      async handler(ctx, params) {
        // 弹窗
        const confirmed = await ctx.modal.confirm({
          title: params.title,
          content: params.content,
        });
        // 消息
        await ctx.message.info(`你点击了按钮,确认结果:${confirmed ? '确认' : '取消'}`);
      },
    },
  },
});
MyModel.registerFlow(myEventFlow);

补充说明:

  • 事件流(EventFlow)可以让按钮的行为通过流程灵活配置,比如弹窗、消息、API 调用等。
  • 你可以为不同事件(如 onClick, onMouseEnter 等)注册不同的事件流,满足复杂业务需求。

#3. 配置事件流参数

在创建模型时,可以通过 stepParams 配置事件流的默认参数:

const model = this.flowEngine.createModel({
  uid: 'my-model',
  use: 'MyModel',
  stepParams: {
    buttonSettings: {
      general: {
        title: 'Primary Button',
        type: 'primary',
      },
    },
    clickSettings: {
      confirm: {
        title: '确认操作',
        content: '你点击了按钮,是否确认?',
      },
    },
  },
});

#模型对比图:ReactComponent vs FlowModel

Flow 并不会改变组件的实现方式。它只是为 ReactComponent 增加了对 PropsFlow 和 EventFlow 的支持,从而让组件的属性和事件都可以通过可视化方式配置和编排。
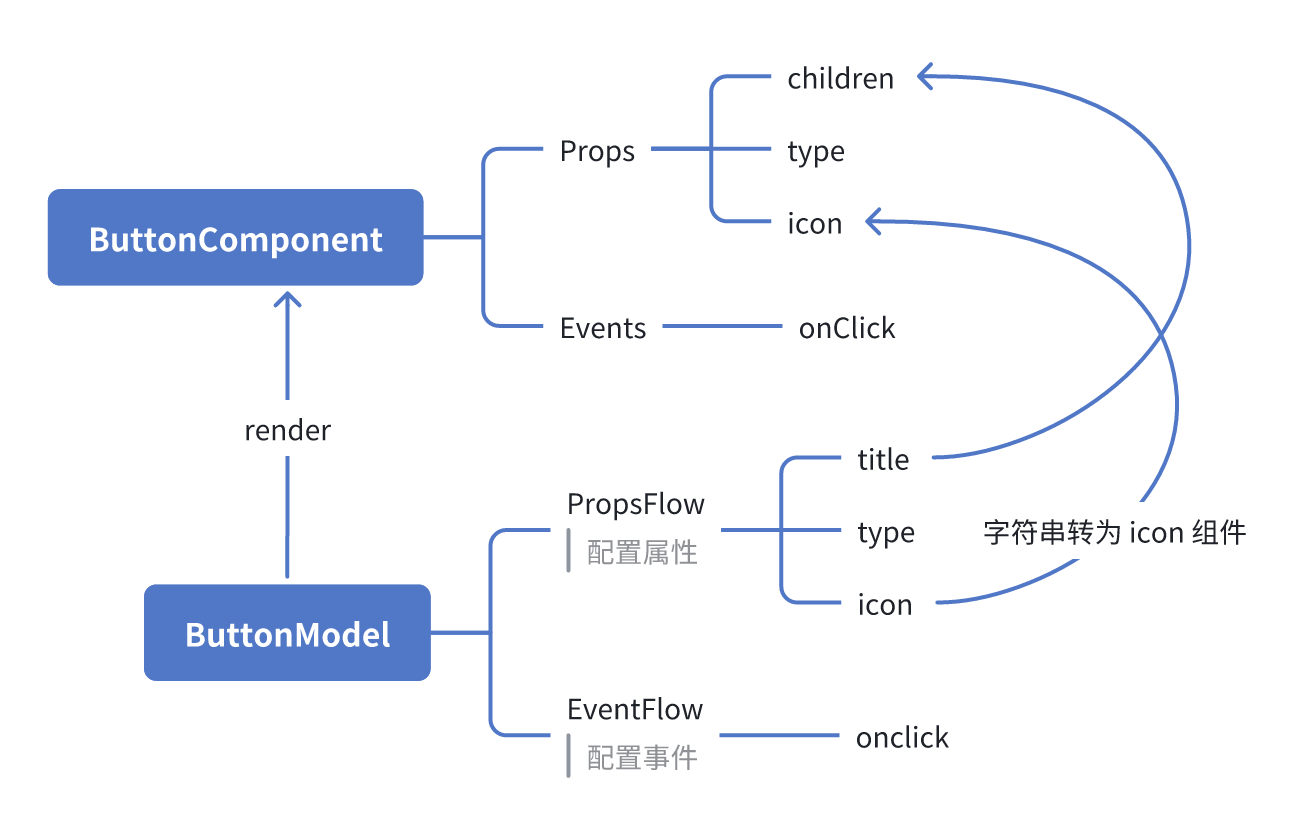
#ReactComponent

graph TD
  Button[ButtonComponent]
  Button --> Props[Props]
  Button --> Events[Events]
  Props --> title[title]
  Props --> type[type]
  Props --> icon[icon]
  Events --> onClick[onClick]

#FlowModel

graph TD
  Button[ButtonModel]
  Button --> Props[PropsFlow]
  Button --> Events[EventFlow]
  Props --> title[title]
  Props --> type[type]
  Props --> icon[icon]
  Events --> onClick[onClick]

#总结

通过以上三步,我们完成了一个支持配置与事件编排的按钮组件,具备以下优势:

  • 🚀 可视化配置属性(如标题、类型、图标)
  • 🔄 事件响应可被流程接管(如点击弹窗)
  • 🔧 支持后续拓展(如条件逻辑、变量绑定等)

这种模式也适用于表单、列表、图表等任何 UI 组件,在 NocoBase 的 FlowEngine 中,一切皆可编排。