

Chapter 12: Meeting Room Booking & Workflows
By now, you must be well-acquainted with NocoBase.
In this chapter, we’ll implement a specific scenario: the Meeting Rooms Management Module.
This module encompasses features such as Meeting Rooms Booking and notifications. We will build this module step by step, starting from scratch and gradually adding complexity. Let’s begin by designing the foundational database schema for this module.
12.1 Designing the Database Schema
The database schema serves as the foundation of the Conference Management Module. In this section, we’ll focus on the Meeting Rooms collection and the Booking collection, and introduce relationships such as Many-to-Many connections with users.
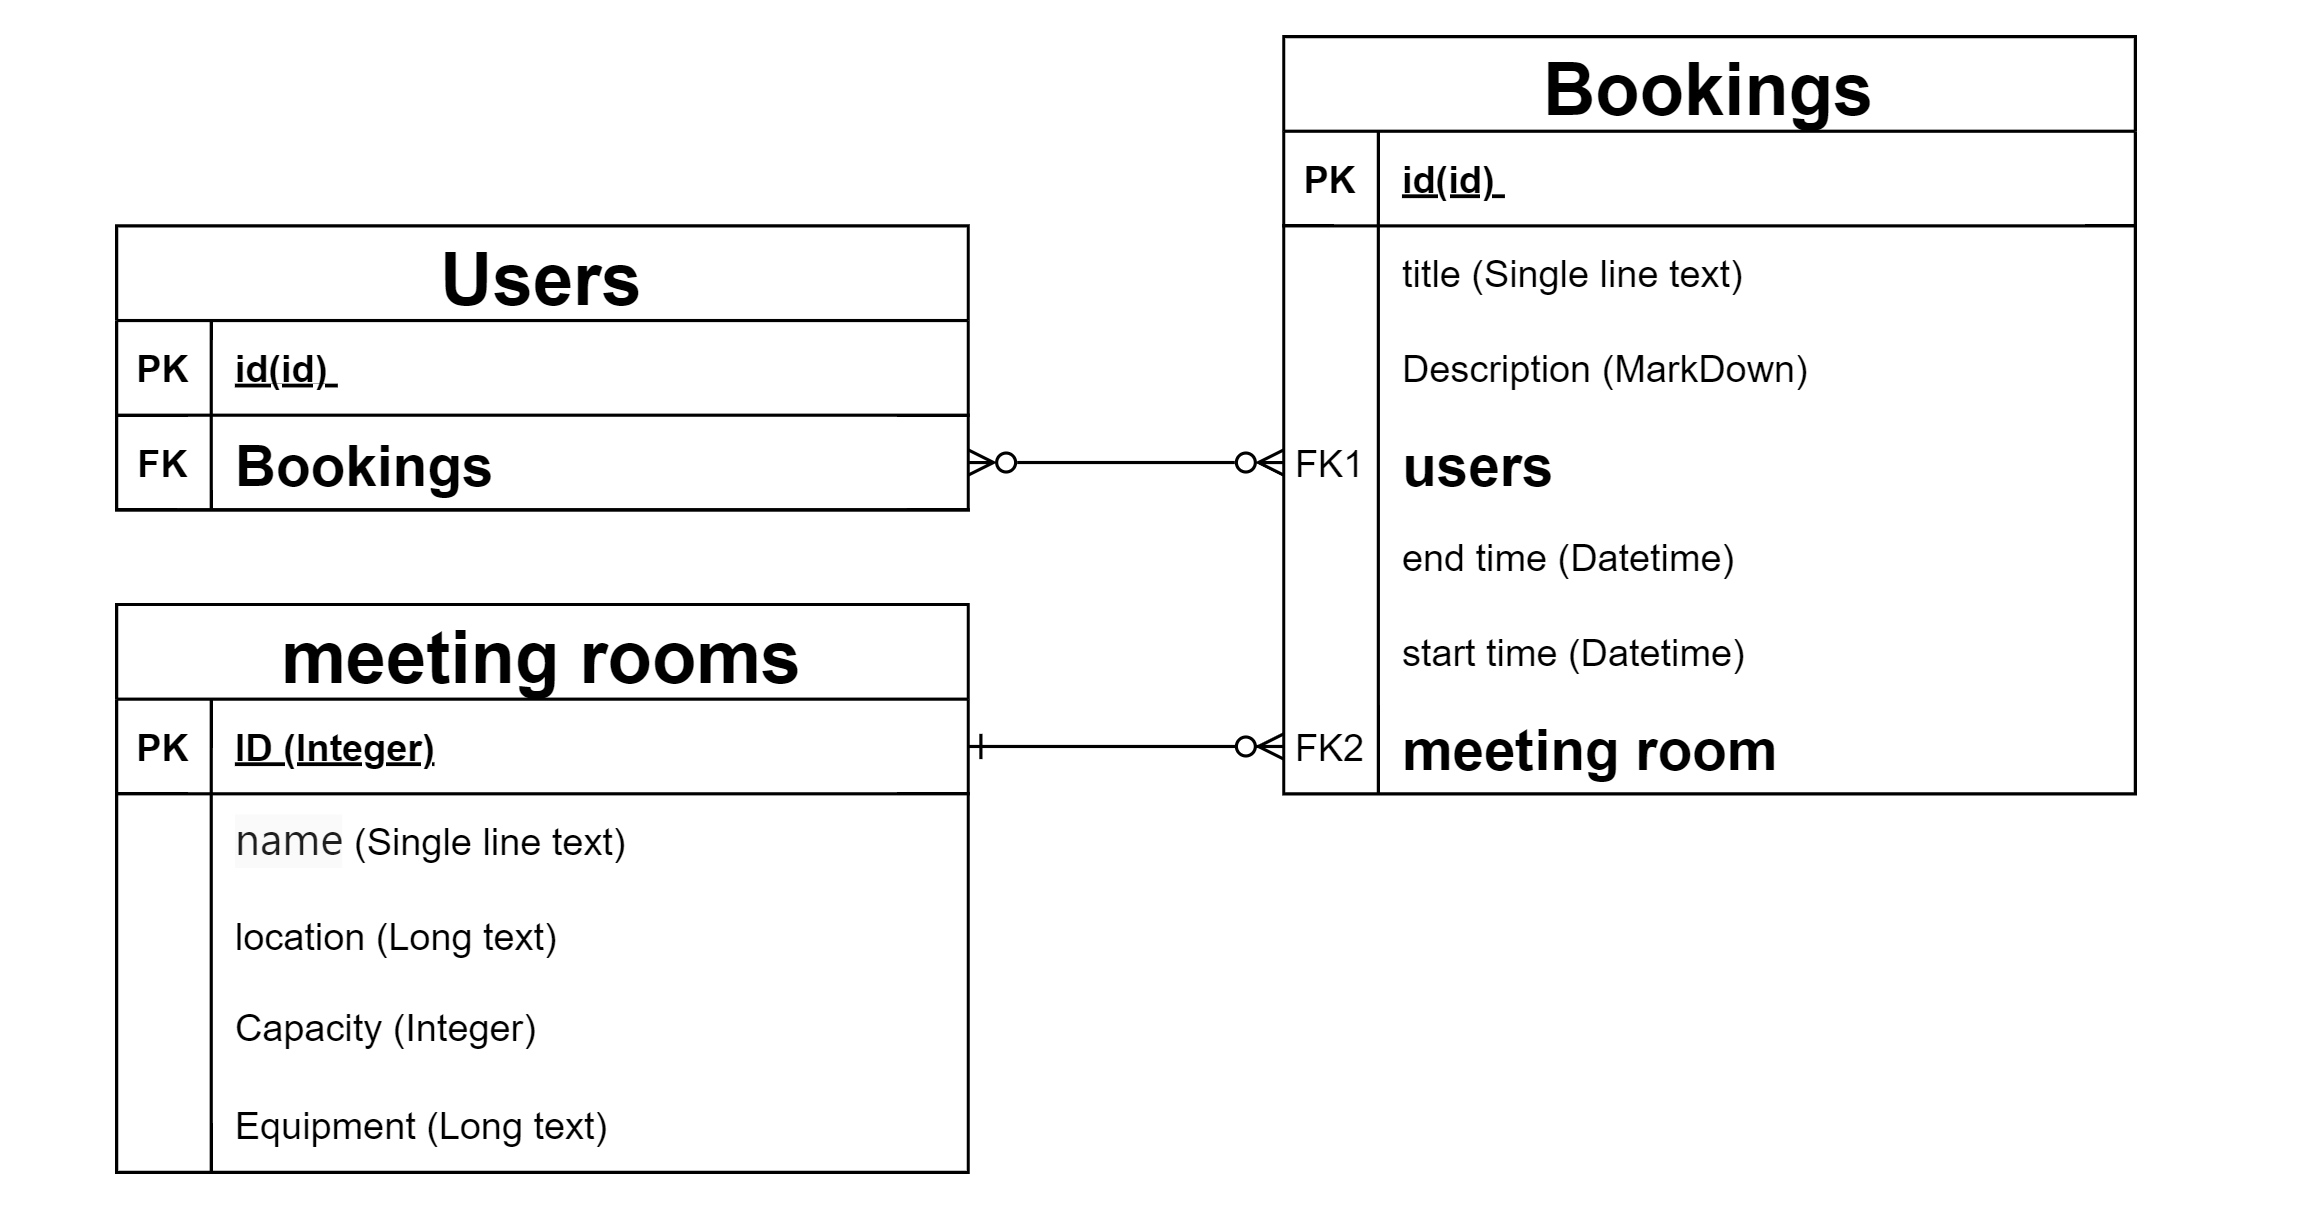
12.1.1 Conference Room Collection
The Conference Room Collection stores basic information about all the conference rooms, including their name, location, capacity, and equipment.
Sample Collection Structure
12.1.2 Booking Collection
The Booking Collection records all the conference room bookings, including details such as the room, participants, time, and meeting agenda.
Sample Collection Structure
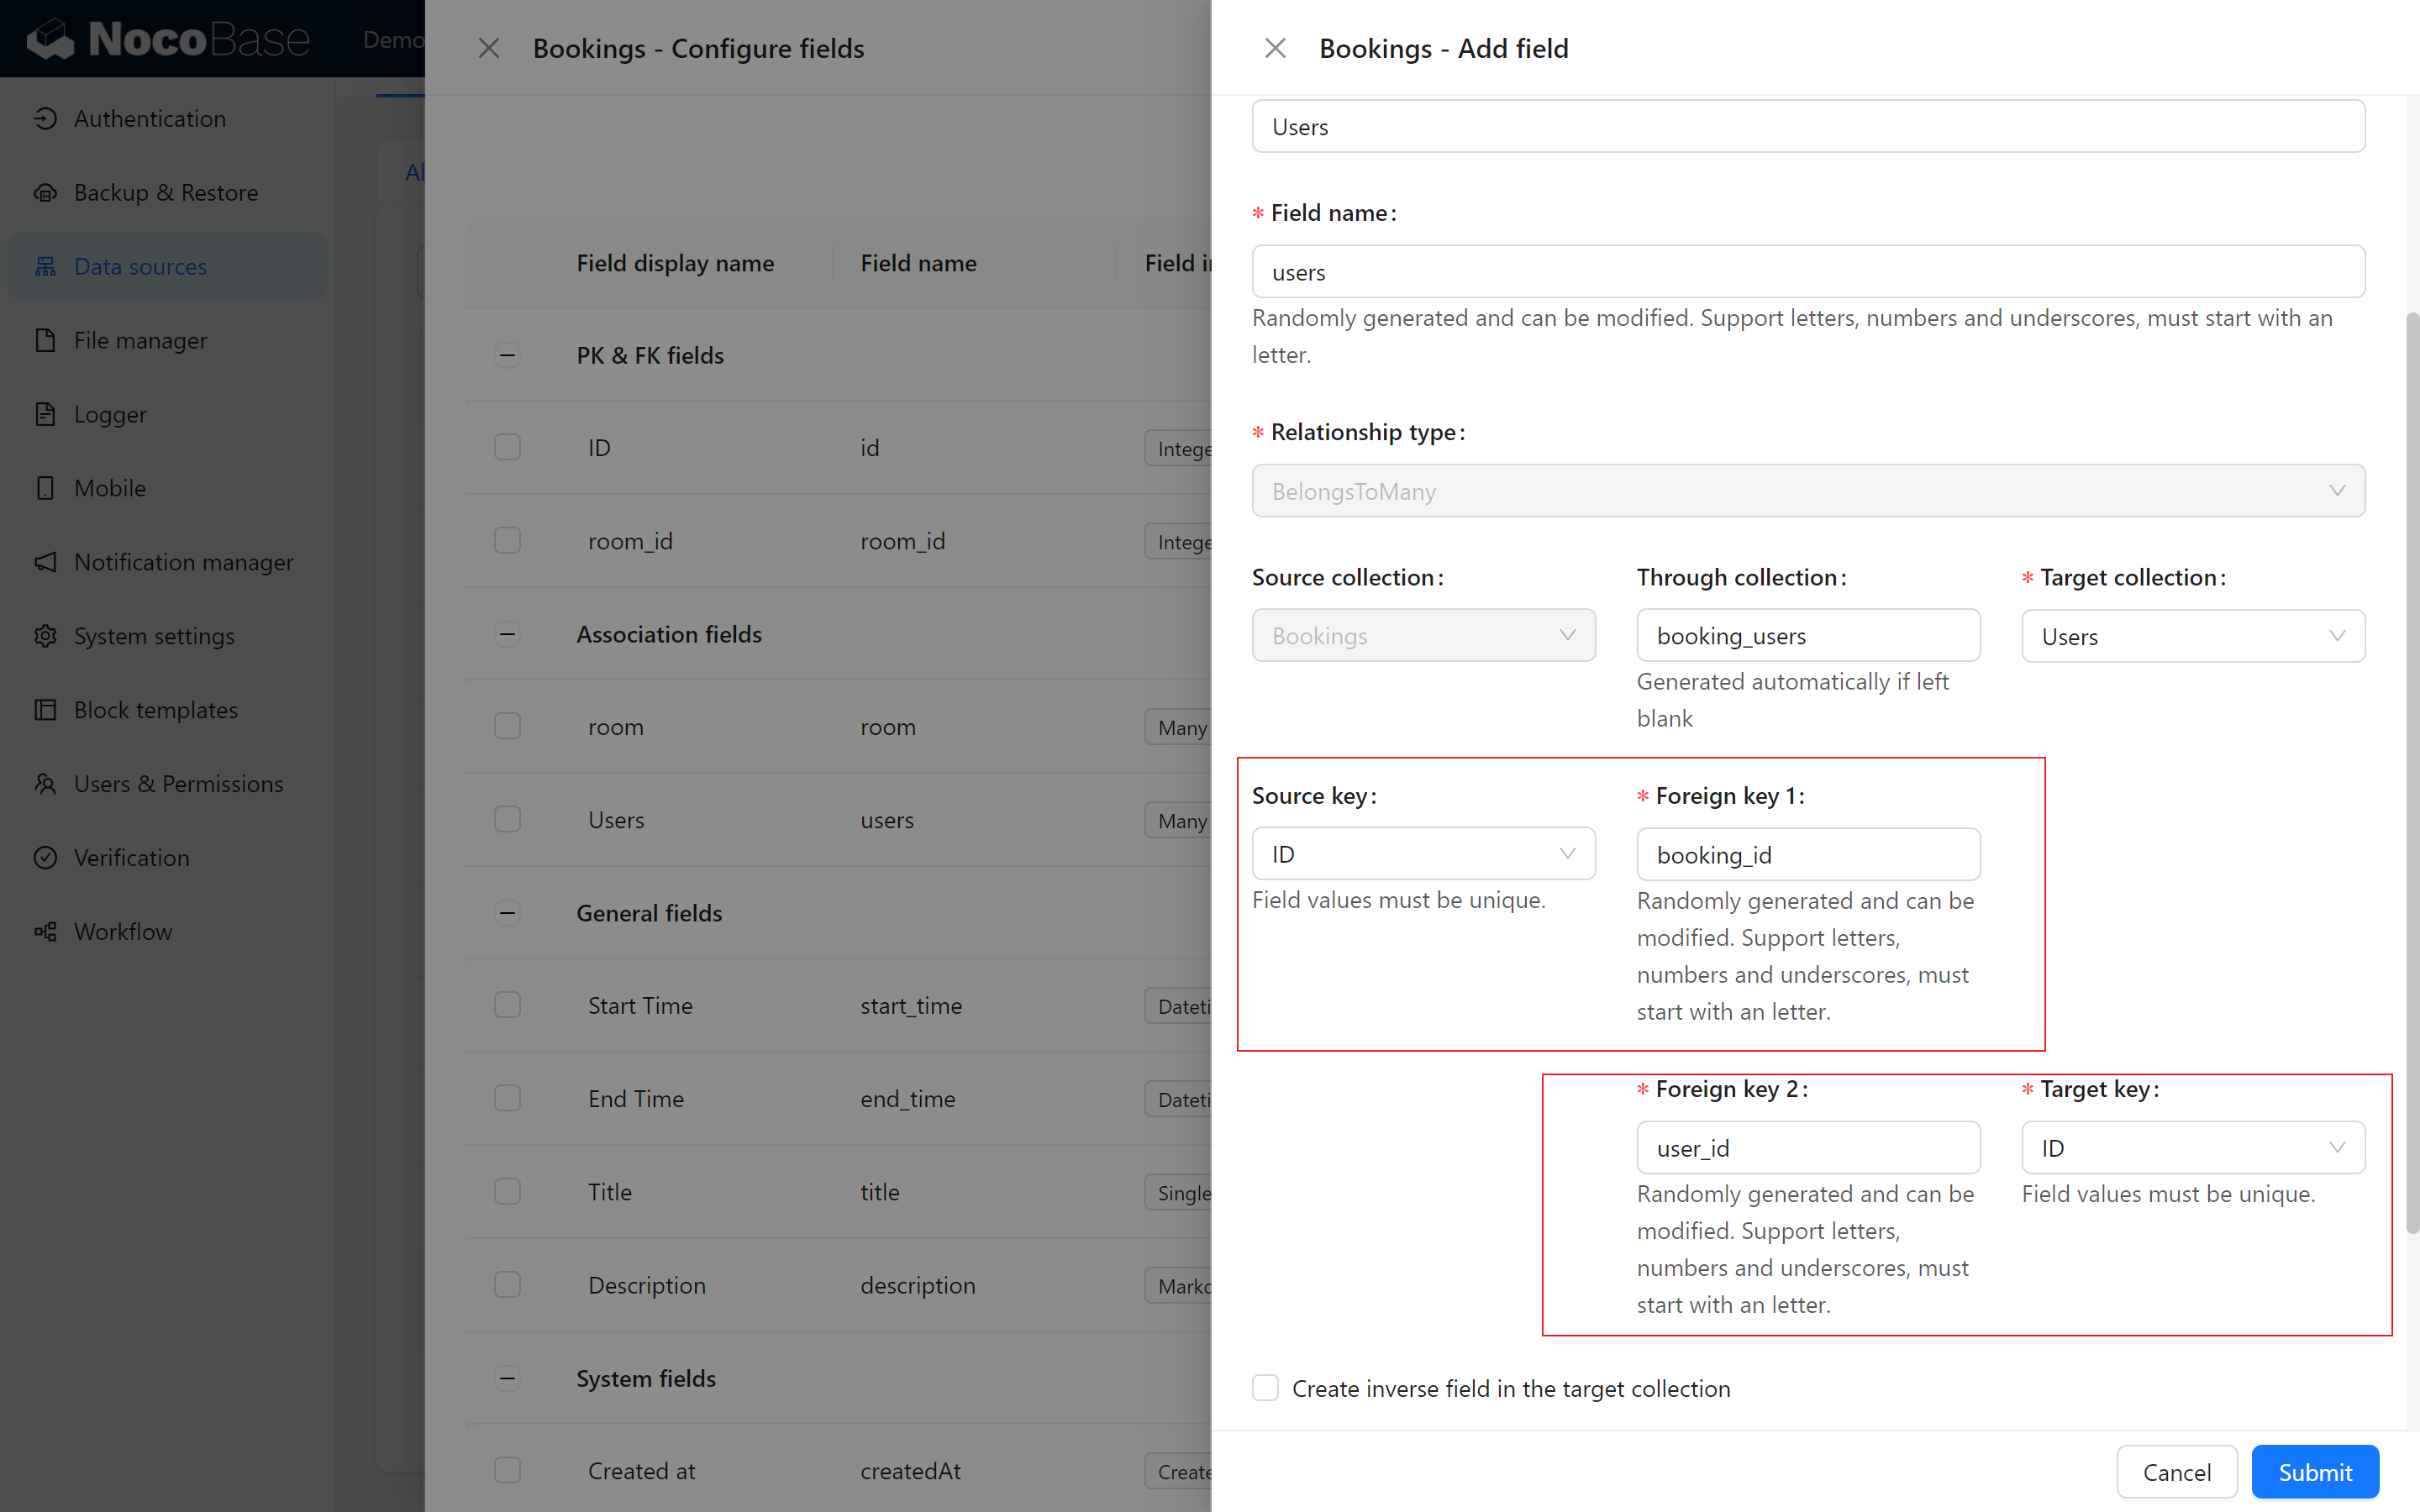
Many-to-Many Relationship
The Booking Collection involves a "Many-to-Many" relationship: a user can attend multiple meetings, and a meeting can have multiple participants. For management purposes, a through collection named booking_users is created.
12.2 Building the Conference Management Module
With the database schema ready, let’s implement the two collections and build the "Conference Management" module step by step.
12.2.1 Creating Table Blocks
First, add the “Meeting Management” module to the page, and create a Meeting Room table block and a Appointment Form table block. Then create a calendar block for the appointment form, with the default view of the calendar set to “days”.
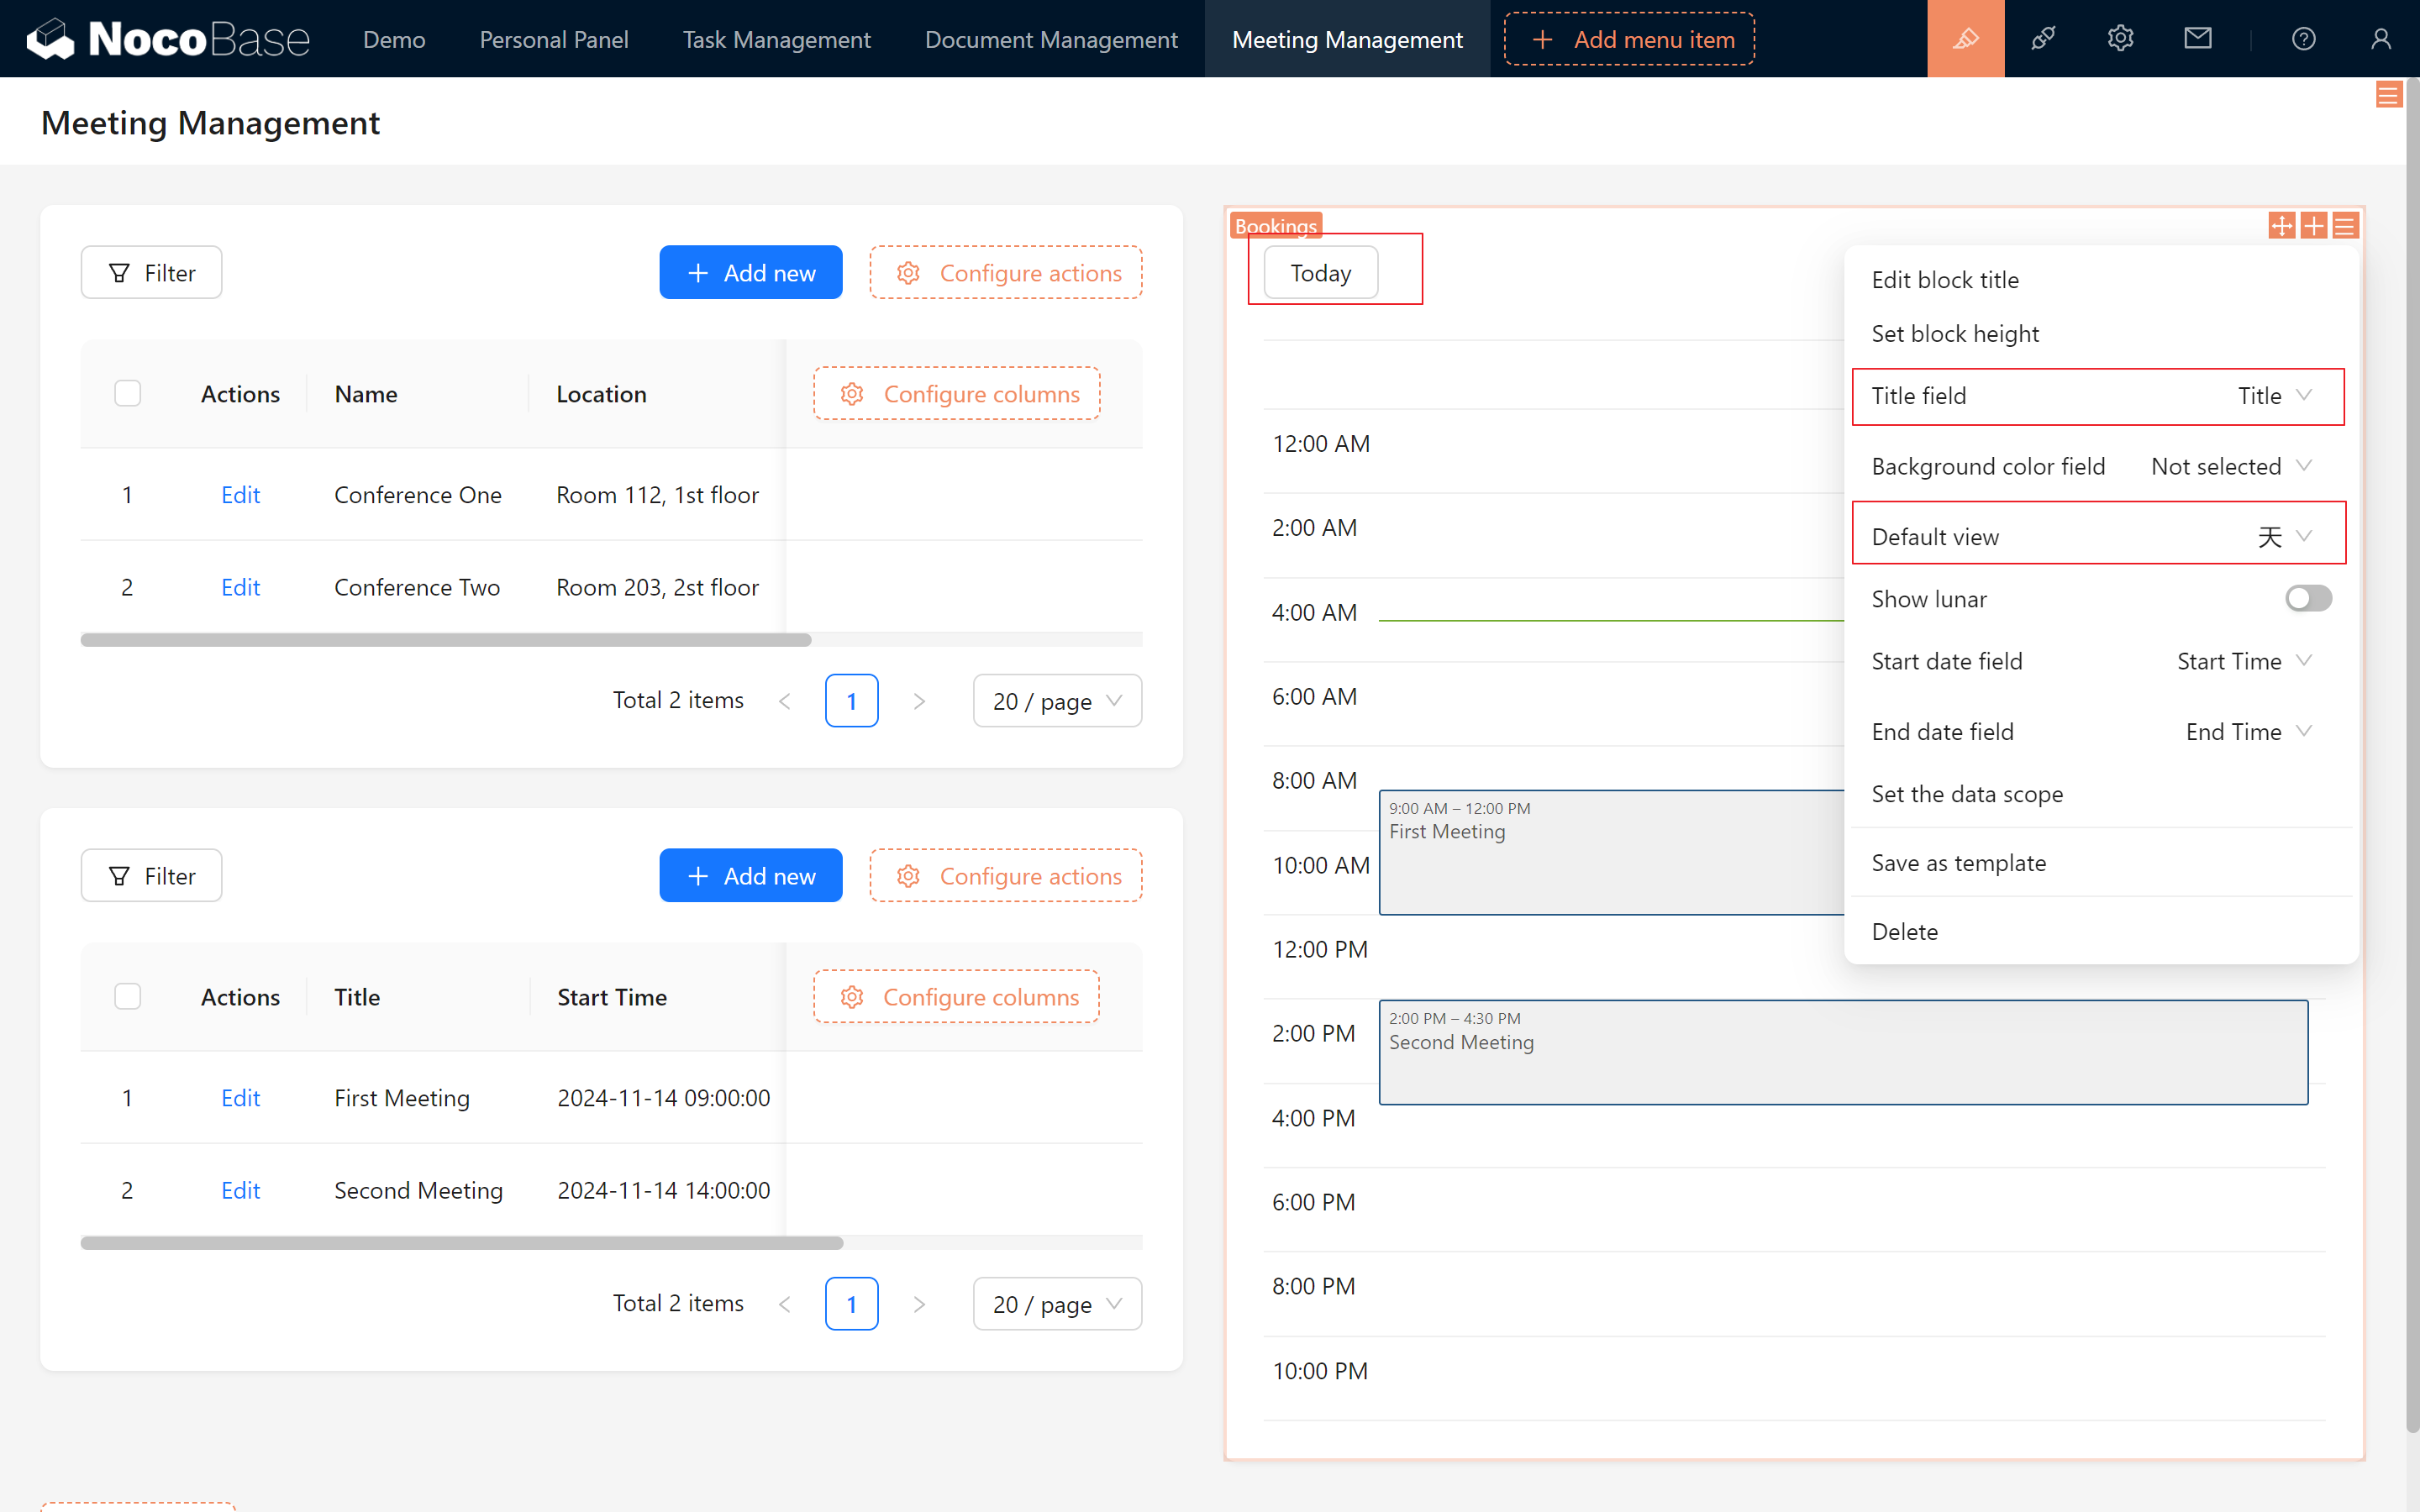
Setting up the Meeting Room form block association
Associate the Meeting Room form block with the other two blocks so that you can automatically filter the appointments for that meeting room. Next, you can try out the filtering, adding, deleting, checking and changing functions to test the basic interaction of the module.
💡NocoBase Block Connection (Highly Recommended!!)
In addition to the filter block mentioned earlier, our table blocks can also be connected to other blocks to achieve click-based filtering functionality.
As shown below, in the configuration of the Meeting Room table, we connected it to two blocks from other booking tables (Booking Table Block, Booking Calendar Block).
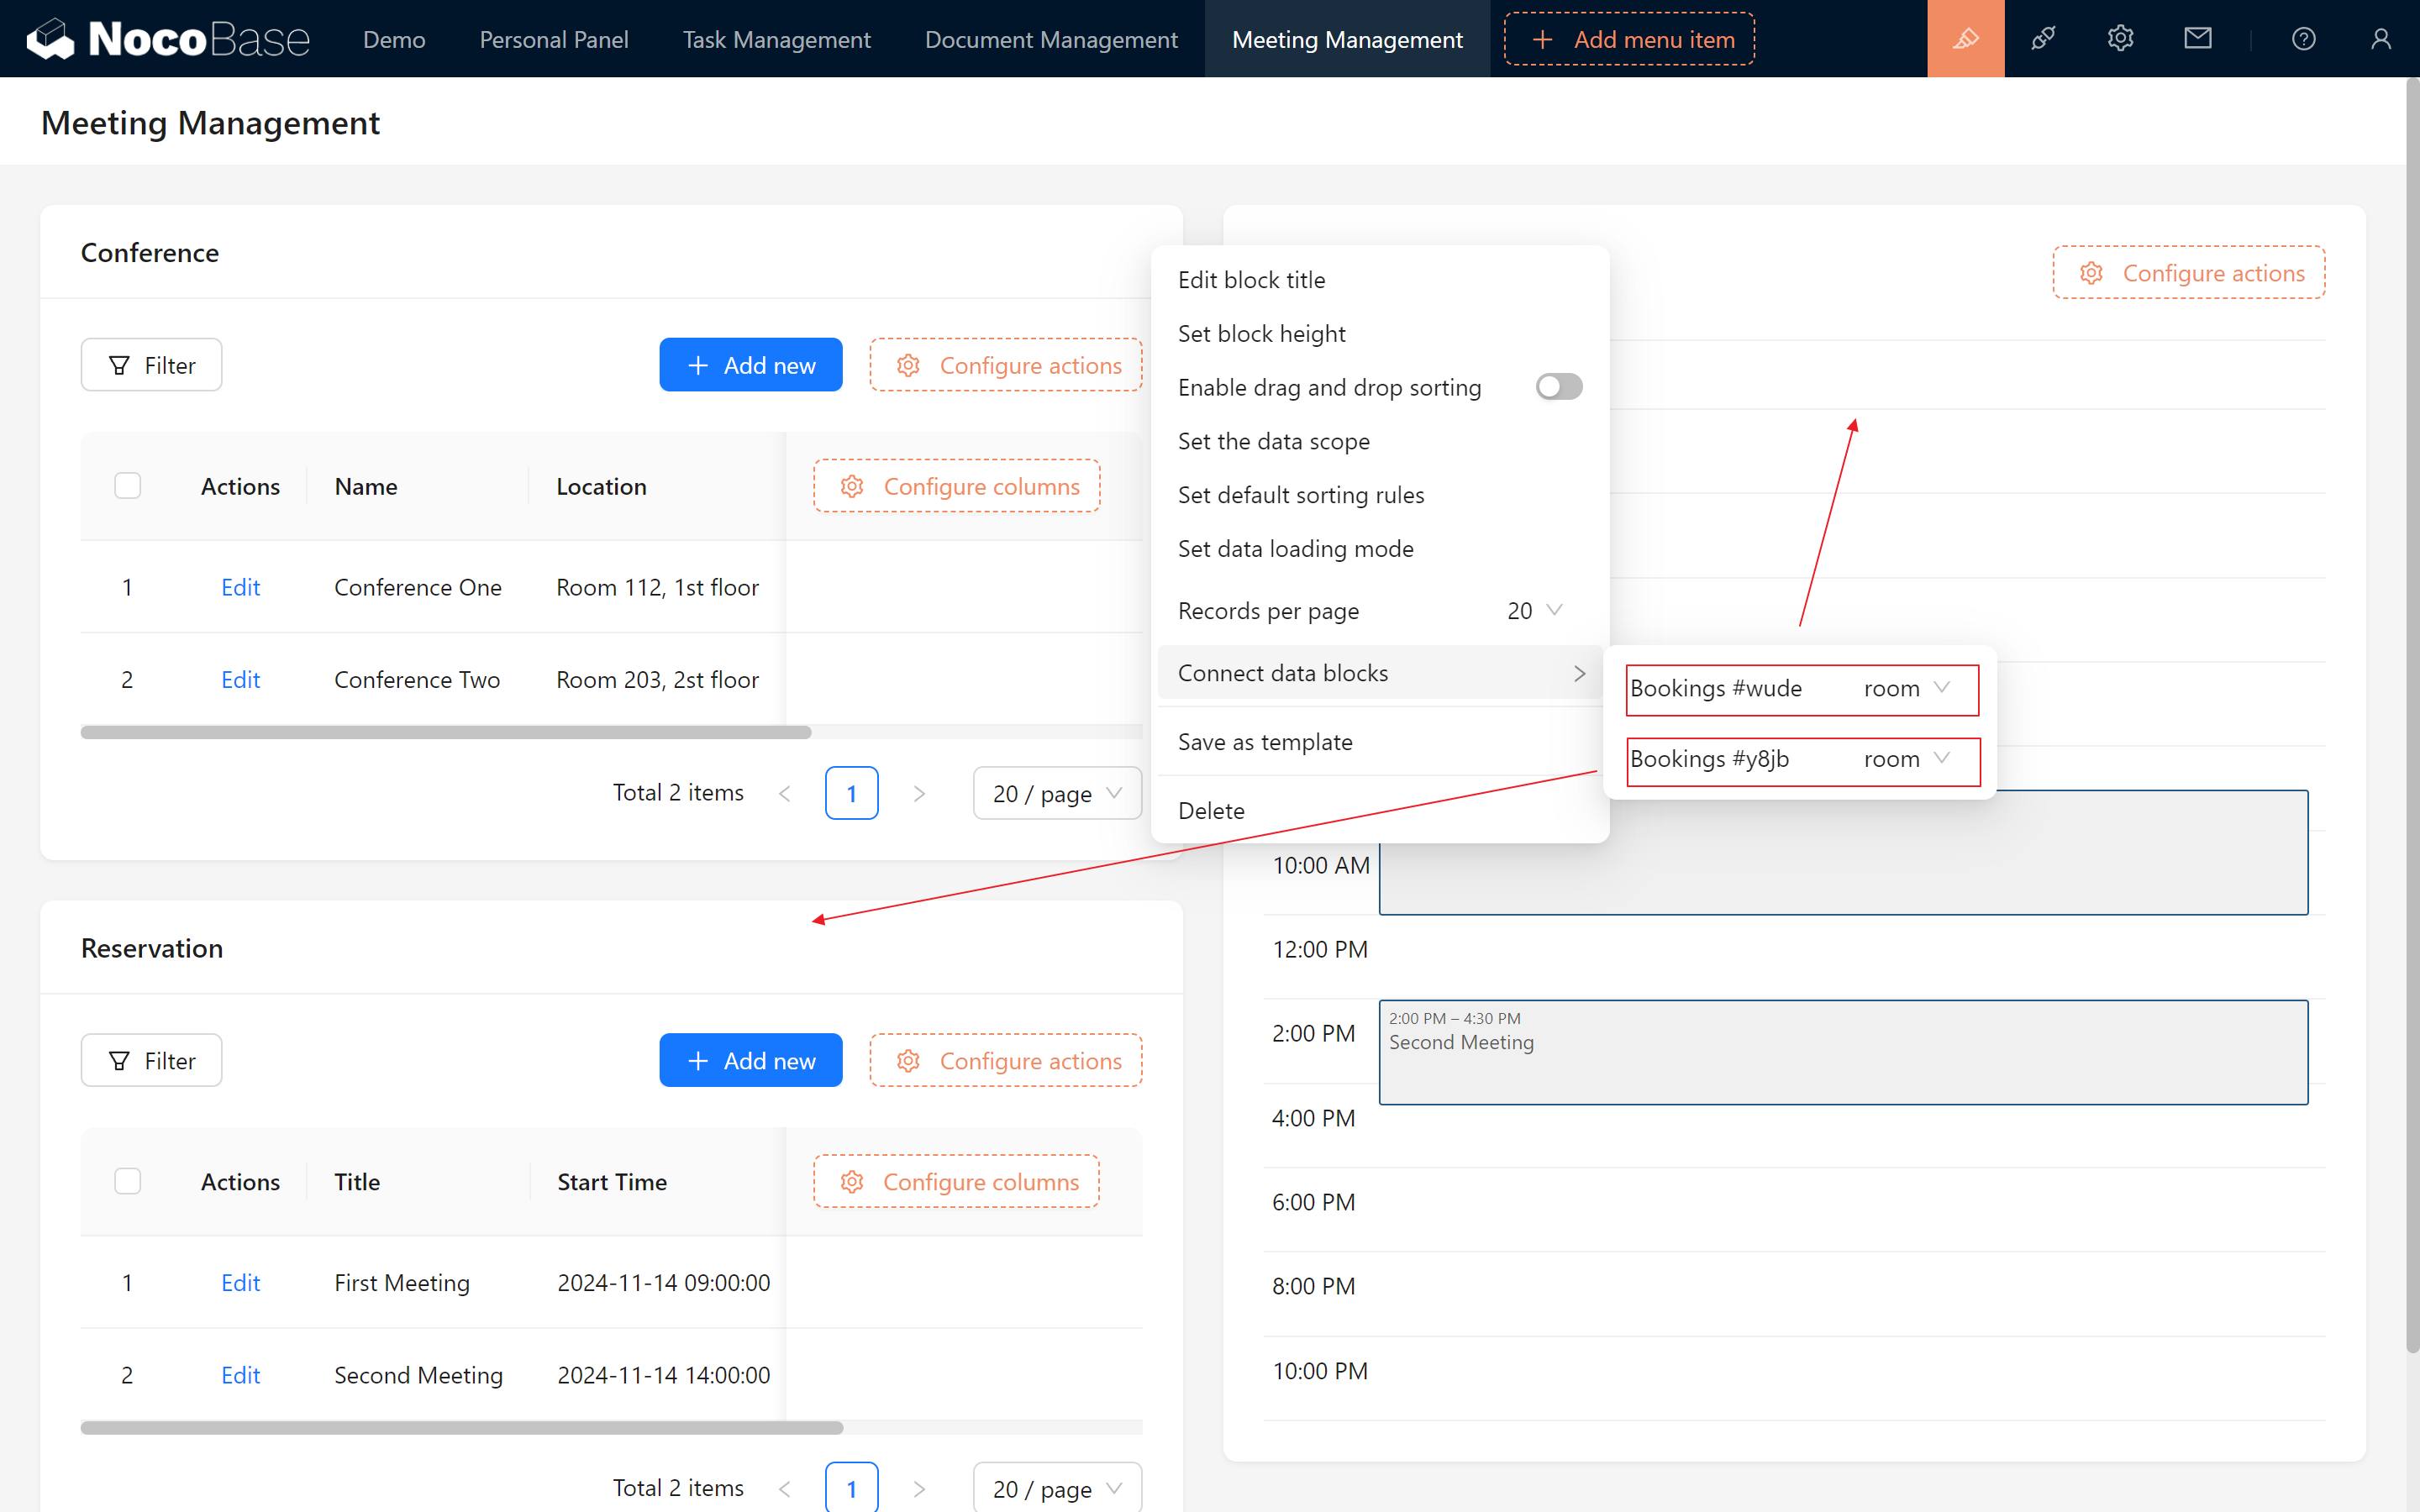
Once connected, clicking on the Meeting Room table filters the other two tables accordingly! Clicking the selected item again will cancel the selection.

12.3 Detecting Meeting Room Occupancy
Once the page is configured, we need to add an important feature: detecting the occupancy of a meeting room. This feature will check if the target meeting room is occupied at the specified time period when creating or updating a meeting, in order to avoid booking conflicts.

12.3.1 Setting up a “pre-operation event” Workflow
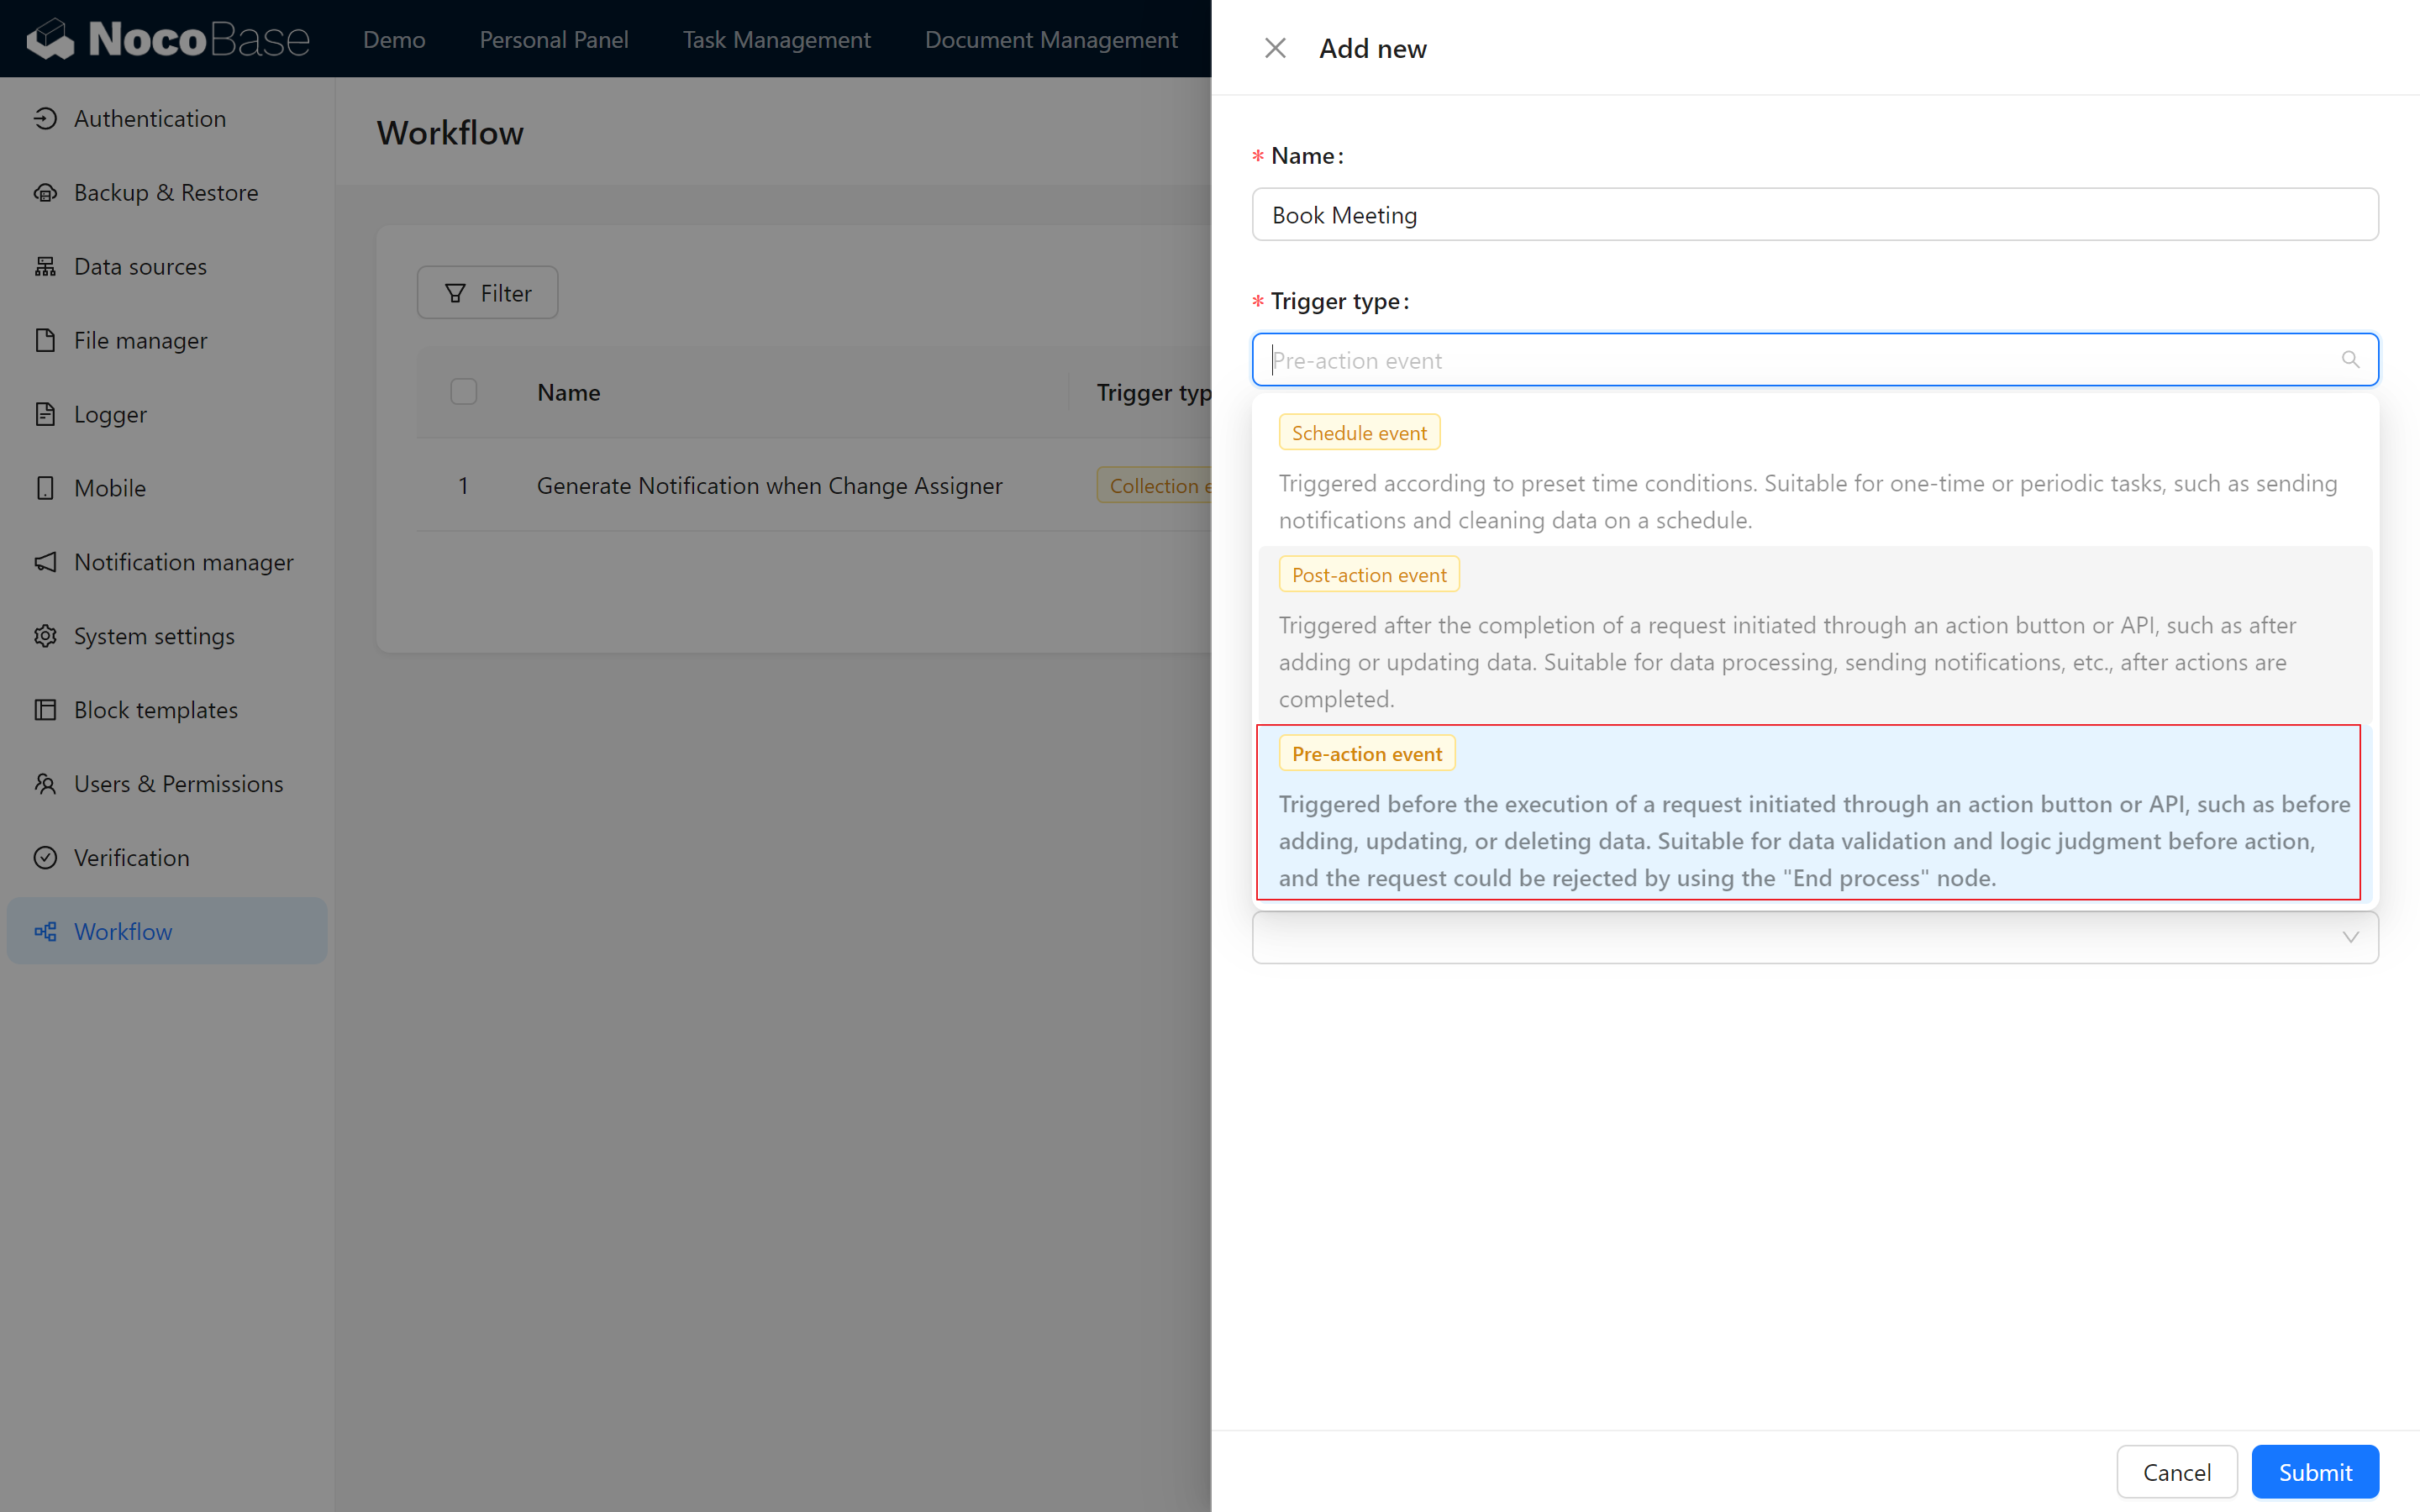
In order to perform the detection at the scheduled time, we use a special workflow - the “pre-action event”:
- Pre-action events (commercial plugin): perform a series of operations before adding, deleting, or changing data, which can be paused and intercepted in advance at any time, in a way that is very close to our daily code development process!
12.3.2 Configuring Nodes
In the workflow for detecting occupancy, we need the following types of nodes:
- Calculation nodes (data transformation logic to handle modifications, additions)
- SQL operations (to perform SQL queries)
- JSON query (commercial plugin for parsing JSON data)
- Response message (commercial plug-in, used to return alert messages)
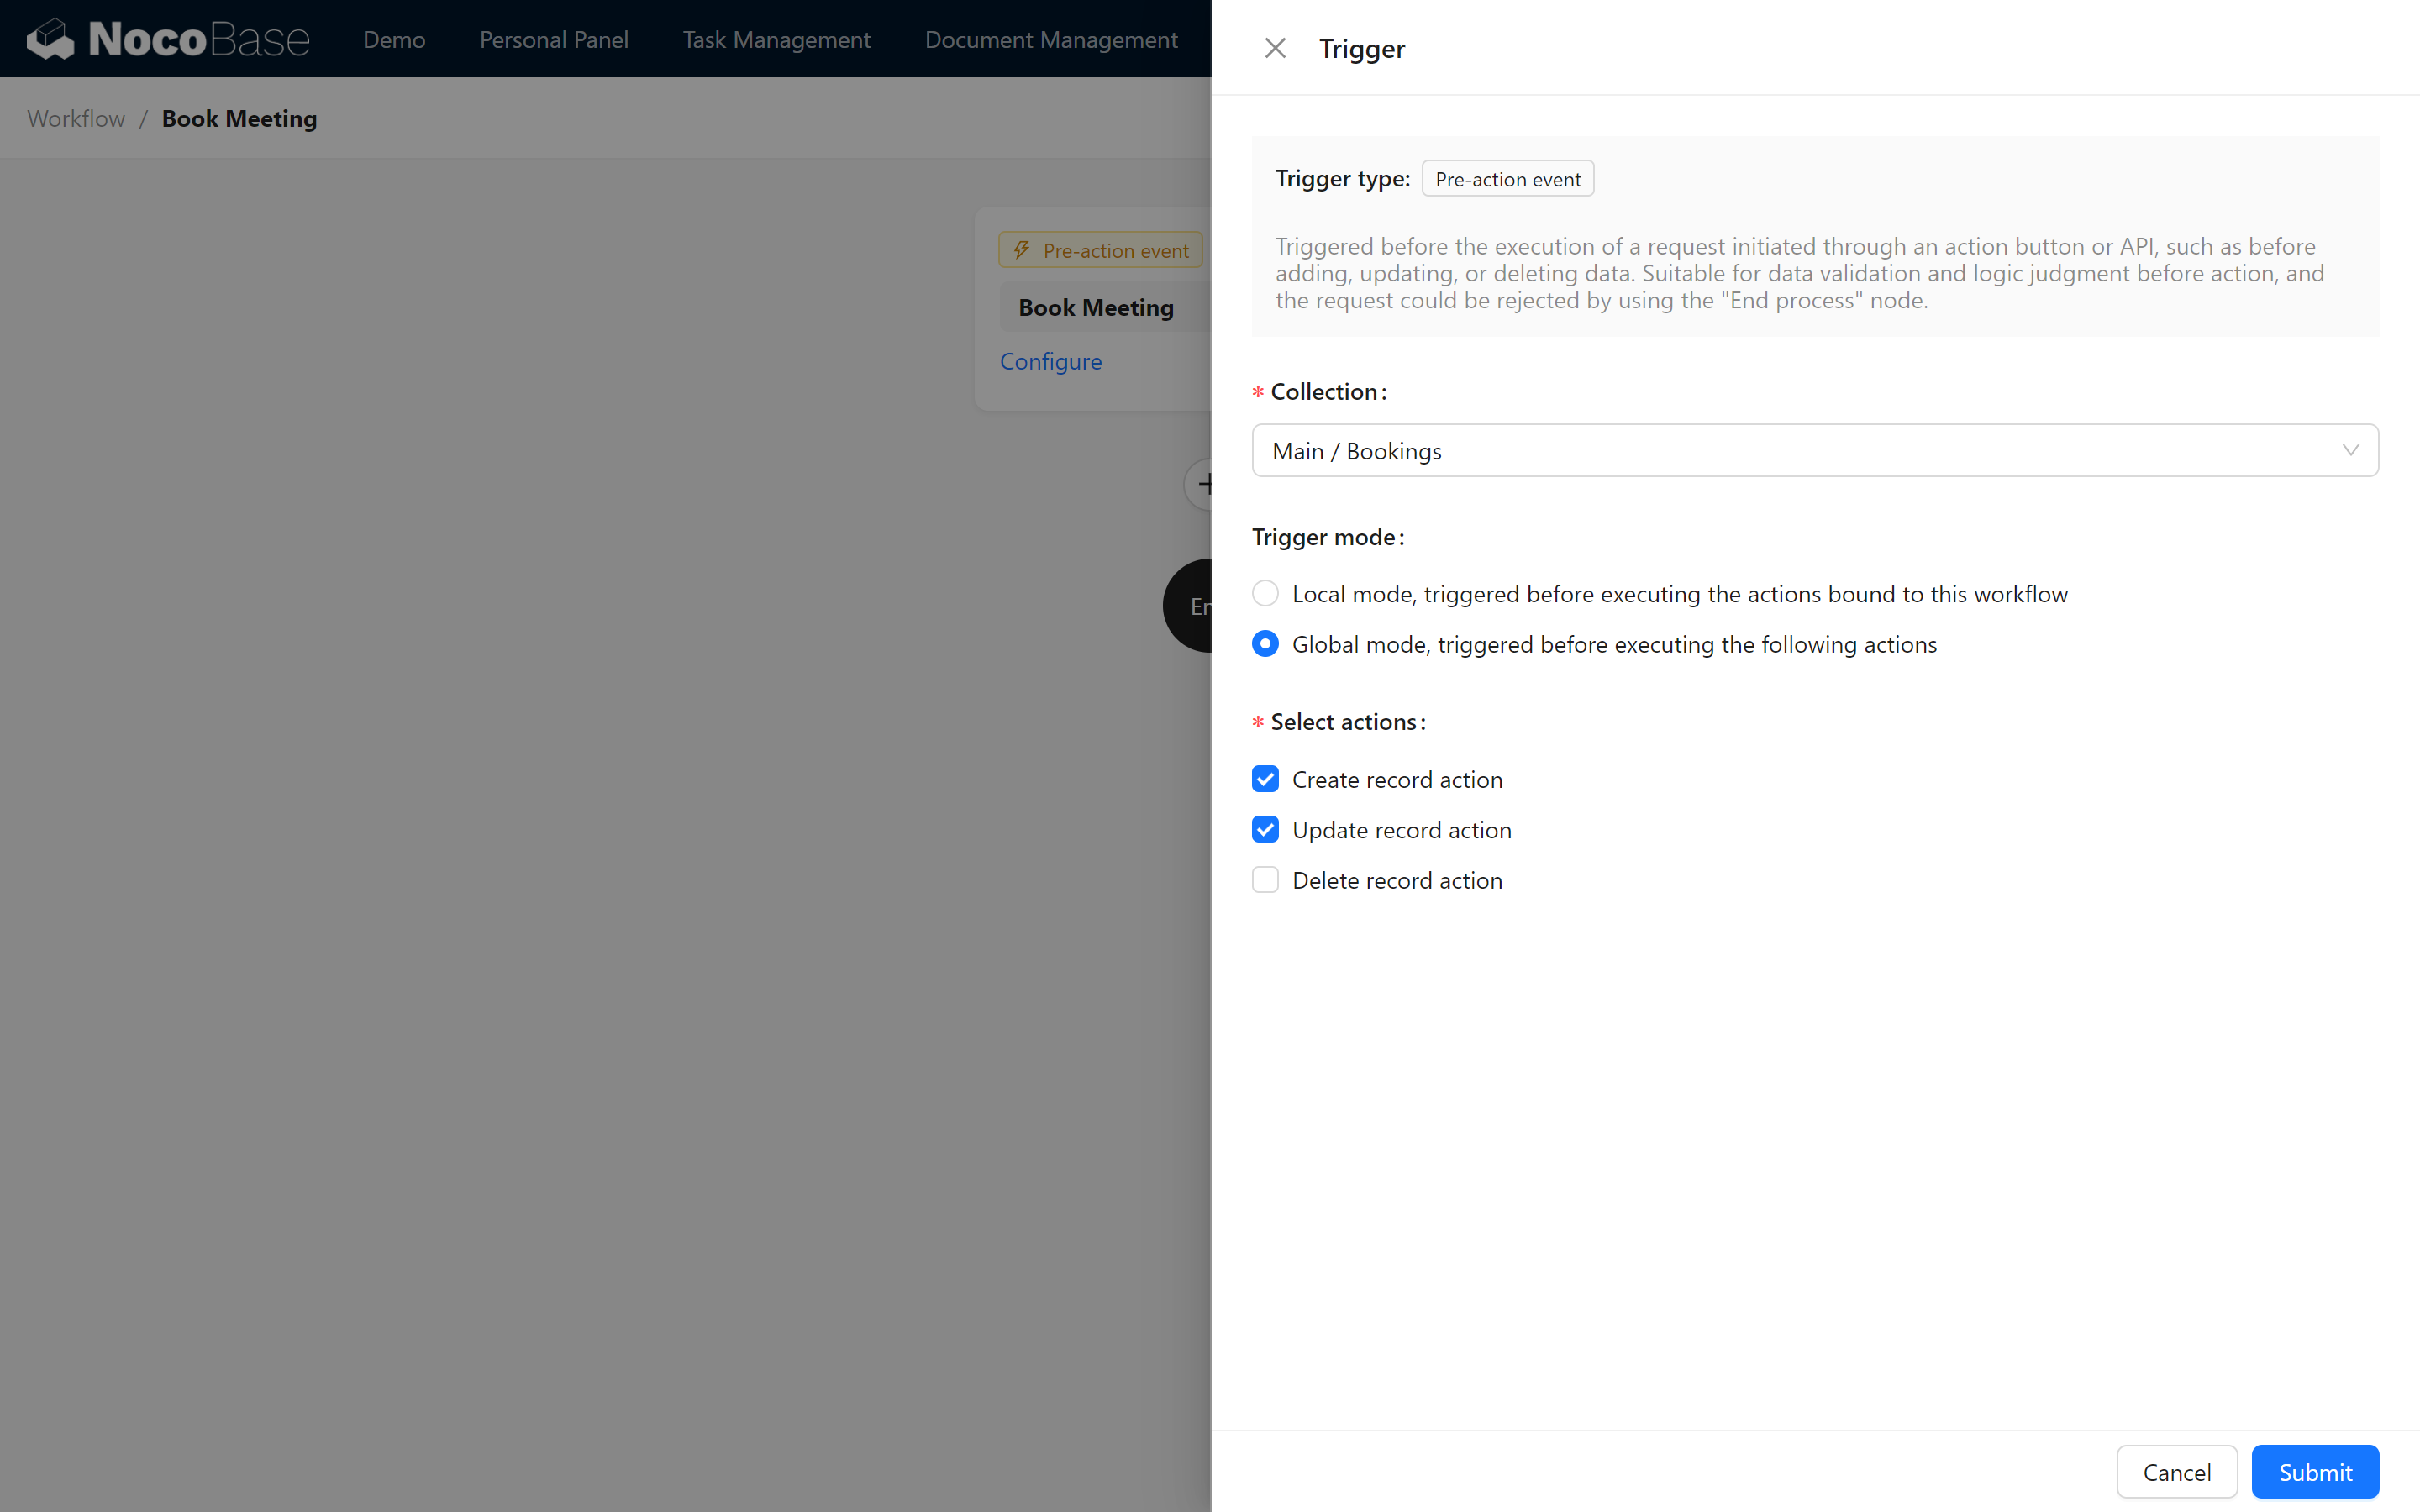
12.3.3 Binding the Appointment Collection and Configuring Triggers
Now, let's bind the appointment collection, select “Global Mode” for the trigger mode, and select the operation type as Create Record and Update Record.
12.4 Configure the Calculation node
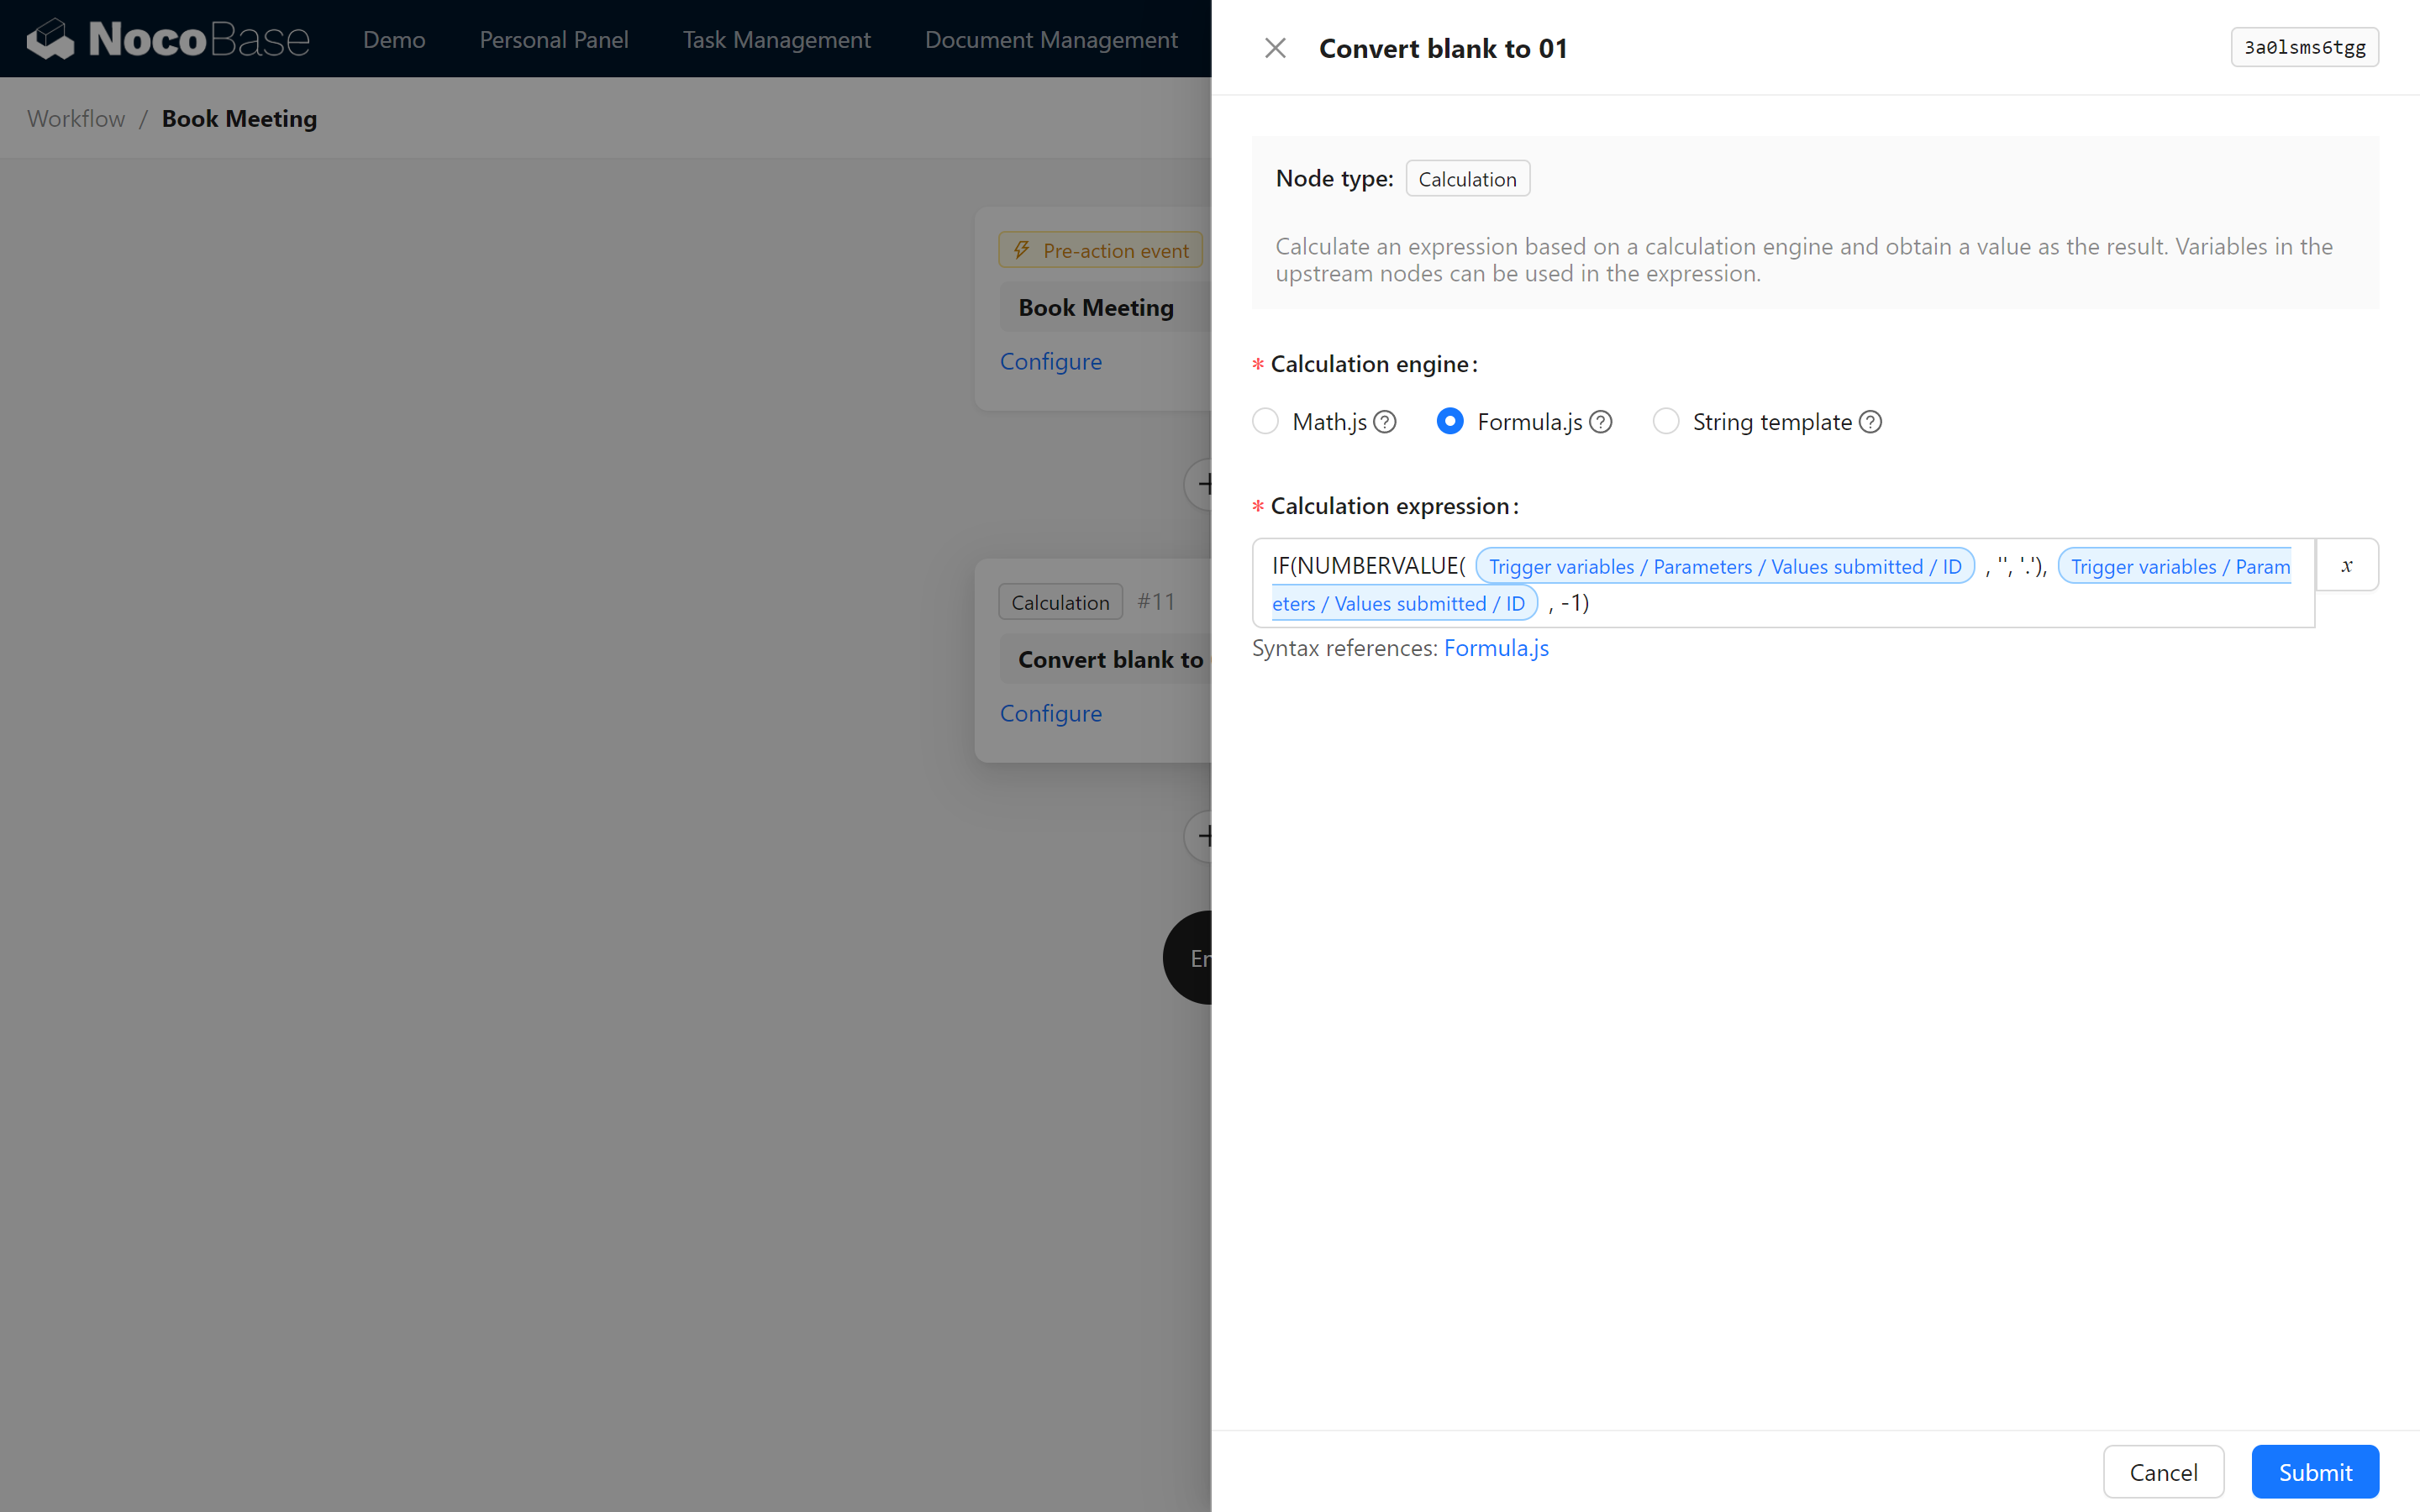
12.4.1 Creating the “Convert Blank ID to -1” operator node
We start by creating an operator node that converts a blank ID to -1. The operator node can convert the variable in the way we want, and offers the following three forms of operation:
- Math.js (refer to Math.js)
- Formula.js (reference Formula.js)
- String template (for data splicing)
Here, we use Formula.js for numerical judgment:
12.5 Creating the SQL Operation Node
Next, create the SQL operation node, execute the query statement, and check the available meeting rooms:
12.5.1 Querying available conference room SQL statements
SQL Note: Variables will be directly substituted into the sql statement, please check the variables carefully to avoid SQL injection. Add single quotes where appropriate.
Where the variables are respectively:
{{$jobsMapByNodeKey.3a0lsms6tgg}} Represents the result of the previous node, [node data/convert blank ID to -1]
{{$context.params.values.end_time}} represents [Trigger variables/Parameters/Values submitted/End Time]
{{$context.params.values.start_time}} for [Trigger variable/Parameter/alues submitted/Start Time].
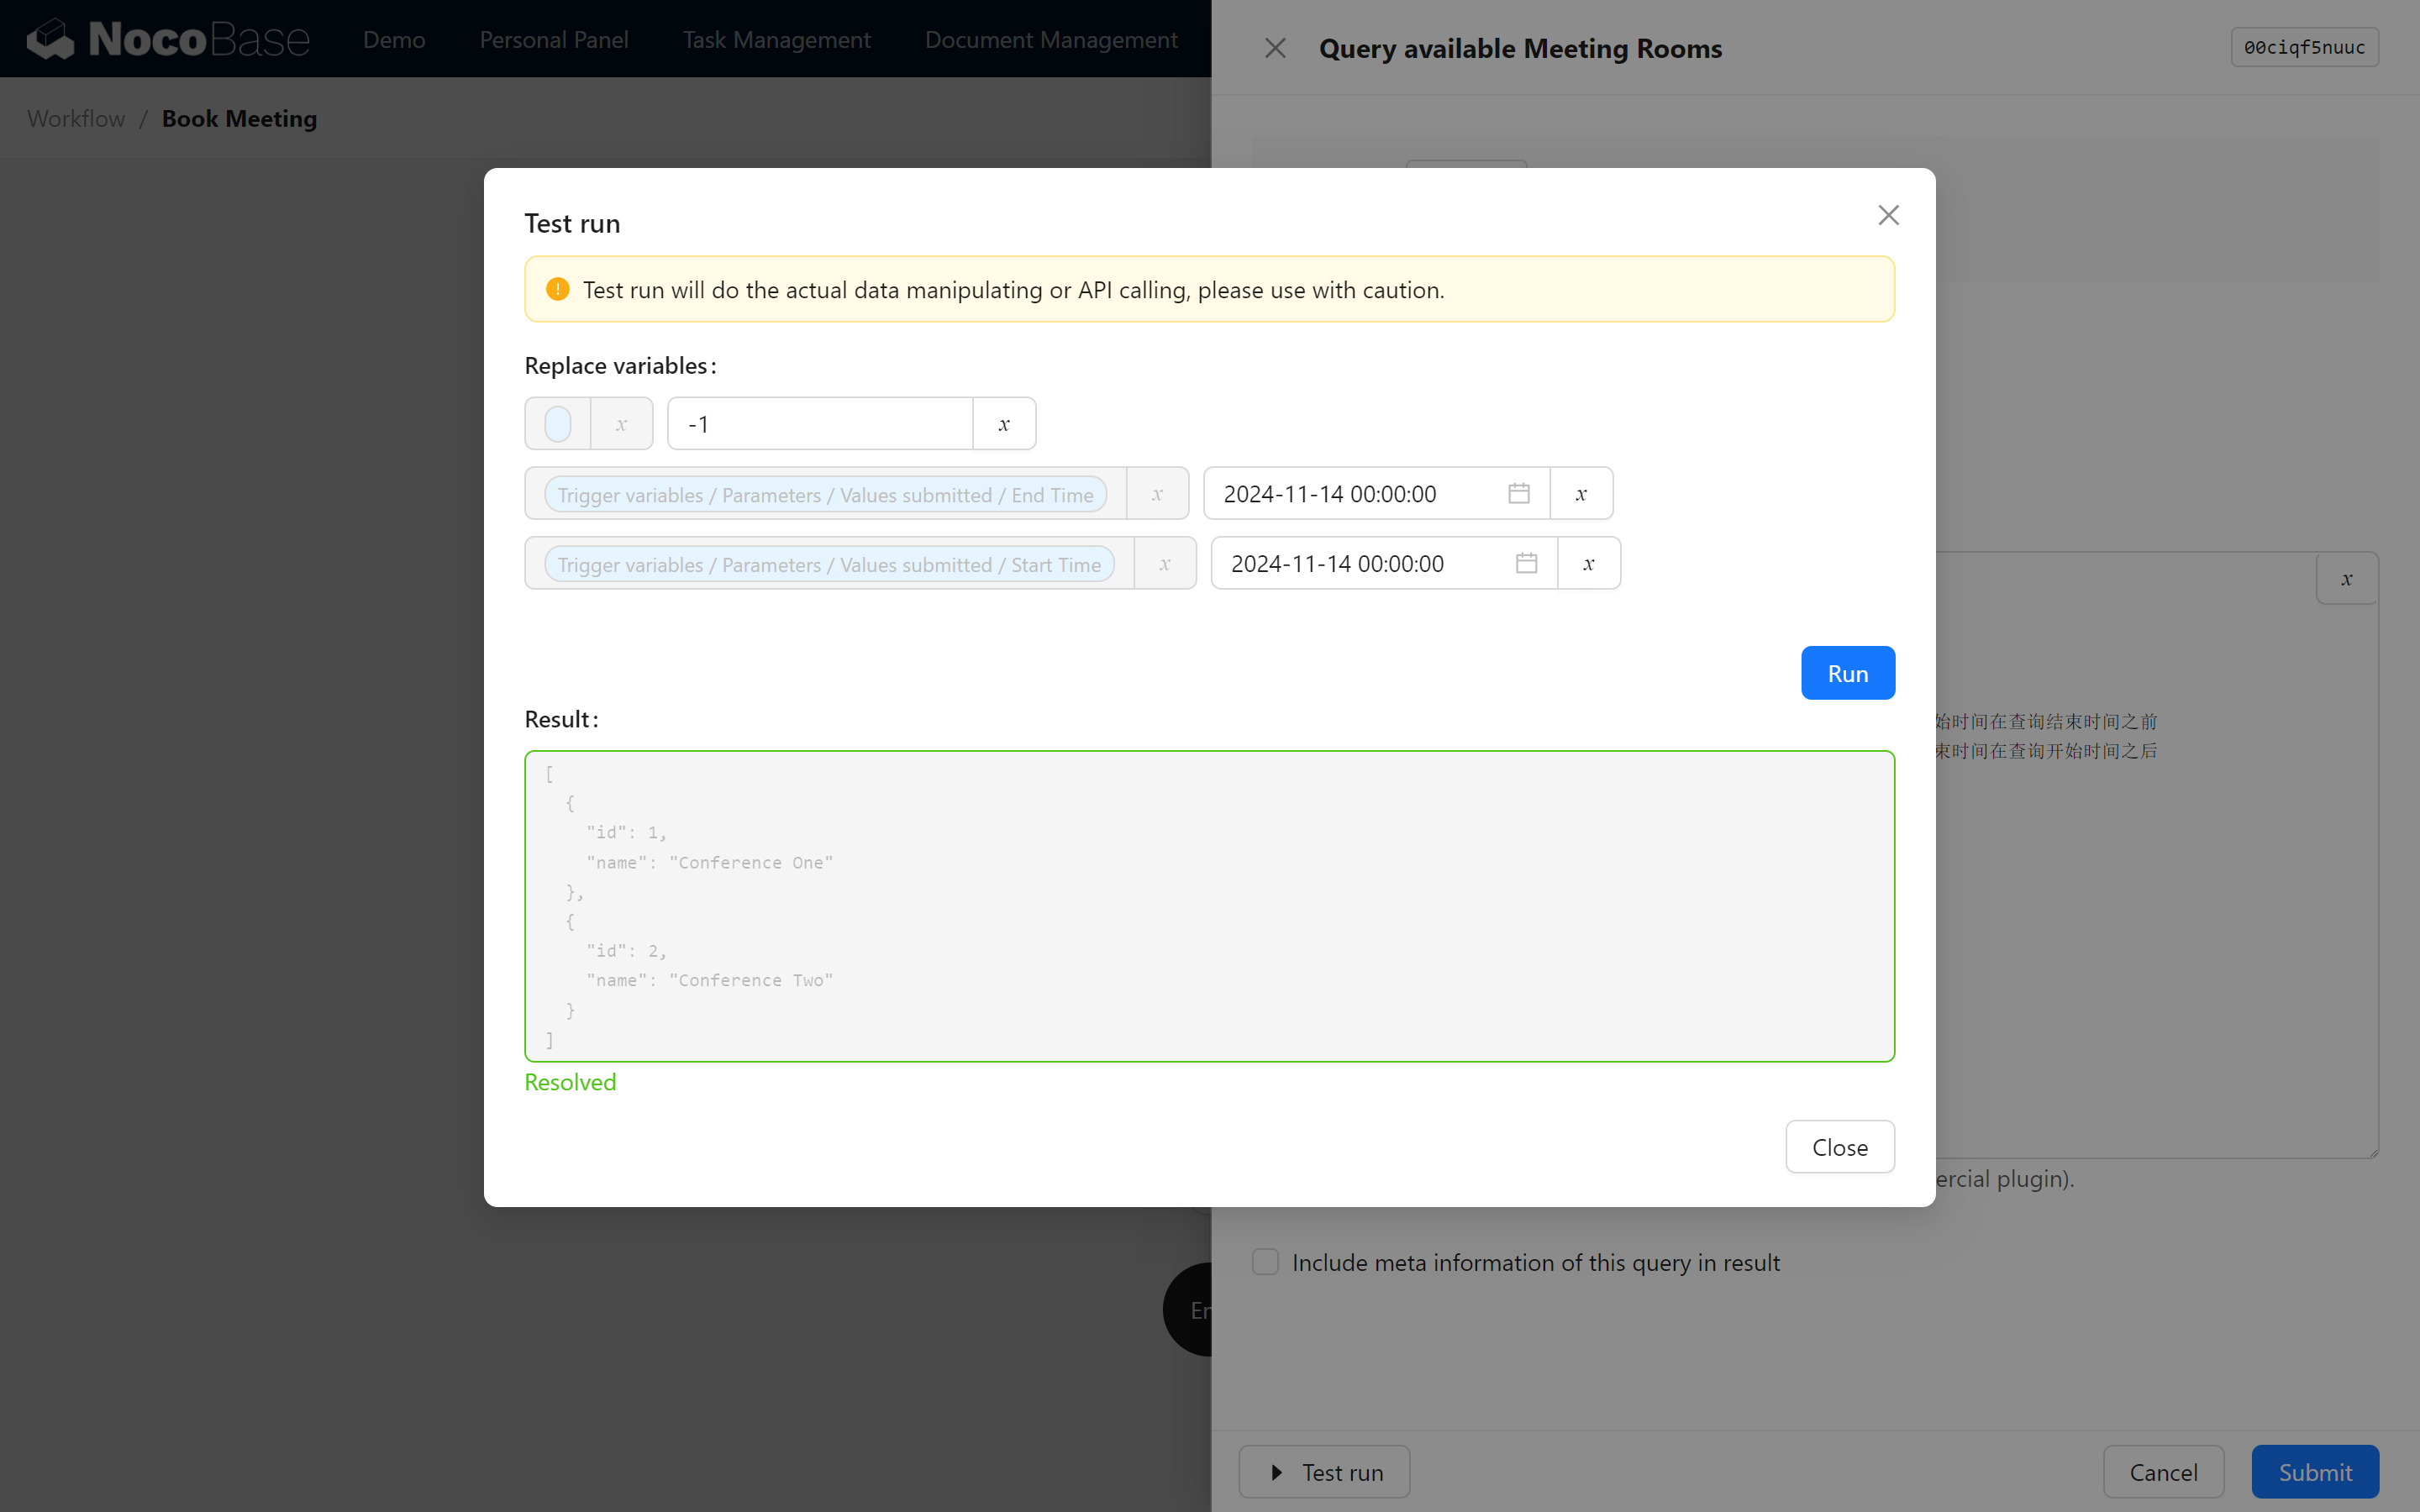
12.5.2 Testing the SQL
Our goal is to query all rooms that do not conflict with the target timestamp.
In the meantime, you can click “Test run” below to change the variable values and debug the SQL.

12.6 JSON Parsing
12.6.1 Configuring the JSON Query Node
Through the test in the previous step, we can observe that the result is in the following form, at this time you need to enable the JSON query node plugin:
JSON is parsed in three ways, which are: JMESPath JSON Path Plus JSONata
Here we choose any one of them, such as JMESPath format, we need to filter the list of all available conference room names, so the expression is filled:
The attribute mapping configuration is for the list of objects and is not necessary at the moment, so it can be left out.

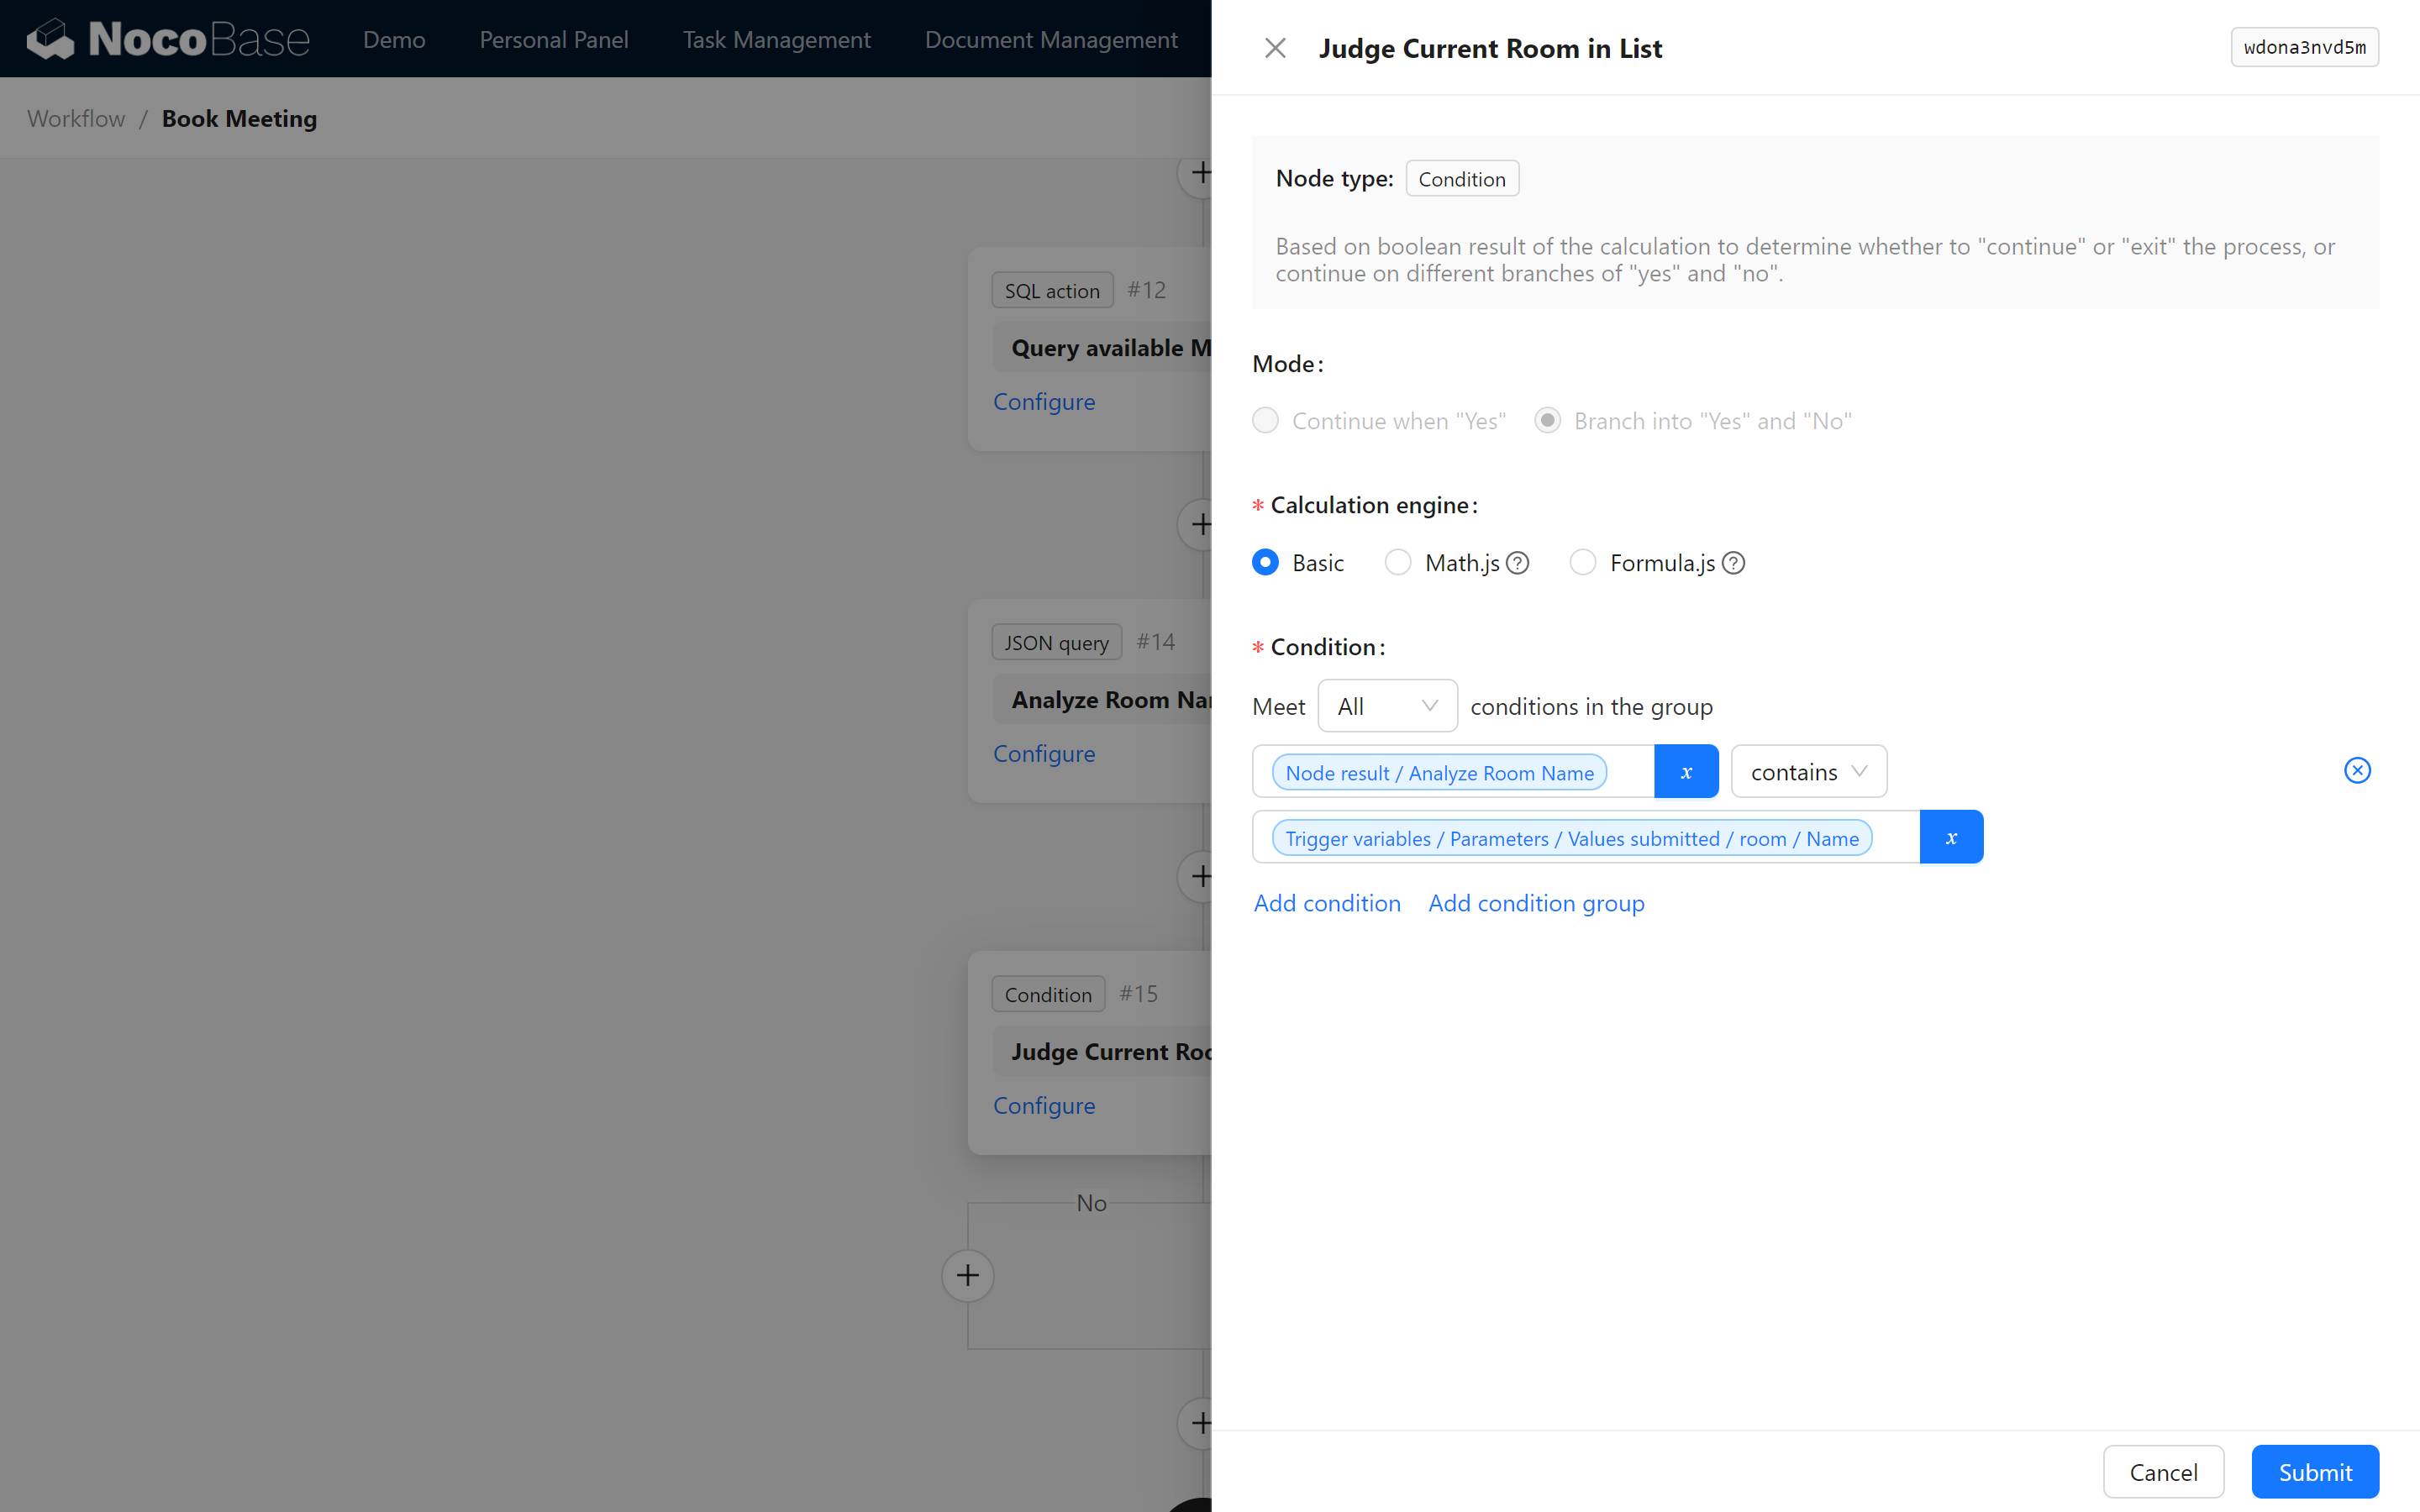
12.7 Condition Judgment
Configure the Conditional Judgment node to determine whether the current conference room is in the list of available conference rooms. According to the judgment result of Yes or No, configure the response message respectively:
Condition Setup: Use the "Basic" operation for the condition:
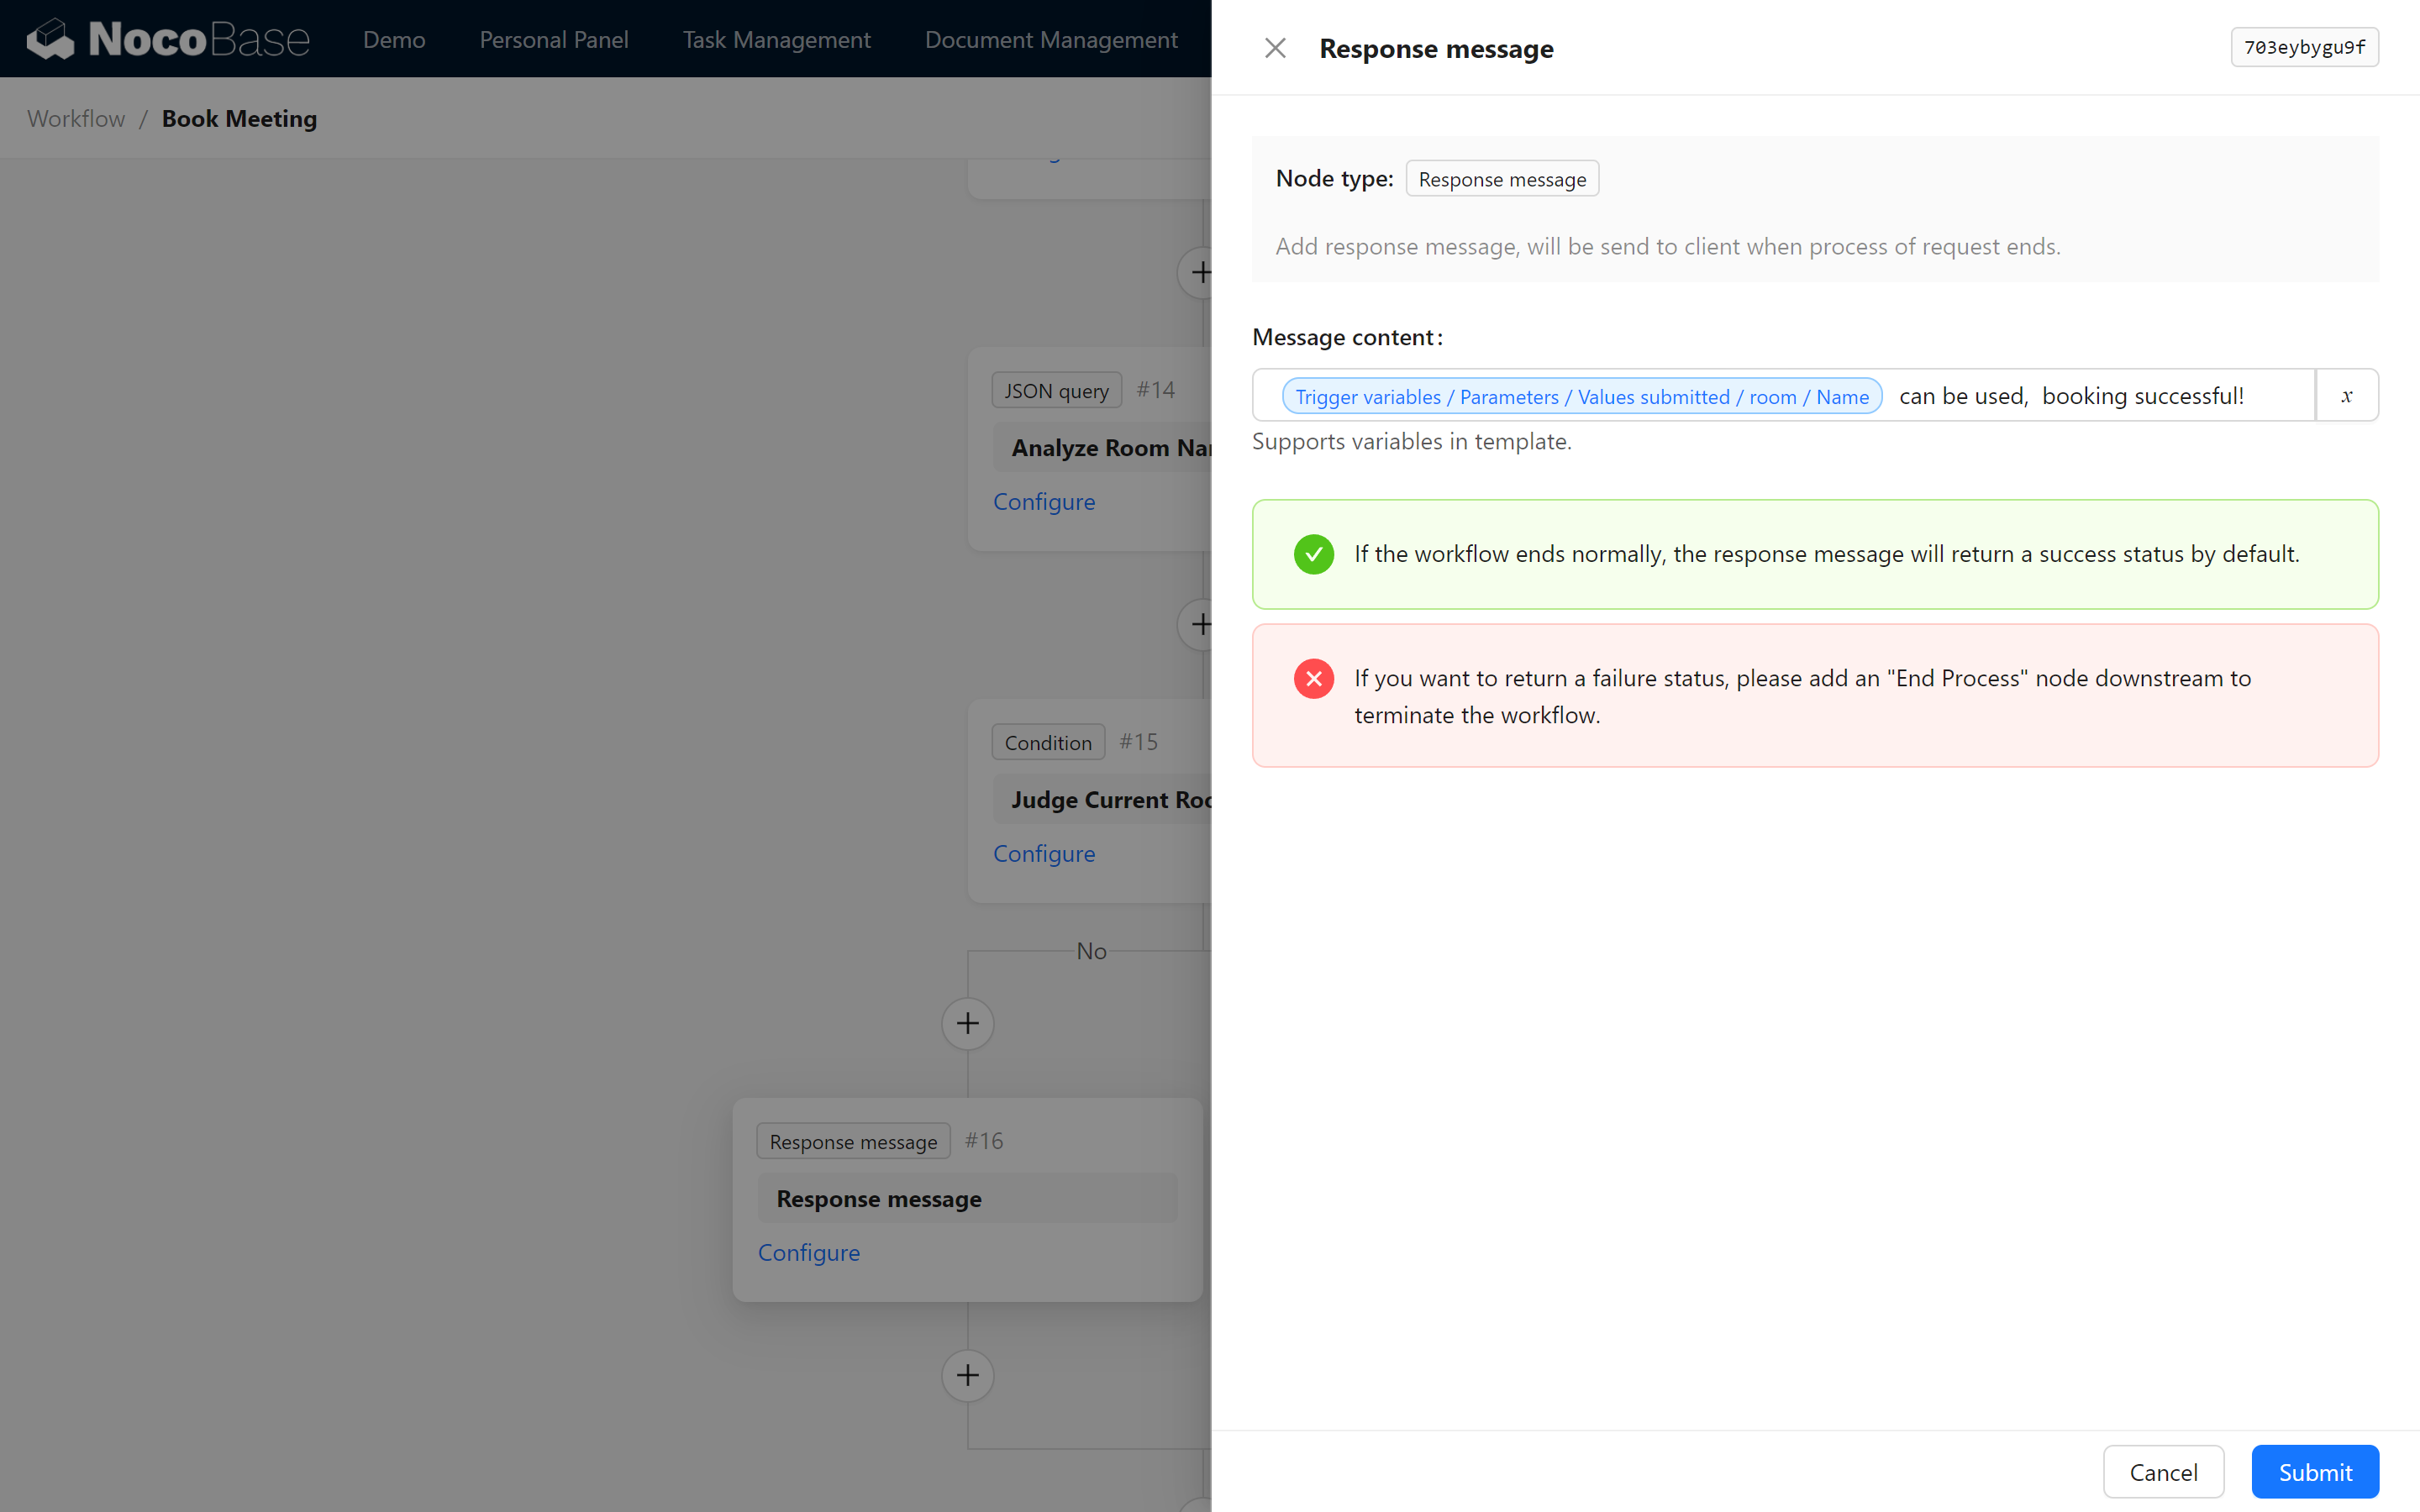
12.7.1 Yes: Configure Success Message
Enable the Workflow: Response Message Plugin:
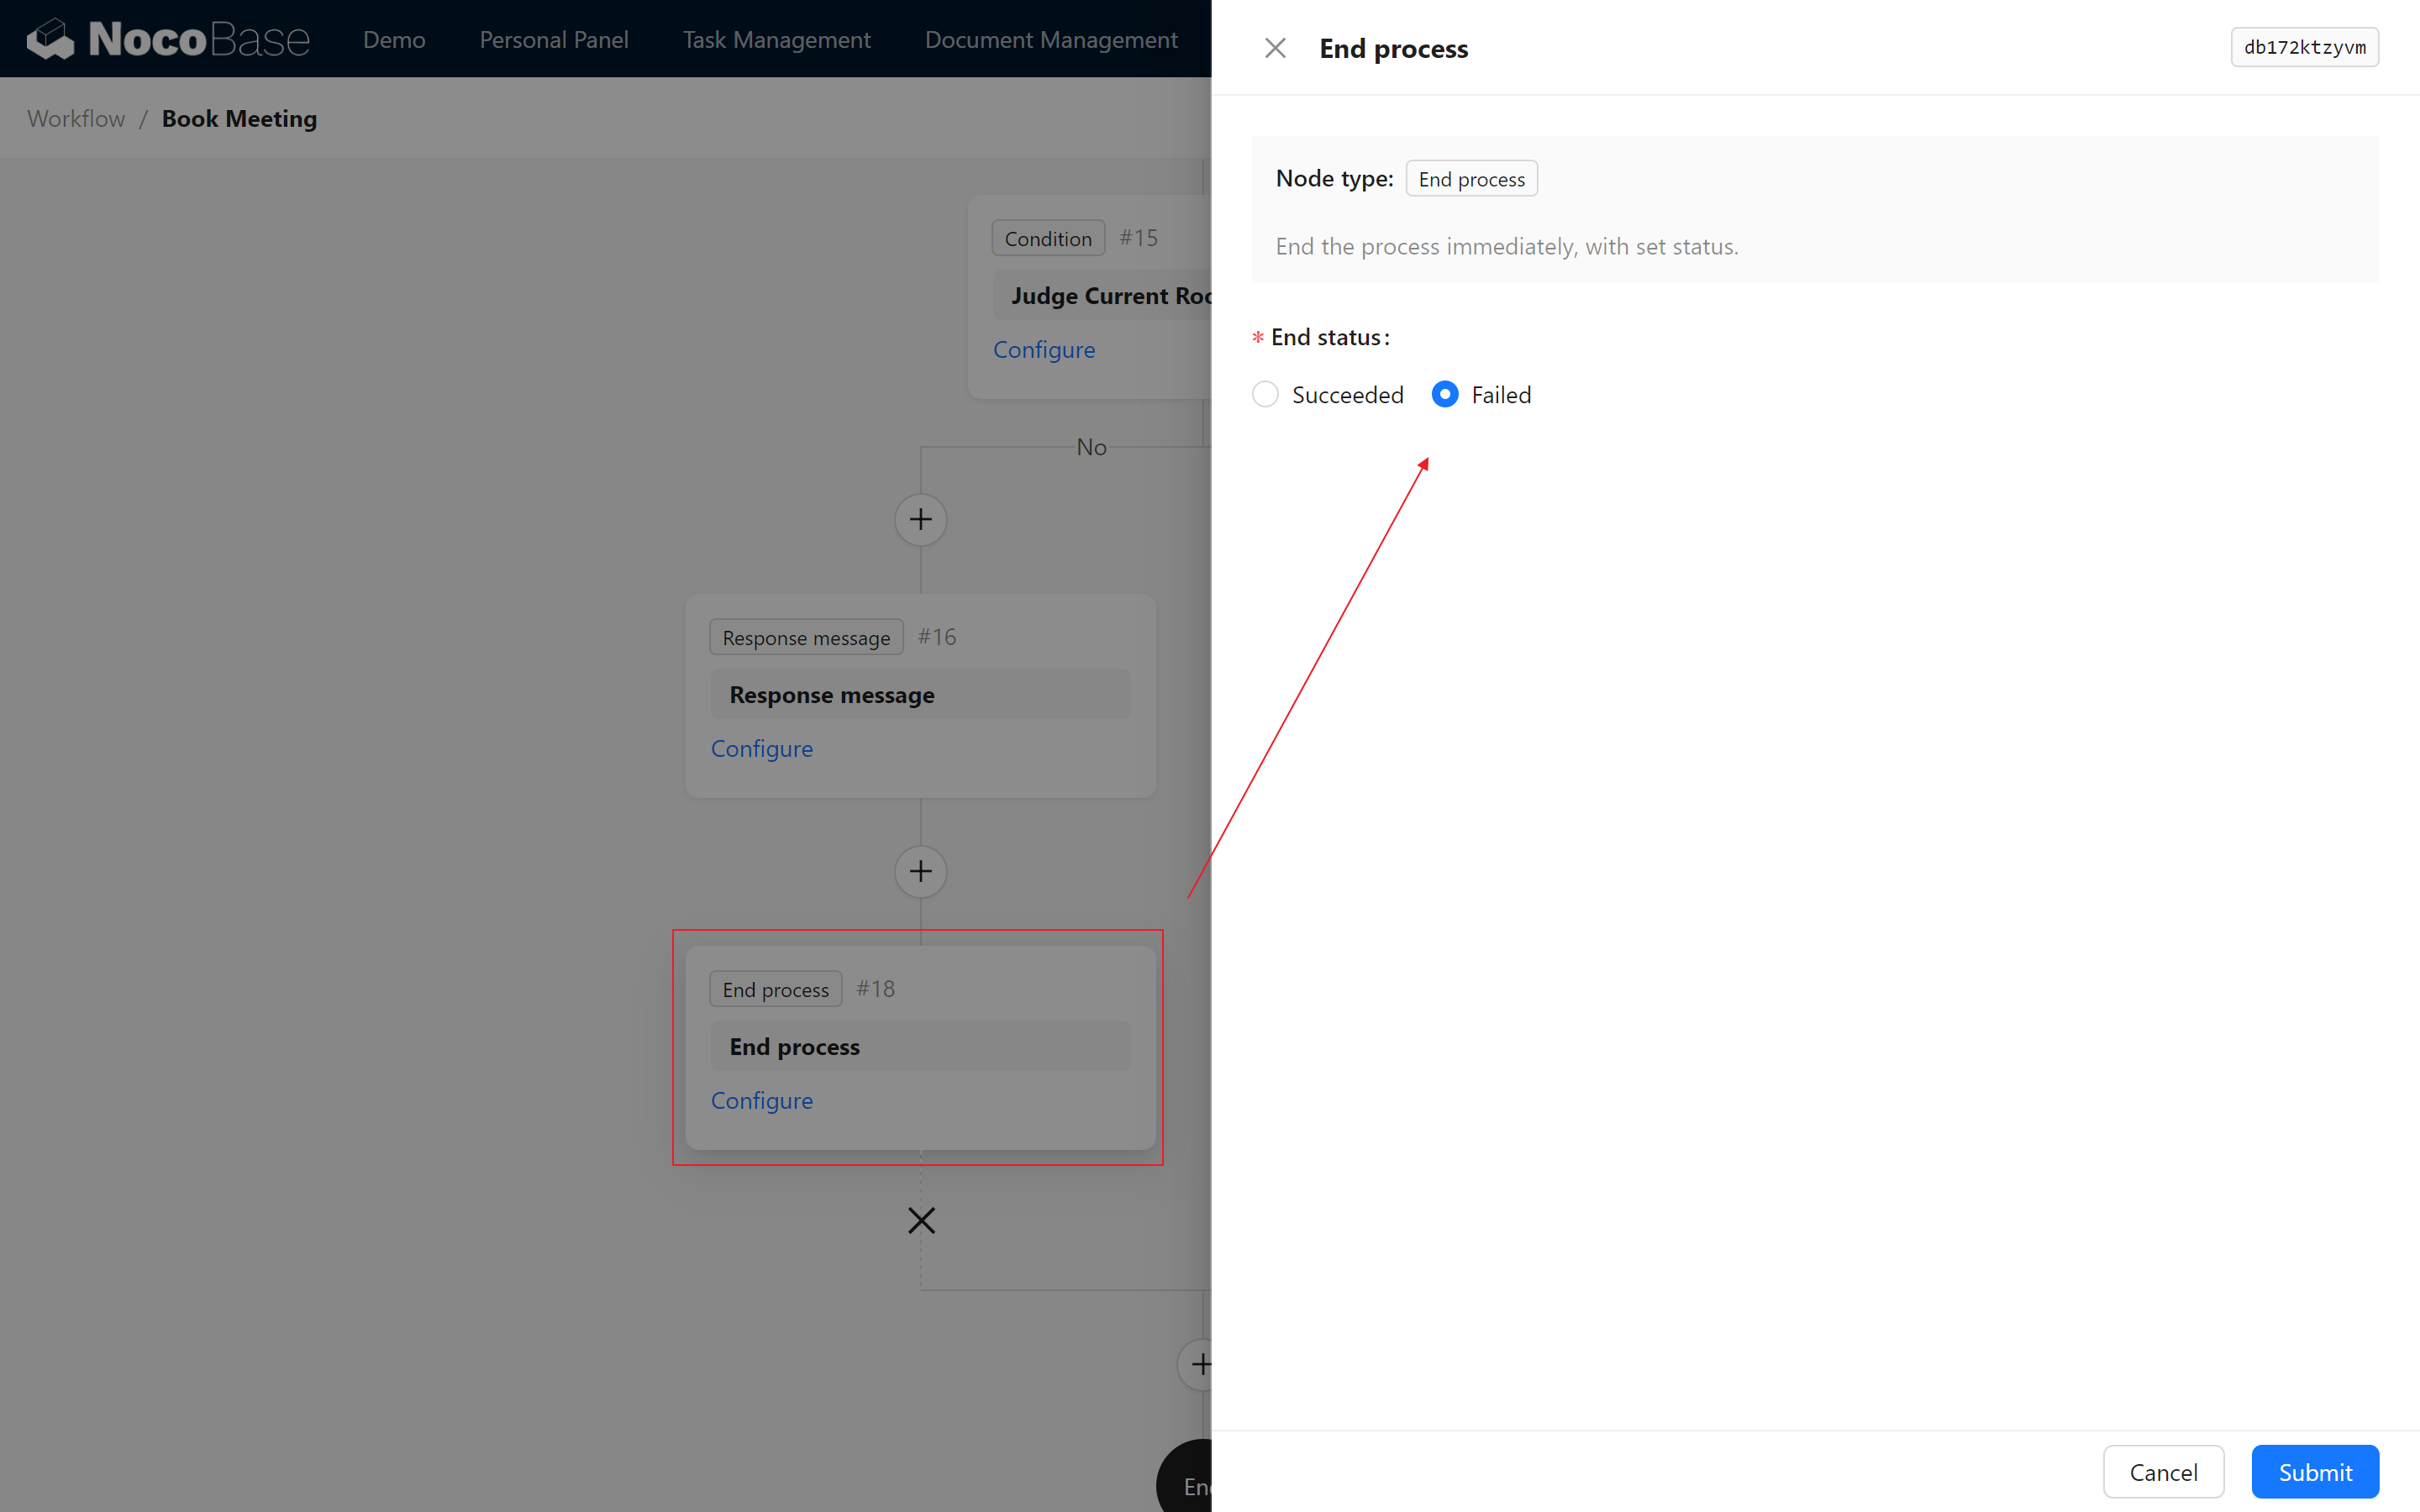
12.7.2 No: Configure Failure Message
For the case where the meeting room is unavailable:
Note: Ensure that the End Workflow node is configured to manually terminate the workflow in case of failure.
12.8 Function Testing and Debugging Details
Now, we move to the final testing phase of the meeting management system. This phase ensures that the workflow can correctly detect and prevent conflicting meeting room bookings.
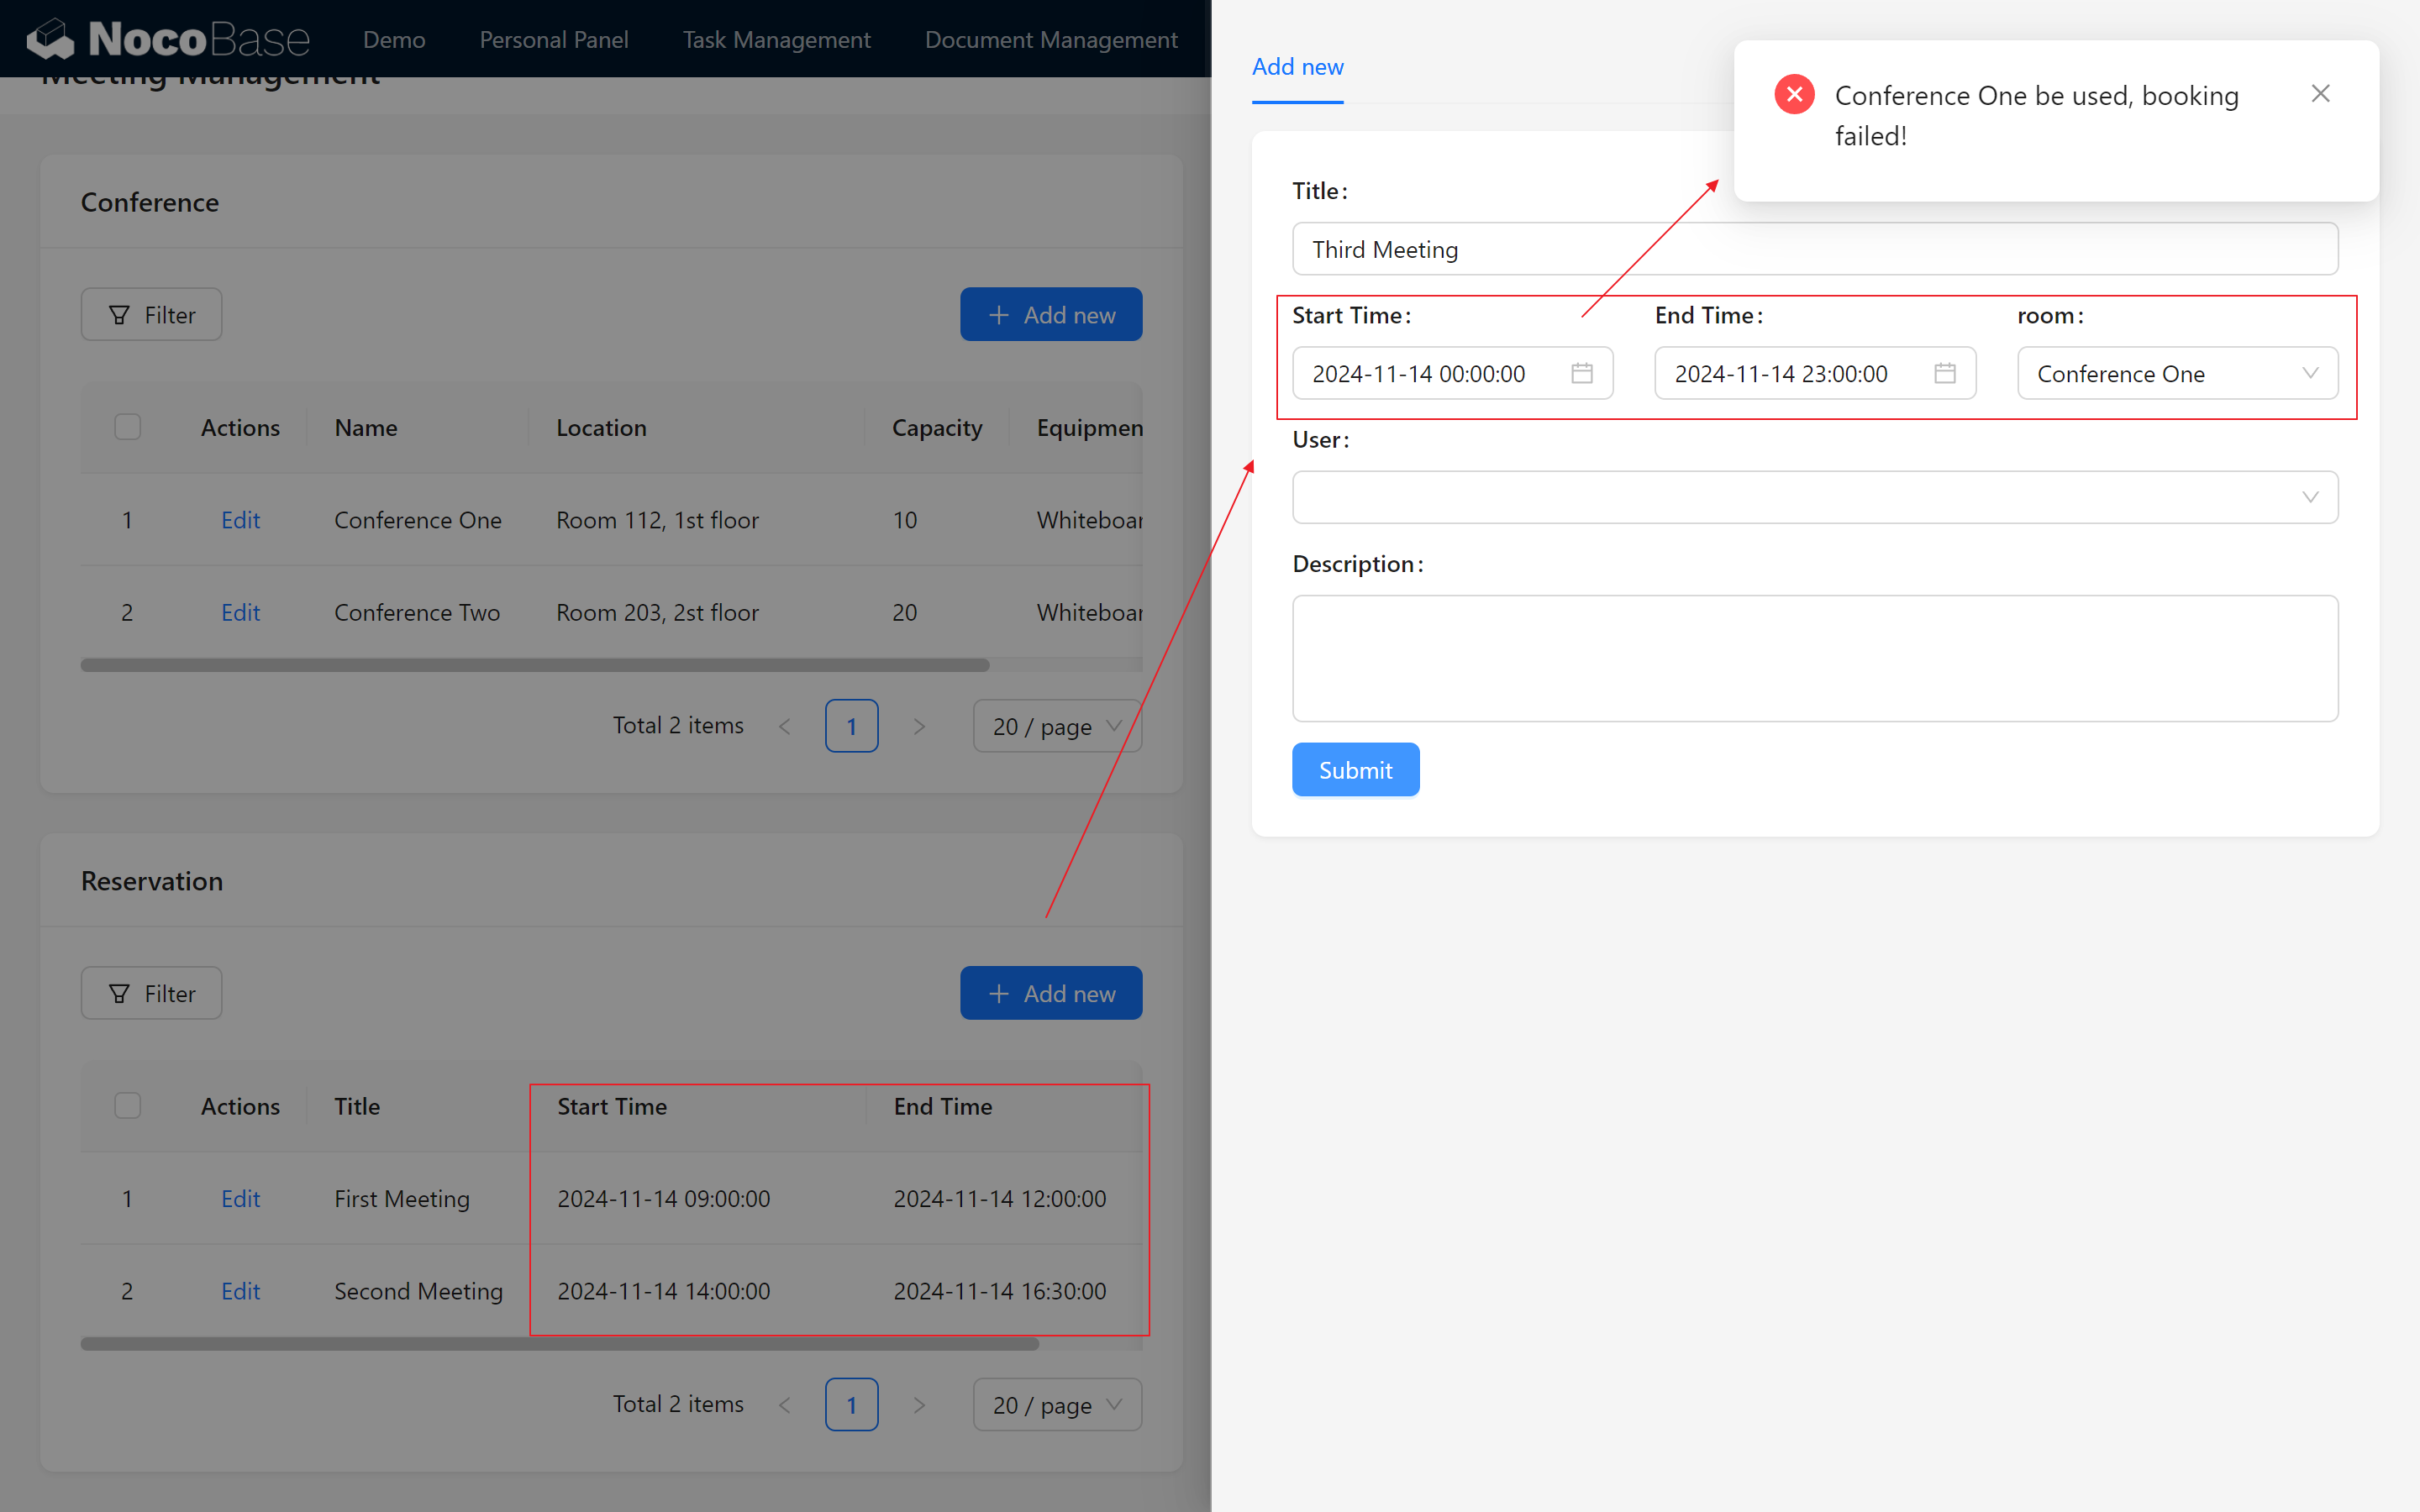
12.8.1 Adding a Booking with Conflicting Times
Firstly, let's try to add a meeting that conflicts with an existing scheduled time to see if the system blocks the operation and pops up an error message.
- Set a Conflicting Booking Period
Add a new booking in "Meeting Room 1" for the time period:
2024-11-14 00:00:00 - 2024-11-14 23:00:00
This time span covers the entire day, intentionally overlapping with existing bookings.
Existing Bookings in "Conference One"
2024-11-14 09:00:00 - 2024-11-14 12:00:002024-11-14 14:00:00 - 2024-11-14 16:30:00
These periods overlap with the new booking request.
(2024-11-14 00:00:00 - 2024-11-14 23:00:00)
That's been overlapped.
Therefore, based on logical judgment, the system should detect the time conflict and block this booking.
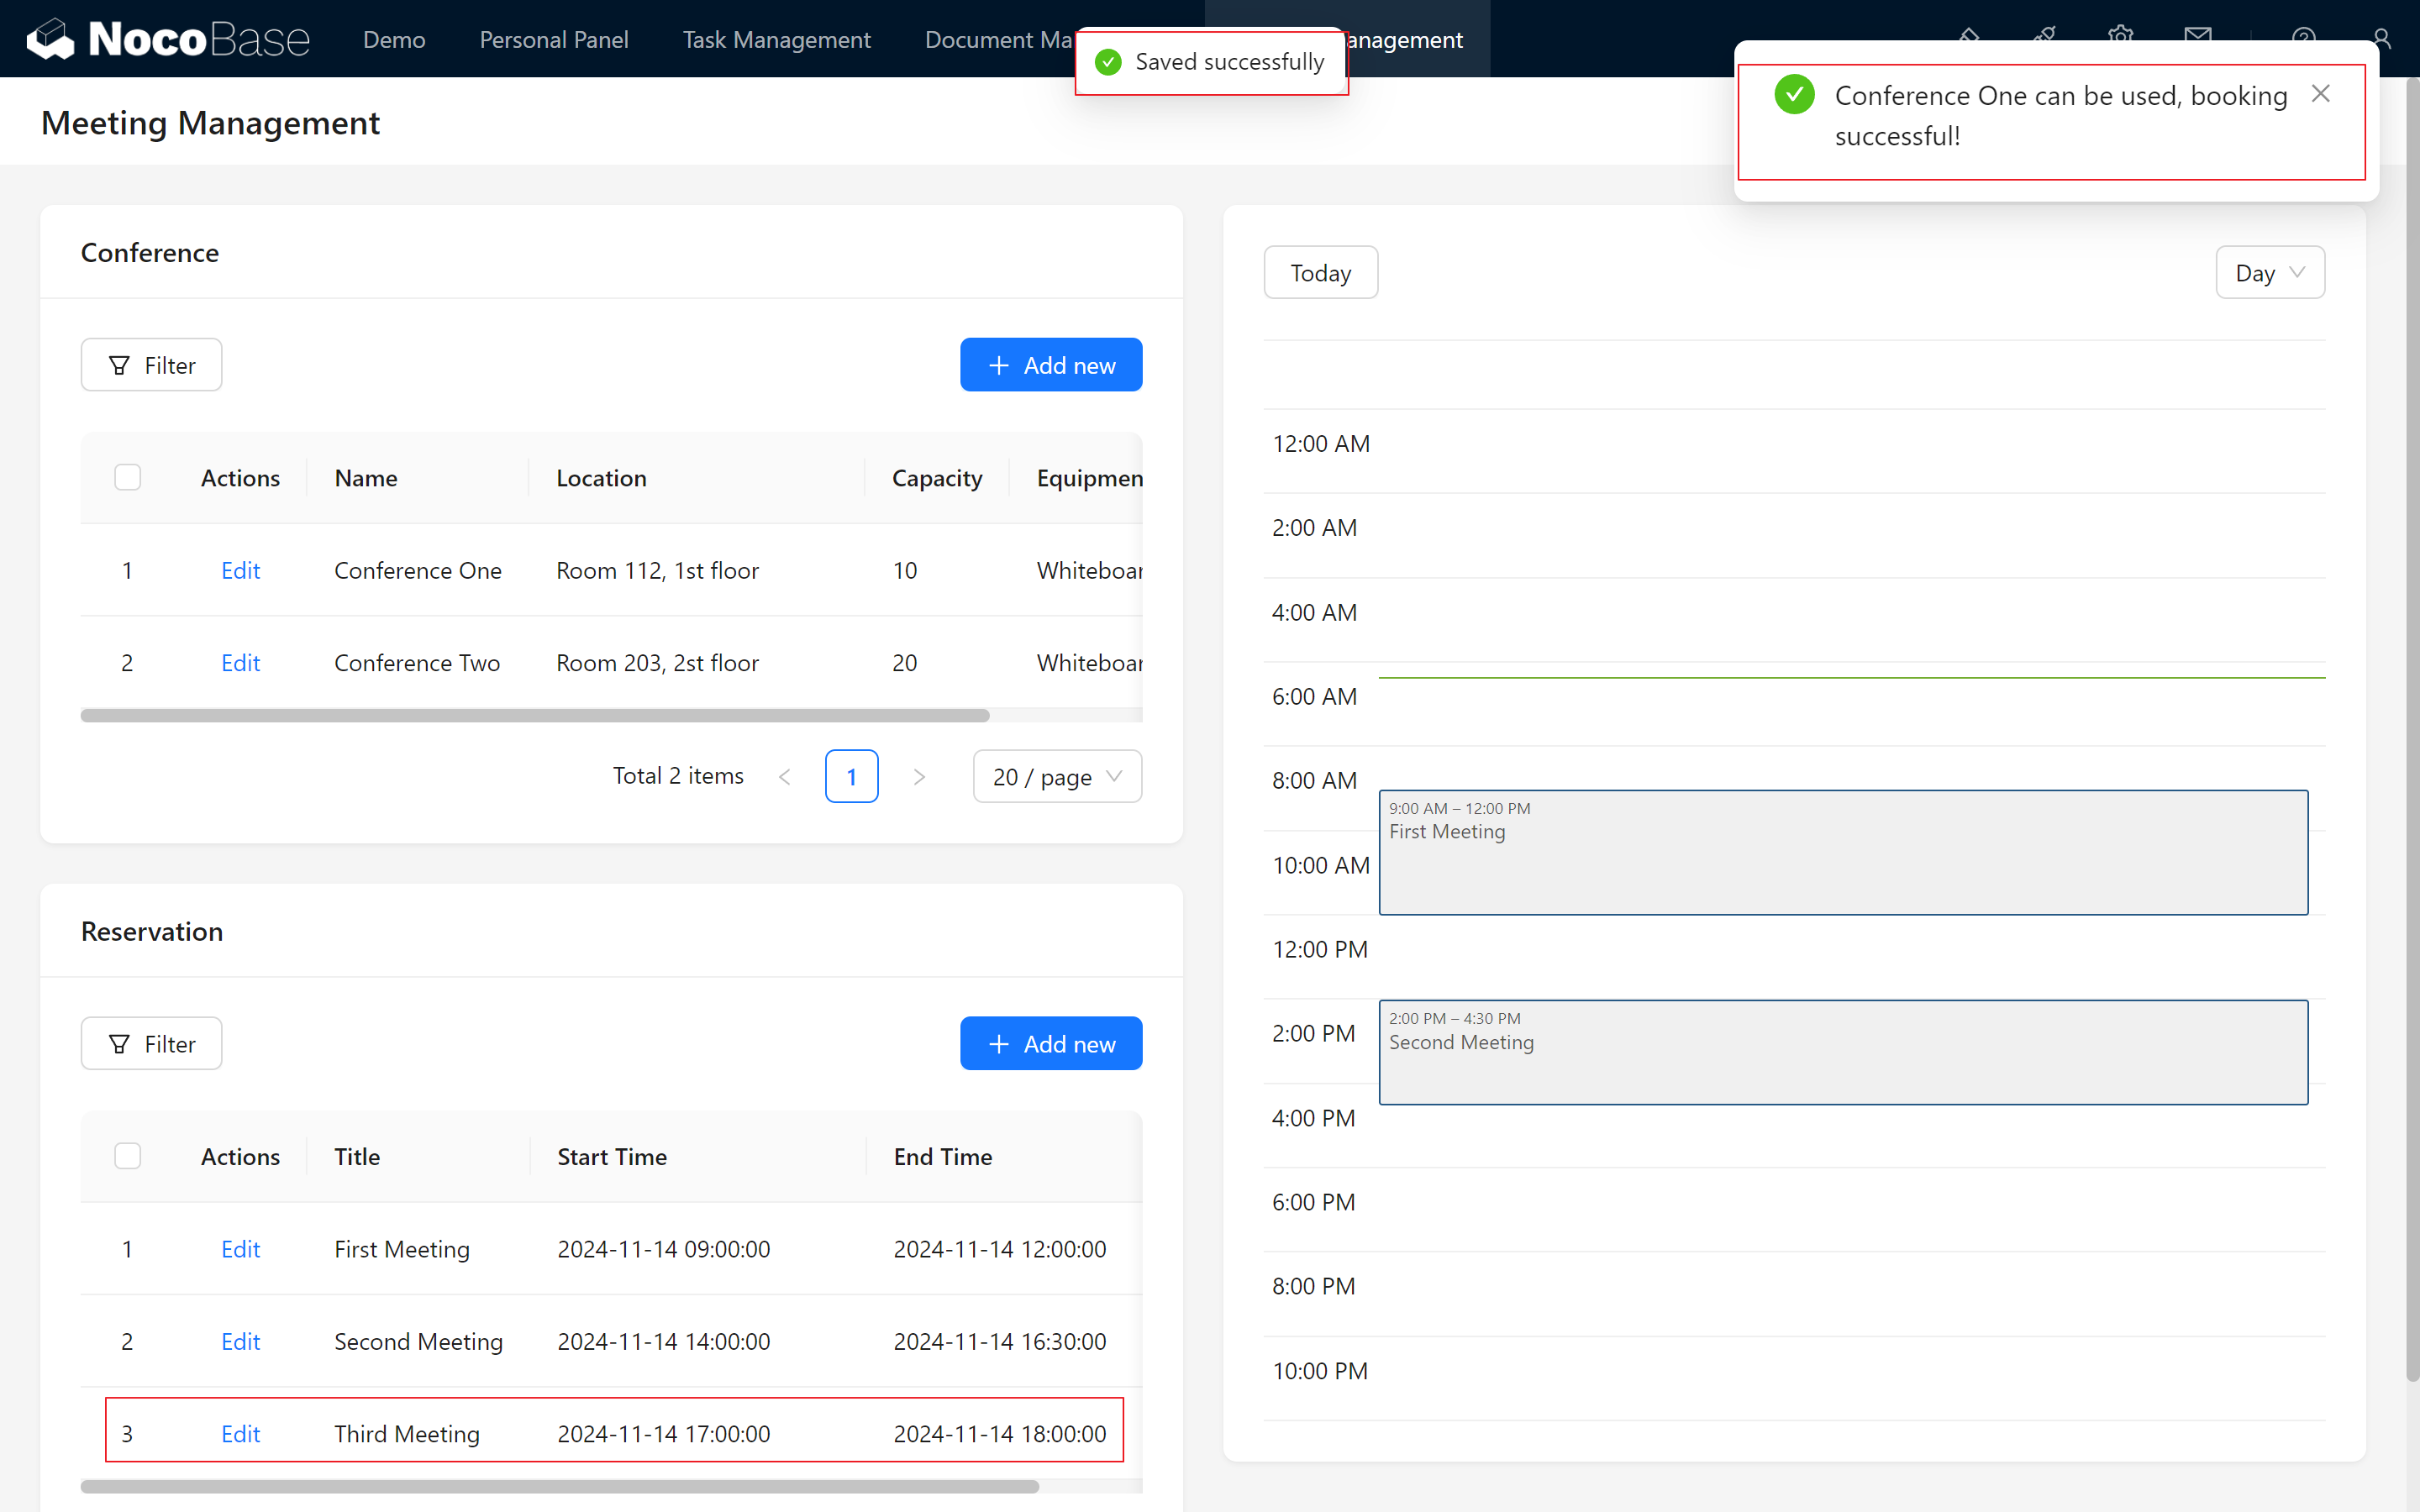
- Submit the booking and validate the feedback
We click the Submit button and the system will execute the detection process in the workflow:
Successful Feedback: After submitting, the system pops up a conflict alert, indicating that the detection logic is working properly. The page Feedback Successfully indicates that we were unable to complete this booking.
12.8.2 Adding a Booking with No Conflicts
Next test conflict-free booking ~
Ensure that we can successfully book a meeting room when the meeting times do not overlap!
- Setting up a Conflict-Free Booking
Let's choose a time period with no conflicts, for example
2024-11-10 16:00:00 - 2024-11-10 17:00:00.
This time period does not overlap with existing bookings and therefore meets the meeting room booking requirements.
- To submit a non-conflicting reservation
Click the Submit button and the system performs the workflow detection logic again:
Verify it together: Submitted successfully! The system displays a “Booking Success” message. The system displays a “Reservation Success” message. This indicates that the reservation function is also working correctly in the case of a conflict-free reservation.
The system displays the “Booking Success” message.
12.8.3 Modifying Existing Booking Times
In addition to adding new bookings, you can also test by modifying the time of existing bookings.
For instance, change an existing meeting time to a non-conflicting period and submit the update.
I'll leave it to you.
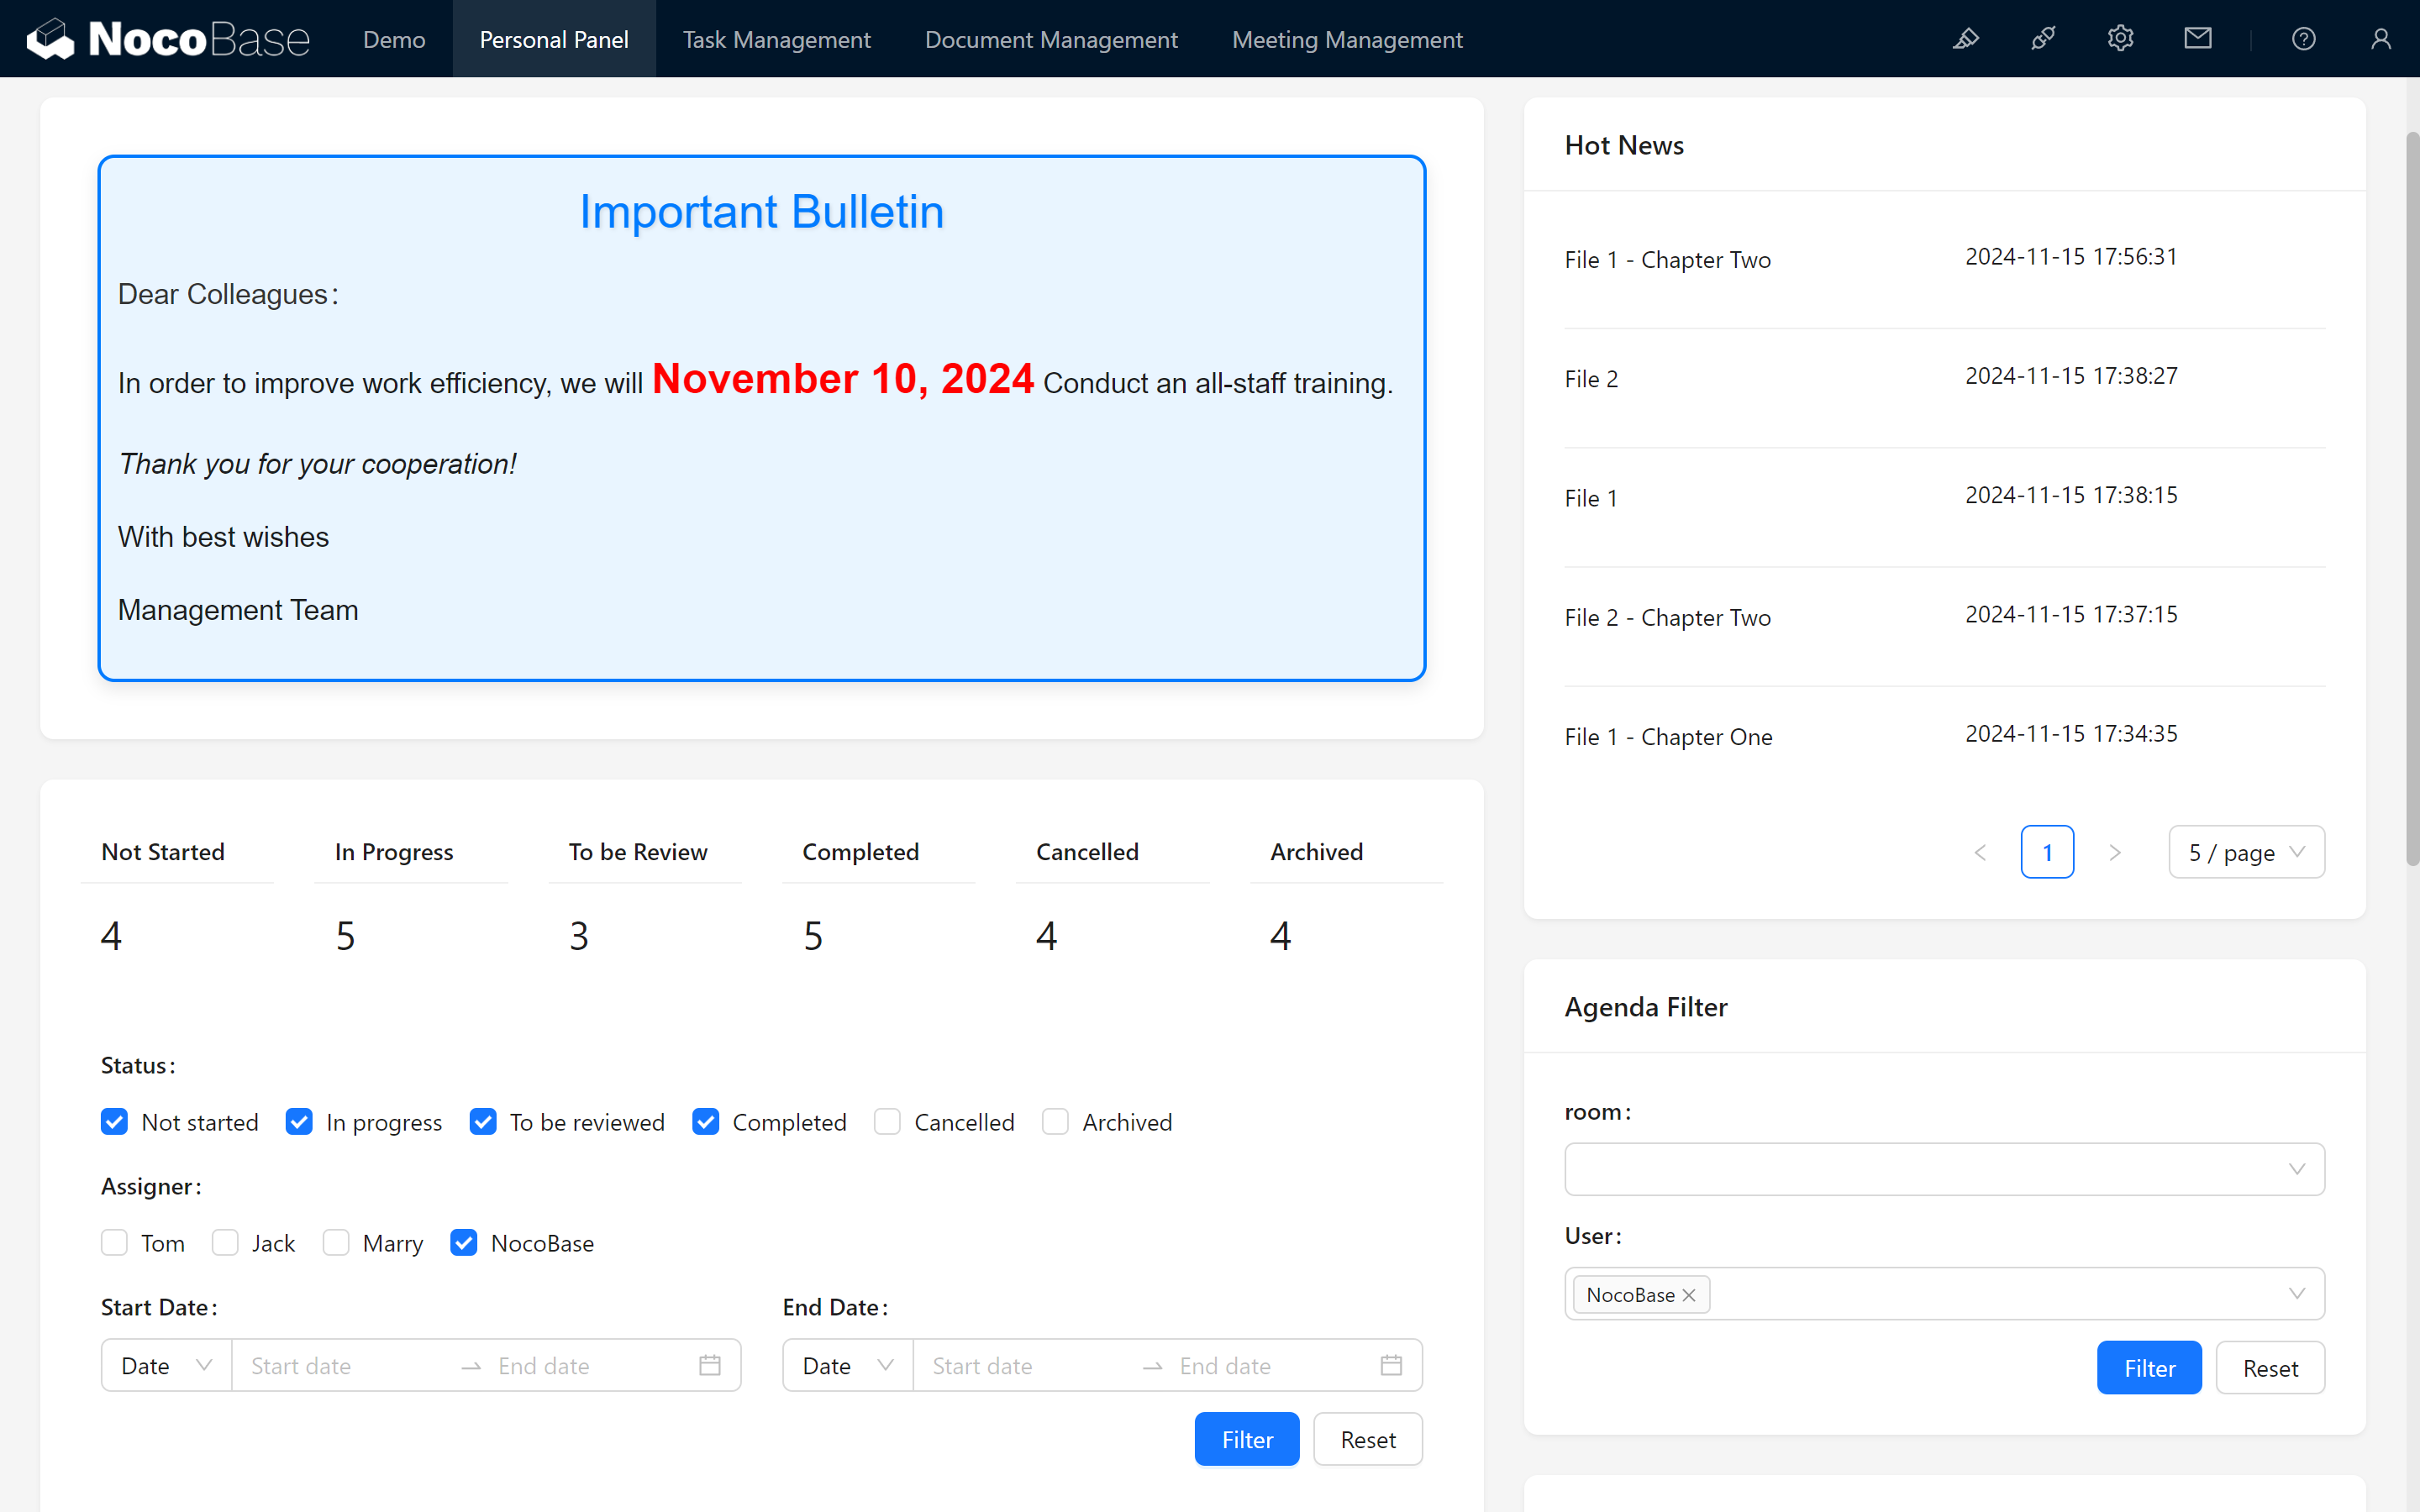
12.9 Dashboard Optimization and Personal Schedule Panel
Once functionality tests are complete, optimize the dashboard to improve user experience.
12.9.1 Adjusting Dashboard Layout
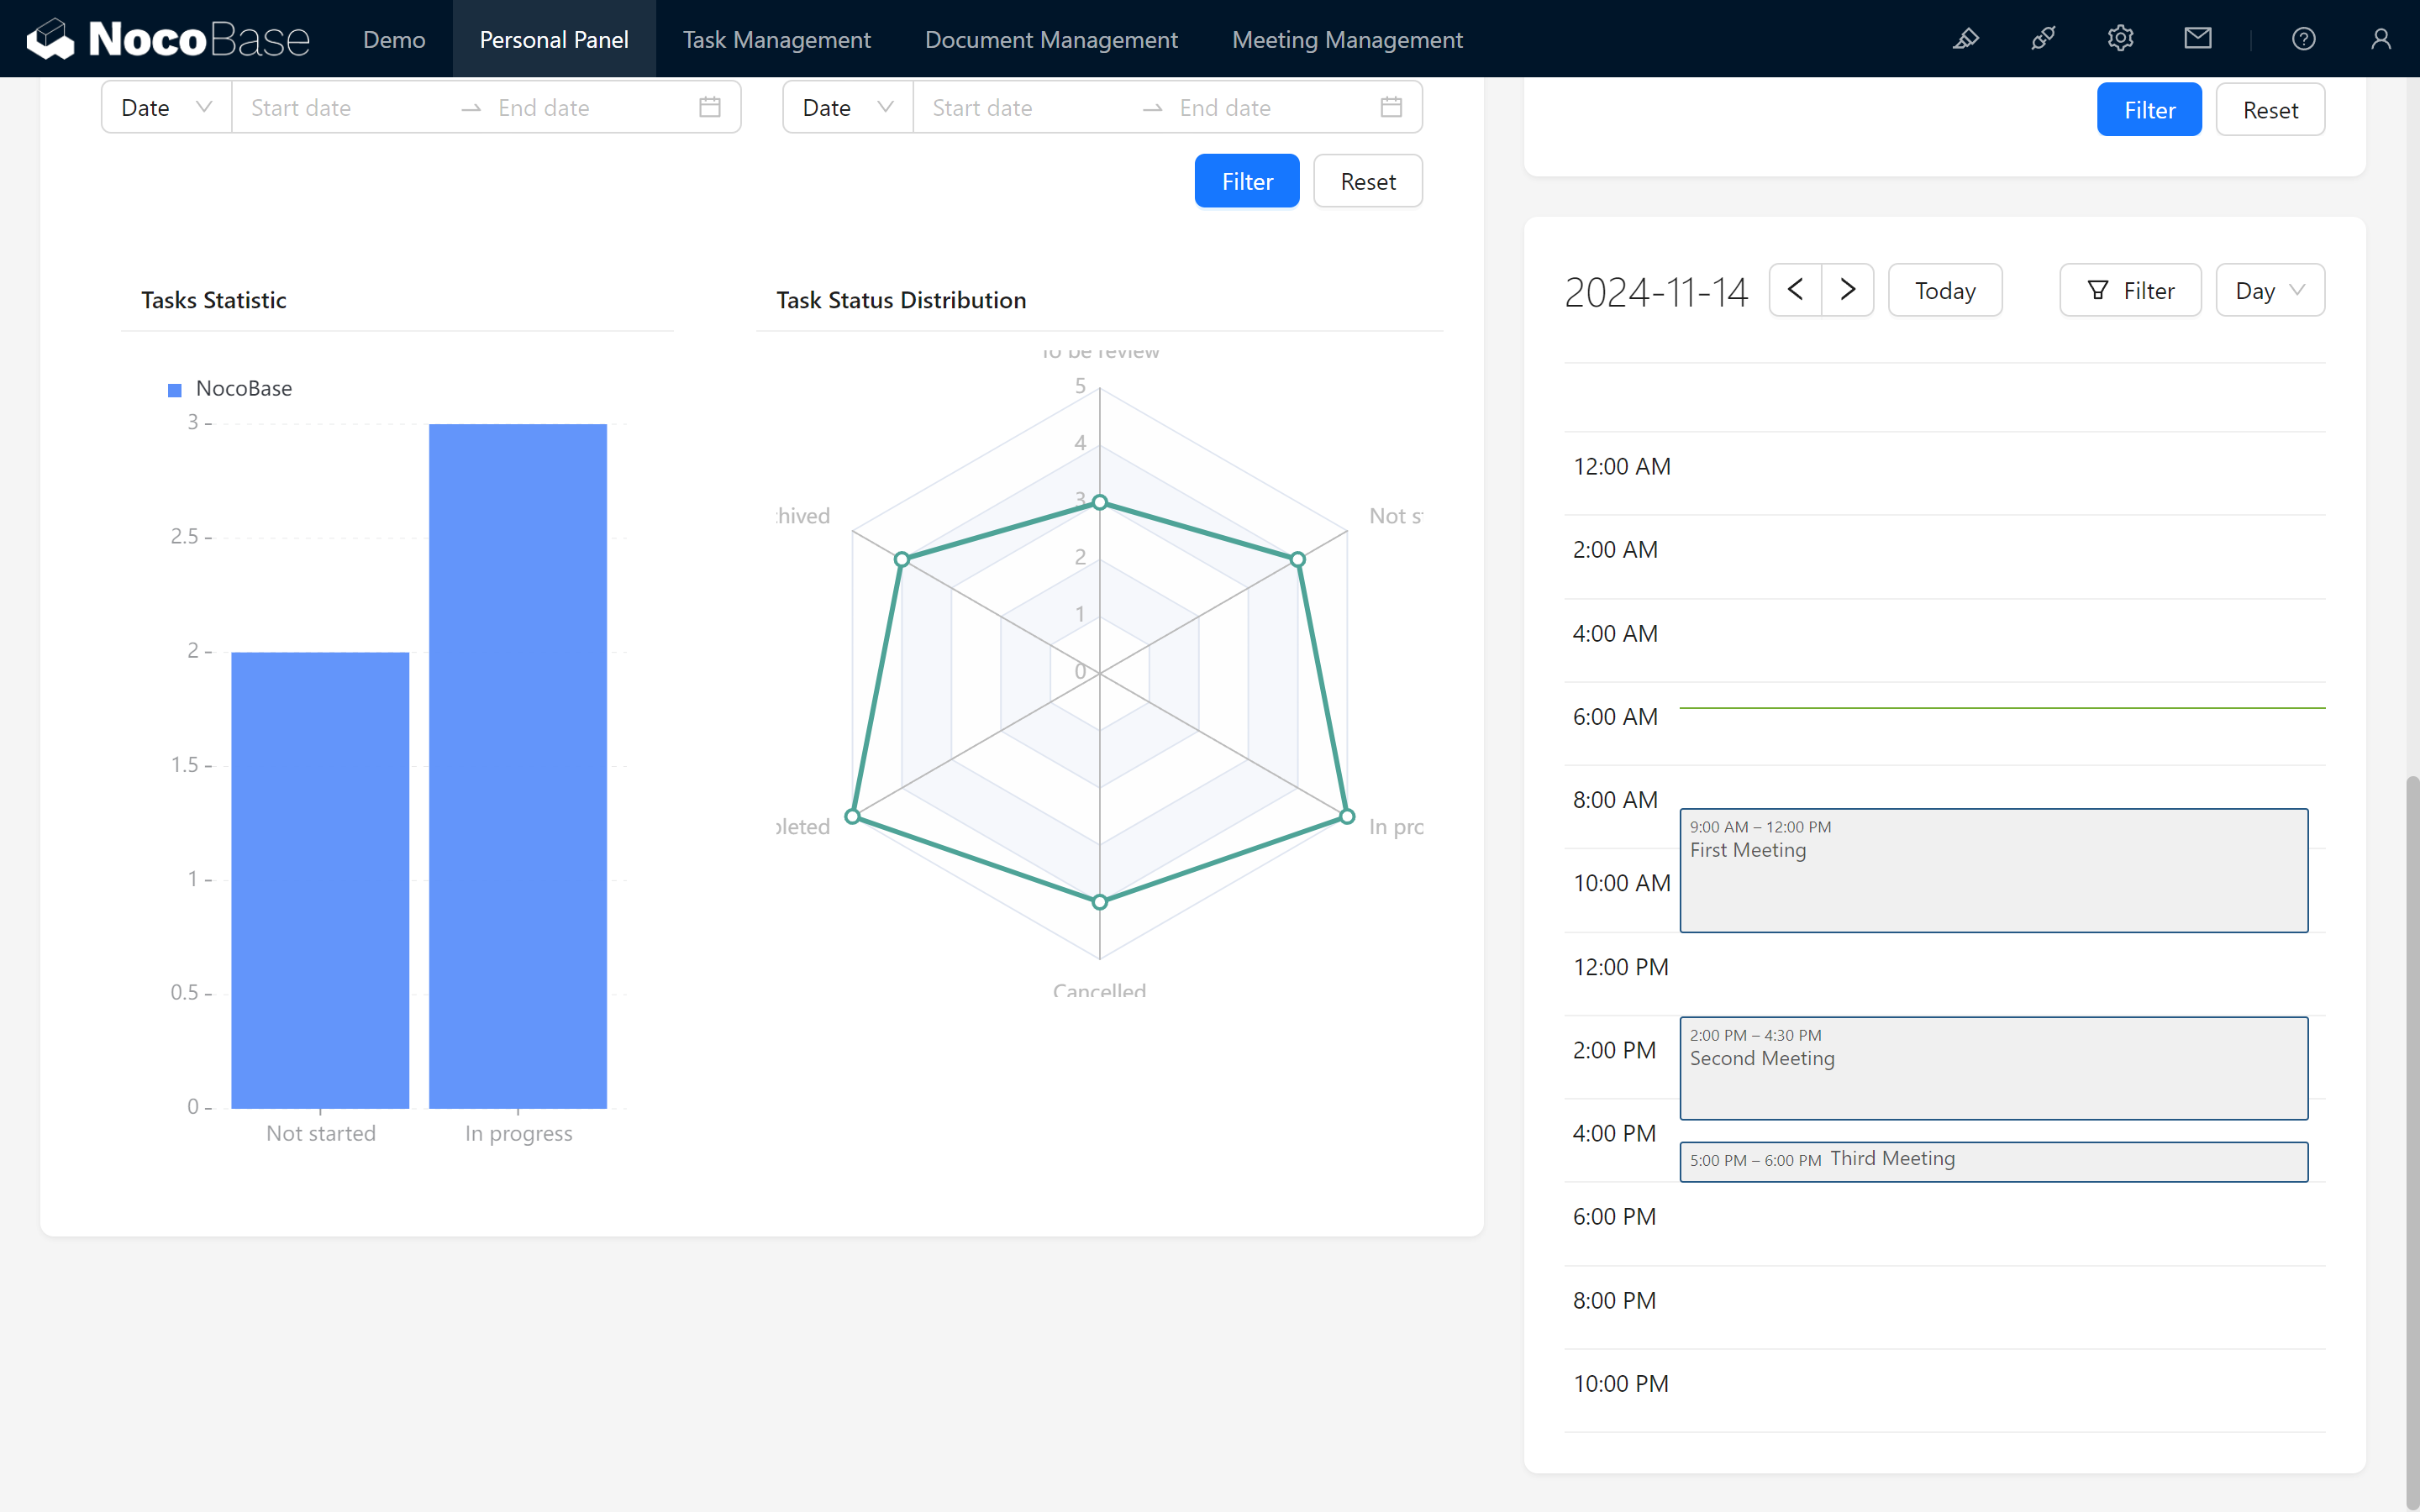
Reorganize the dashboard content based on user interaction habits for easier data viewing.Enhance the user experience by adding a Personal Schedule Panel:
- Create a "Personal Schedule" Section Add a calendar or list block to display each user's individual meeting schedule.
- Set Member Defaults Configure the default member value to the current user. This ensures that when a user accesses the dashboard, their related meetings are displayed by default.
Further optimize the user experience in the meeting management module.
After configuration, the dashboard becomes more intuitive and feature-rich, enabling users to better navigate and manage their meetings.
With these steps, we have successfully implemented and optimized the core functionalities of the conference room booking management module! Enjoy the process of mastering NocoBase’s modular system-building capabilities.
Keep exploring and creating endless possibilities! If you encounter any issues along the way, don’t forget to check the NocoBase Documentation or join the NocoBase Community for discussions and support.