

Chapter 3: Building Pages — From Blank to Functional
In the last chapter, we built the skeleton of our data tables — but right now the data only lives in the "backend." Users can't see it at all. In this chapter, we'll bring our data front and center, turning it into a real, usable ticket list.
3.1 What Is a Block
In NocoBase, a Block is a building brick on a page. Want to show a table? Drop in a Table block. Need a form? Add a Form block. A single page can freely combine multiple blocks, and you can drag and drop to rearrange the layout.
Common block types:
| Type | Purpose |
|---|---|
| Table | Displays multiple records in rows and columns |
| Form | Lets users input or edit data |
| Details | Shows the full information of a single record |
| Filter Form | Provides filter criteria to narrow down data in other blocks |
| Chart | Pie charts, line charts, and other visualizations |
| Markdown | A section of custom text or instructions |
Remember this analogy: Blocks = building bricks. We're about to use them to assemble our tickets page.
3.2 Adding a Menu and Pages
First, we need to create an entry point for "Tickets" in the system.
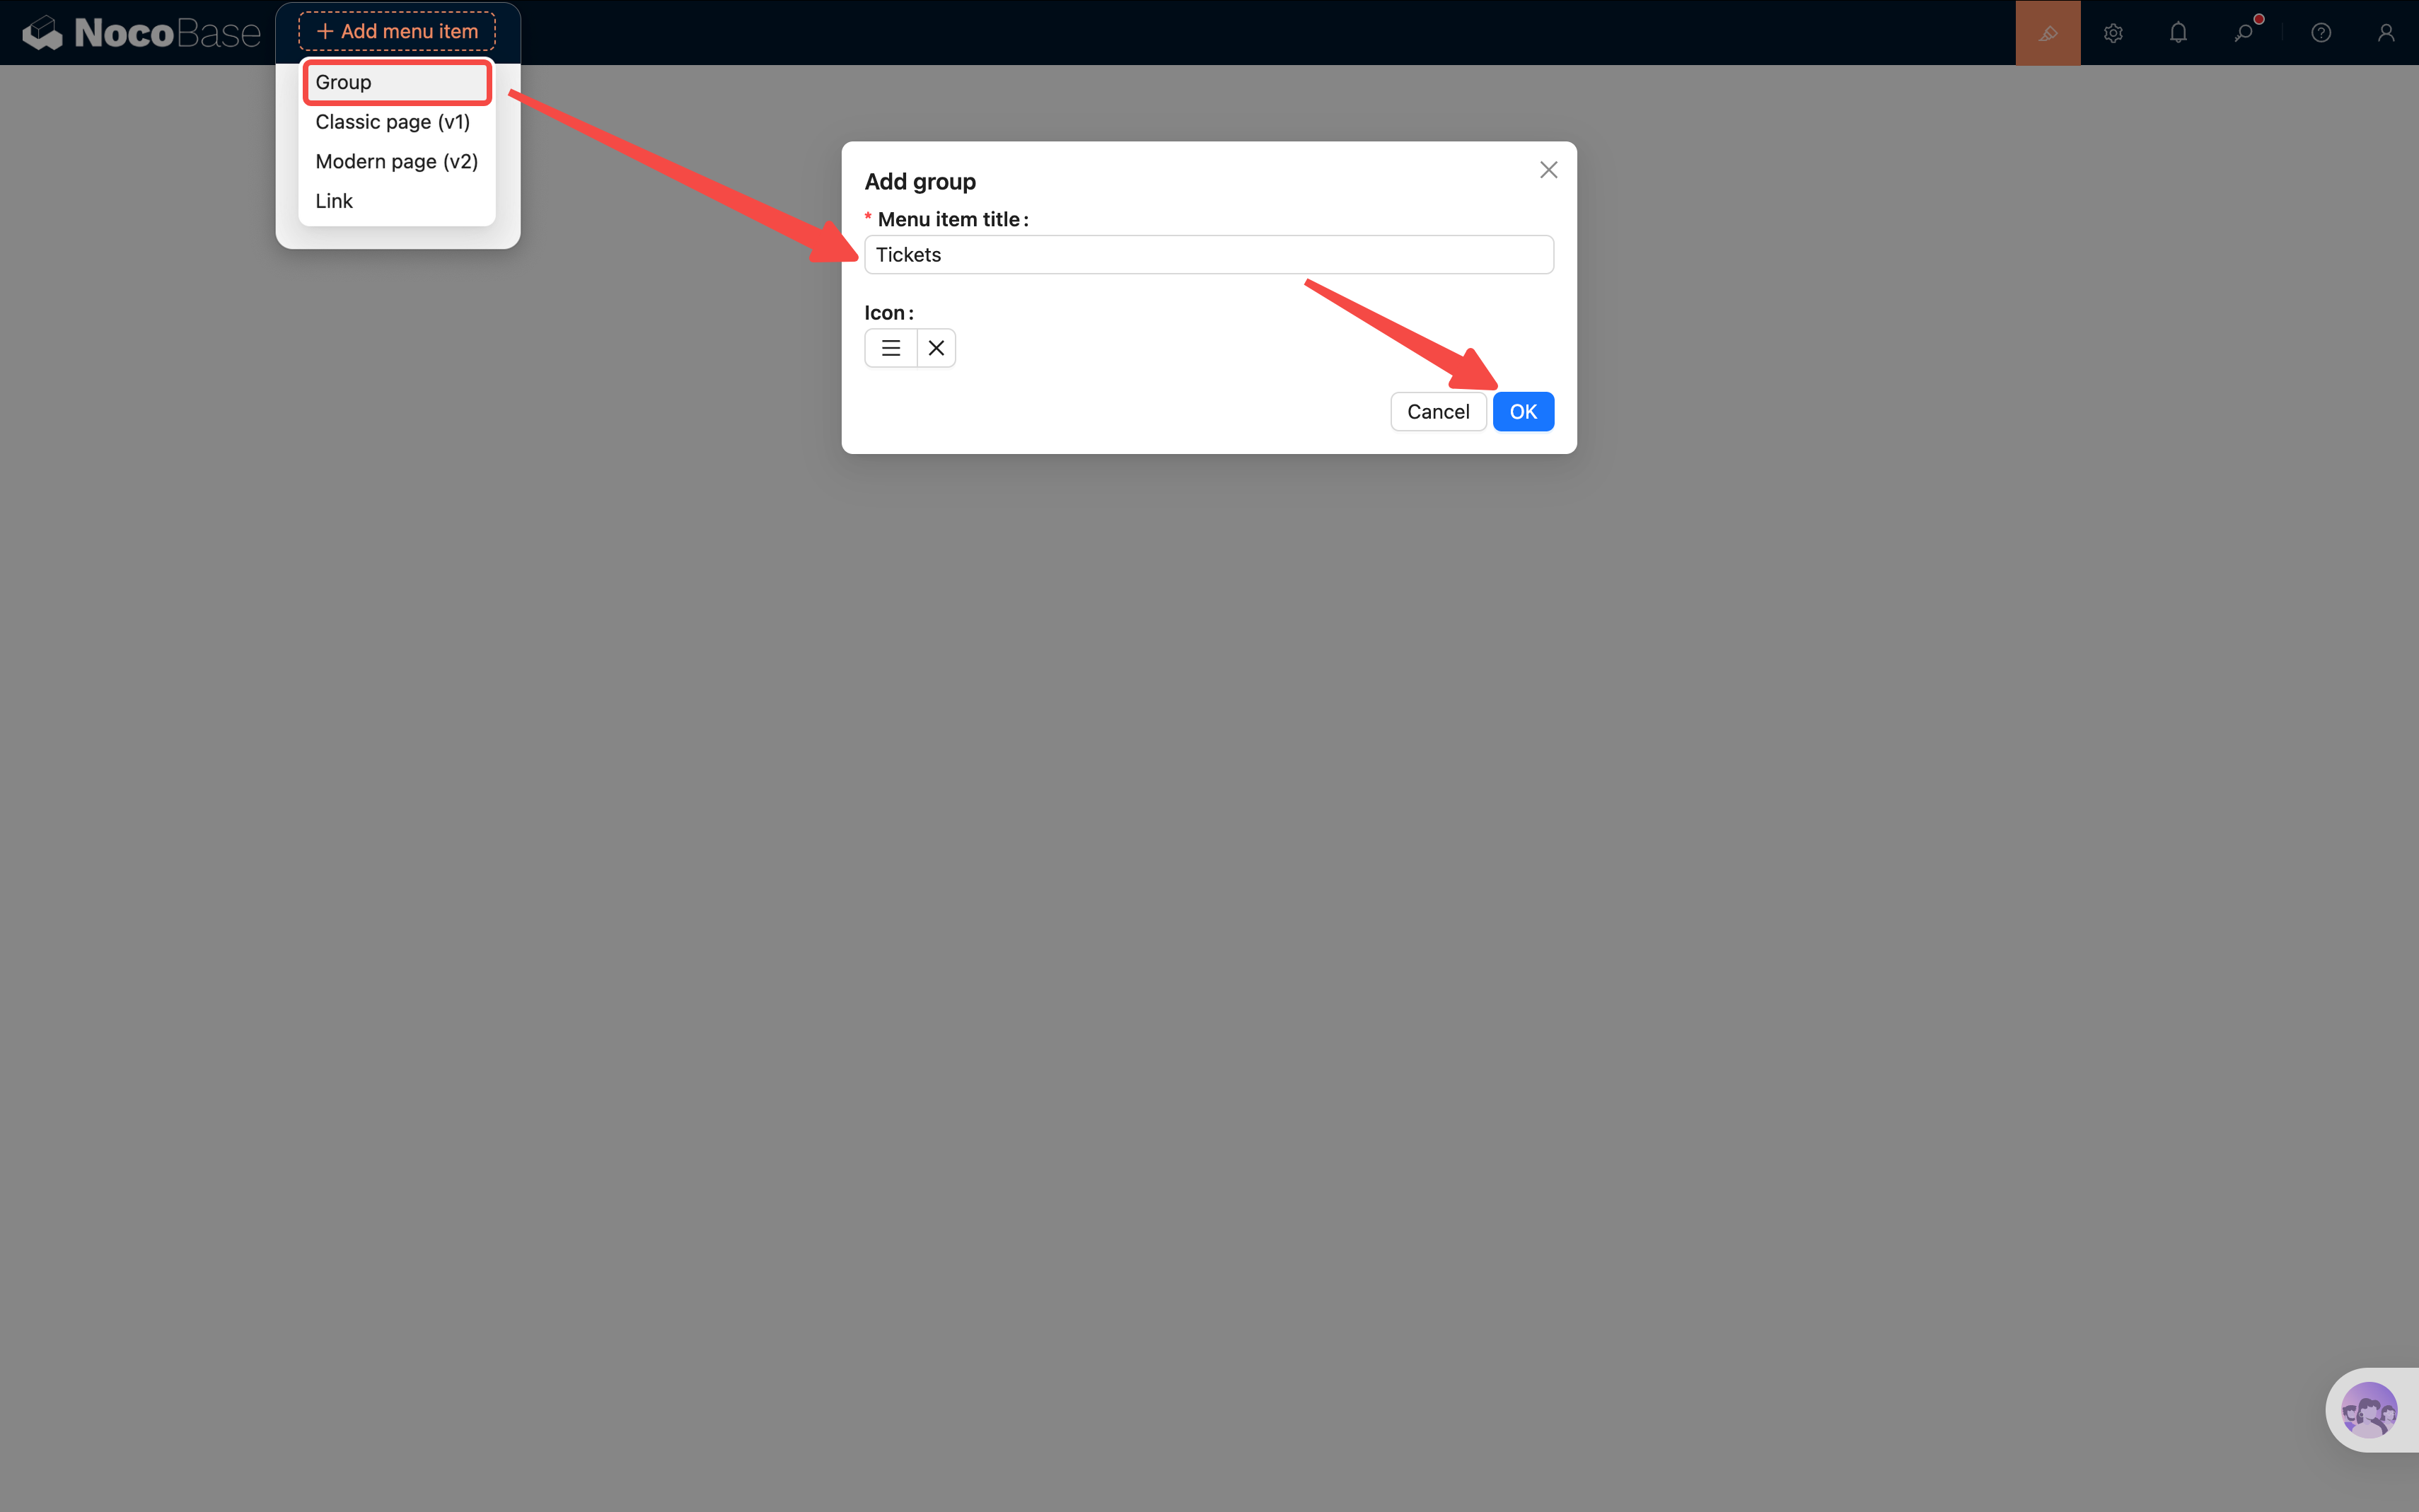
- Click the UI Editor toggle in the top-right corner to enter design mode (the entire page will show orange editable borders).
- Click the "Add menu item" button (
+icon) in the top navigation bar, select "Add group", and name it "Tickets". - The "Tickets" menu appears immediately in the top navigation bar. Click on it — a sidebar menu will expand on the left.
- In the sidebar, click the orange "Add menu item" button, select "Modern page (v2)", and add two sub-pages one by one:
- All Tickets — displays all tickets
- Categories — manages category data
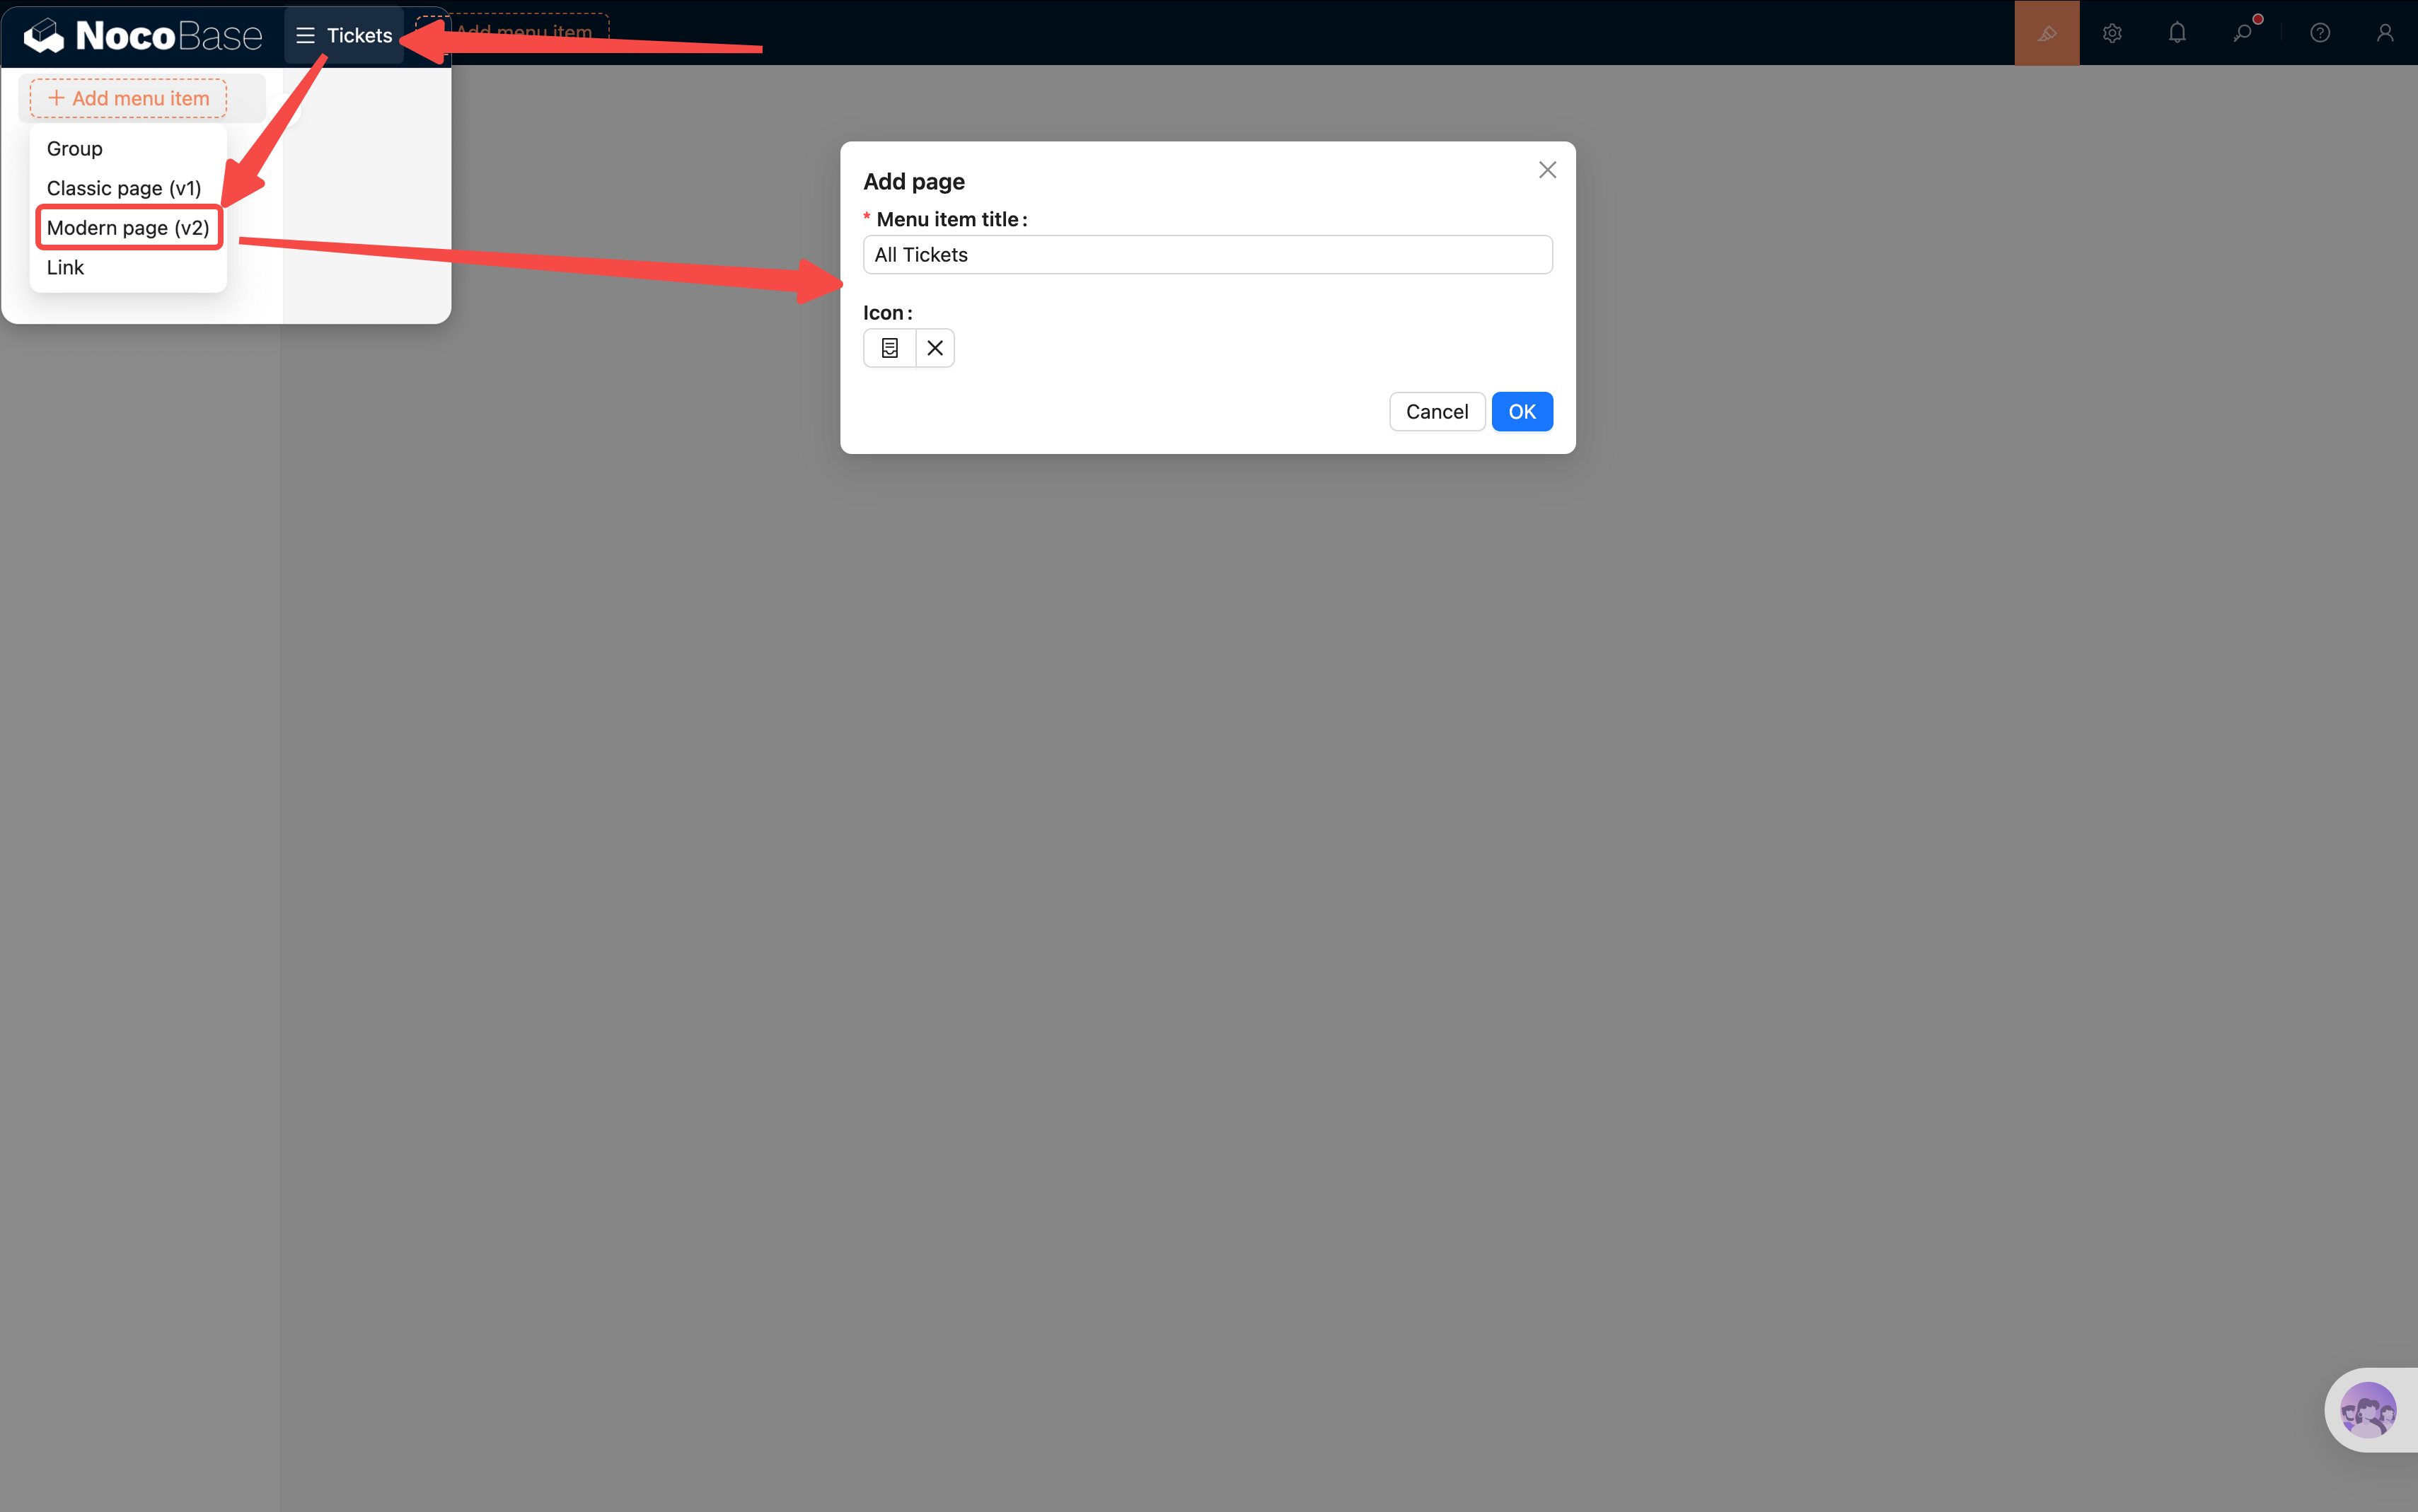
Note: You'll see both "Classic page (v1)" and "Modern page (v2)" options. This tutorial uses v2 throughout.
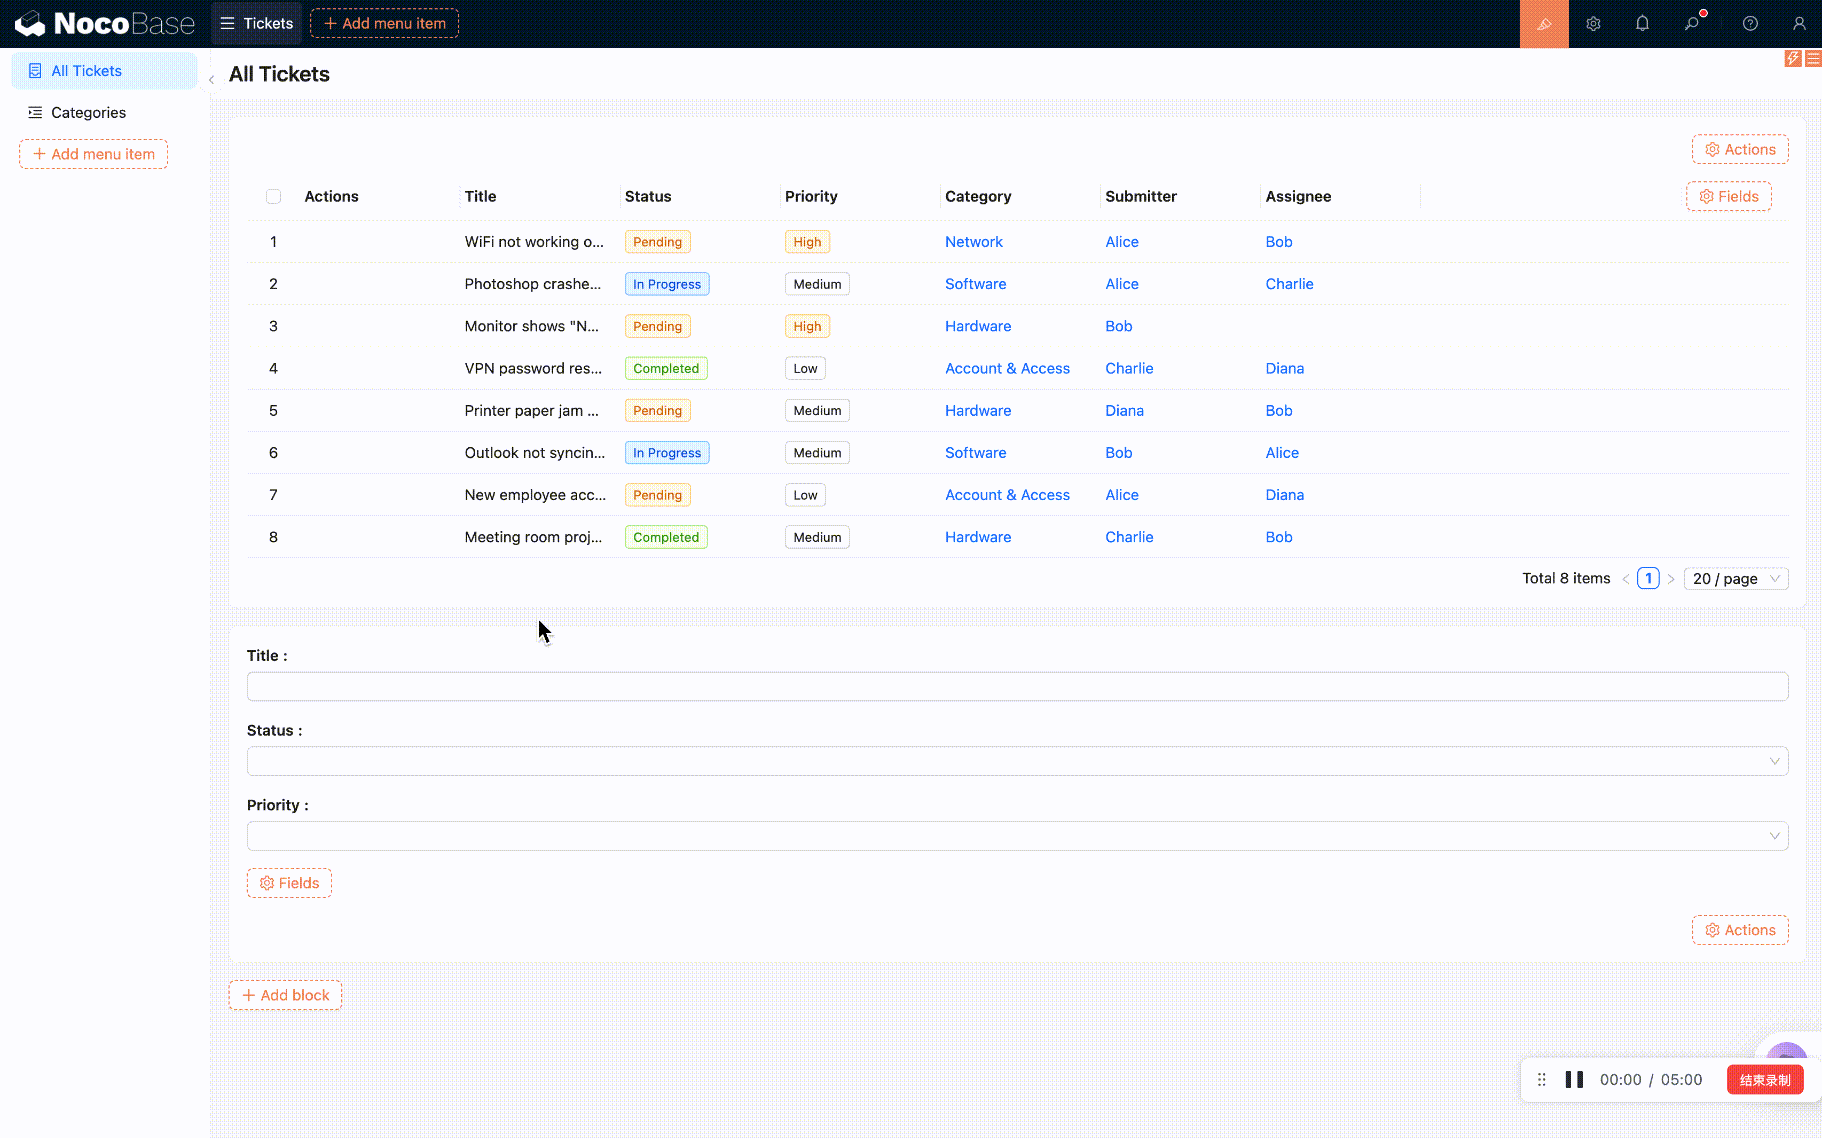
3.3 Adding a Table Block
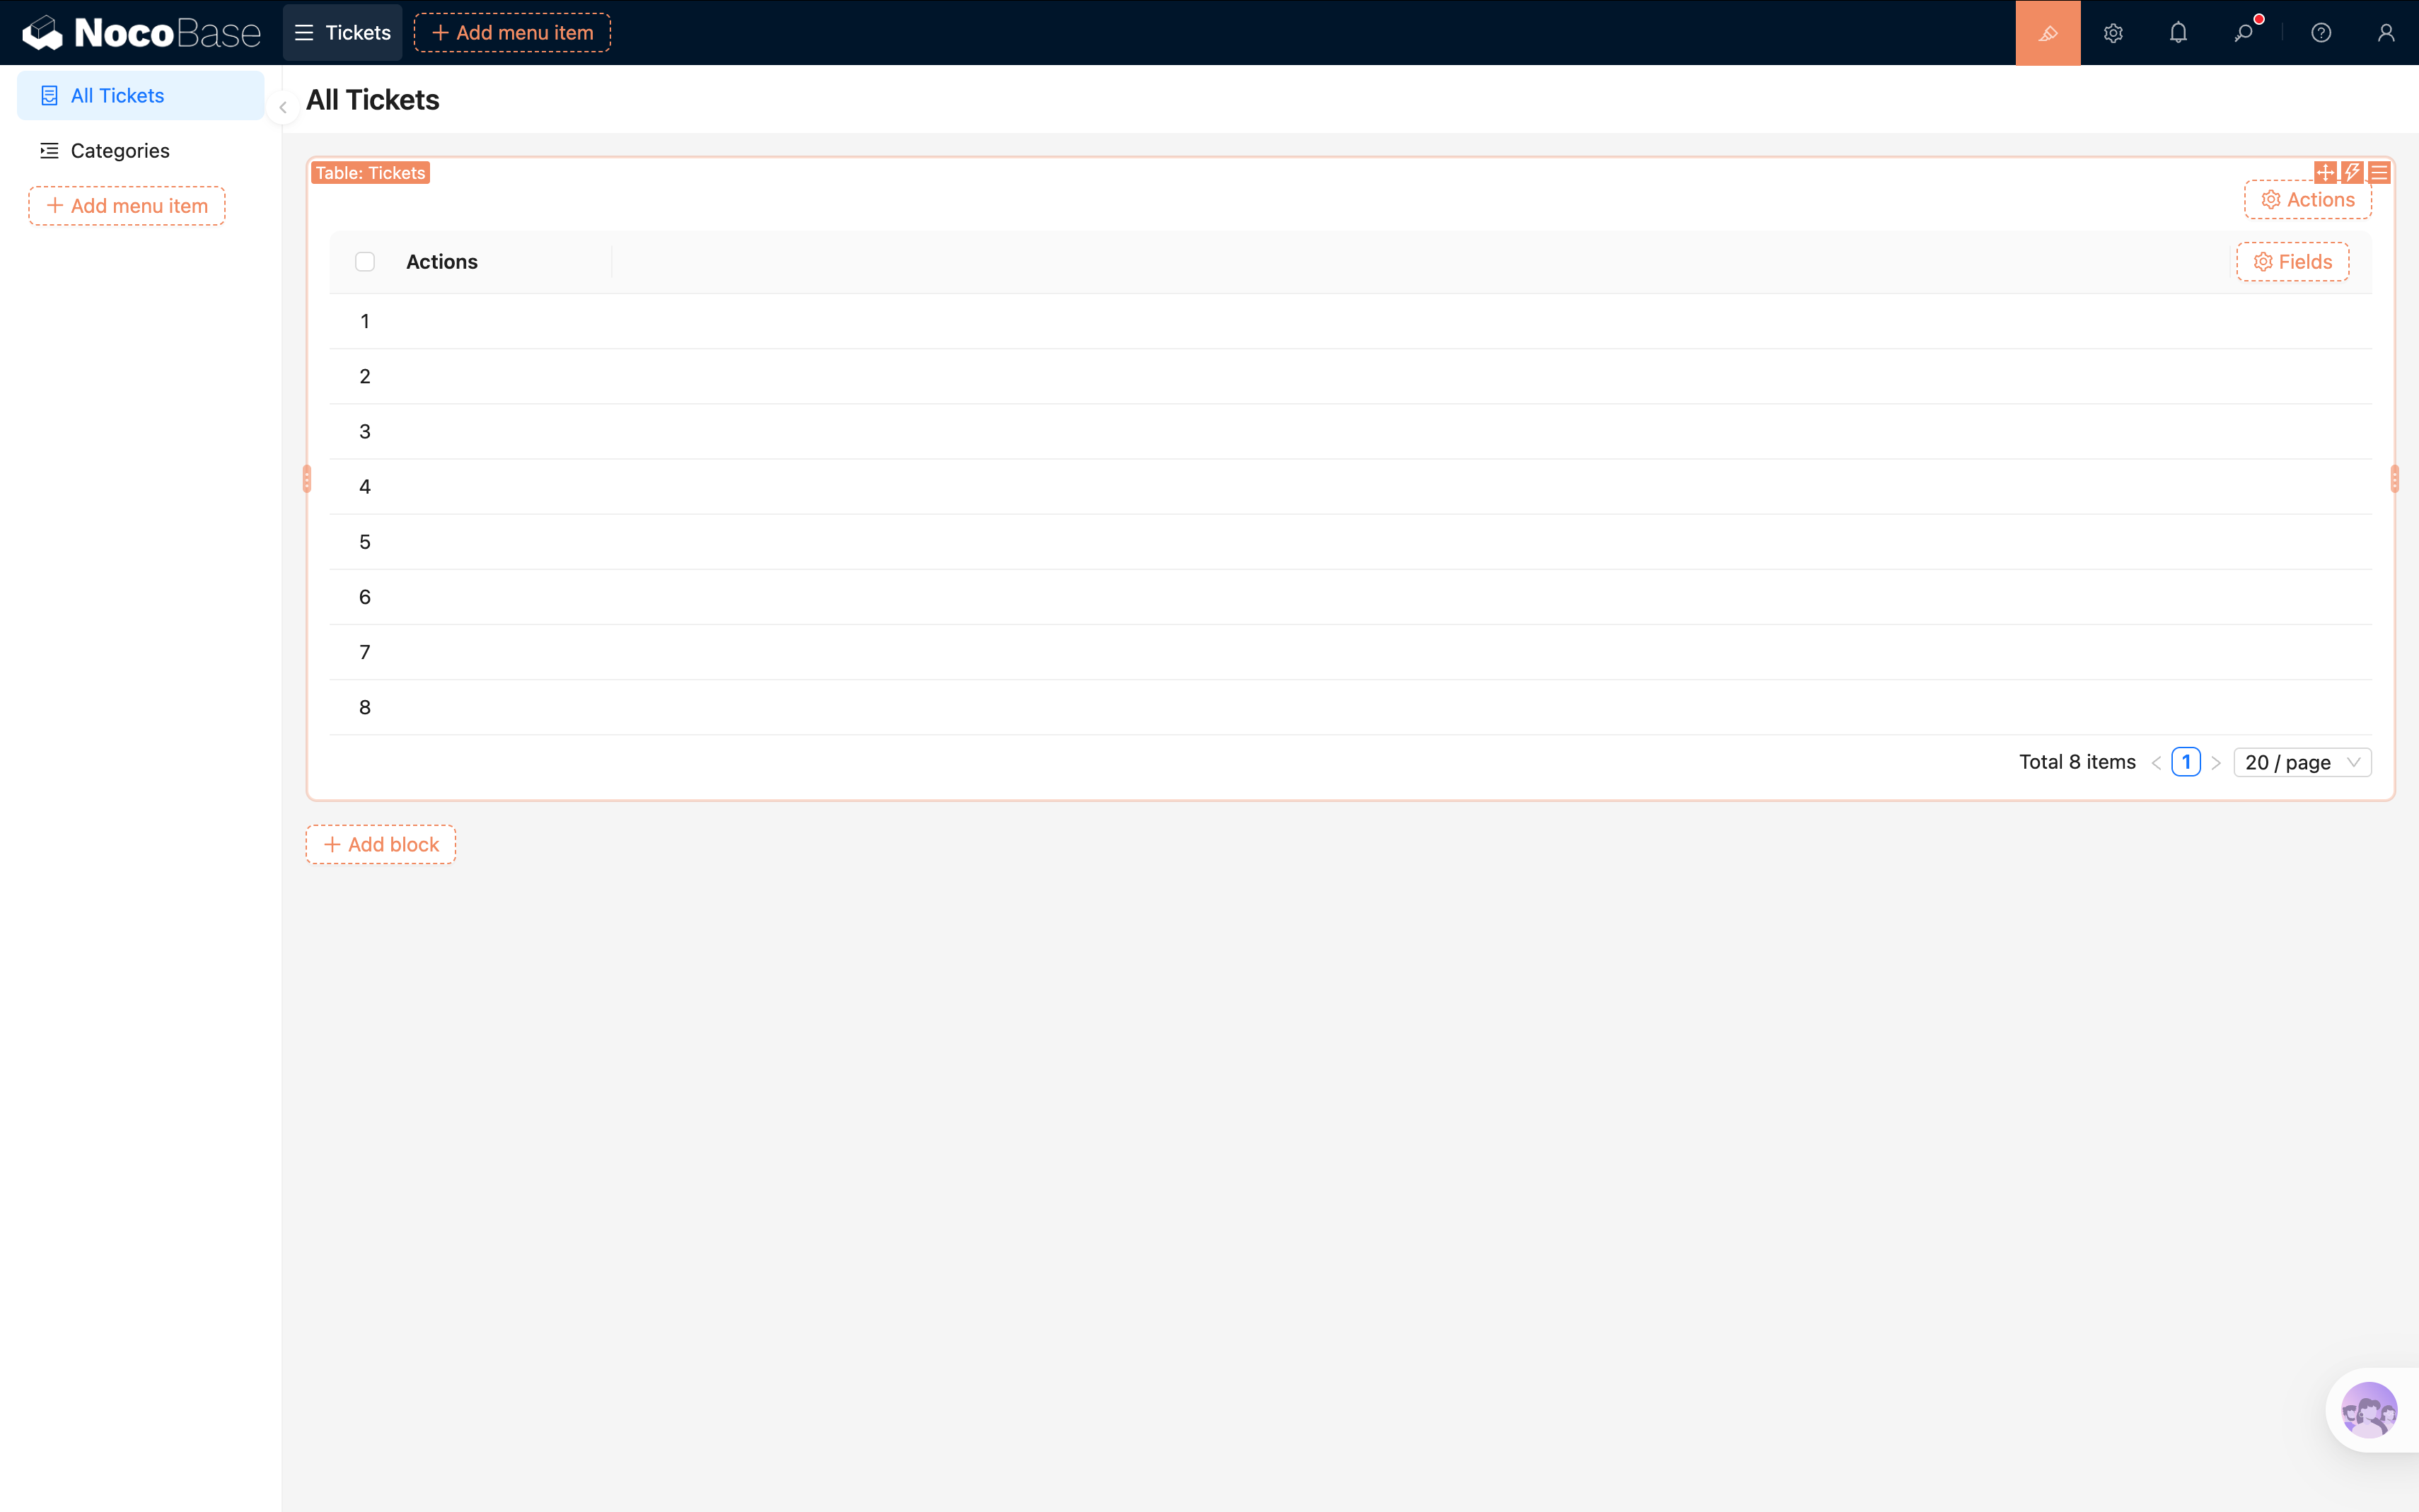
Now go to the "All Tickets" page and add a Table block:
- On the blank page, click "Add block".
- Select Data blocks -> Table.
- In the collection list that pops up, select "Tickets" (the table we created in the last chapter).

Once the Table block is added, you'll see an empty table on the page. Don't worry — next we'll configure which columns it should display.
3.4 Configuring Display Columns
By default, a table won't automatically show all fields. We need to manually choose which columns to display:
- On the right side of the Table block header, click "Fields".
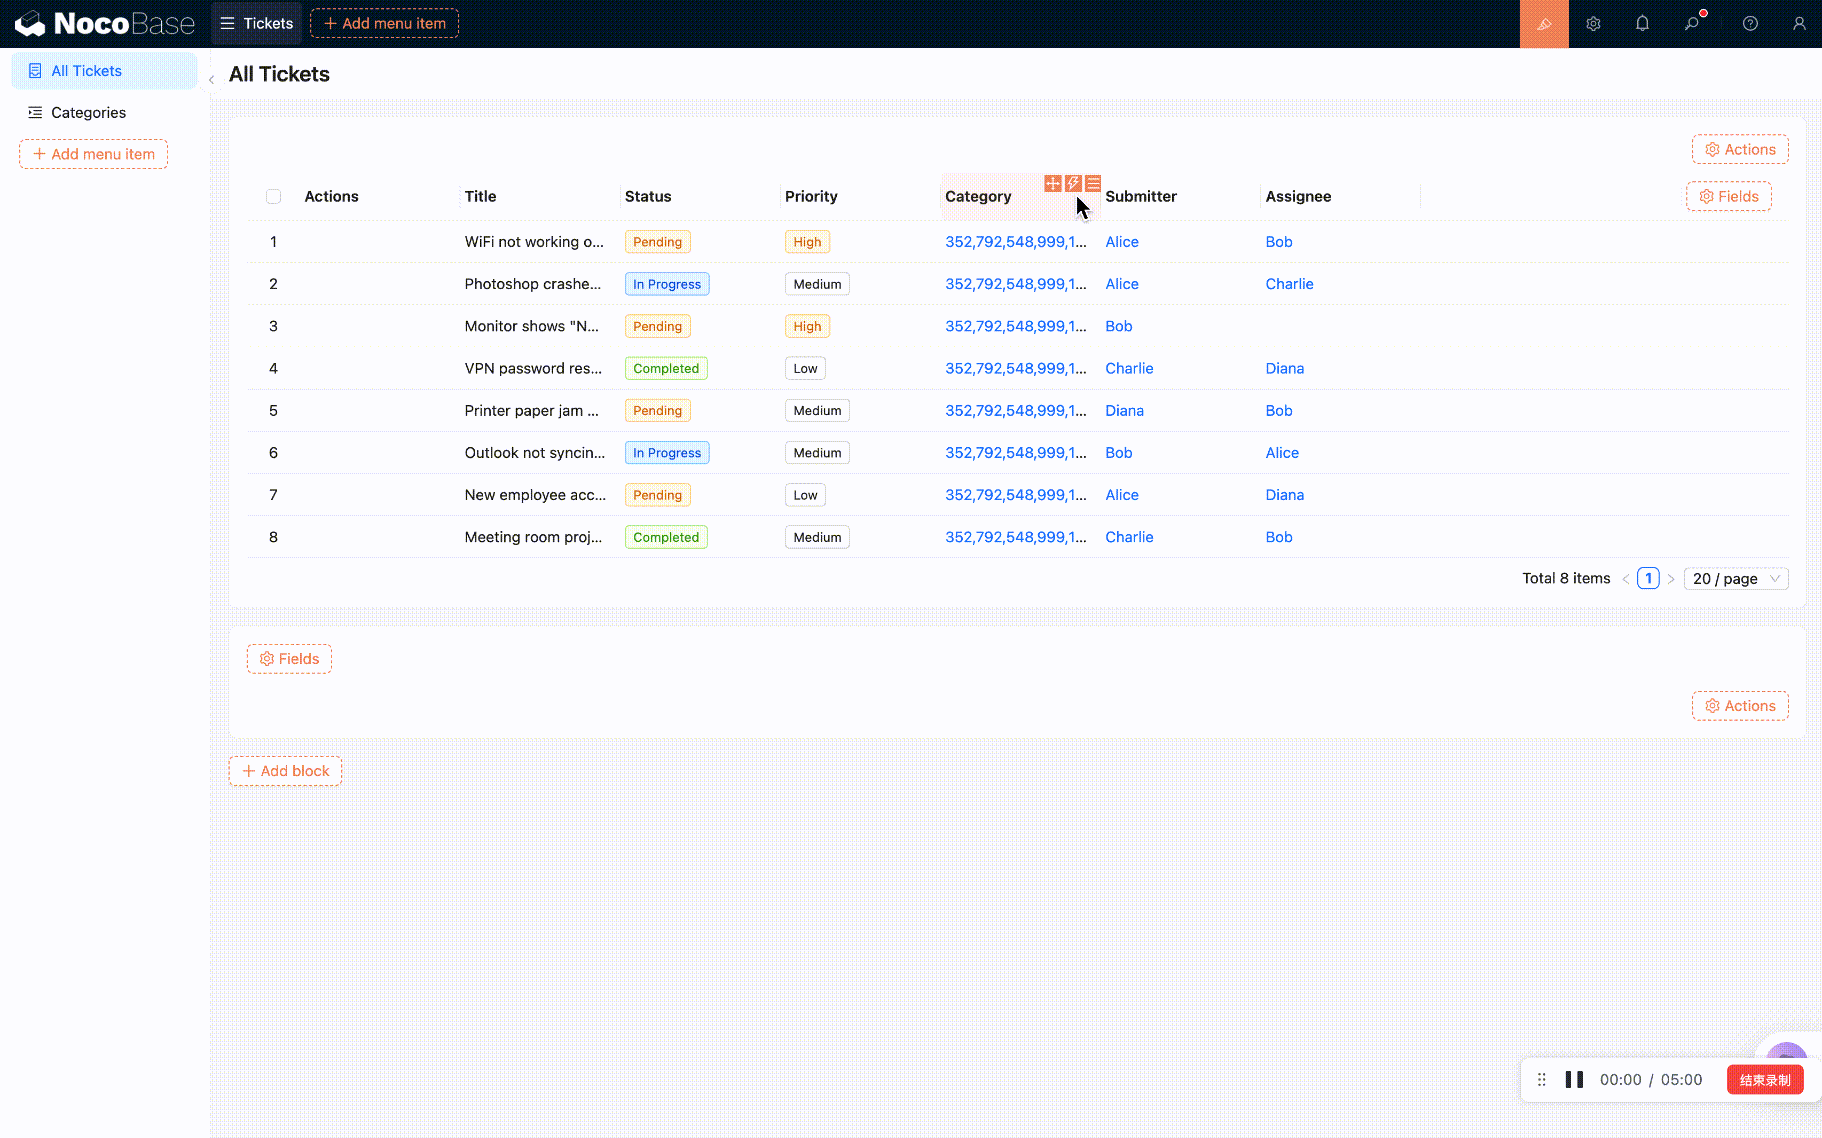
- Check the fields you want to show:
- Title — the ticket subject, visible at a glance
- Status — current processing progress
- Priority — urgency level
- Category — a relation field that will display the category name
- Submitter — who submitted the ticket
- Assignee — who is responsible
- Fields you don't need to display (like ID or Created at) can be left unchecked to keep the table clean.
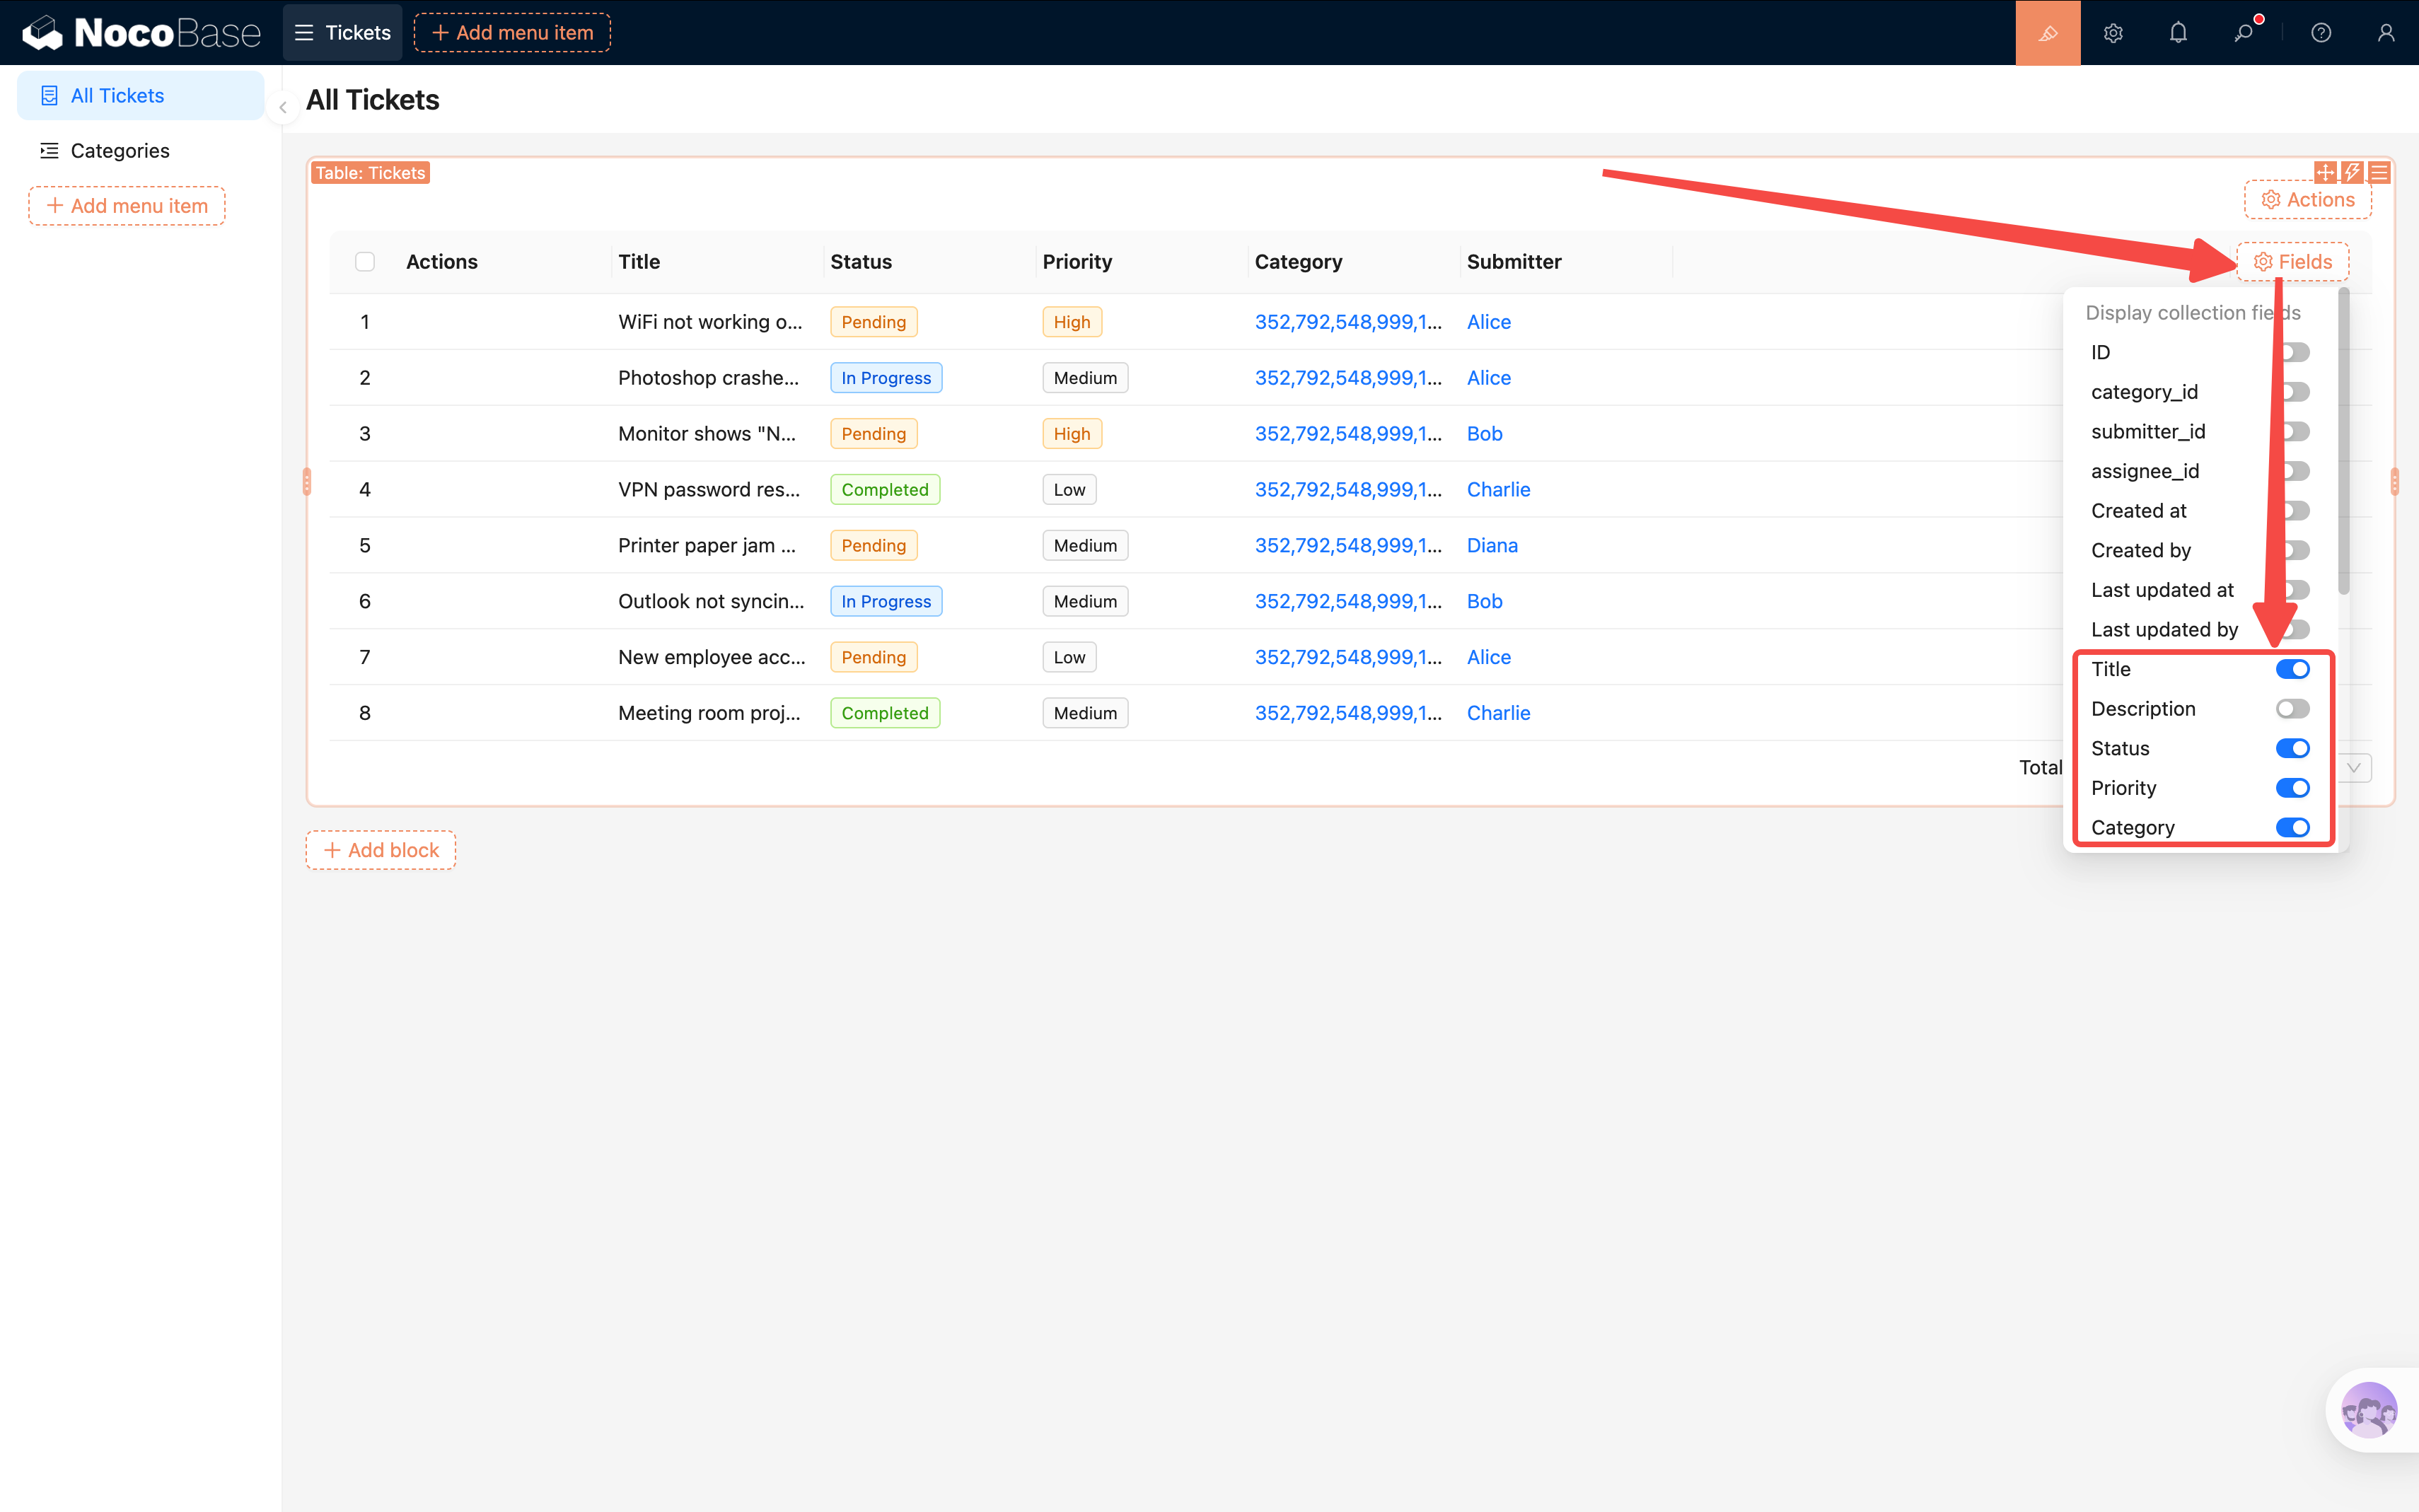
Tip: You can drag and drop to reorder the displayed fields. Put the most important ones — "Title" and "Status" — up front so key information is visible at a glance.
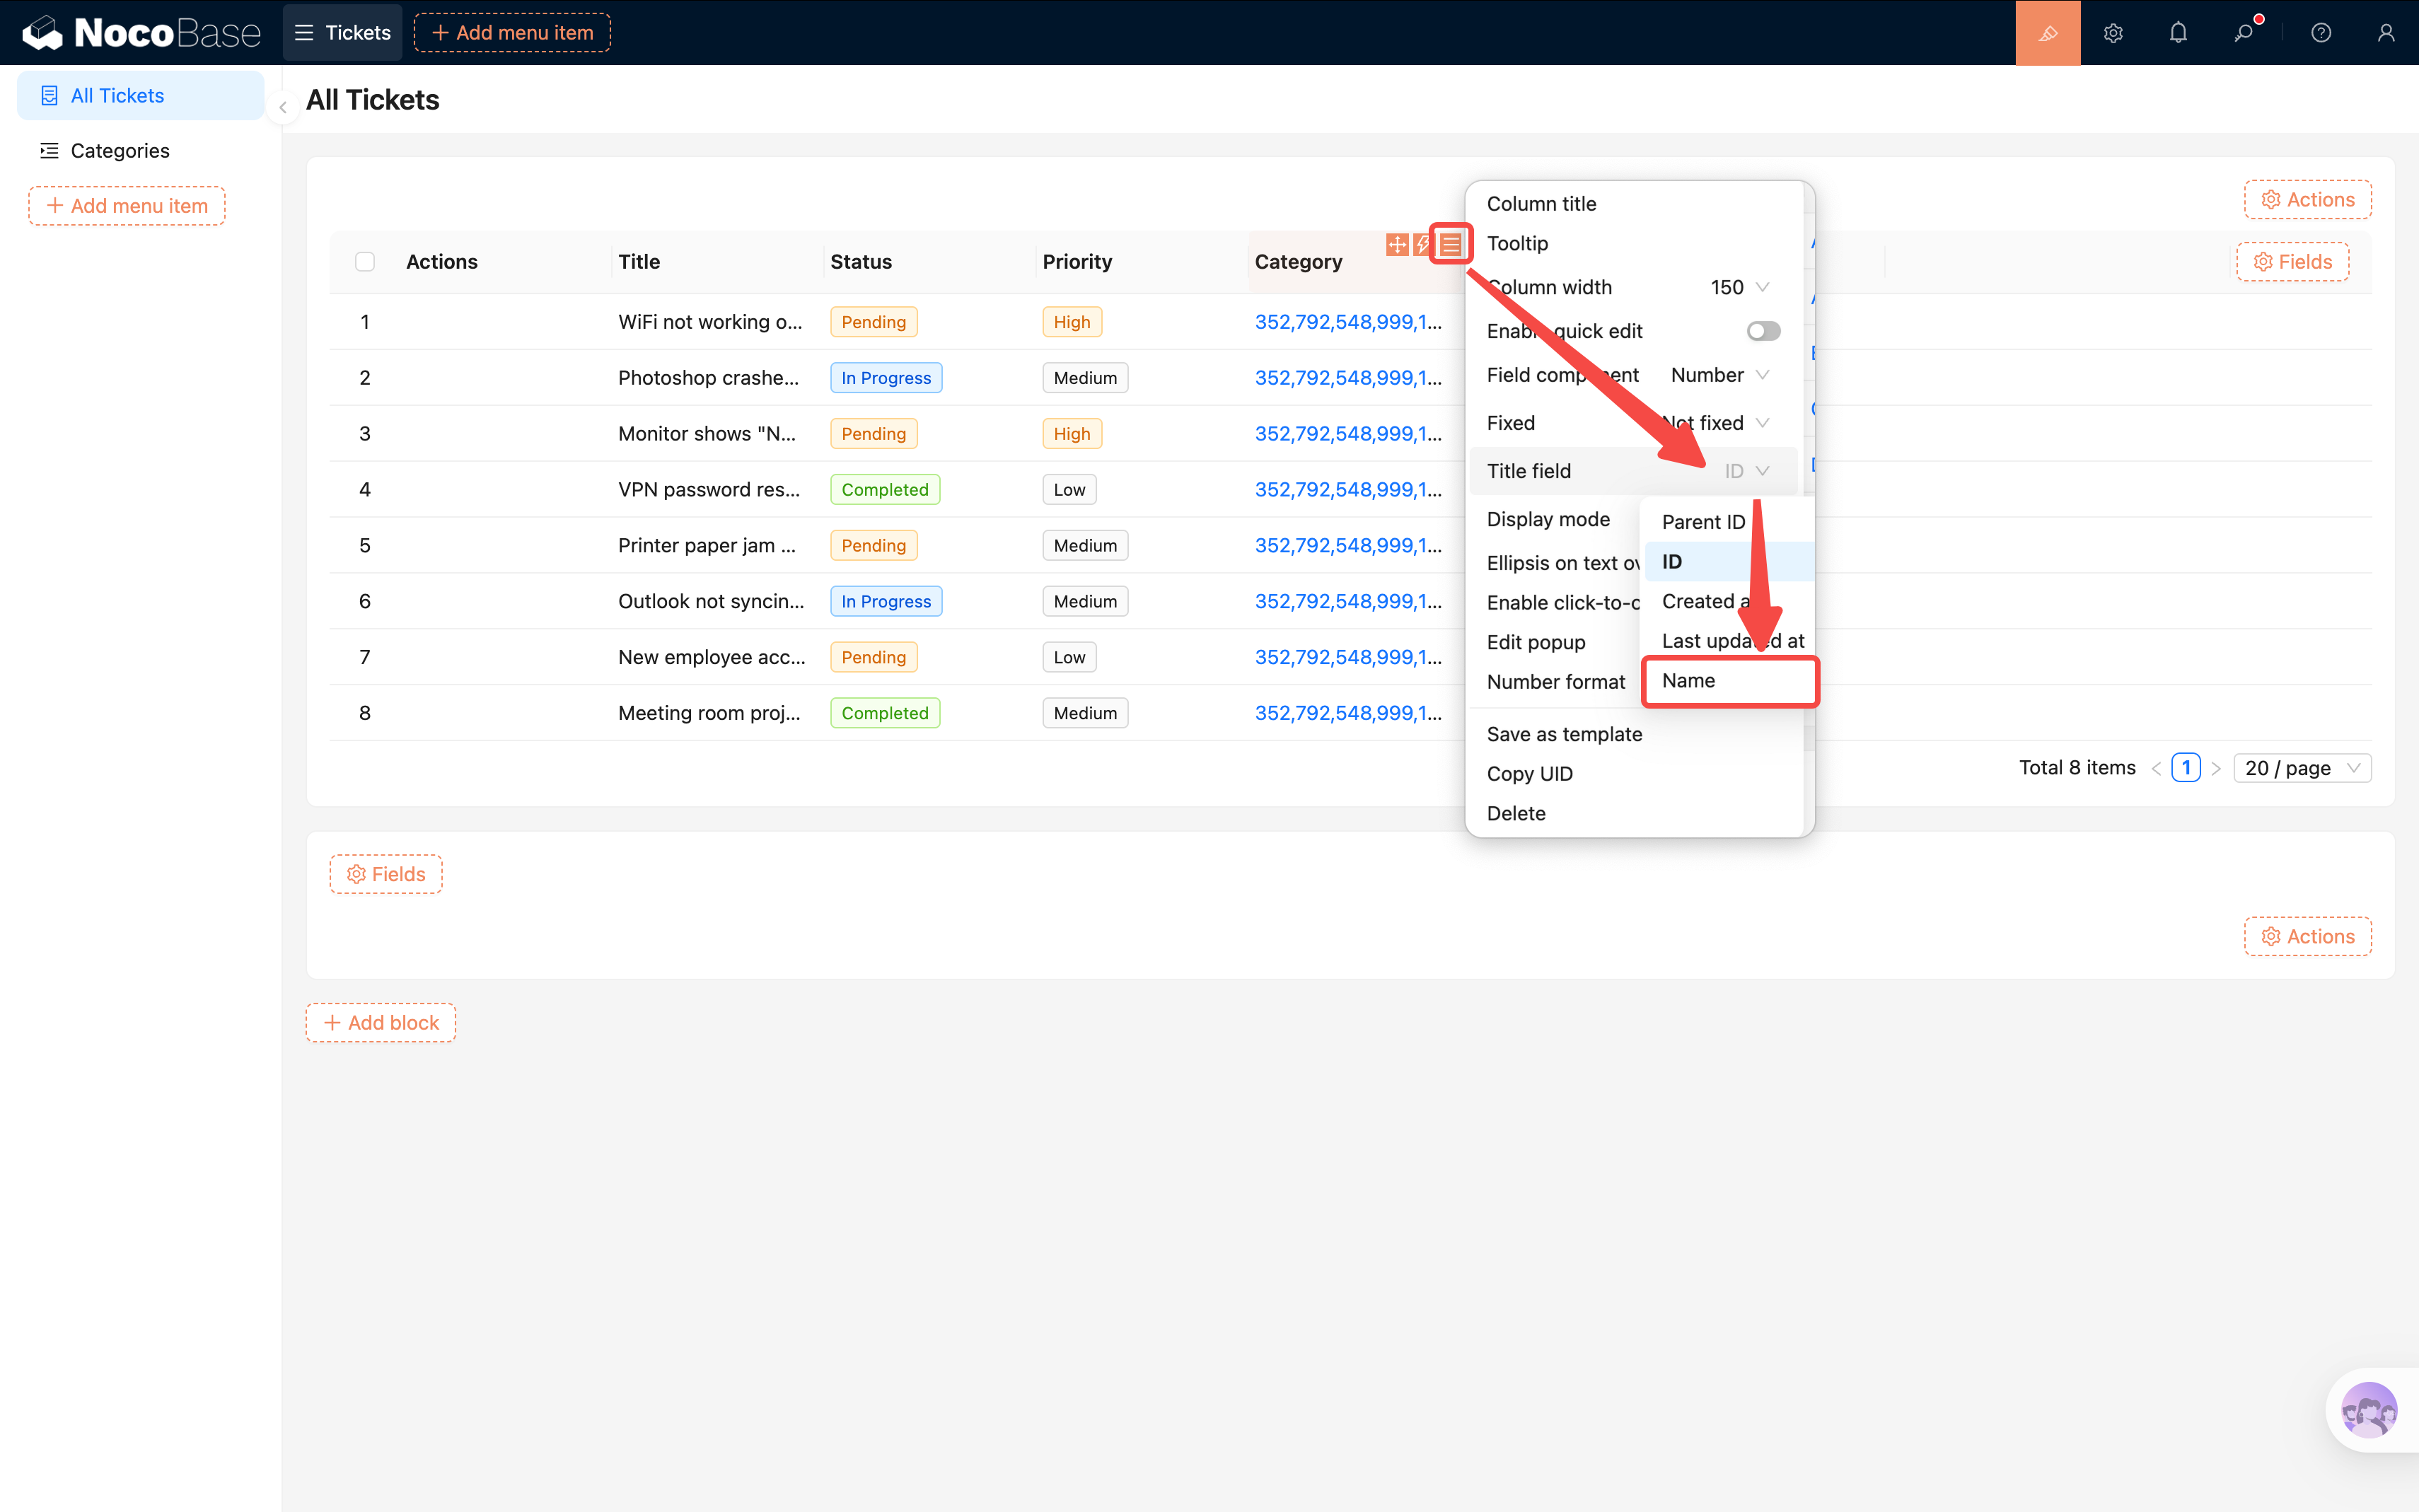
Relation Fields Showing IDs
After enabling "Category," you'll notice the table shows category IDs (numbers) instead of names. That's because relation fields default to using ID as the title field. Two ways to fix this:
Option A: Change it in the column settings (current table only)
Click the column settings for the "Category" column and find "Title field". Change it from ID to Name. This only affects the current Table block.
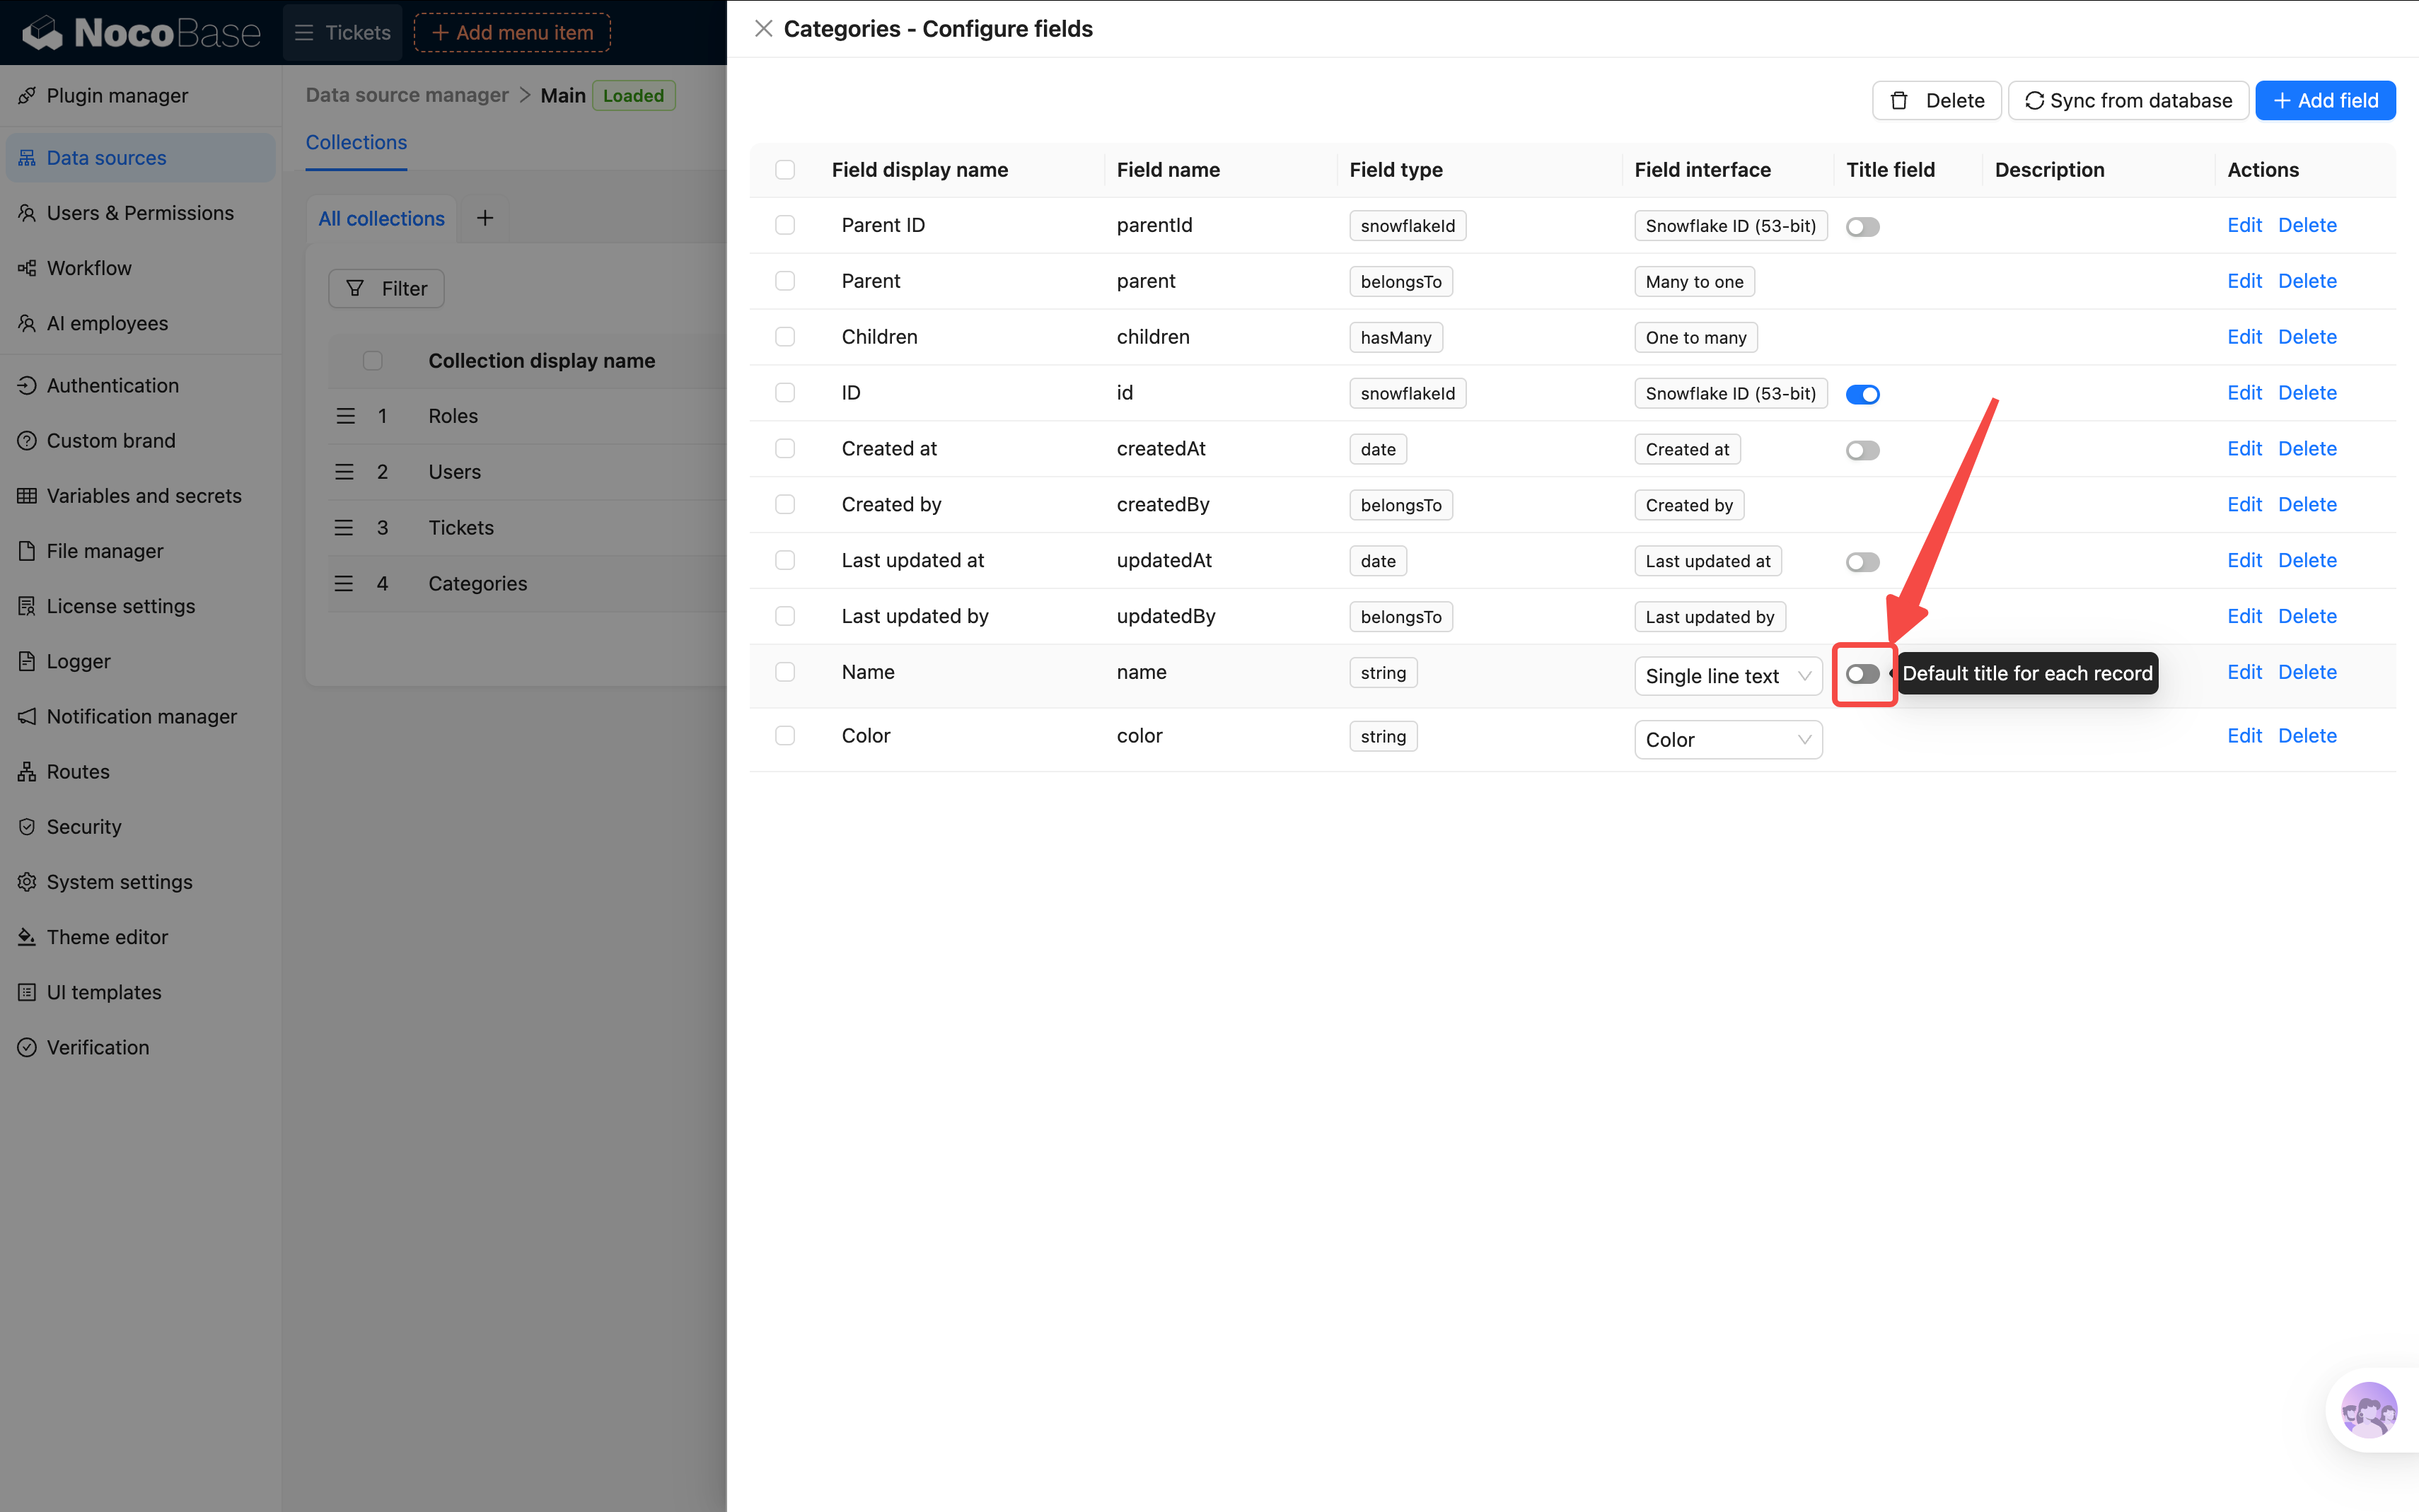
Option B: Change it in the data source (global, recommended)
Go to Settings -> Data sources -> Collections -> Categories, and change the "Title field" to Name. All blocks referencing the Categories collection will then display names by default. After the change, you'll need to re-add the field on the page for it to take effect.
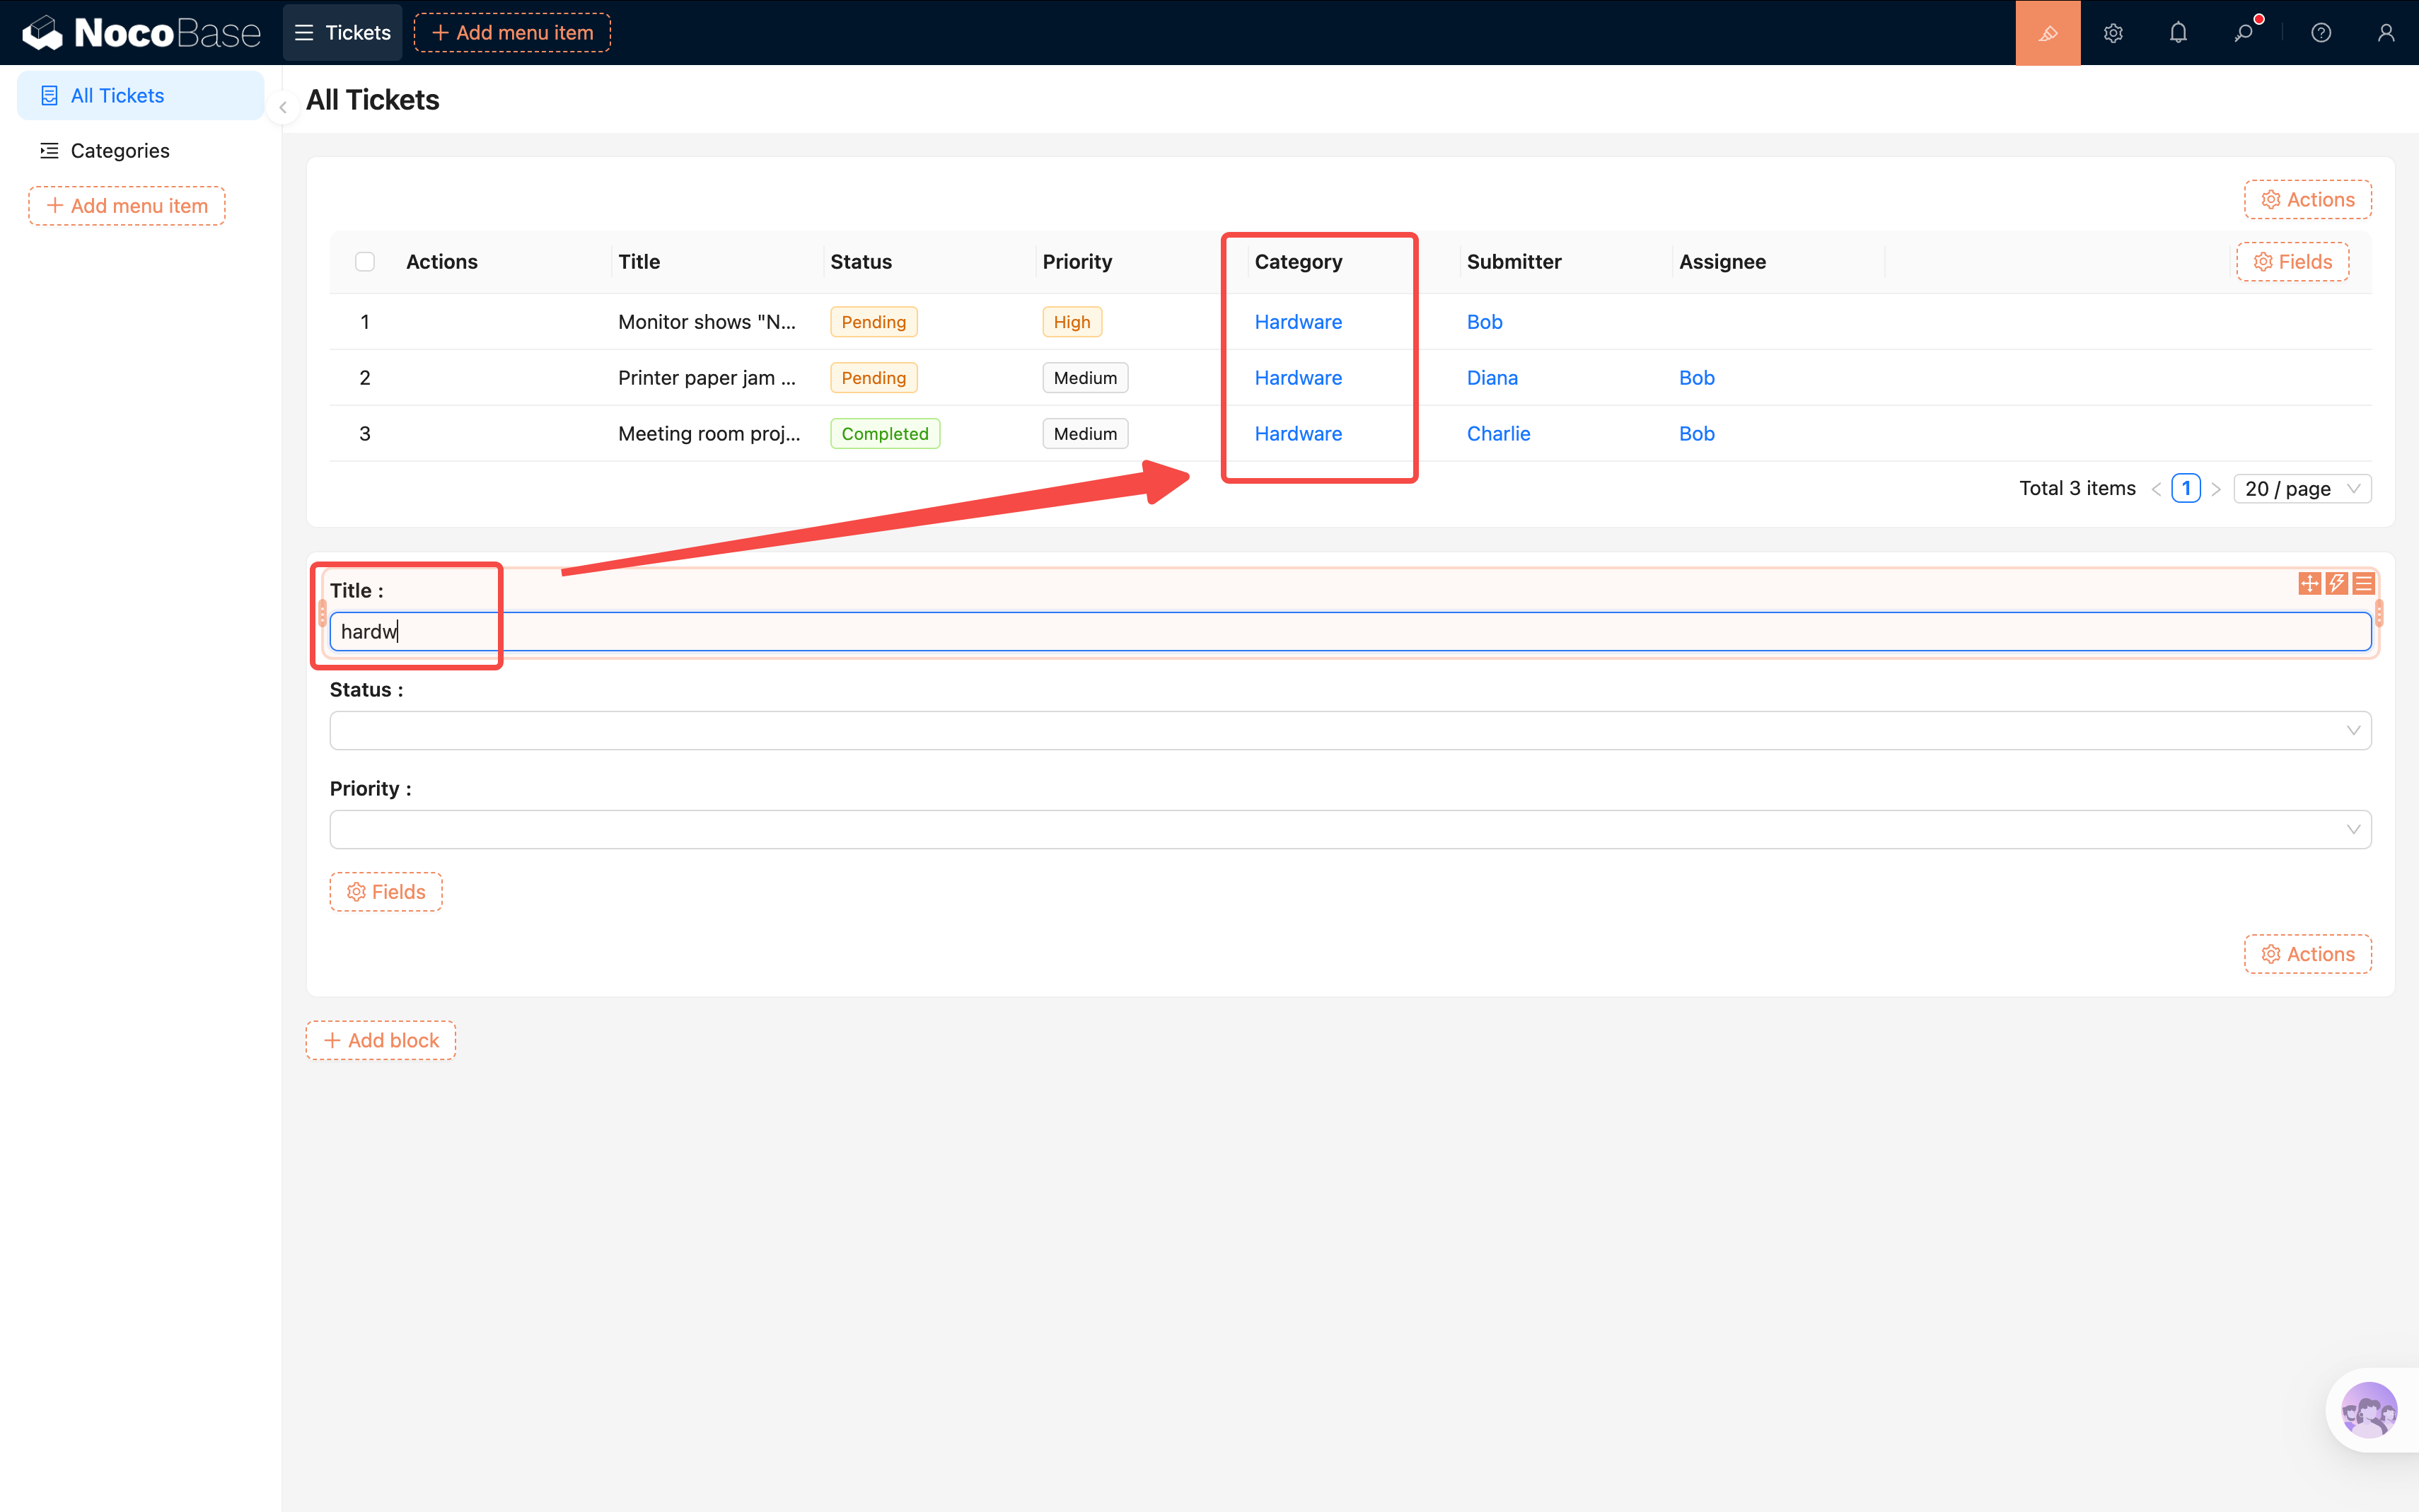
3.5 Adding Filtering and Sorting
As tickets pile up, we'll need to quickly find specific ones. NocoBase provides several ways to filter data — let's start with the most common: the Filter Form block.
Adding a Filter Form
- On the All Tickets page, click "Add block" and select Filter blocks -> Filter form.
- In v2 pages, there's no collection selection step — the Filter form is added directly to the page.
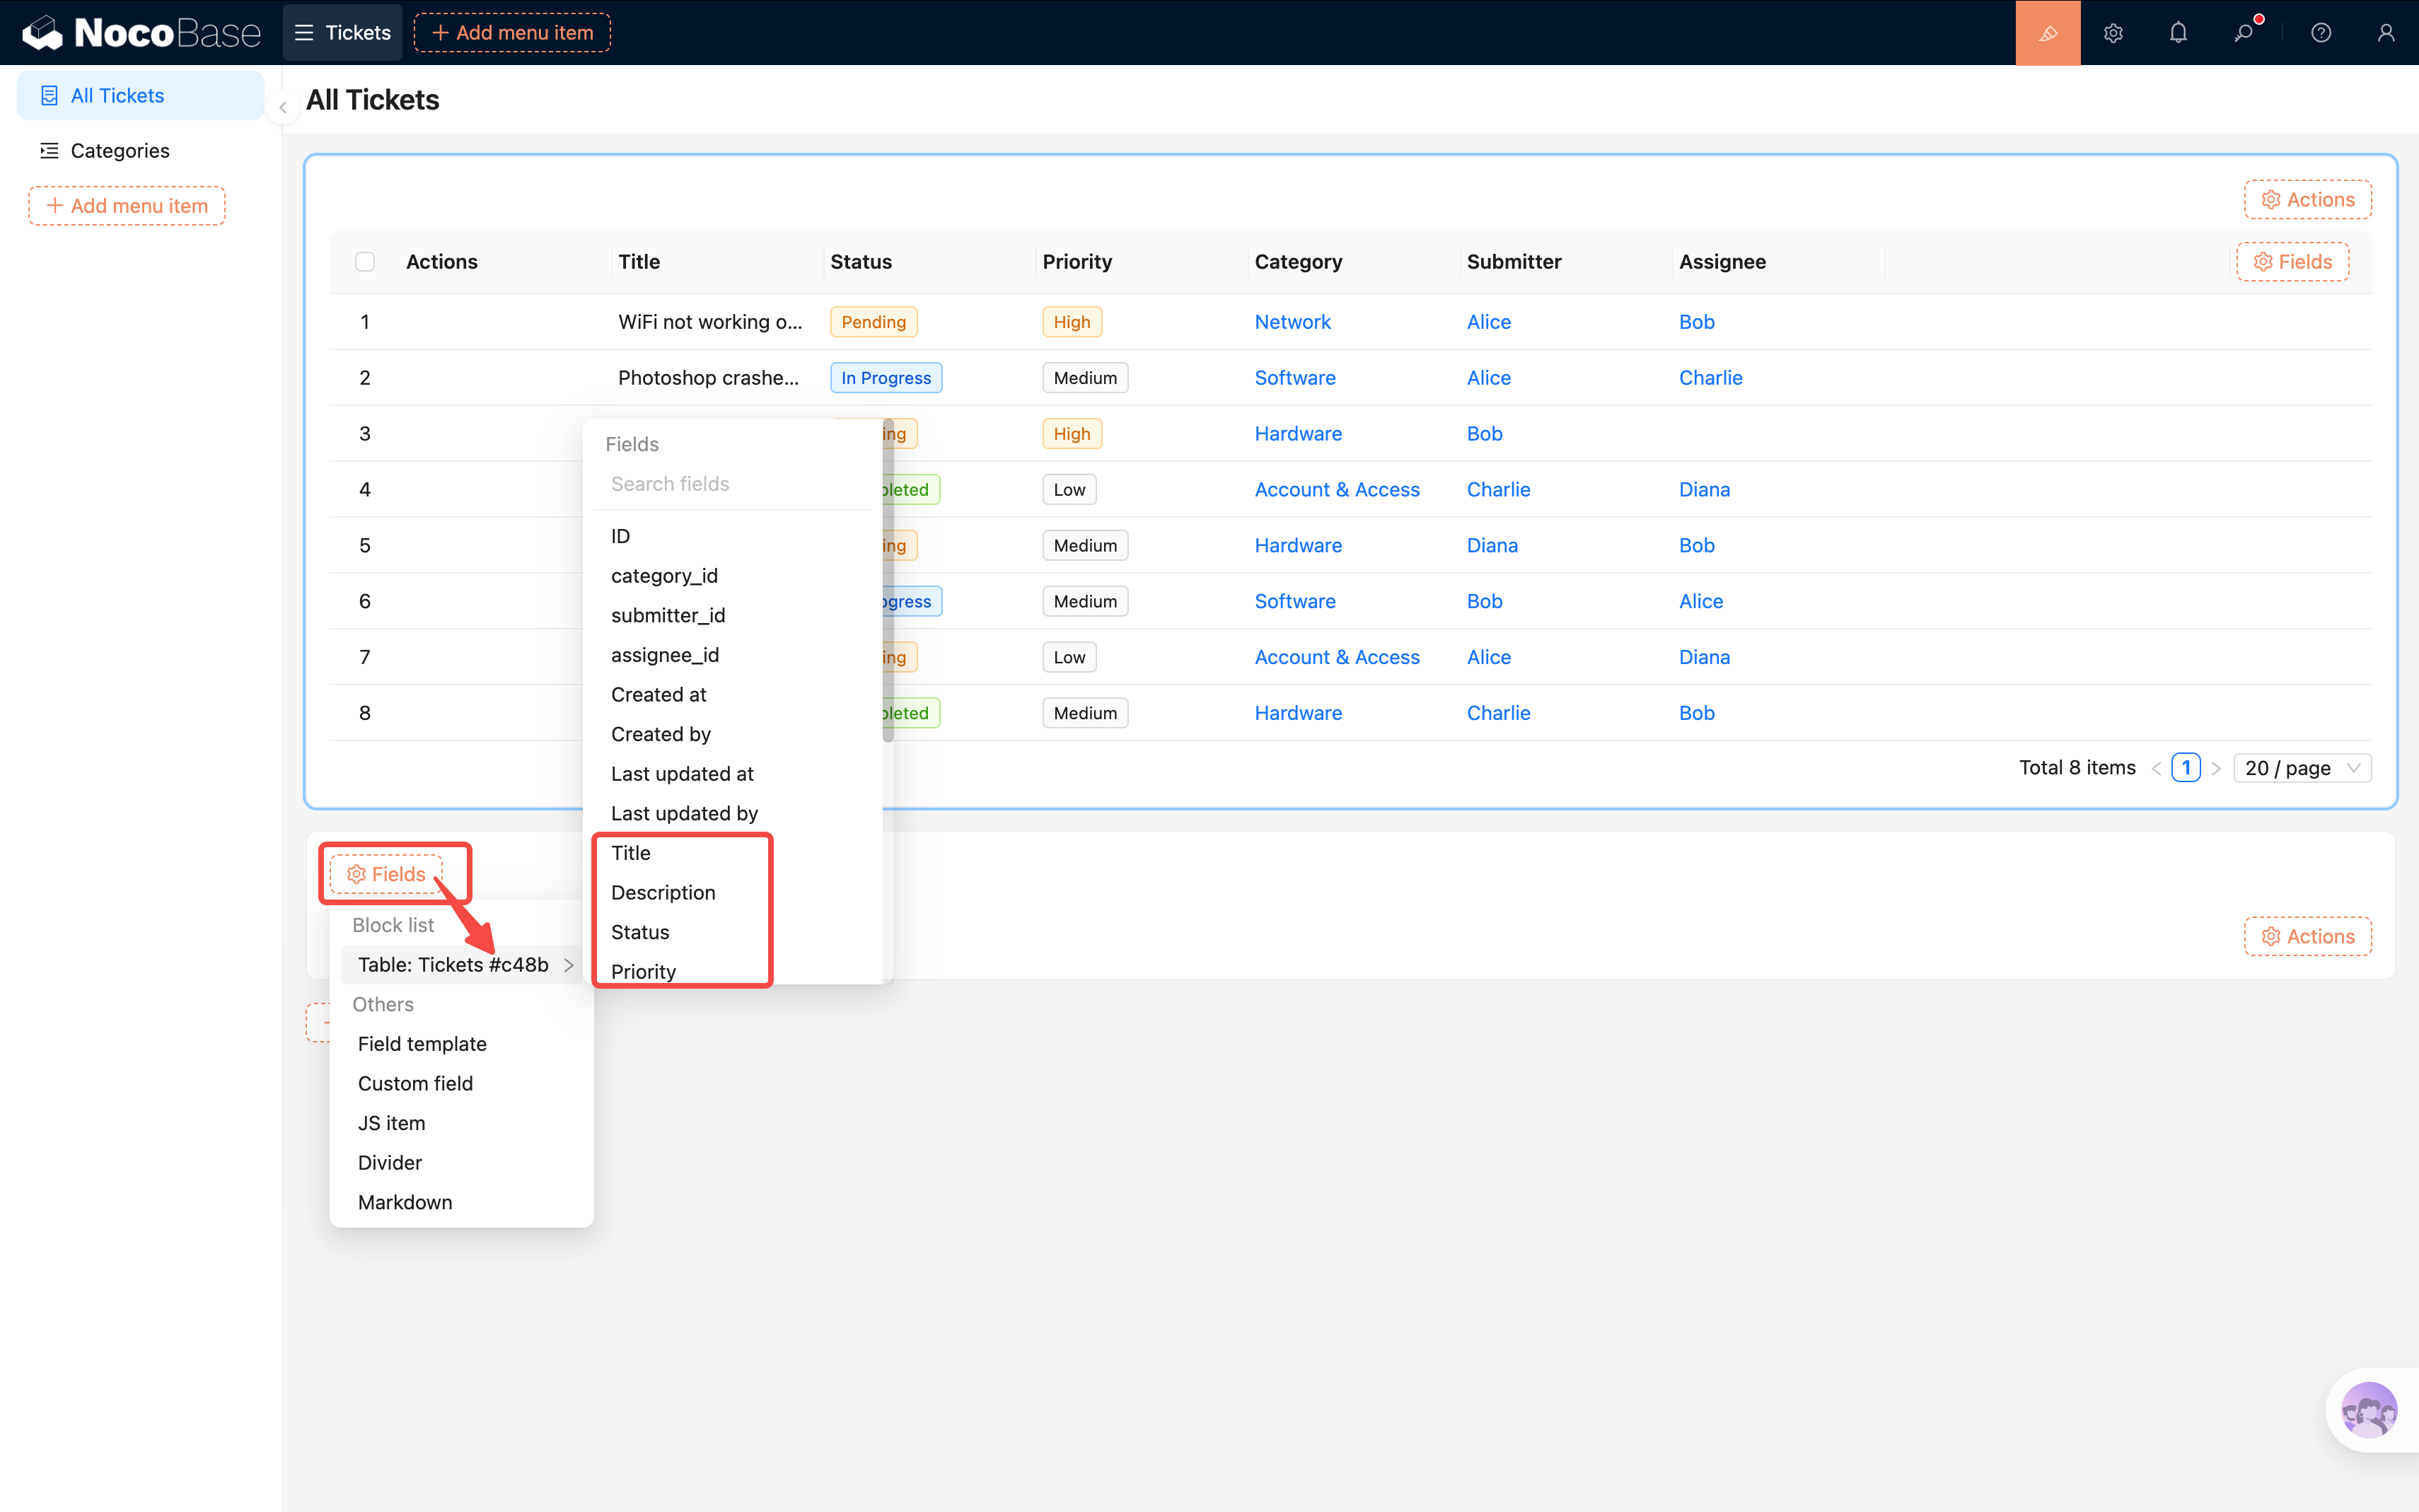
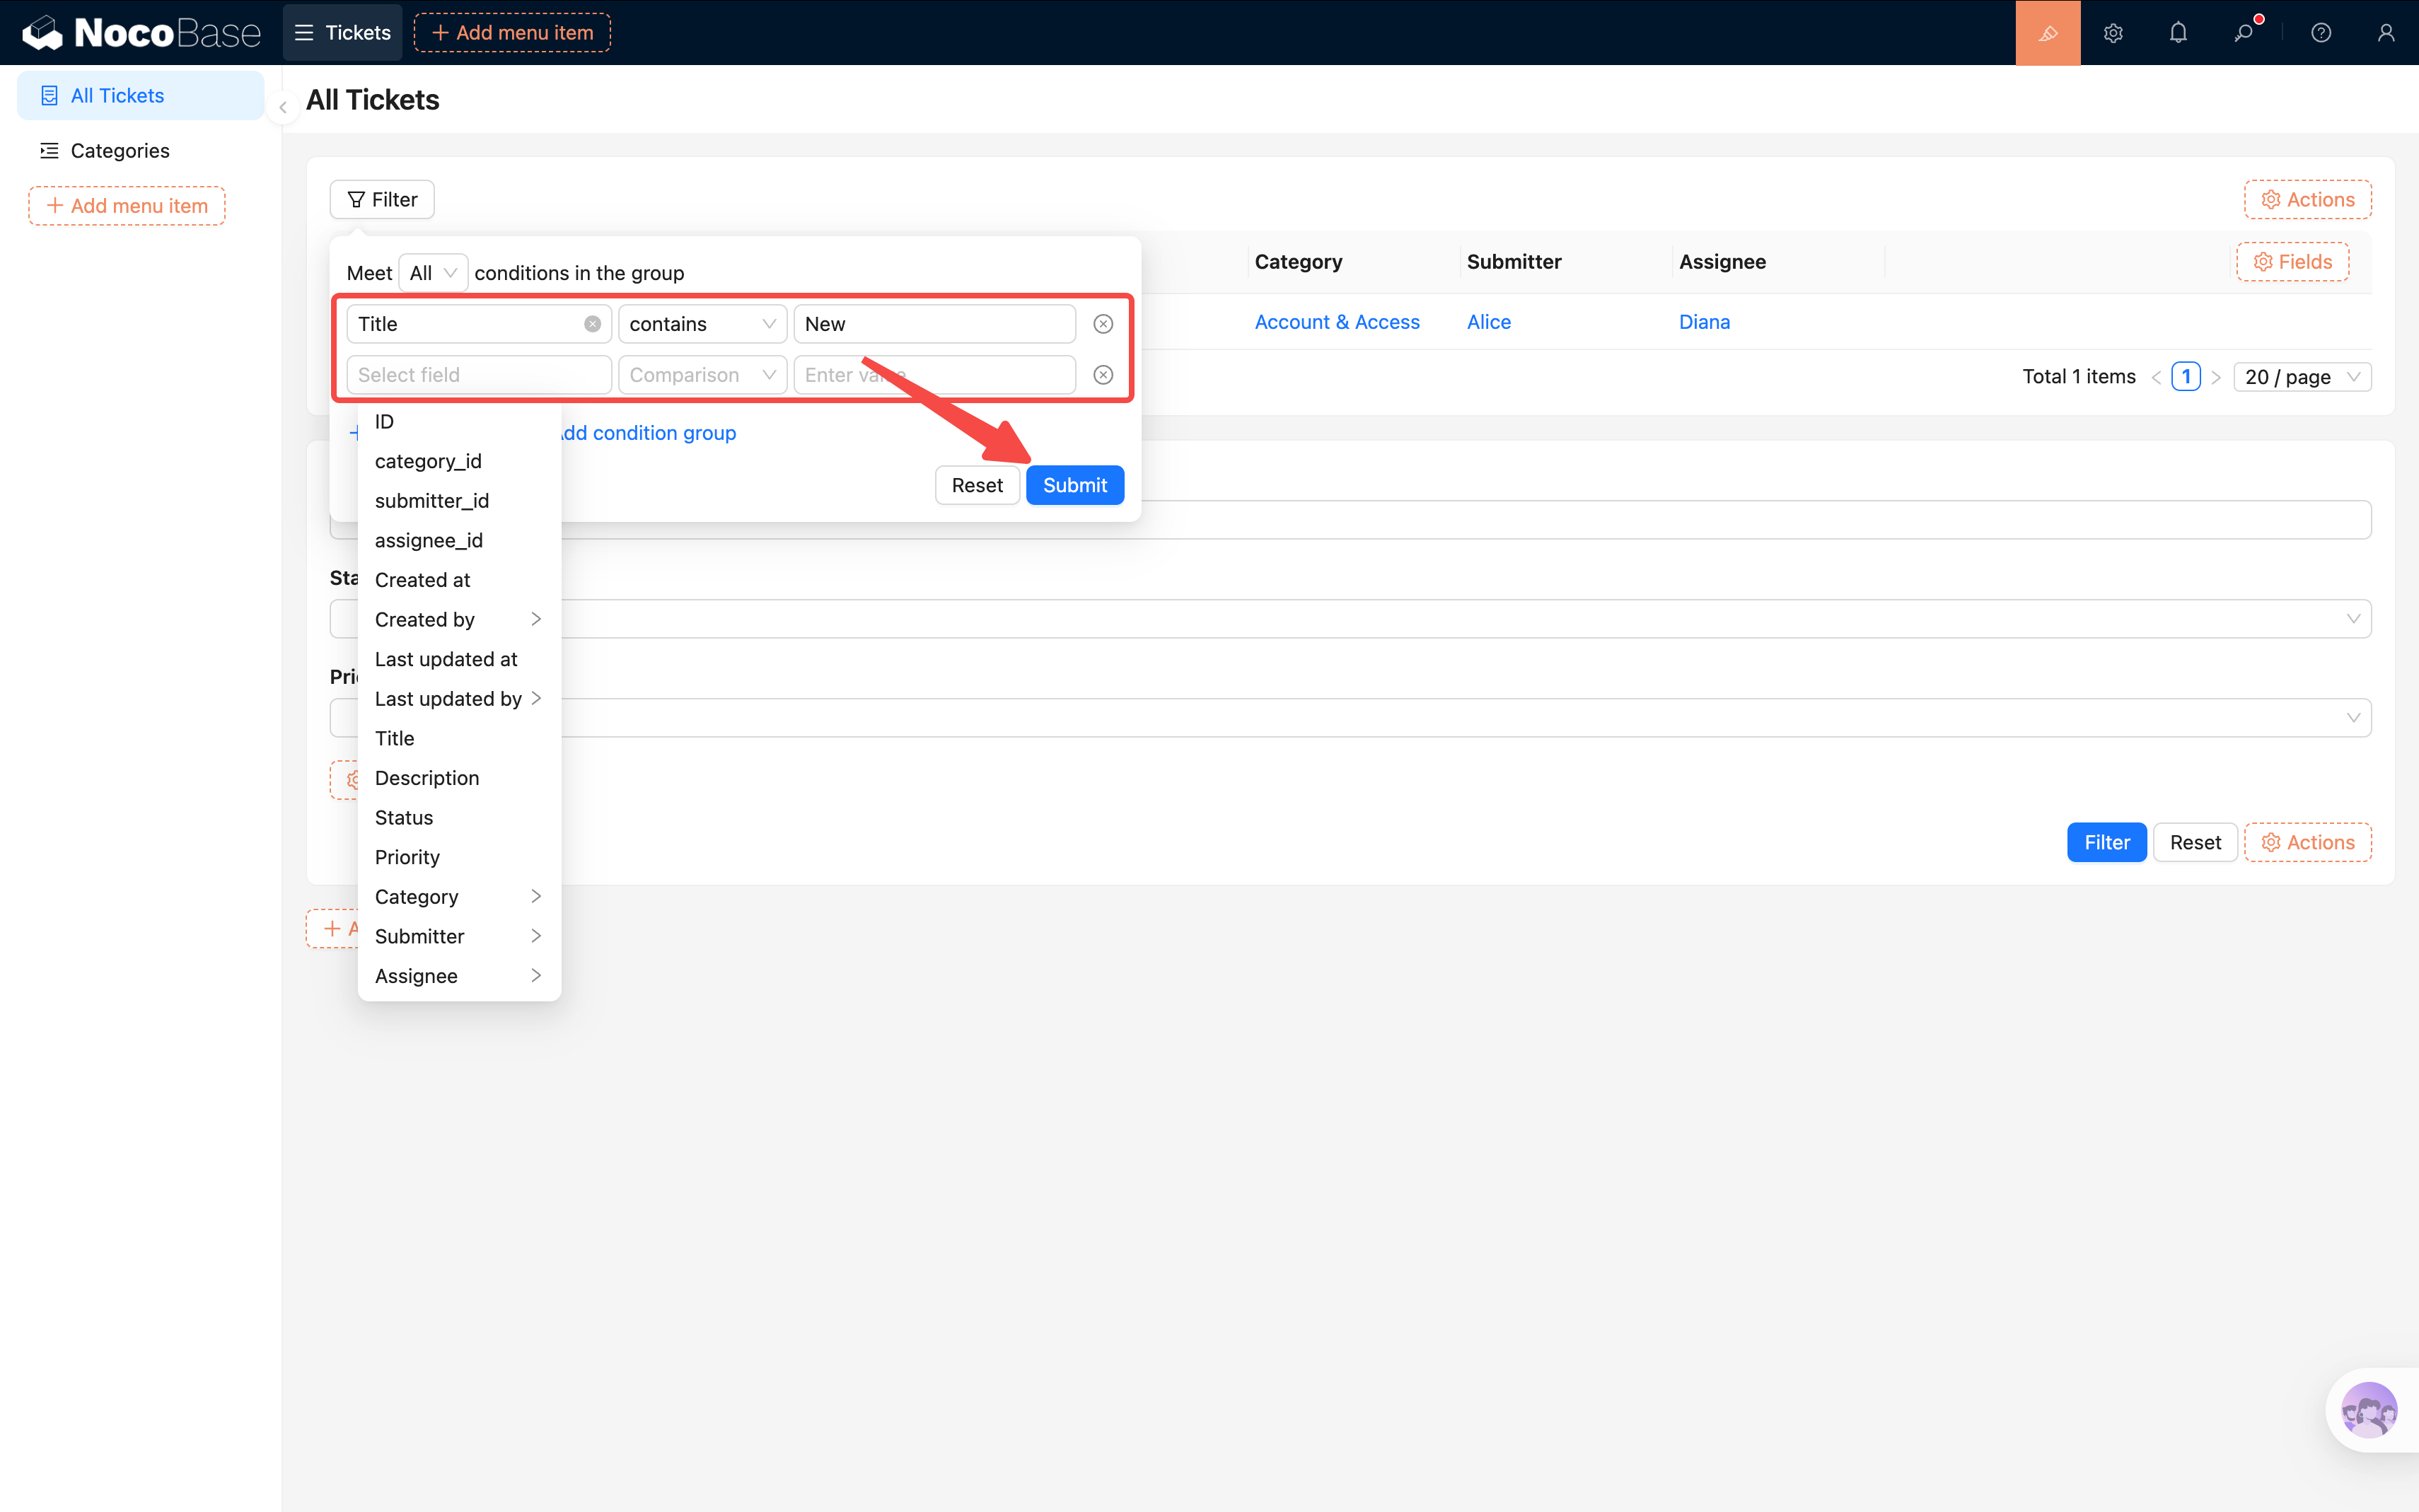
- In the Filter form, click "Fields". A list of all filterable data blocks on the current page will appear, e.g.,
Table: Tickets #c48b(the code after#is the block's UID, useful for distinguishing multiple blocks from the same collection).

- Hover over a block name to expand its list of filterable fields. Click to add them: Status, Priority, Category.
- Once added, users can type filter criteria and the table data will update automatically in real time.
Multi-Field Fuzzy Search
What if you want a single search box to match across multiple fields at once?
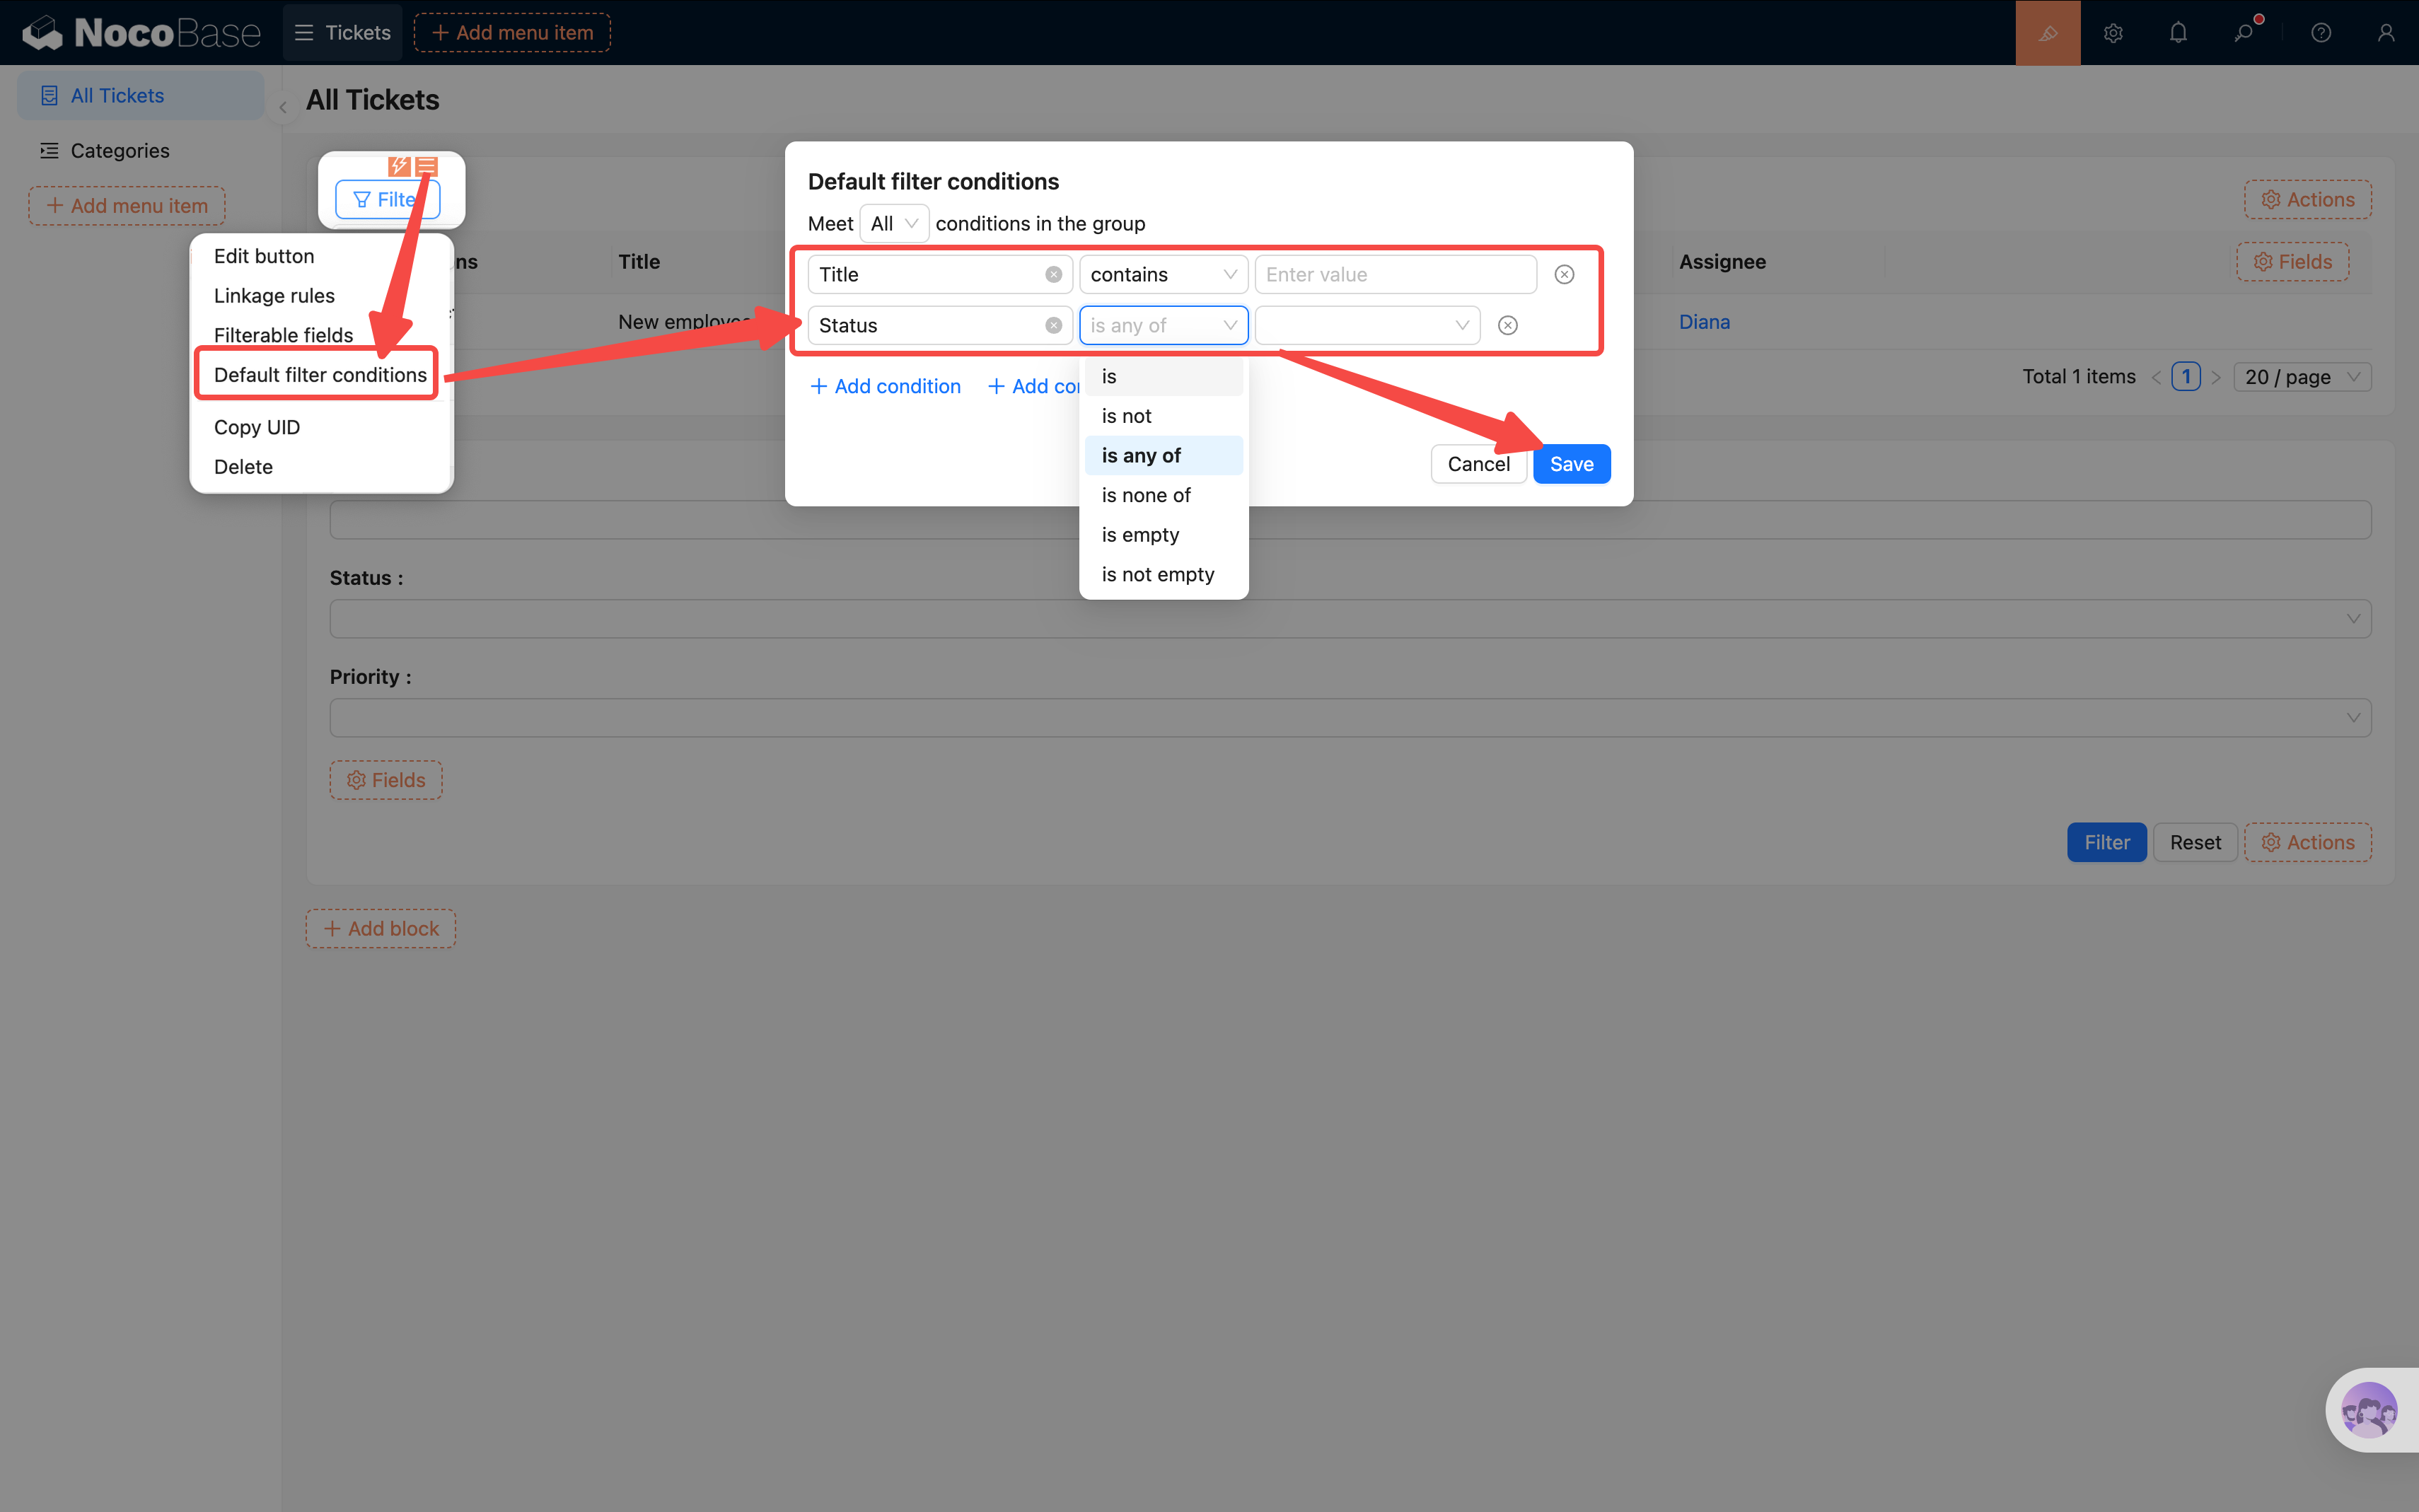
Click the settings icon in the top-right corner of a search field and you'll see "Connect fields". It lists all searchable fields from each block on the page — by default, only "Title" is connected.
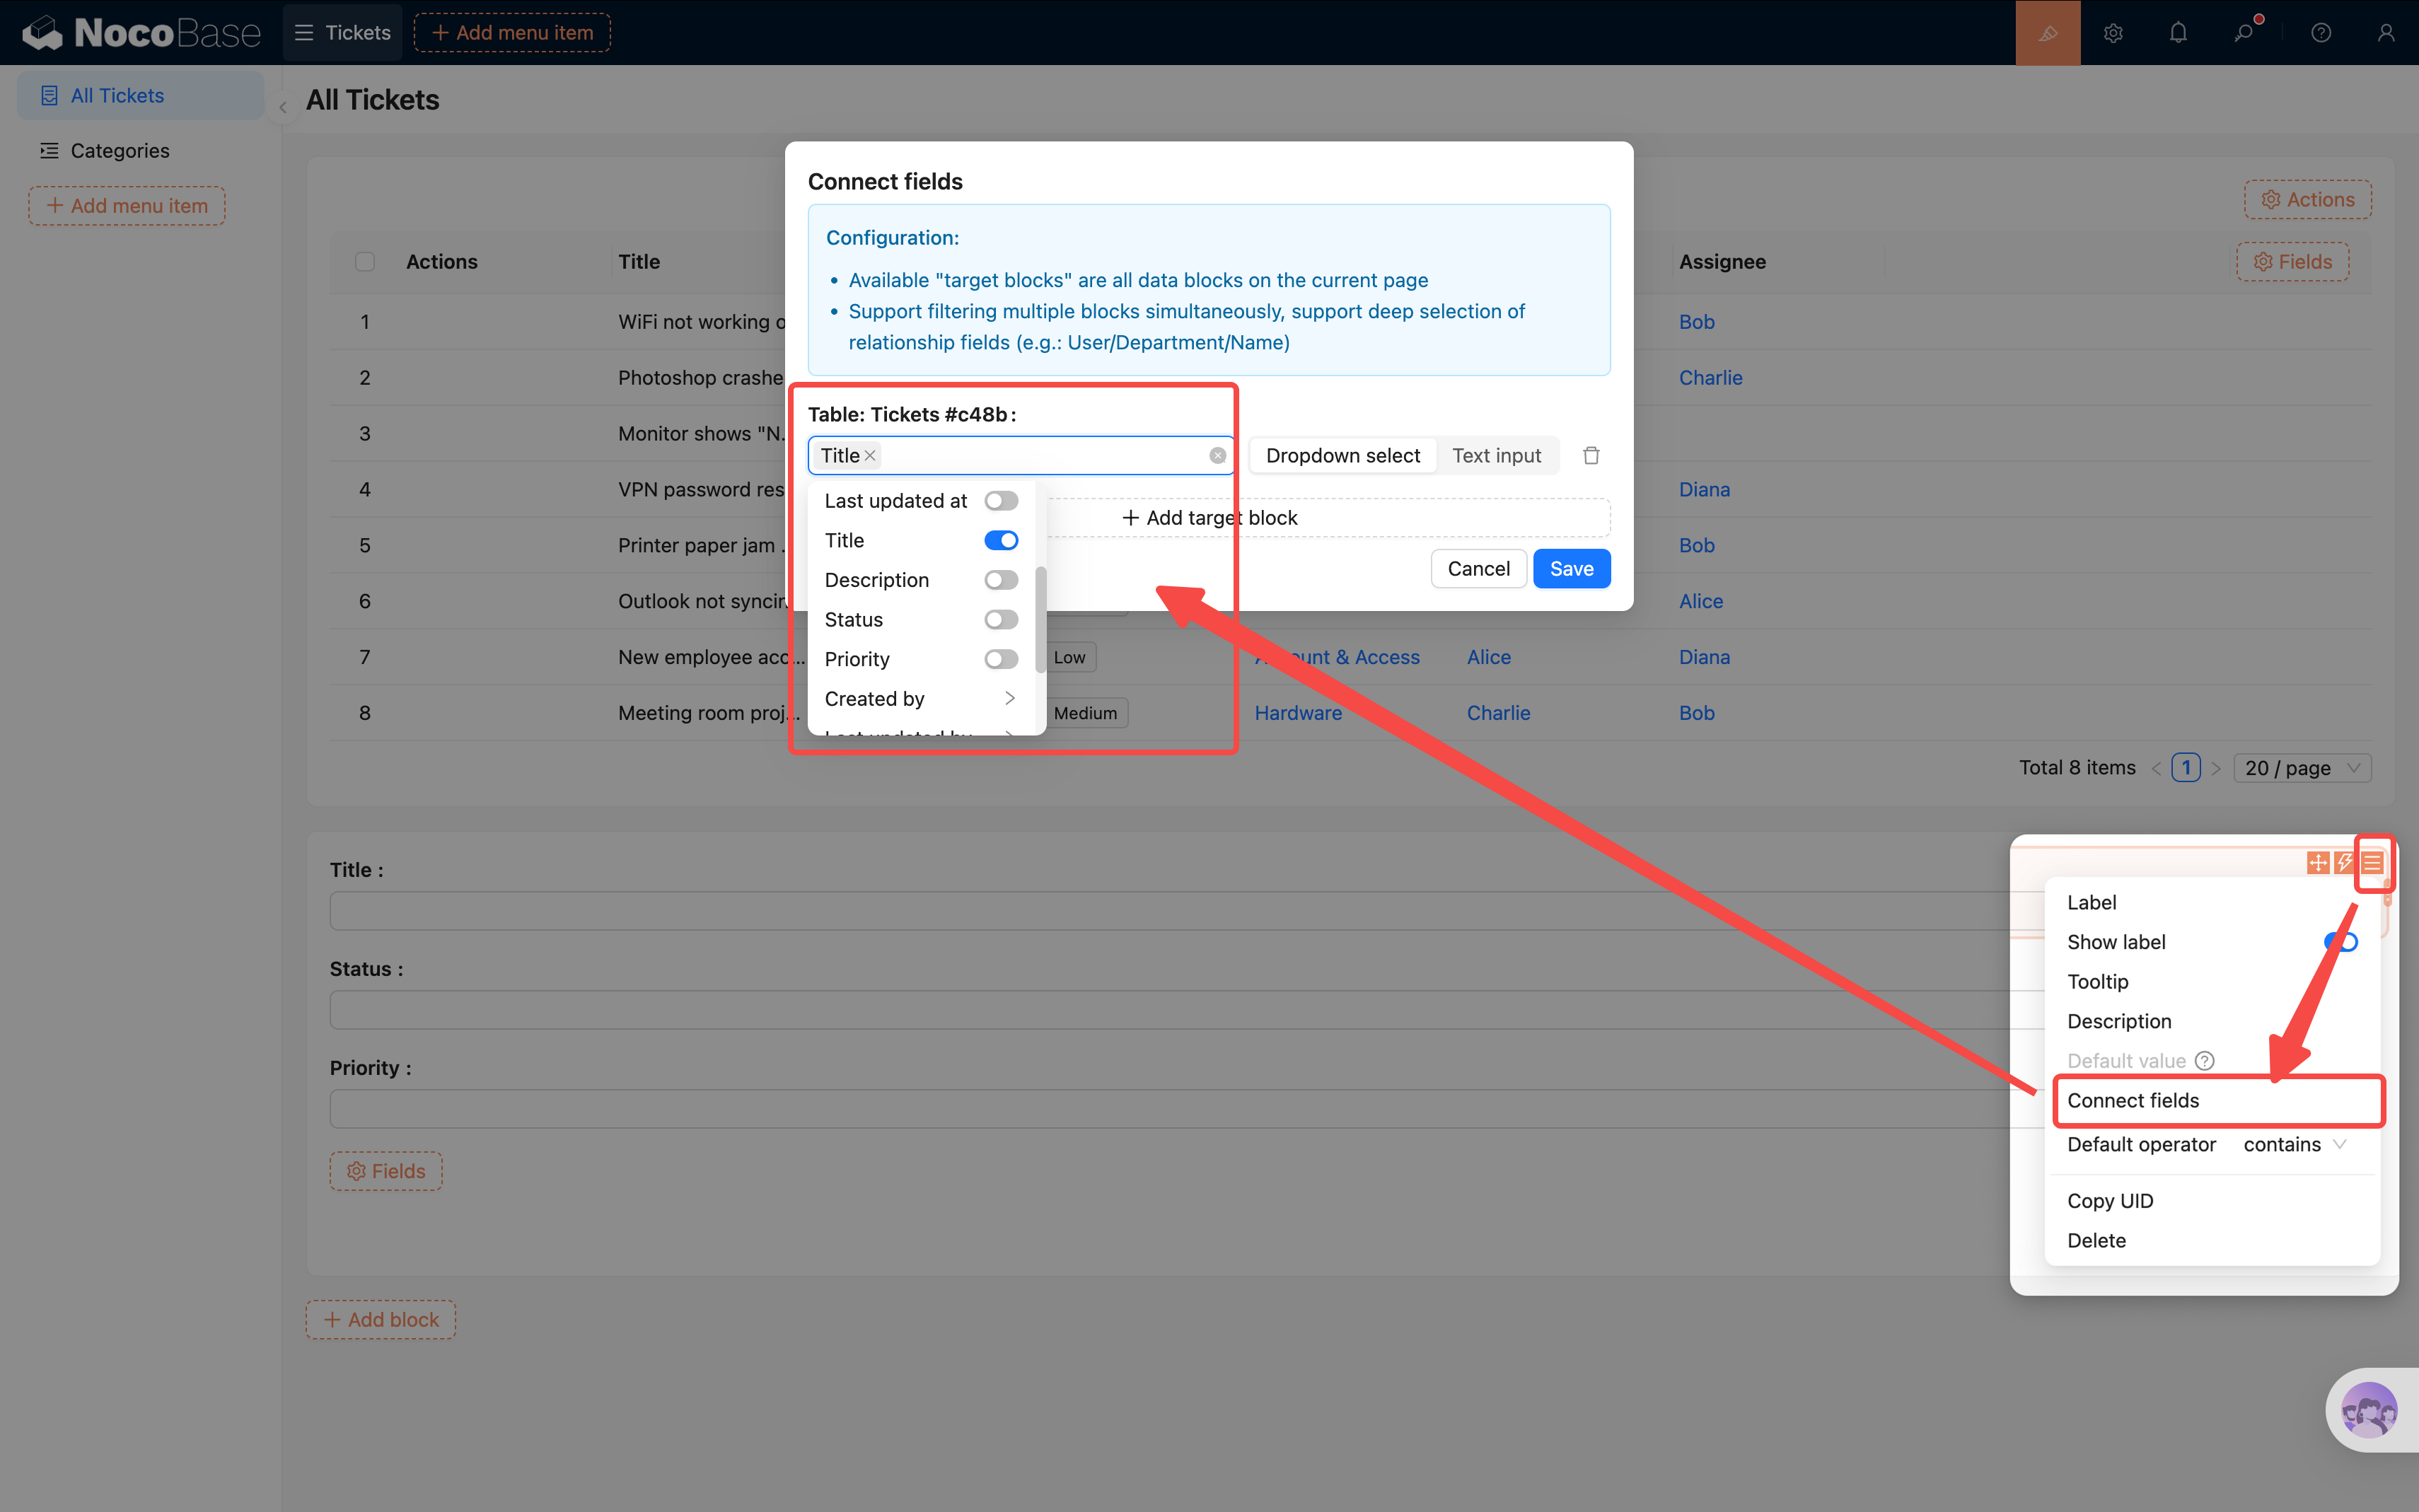
Select additional fields like Description so that a keyword search matches all of them simultaneously.
You can even search through relation fields — click "Category," then in the next level check "Category Name." Now searches will also match against category names.

Connect fields is powerful: it works across multiple blocks and multiple fields. If your page has several data blocks, try adding more and experiment!
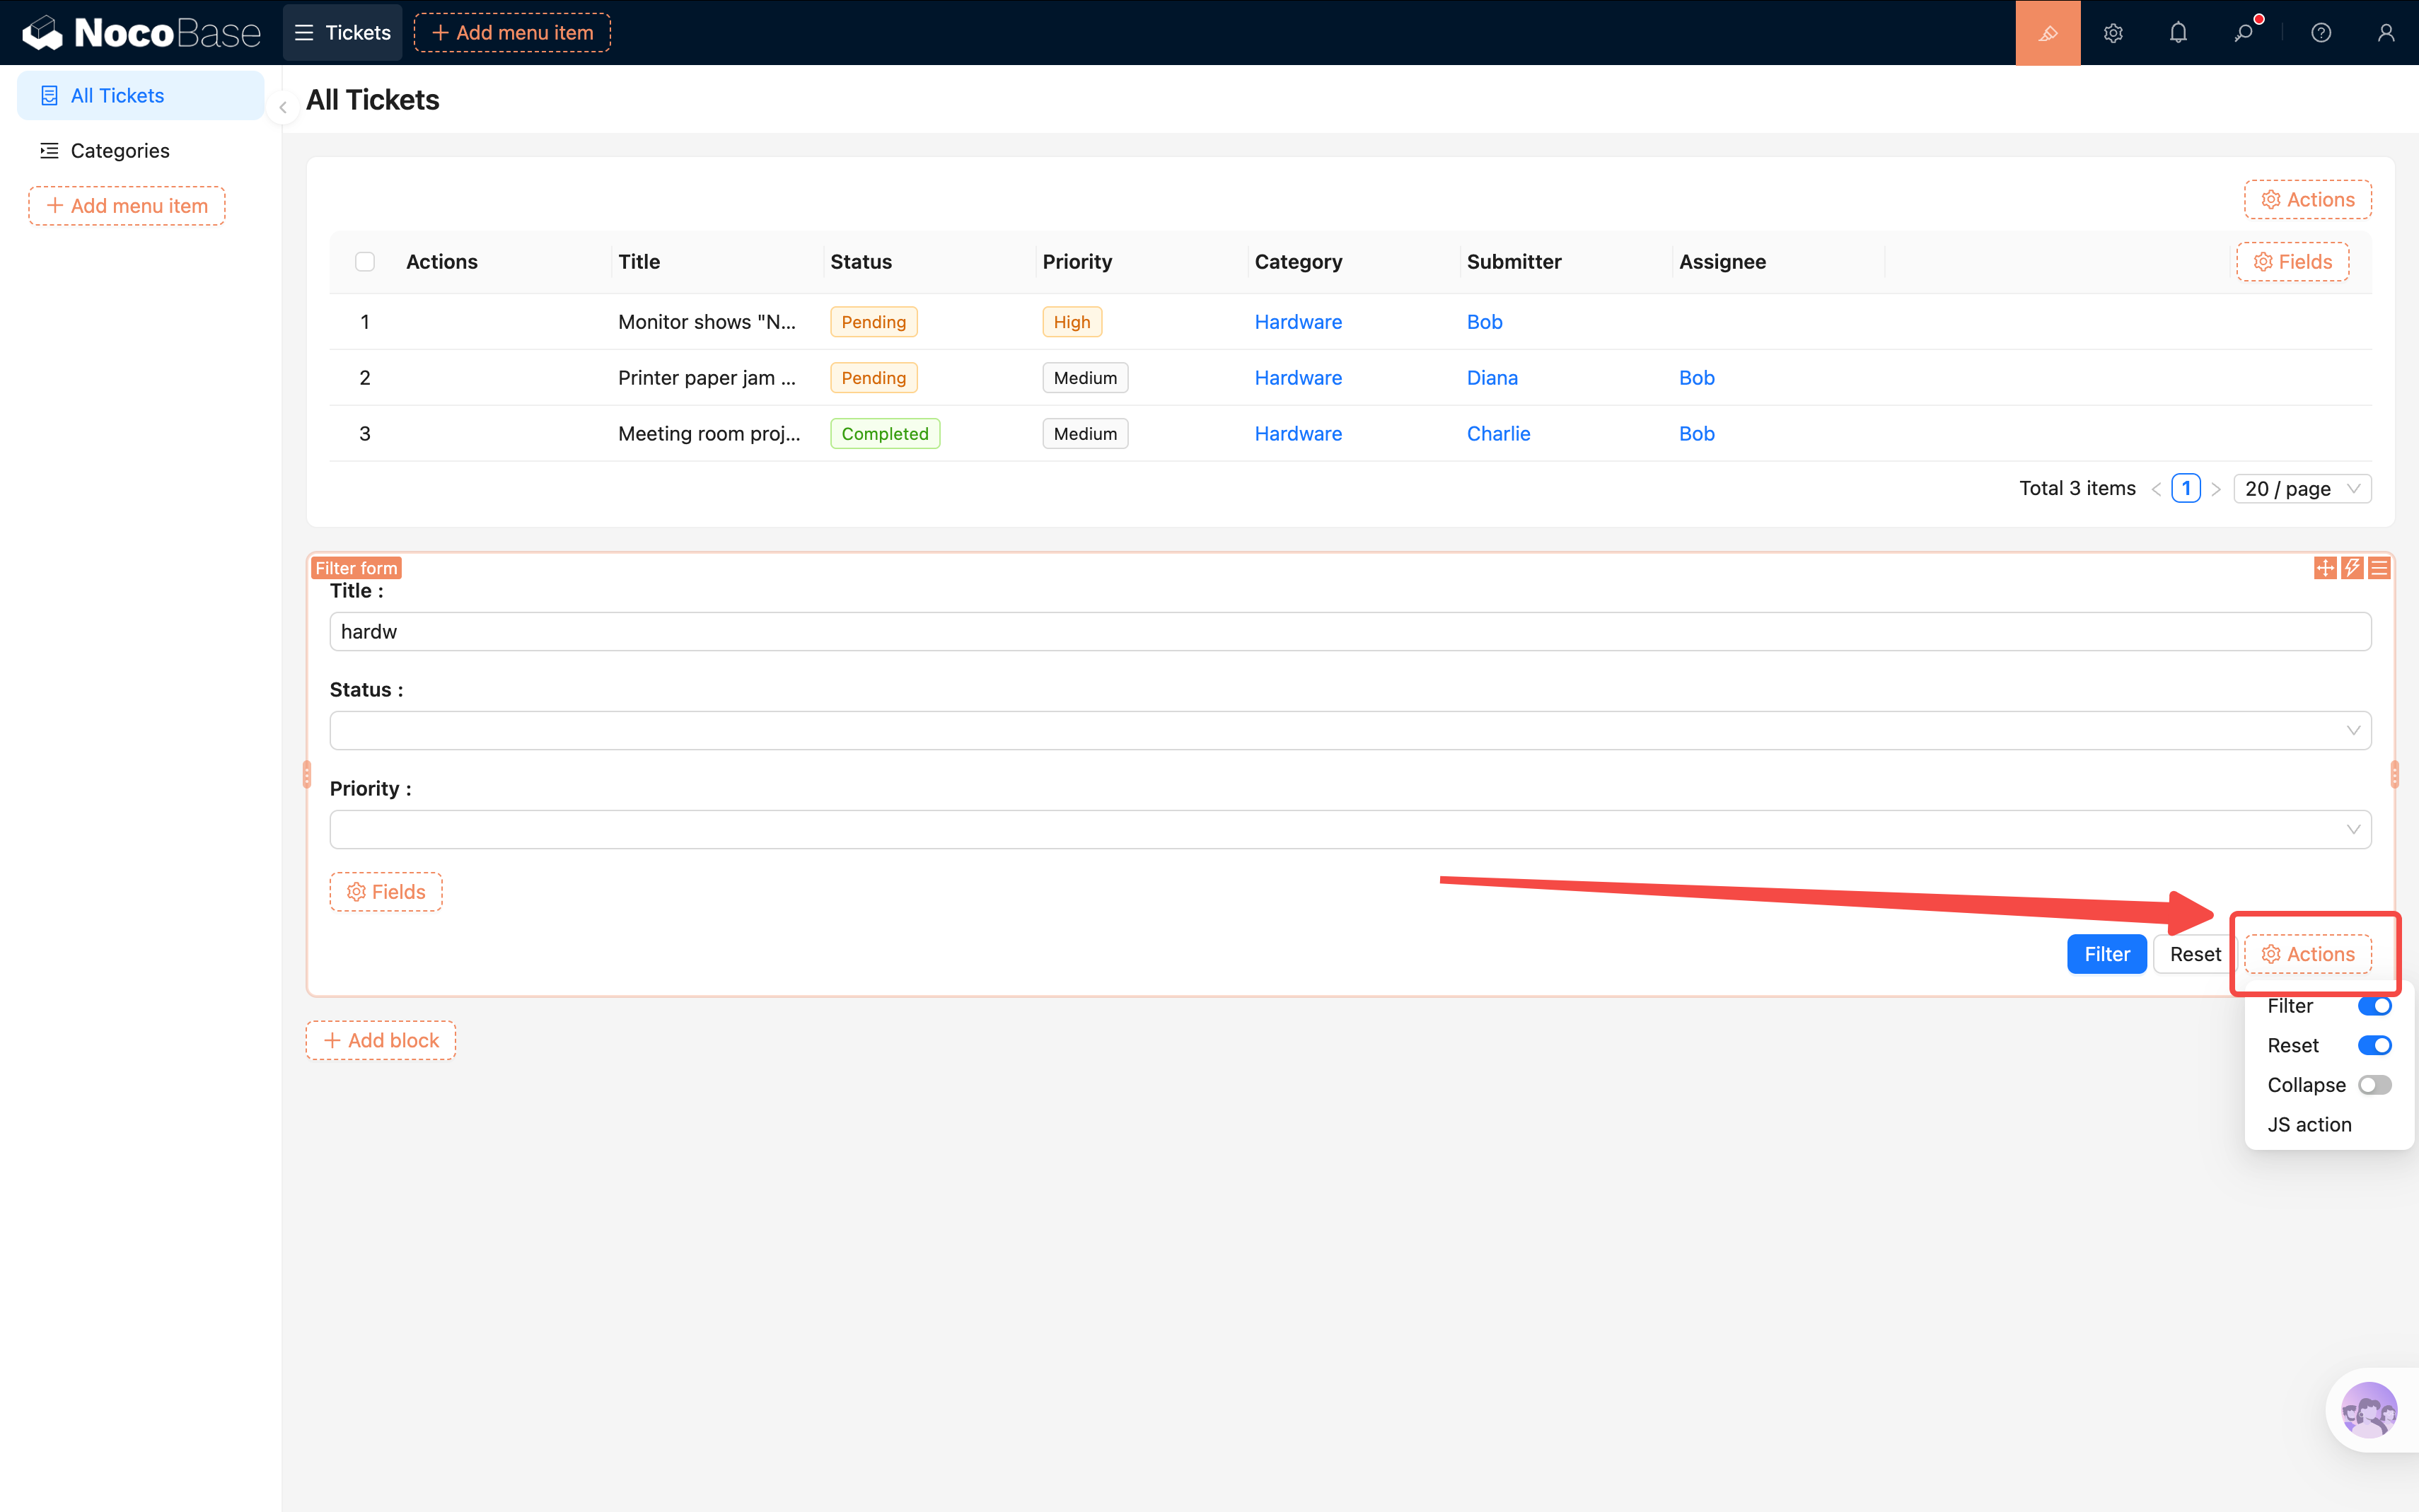
Don't Want Auto-Filtering?
If you'd prefer users to click a button before filtering takes effect, click "Actions" at the bottom-right of the Filter form and enable the "Filter" and "Reset" buttons. Users will then need to click "Filter" to apply their criteria.
Alternative: The Table's Built-in Filter Action
Besides a dedicated Filter Form block, the Table block itself has a built-in "Filter" action. Click "Actions" above the Table block and enable "Filter". A filter button will appear in the table toolbar. Clicking it opens a condition panel where users can filter data by field values directly.
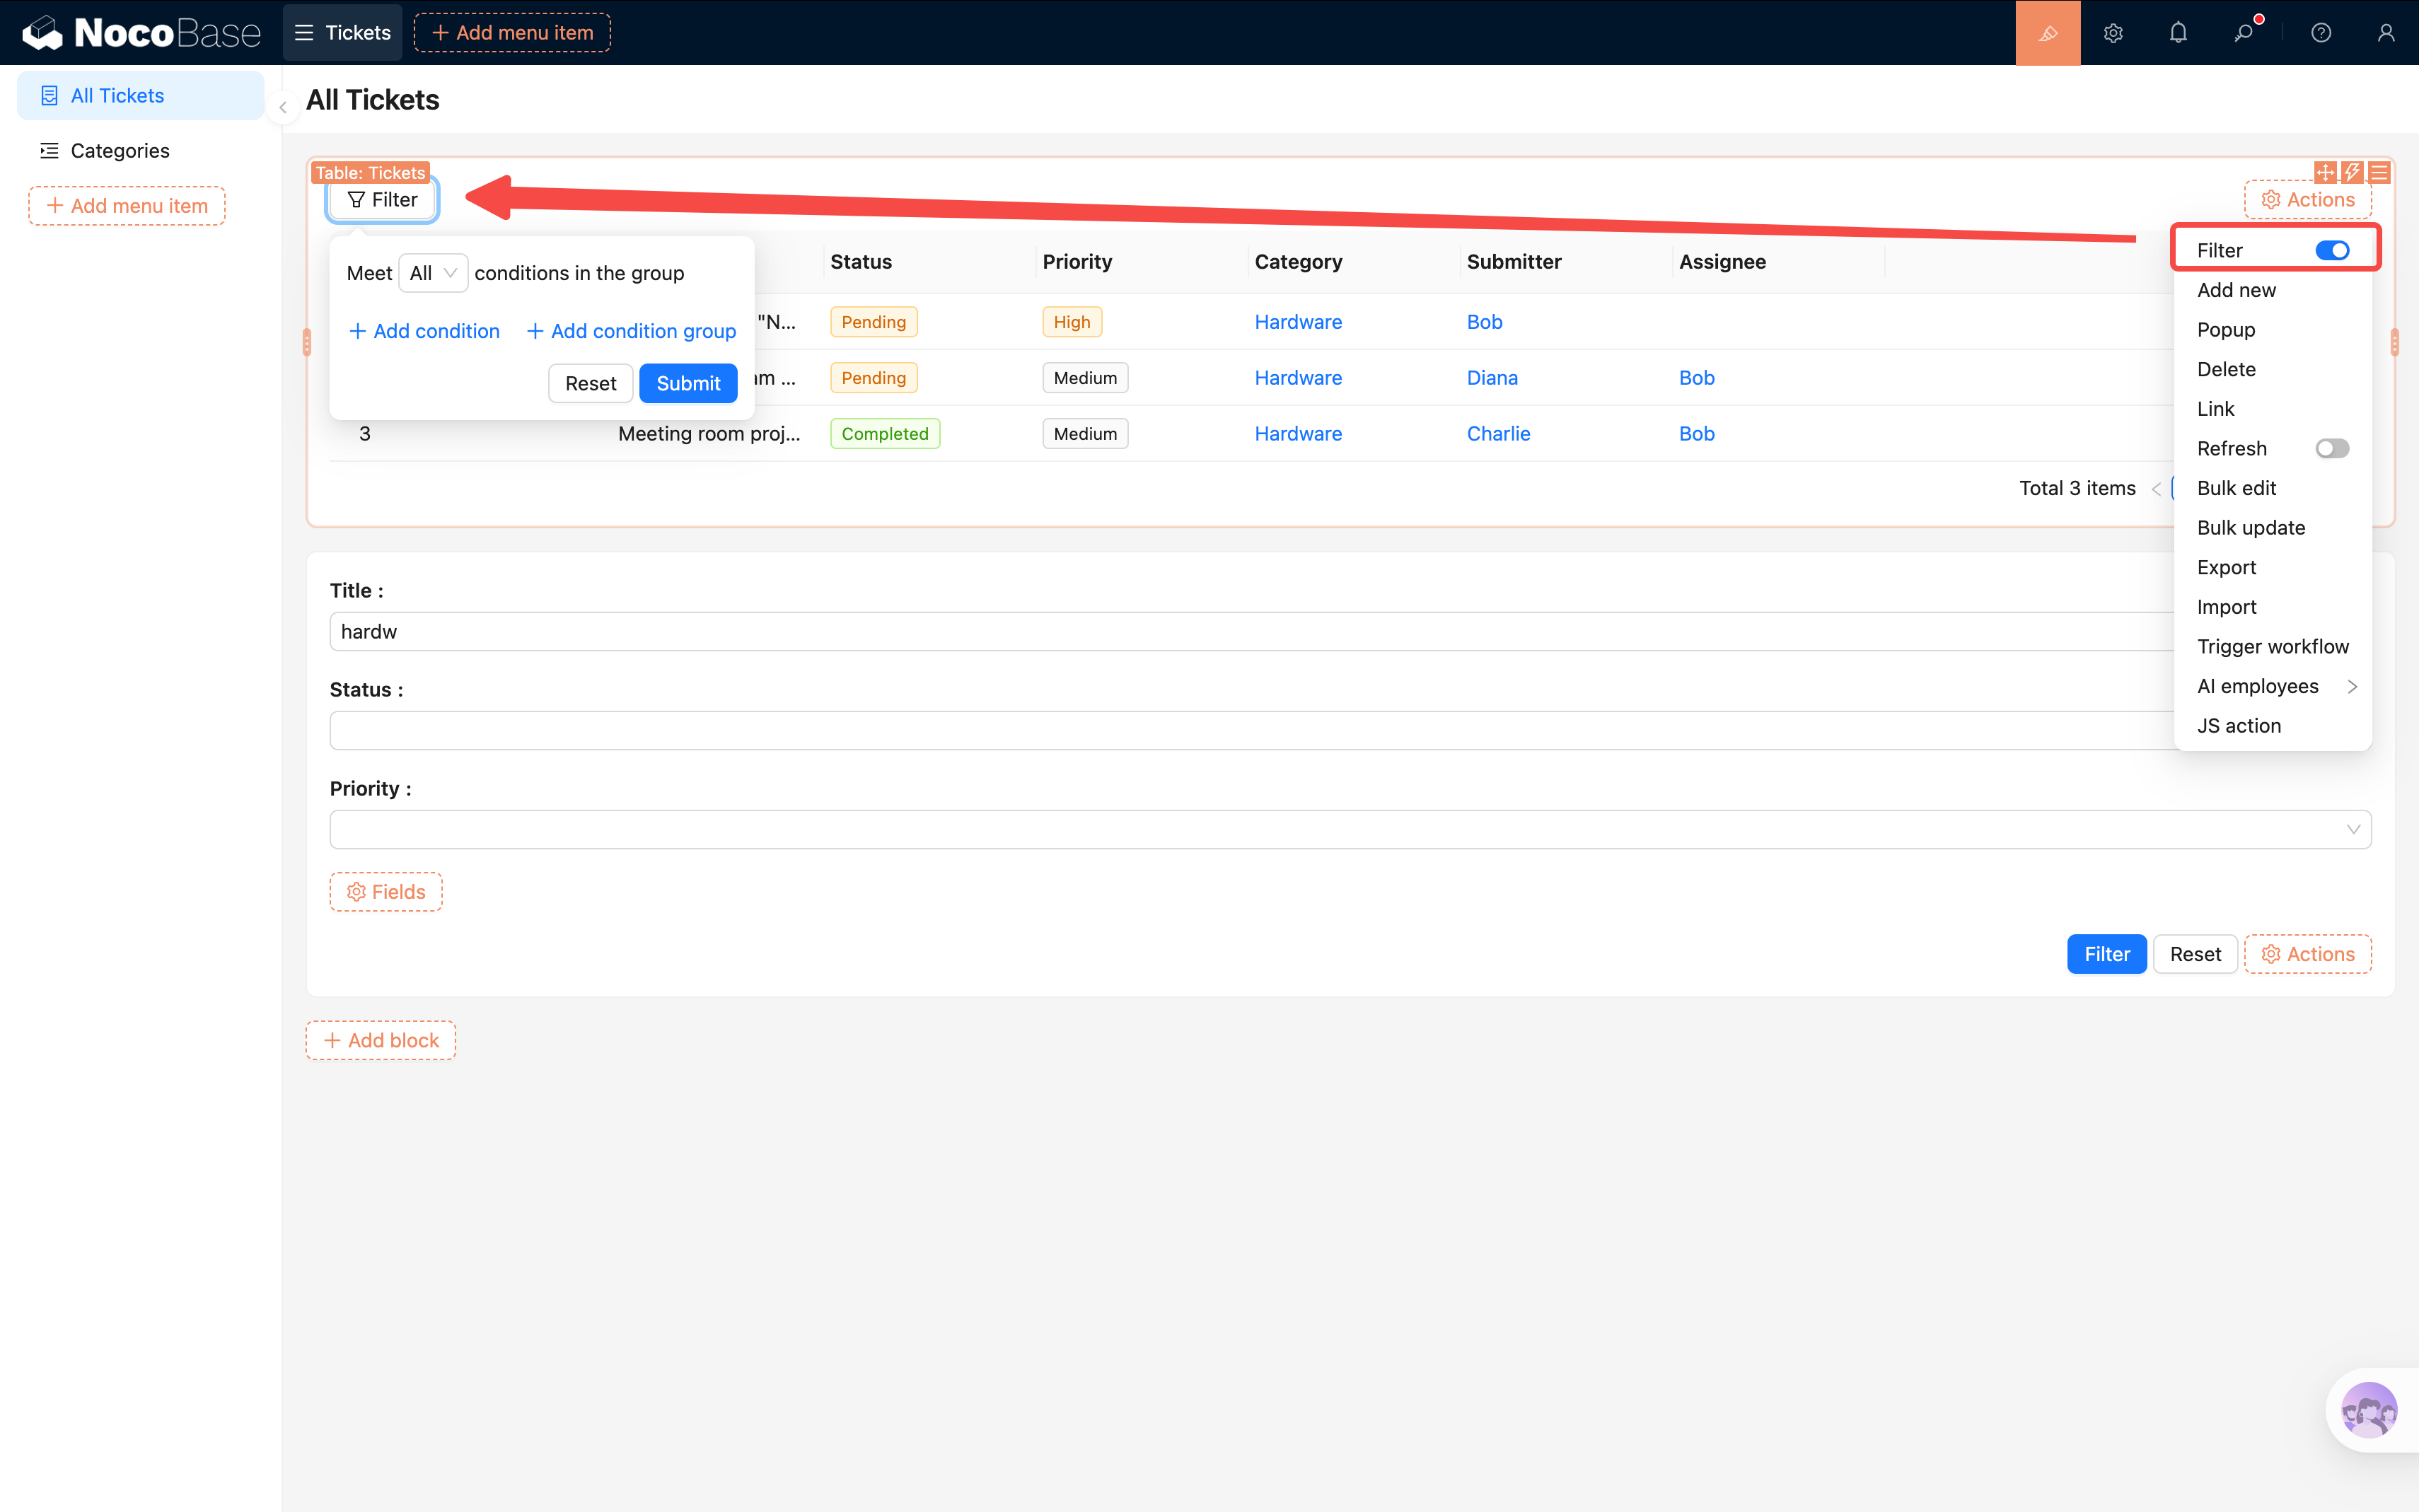
If you don't want users to hunt for fields every time they open the filter, you can pre-configure default filter fields in the Filter button's settings — so the most common criteria are ready to use right away.
Note: The table's built-in Filter action currently does not support fuzzy search — it only handles exact matches and condition-based filtering. If you need fuzzy search, use the Filter Form block with "Connect fields" described above.
Setting Default Sorting
We want the newest tickets to appear at the top:
- Click the block settings icon (three-line icon) in the top-right corner of the Table block.
- Find "Set default sorting rules".
- Add a sort field: select Created at, set the order to Descending.
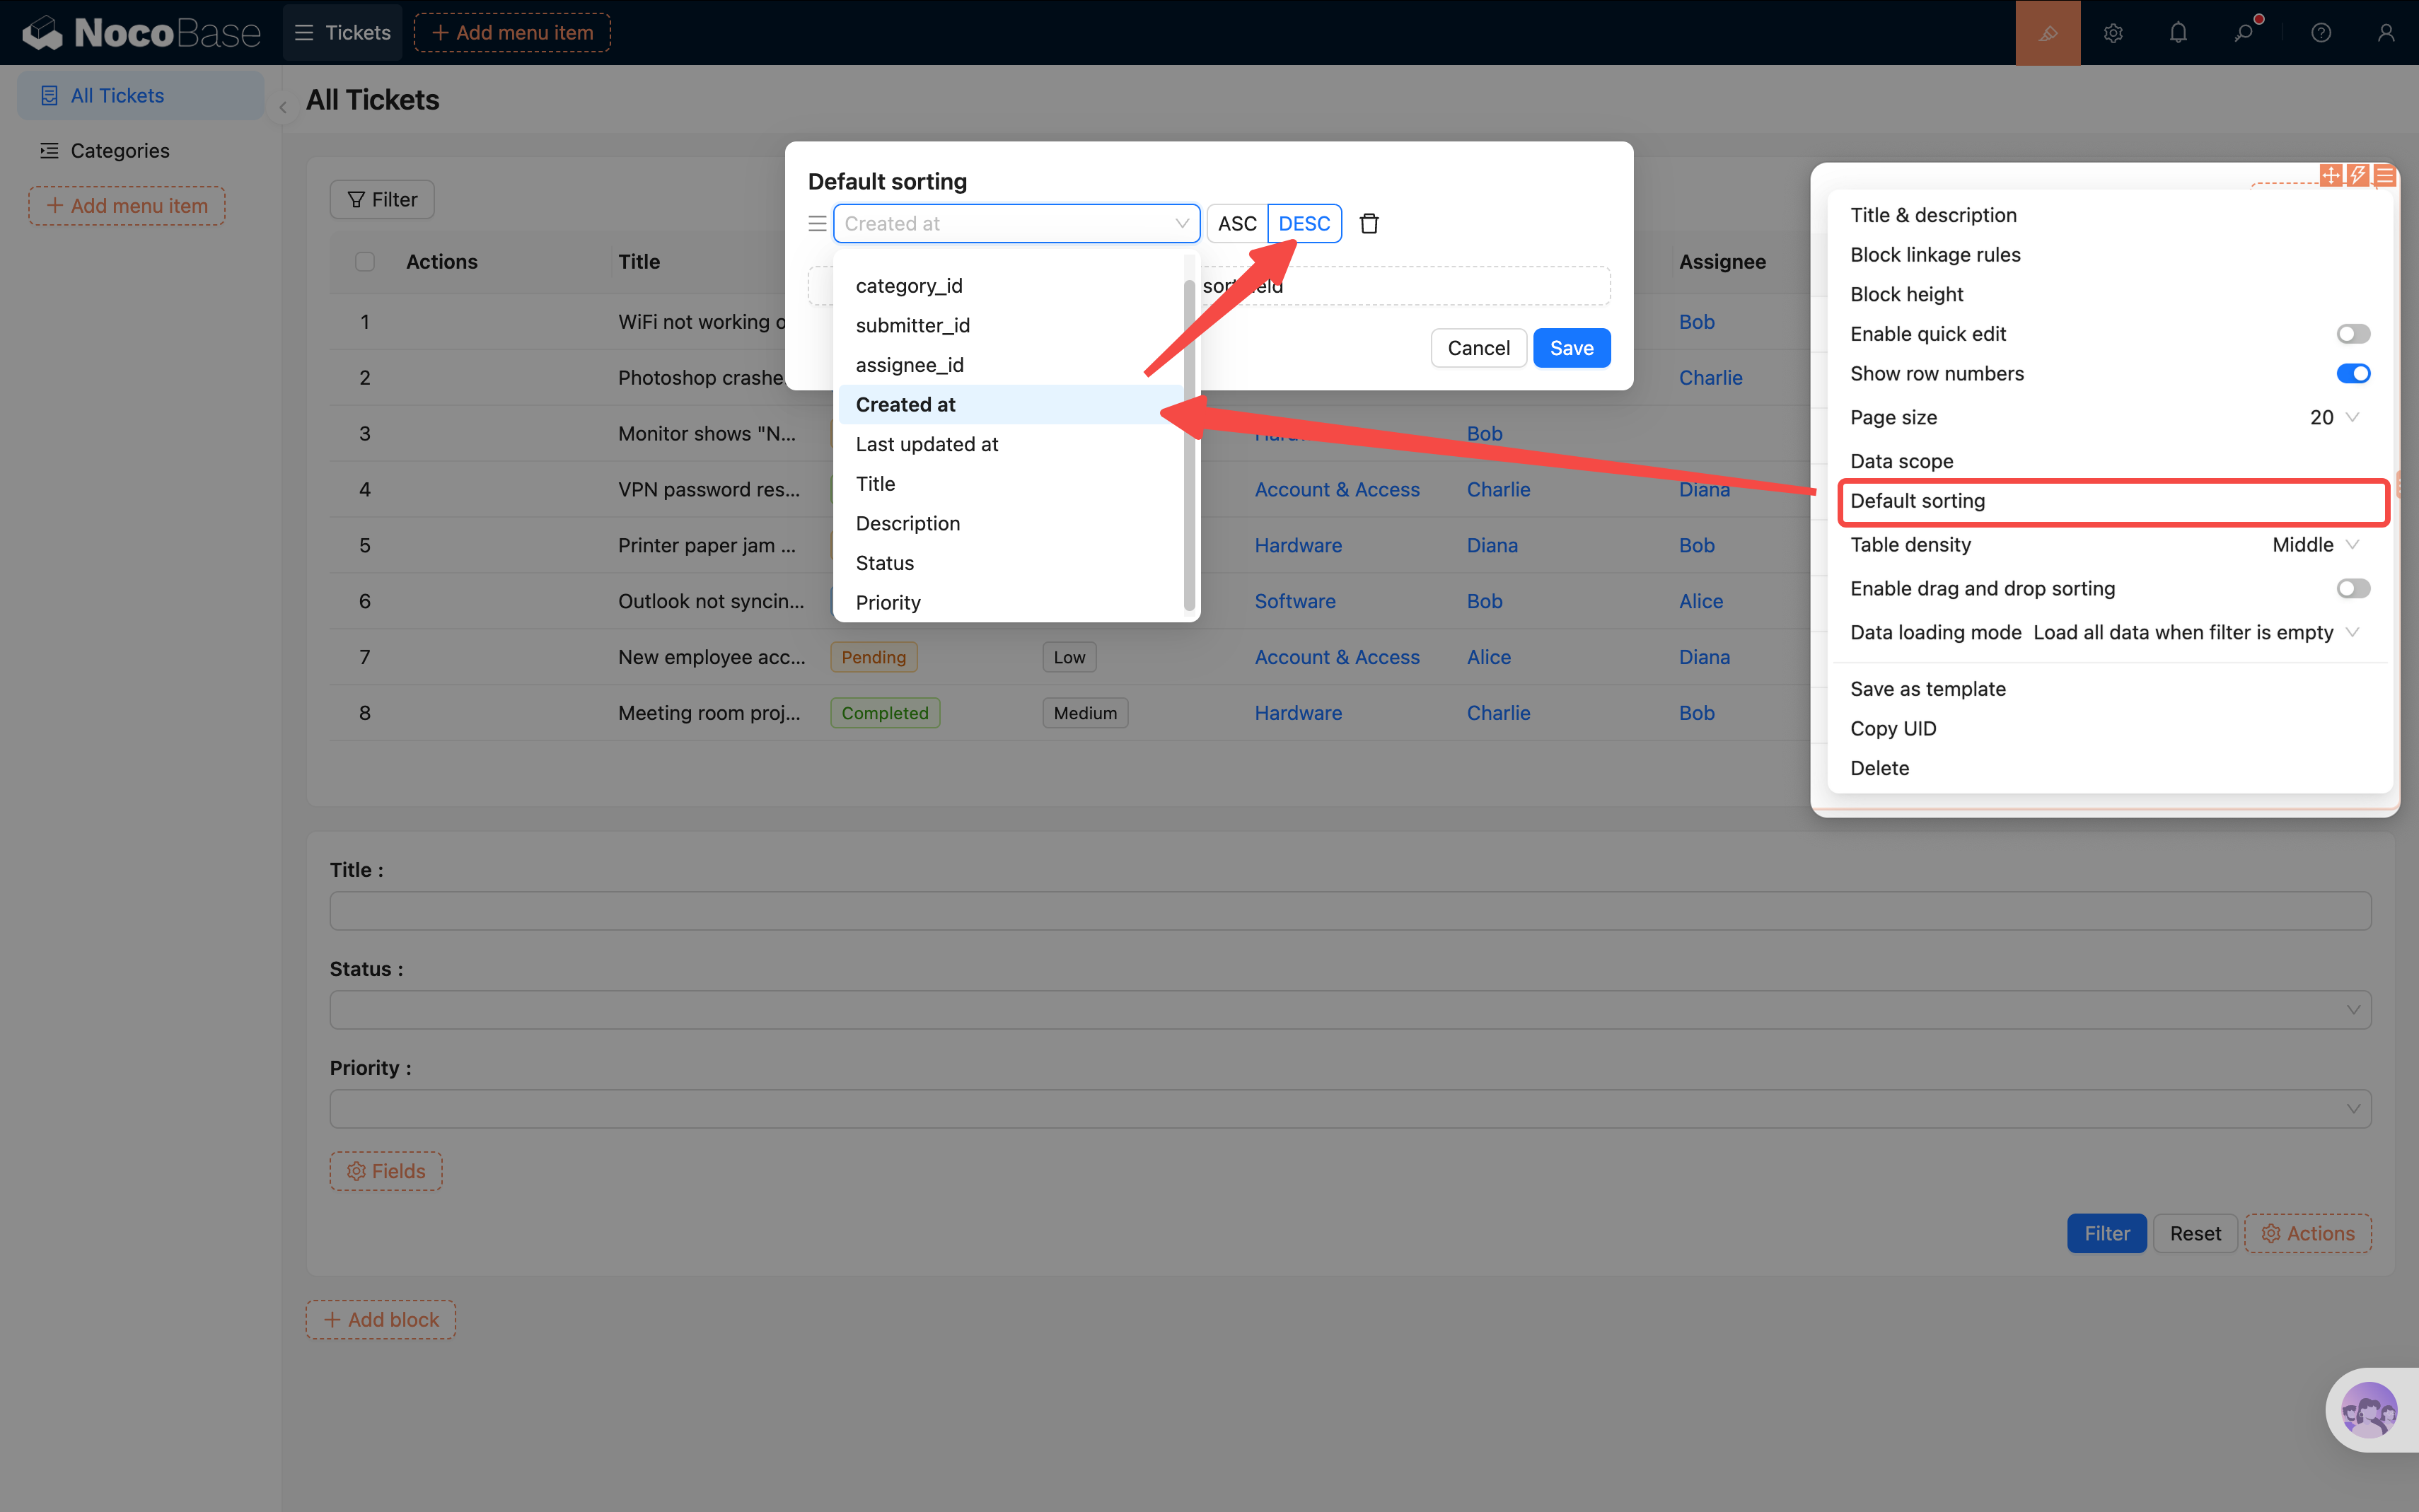
This way, newly submitted tickets always appear at the top, making them easier to handle.
3.6 Configuring Row Actions
Viewing a list isn't enough — we also need to click into tickets to see details and make edits.
- In the actions column, click the second "+" icon.
- Click to add actions: View, Edit, Delete.
- Each row will now have "View", "Edit", and "Delete" buttons in the actions column.
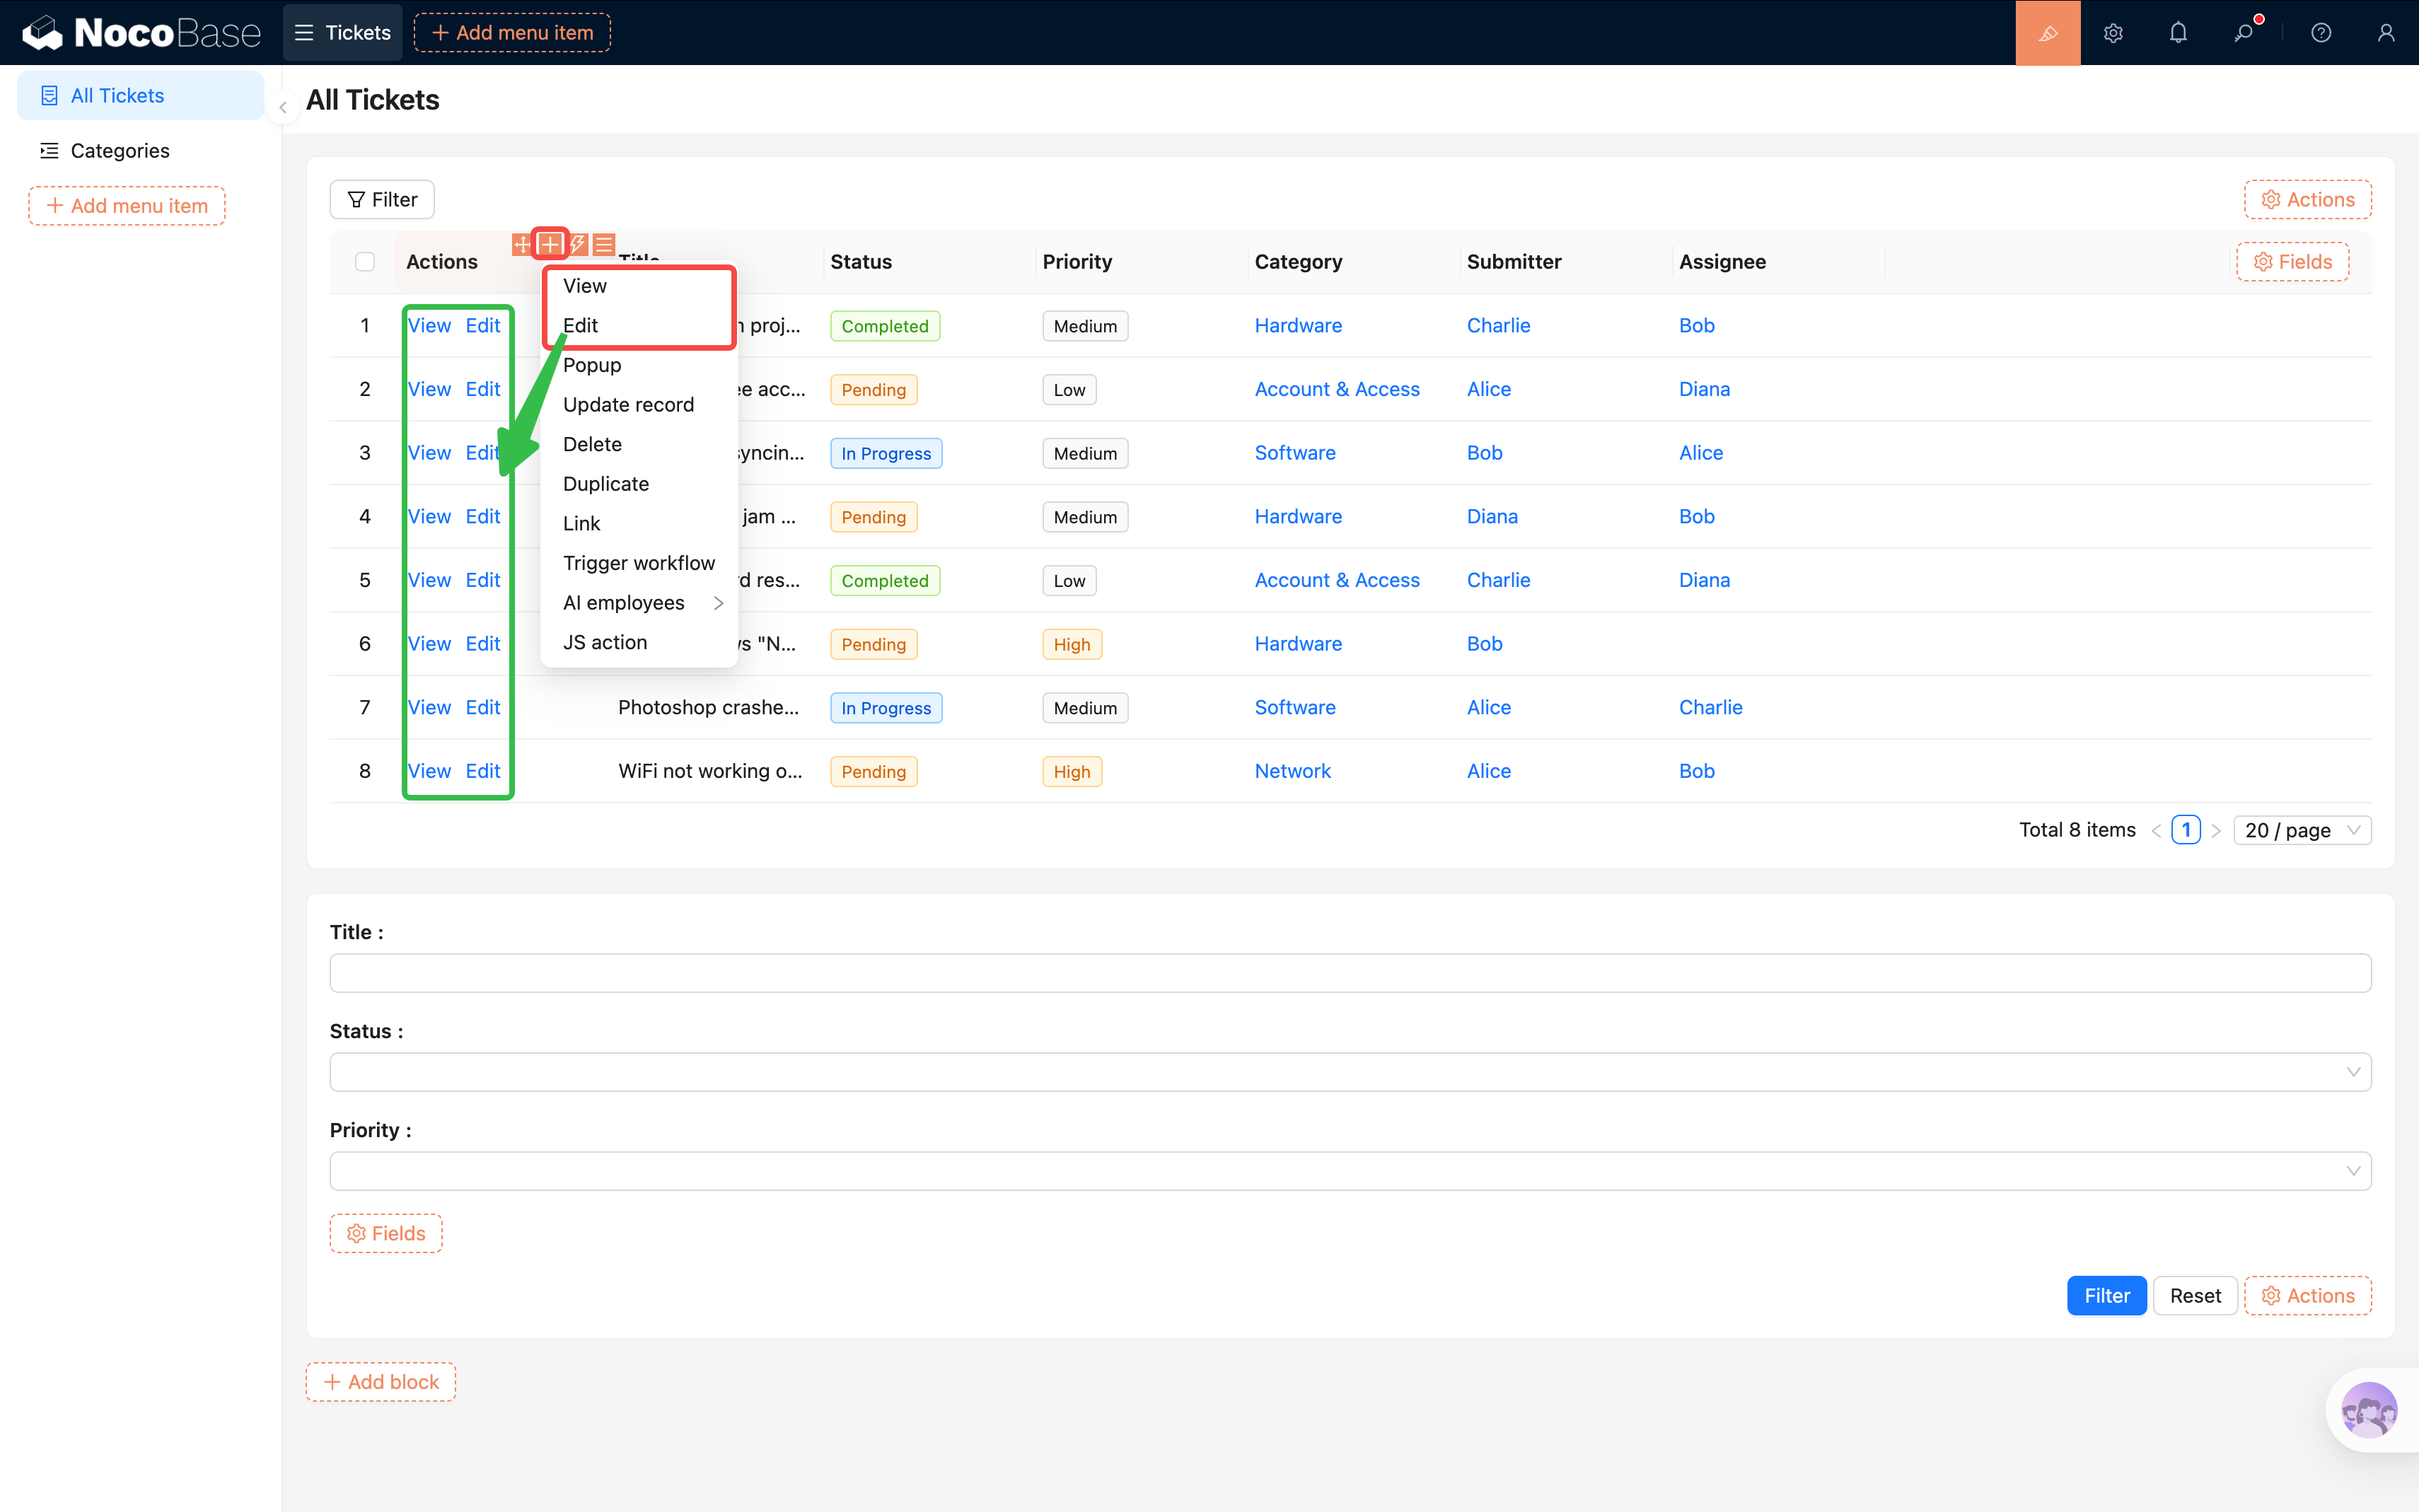
Clicking the "View" or "Edit" button opens a Drawer where we can place blocks to show or edit the full record. We'll configure that in detail in the next chapter. Clicking "Delete" removes the row.
3.7 Adjusting Page Layout
By now the page has both a Filter Form and a Table block, but they're stacked vertically by default — which may not look great. NocoBase lets you drag and drop to rearrange blocks.
In design mode, hover over the drag handle at the top-left corner of a block (the cursor will change to a crosshair), then hold and drag.
Drag the Filter Form above the Table: Grab the Filter Form block and move it toward the top edge of the Table block. When a blue guide line appears, release — the Filter Form will snap into place above the Table.
Drag filter fields onto the same row: Inside the Filter Form, fields are stacked vertically by default. Drag "Priority" to the right of "Status" — when a vertical guide line appears, release. The two fields will sit side by side on one row, saving vertical space.
Almost everything in NocoBase supports drag-and-drop — action buttons, table columns, menu items, and more. Feel free to explore!
3.8 Configuring the Categories Page
Don't forget — we created a "Categories" sub-page back in section 3.2. Now let's add content to it. The setup is similar to the ticket list — add a Table block, check fields, configure actions — so we won't repeat every step. Just one key difference.
Remember the "Categories" collection we created in Chapter 2? It's a tree table (supports parent-child hierarchy). To display the tree structure correctly, you need to enable a setting:
- Go to the "Categories" page and add a Table block, selecting the "Categories" collection.
- Click the Table block's block settings (three-line icon), find "Tree table", and toggle it on.
Once enabled, the table will display categories in an indented hierarchy showing parent-child relationships, instead of listing all records flat.
- Check the fields you want to display (e.g., Name, Description), and configure row actions (Add new, Edit, Delete).
- Layout tip: Put "Name" in the first column and "Actions" in the second. The categories table doesn't have many fields, so a two-column layout is more compact and user-friendly.
[Screenshot: Categories tree table configured]
Summary
Congratulations! Our ticket system now has a proper management interface:
- A clear menu structure (Tickets -> All Tickets / Categories)
- A Table block displaying ticket data
- A Filter Form for quick filtering by status, priority, and category
- Sorting rules that order tickets by creation time, newest first
- Row action buttons for convenient viewing and editing
- A tree table displaying category hierarchy
Easier than you expected, right? The entire process required zero lines of code — everything was done through drag-and-drop and configuration.
Next Chapter Preview
Being able to "see" data isn't enough — users also need to submit new tickets. In the next chapter, we'll build Form blocks, configure field linkage rules, and enable change history to track every modification to a ticket.