

Implementing CRM Lead Conversion
1. Introduction
This tutorial will guide you step-by-step on how to implement the CRM Opportunity Conversion feature in NocoBase. We will cover how to create the necessary collections, configure data management pages, design the conversion process, and set up association management to help you build the entire business process successfully.
🎉 NocoBase CRM Solution is Now Live — Ready for You to Explore
2. Preparation: Creating the Required Collections
Before starting, we need to prepare the following four collections and configure the relationships between them.
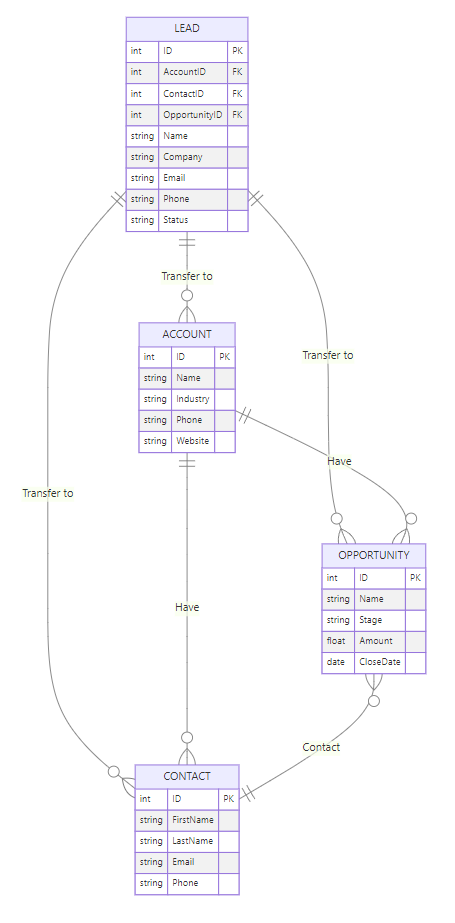
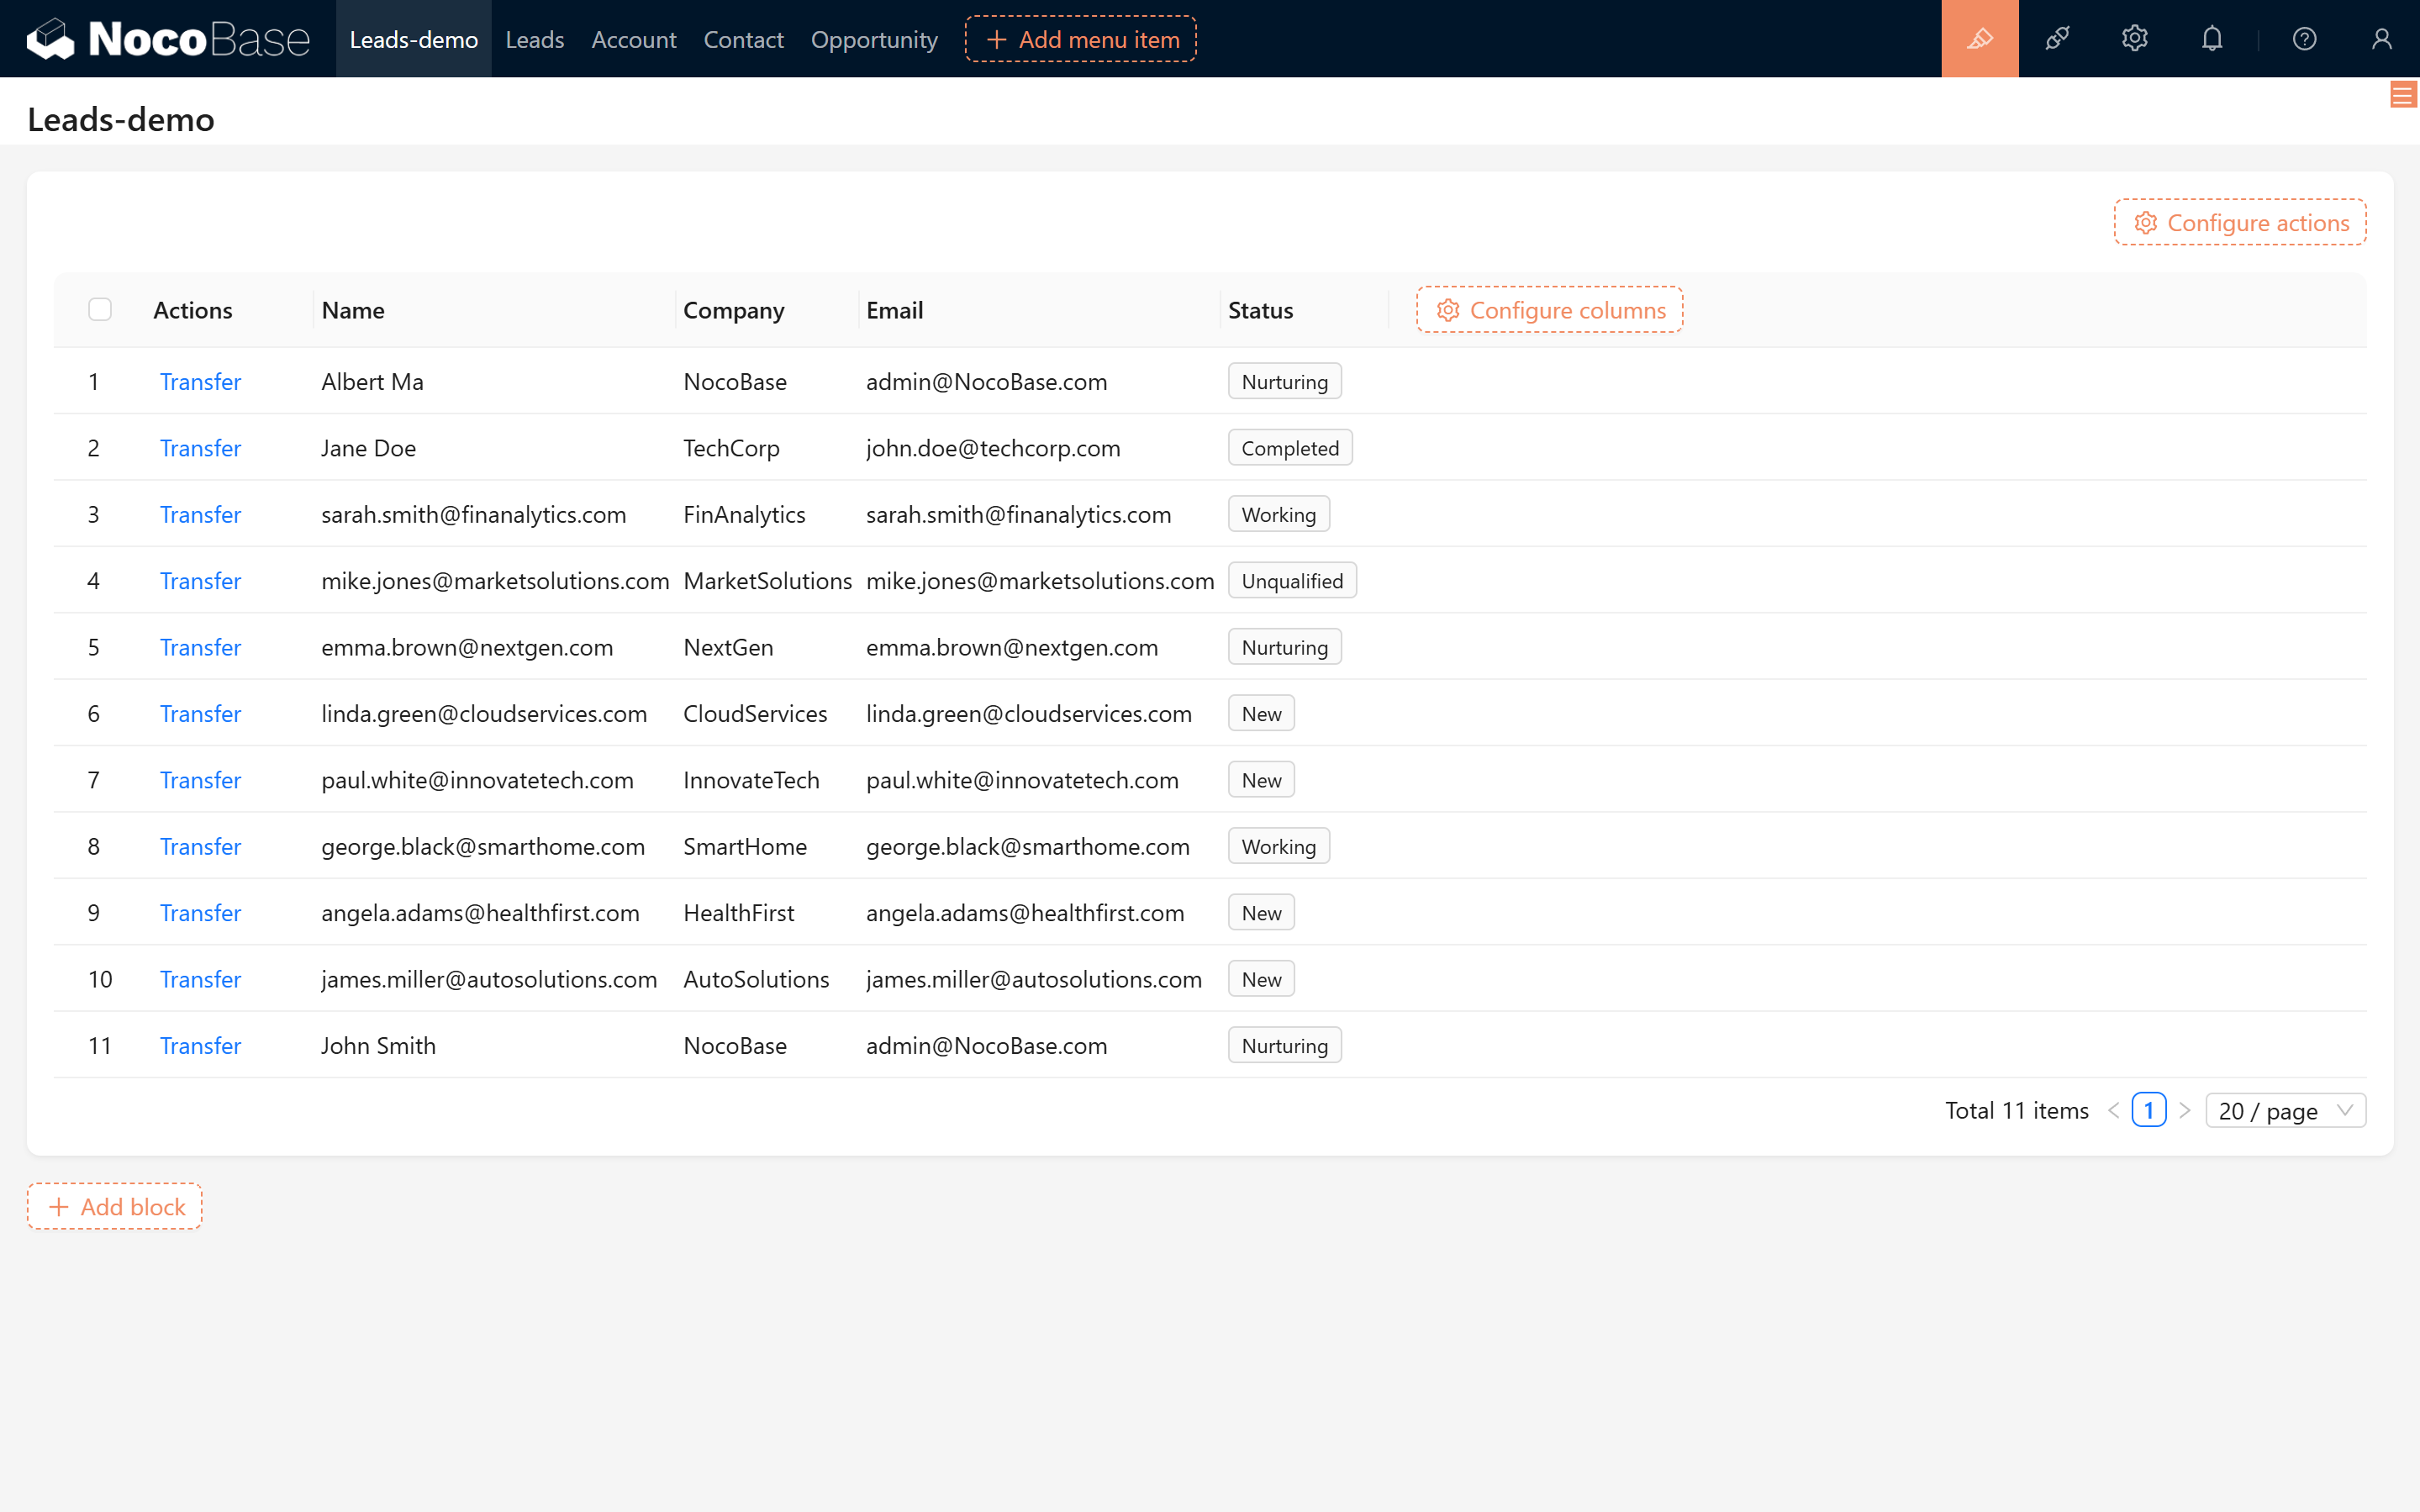
2.1 LEAD Collection (Lead)
This collection is used to store potential customer information. Its field definitions are as follows:
| Field Name | Display Name | Field Interface | Description |
|---|---|---|---|
| id | Id | Integer | Primary key |
| account_id | account_id | Integer | Foreign key to ACCOUNT |
| contact_id | contact_id | Integer | Foreign key to CONTACT |
| opportunity_id | opportunity_id | Integer | Foreign key to OPPORTUNITY |
| name | Lead Name | Single line text | Name of the potential customer |
| company | Company Name | Single line text | Name of the potential customer's company |
| Email address of the potential customer | |||
| phone | Phone | Phone | Contact phone number |
| status | Status | Single select | Current status of the lead (Not Qualified, New Lead, Processing, Following Up, In Transaction, Completed) |
| Account | Company | Many to one | Associated to the Company Collection |
| Contact | Contact | Many to one | Associated to the Contact Collection |
| Opportunity | Opportunity | Many to one | Associated to the Opportunity Collection |
2.2 ACCOUNT Collection (Company)
This collection is used to store detailed information about companies. Its field configuration is as follows:
| Field Name | Display Name | Field Interface | Description |
|---|---|---|---|
| name | Name | Single line text | Account name (company or organization name) |
| industry | Industry | Single select | Industry of the account |
| phone | Phone | Phone | Contact phone number of the account |
| website | Website | URL | Official website URL of the account |
2.3 CONTACT Collection (Contact)
This collection stores contact information and includes the following fields:
| Field Name | Display Name | Field Interface | Description |
|---|---|---|---|
| name | Name | Single line text | Name of the contact |
| Email address of the contact | |||
| phone | Phone | Phone | Phone number of the contact |
2.4 OPPORTUNITY Collection (Opportunity)
This collection is used to record opportunity information. Its field definitions are as follows:
| Field Name | Display Name | Field Interface | Description |
|---|---|---|---|
| name | Name | Single line text | Name of the opportunity |
| stage | Stage | Single select | Stage of the opportunity (Qualification, Requirement, Proposal, Negotiation, Deal Closed, Successful, Failed) |
| amount | Amount | Number | Amount of the opportunity |
| close_date | Close Date | Datetime | Expected close date of the opportunity |
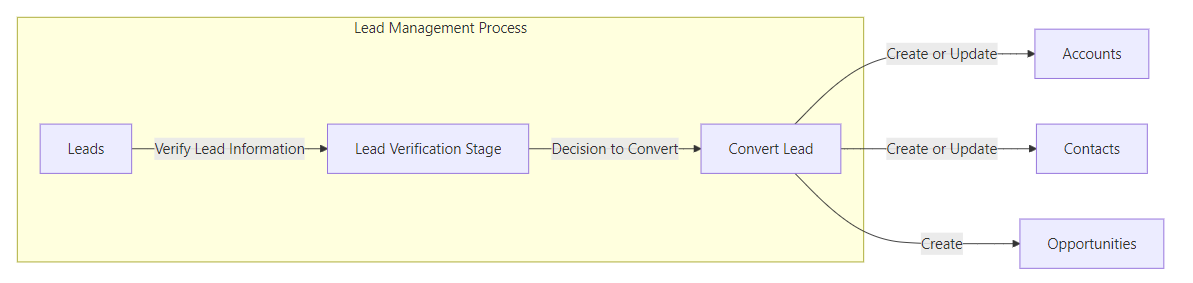
3. Understanding the Opportunity Conversion Process
3.1 Overview of the Normal Conversion Process
An opportunity, when converted from a lead, generally goes through the following process:
3.2 Explanation of the Relationships
Assuming you have successfully created the above four collections and configured the mapping relationships among them:
4. Creating Data Management Pages
In the NocoBase workspace, create data management pages for each collection and add some sample lead data for subsequent testing.
5. Implementing the Opportunity Conversion Function
This section focuses on explaining how to convert a lead into company, contact, and opportunity records, and ensuring that the conversion operation is not triggered repeatedly.
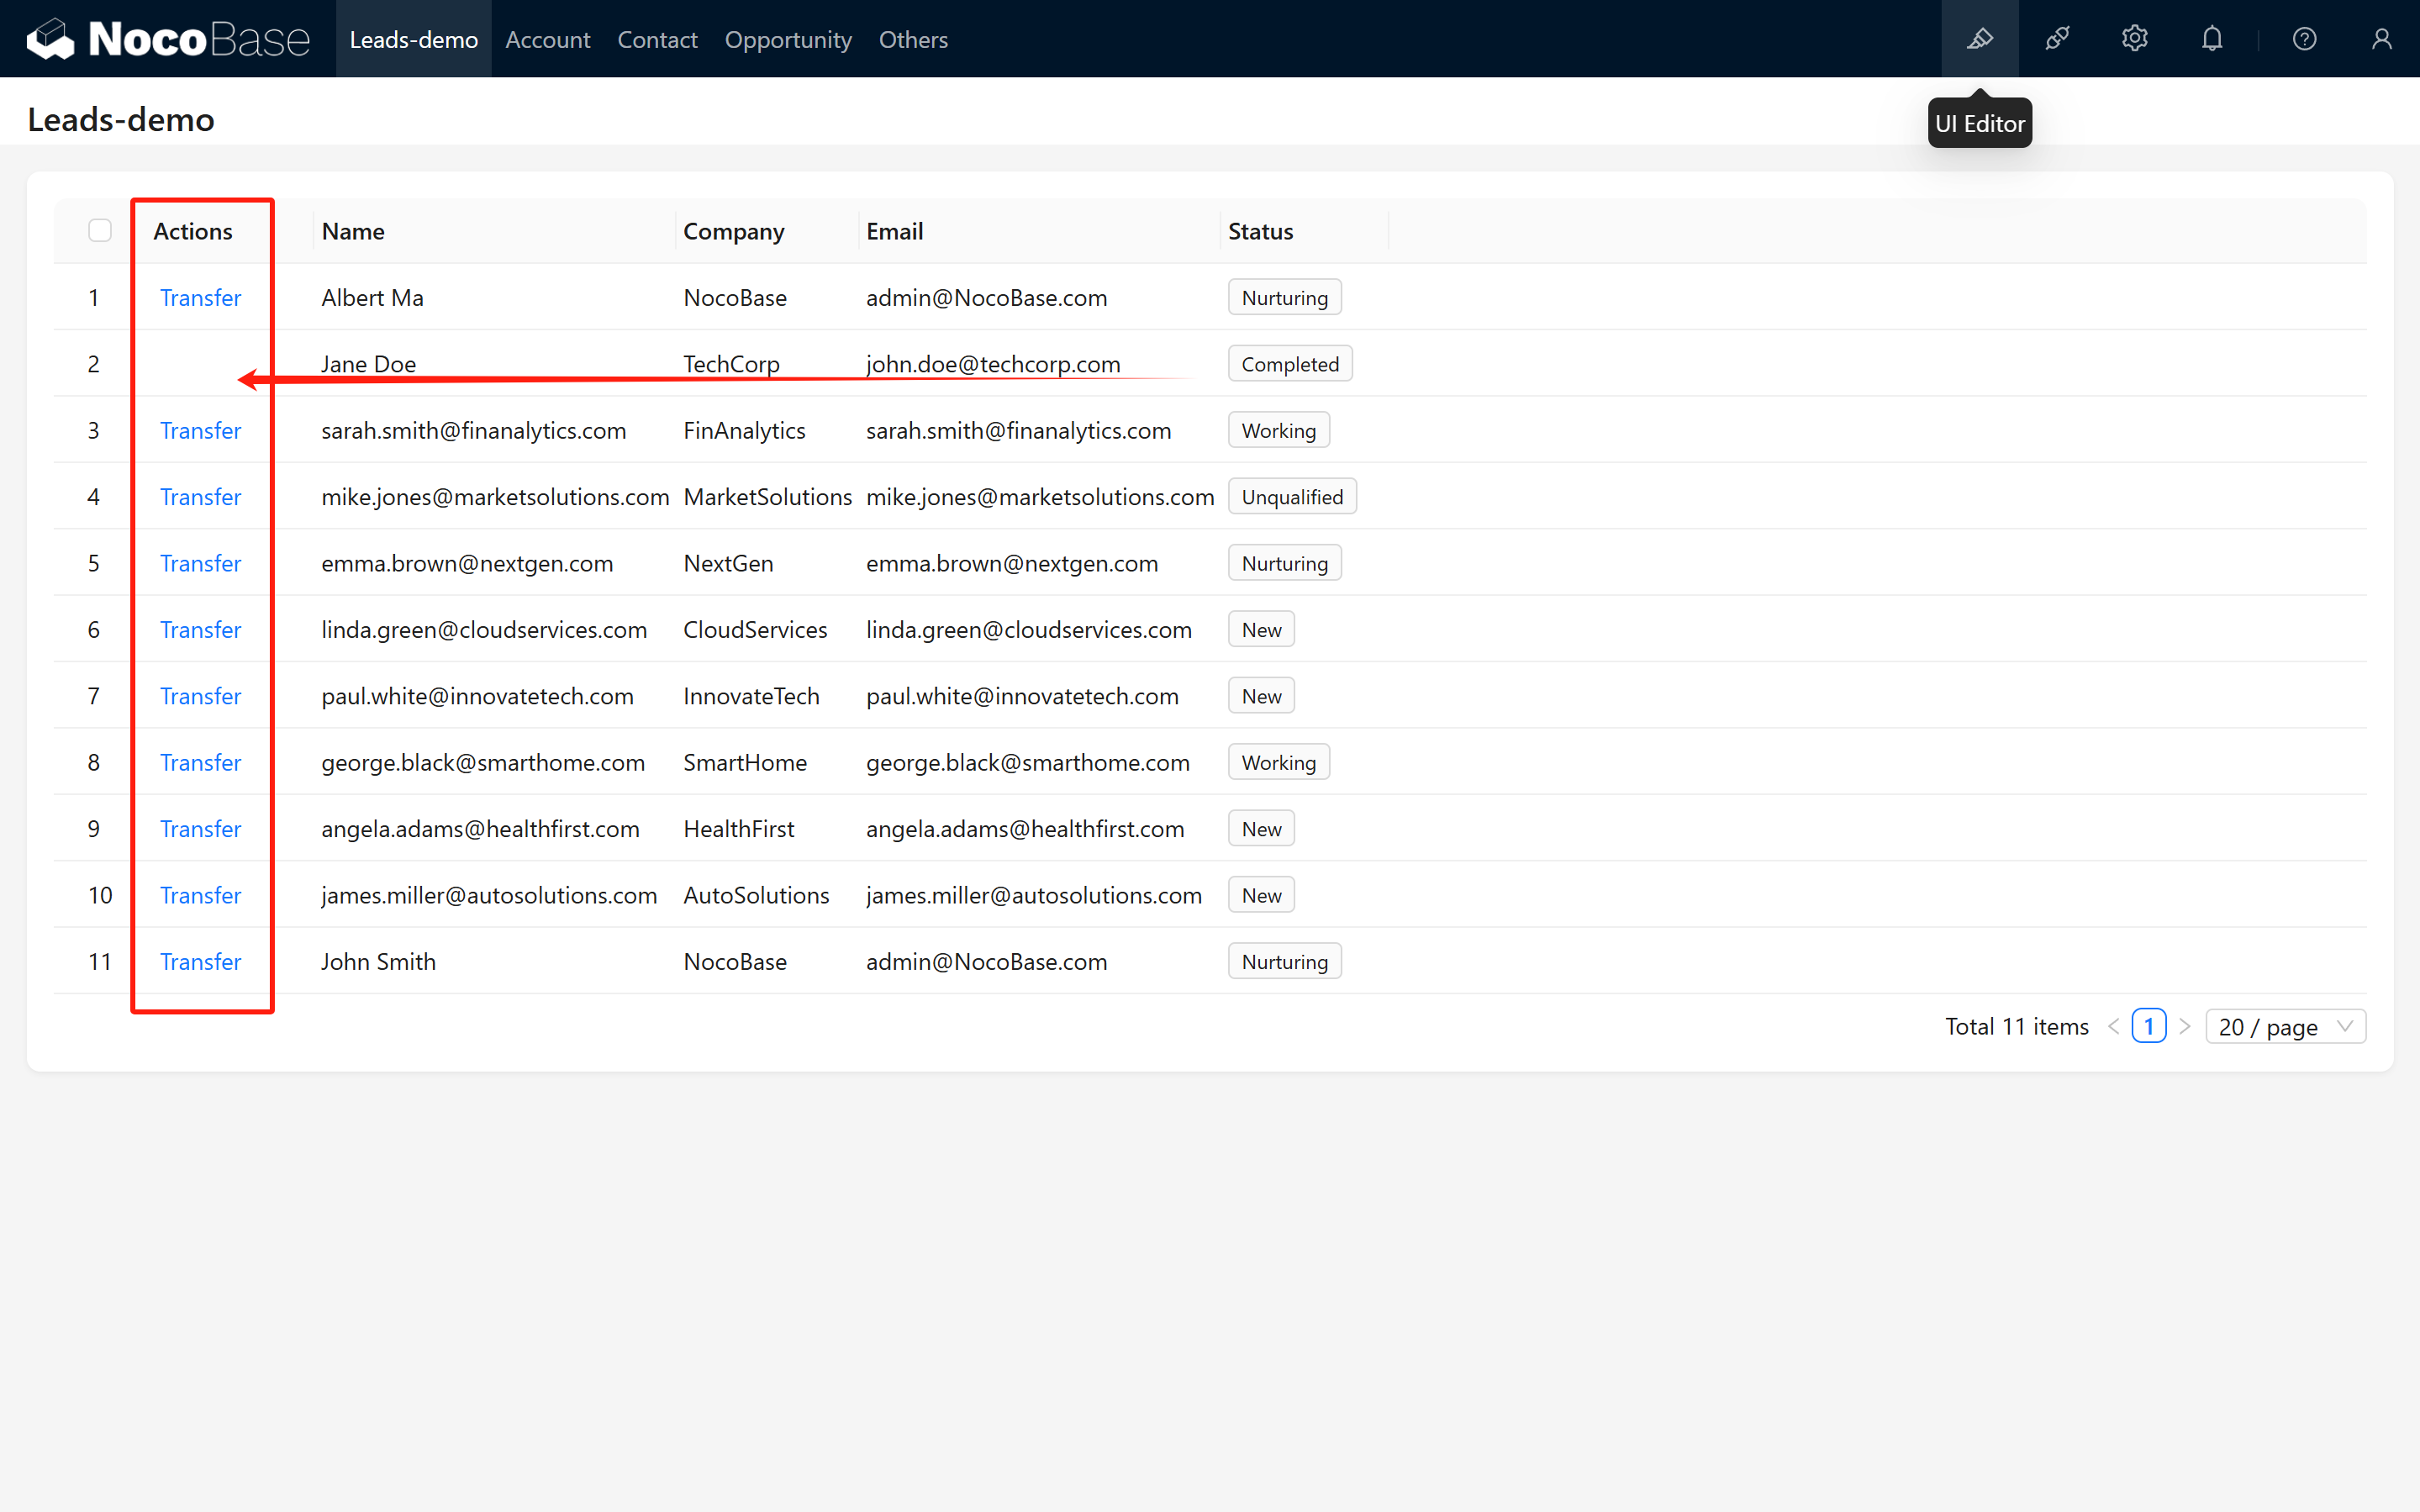
5.1 Create the "Conversion" Edit Operation
In the lead detail view, create an edit operation named "Conversion". In the conversion modal, configure the following:
5.1.1 Display Lead Basic Information
Display the basic information of the current lead in read-only mode to ensure that users do not accidentally modify the original data.
5.1.2 Display Associated Relationship Fields
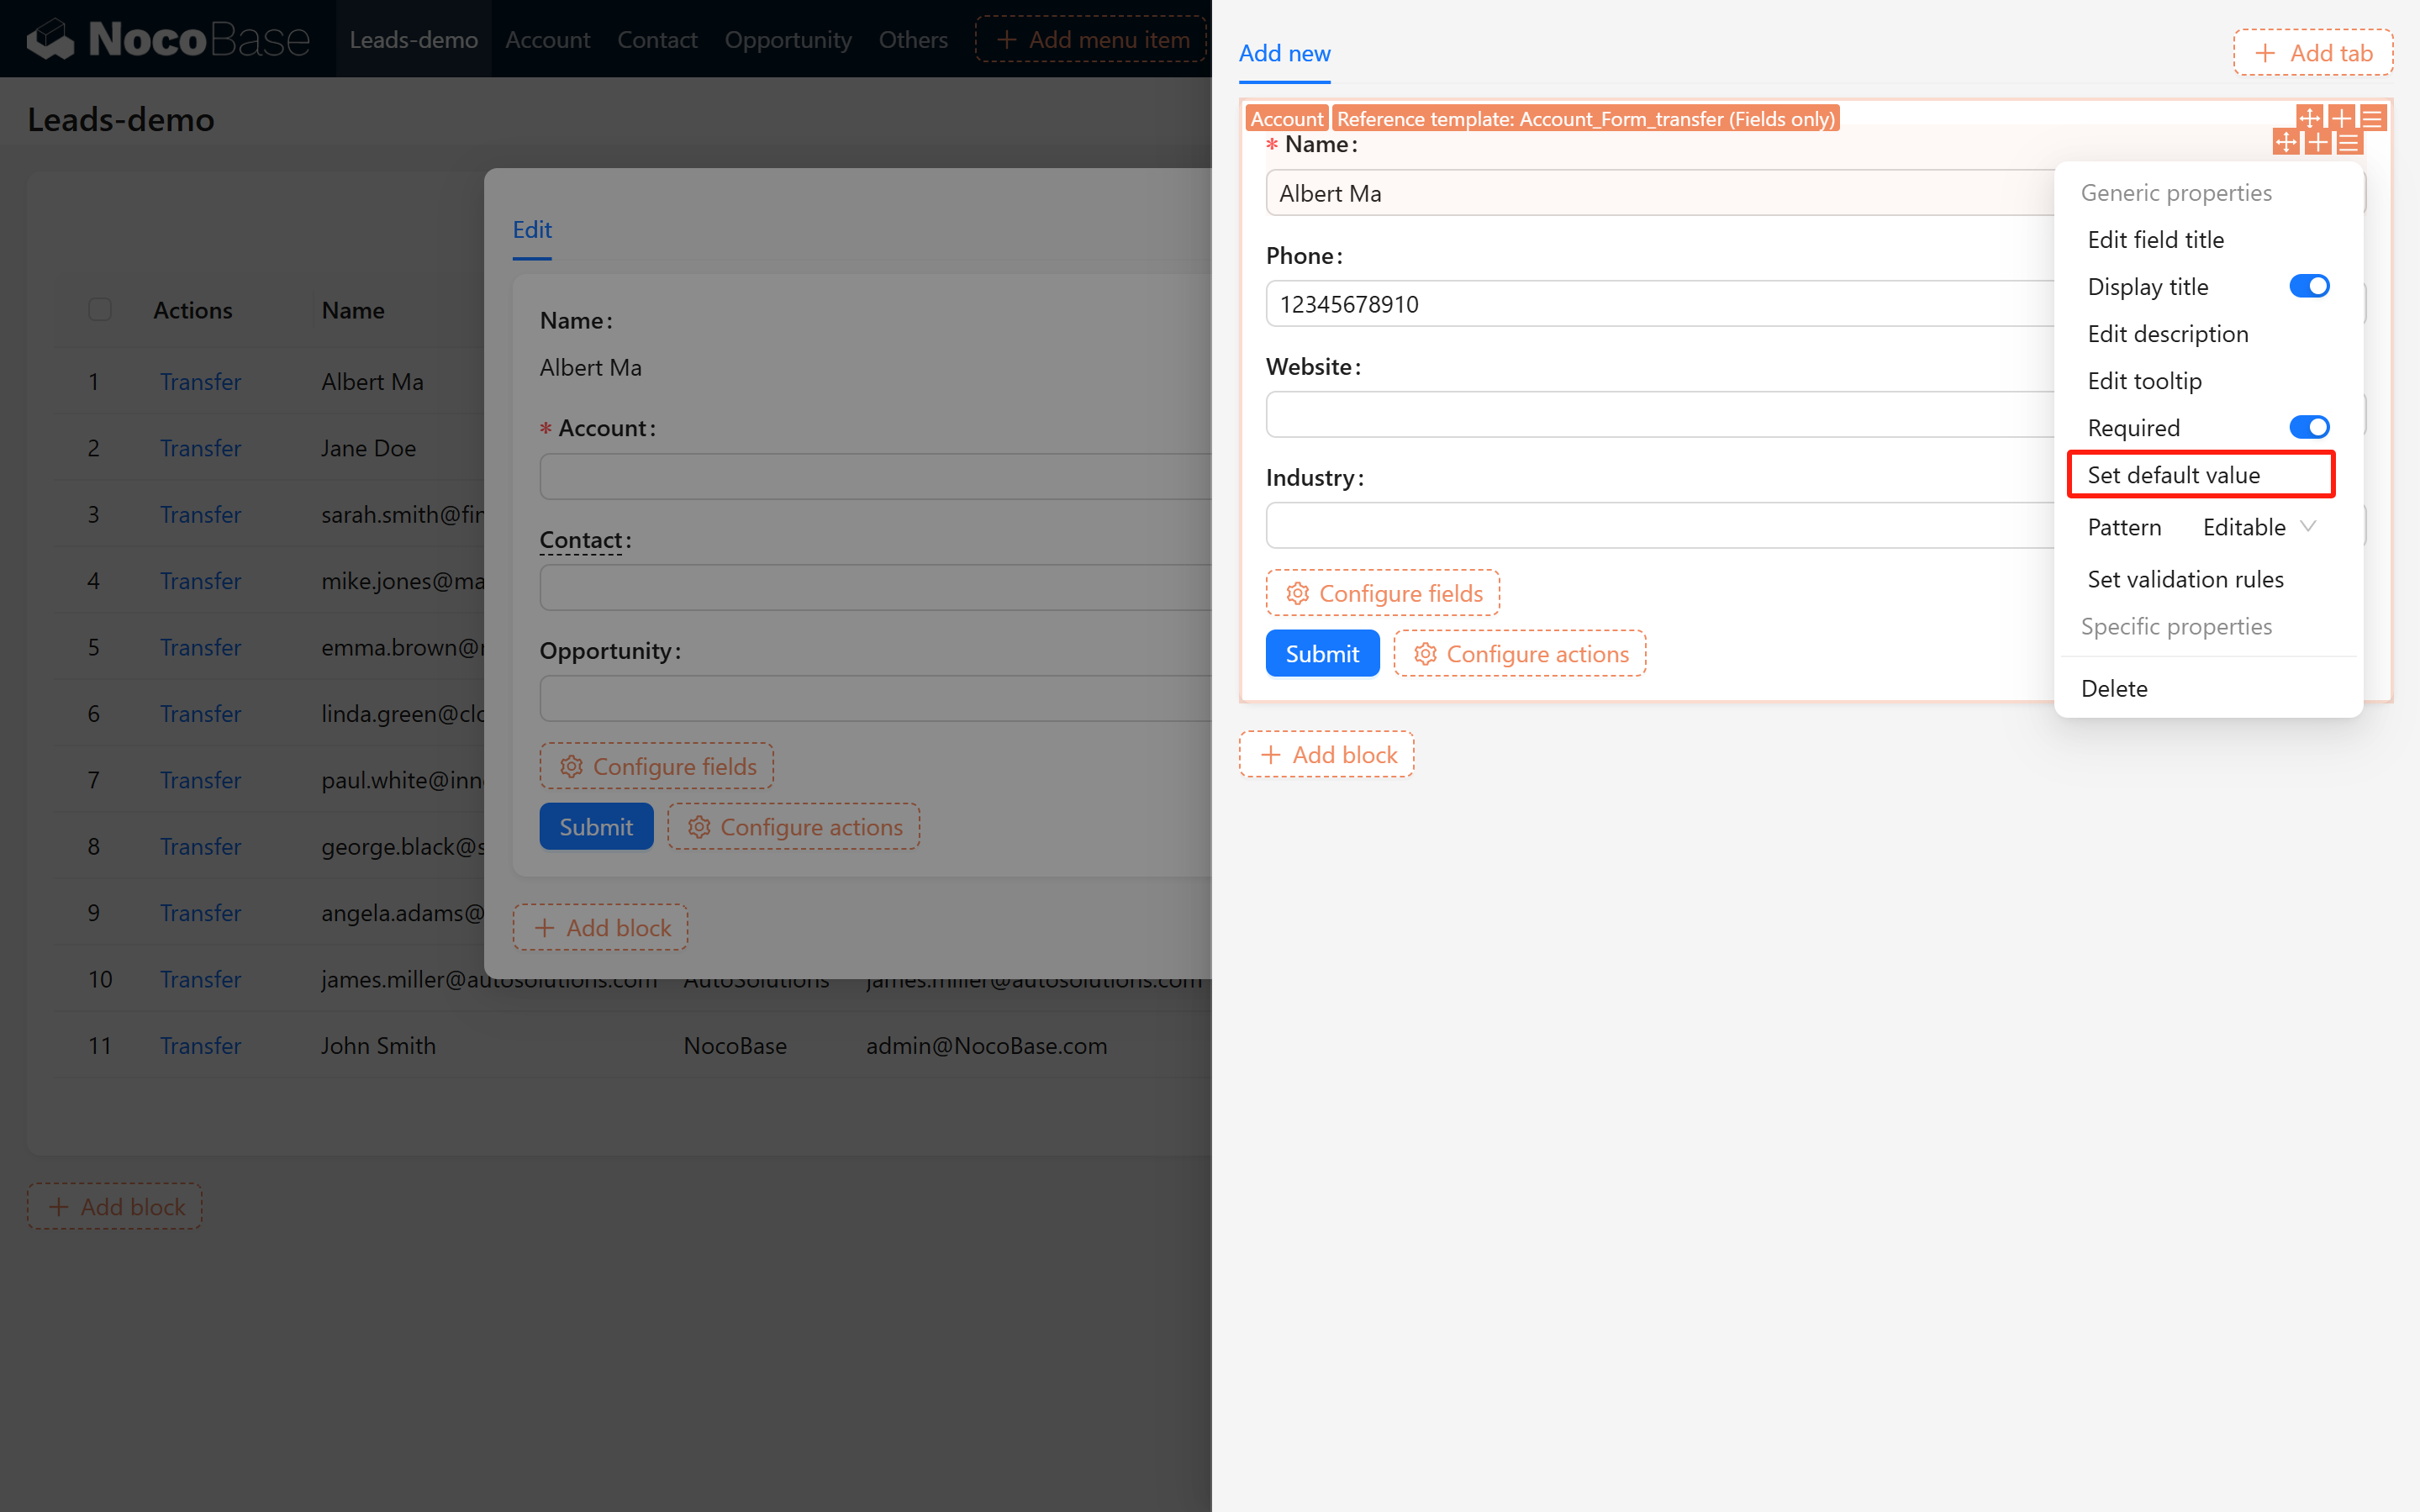
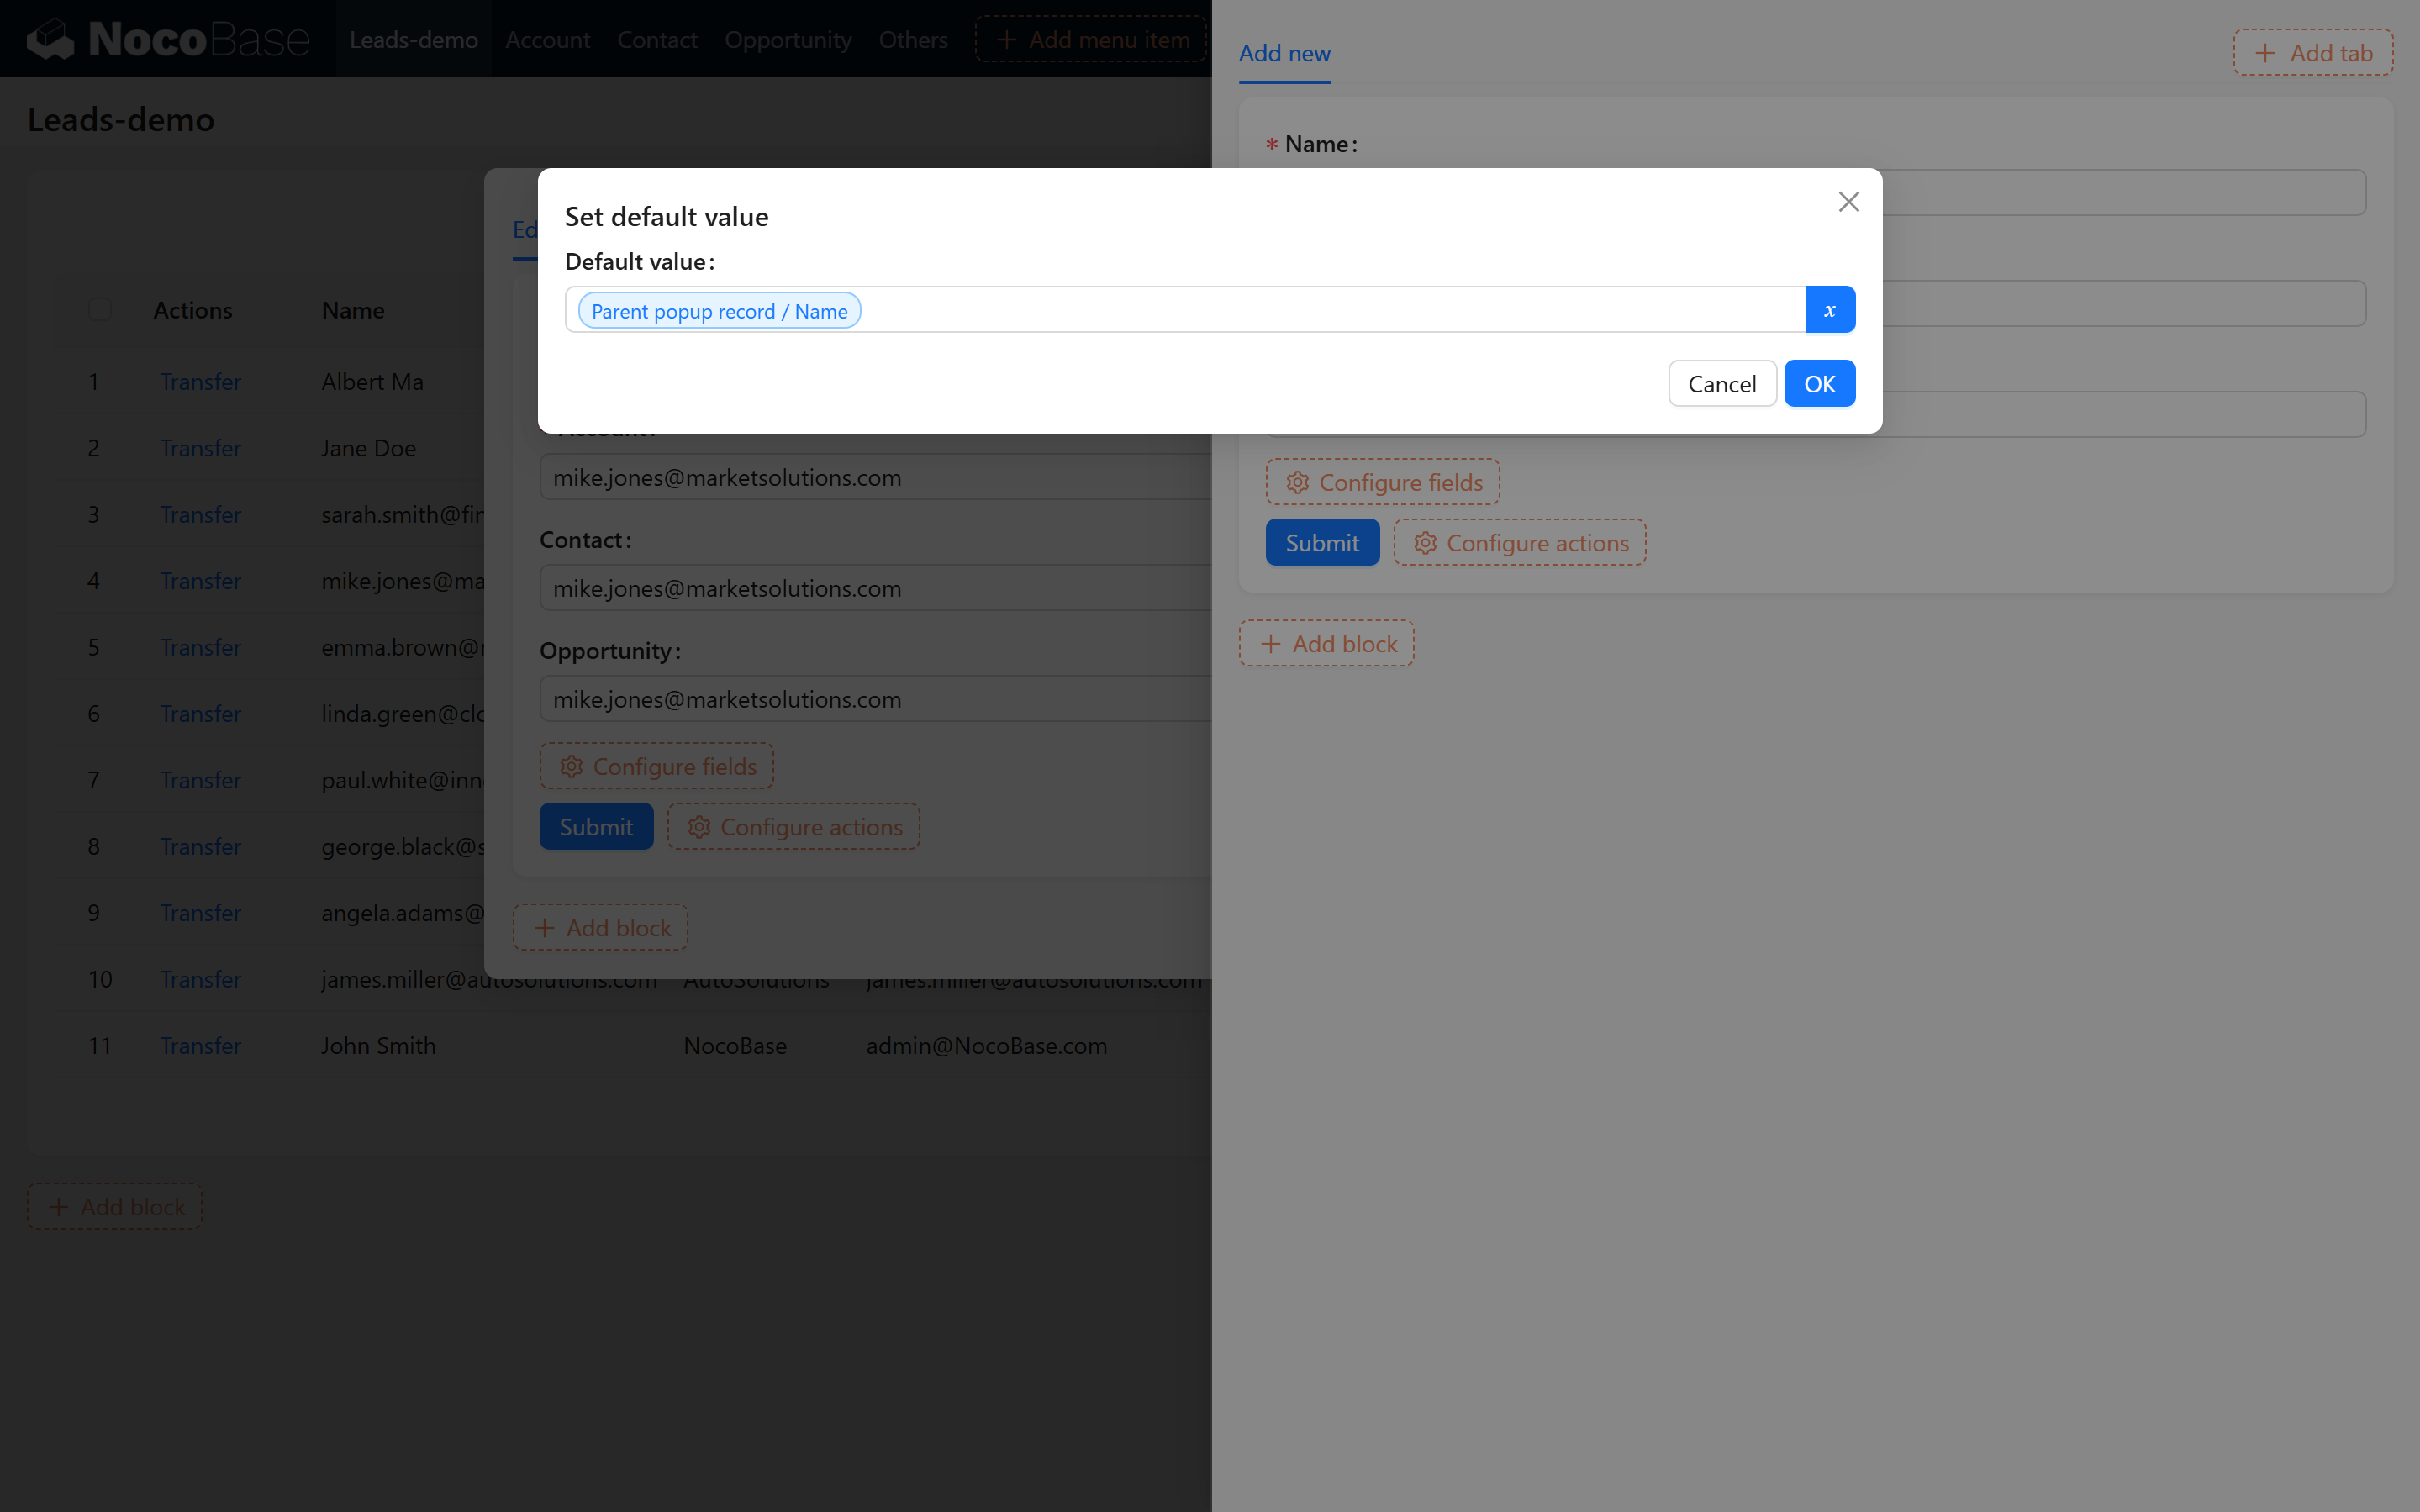
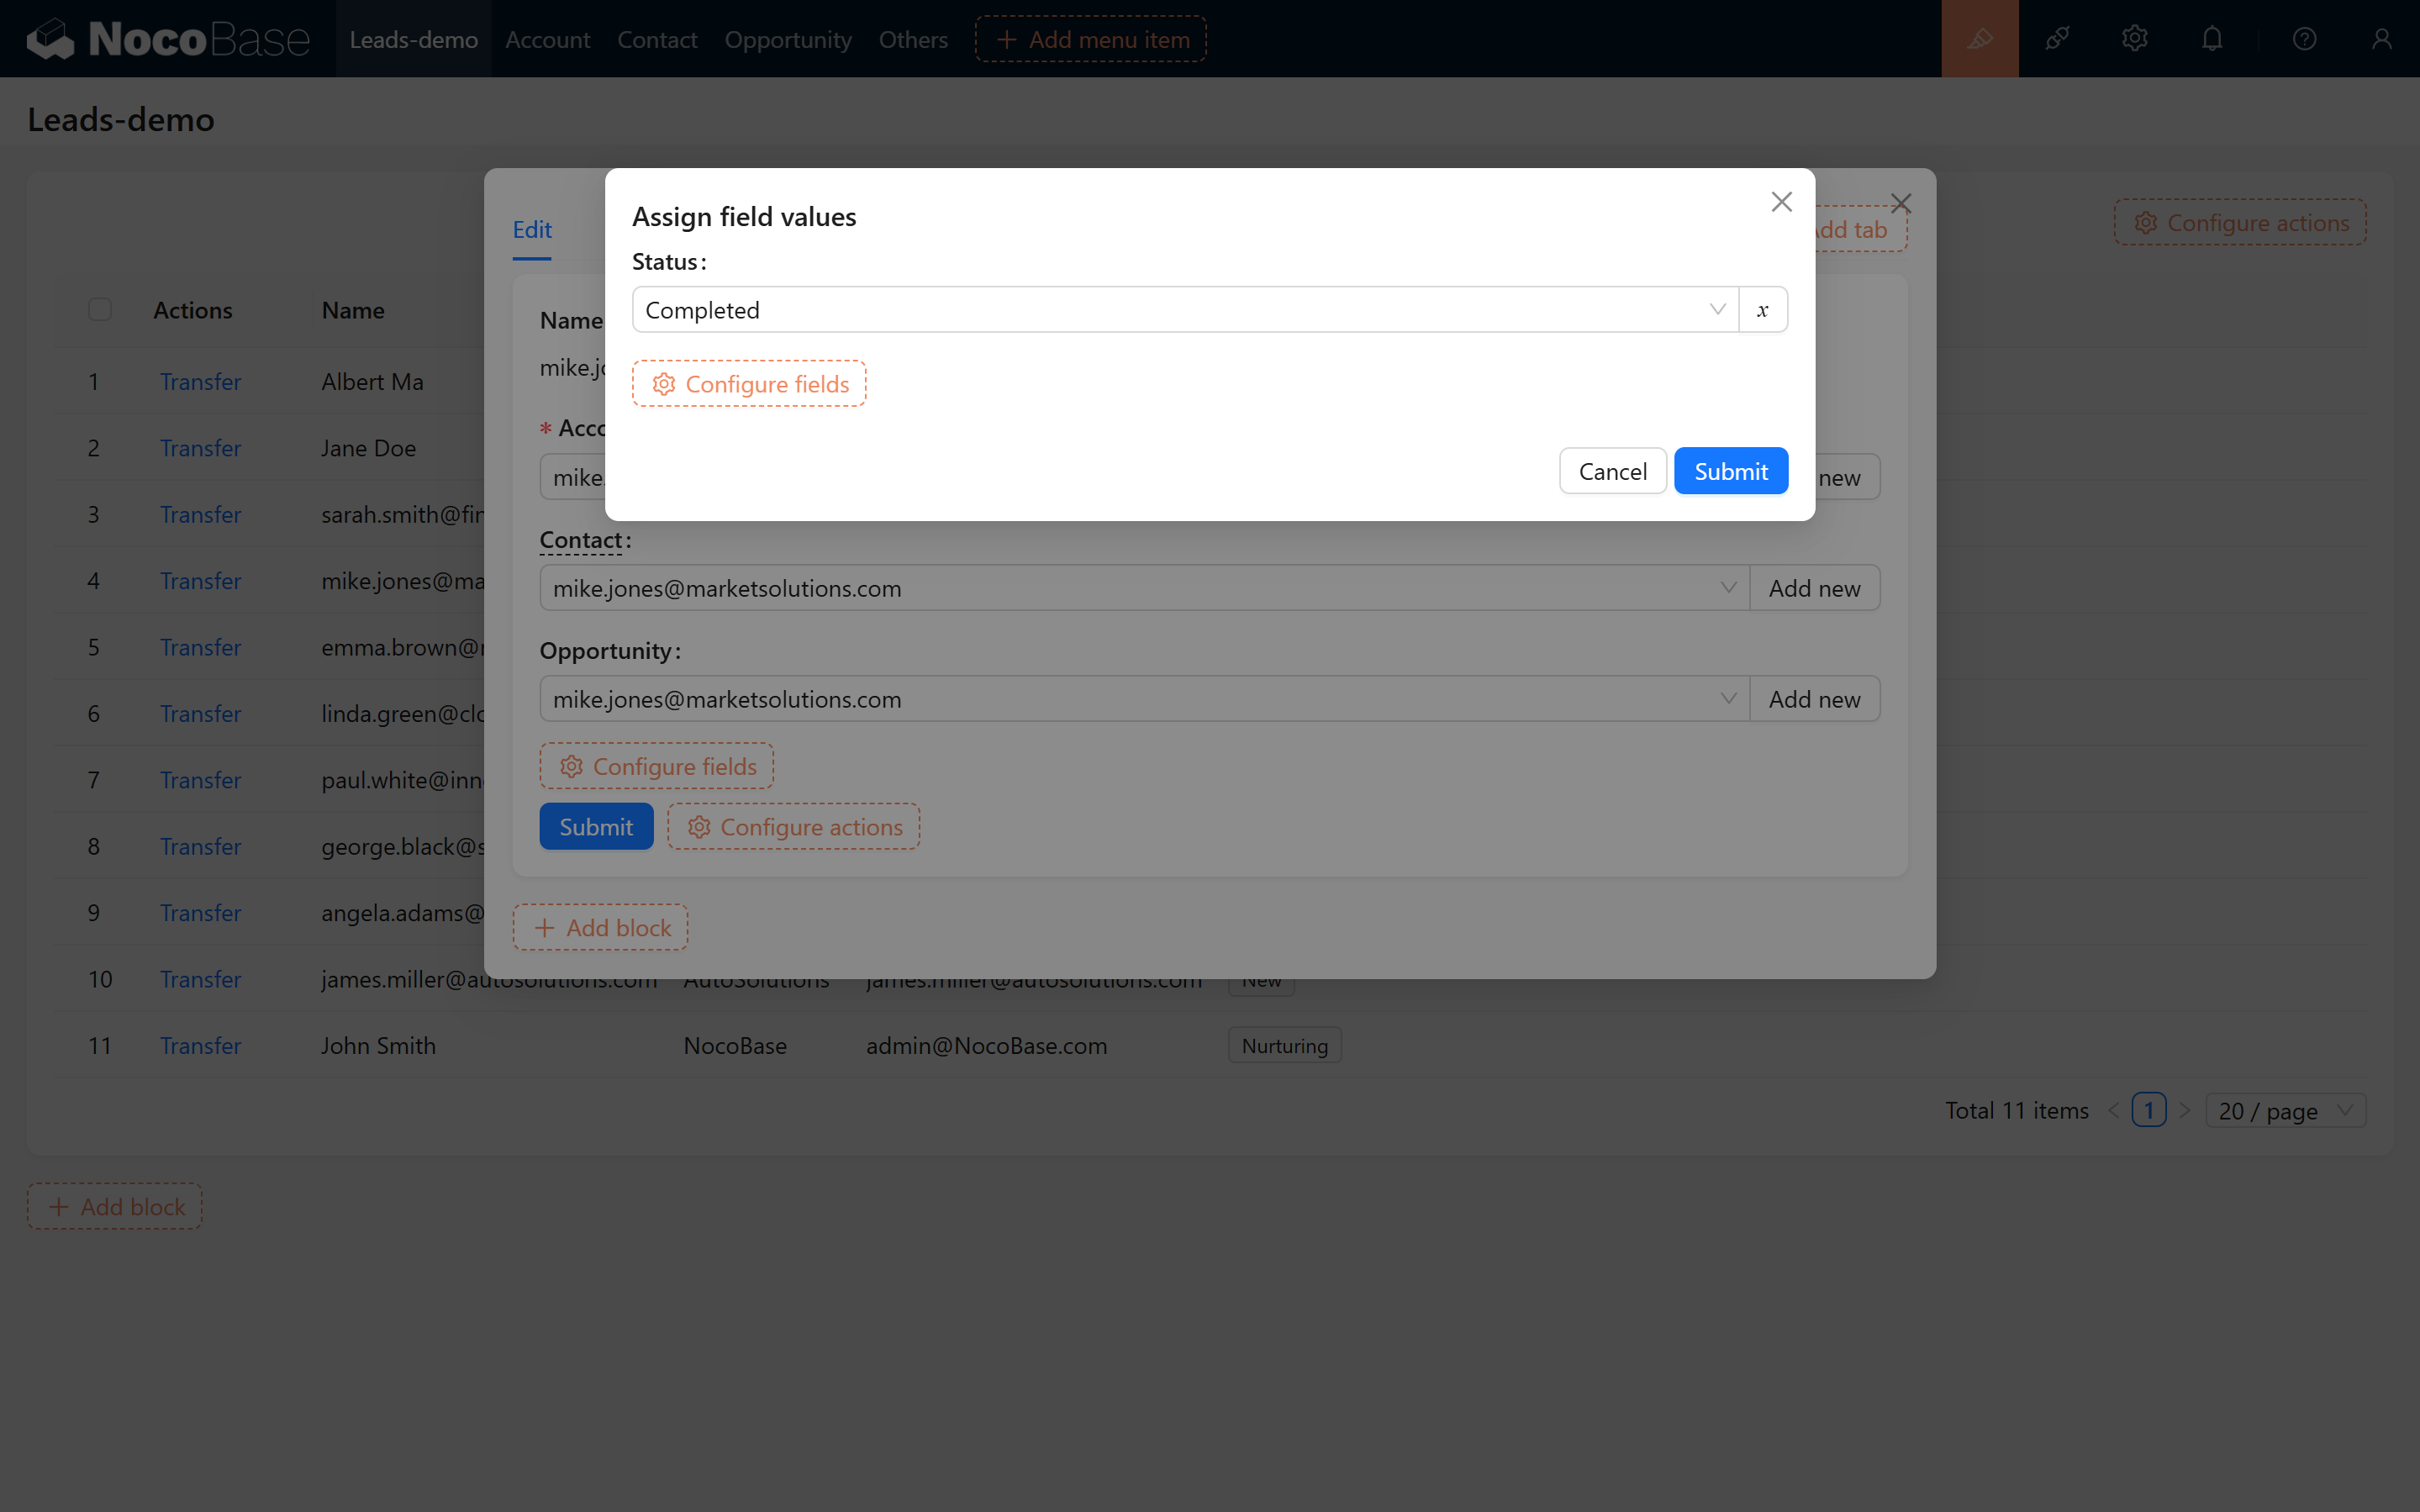
In the modal, display the following three association fields and enable the "Quick Create" feature for each. This allows immediate creation of new data if no matching record is found.
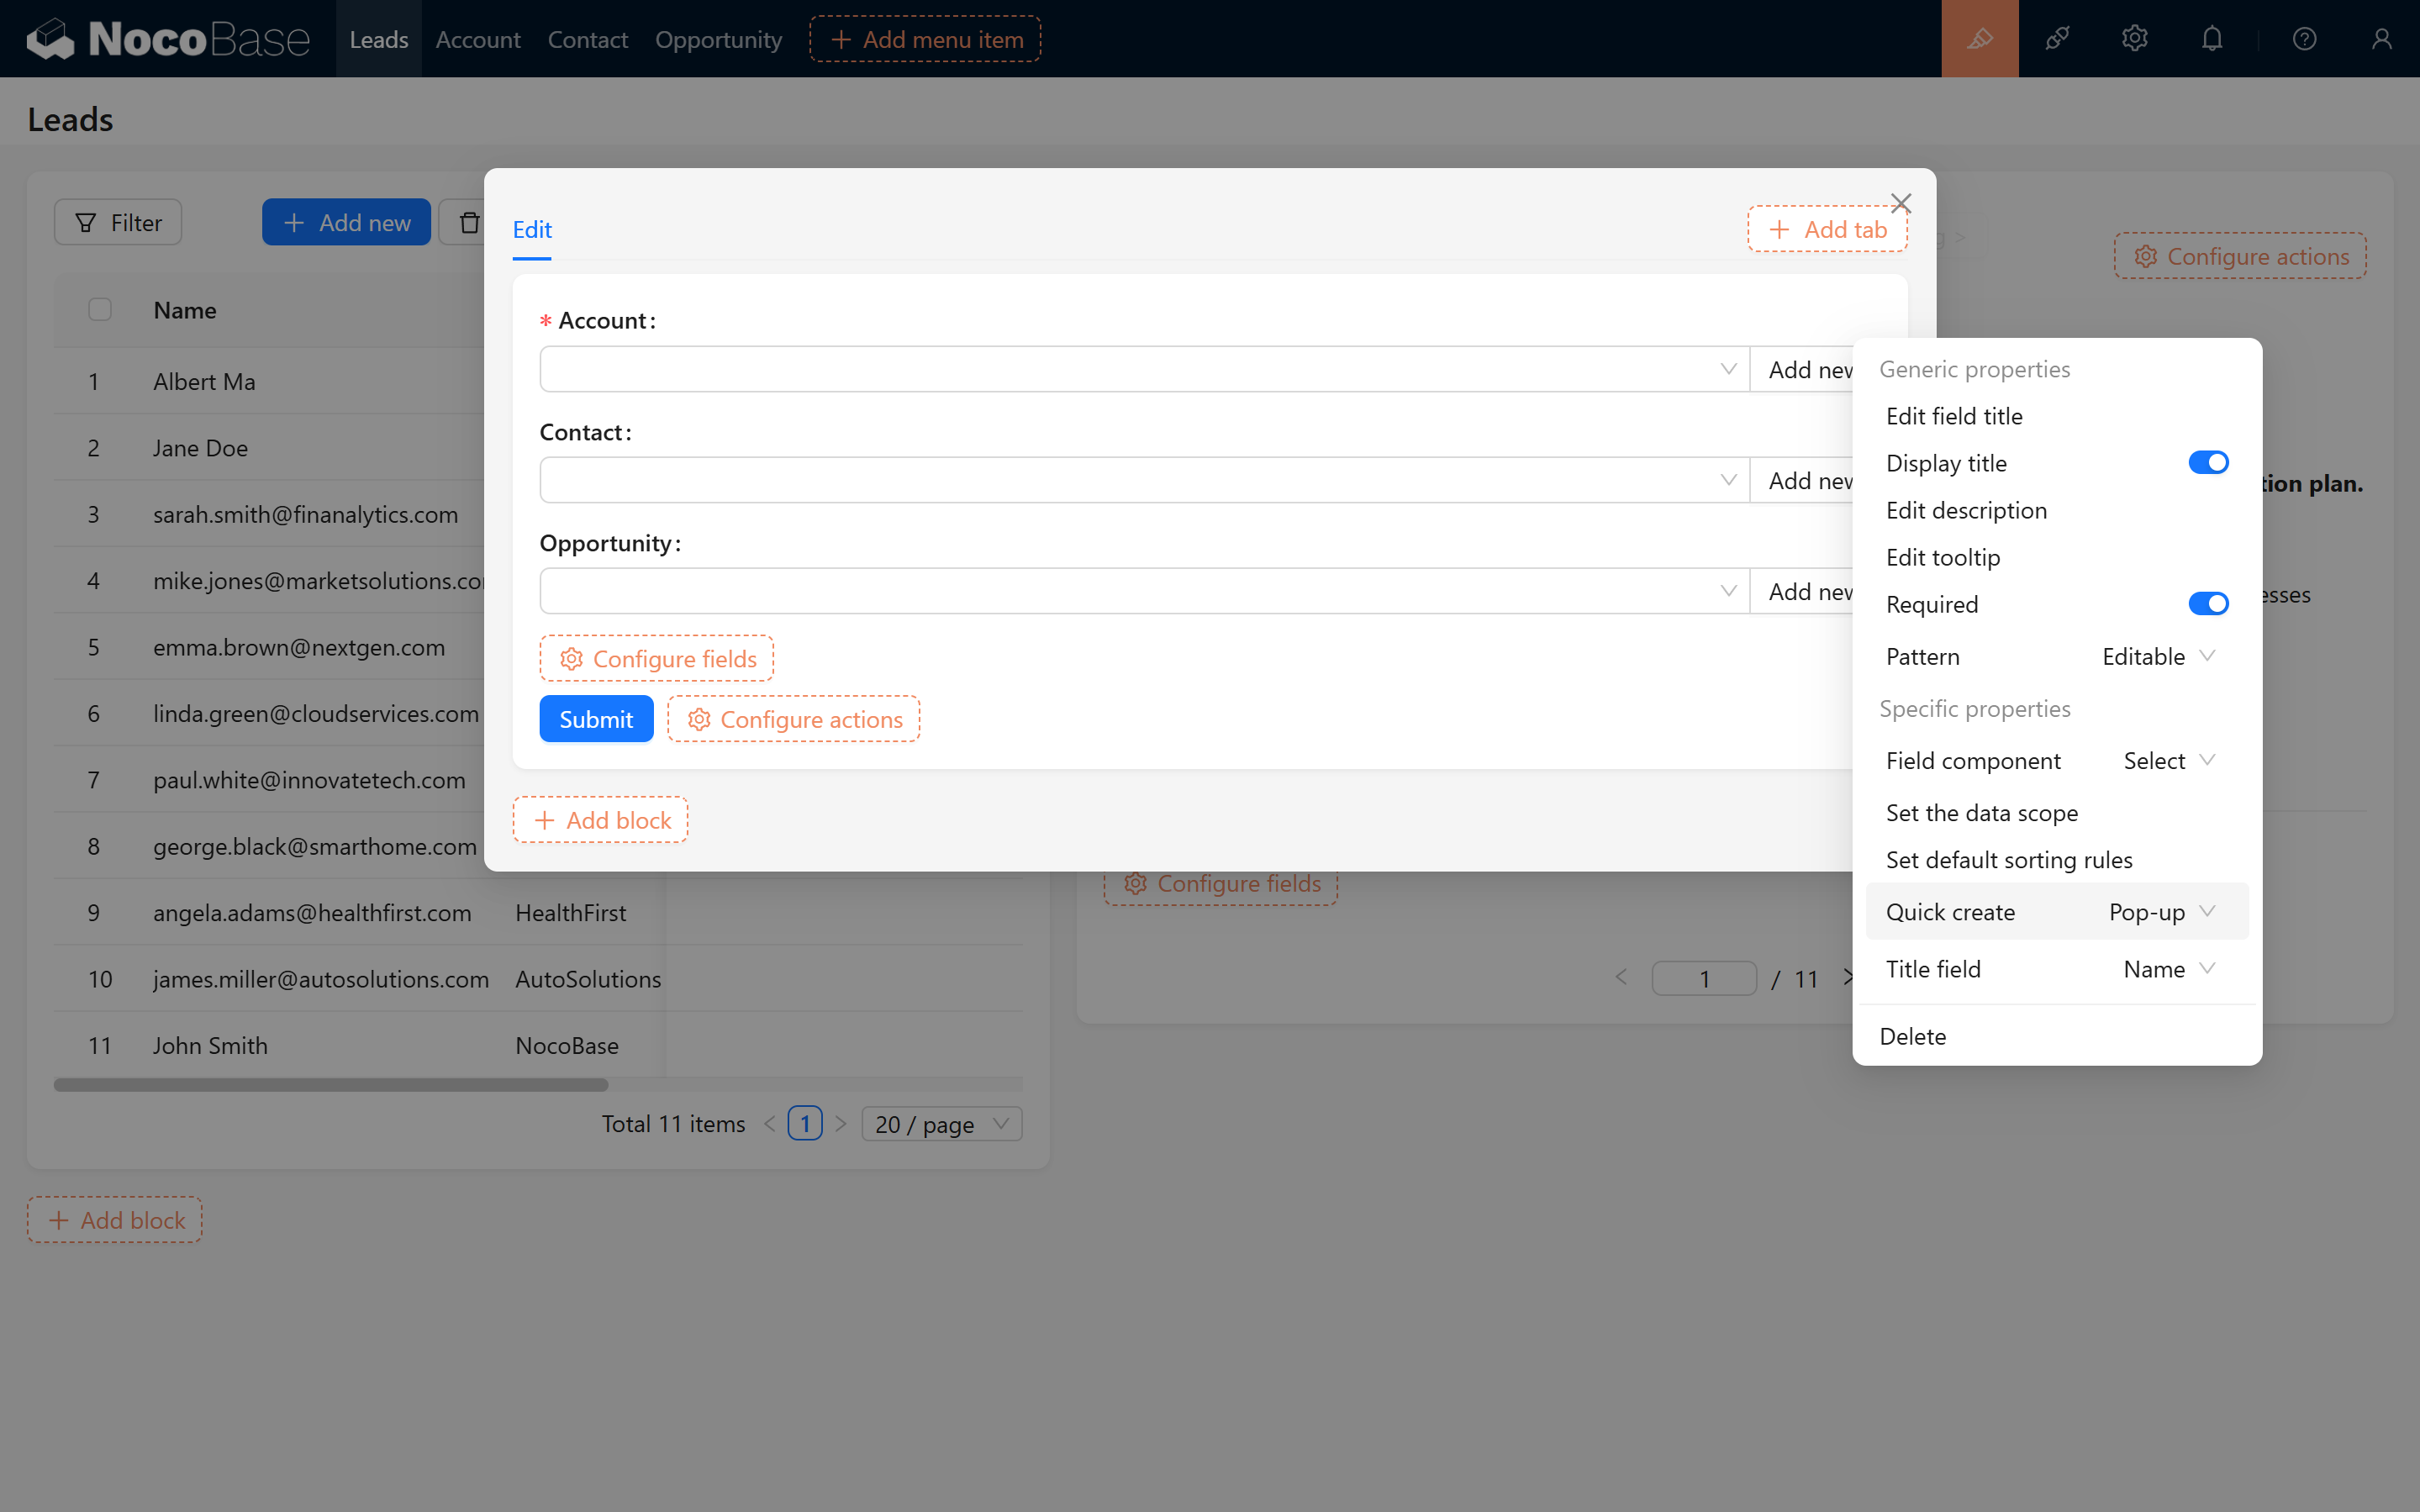
5.1.3 Configure the Default Mapping for Quick Create
In the "Quick Create" modal settings, configure default values for each association field so that the lead information is automatically mapped to the target collection. The mapping rules are as follows:
- Lead/Lead Name → Company/Name
- Lead/Email → Company/Email
- Lead/Phone → Company/Phone
- Lead/Lead Name → Contact/Name
- Lead/Email → Contact/Email
- Lead/Phone → Contact/Phone
- Lead/Lead Name → Opportunity/Name
- Lead/Status → Opportunity/Stage
Configuration example screenshots:
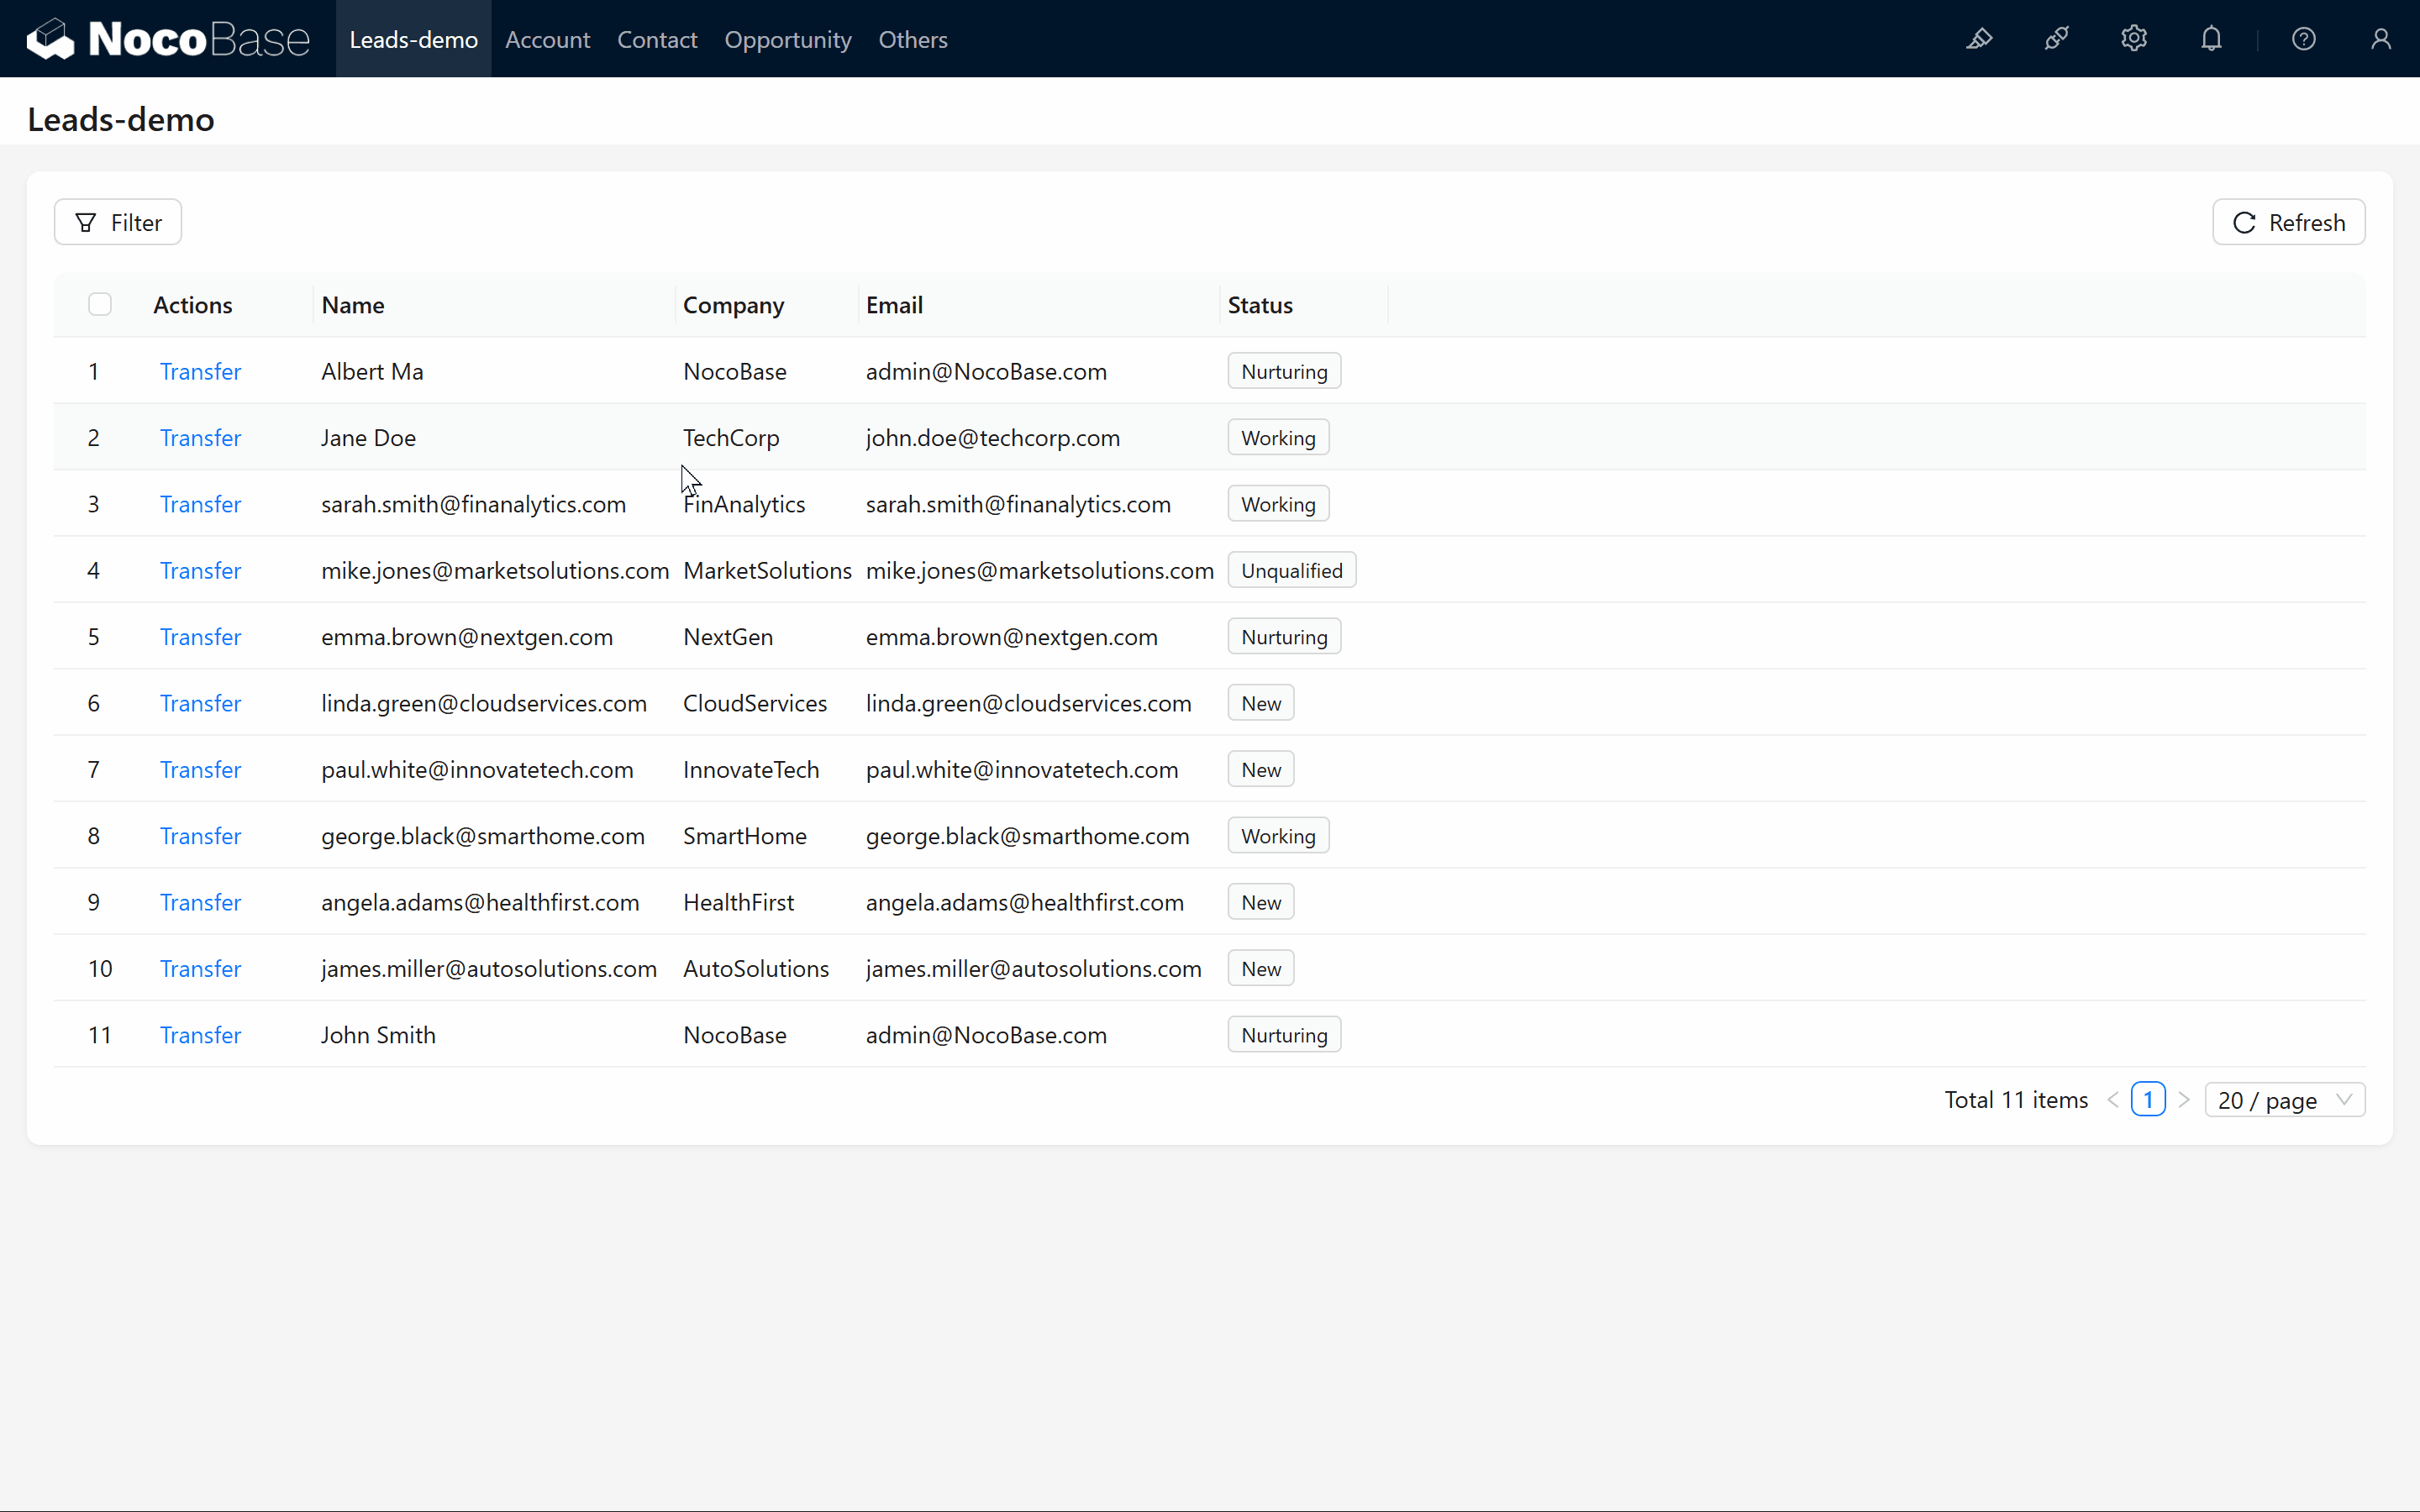
5.1.4 Viewing the Conversion Effect
After completing the configuration, when the conversion operation is executed, the system will create and associate new company, contact, and opportunity records based on the mapping rules. The effect is demonstrated below:
![]() Next, we will add a success feedback for the submission operation:
Next, we will add a success feedback for the submission operation:

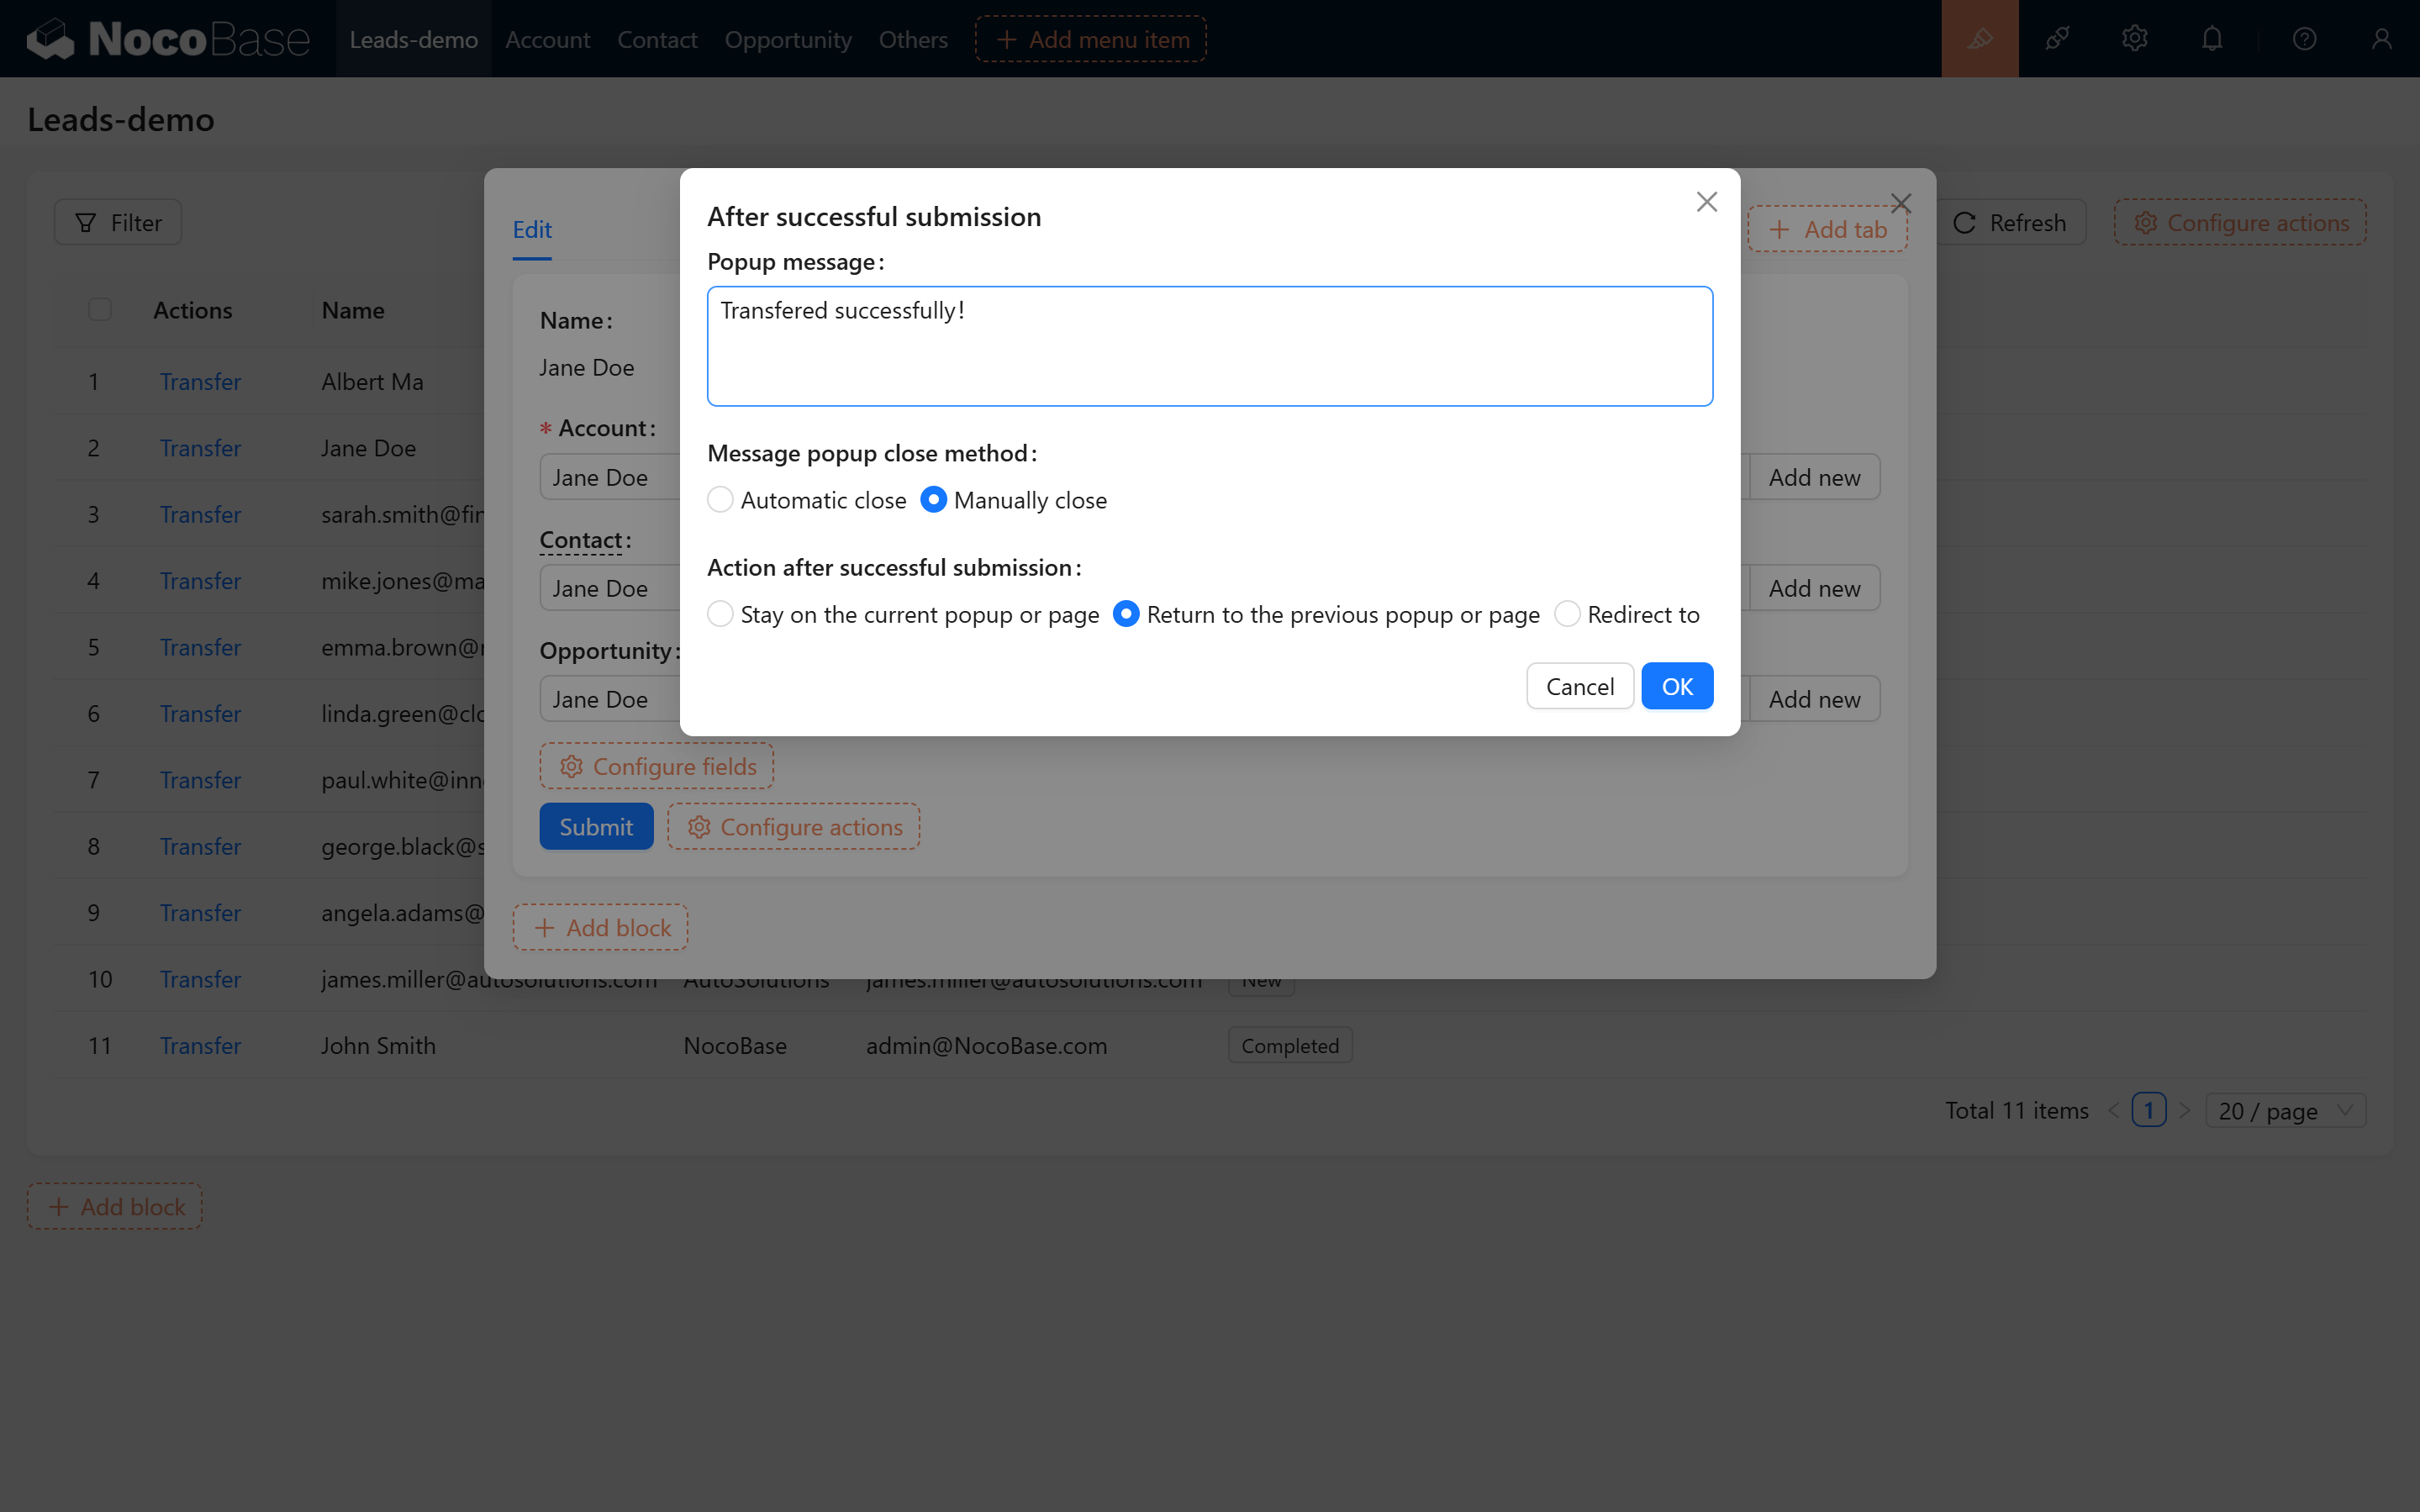
Submission effect:
![]()
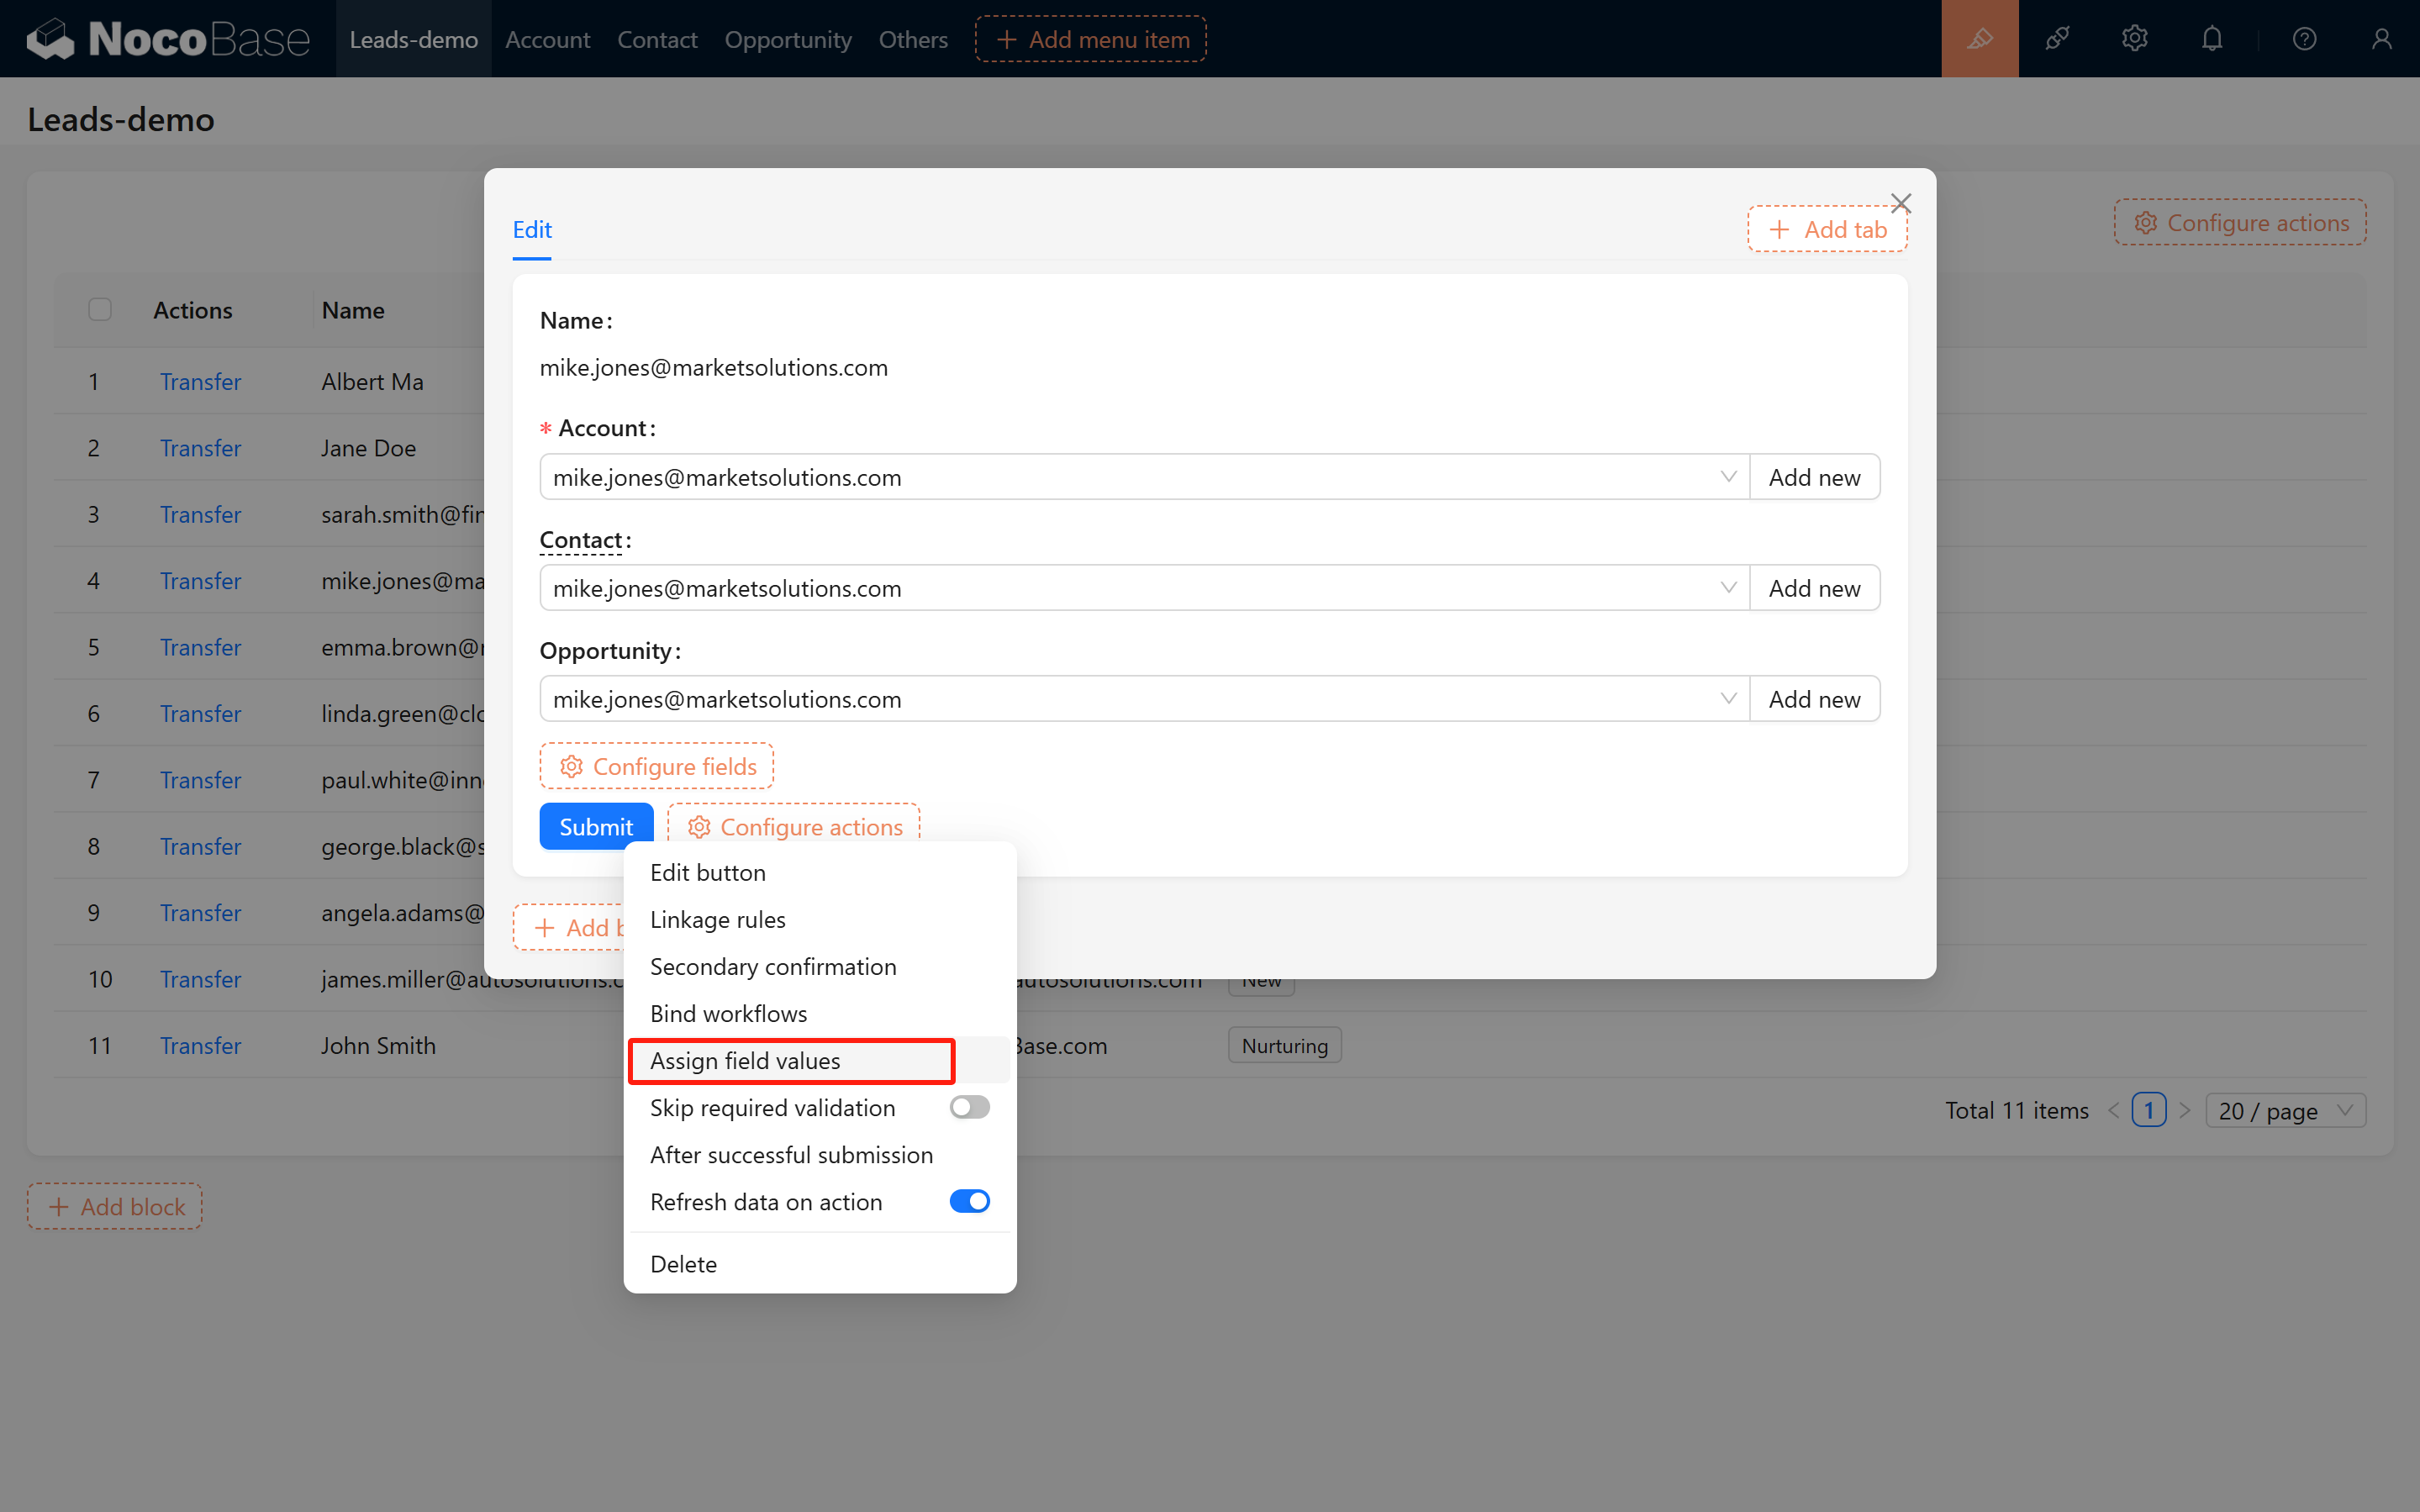
5.2 Preventing Duplicate Conversions
To avoid converting the same lead multiple times, you can control it in the following ways:
5.2.1 Update Lead Status
In the conversion form submission operation, add an automatic data update step to change the lead status to "Converted".
Configuration screenshots:
 Effect demonstration:
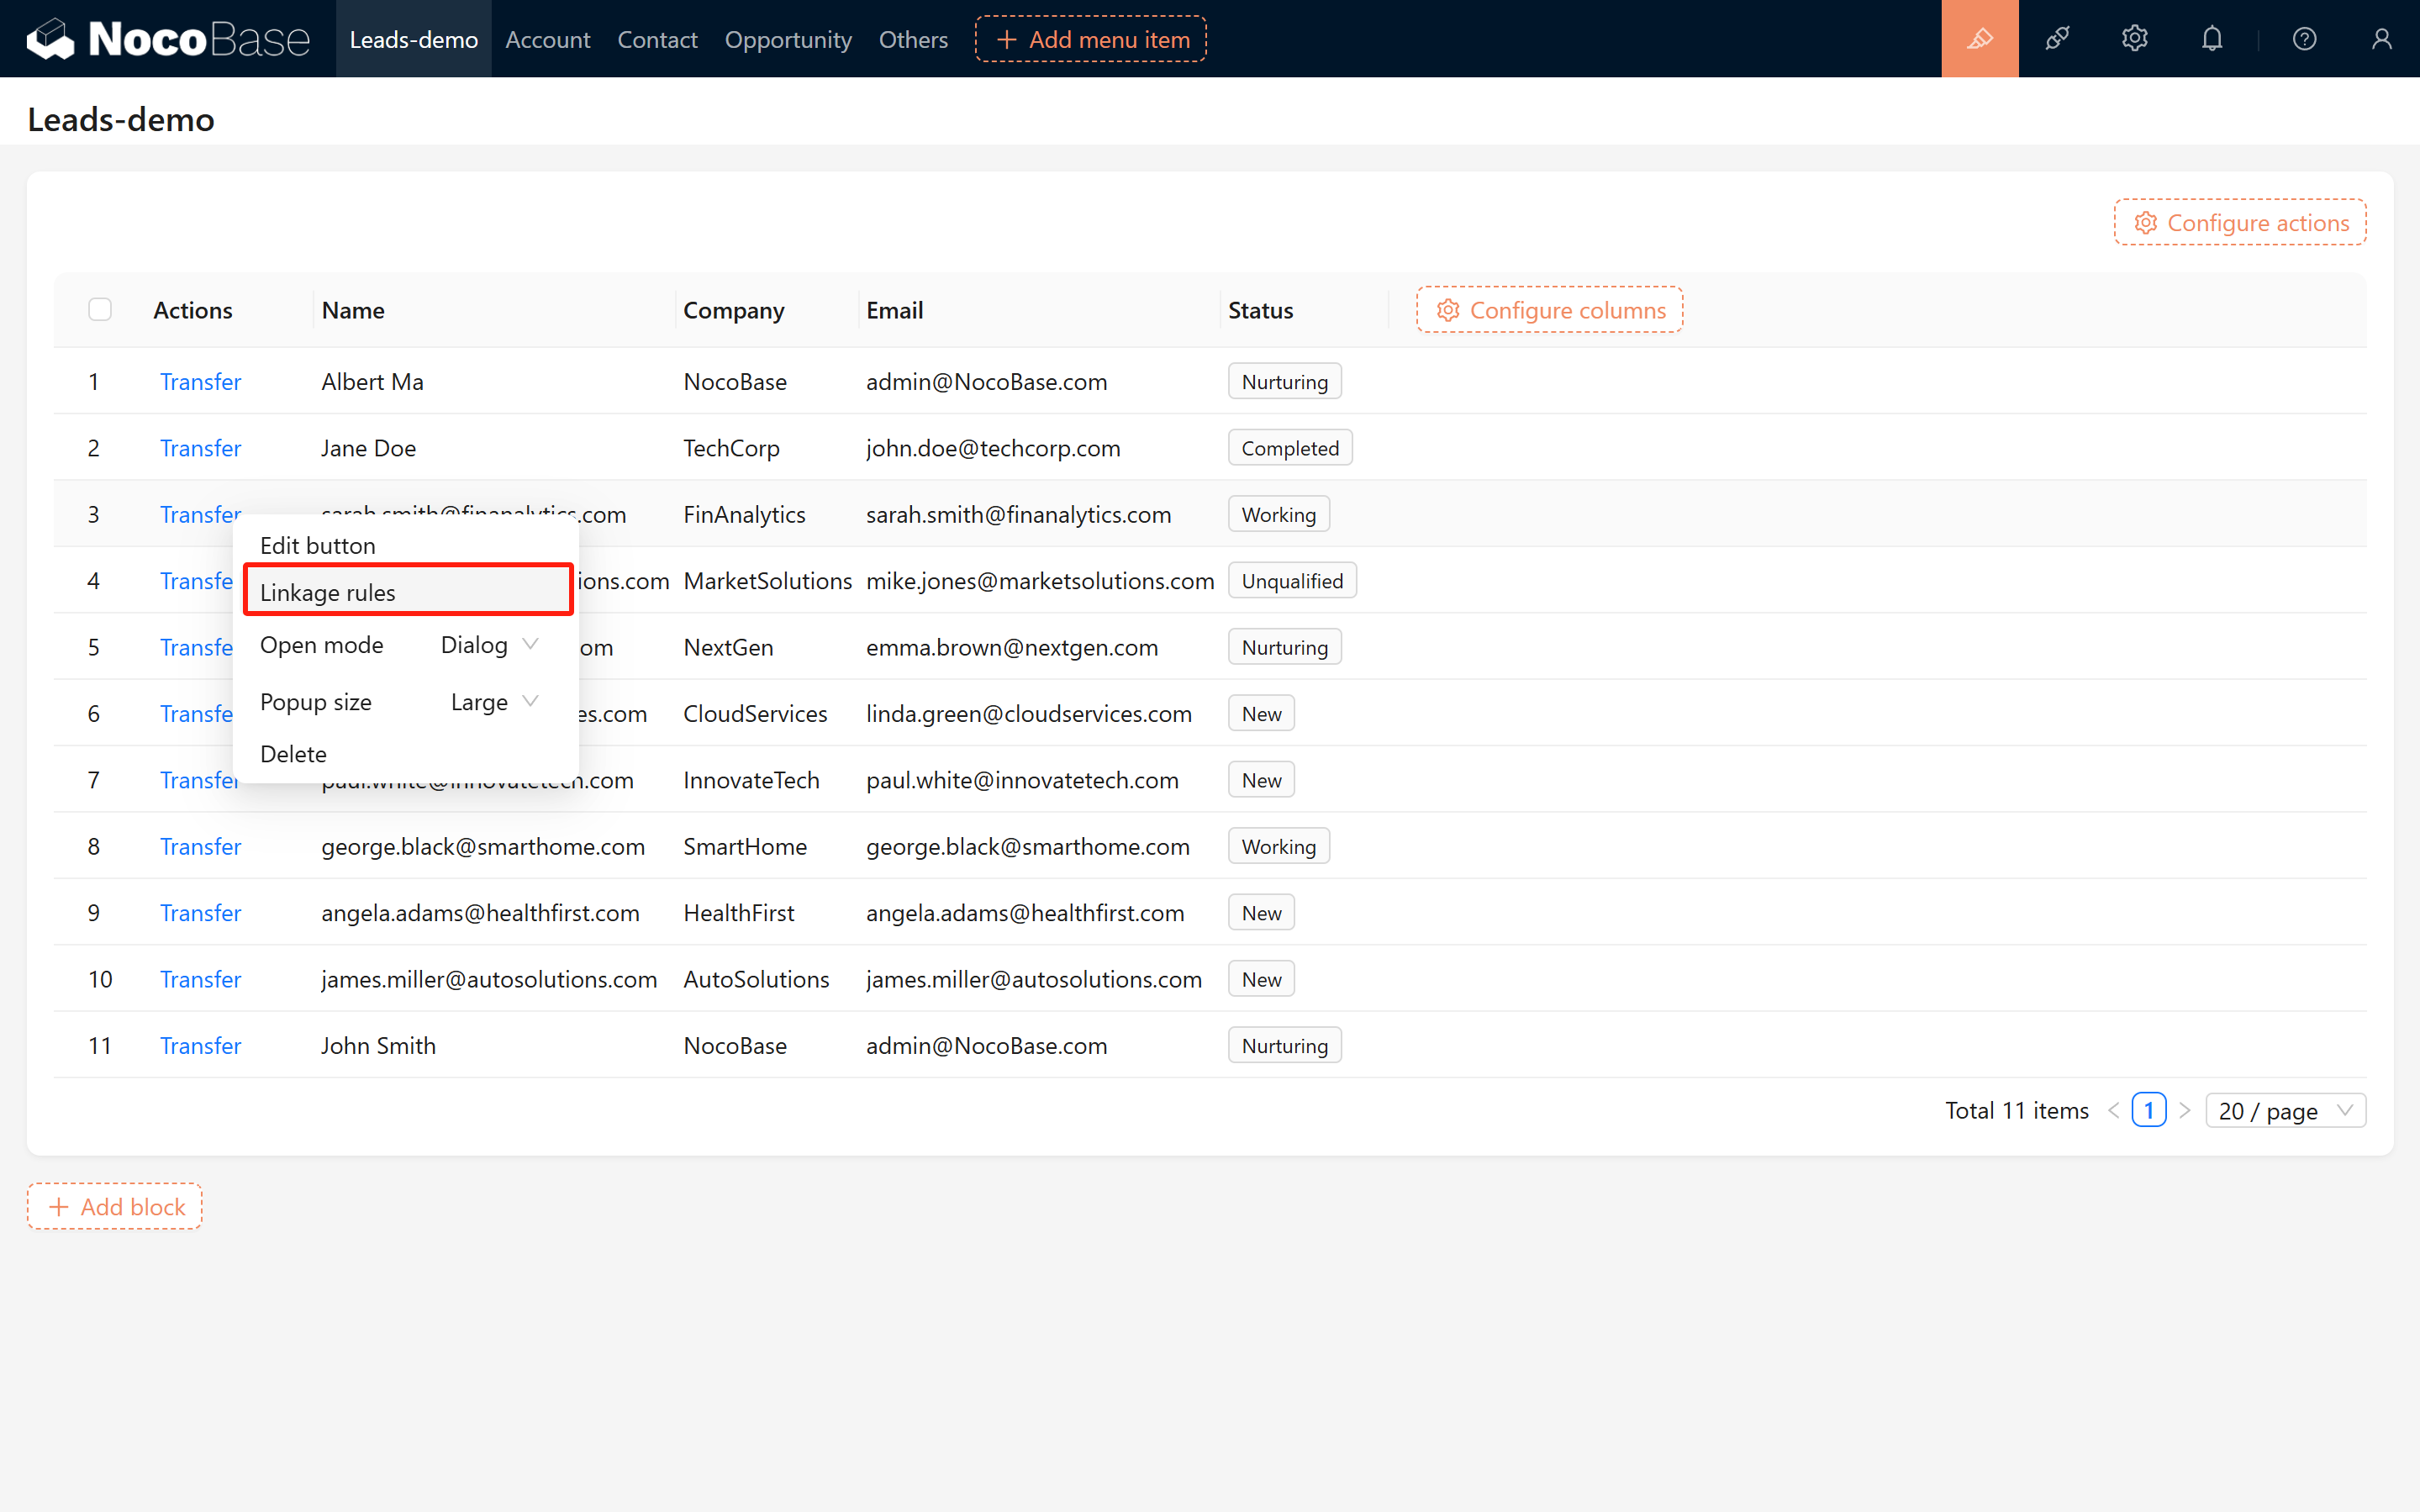
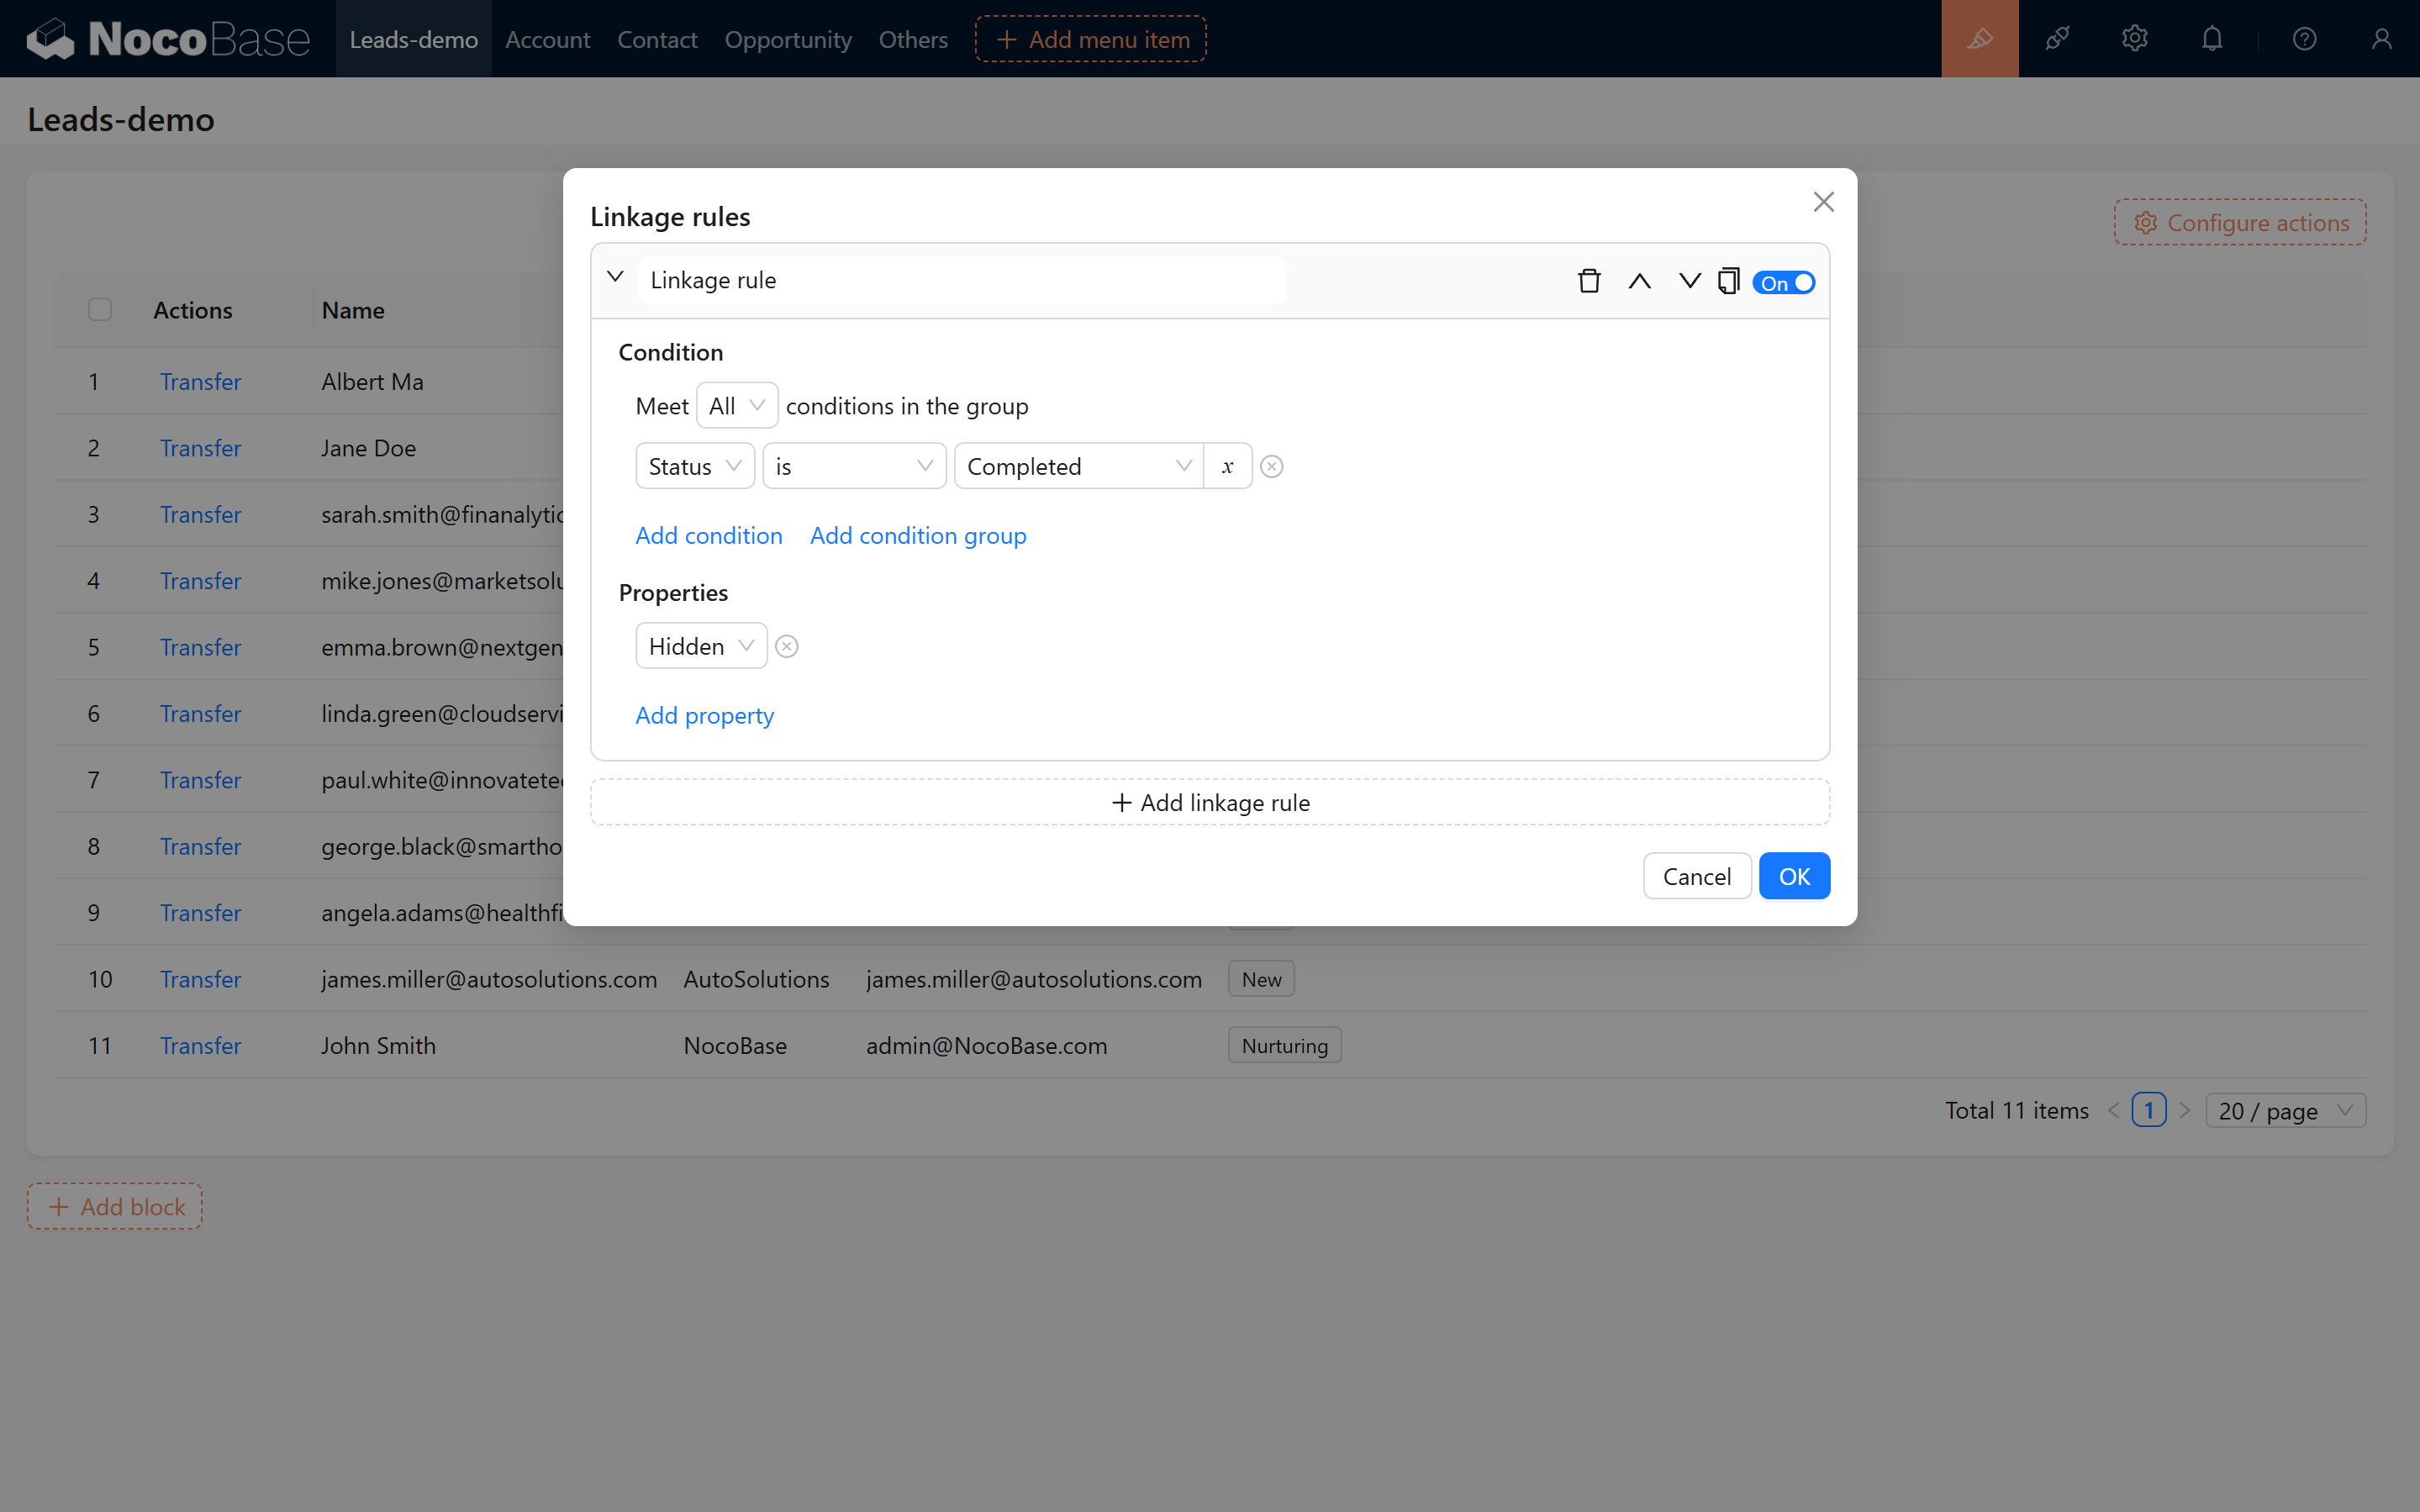
5.2.2 Set Button Linking Rules
Add linking rules to the conversion button: when the lead status is "Converted", automatically hide the conversion button to prevent duplicate operations.
Configuration screenshots:
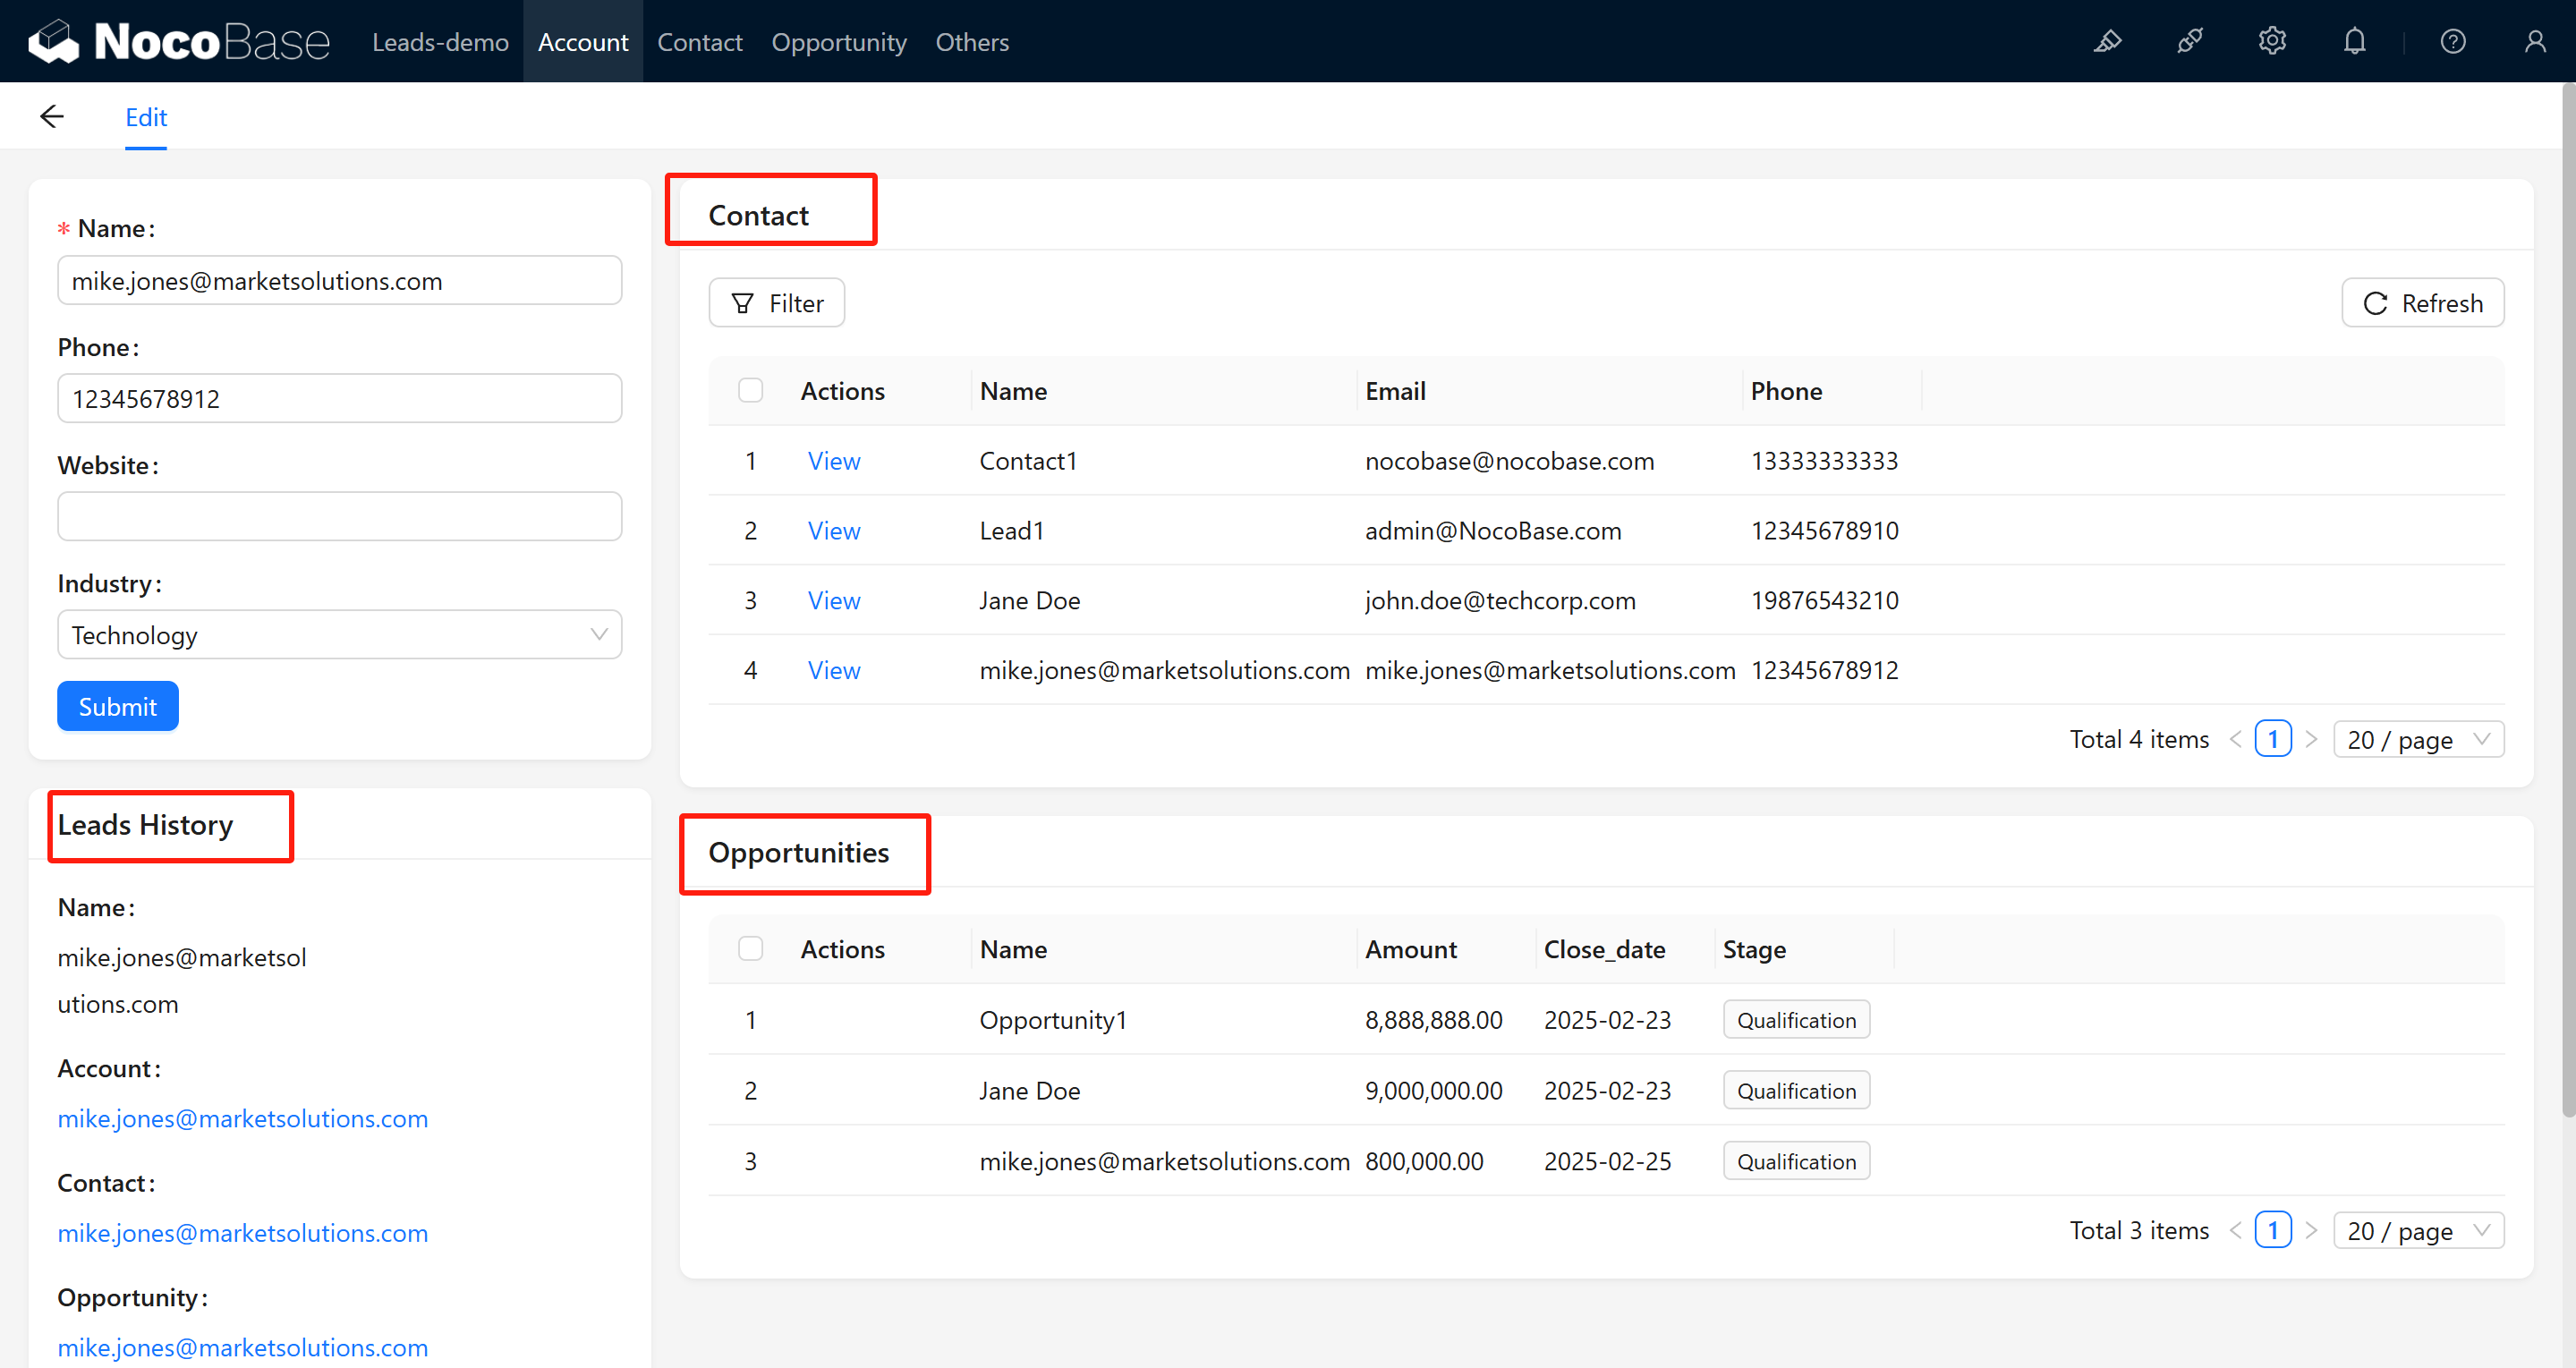
6. Configuring the Association Management Blocks on the Detail Pages
To allow users to view associated data on the detail pages of each Collection, you need to configure the corresponding list blocks or detail blocks.
6.1 Configure the Company Collection Detail Page
In the company detail page (for example, within the contact's edit/detail modal), add the following list blocks:
- Contact list block
- Opportunity list block
- Lead list block
Example screenshot:
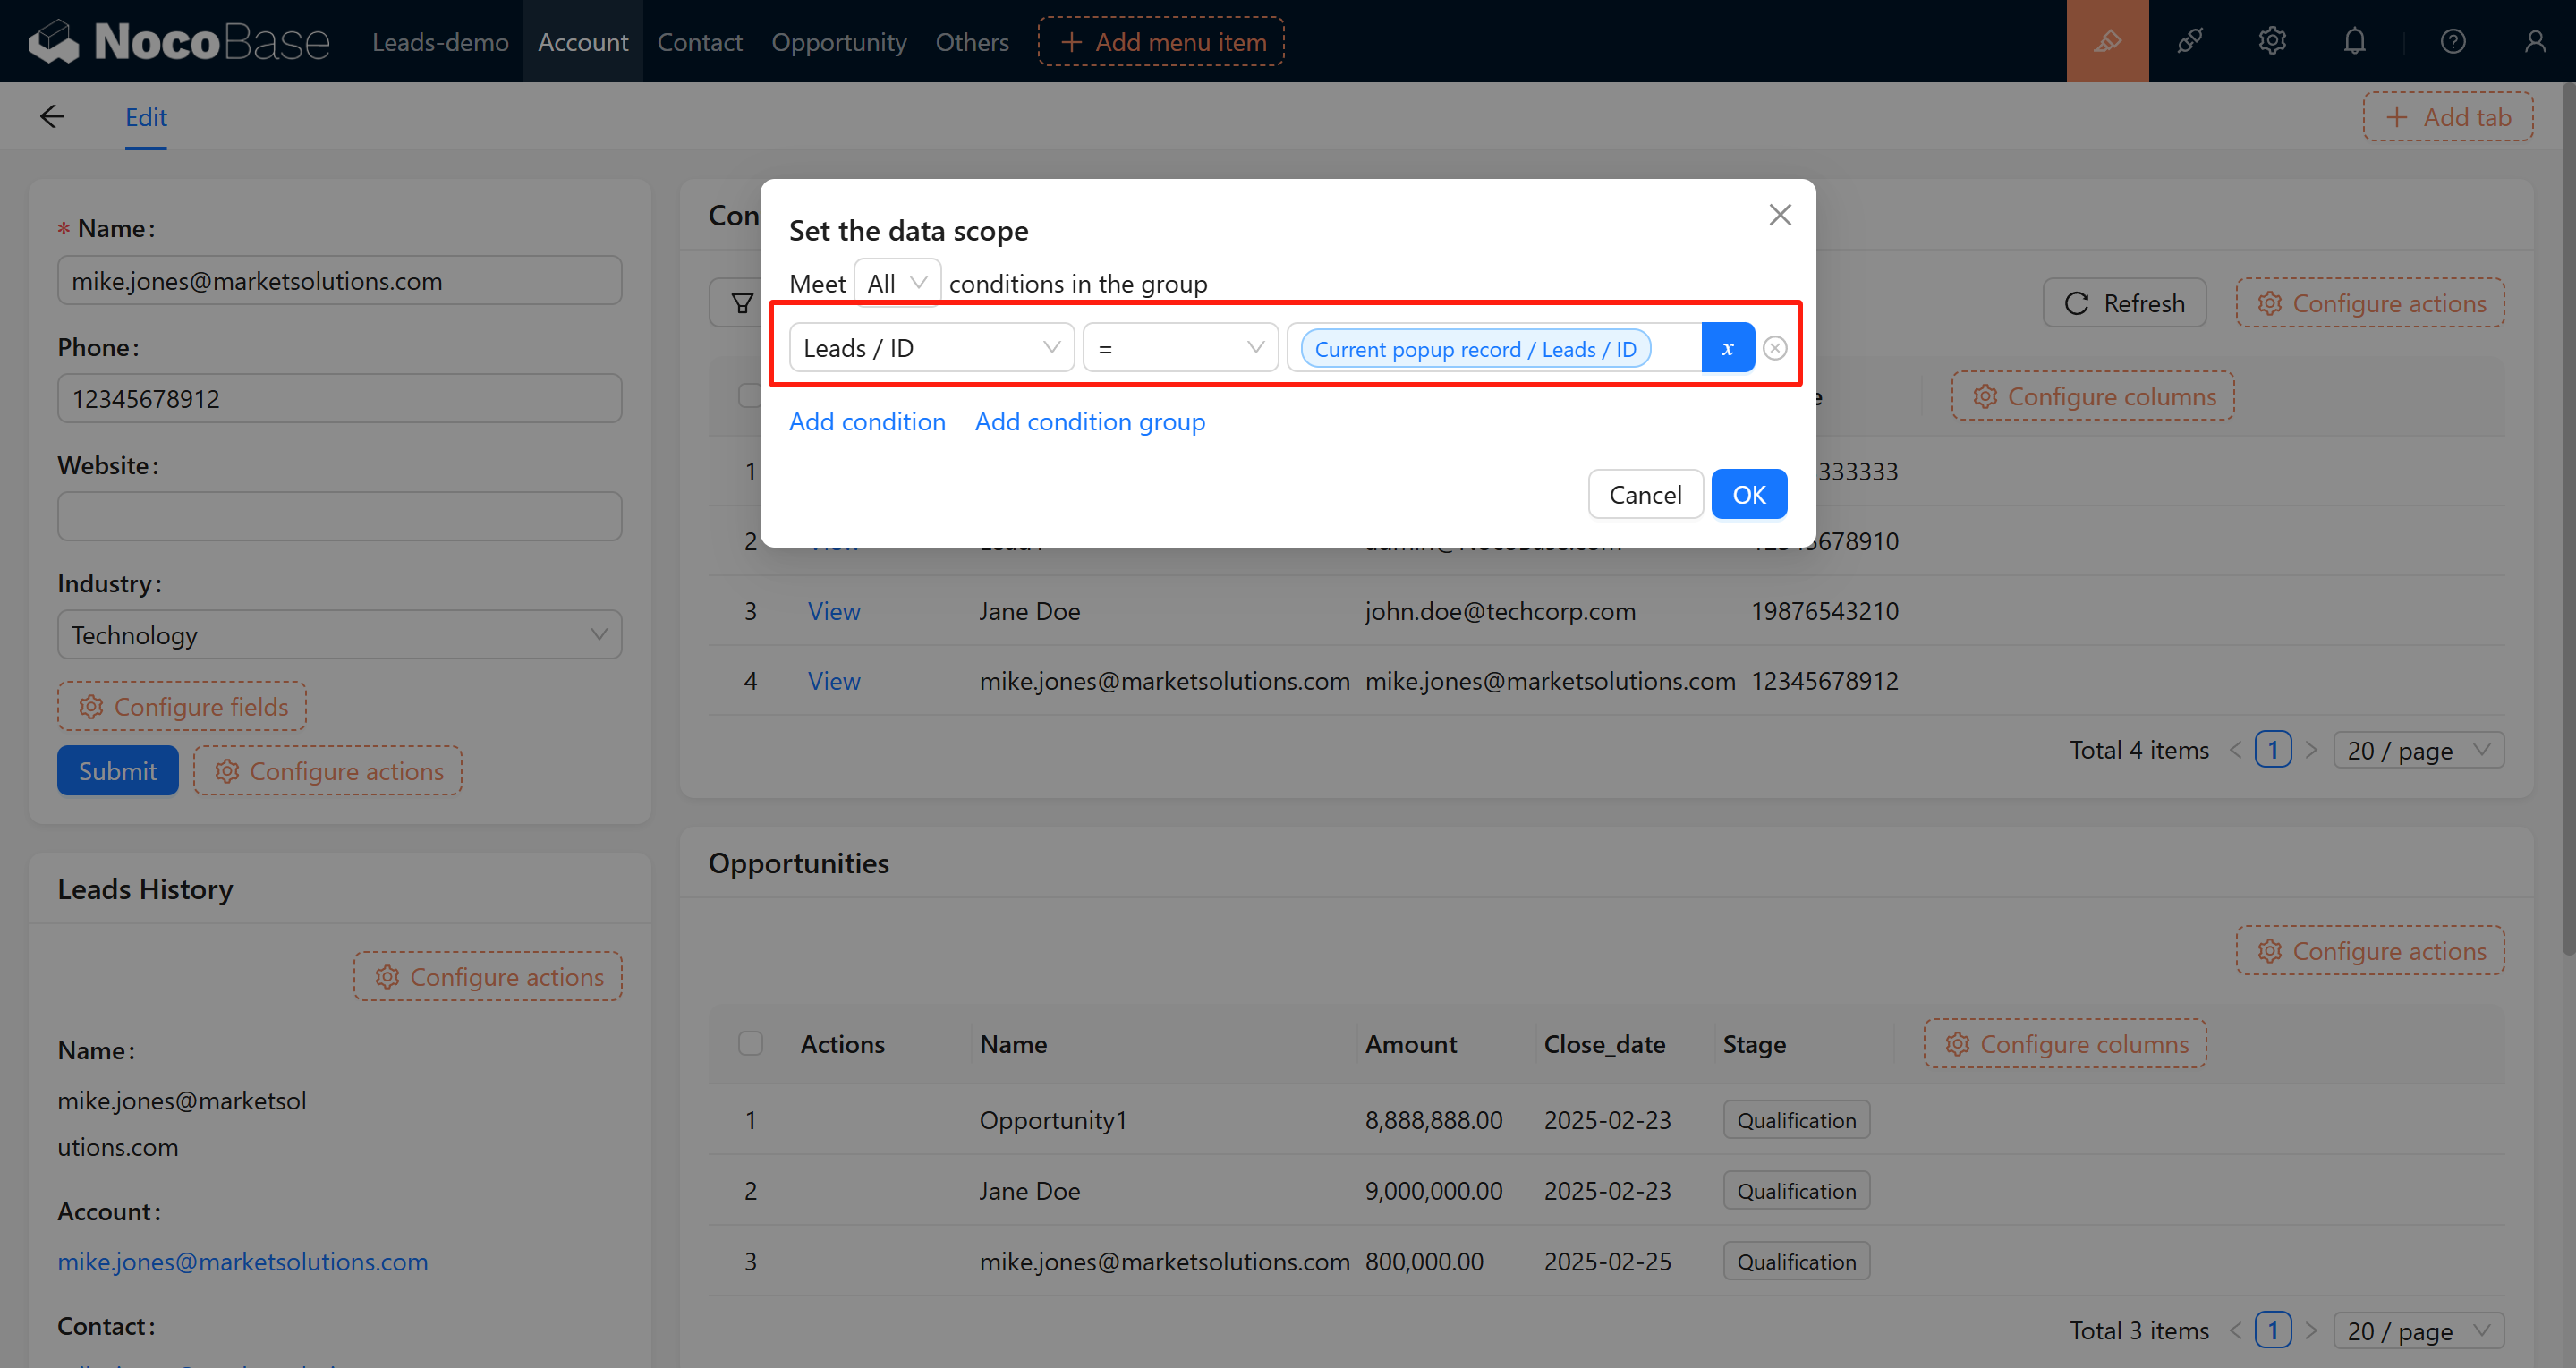
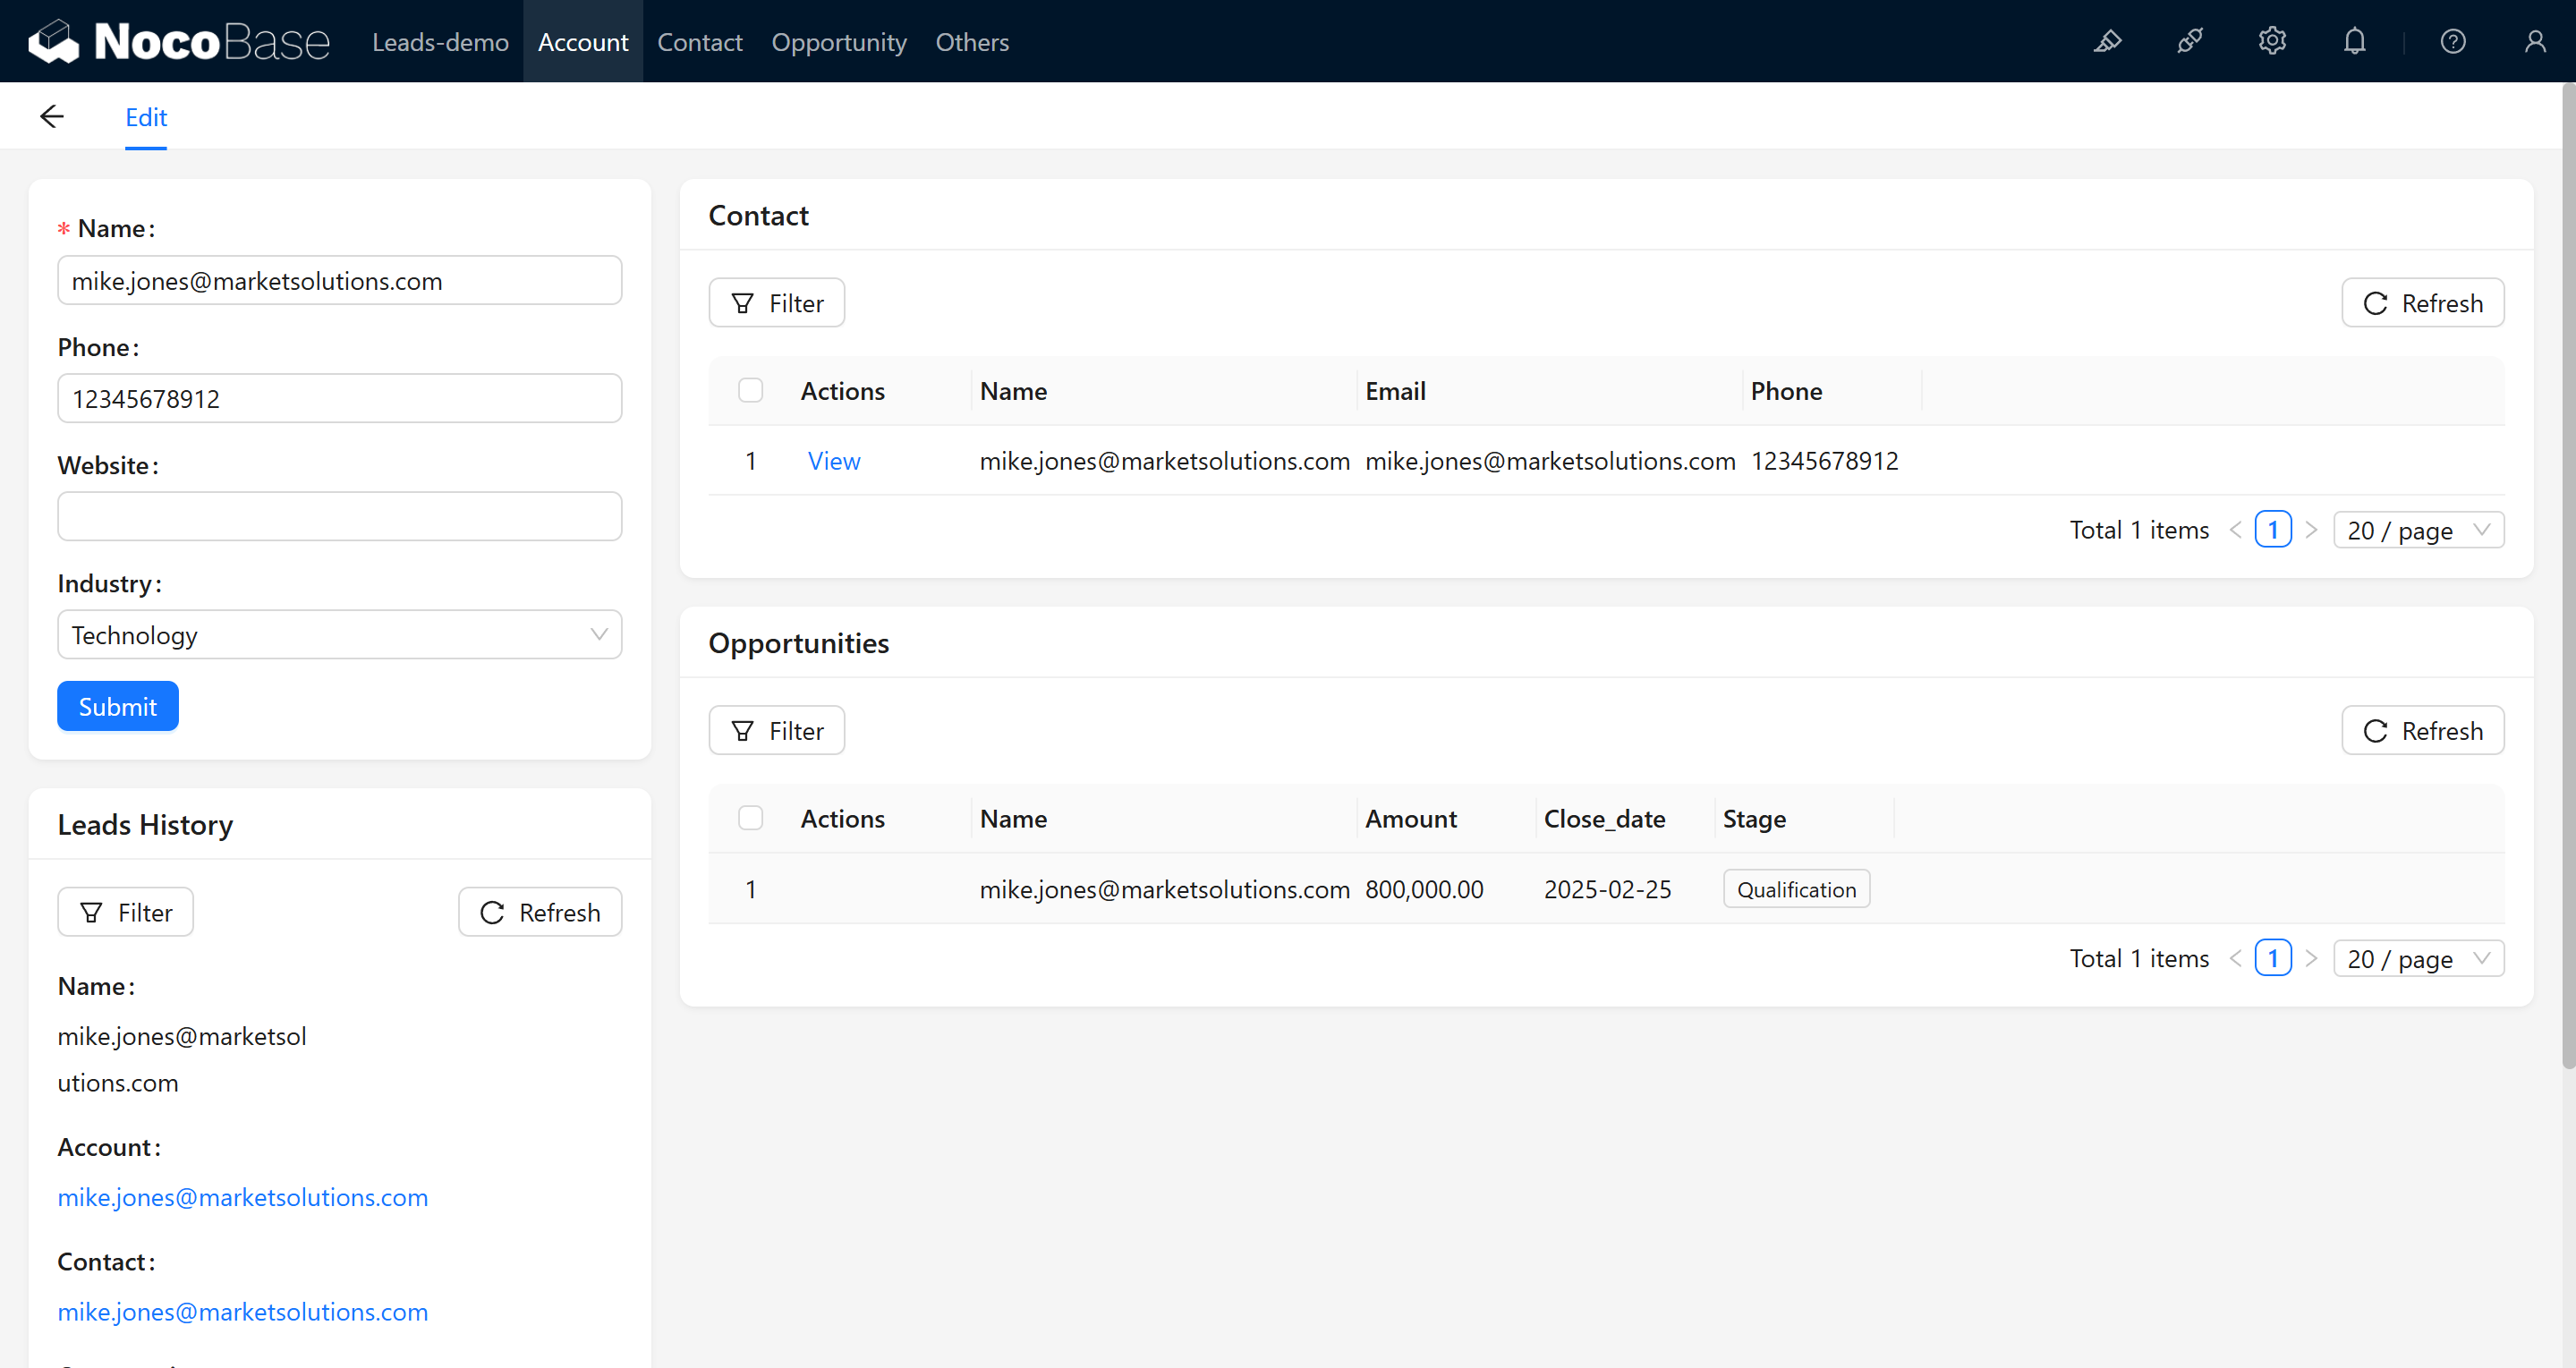
6.2 Add Filter Conditions
For each list block, add filter rules to ensure that only data associated with the current company ID is displayed.
Configuration screenshots:
6.3 Configure the Contact and Opportunity Detail Pages
In the detail modal of the Contact Collection, add the following blocks:
- Opportunity list block
- Company detail block
- Lead list block (filtered by ID)
Screenshot:

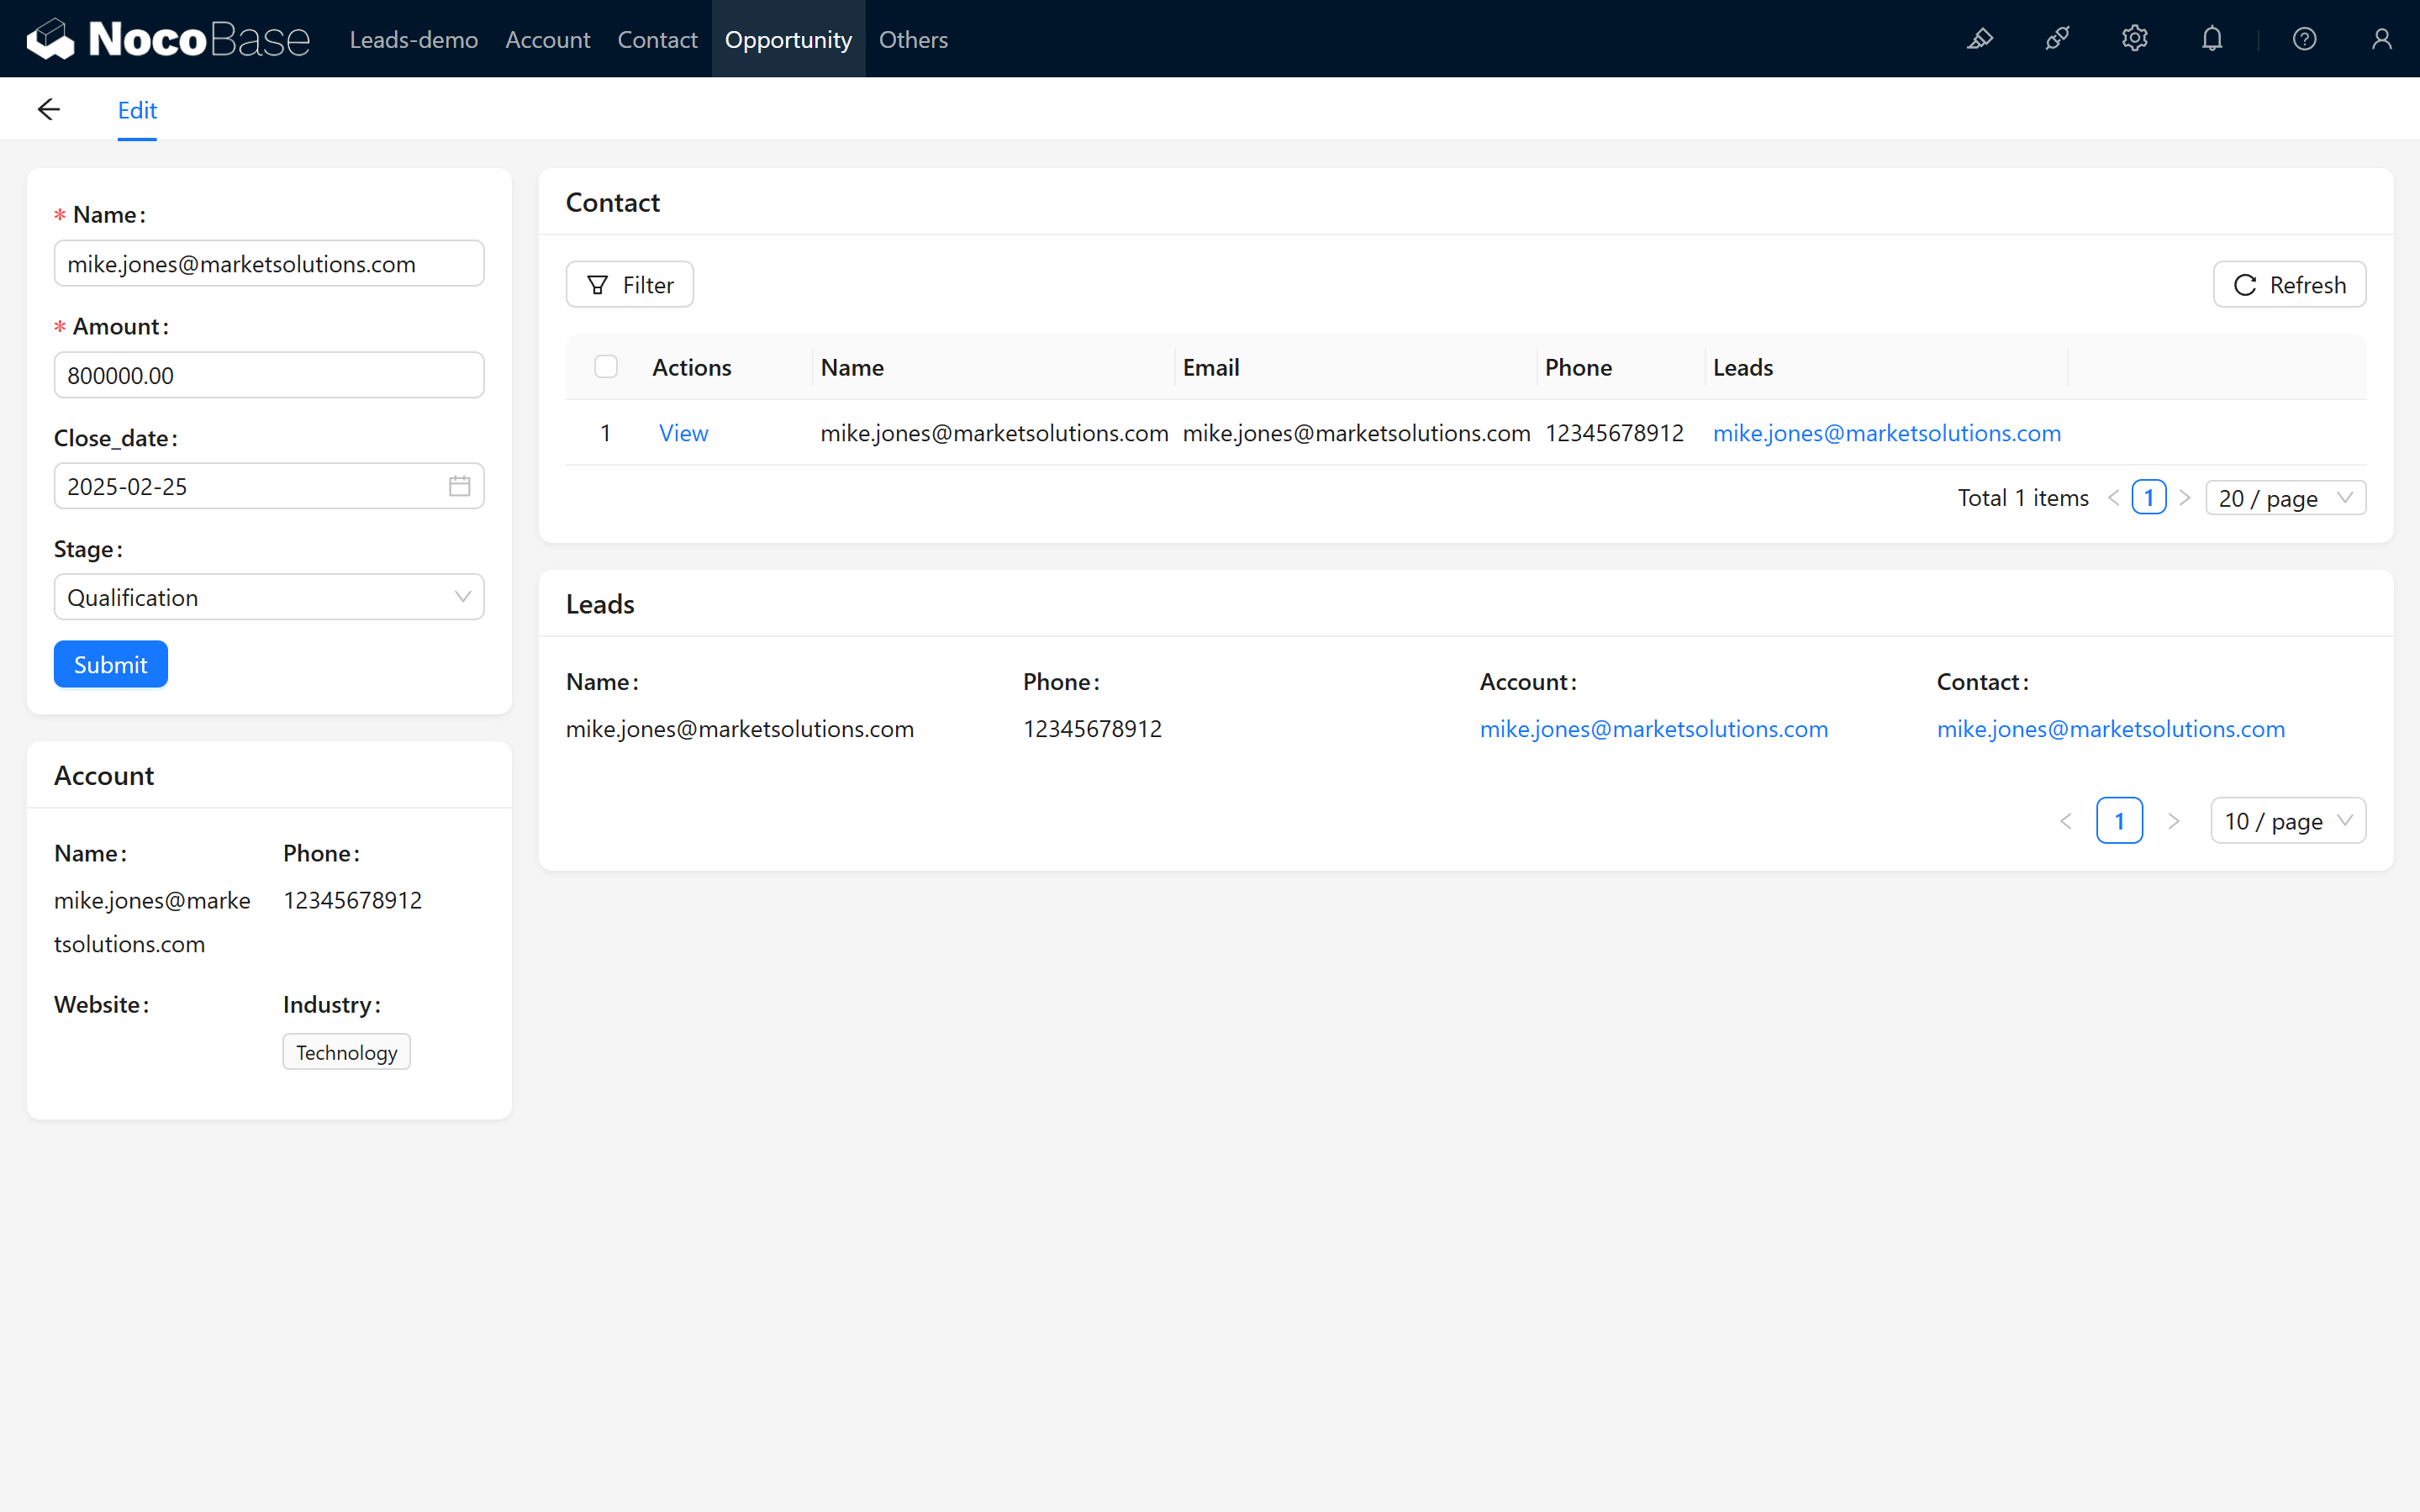
In the Opportunity detail page, similarly add:
- Contact list block
- Company detail block
- Lead list block (filtered by ID)
Screenshot:
7. Conclusion
Through the steps above, you have successfully implemented a simple CRM opportunity conversion feature and configured the association management between contacts, companies, and leads. We hope this tutorial provides a clear, step-by-step guide to help you master the construction of the entire business process, bringing convenience and efficient operations to your project.
If you encounter any issues during the operation, feel free to visit the NocoBase community or refer to the official documentation. We hope this guide helps you successfully implement user registration auditing based on your actual needs and provides flexibility for further extensions. Wishing you smooth usage and project success!