

Chapter 5: Users & Permissions — Who Sees What
In the last chapter, we built forms and detail pages — our ticket system can now handle data entry and viewing. But there's a problem: everyone sees the same thing after logging in. Regular employees who submit tickets can access the admin pages, technicians can delete categories... that's not going to work.
In this chapter, we'll add "access control" to the system: different people see different menus and operate on different data.
5.1 Understanding Roles
In NocoBase, a role is a collection of permissions. You don't need to configure permissions for each user individually — instead, you define a few roles first, then assign users to the appropriate roles.
NocoBase comes with three built-in roles after installation:
- Root: Super admin with full permissions — cannot be deleted
- Admin: Administrator with UI configuration permissions by default
- Member: Regular member with limited default permissions
But these three built-in roles aren't enough for our needs. Our ticket system requires finer-grained control, so we'll create 3 custom roles next.
5.2 Creating Three Roles
Open the settings menu in the top-right corner and go to Users & Permissions -> Roles.
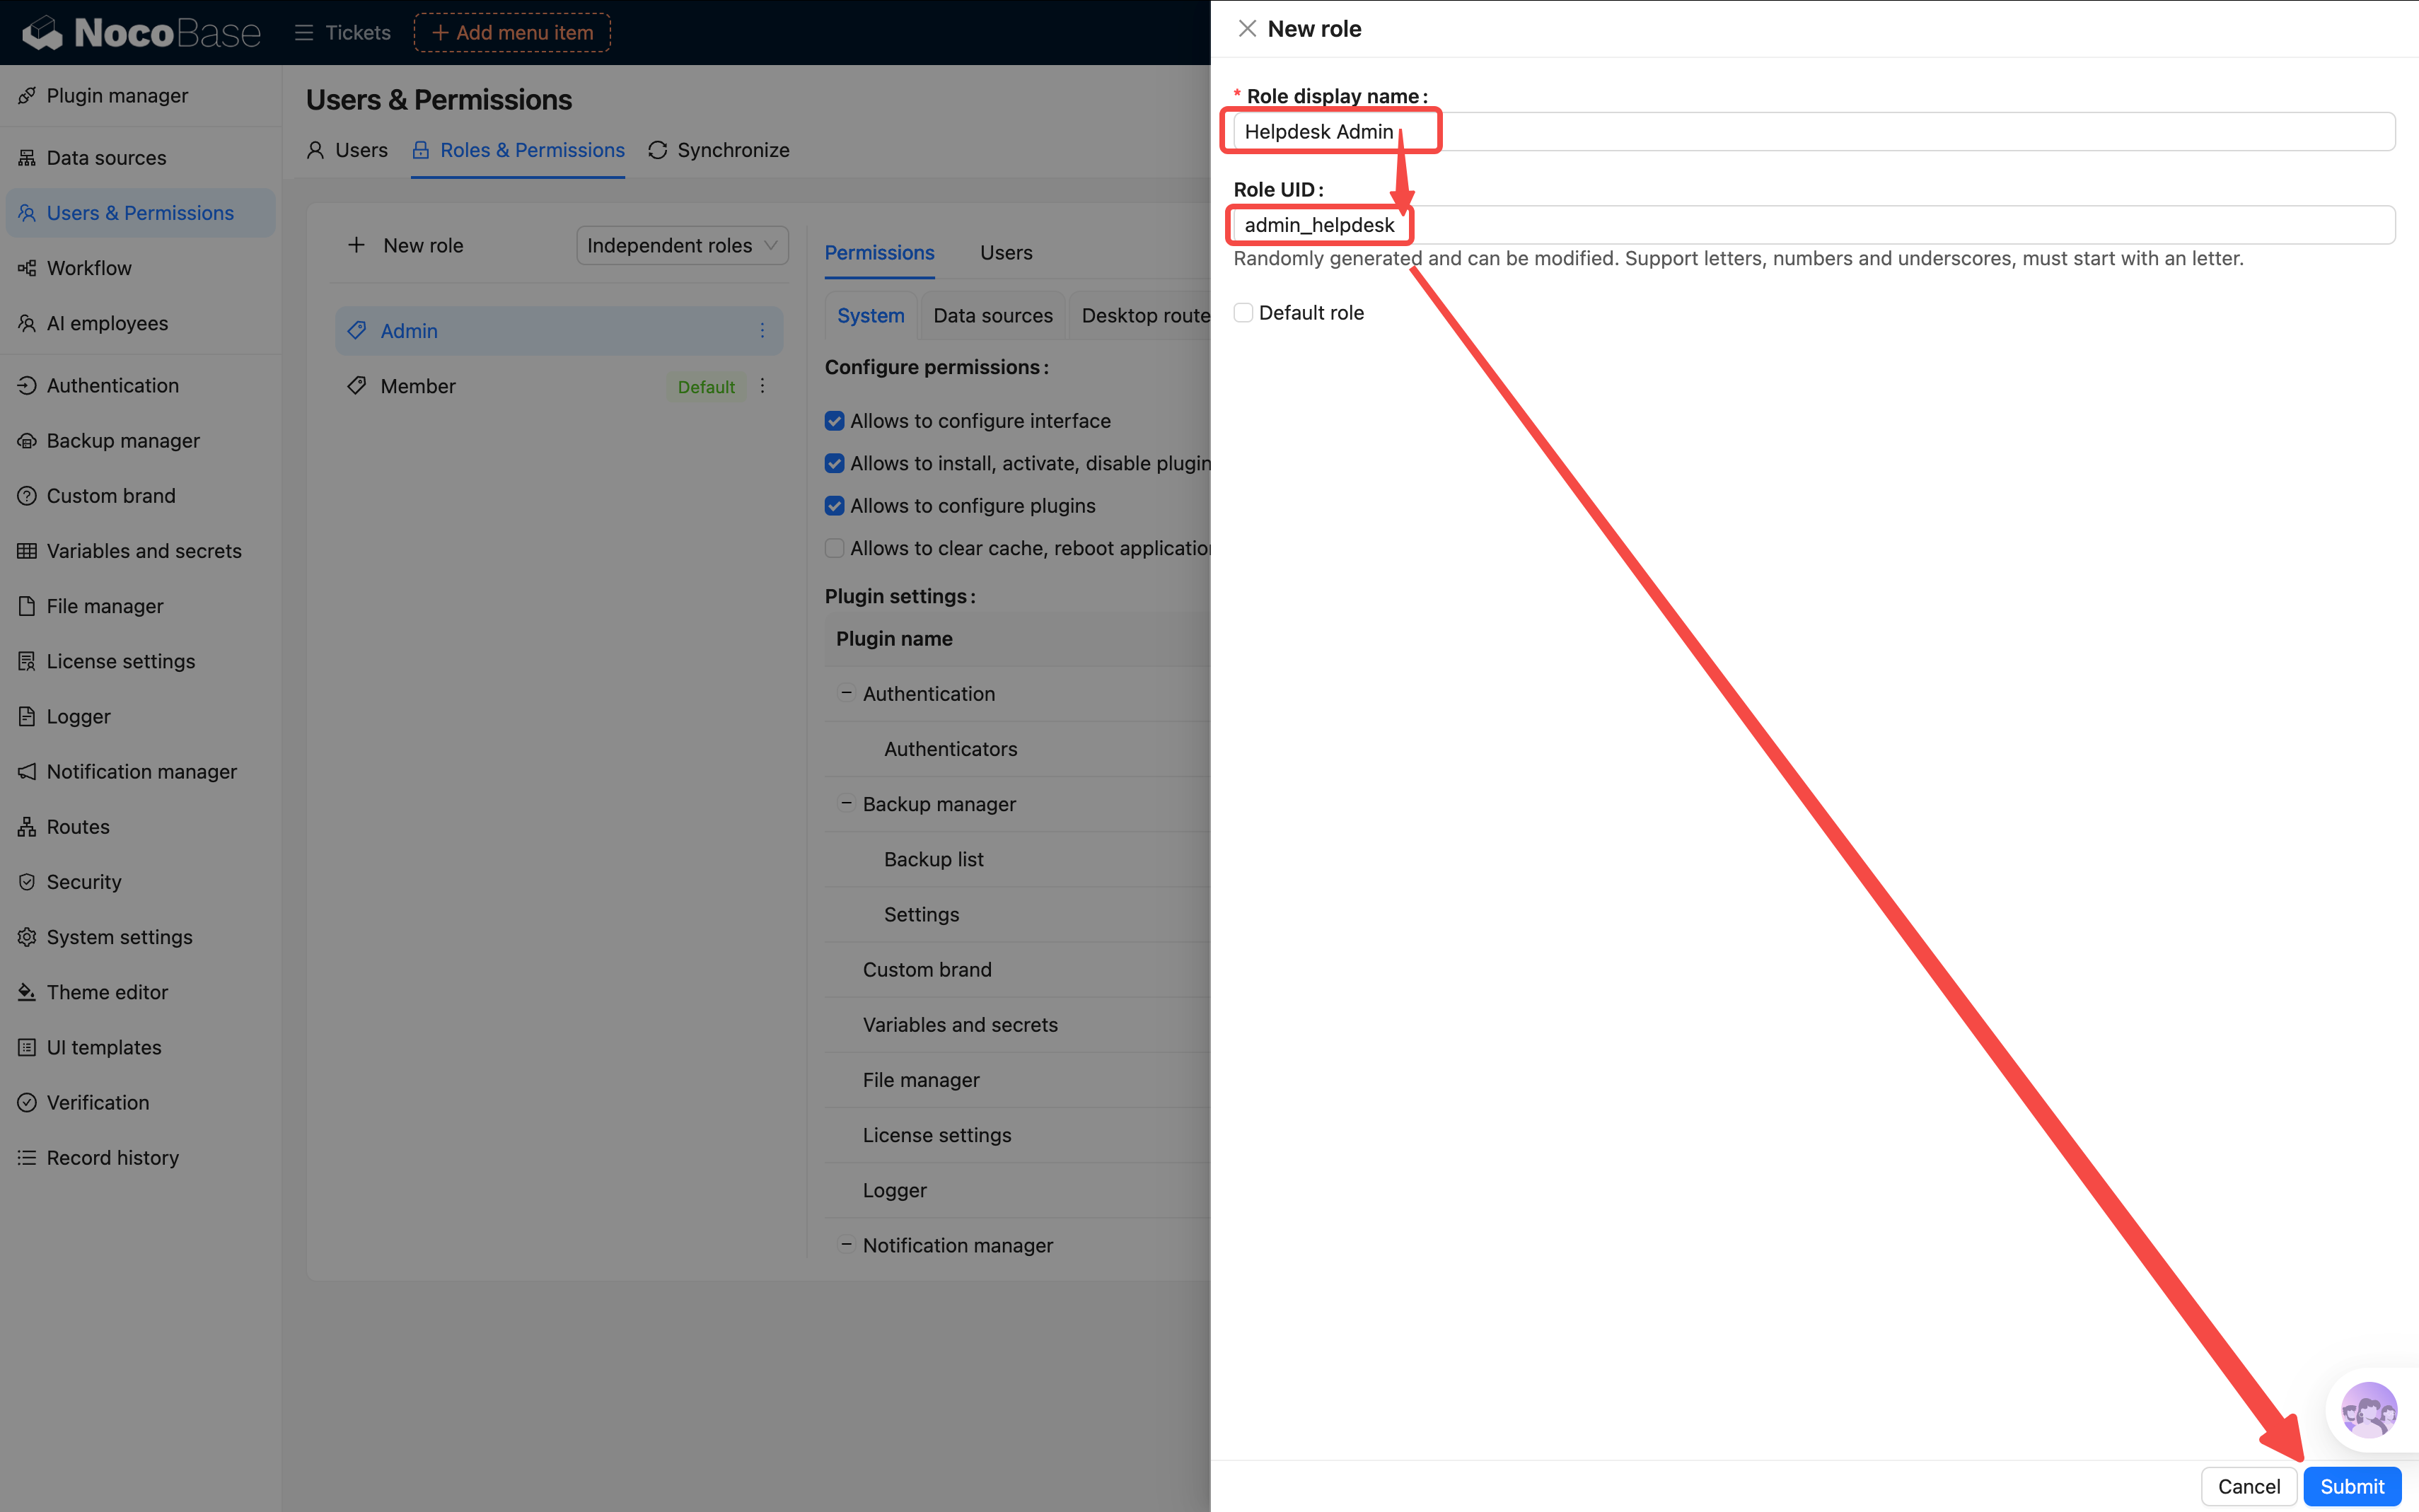
Click Add role and create the following roles one by one:
| Role Name | Role Key | Description |
|---|---|---|
| HelpDesk Admin | admin-helpdesk | Can see all tickets, manage categories, assign handlers |
| Technician | technician | Can only see tickets assigned to them, can process and close |
| Regular User | user | Can only submit tickets and view their own submissions |
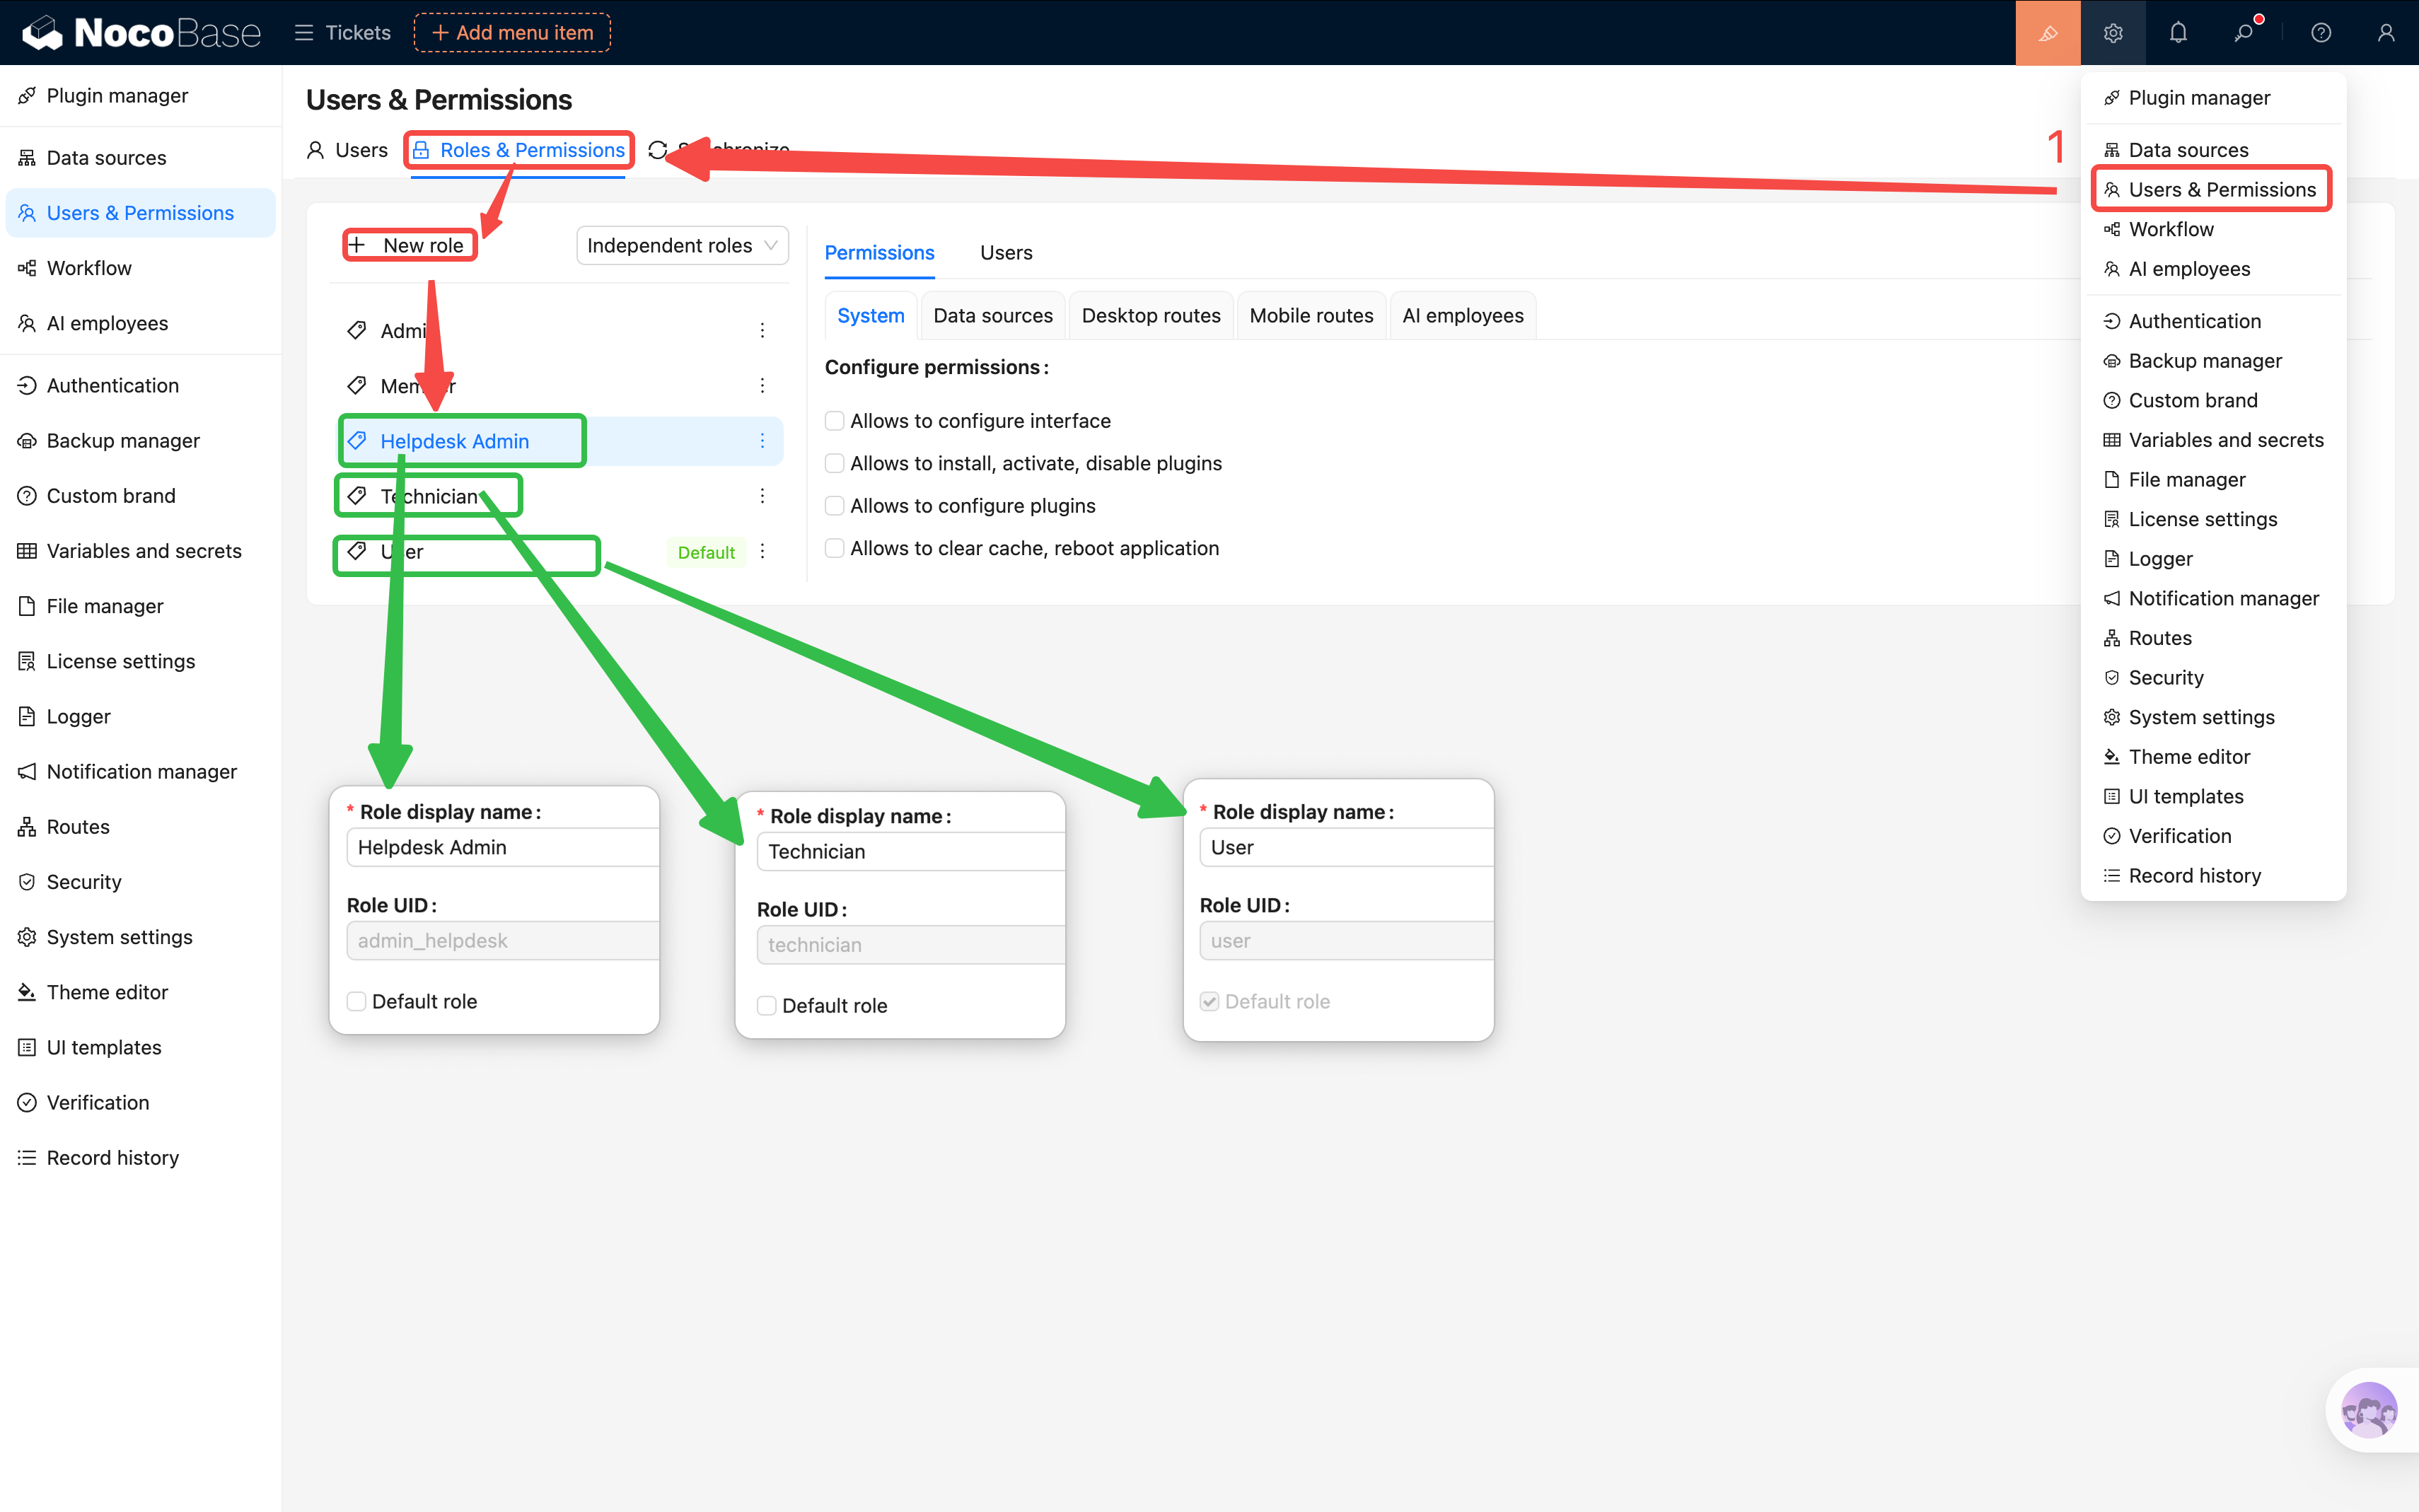
The Role Key is a unique internal ID used by the system. It cannot be changed after creation, so we recommend using lowercase English. The Role Name can be modified at any time.
After creation, you should see our three new roles in the roles list.
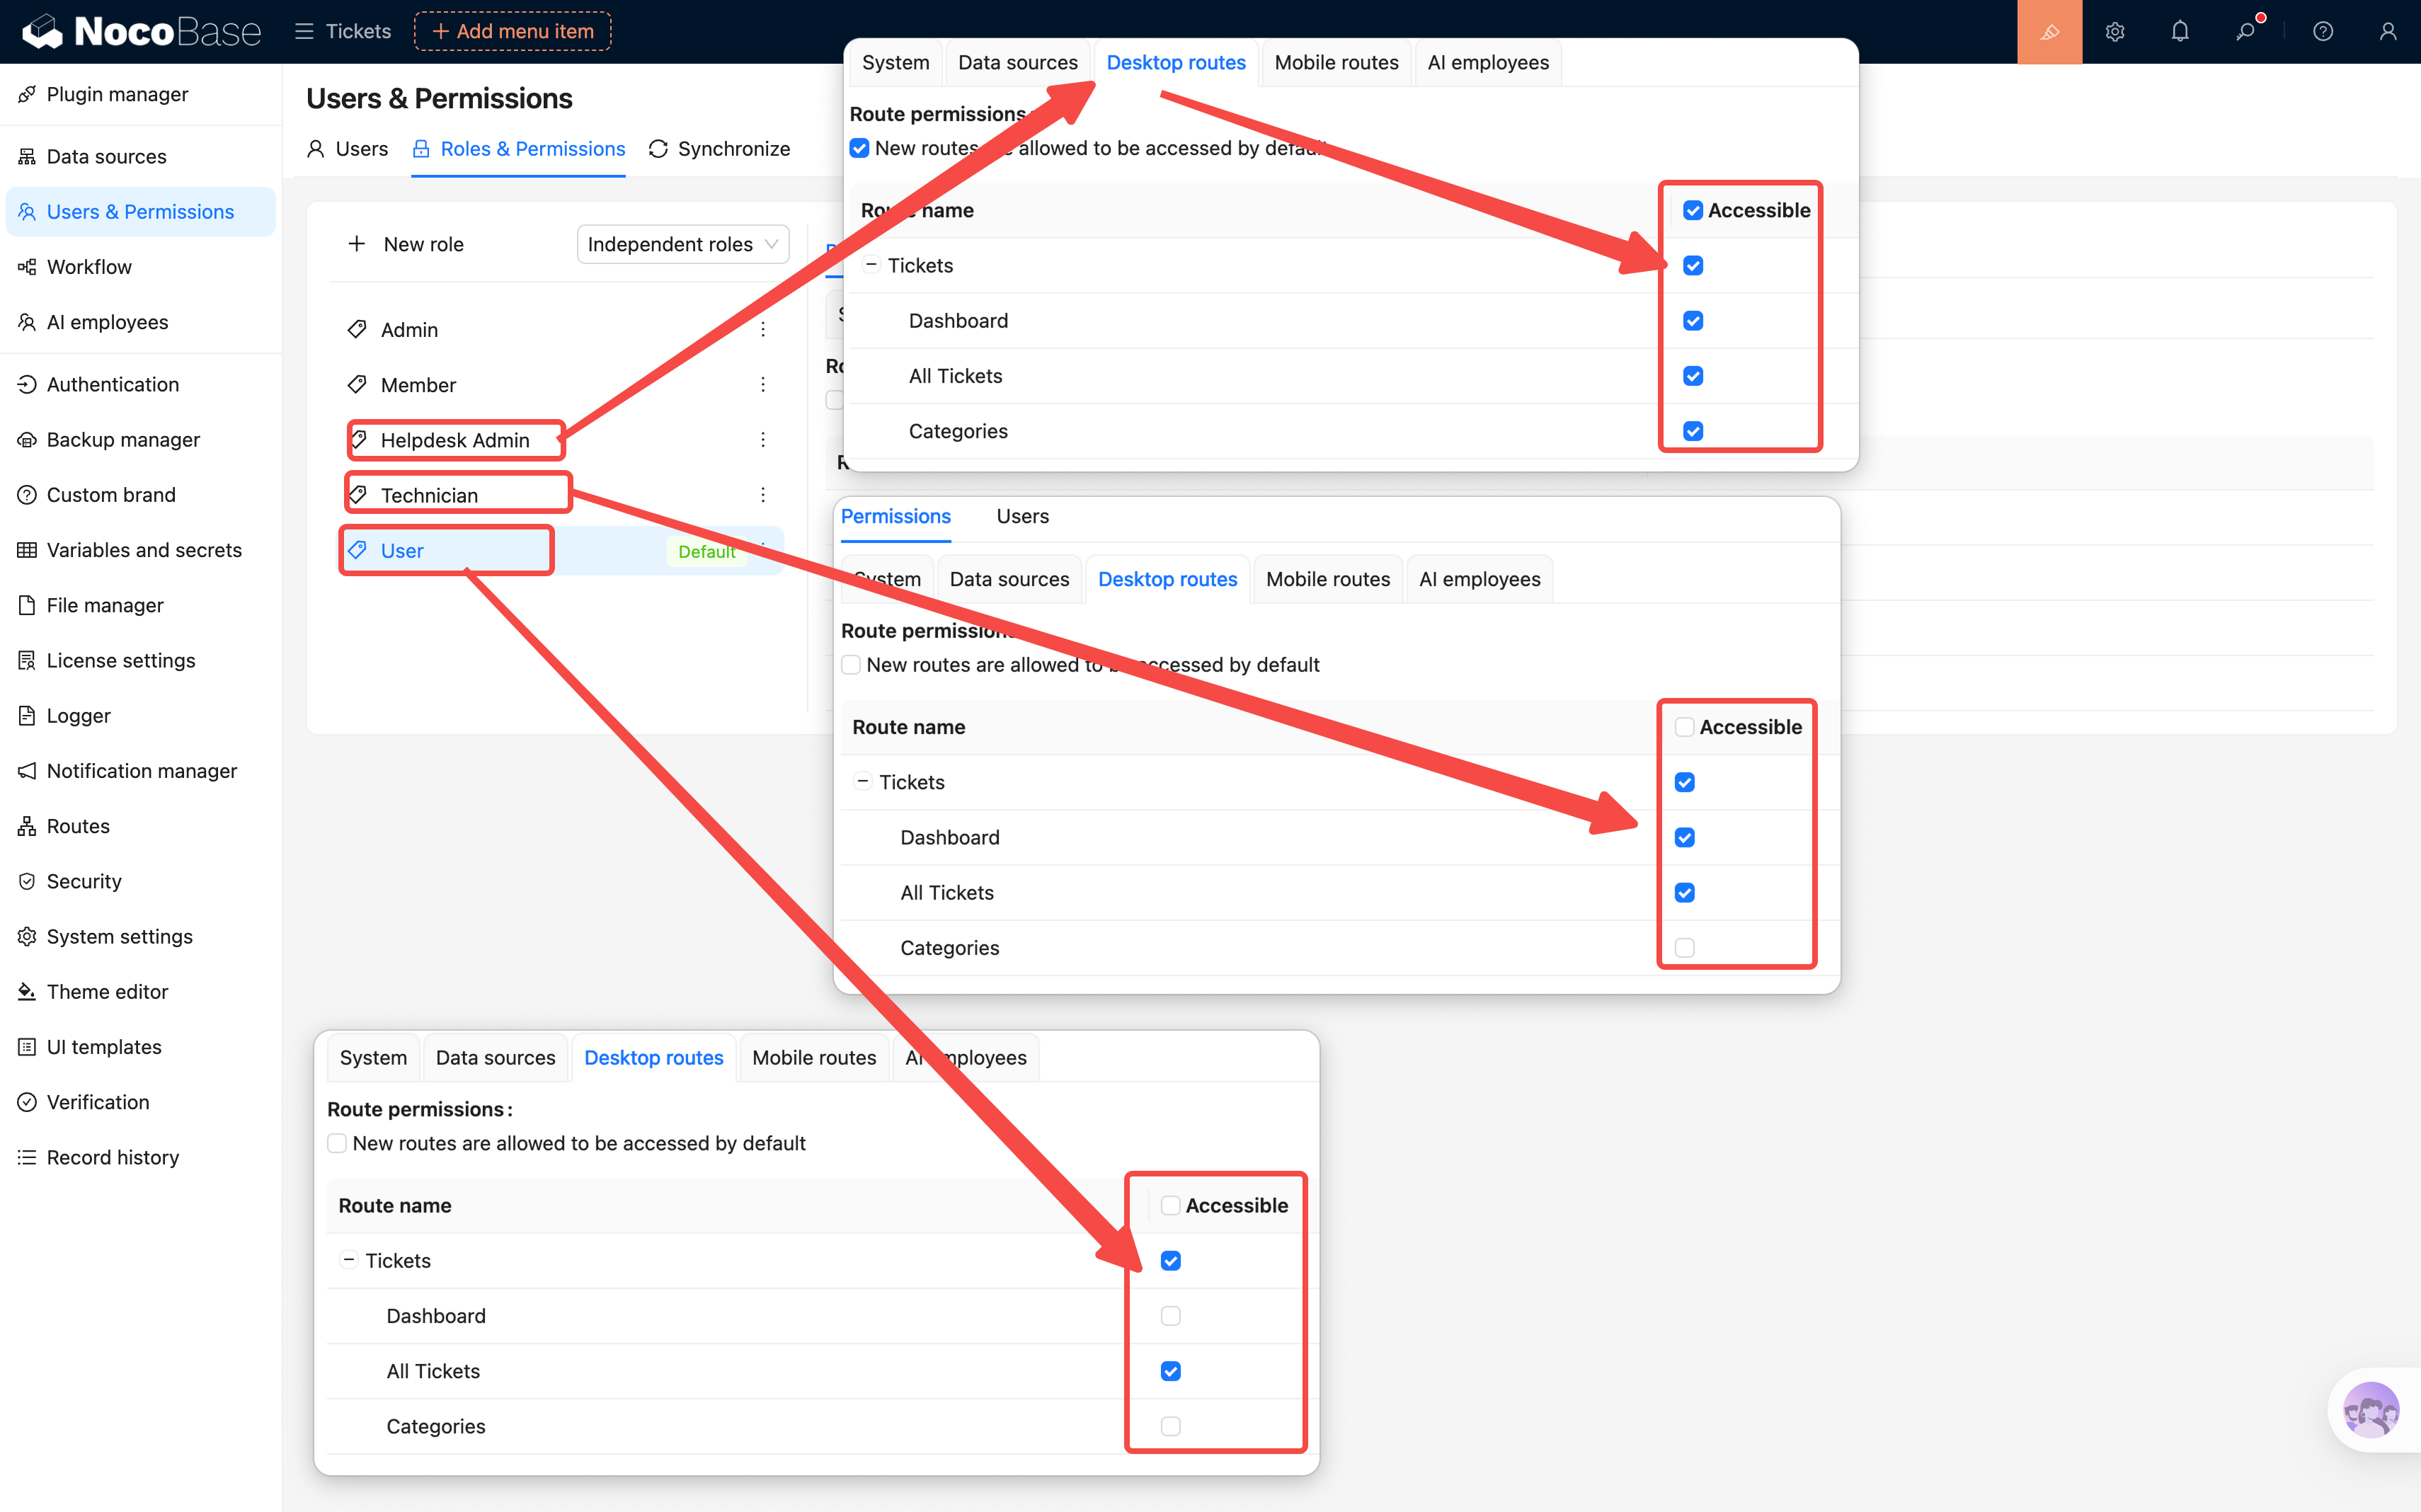
5.3 Configuring Menu Permissions
Now that the roles are set up, we need to tell the system which menus each role can access.
Click on a role to enter its permission configuration page, and find the Menu permissions tab. This lists all menu items in the system — check a box to allow access, uncheck it to hide it.
HelpDesk Admin (admin-helpdesk): Check all
- Tickets, Categories, Dashboard — all visible
Technician (technician): Partial access
- ✅ Tickets
- ✅ Dashboard
- ❌ Categories (technicians don't need to manage categories)
Regular User (user): Minimum permissions
- ✅ My Tickets (or the "Submit Ticket" page)
- ❌ Tickets
- ❌ Categories
- ❌ Dashboard
Tip: NocoBase has a handy setting — "Allow access to new menu items by default." If you don't want to manually check every new page you add, you can enable this for the admin role. For the regular user role, we recommend keeping it disabled.
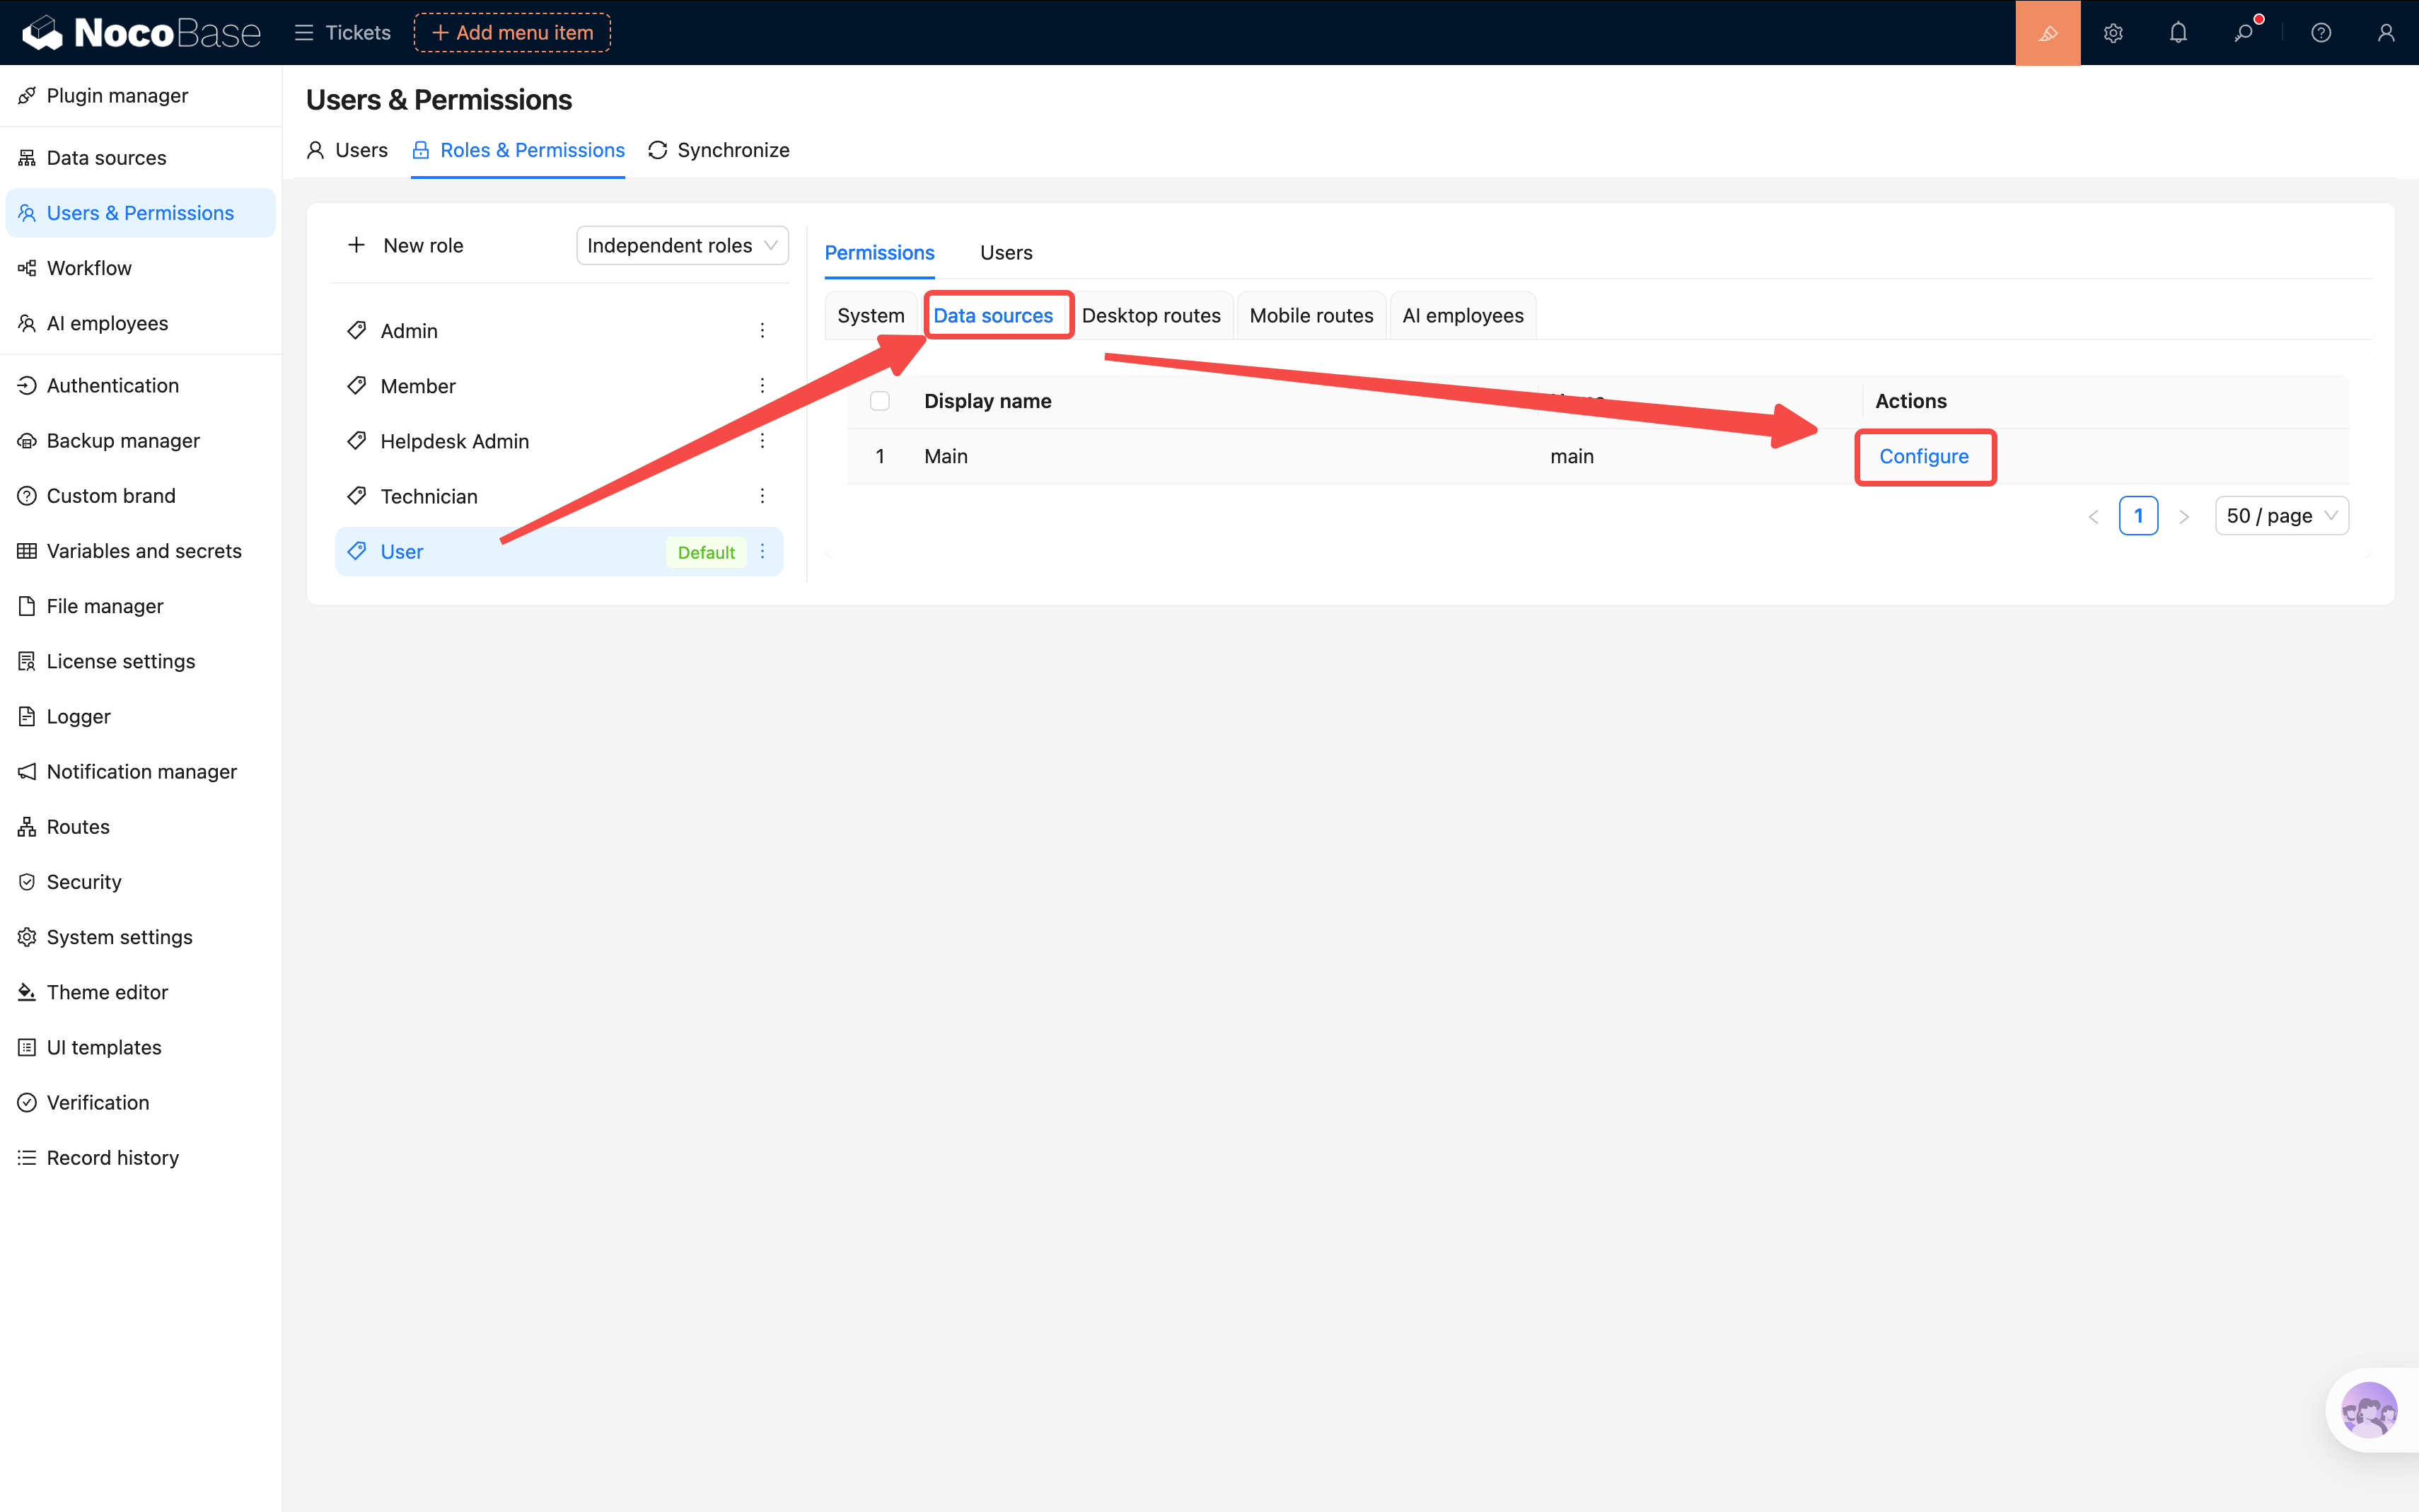
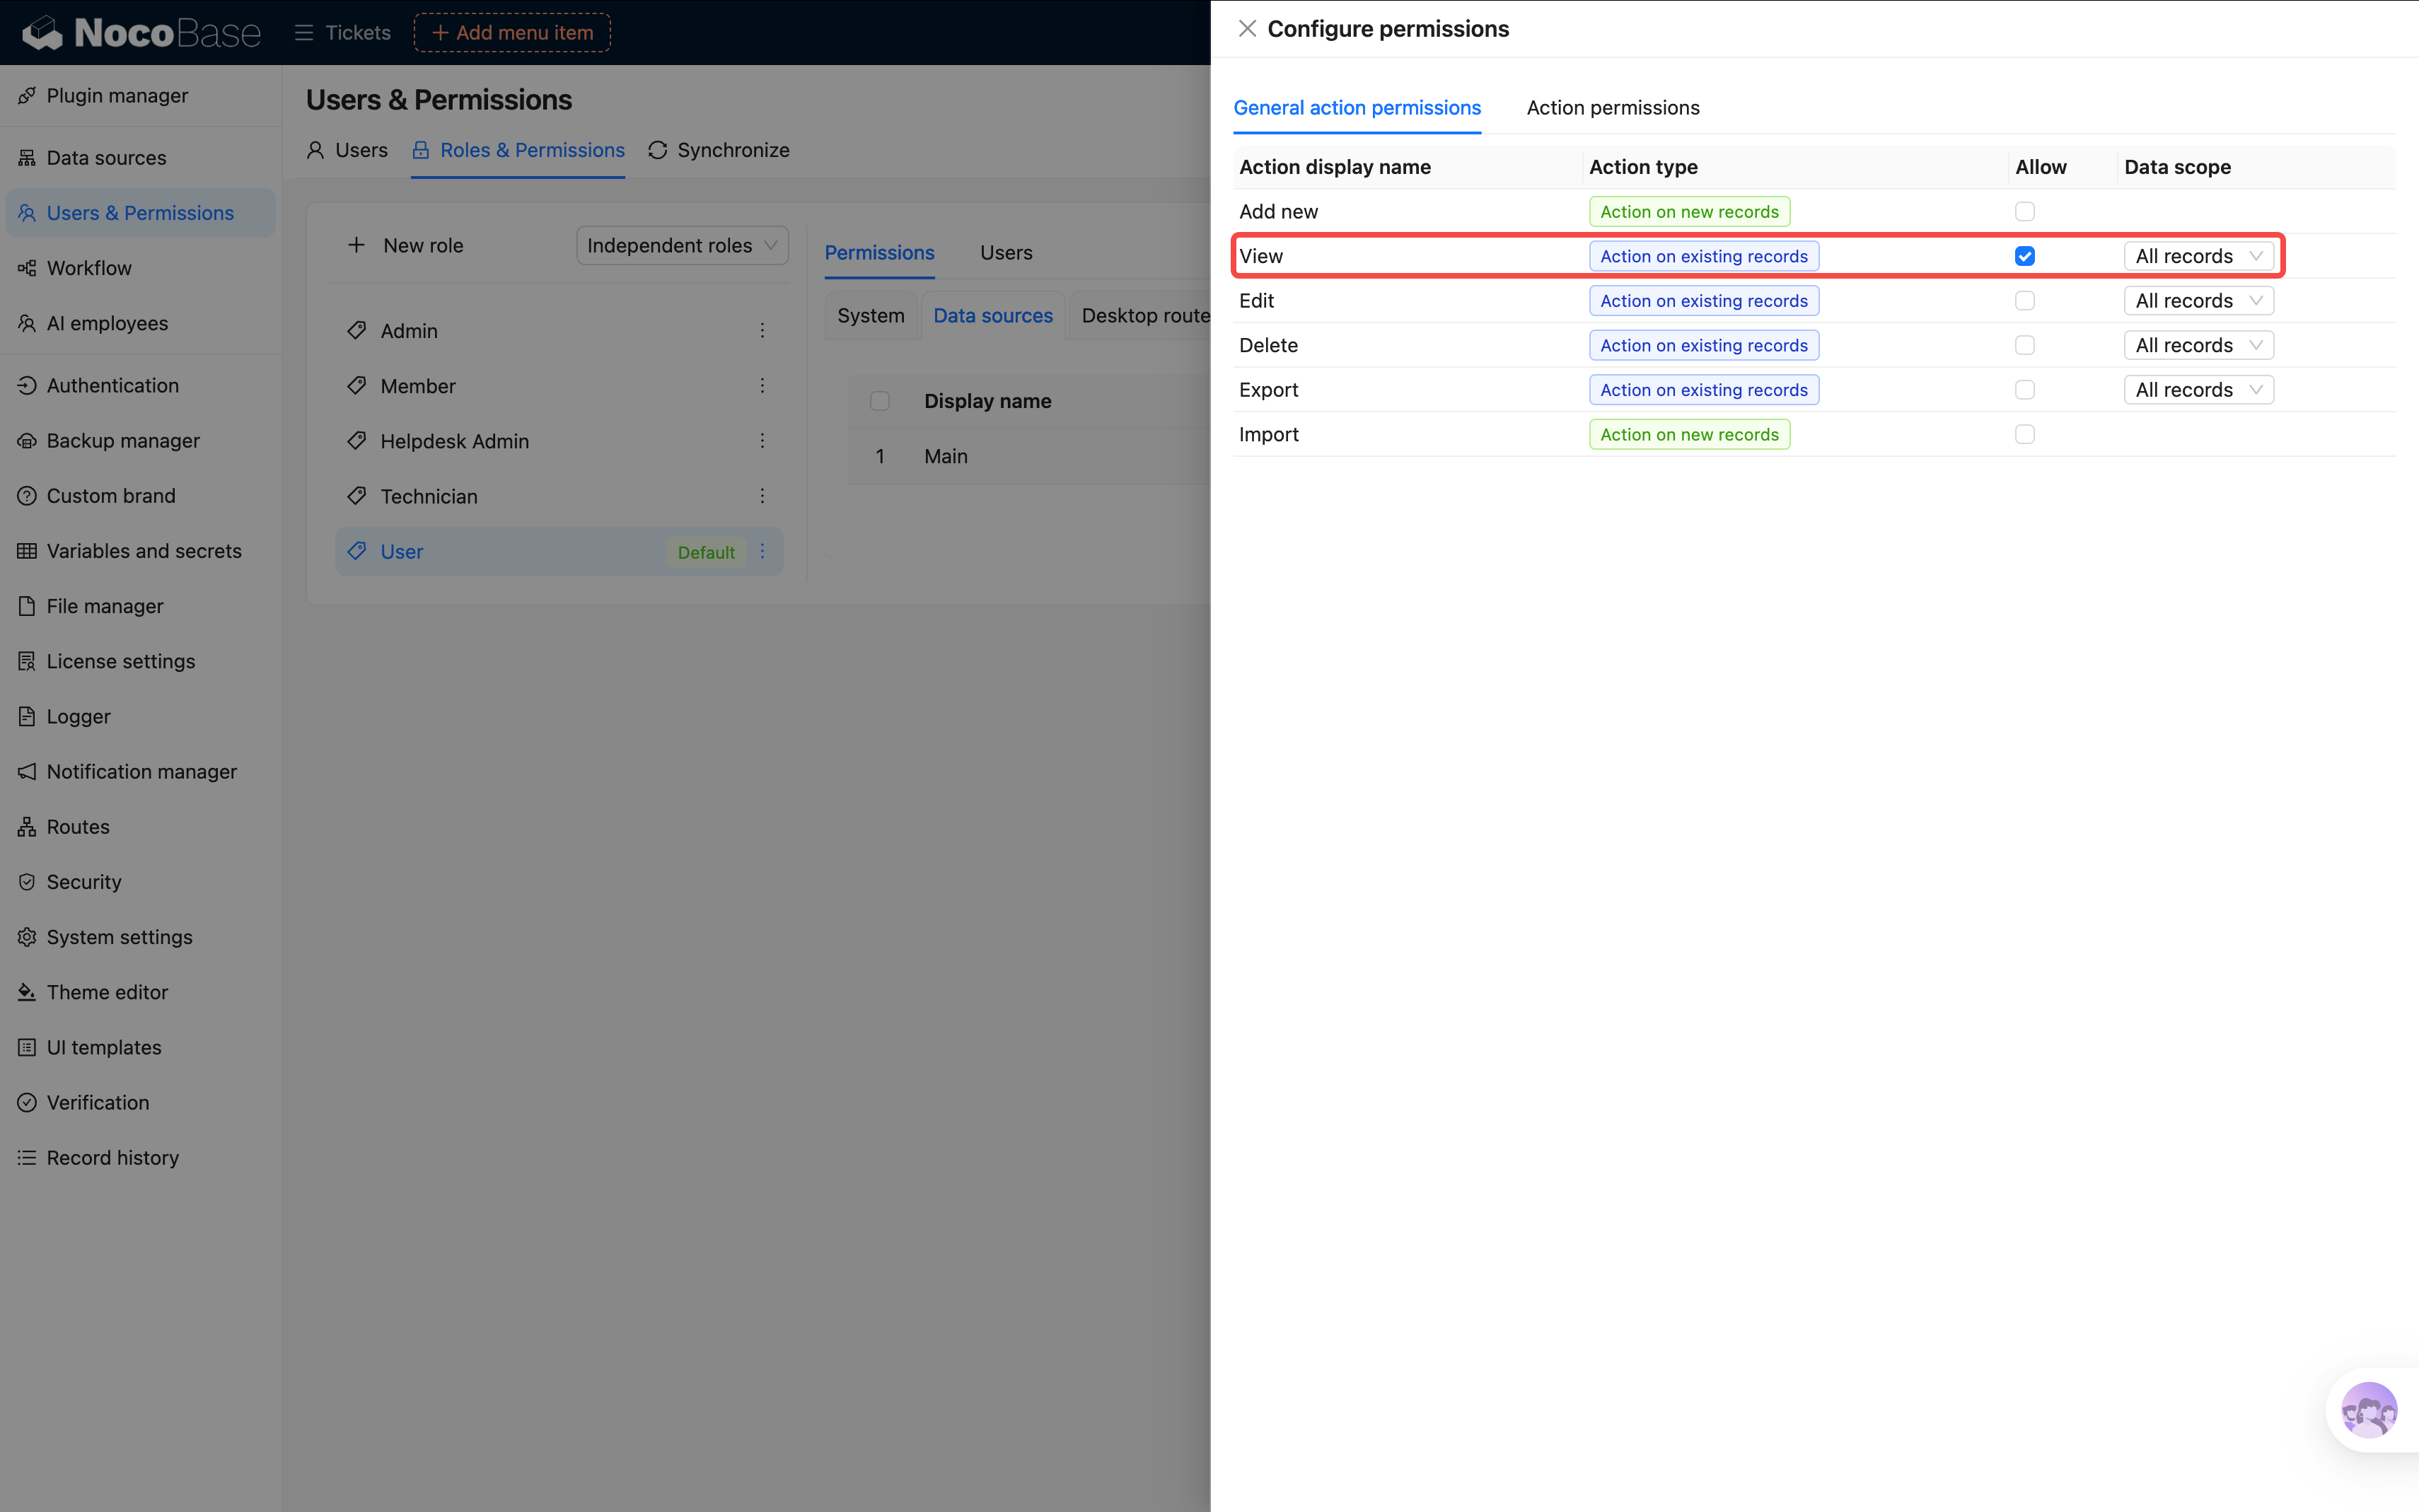
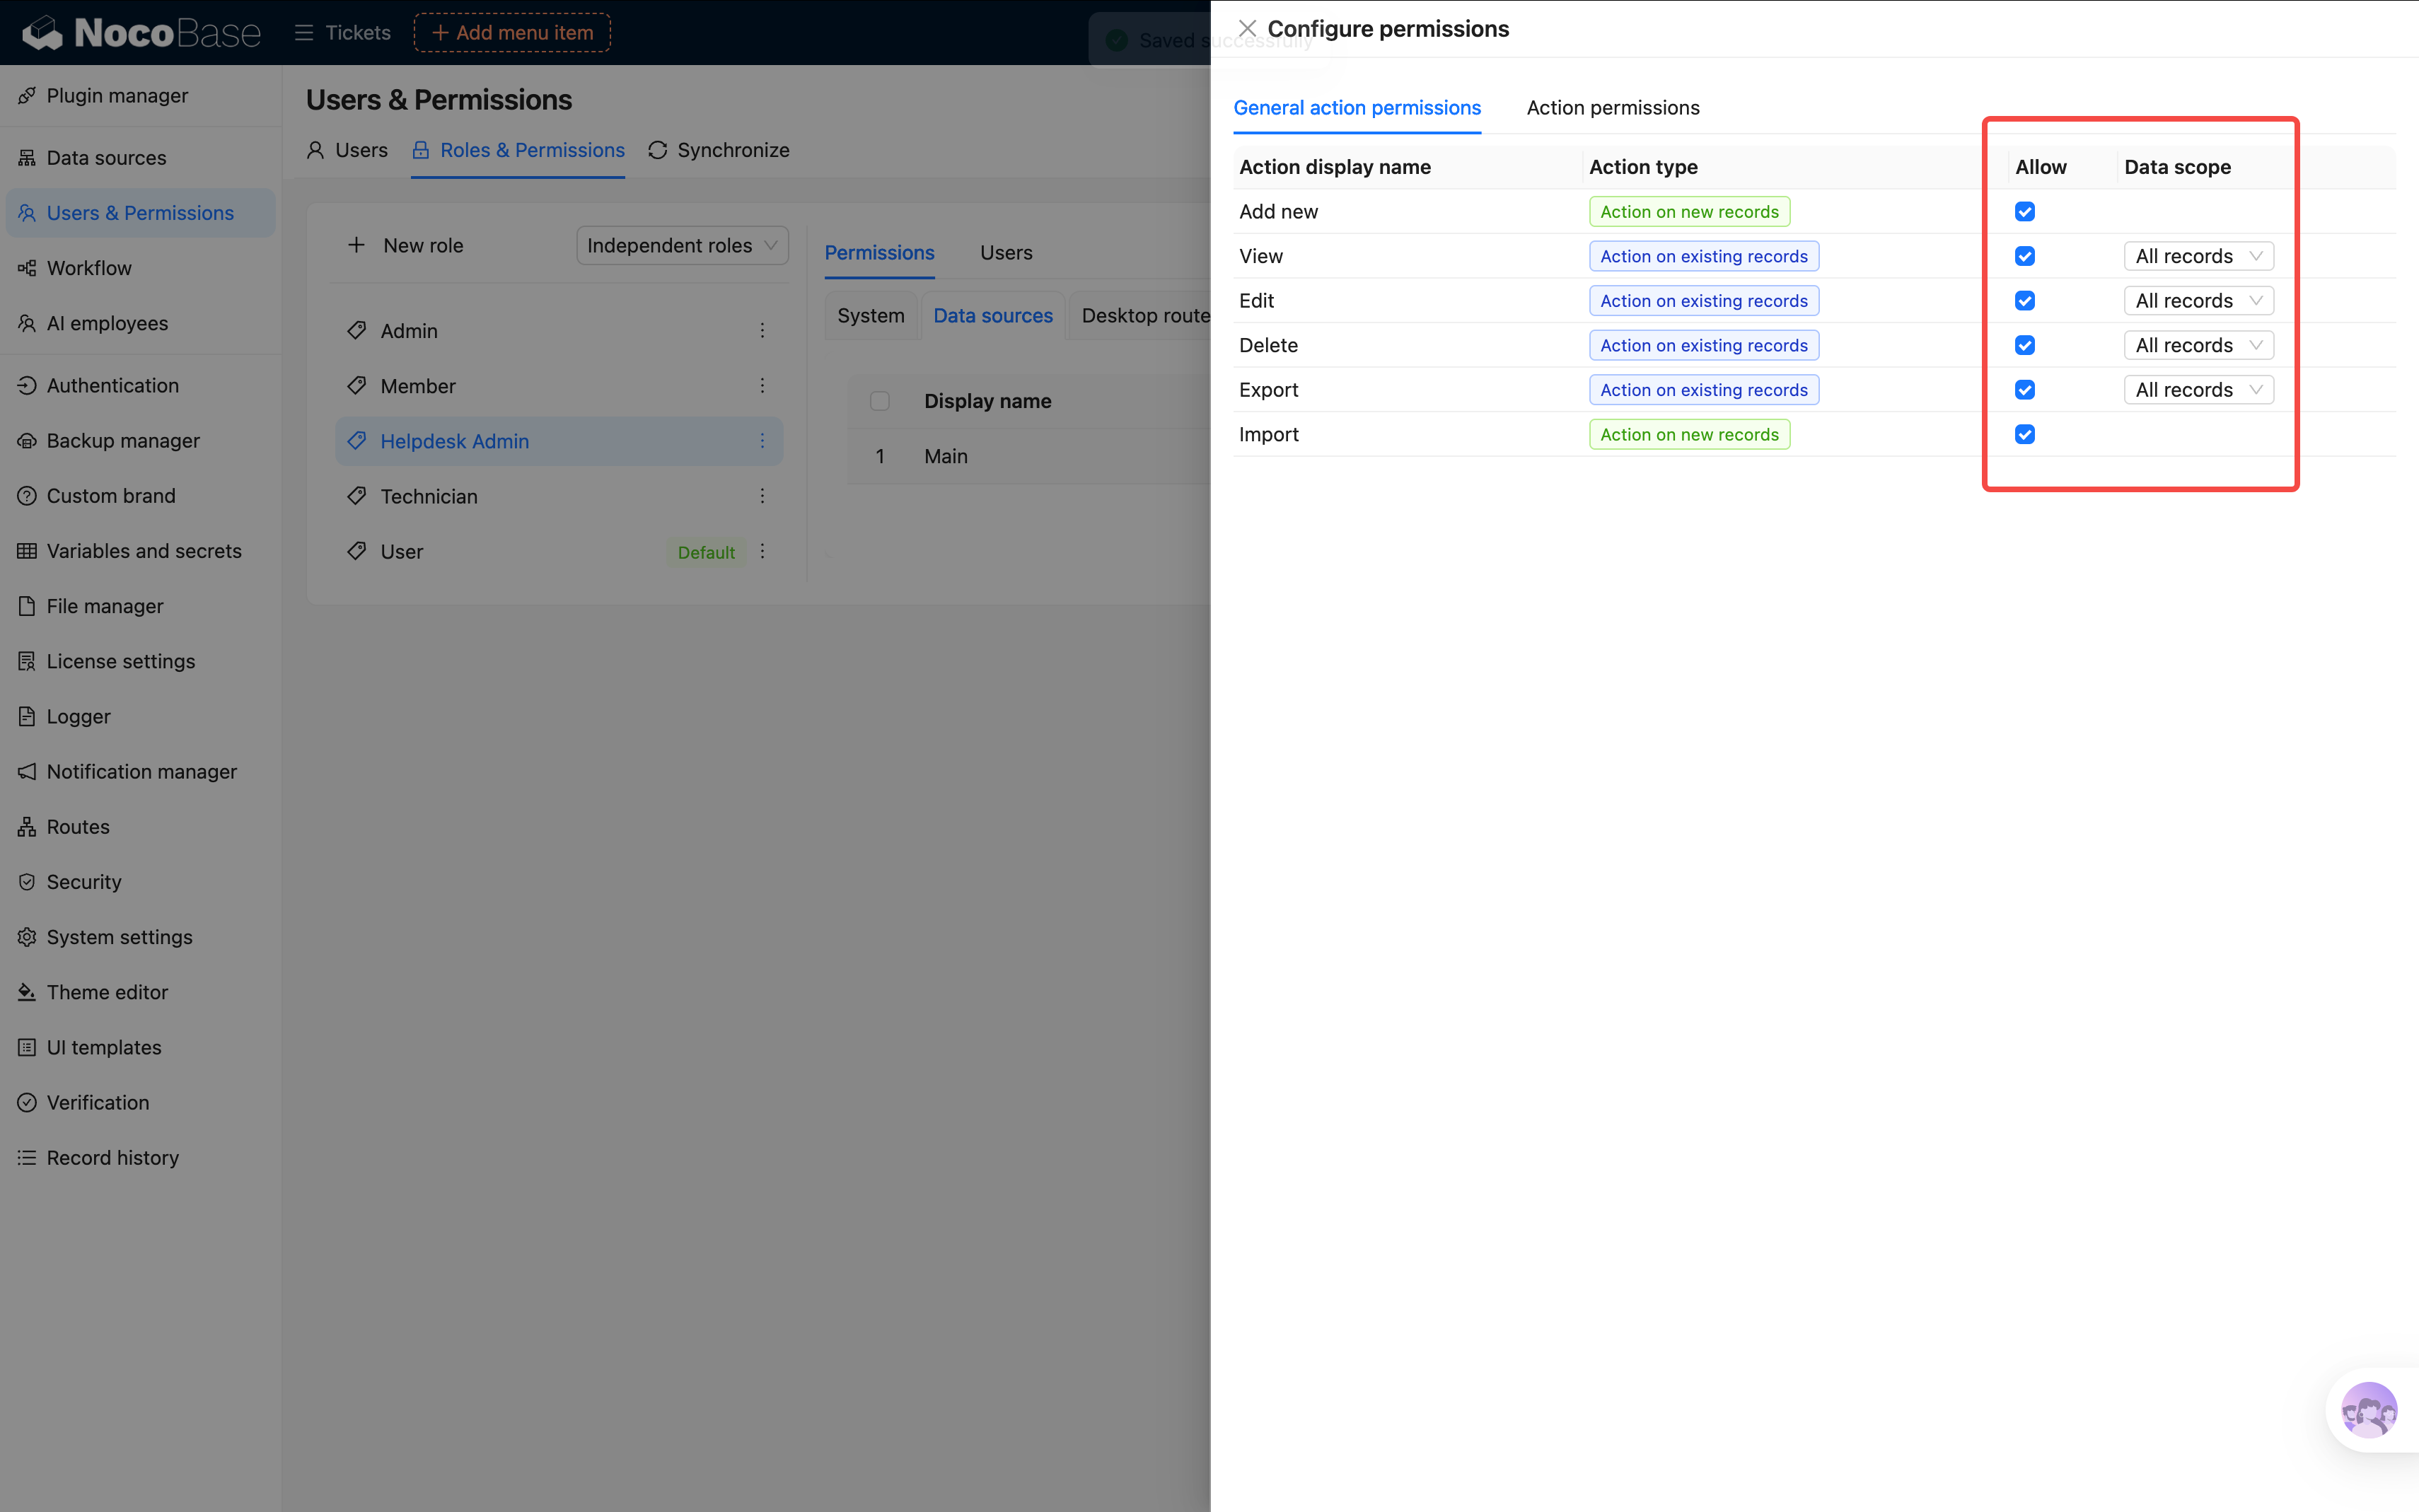
5.4 Configuring Data Permissions
Menu permissions control "can I access this page?" while data permissions control "what data can I see once I'm on the page?"
Key concept: Data Scope.
In the role's permission settings, switch to the Action permissions tab. Find our "Tickets" collection and click to configure it individually.
Regular User: Only See Their Own Tickets
- Find the View permission for the "Tickets" collection
- Set the data scope to Own records
- This way, regular users can only see tickets where they are the creator (note: the default "Own records" is based on the system creator field, not the Submitter field, but this can be changed)
Similarly, set the "Edit" and "Delete" permissions to Own records as well (or simply don't grant delete permission at all).
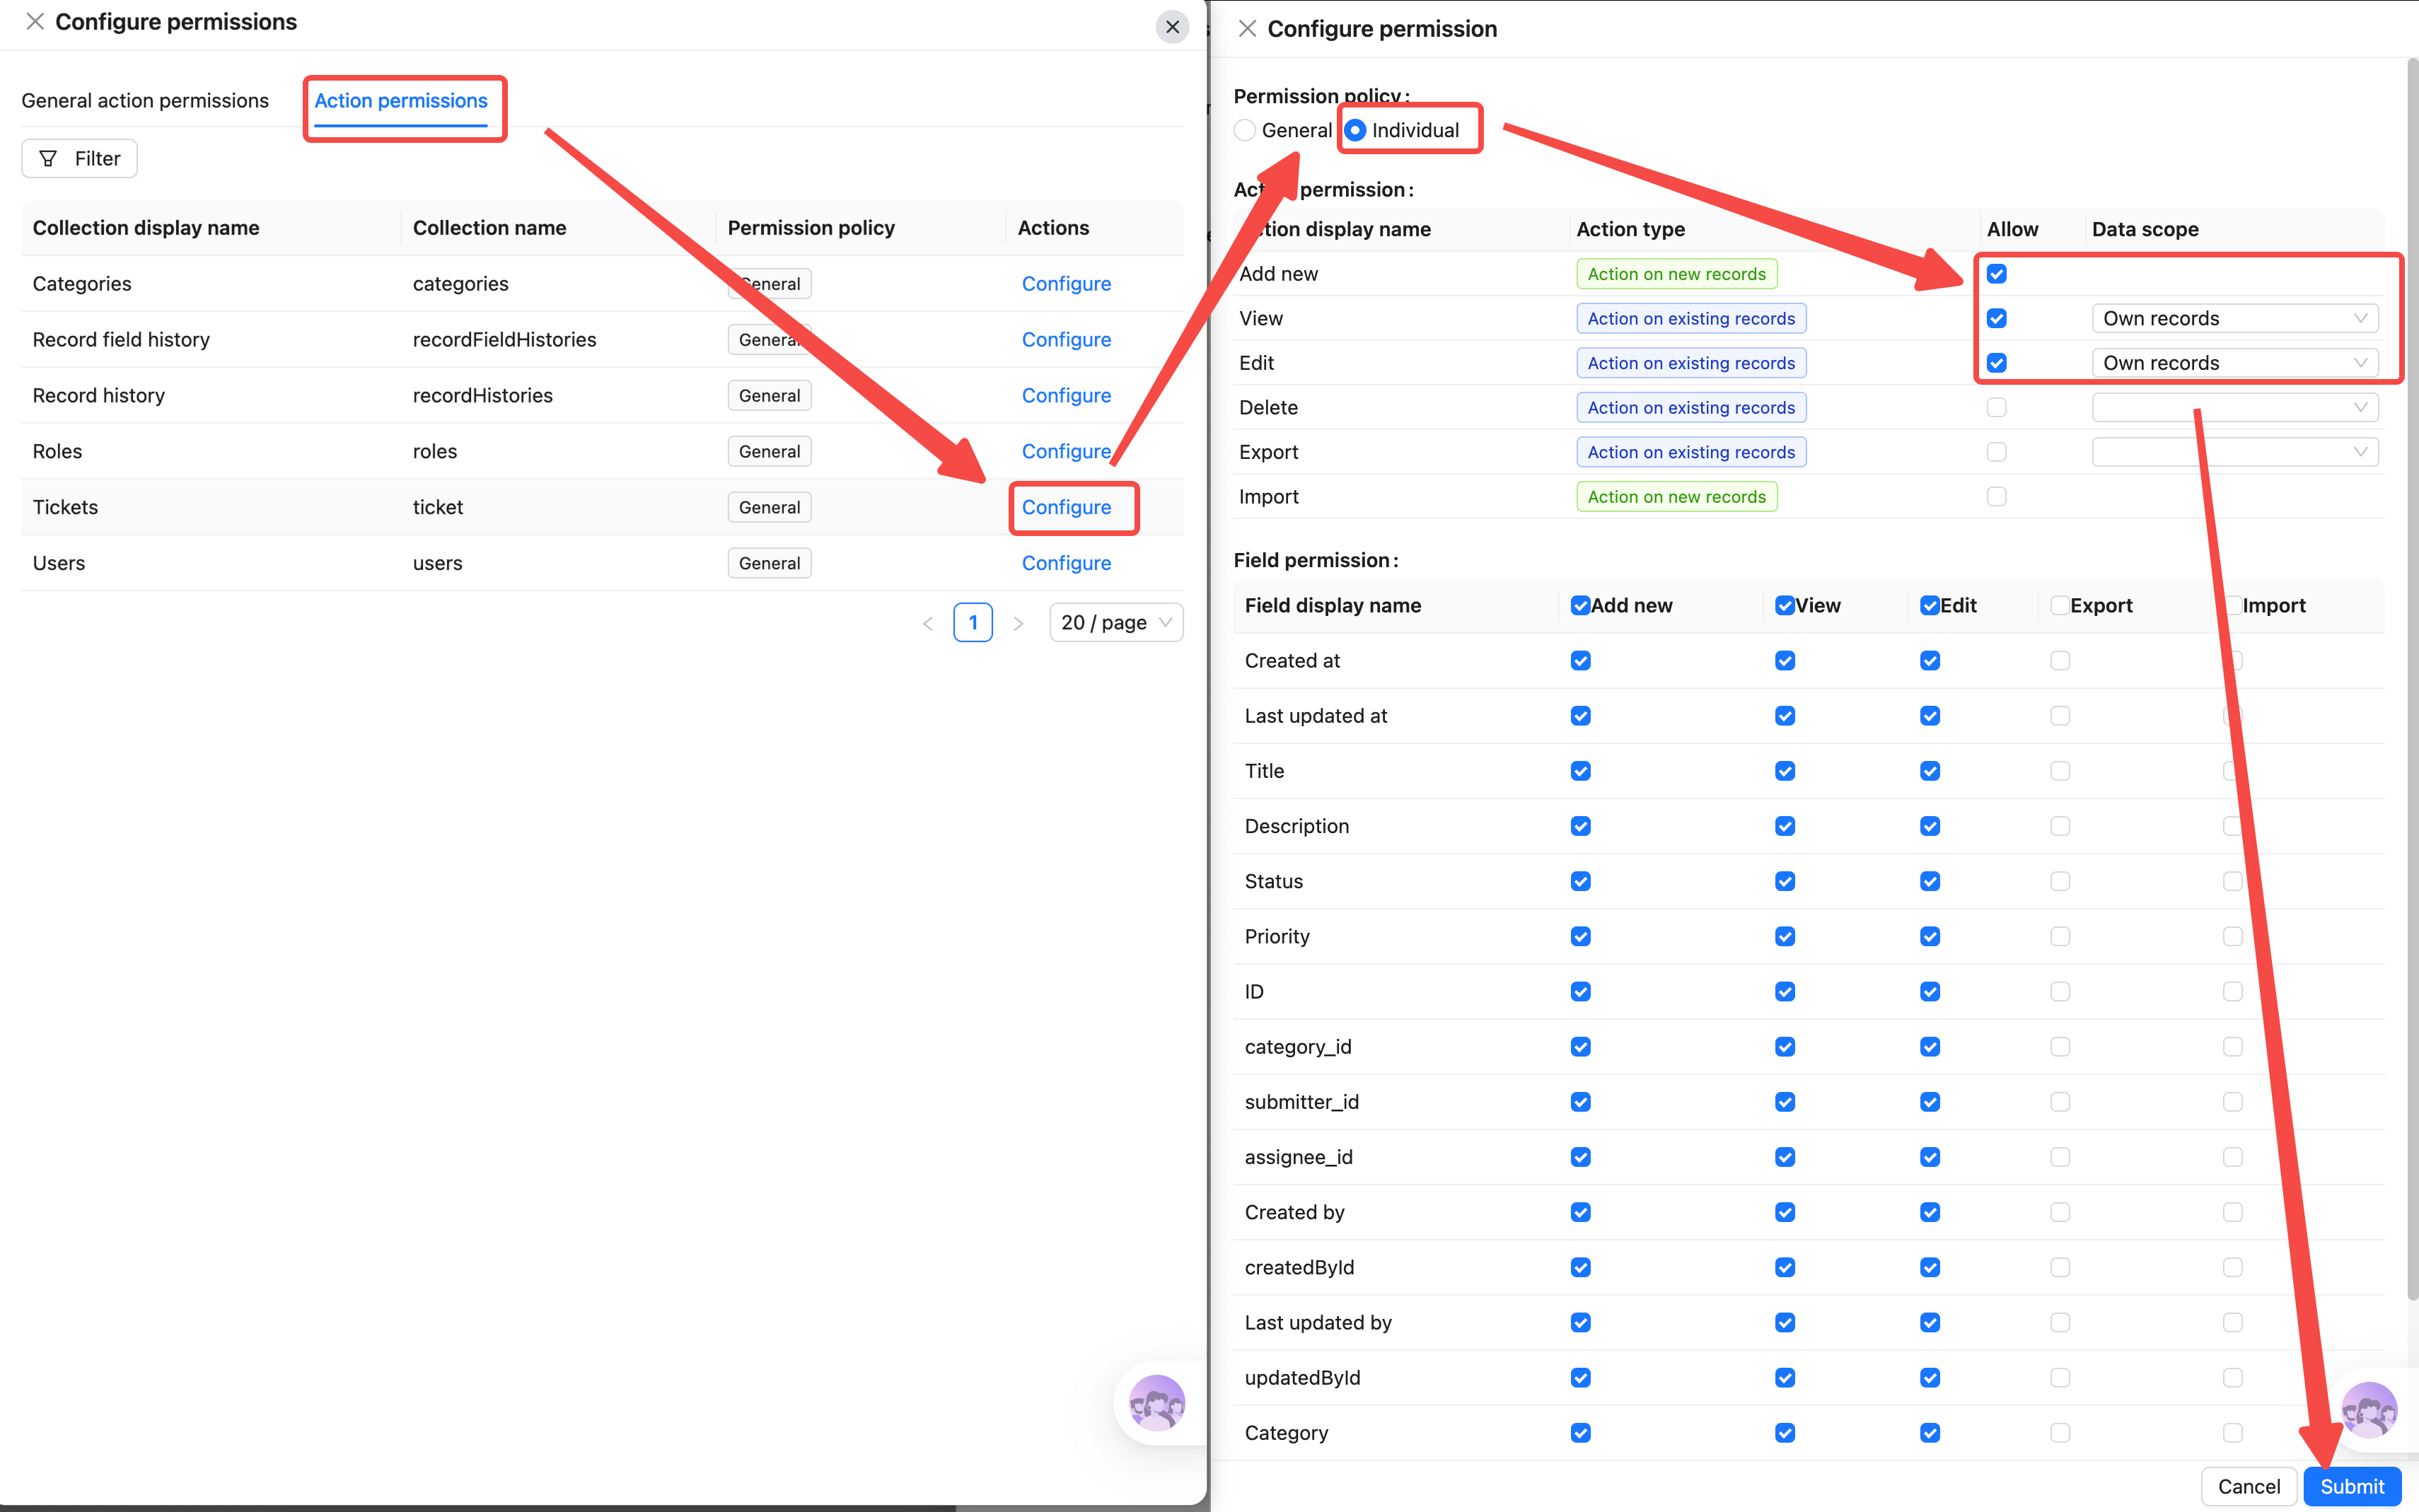
About global configuration: if you only configure the Tickets collection, other data and settings (like categories, assignees) may become invisible. Since our system is fairly simple, we'll check "View all data" globally for now, and only set specific data scopes for sensitive collections.
Technician: Only See Tickets Assigned to Them
- Find the View permission for the "Tickets" collection
- Set the data scope to Own records
- There's a nuance here — NocoBase's "Own records" filters by creator by default. If we want to filter by "Assignee" instead, we can further adjust this in the global operation permissions, or achieve it on the frontend by setting filter conditions on the data block
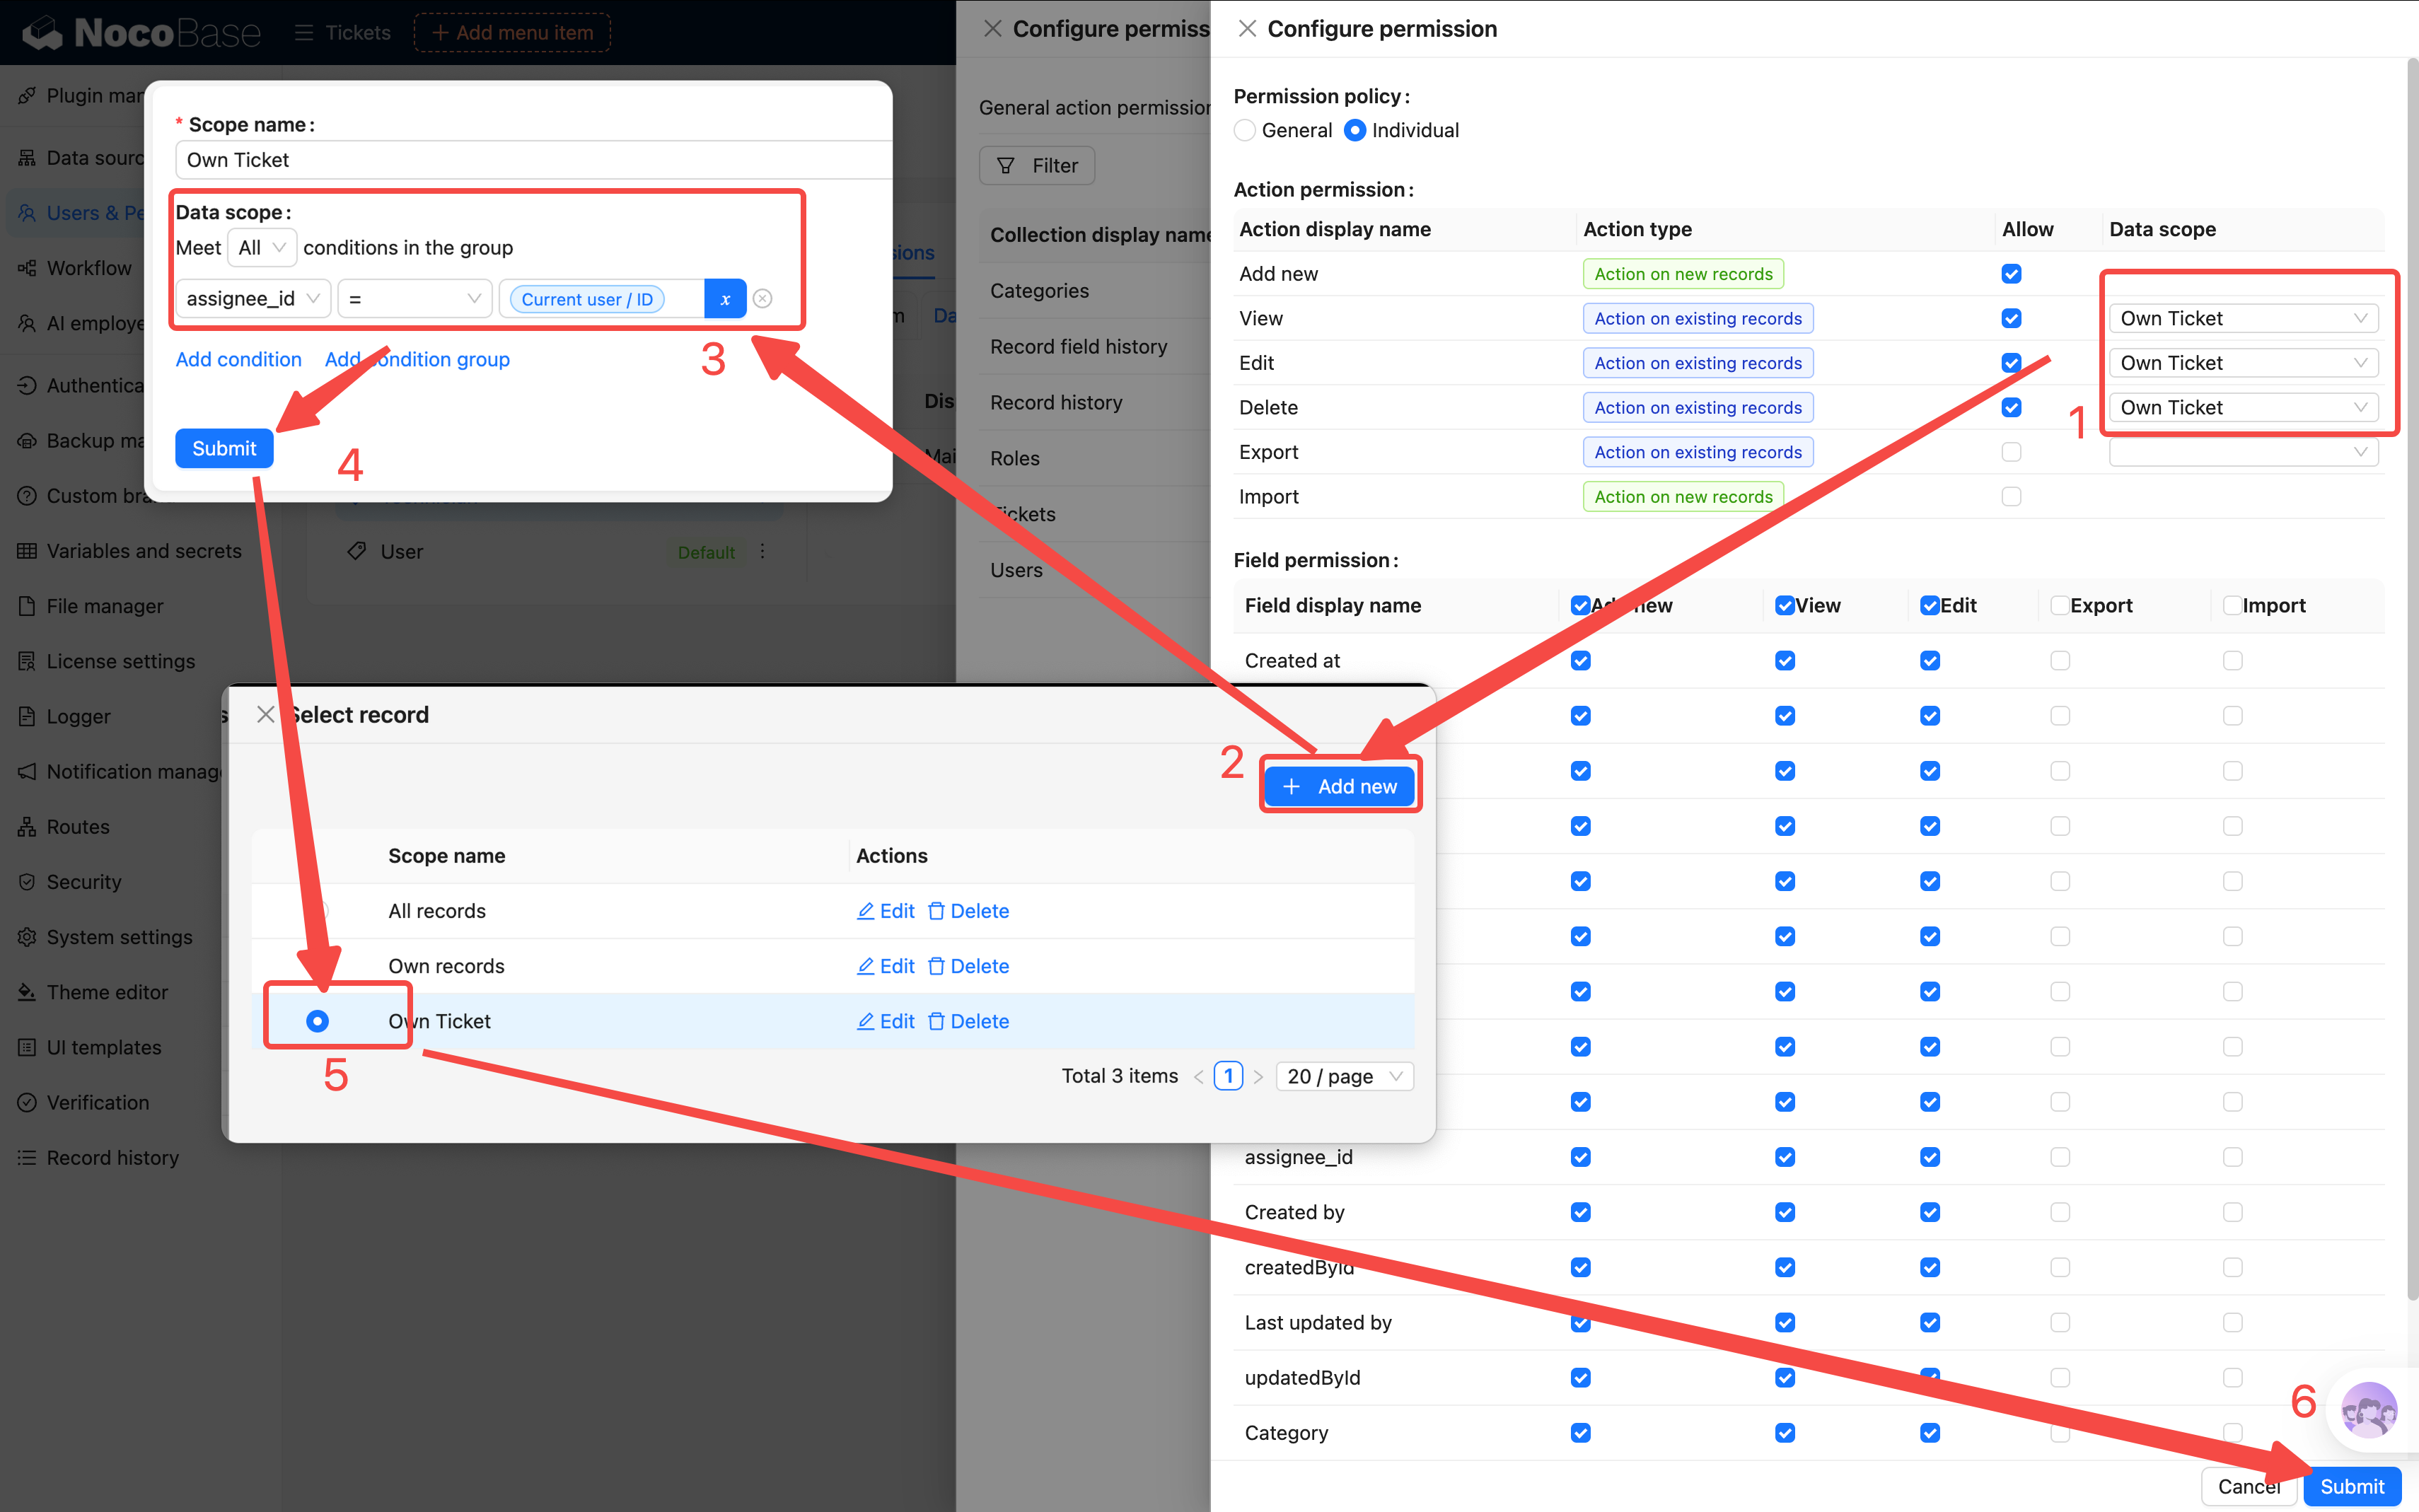
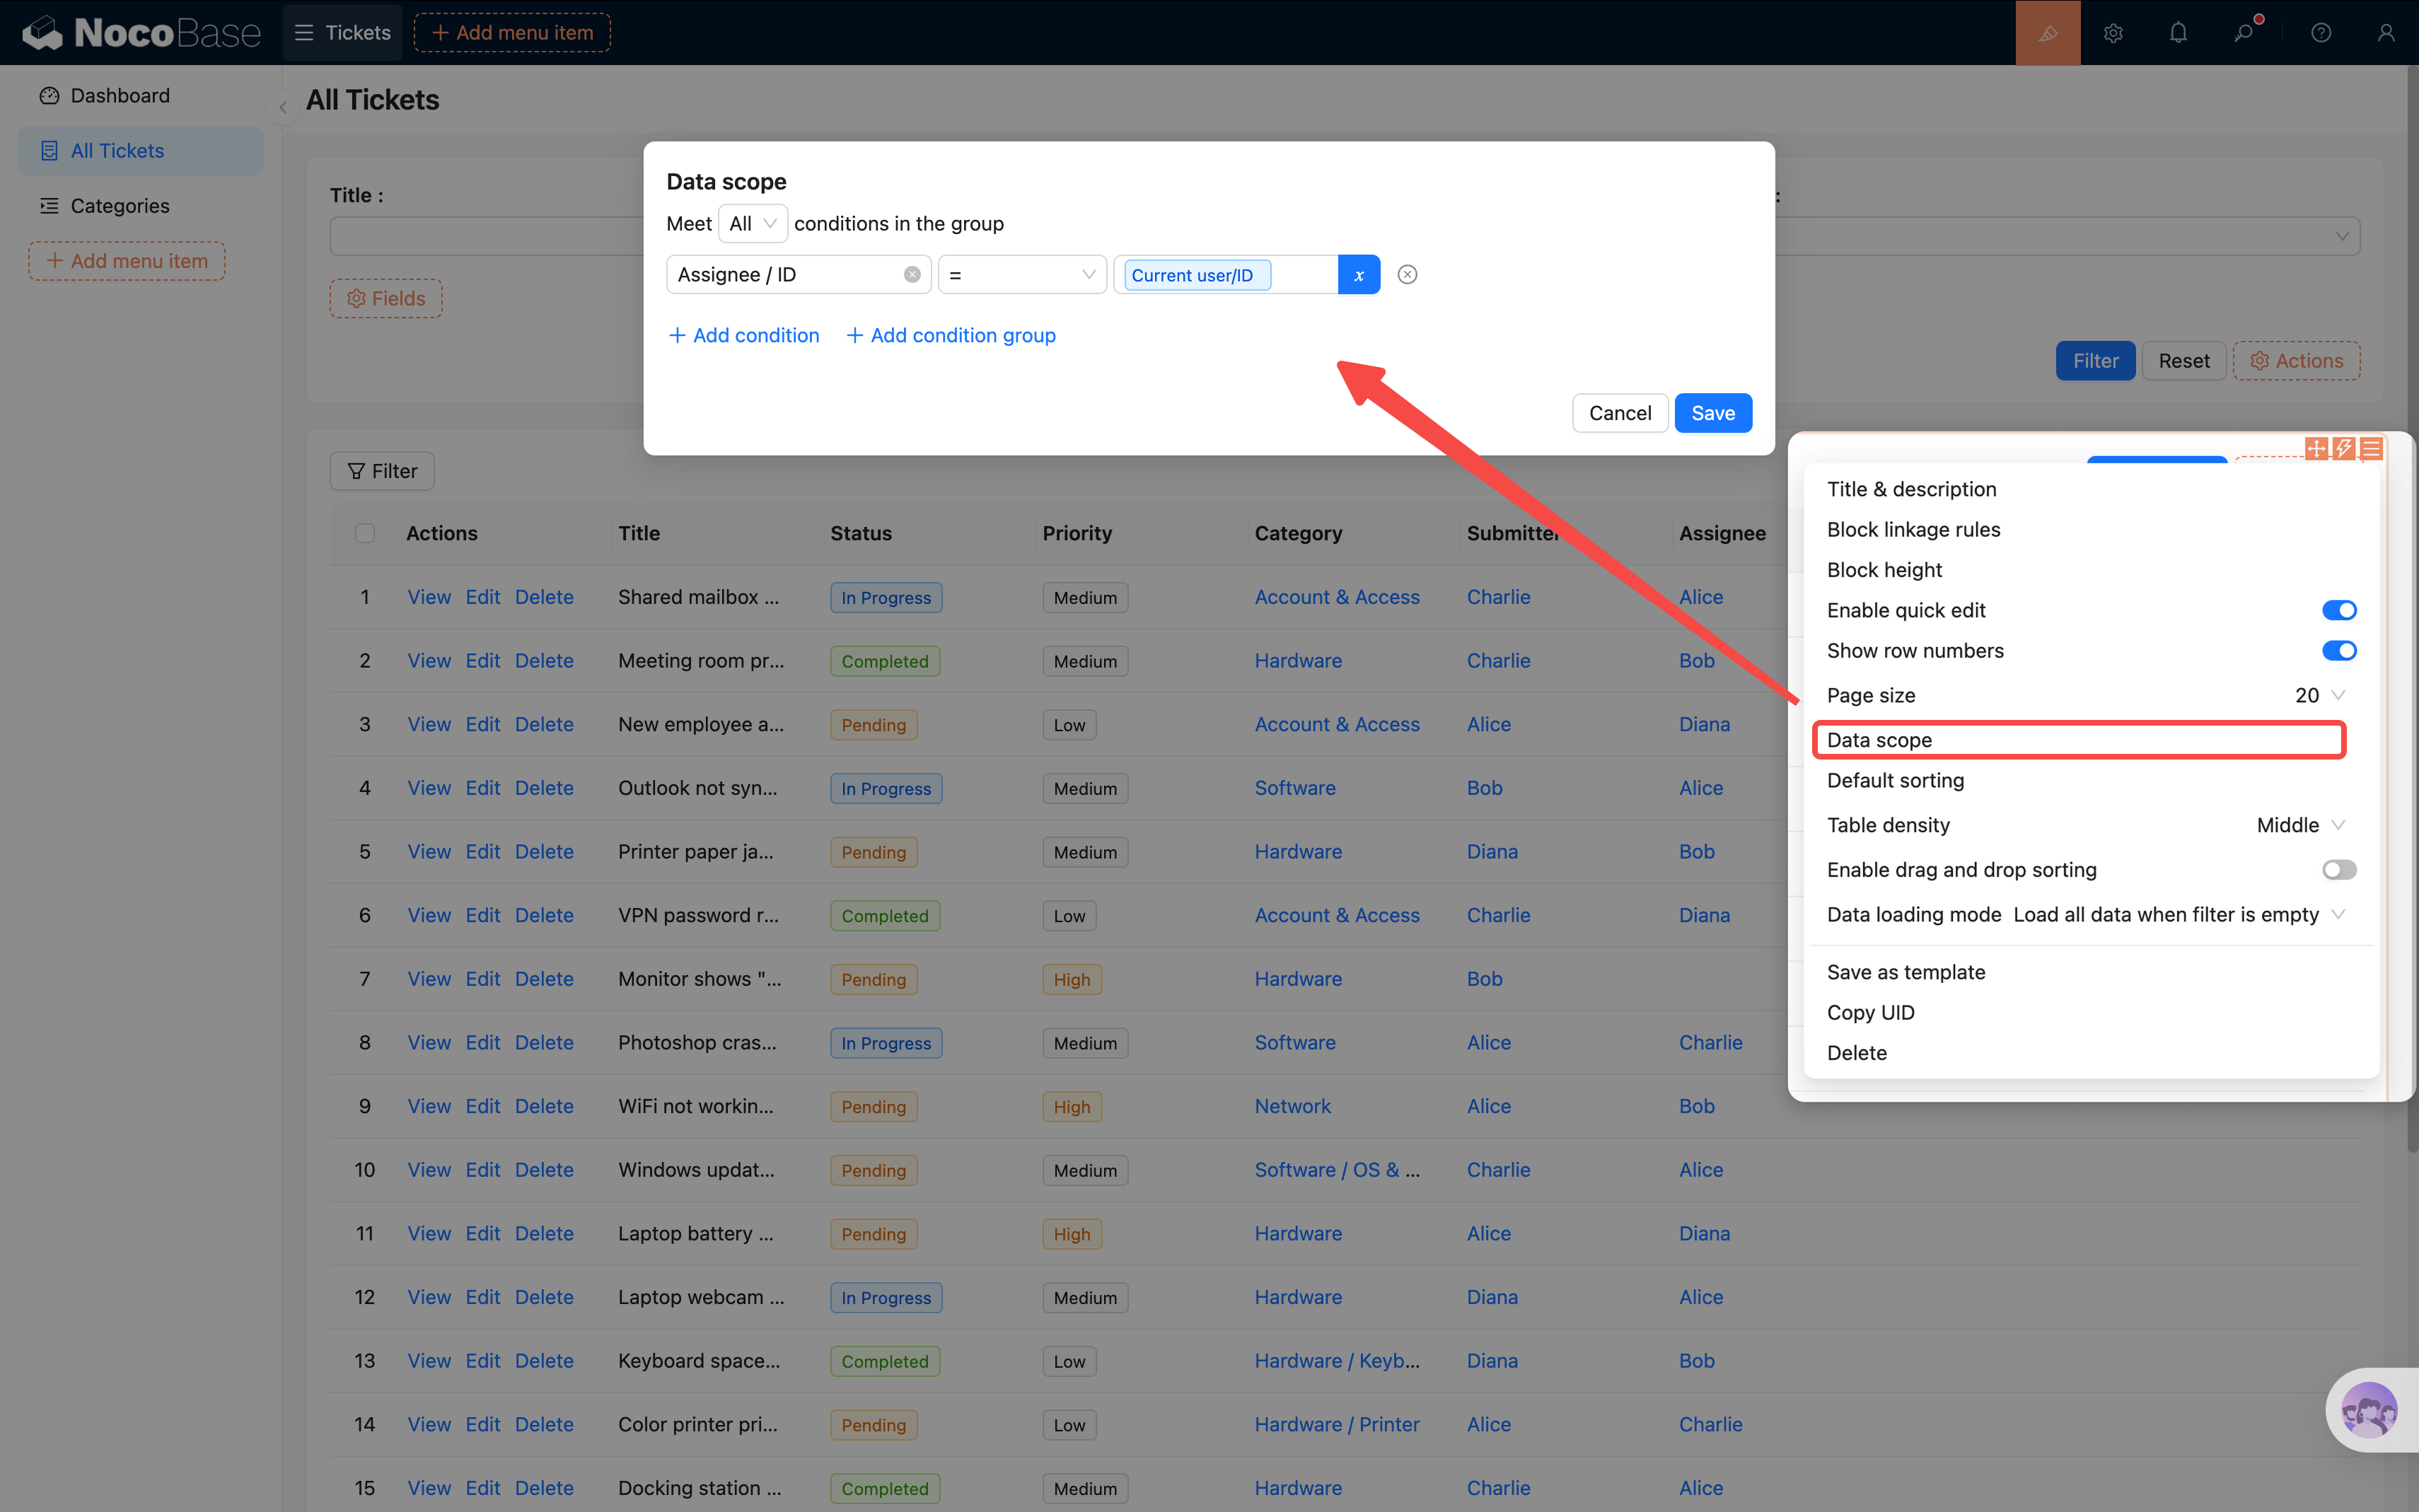
Practical tip: You can also set default filter conditions on table blocks to assist permission control, e.g., "Assignee = Current user." But note that page configuration applies globally — admins would be limited too. A compromise: configure "Assignee = Current user or Submitter = Current user" to cover both regular users and technicians; if admins need a full view, create a separate page without filter conditions.
HelpDesk Admin: See All Data
For the admin role, set the data scope to All records and enable all operations. Simple and straightforward.
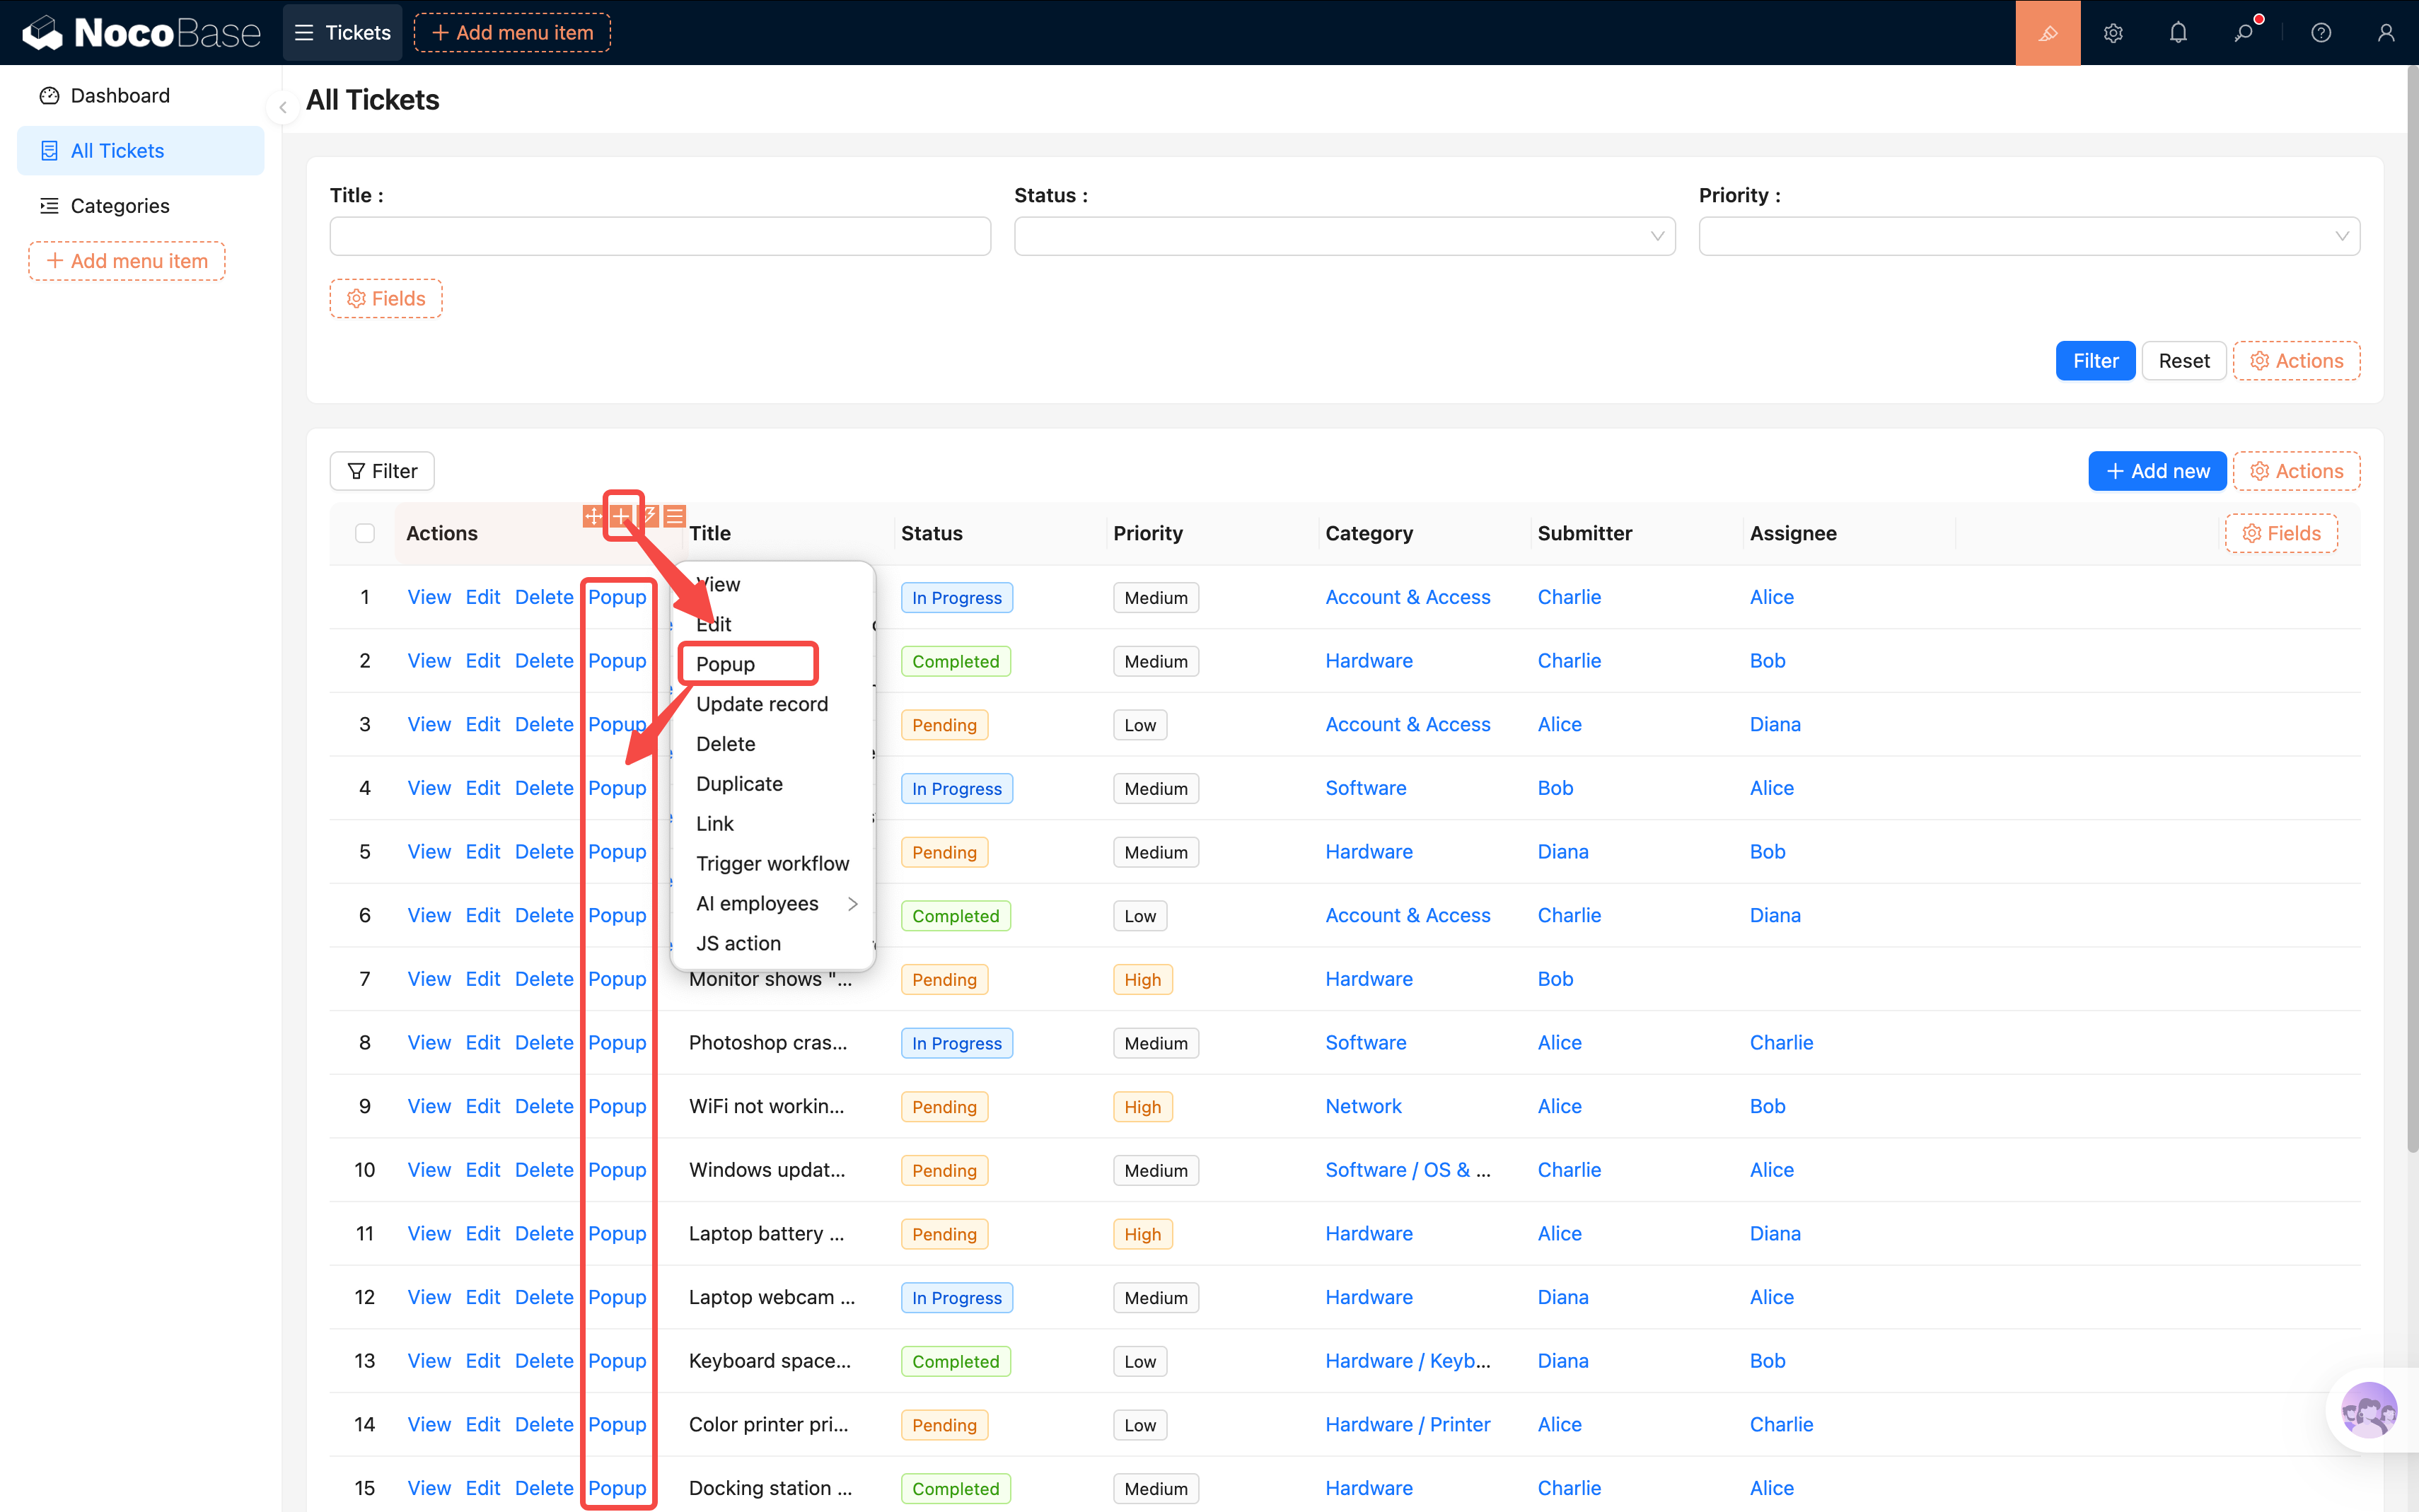
5.5 Ticket Assignment Action
Before testing permissions, let's add a handy feature to the ticket list: assigning a handler. Admins can assign a ticket to a technician directly from the list, without opening the full edit form and dealing with a bunch of fields.
The implementation is simple — add a custom popup button to the table row actions:
- Enter UI Editor mode. In the ticket list table's actions column, click "+" to add a "Popup" action button.
- Change the button title to "Assign" (click the button settings to modify the title).
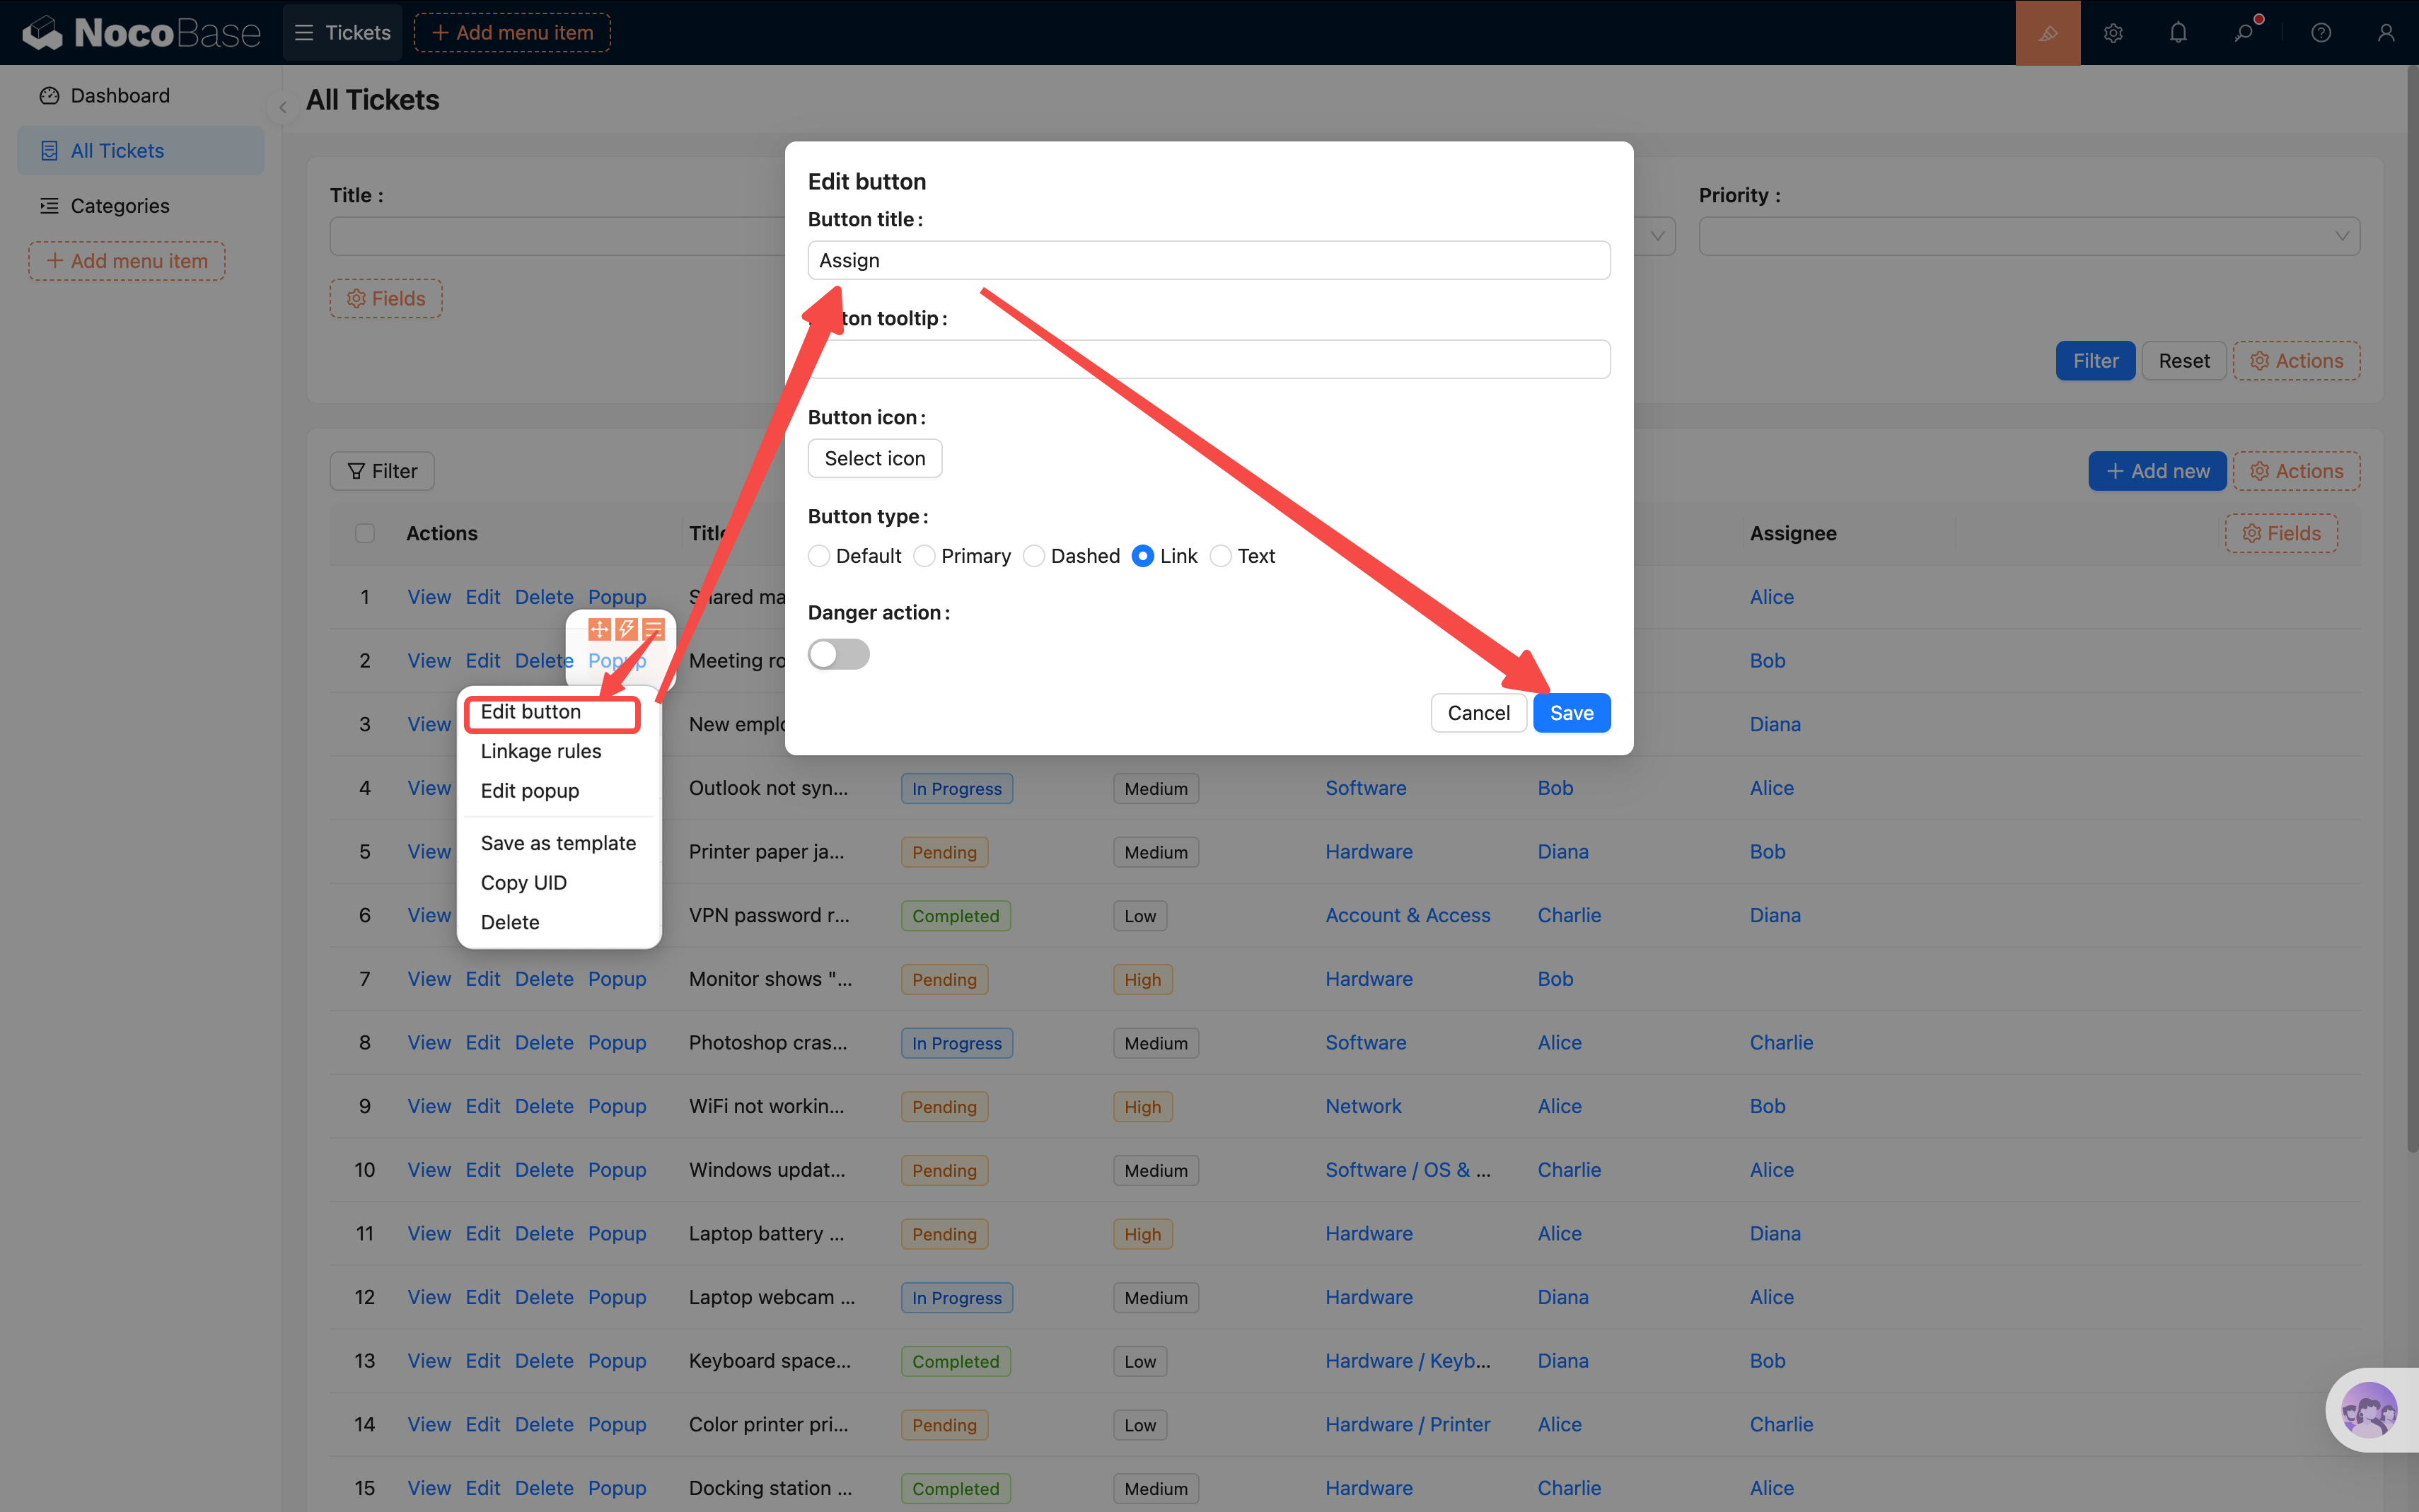
Since there's only a simple assignment to make, a compact dialog is more appropriate than a drawer. Click the popup settings in the button's top-right corner, select Dialog (narrow) > Confirm.
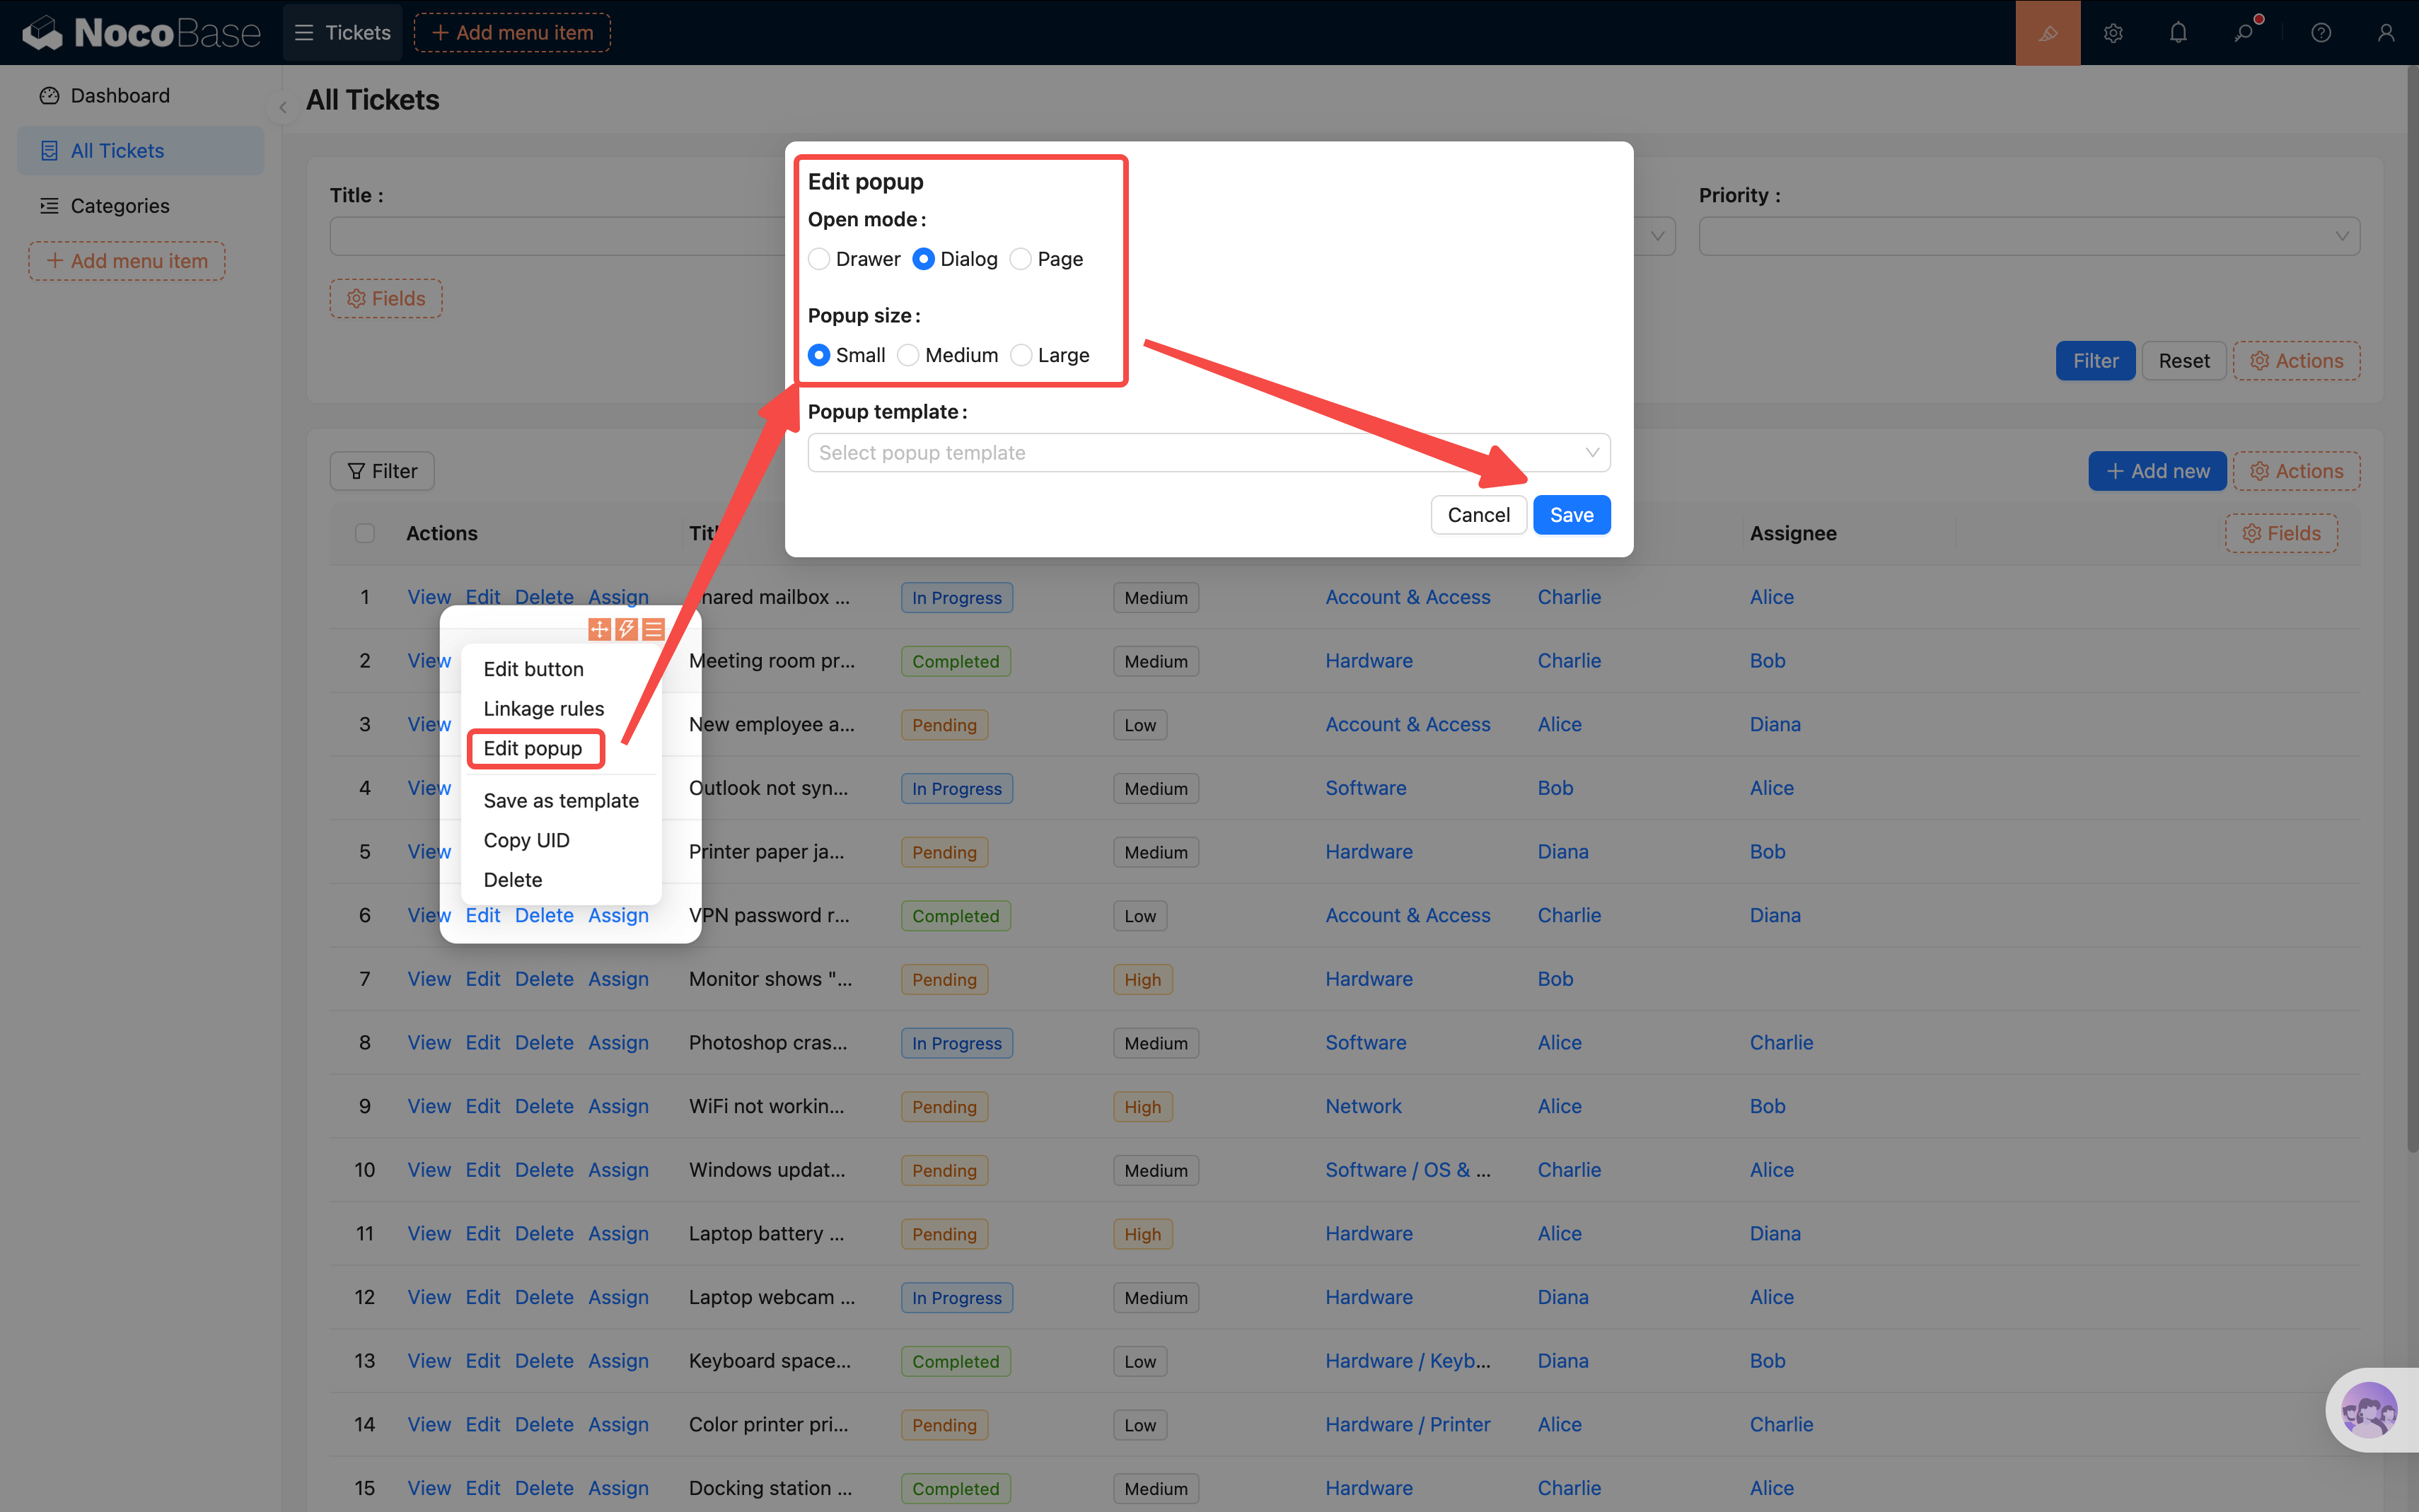
- Click the "Assign" button to open the popup. In the popup, go to "Add block → Data blocks → Form (Edit)", and select the current collection.
- In the form, only check the "Assignee" field, and set it as required in the field settings.
- Add a "Submit" action button.
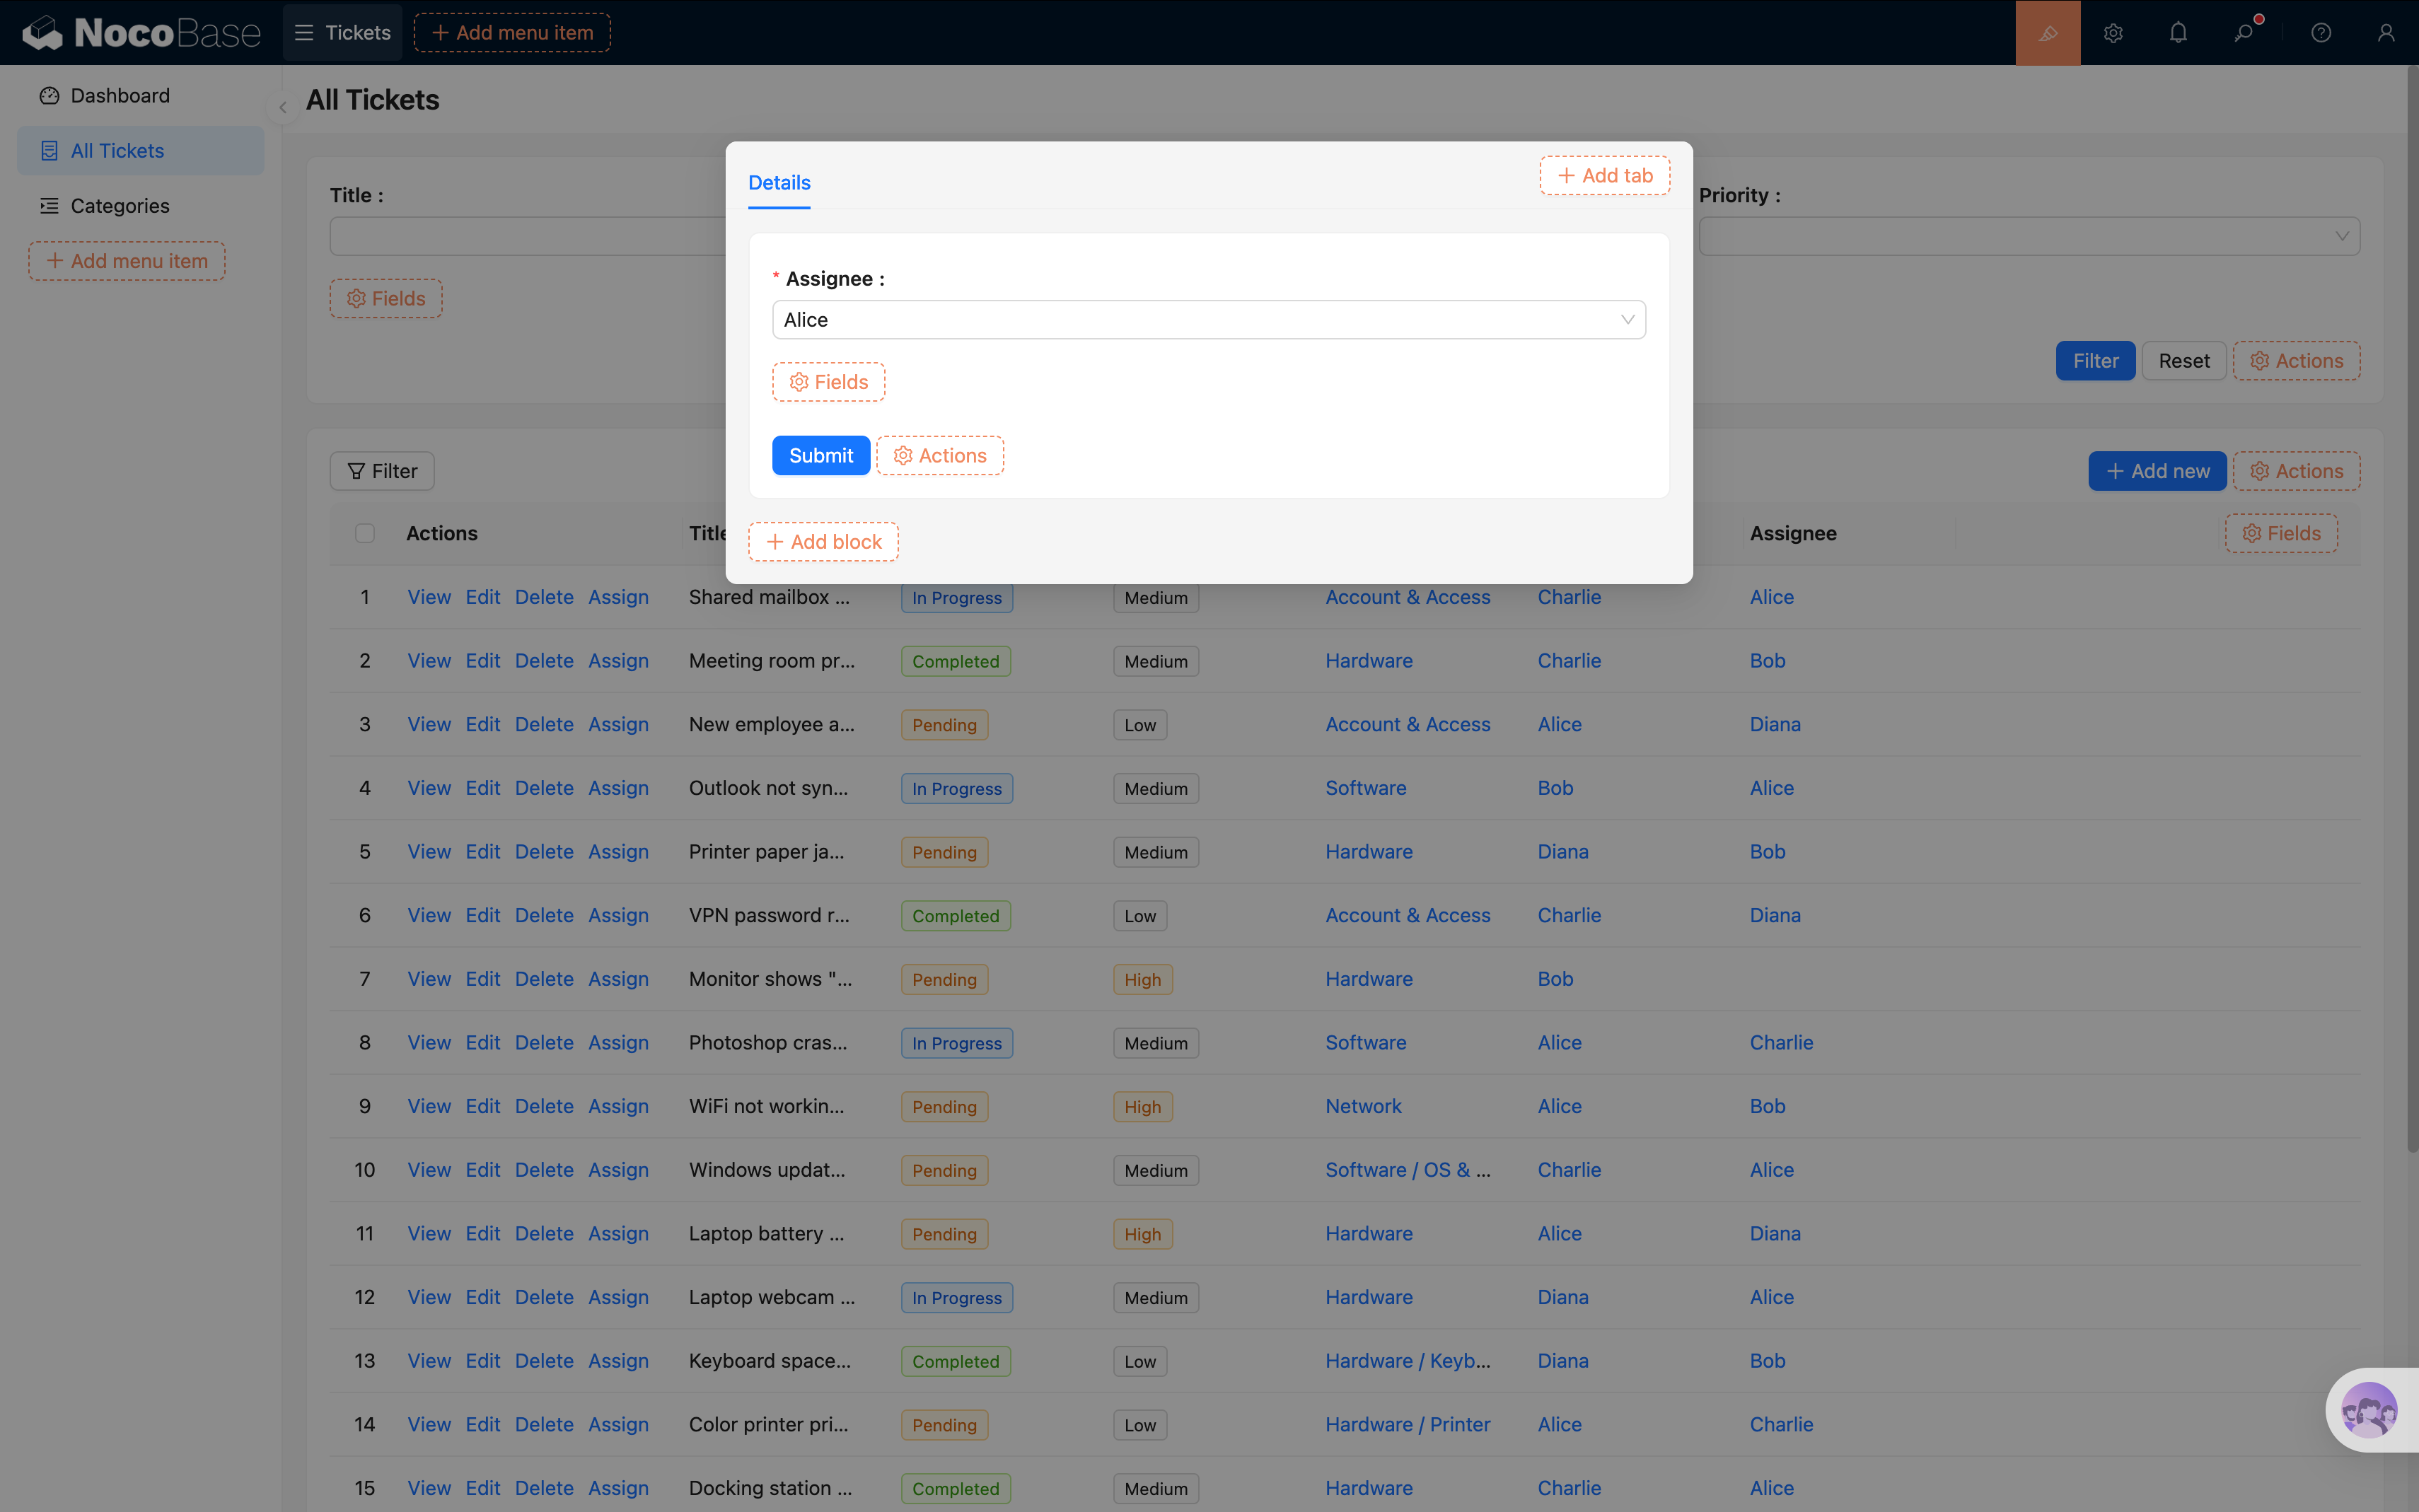
Now admins can click "Assign" in the ticket list, pick a handler from a minimal form, and submit. Quick, precise, and no risk of accidentally changing other fields.
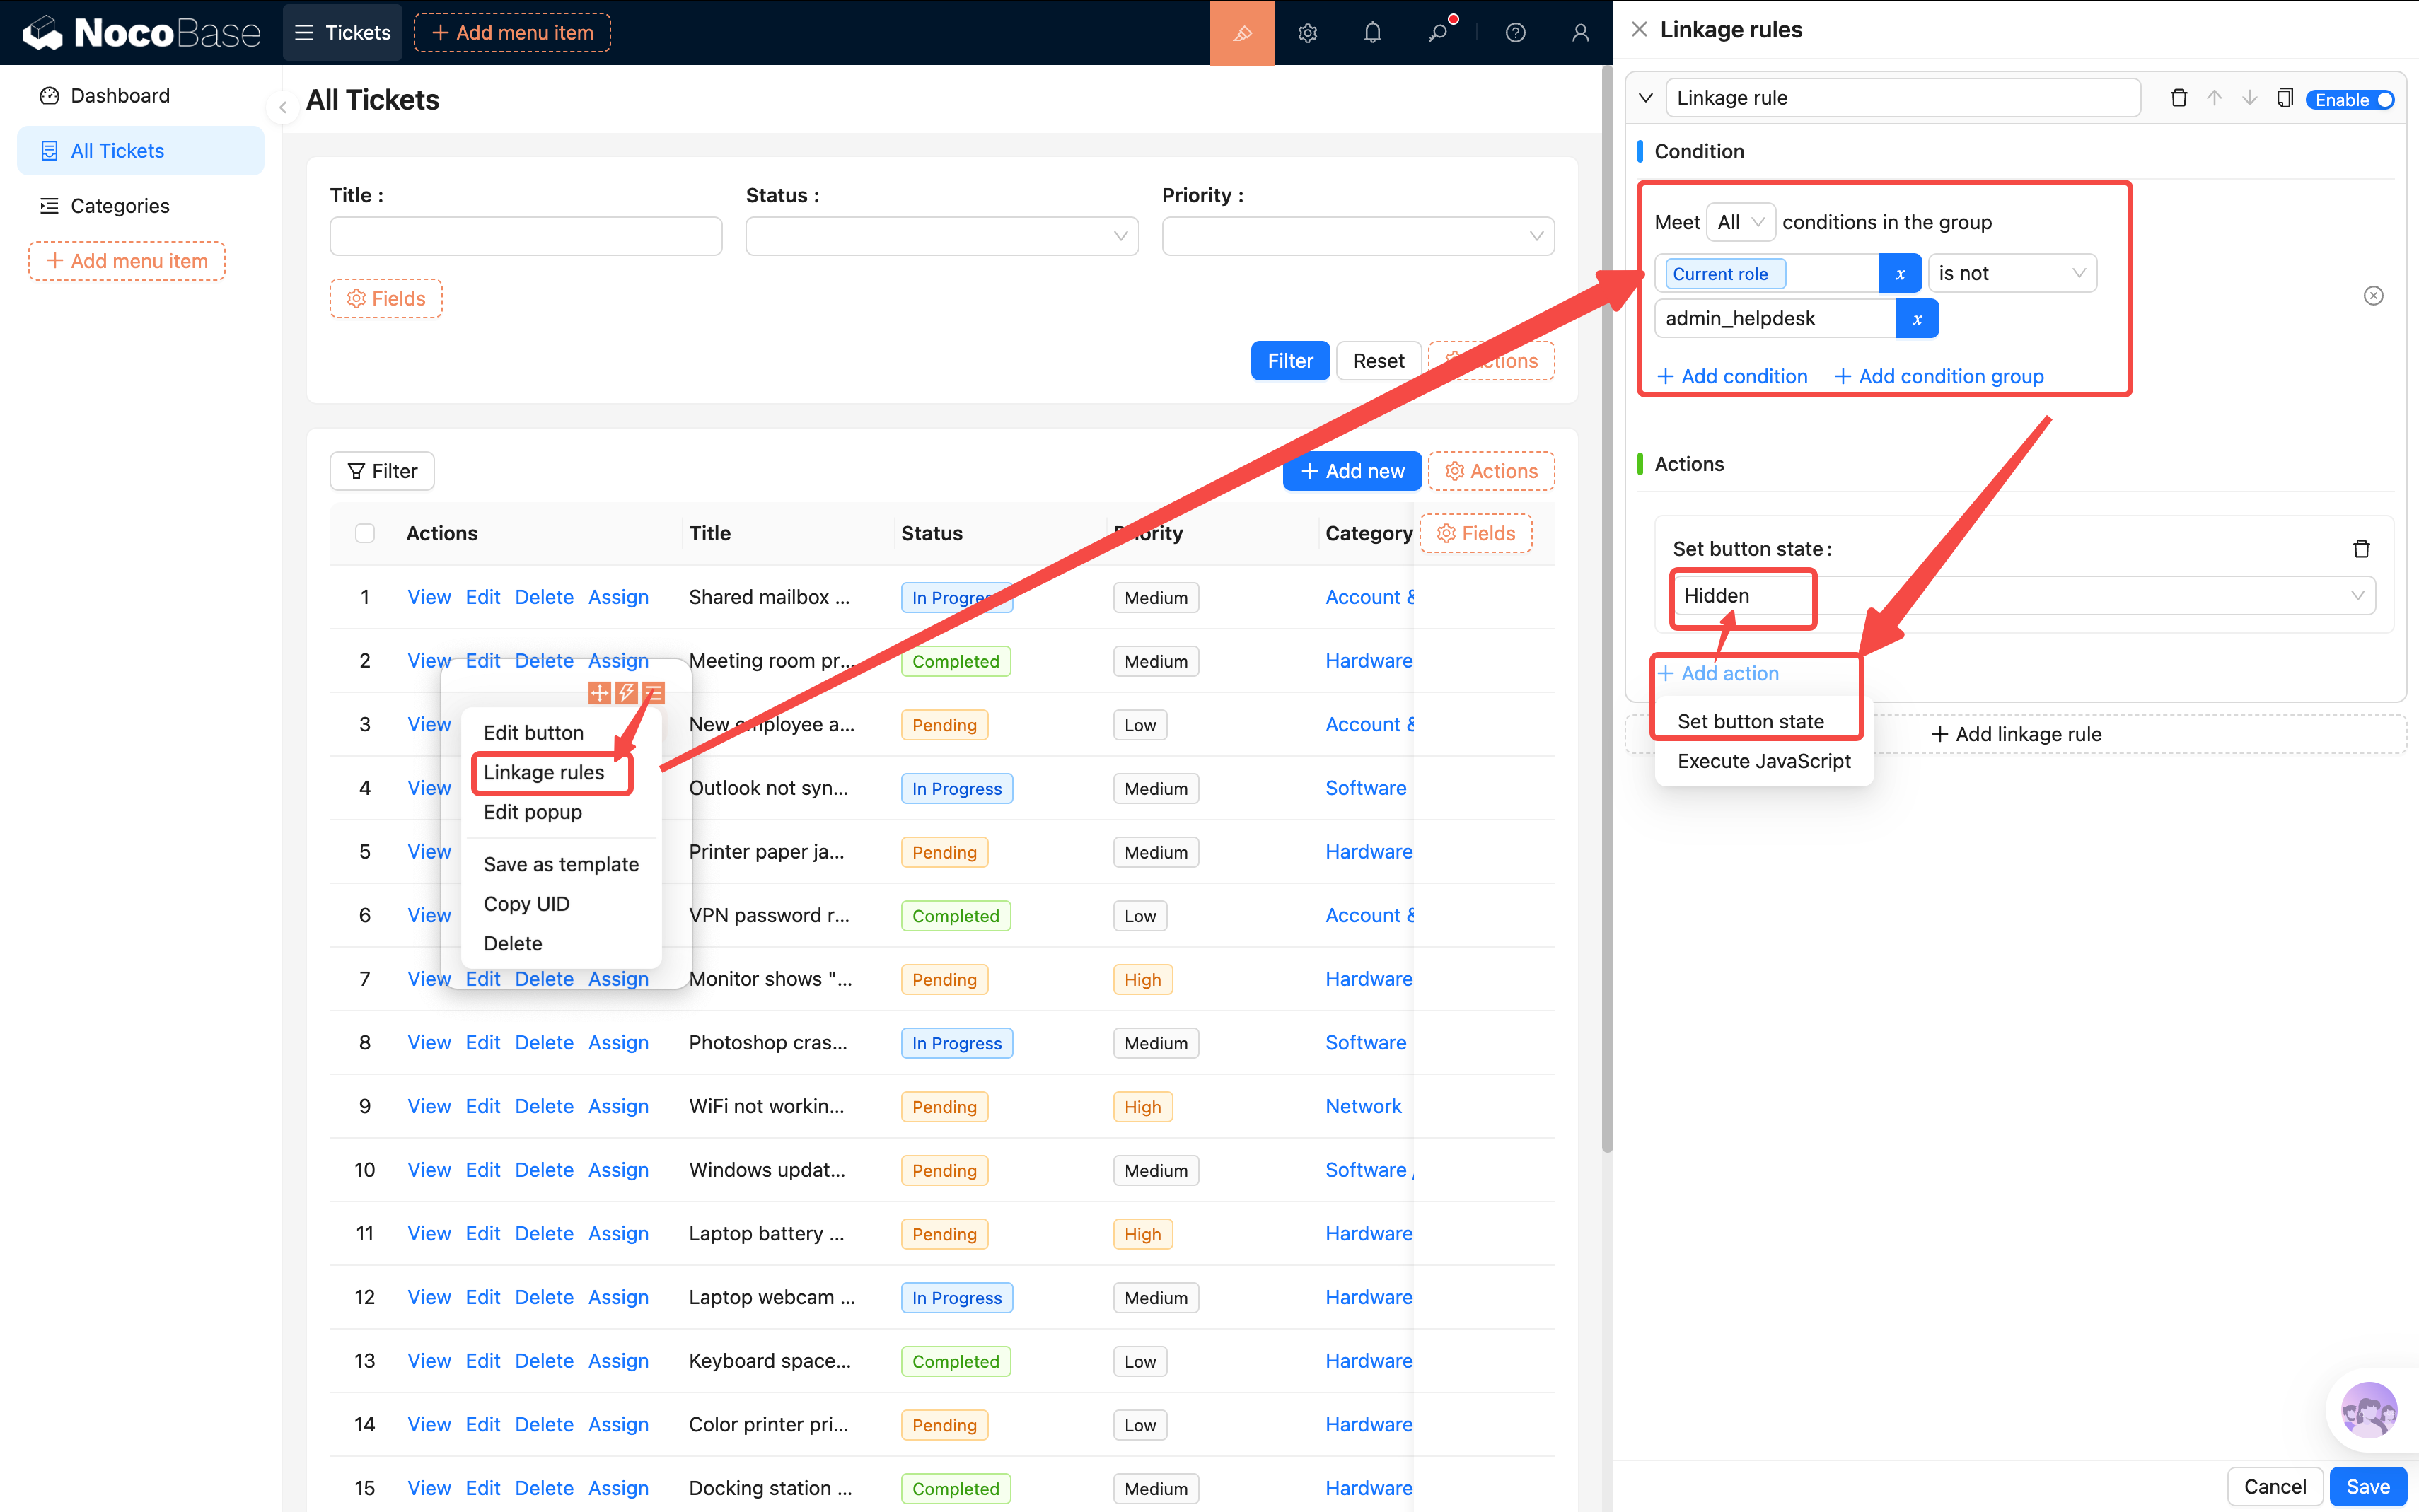
Controlling Button Visibility with Linkage Rules
The "Assign" button is only needed by admins — showing it to regular users and technicians would be confusing. We can use linkage rules to show or hide the button based on the current user's role:
- In UI Editor mode, click the "Assign" button's settings and find "Linkage rules".
- Add a rule with the condition: Current user / Roles / Role name is not equal to HelpDesk Admin (the name corresponding to the admin-helpdesk role).
- Set the action when the condition is met: Hide the button.
This way, only users with the admin role can see the "Assign" button — it's automatically hidden for all other roles.
5.6 Creating Test Users and Trying It Out
Permissions are configured — let's verify them in practice.
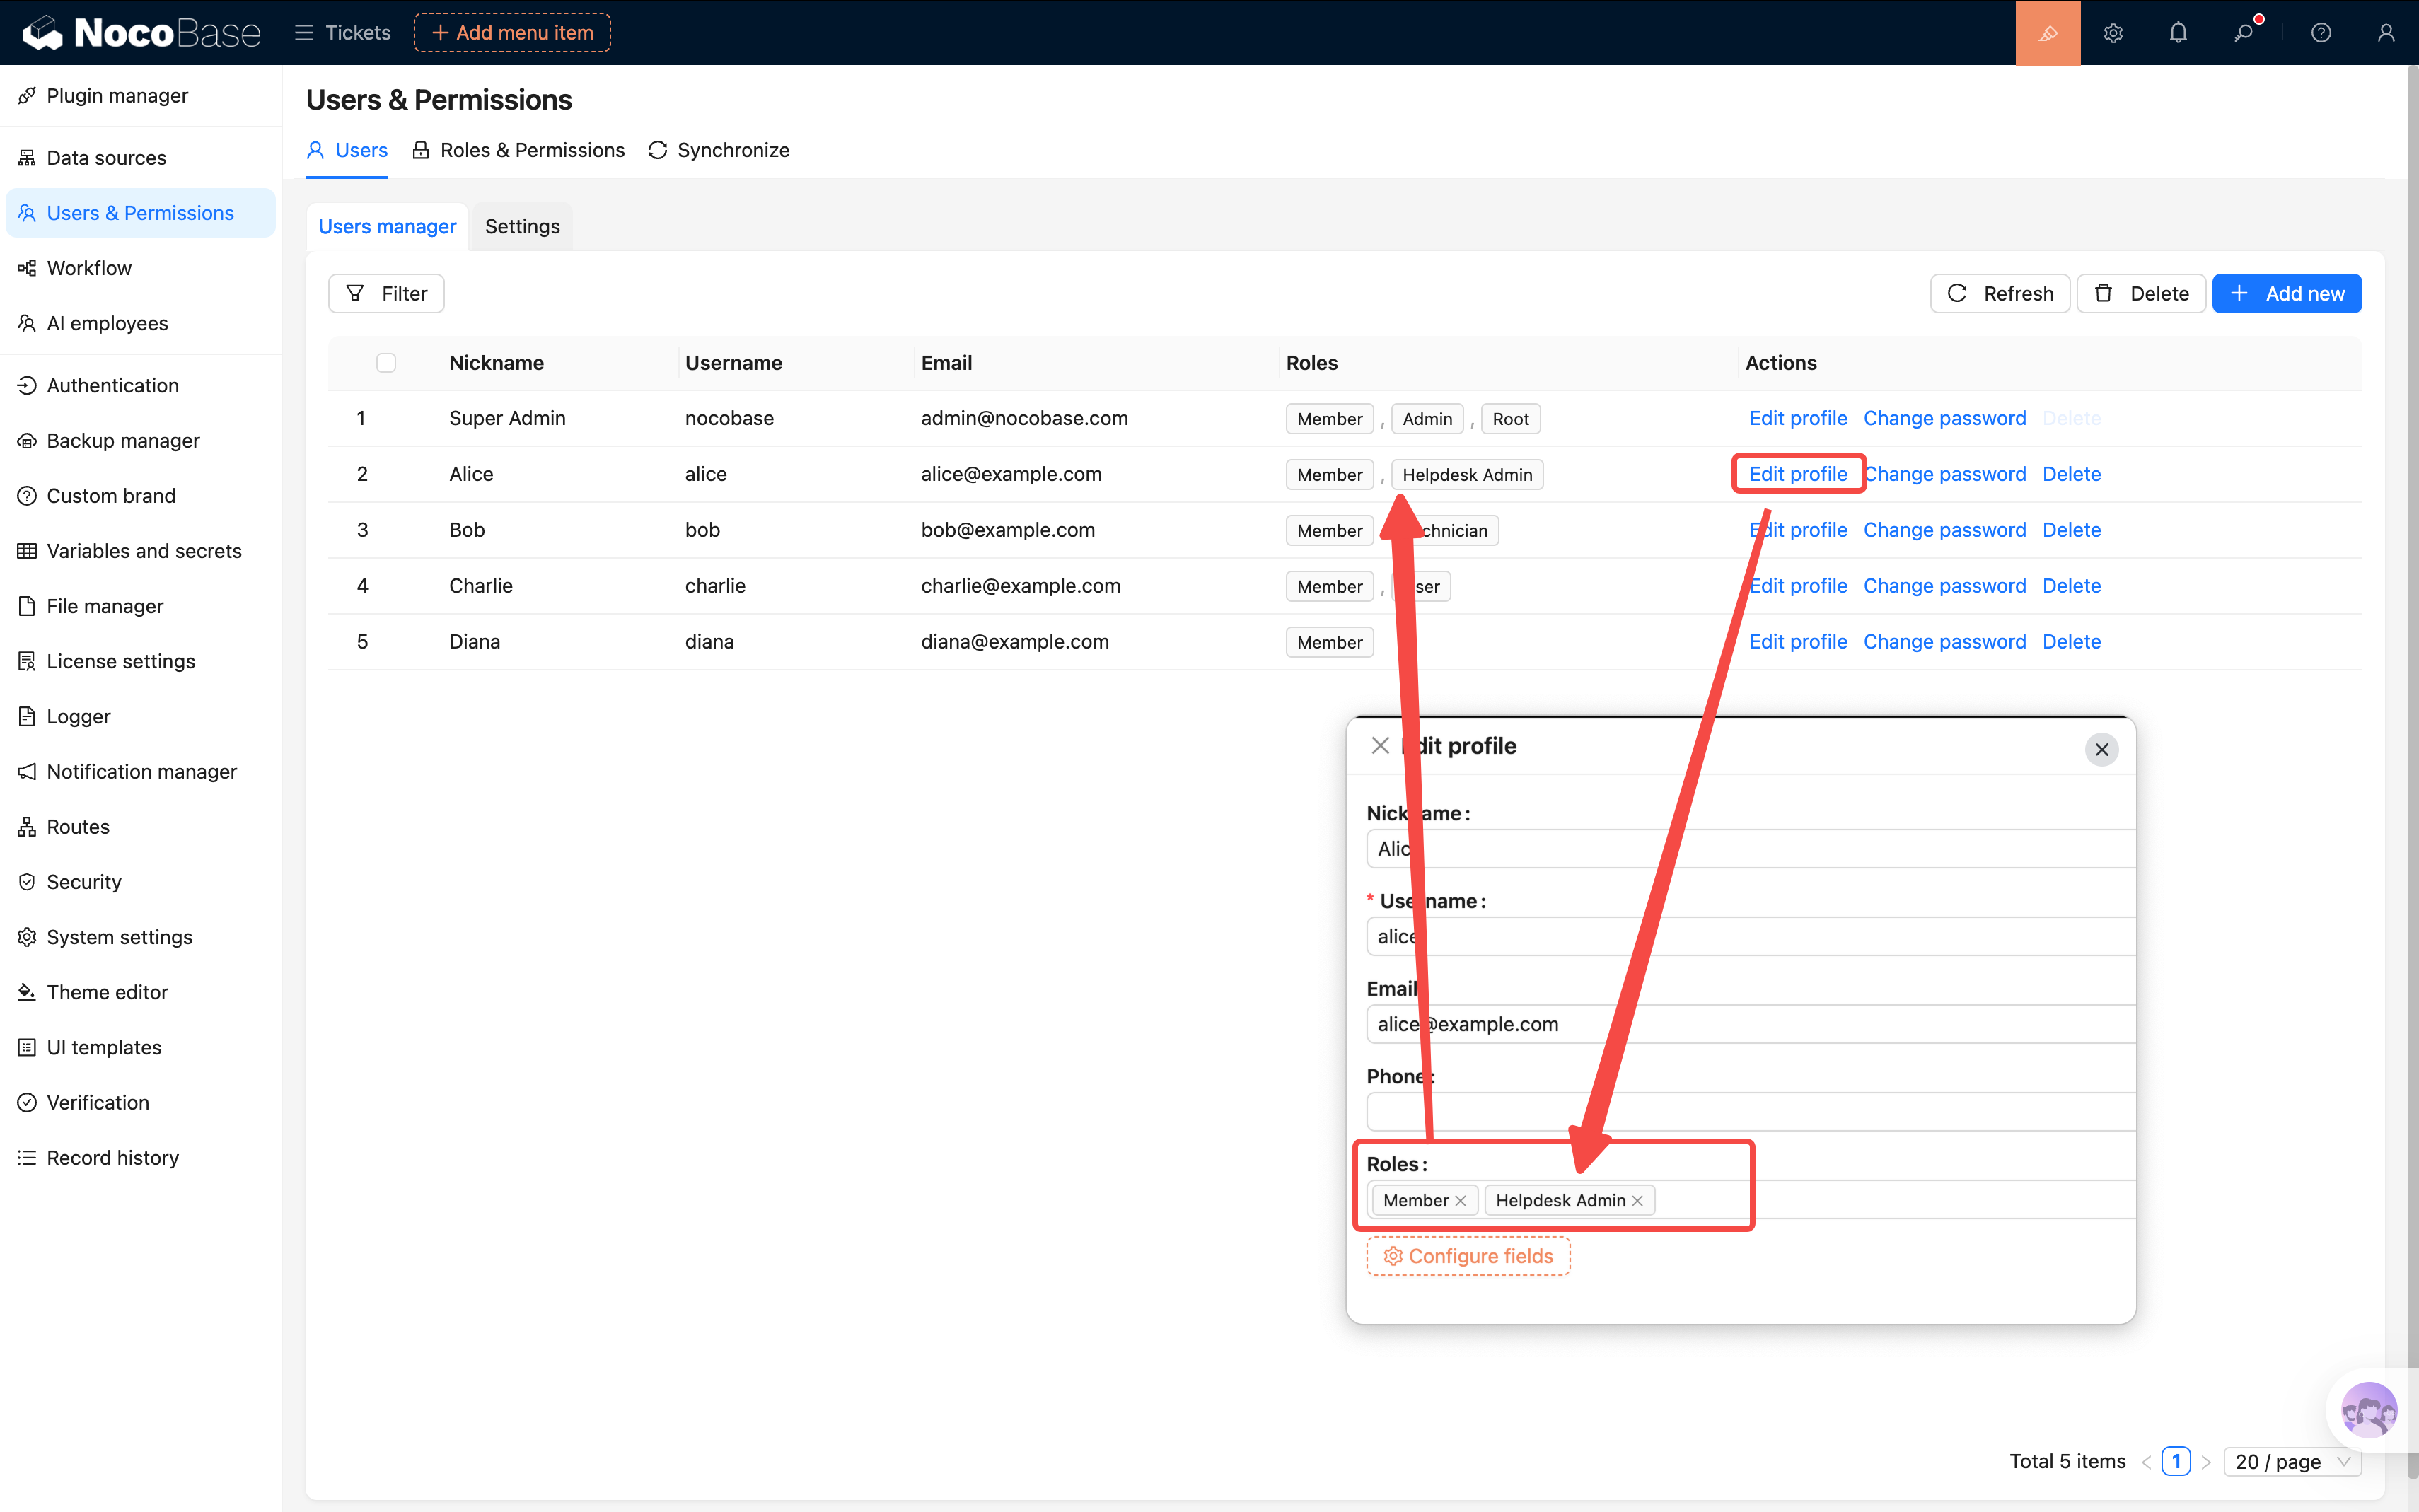
Go to User Management (in the settings center or the user management page you built earlier) and create 3 test users:
| Username | Role |
|---|---|
| Alice | HelpDesk Admin (admin-helpdesk) |
| Bob | Technician (technician) |
| Charlie | Regular User (user) |
After creating them, log in with each account and check two things:
1. Are the menus displayed as expected?
- Alice → Can see all menus
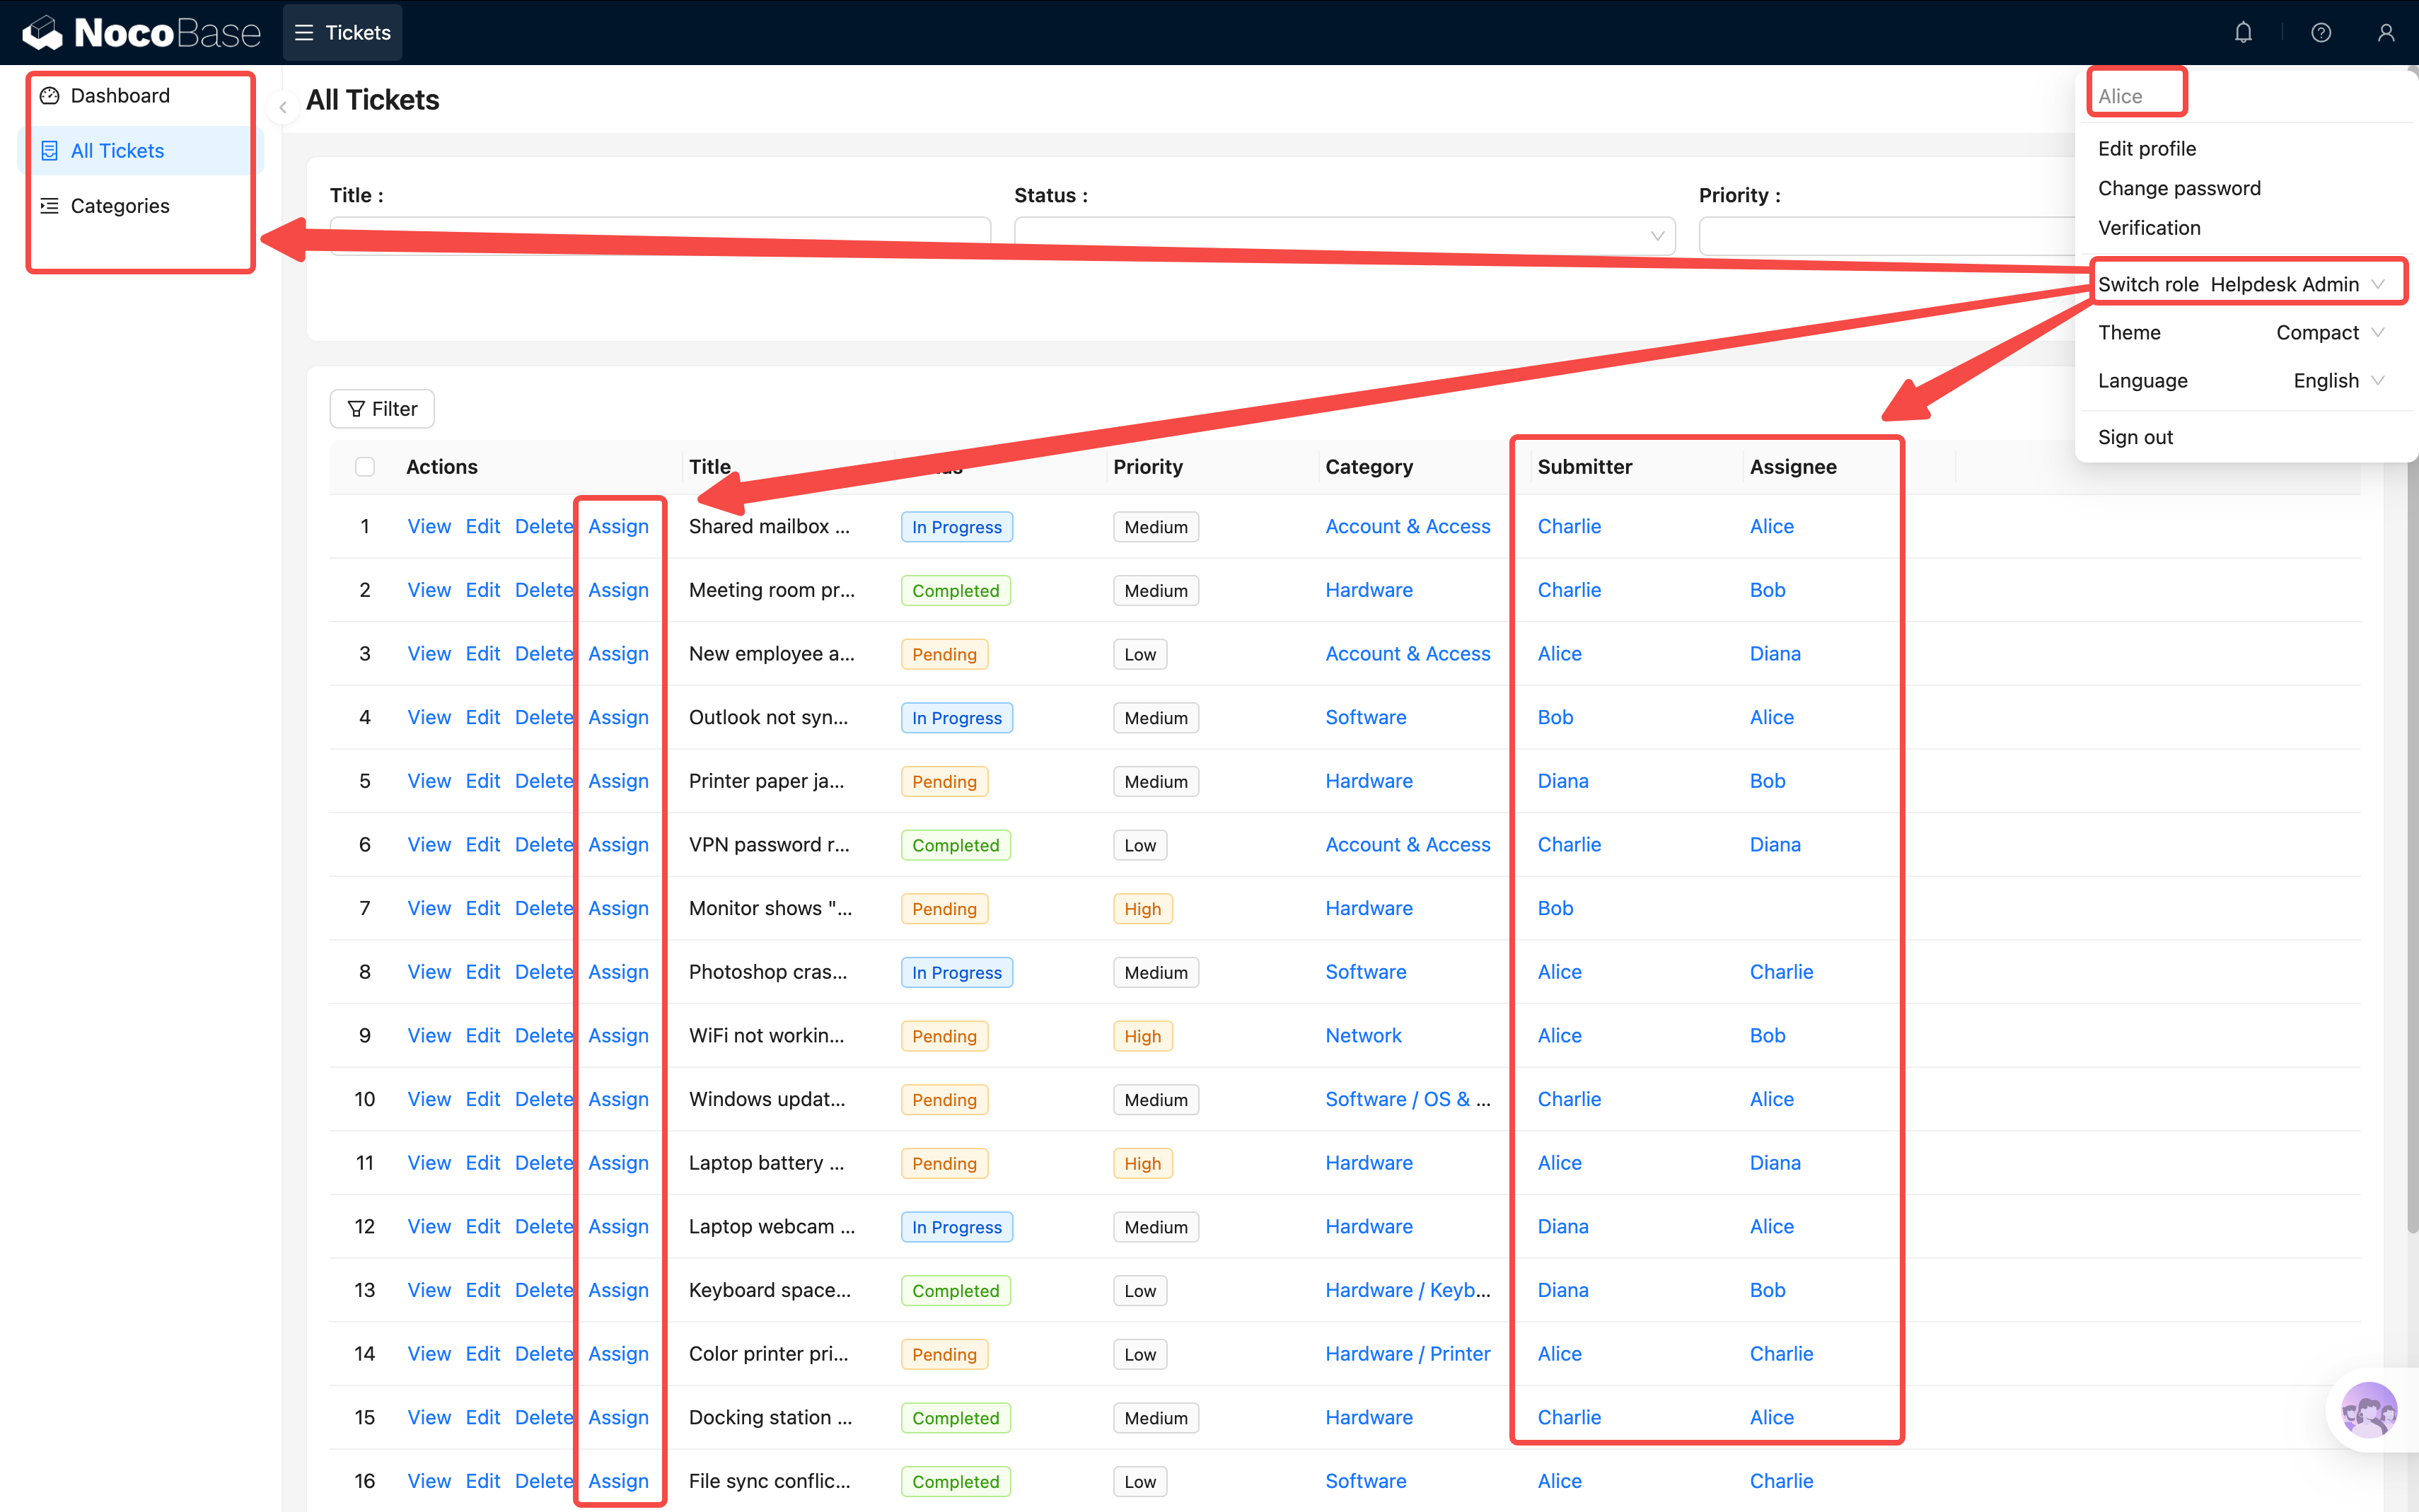
- Bob → Only sees Tickets and Dashboard
- Charlie → Only sees "My Tickets"
2. Is the data filtered as expected?
- First, log in as Alice and create a few tickets assigned to different people
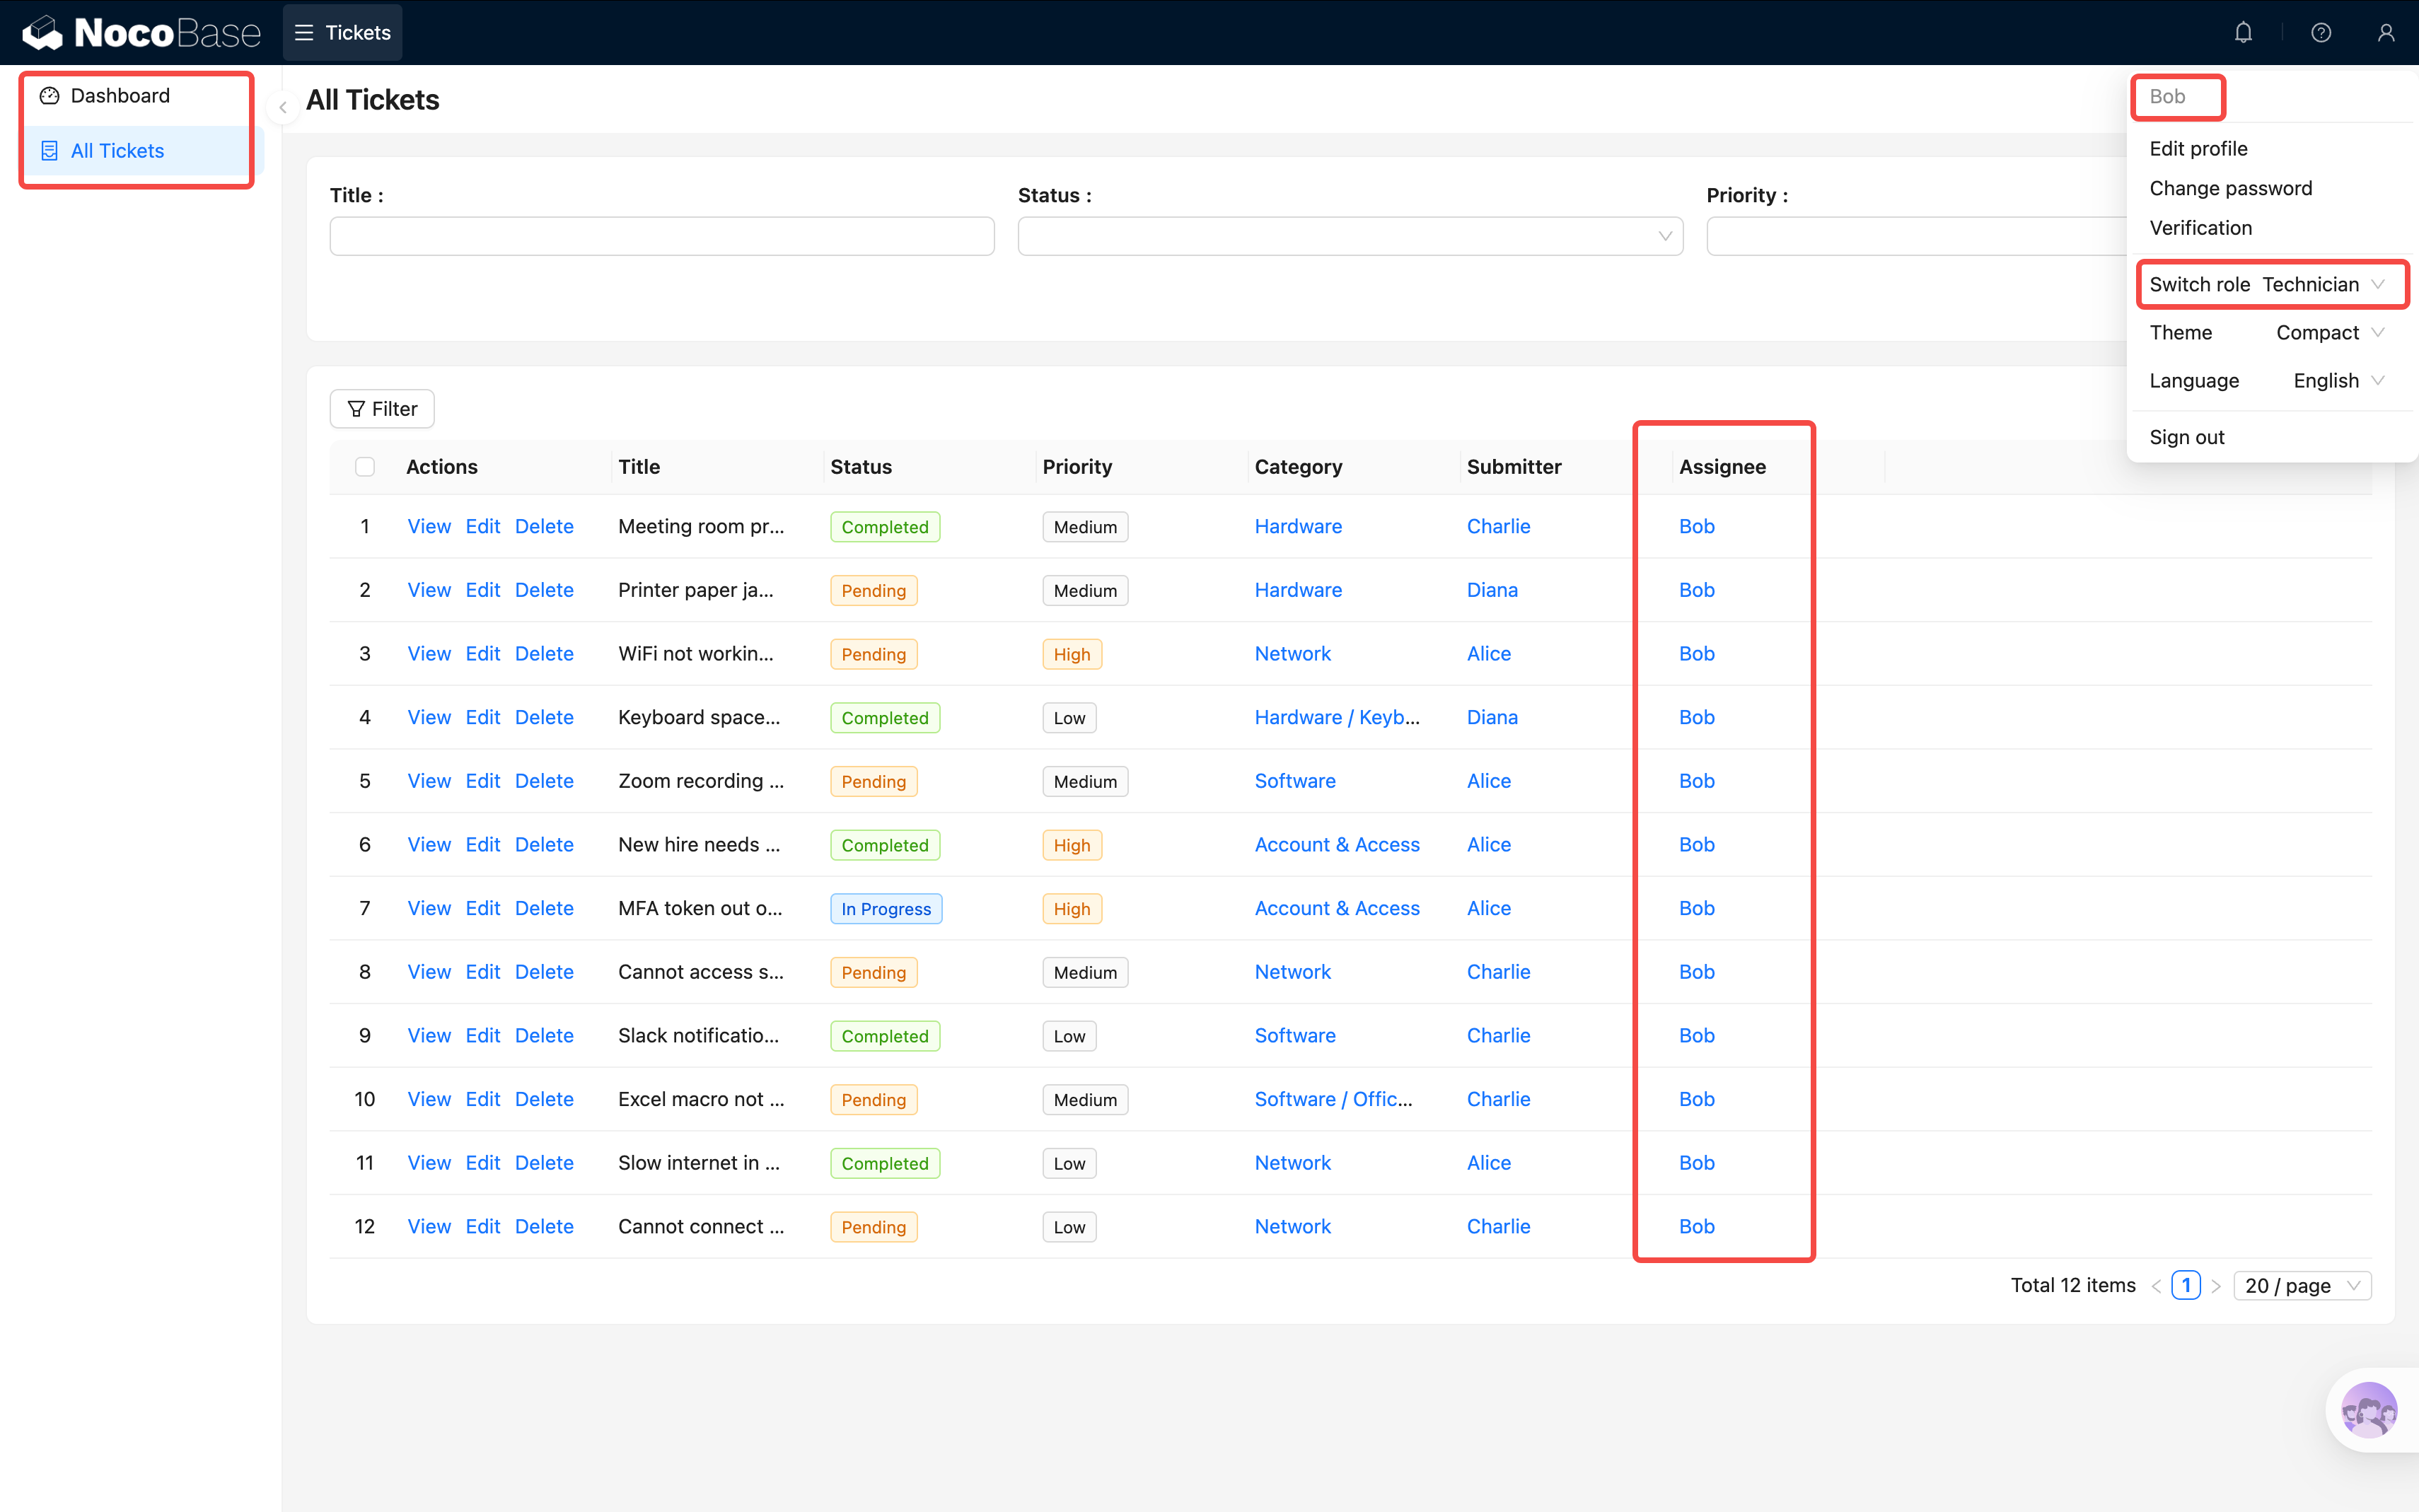
- Switch to Bob → Only sees tickets assigned to them
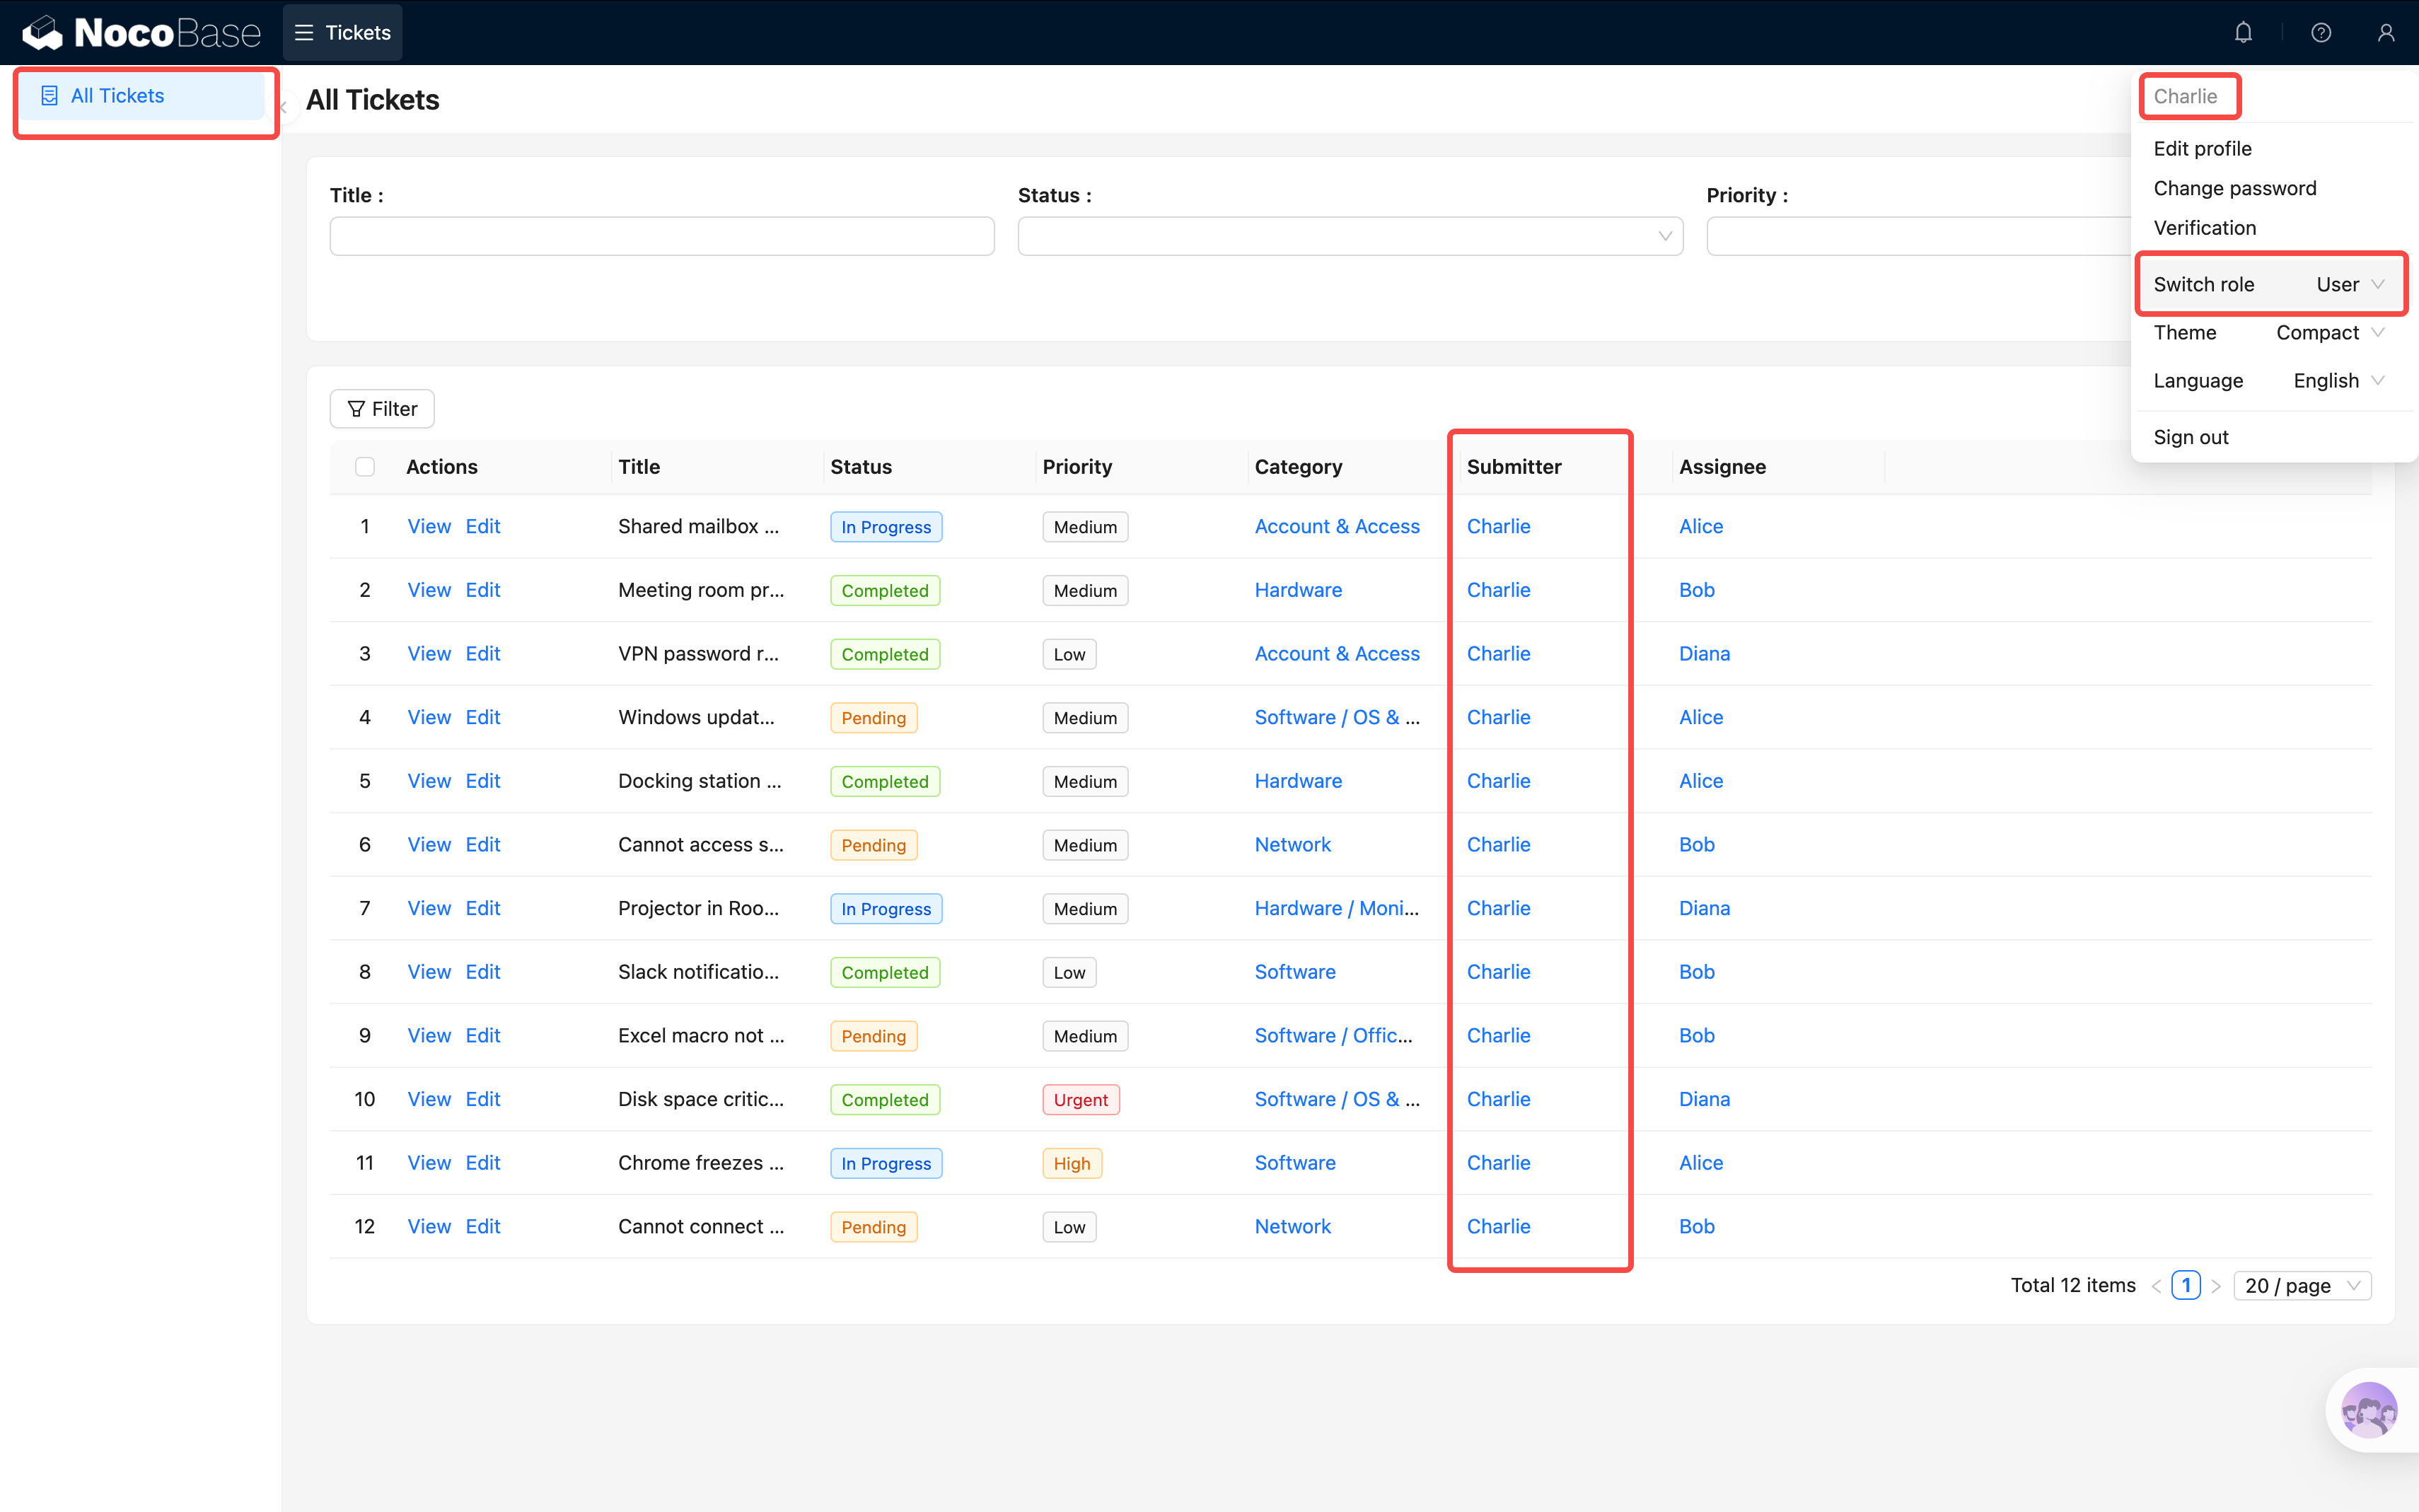
- Switch to Charlie → Only sees tickets they submitted
Pretty cool, right? The same system, completely different content for different users! That's the power of permissions.
Summary
In this chapter, we completed the ticket system's permission framework:
- 3 roles: HelpDesk Admin, Technician, Regular User
- Menu permissions: Control which pages each role can access
- Data permissions: Control which data each role can see (via data scope)
- Test verification: Log in with different accounts to confirm permissions work
At this point, our ticket system is shaping up nicely — it can handle data entry, viewing, and role-based access control. But everything is still manual.
Next Chapter Preview
In the next chapter, we'll learn about Workflows — letting the system do work for us automatically. For example, automatically notifying the assignee when a ticket is submitted, or logging a timestamp when the status changes.