

Chapter 4: Forms & Details — Input, Display, All in One
In the last chapter, we built the ticket list — data is now visible. But how do users submit new tickets? In this chapter, we'll solve the "entering data" problem — building Form blocks, configuring field linkage, and even tracking every change made to a ticket.
4.1 Creating a New Ticket Form
We want to add a "New" button to the ticket list page. Clicking it will pop up a form for users to fill in a ticket.
Adding the "Add new" Action Button
- Make sure you're in UI Editor mode (top-right toggle is on).
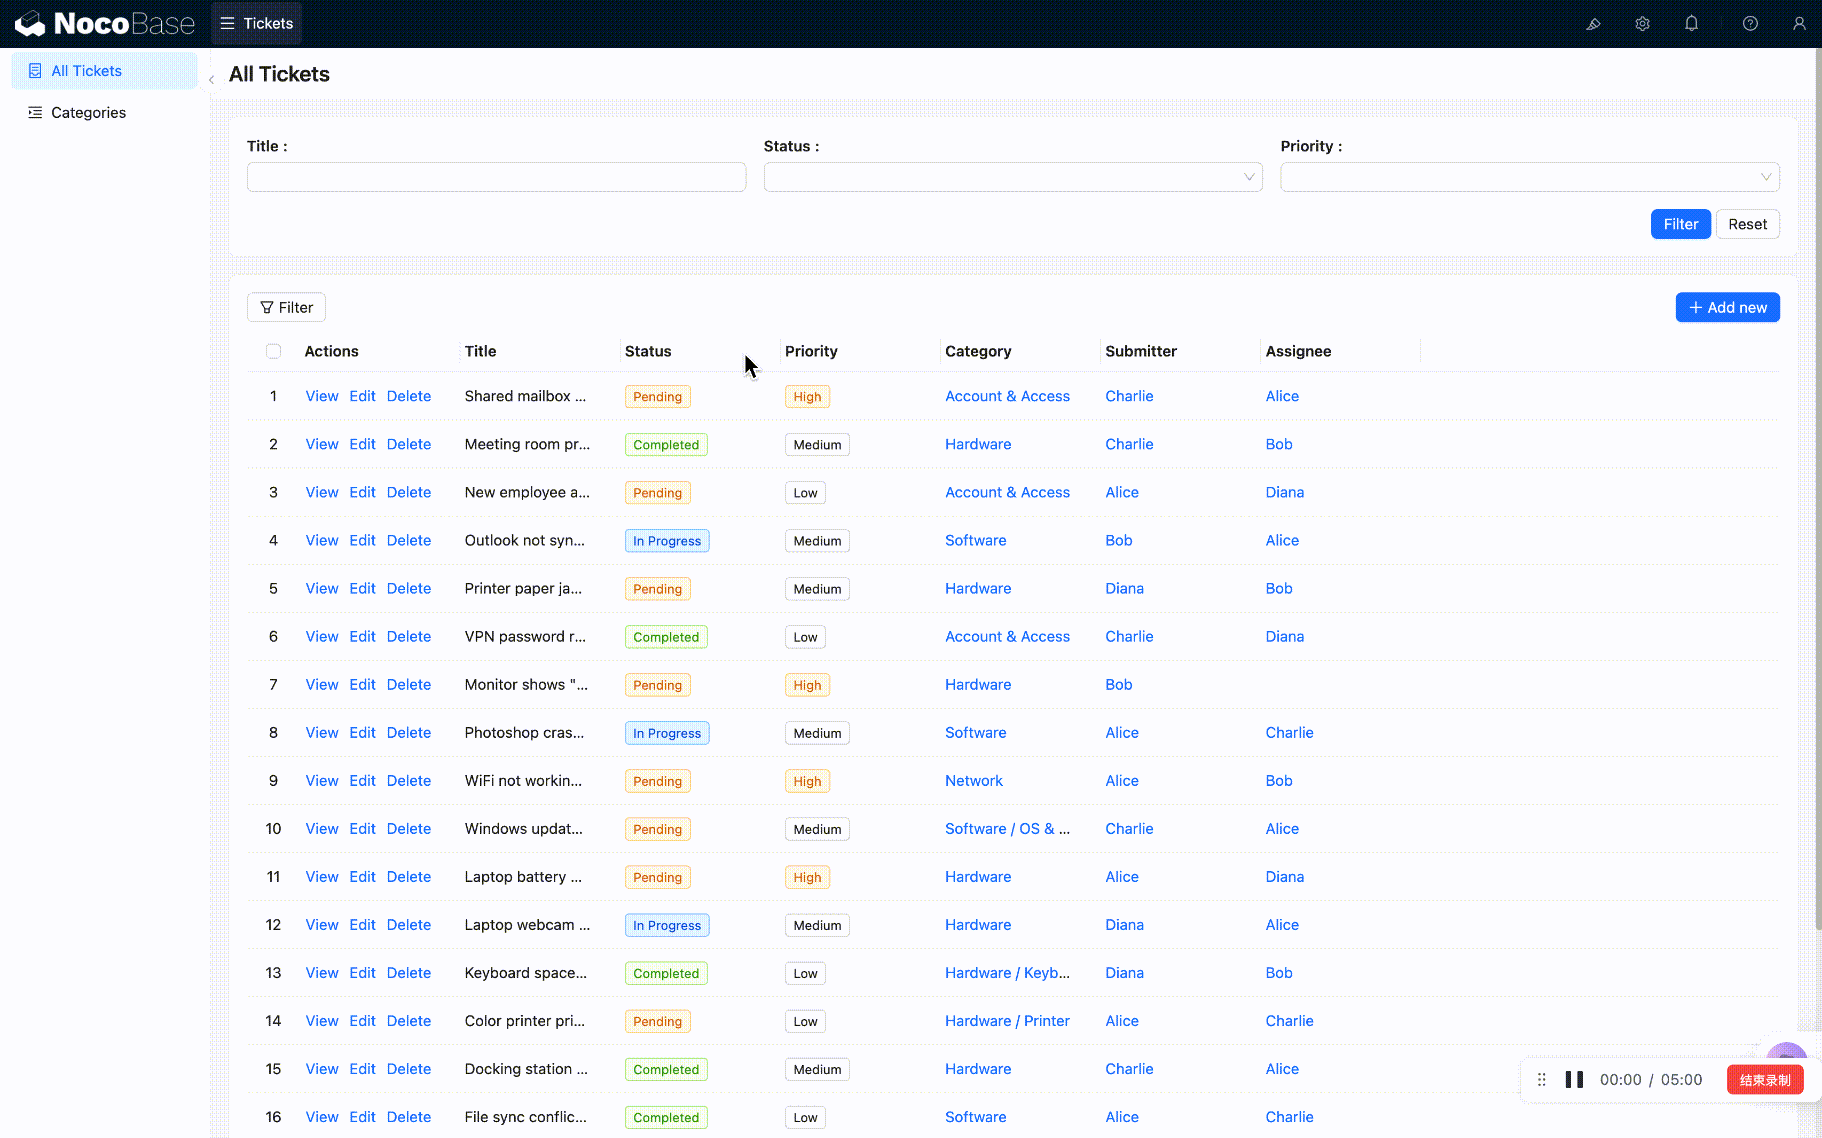
- Go to the "All Tickets" page, and click "Actions" above the Table block.
- Check the "Add new" action button.
- An "Add new" button will appear above the table. Clicking it opens a popup.

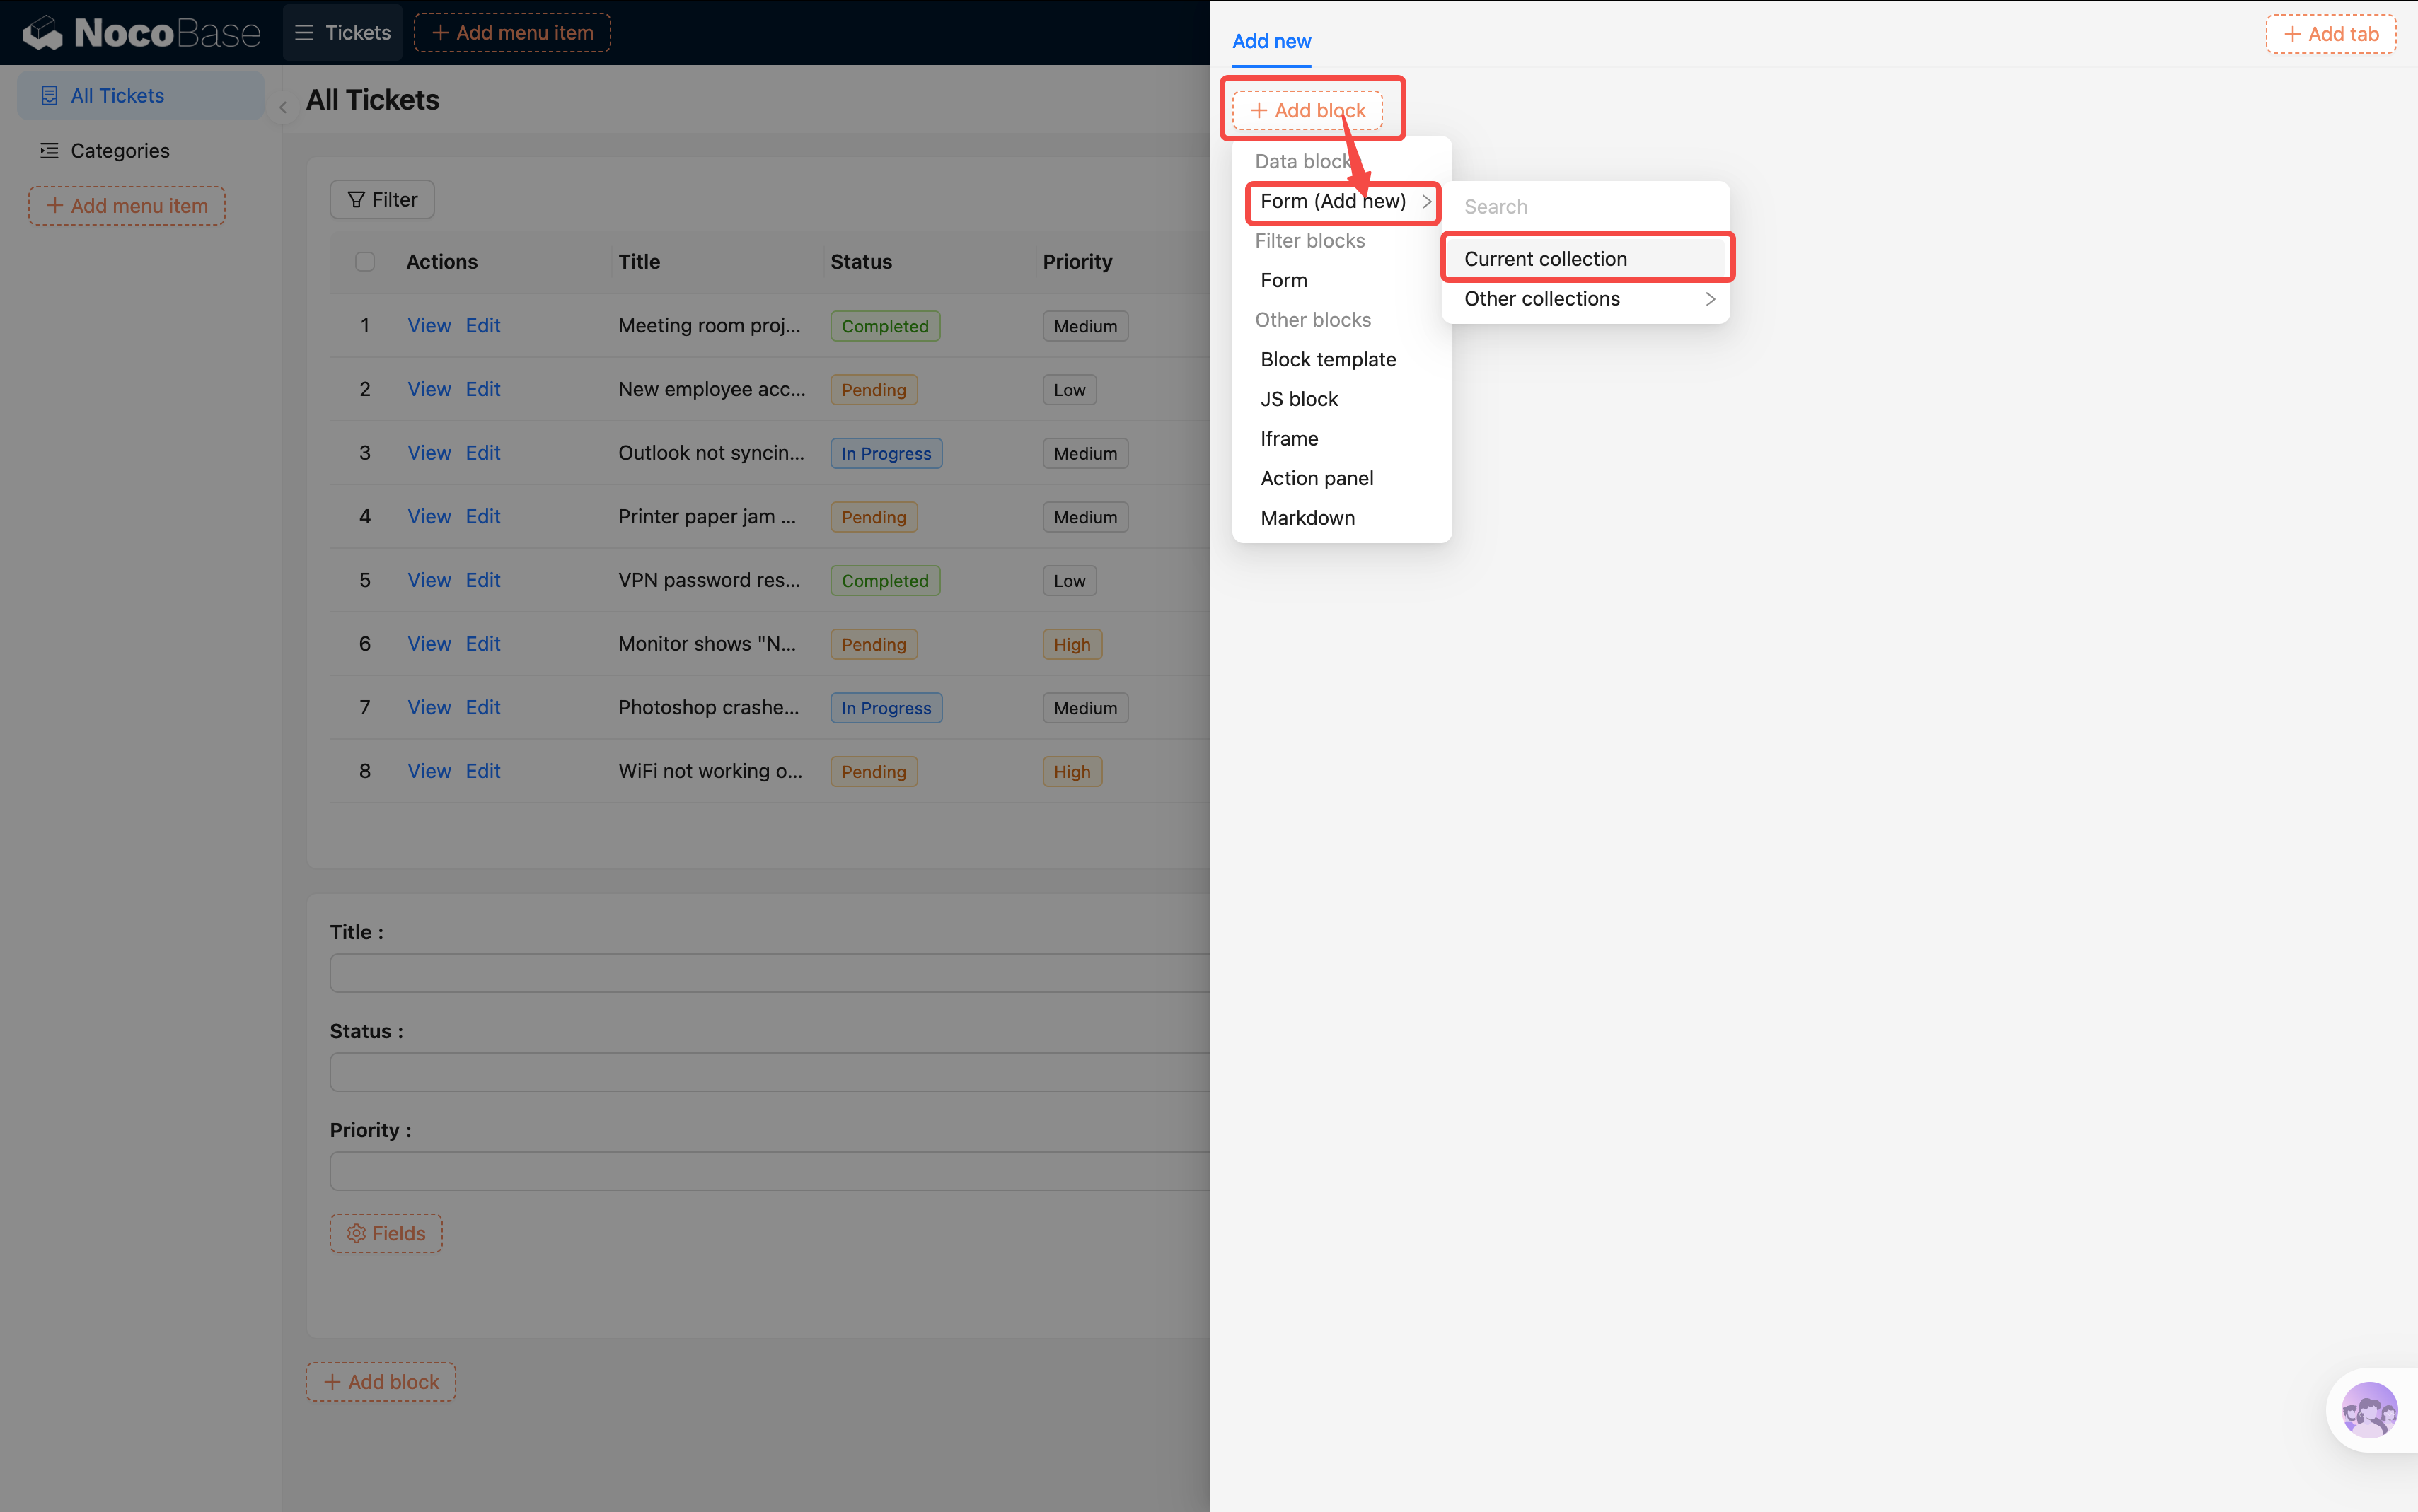
Configuring the Form in the Popup
-
Click the "Add new" button to open the popup.
-
In the popup, click "Add block" -> Data blocks -> Form (Add new).
-
Select "Current collection". The popup already knows which collection it's associated with — no need to specify manually.
-
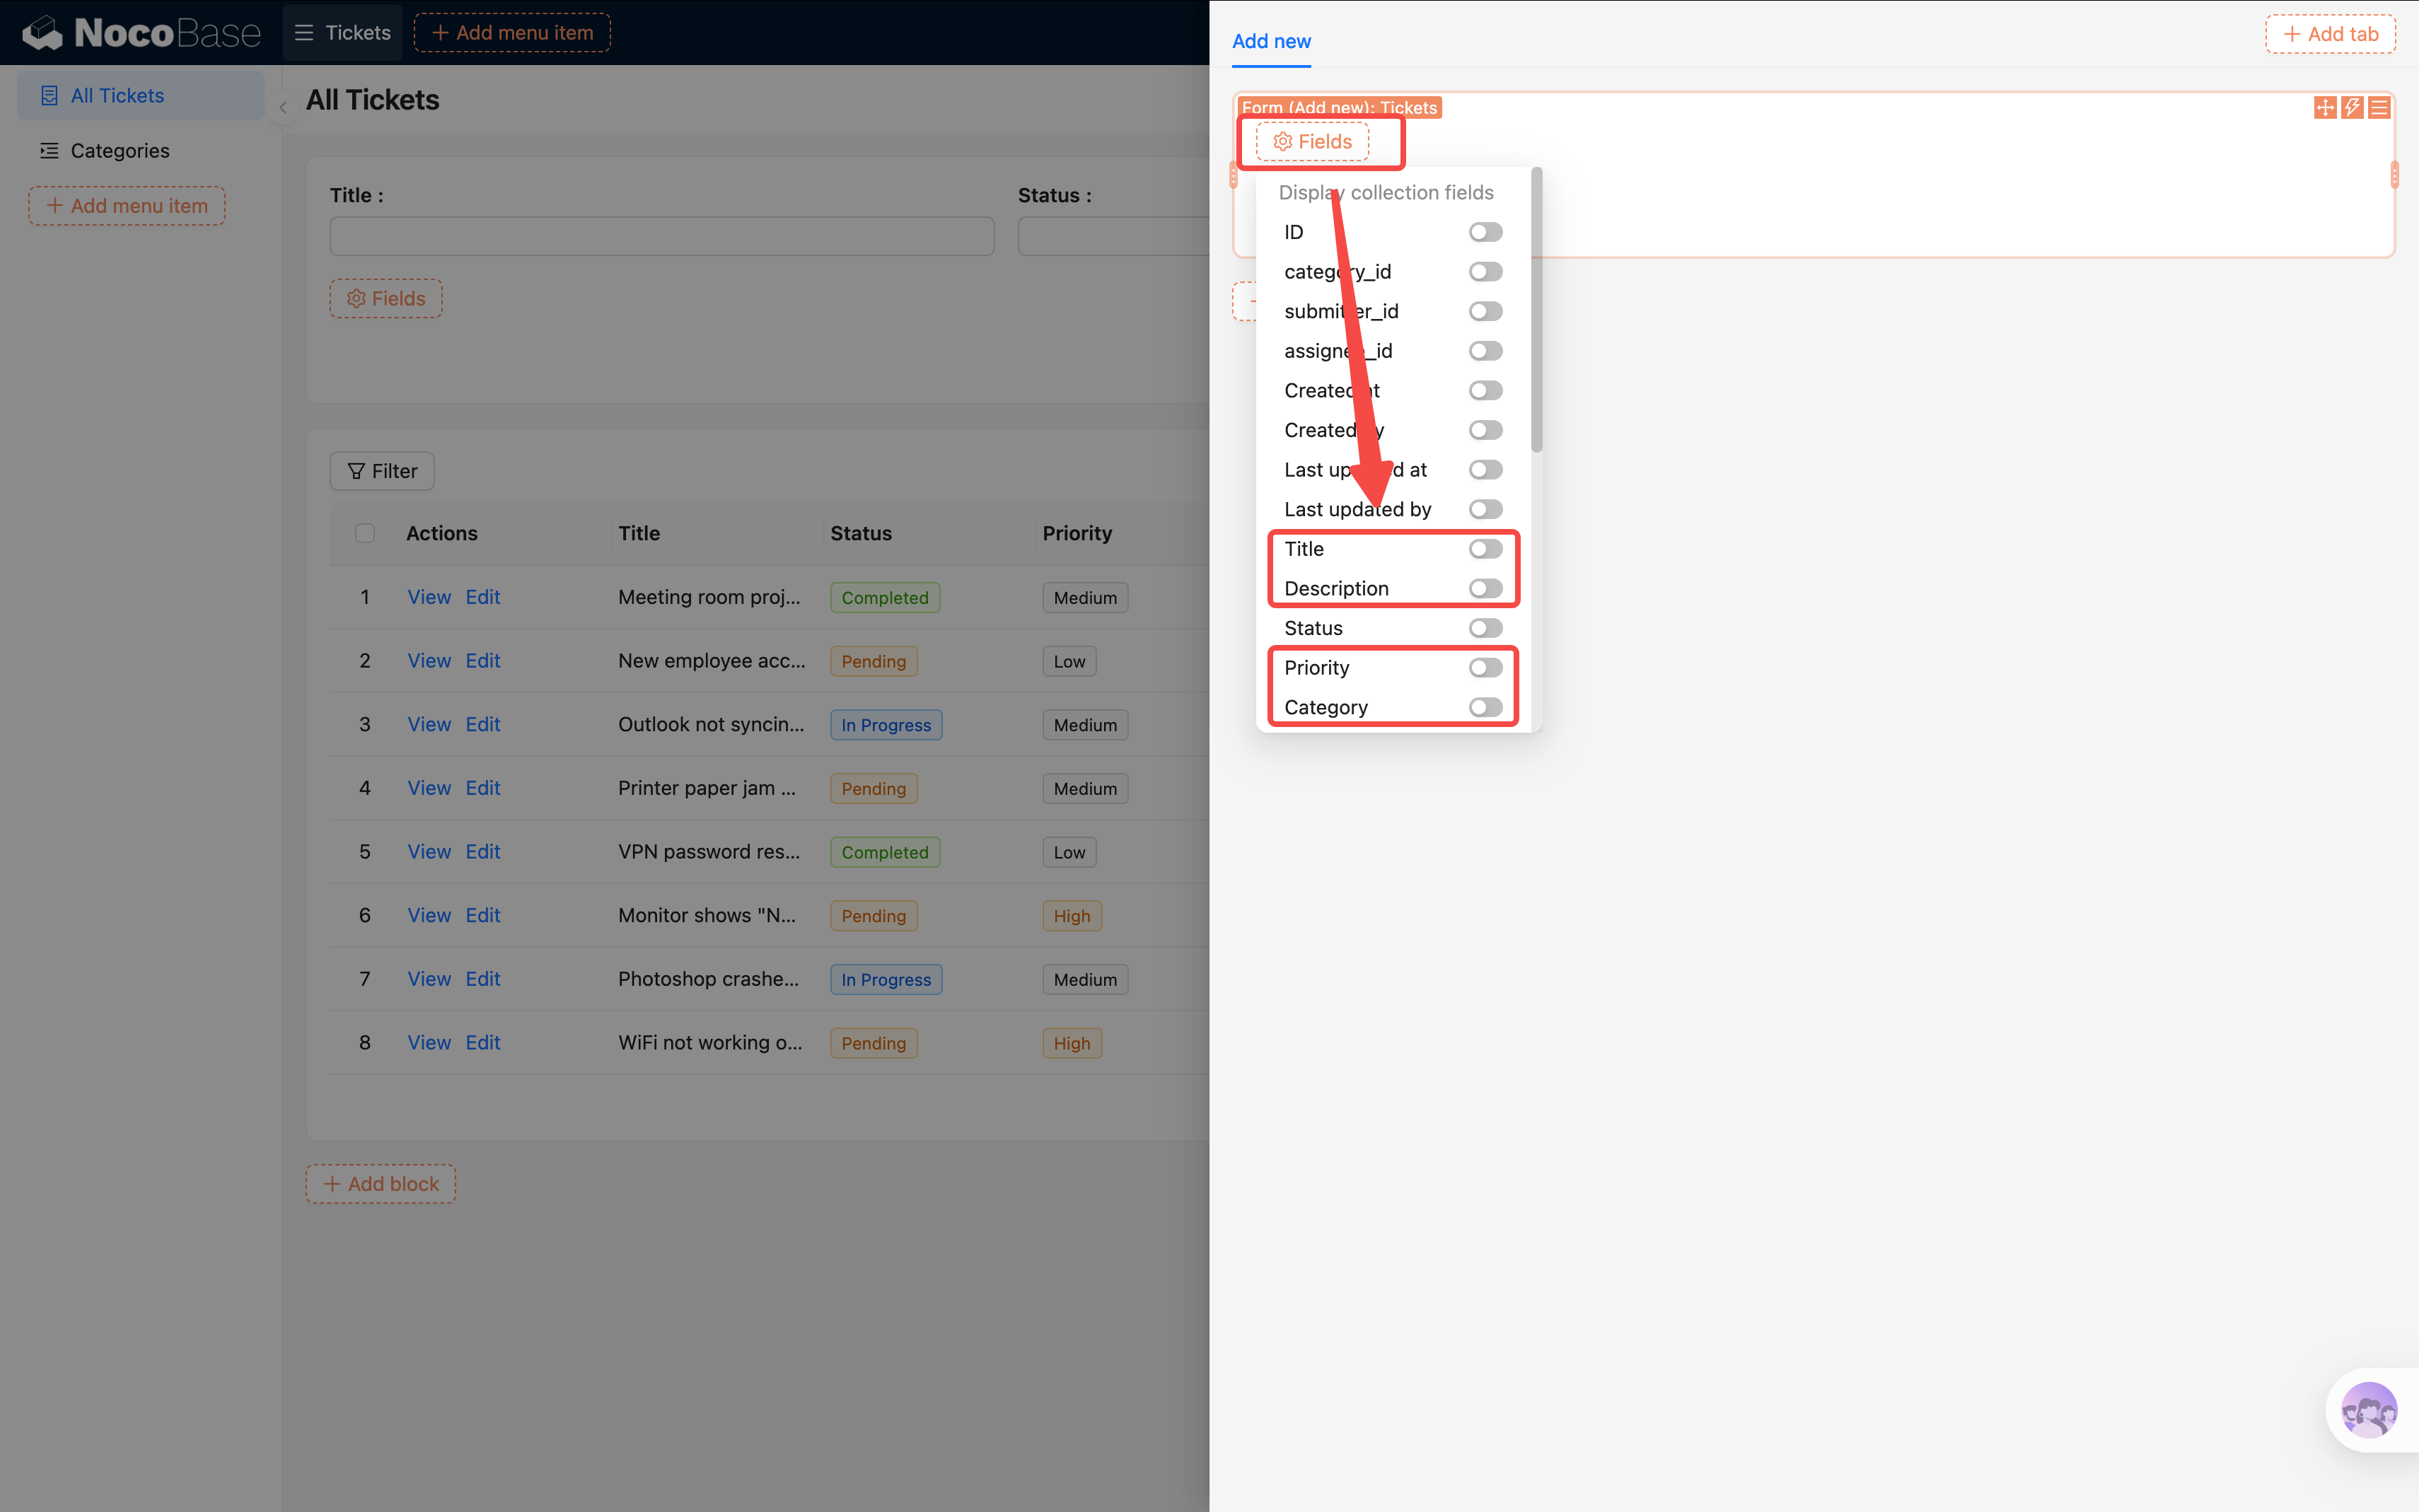
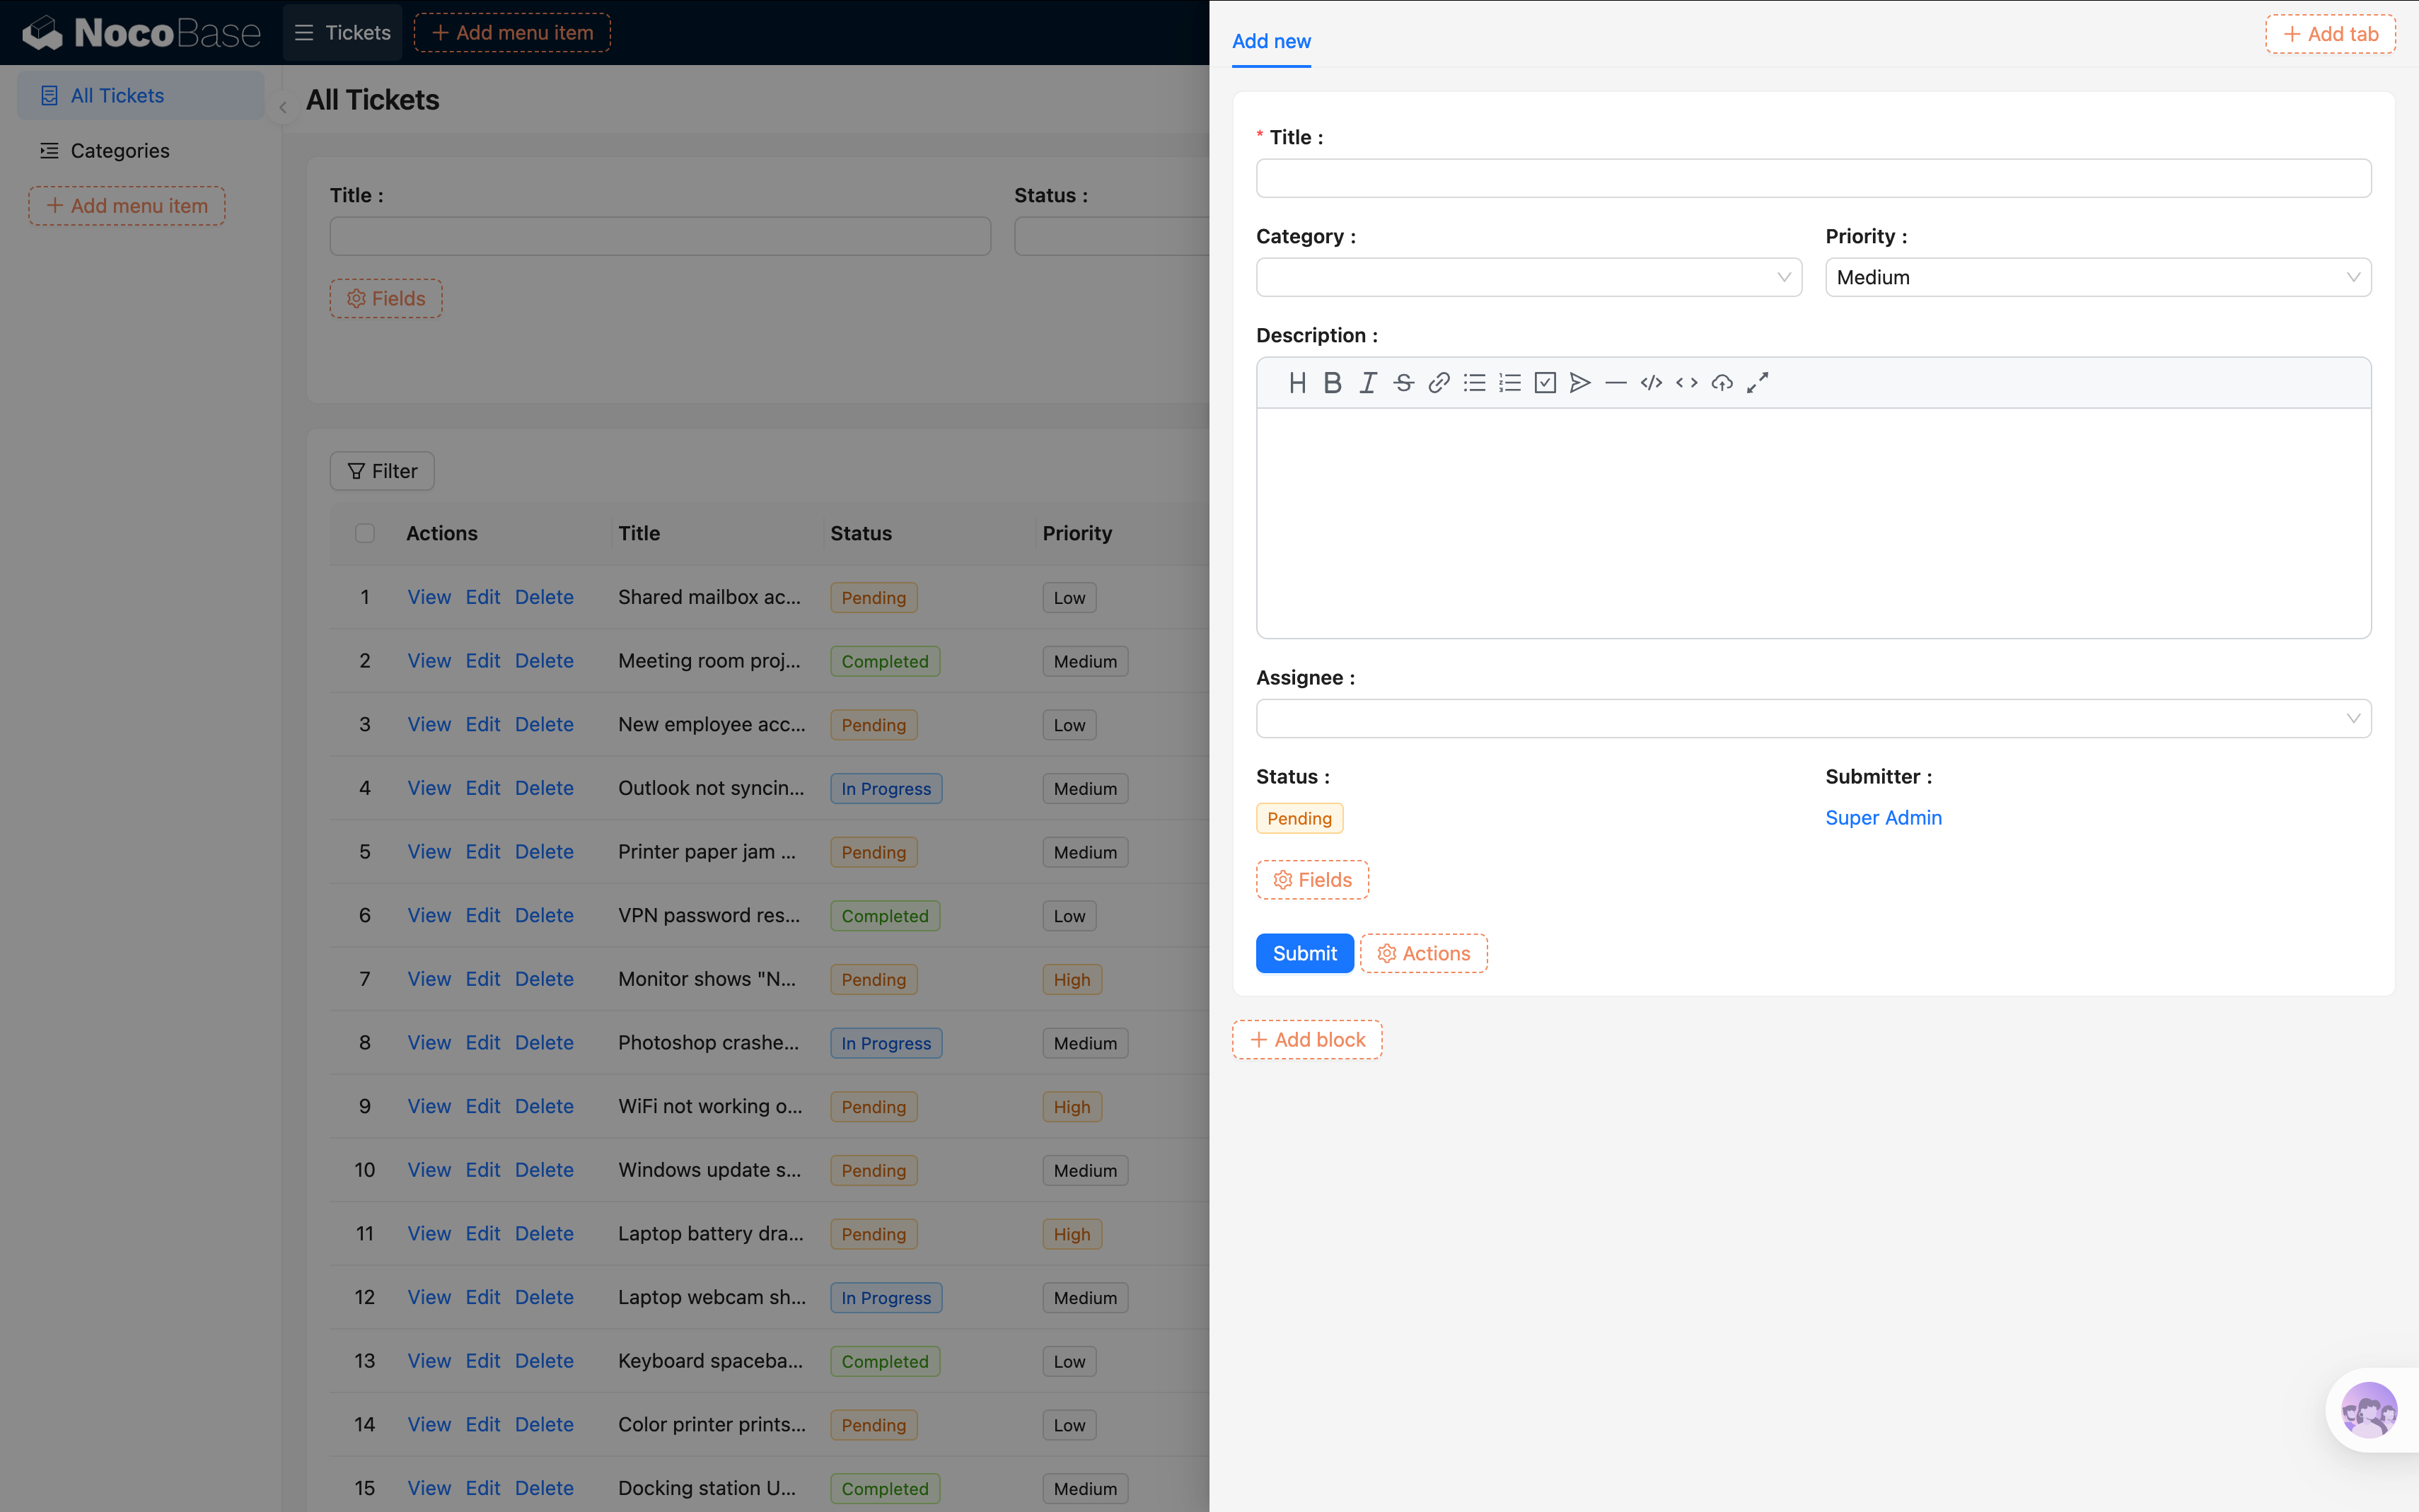
In the form, click "Fields" and check the following fields:
| Field | Configuration Notes |
|---|---|
| Title | Required (auto-inherited) |
| Description | Rich text input |
| Status | Dropdown select (we'll set a default via linkage rules later) |
| Priority | Dropdown select |
| Category | A relation field that automatically appears as a dropdown selector |
| Submitter | Relation field (we'll set a default via linkage rules later) |
| Assignee | Relation field |
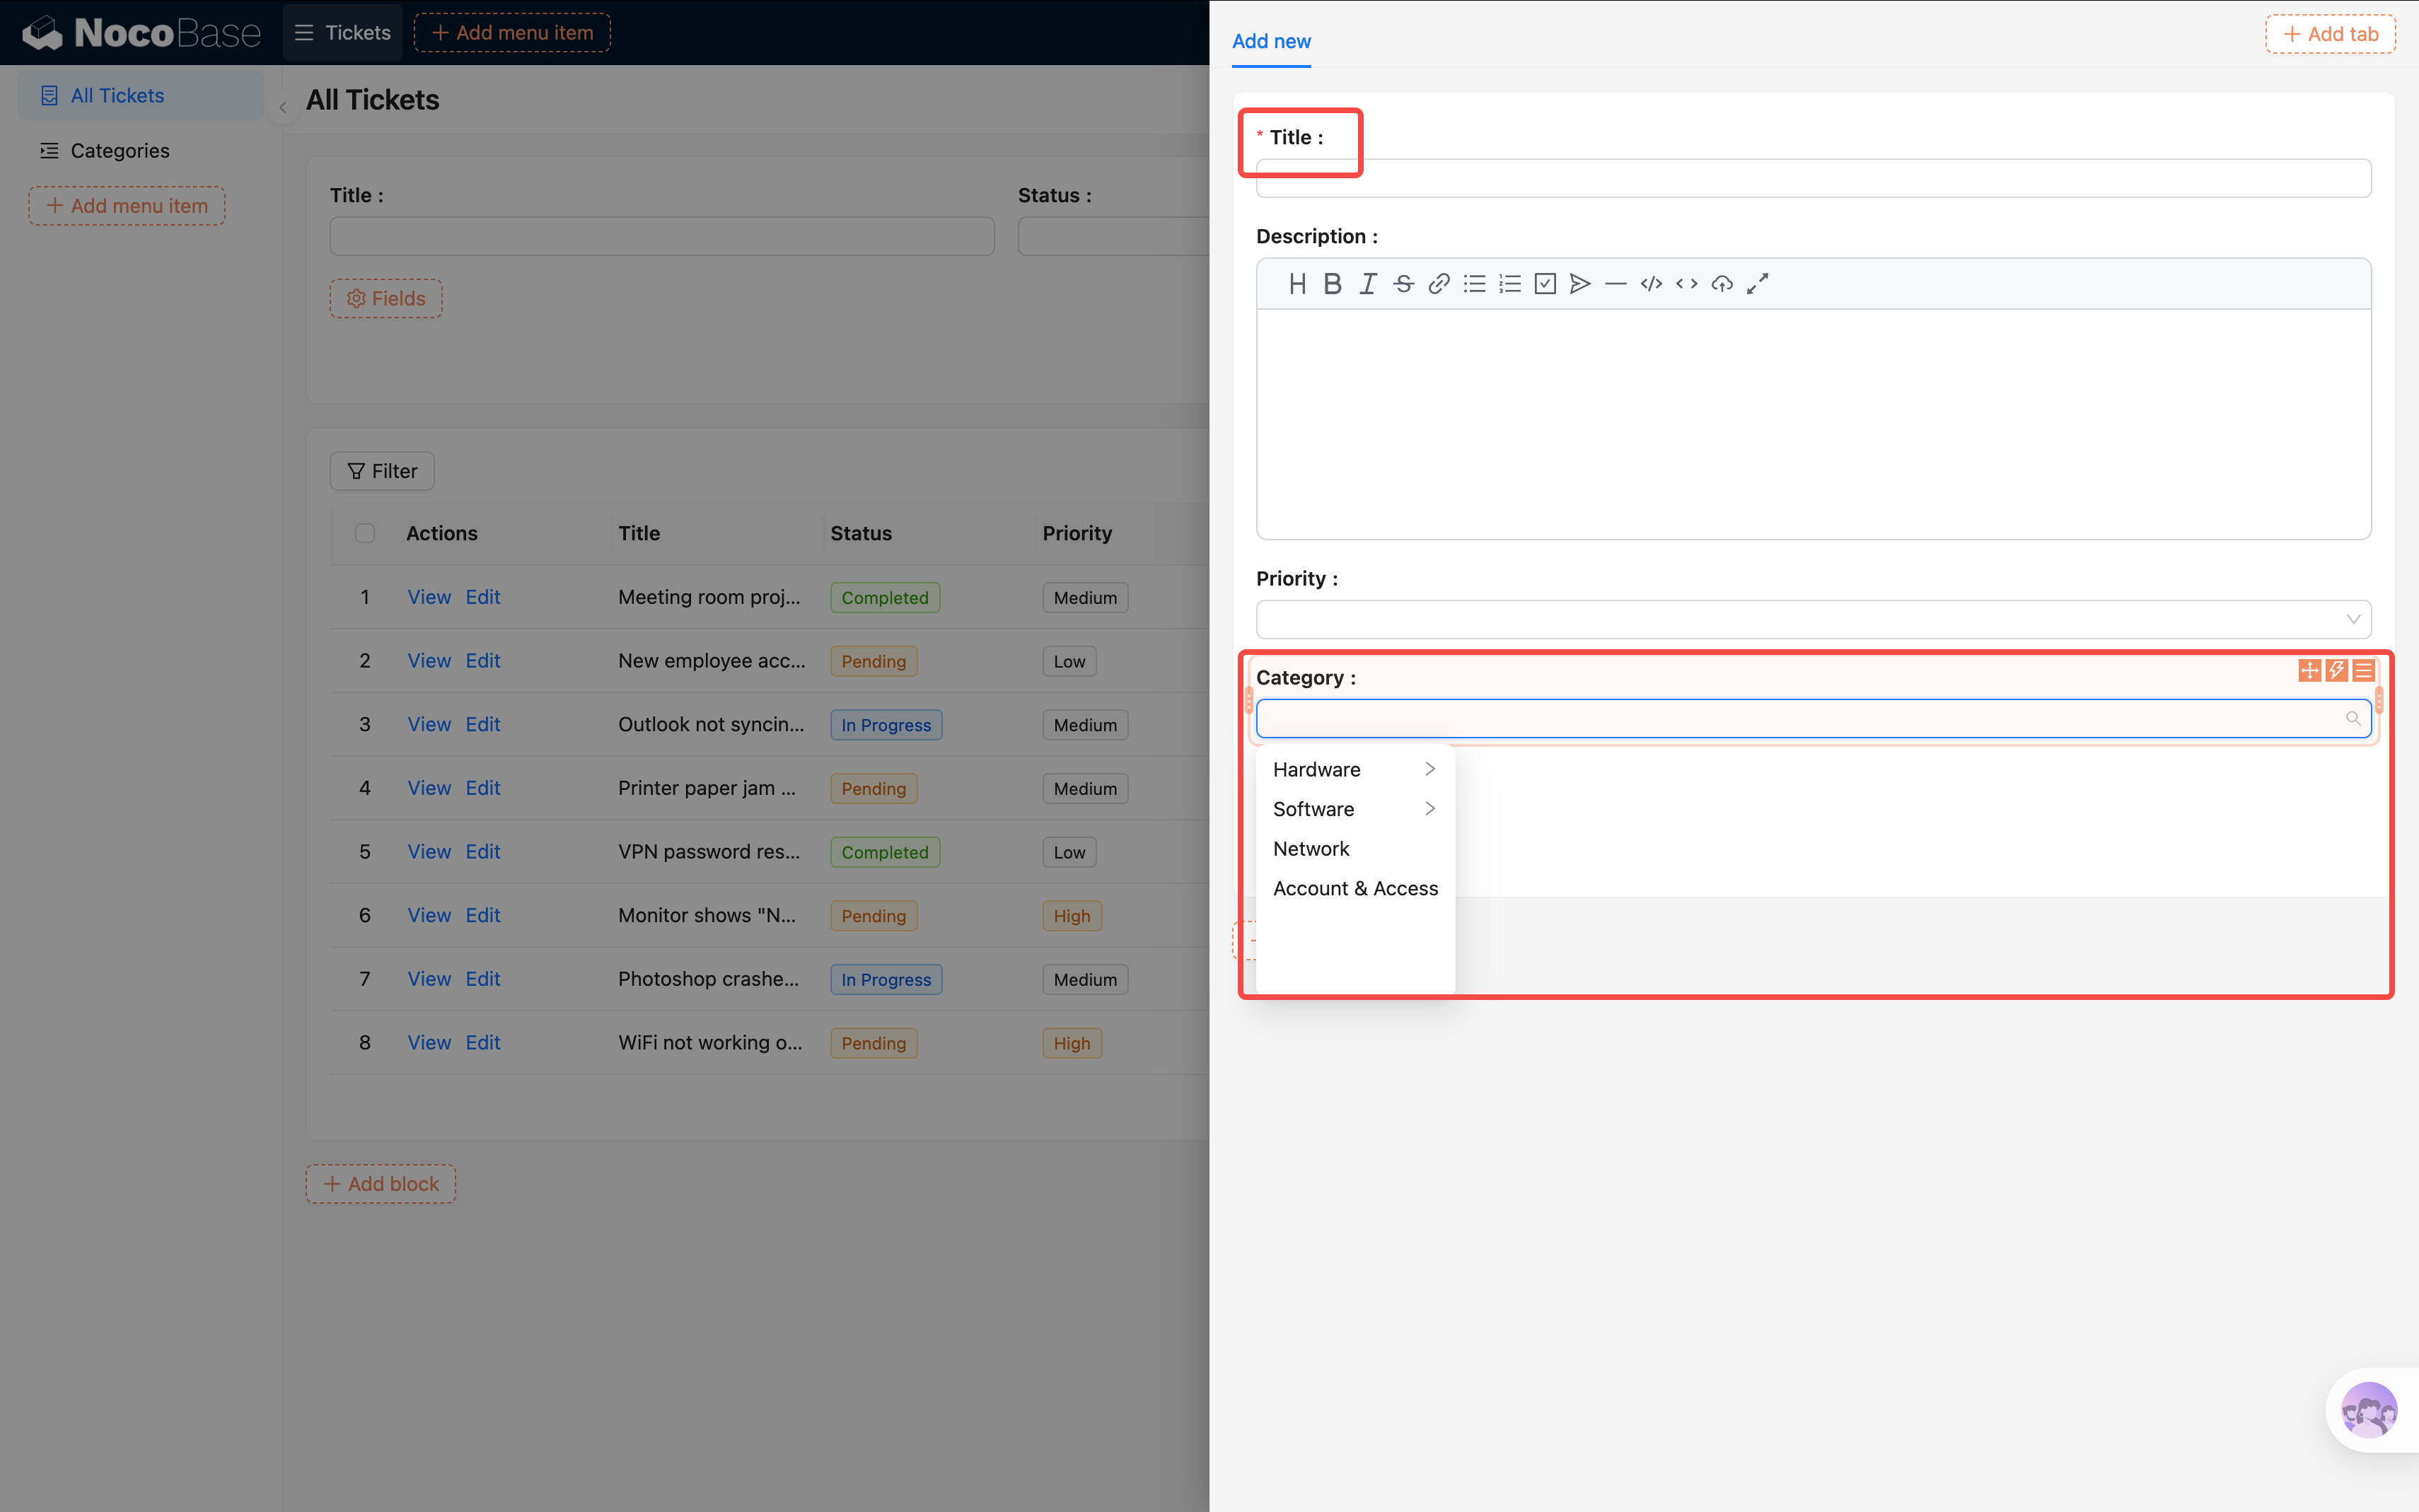
You'll notice a red asterisk * next to "Title" automatically — because we set it as required when creating the field in Chapter 2. Forms automatically inherit required rules from the collection's field settings; no extra configuration needed.
Tip: If a field isn't required at the collection level but you want it required in this specific form, you can set it individually in the field's settings.
Adding the Submit Button
- Below the Form block, click "Actions".
- Check the "Submit" button.
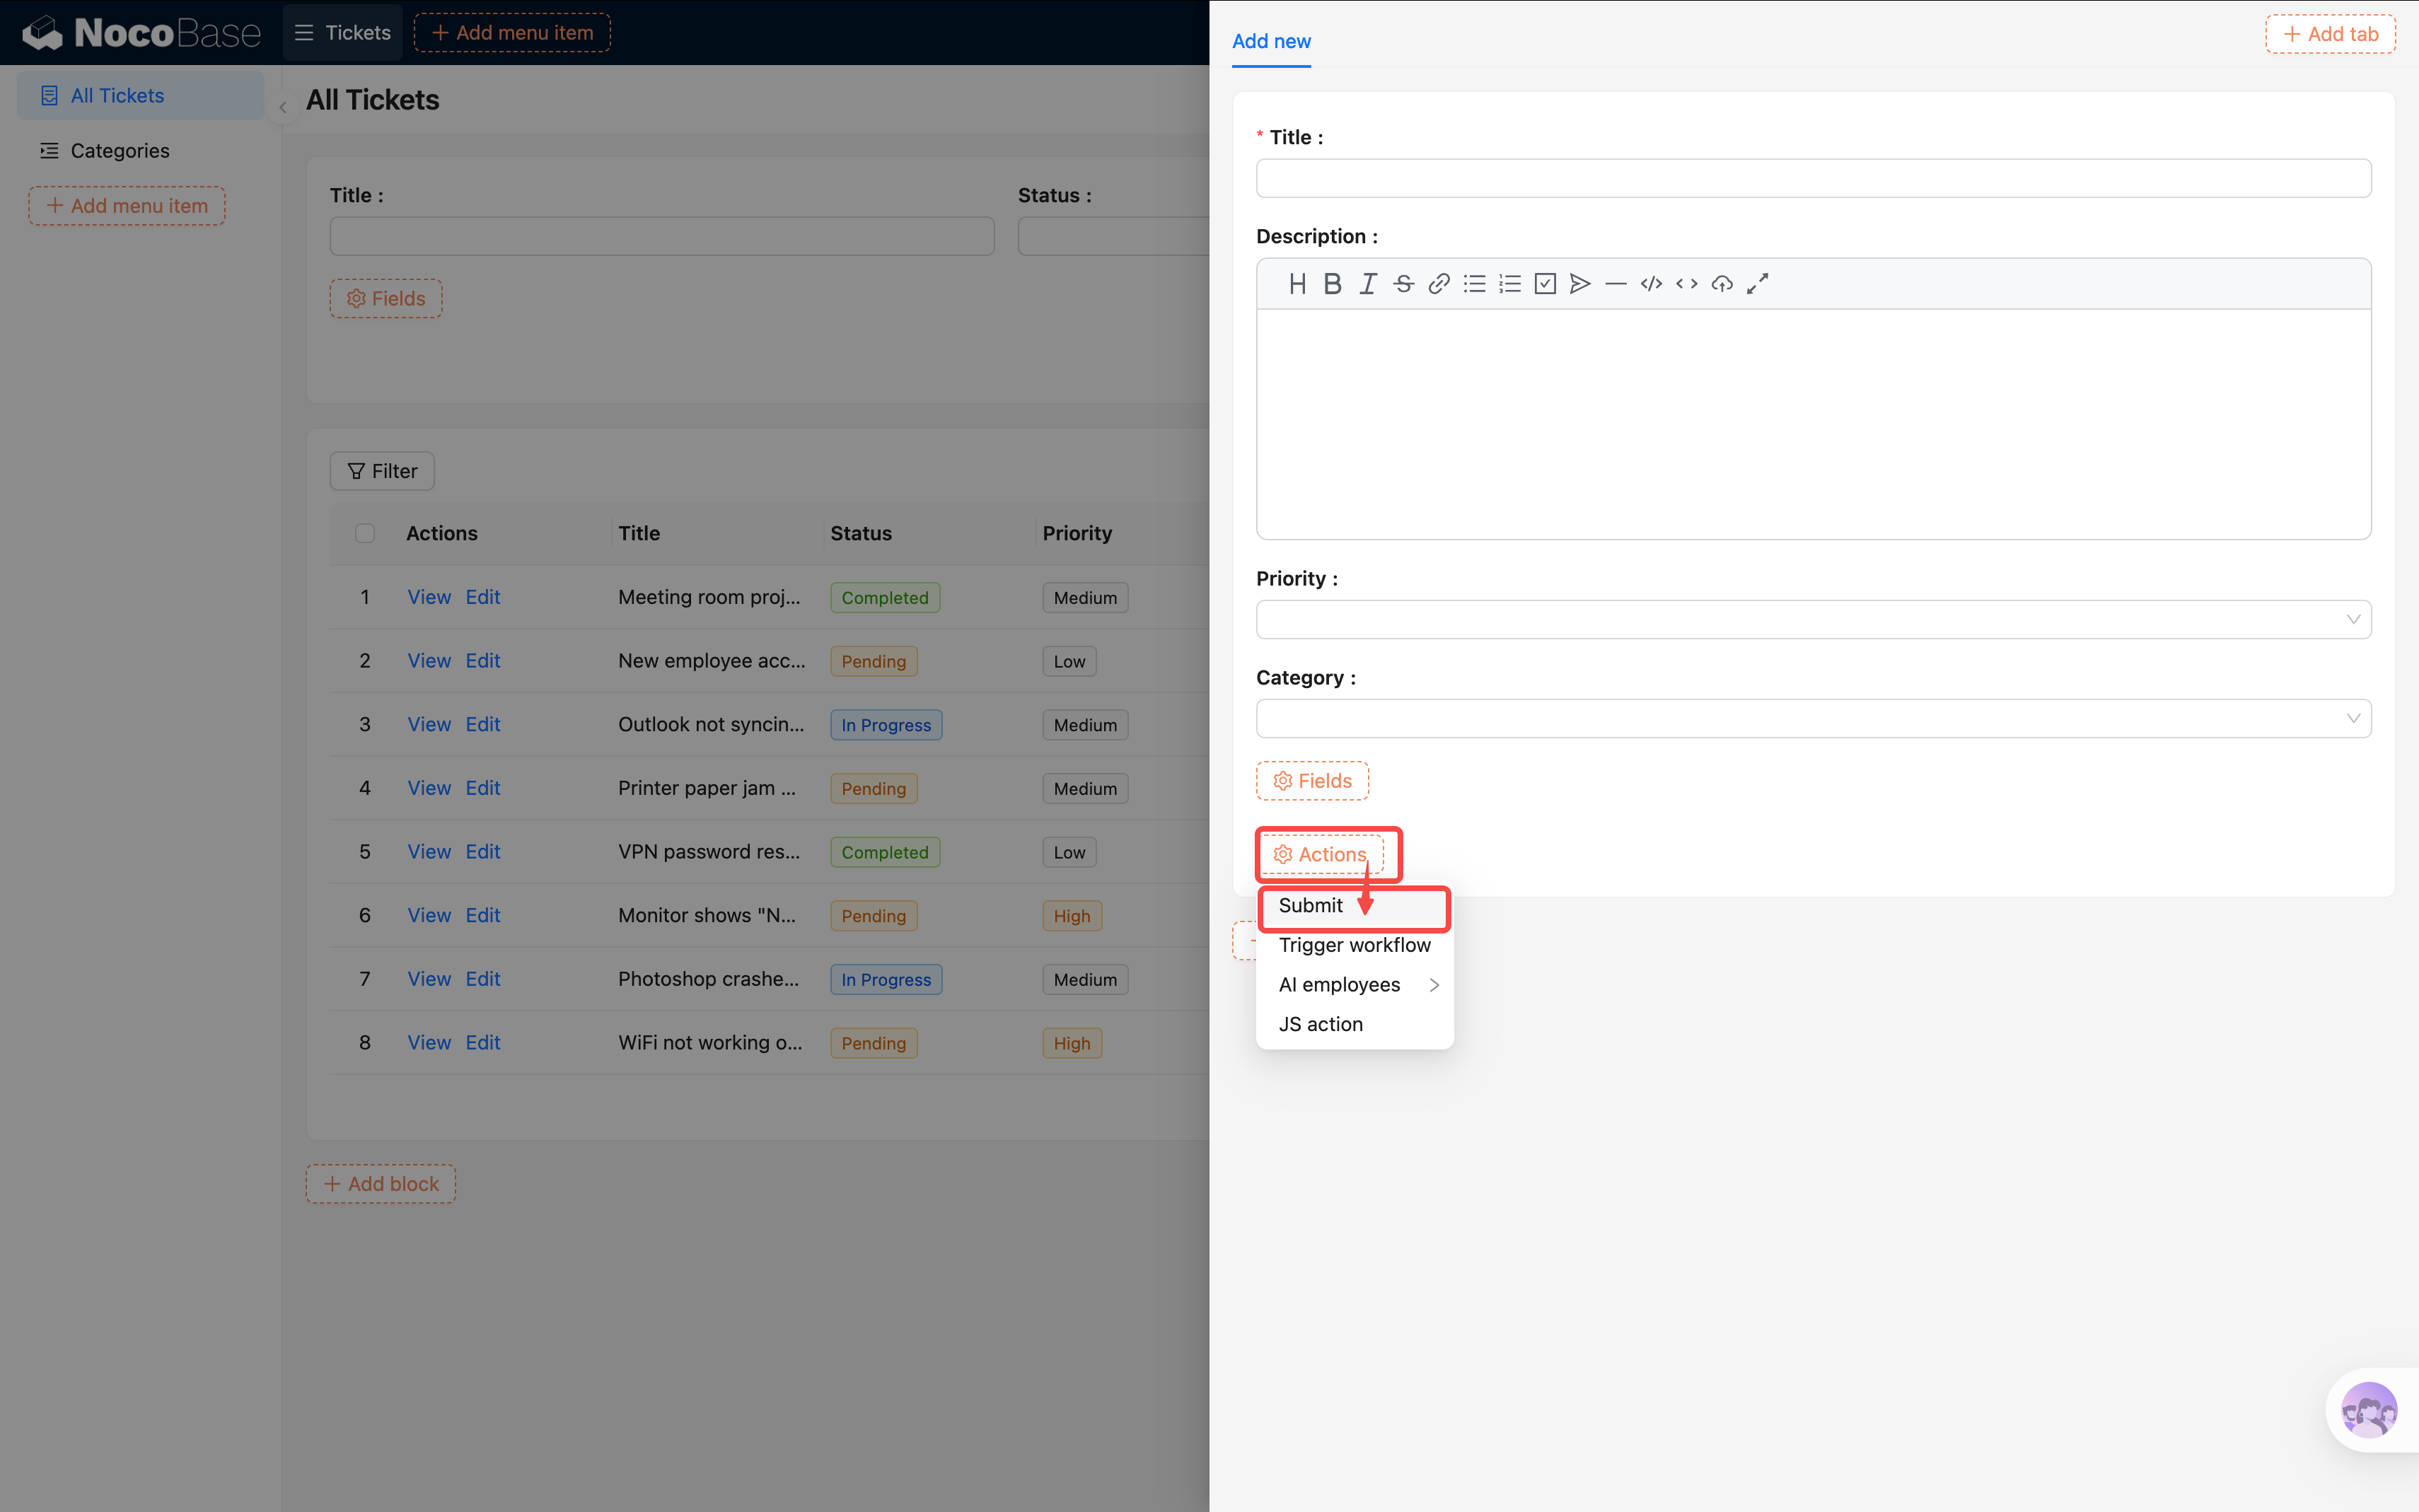
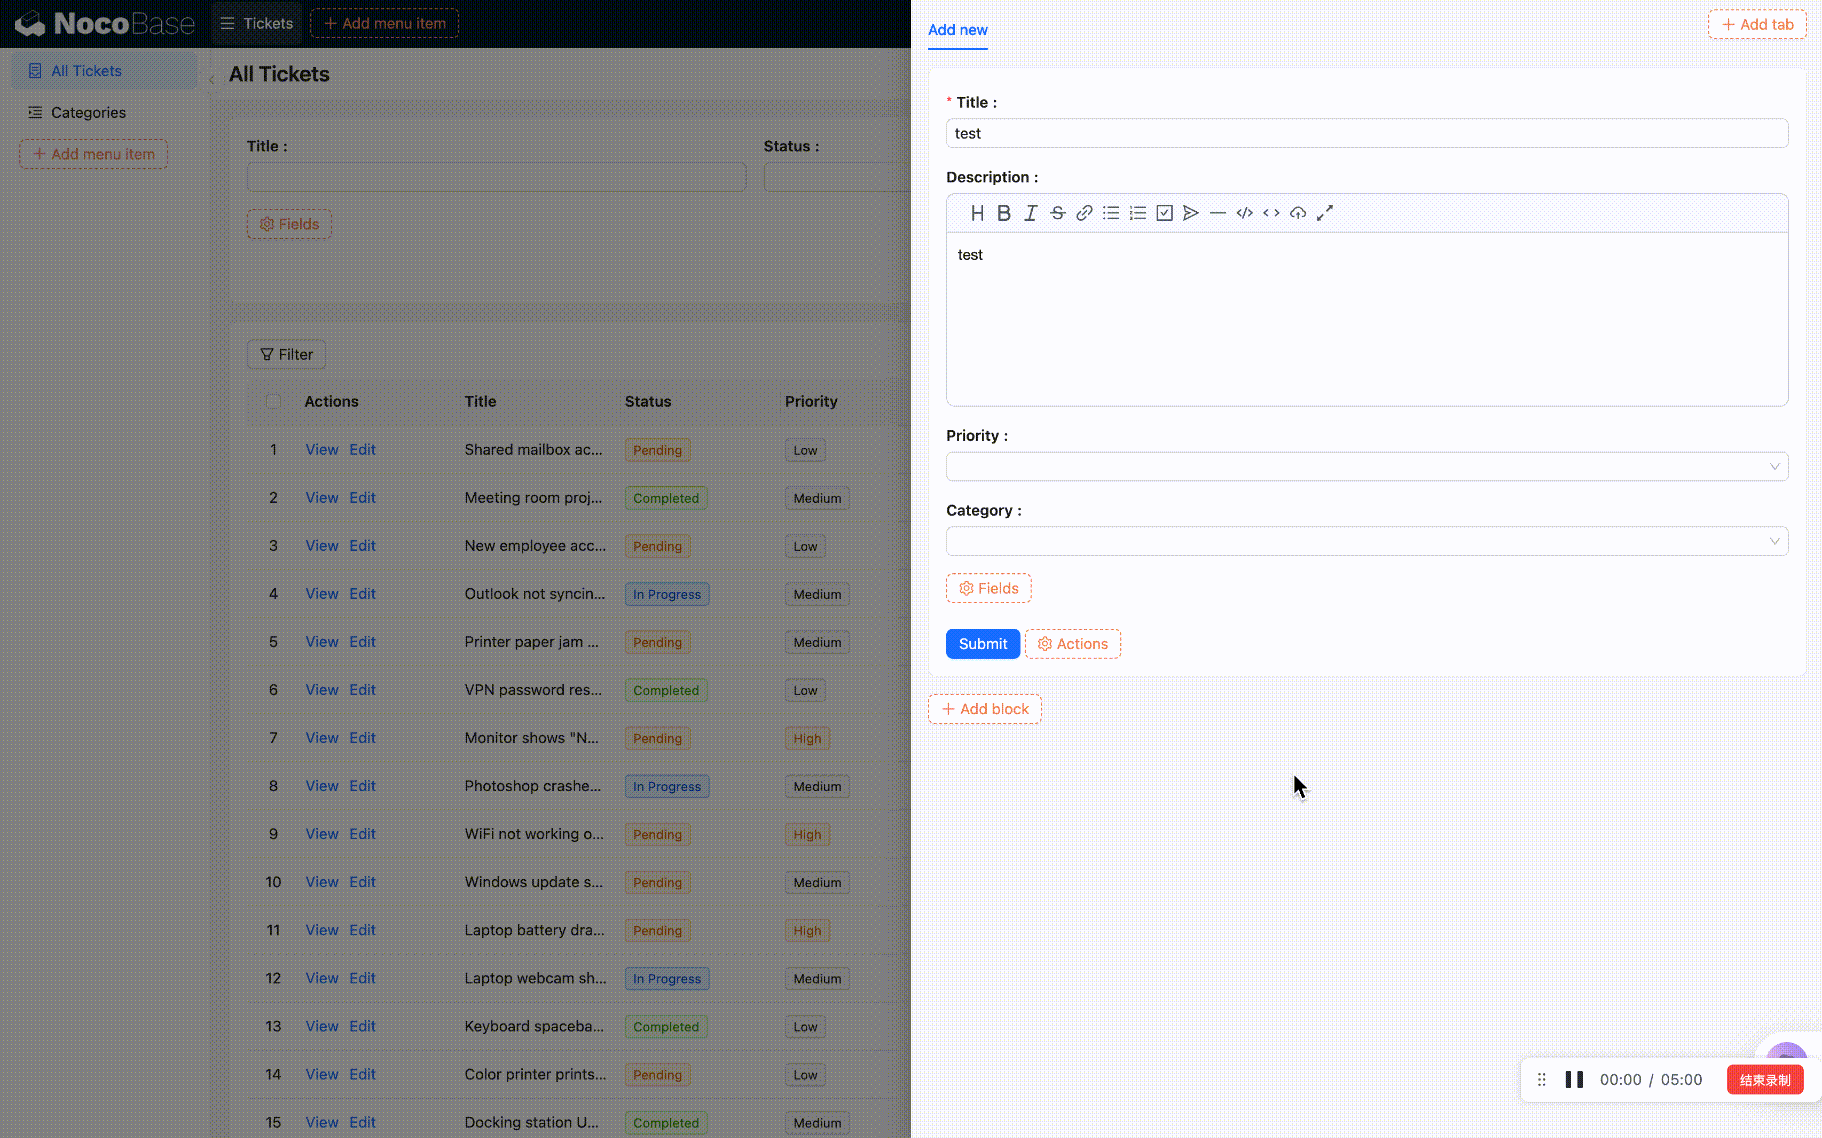
- After filling in the form, users can click Submit to create a new ticket.
4.2 Linkage Rules: Defaults & Field Linkage
Some fields should be auto-filled (e.g., Status defaults to "Pending"), while others need to change dynamically based on conditions (e.g., urgent tickets require a description). The default value feature in 2.0 is still evolving, so in this tutorial we'll use Linkage Rules for both default values and field linkage.
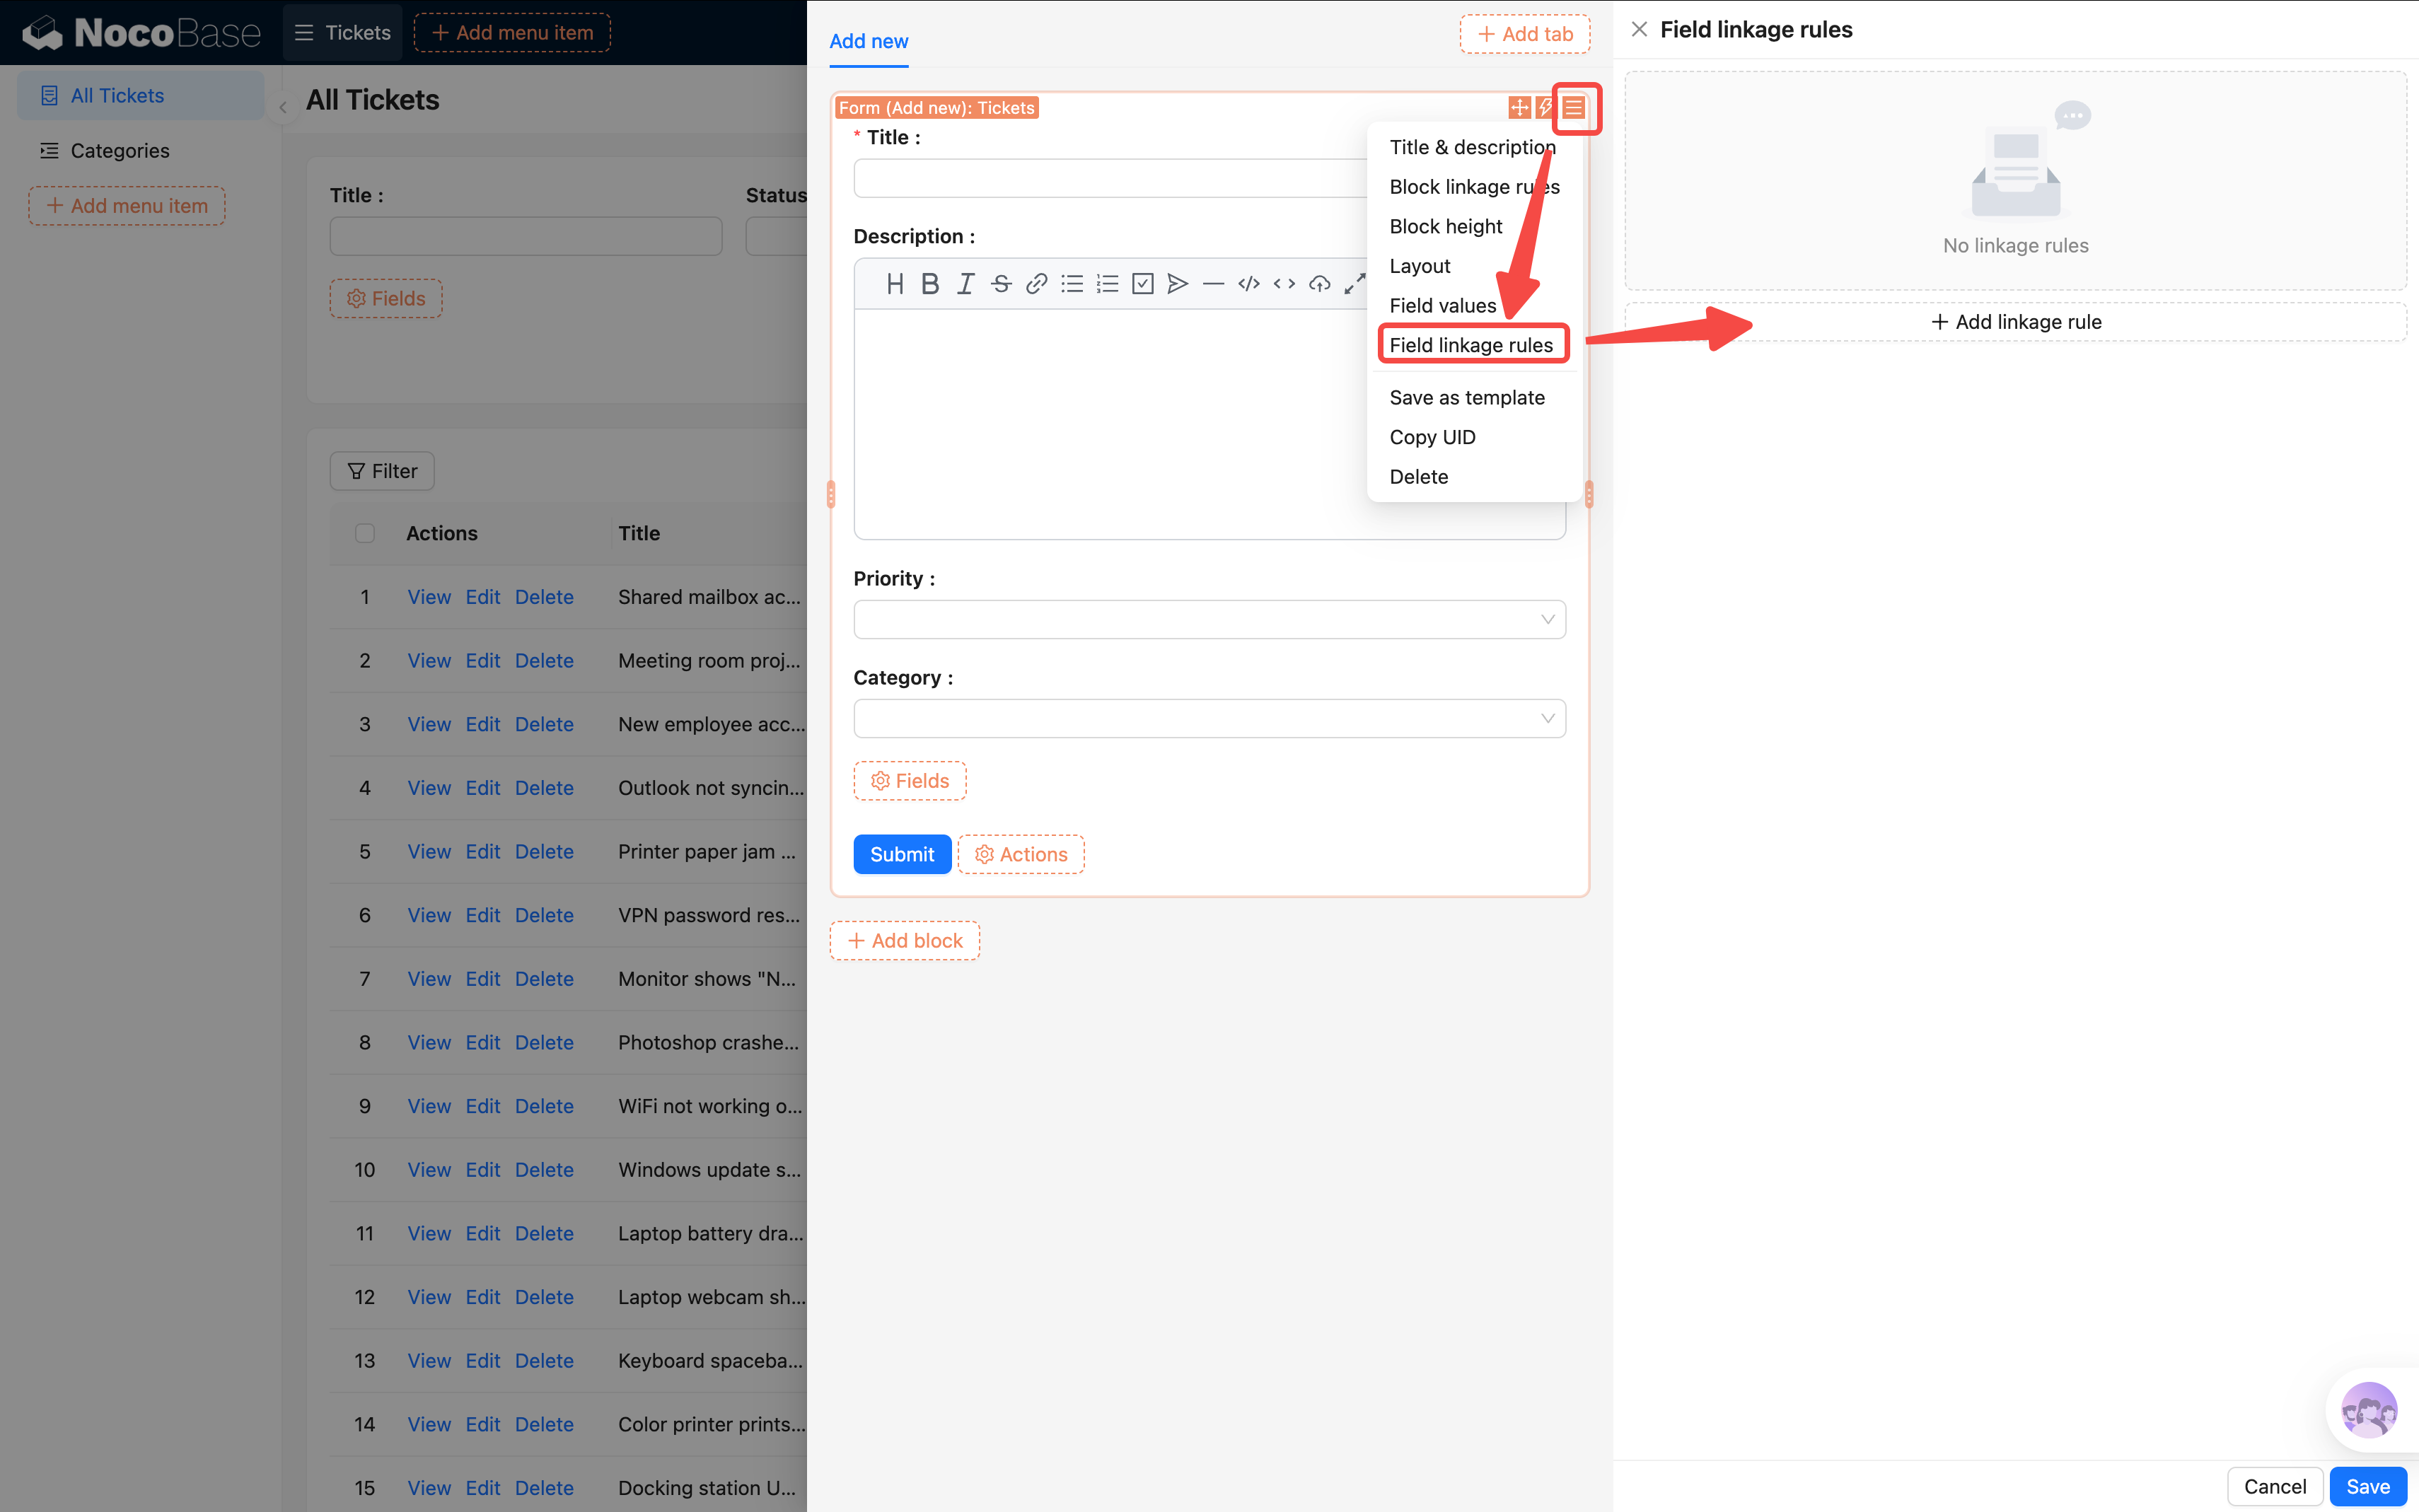
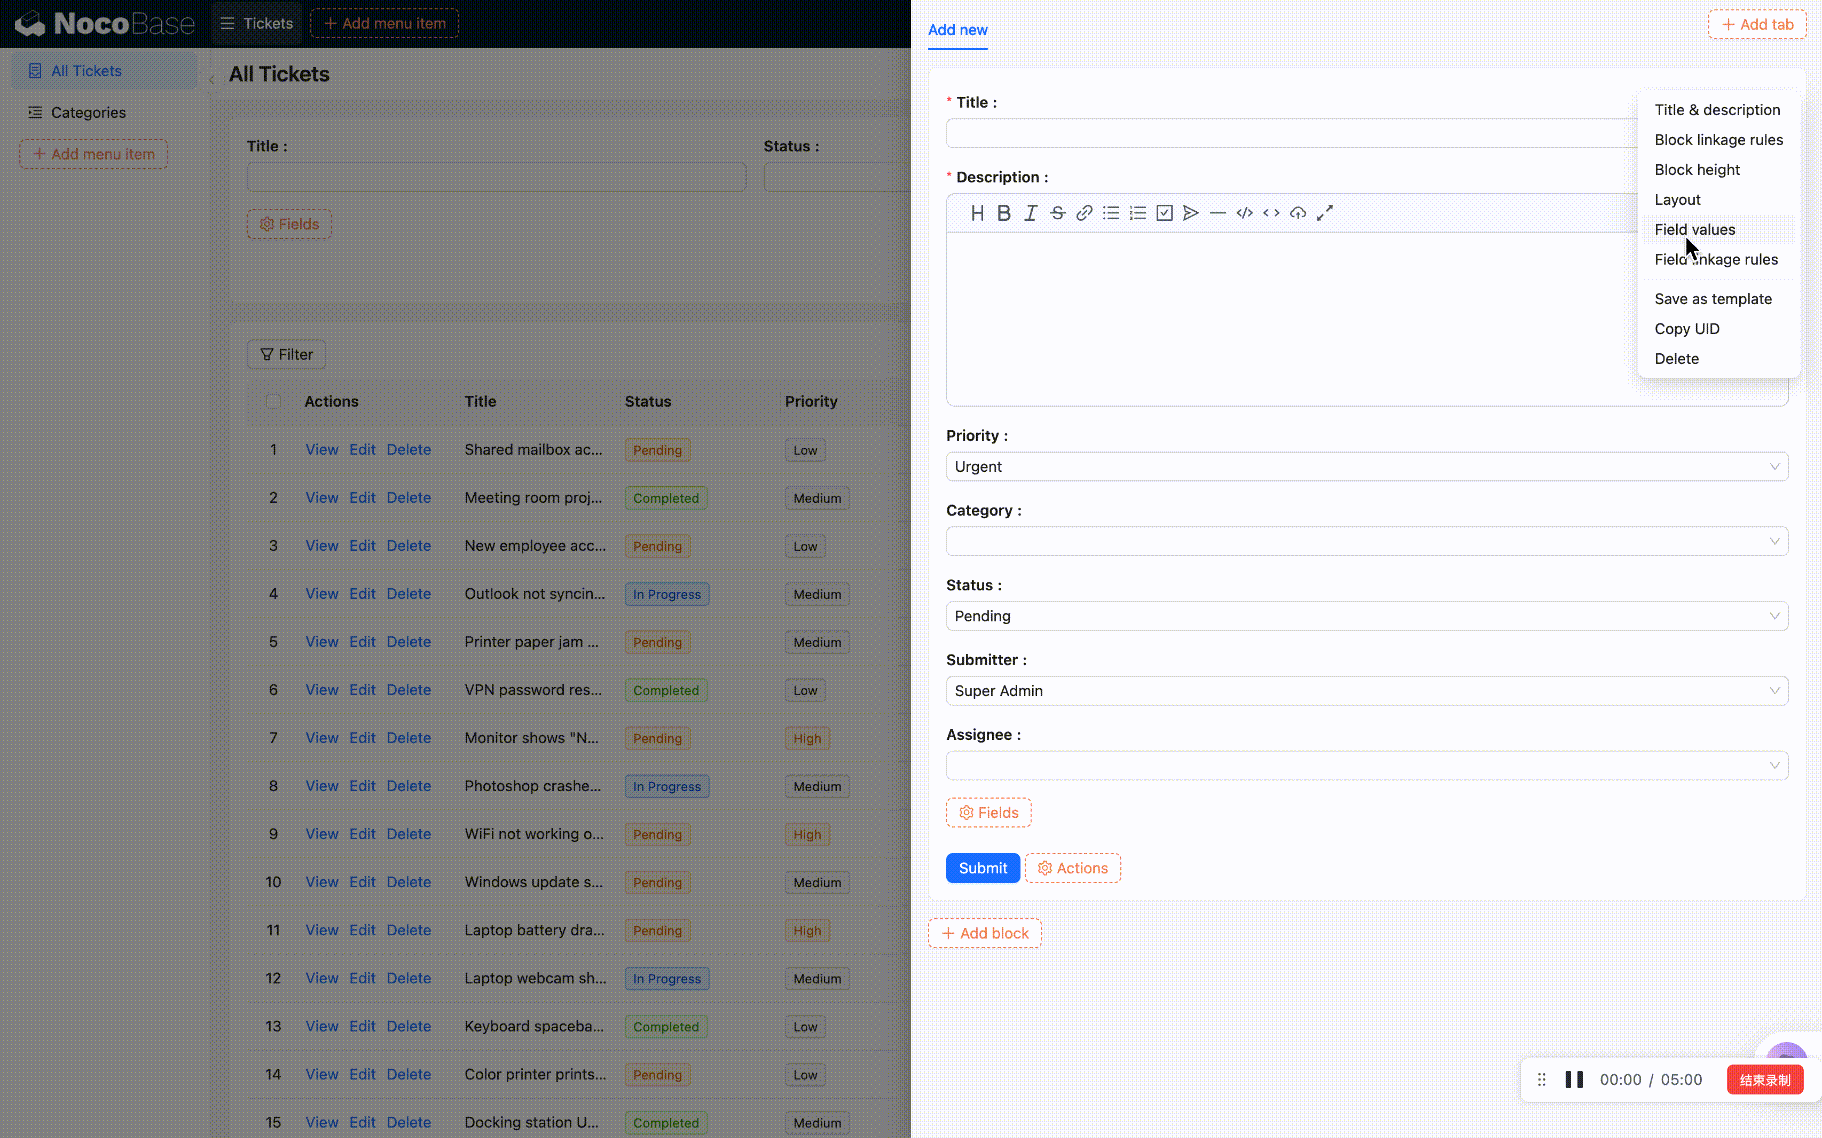
- Click the block settings icon (three-line icon) in the top-right corner of the Form block.
- Find "Linkage rules" — clicking it opens a configuration panel in the sidebar.
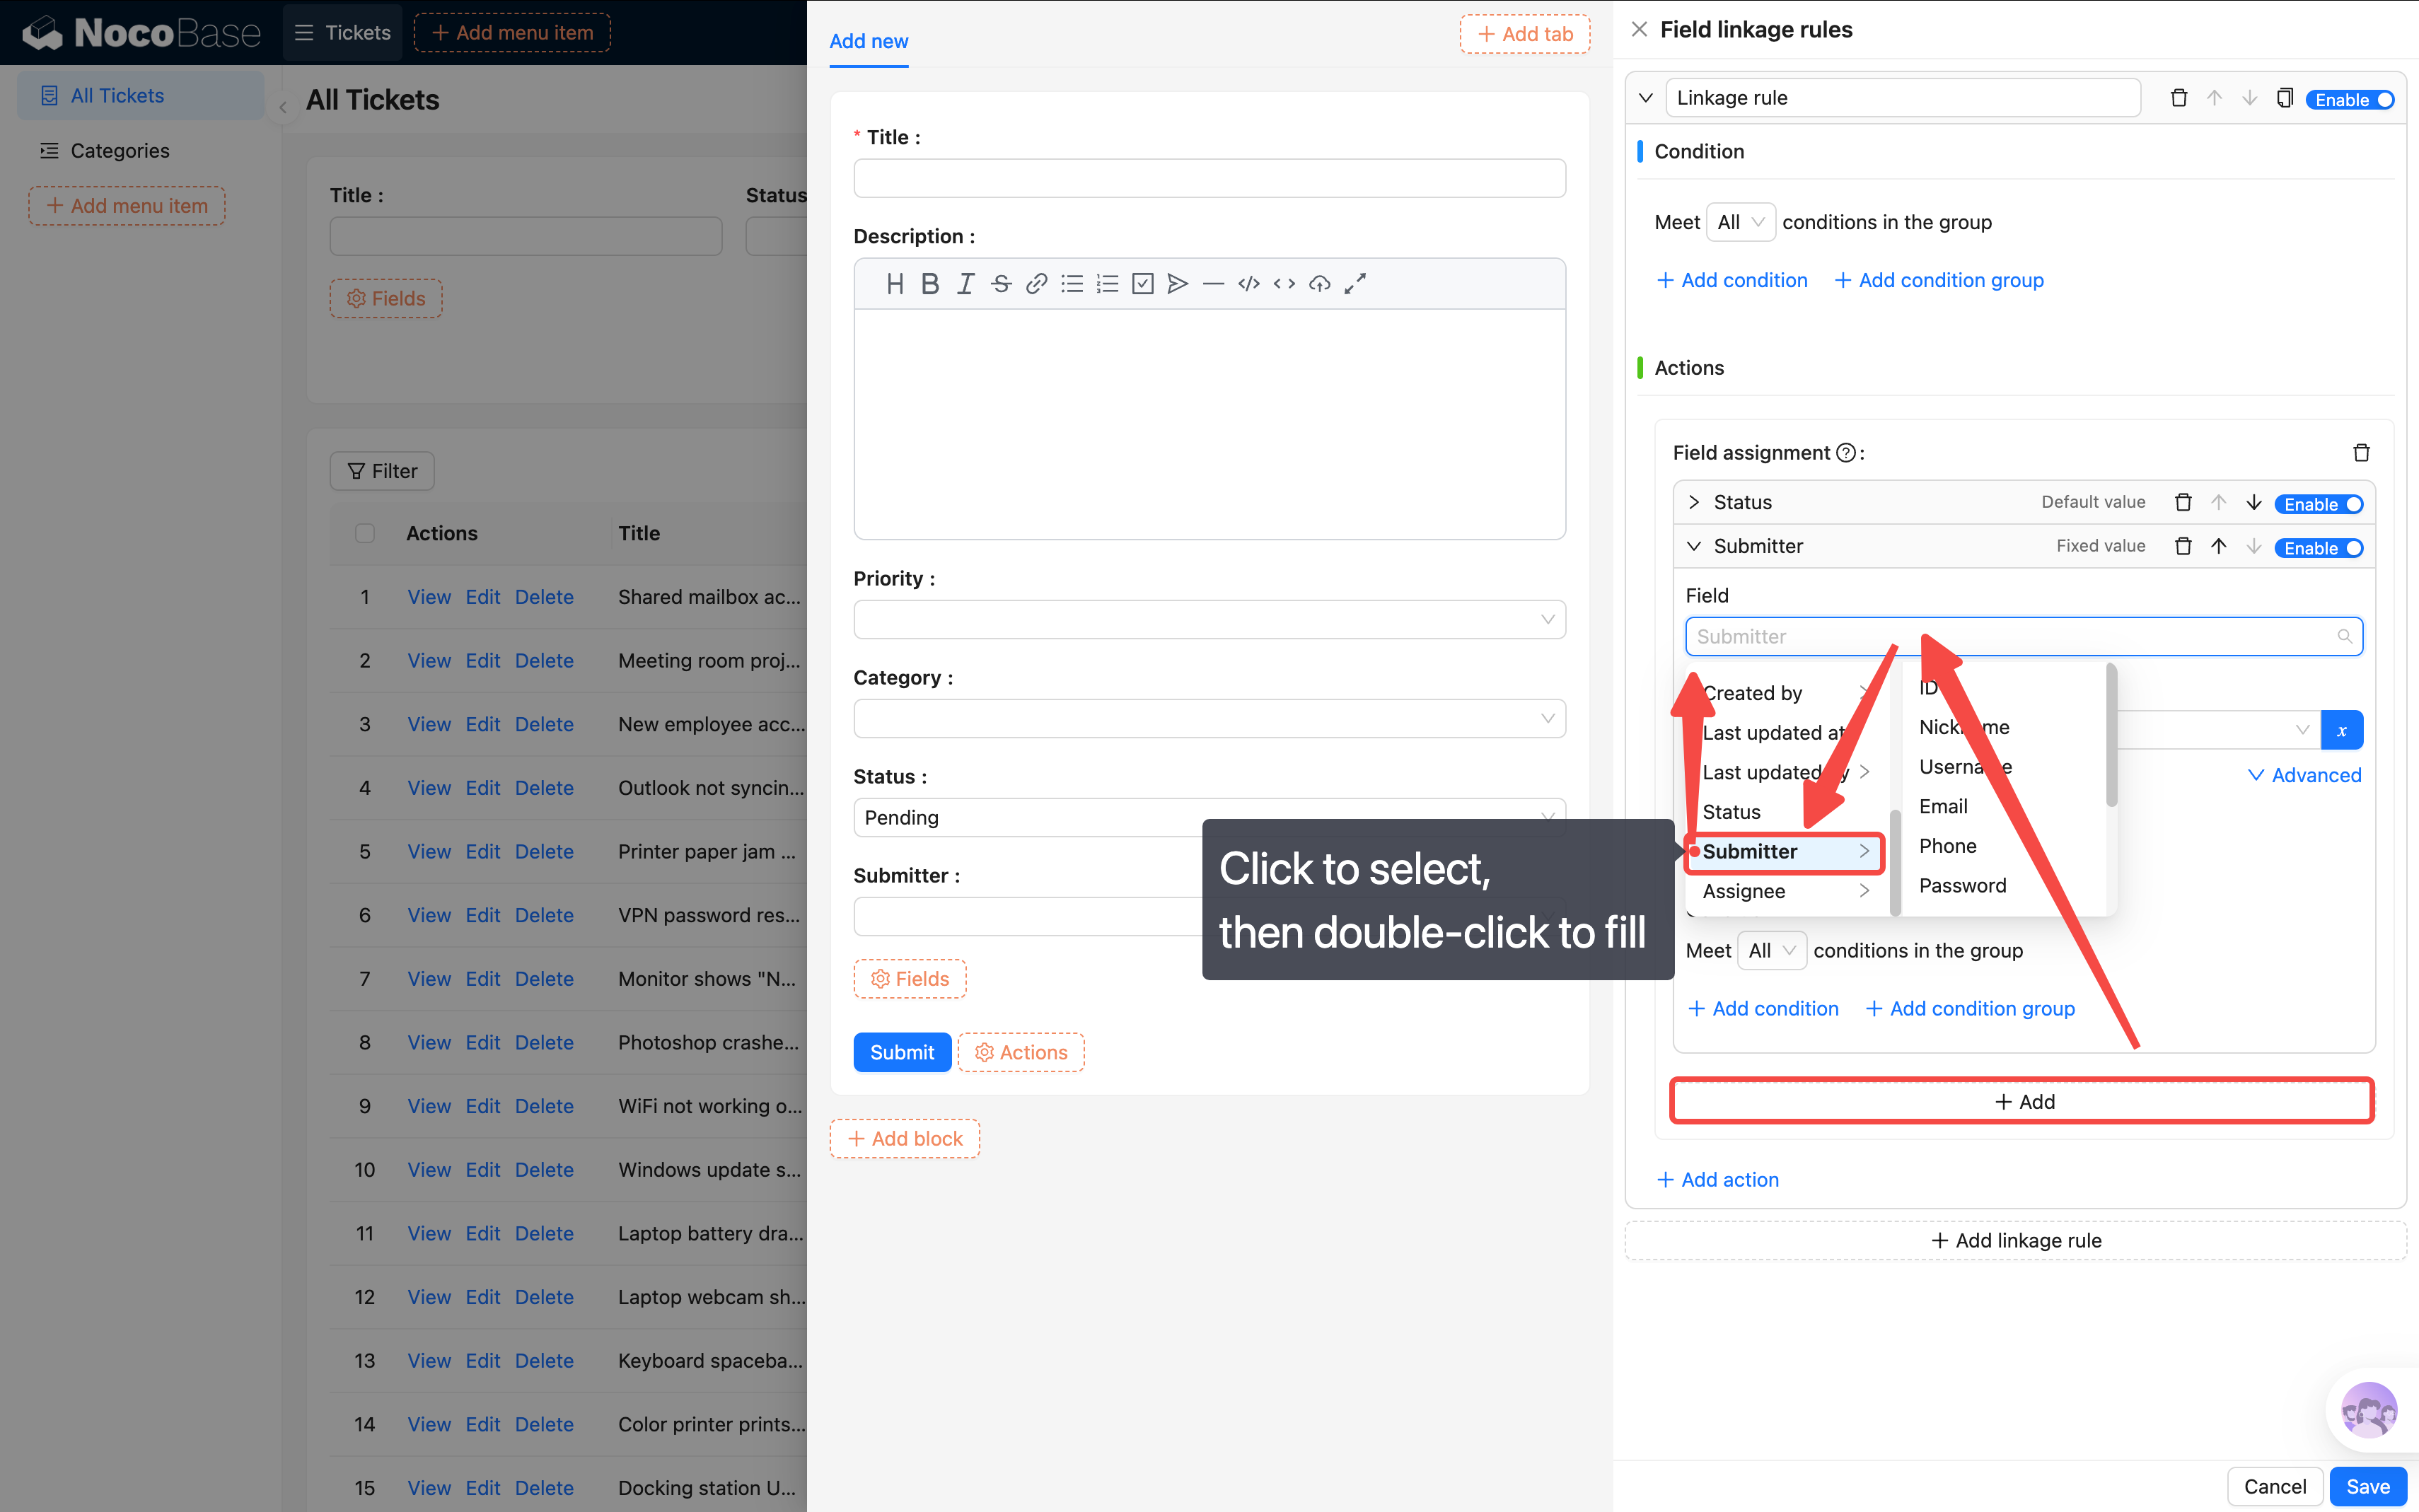
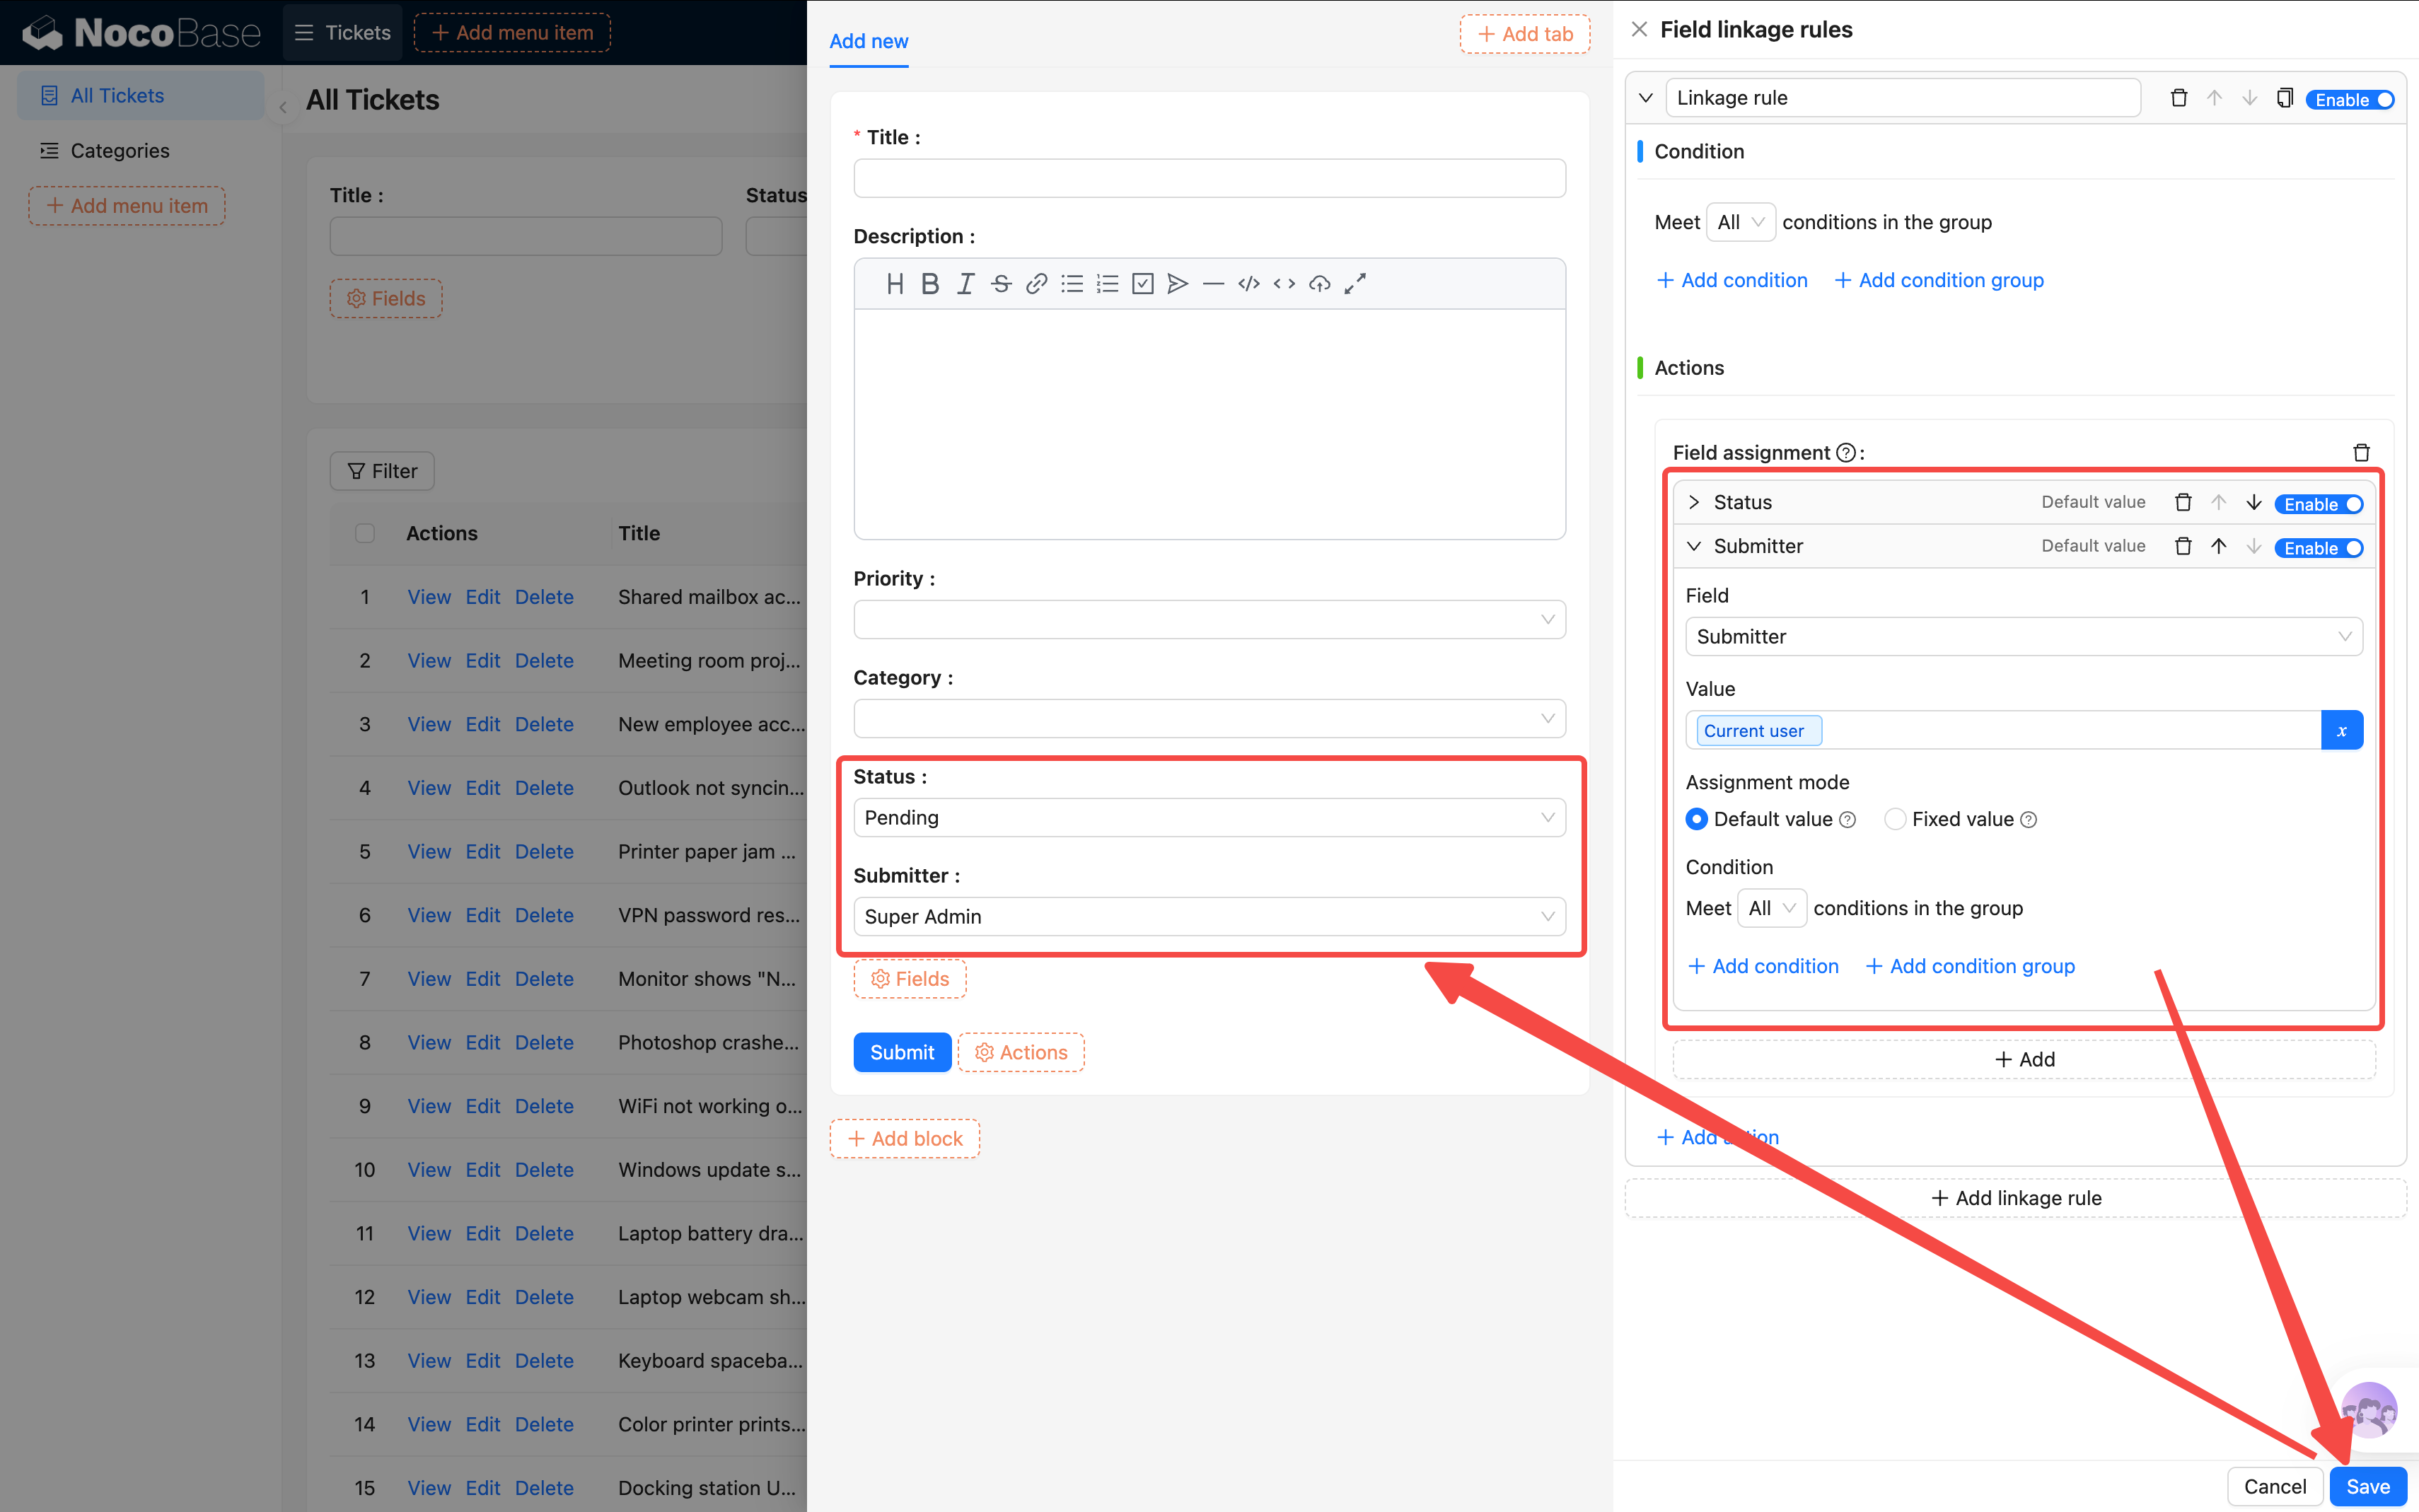
Setting Default Values
Let's first set default values for "Status" and "Submitter":
- Click "Add linkage rule".
- Leave the condition empty — an unconditional linkage rule executes immediately when the form loads.
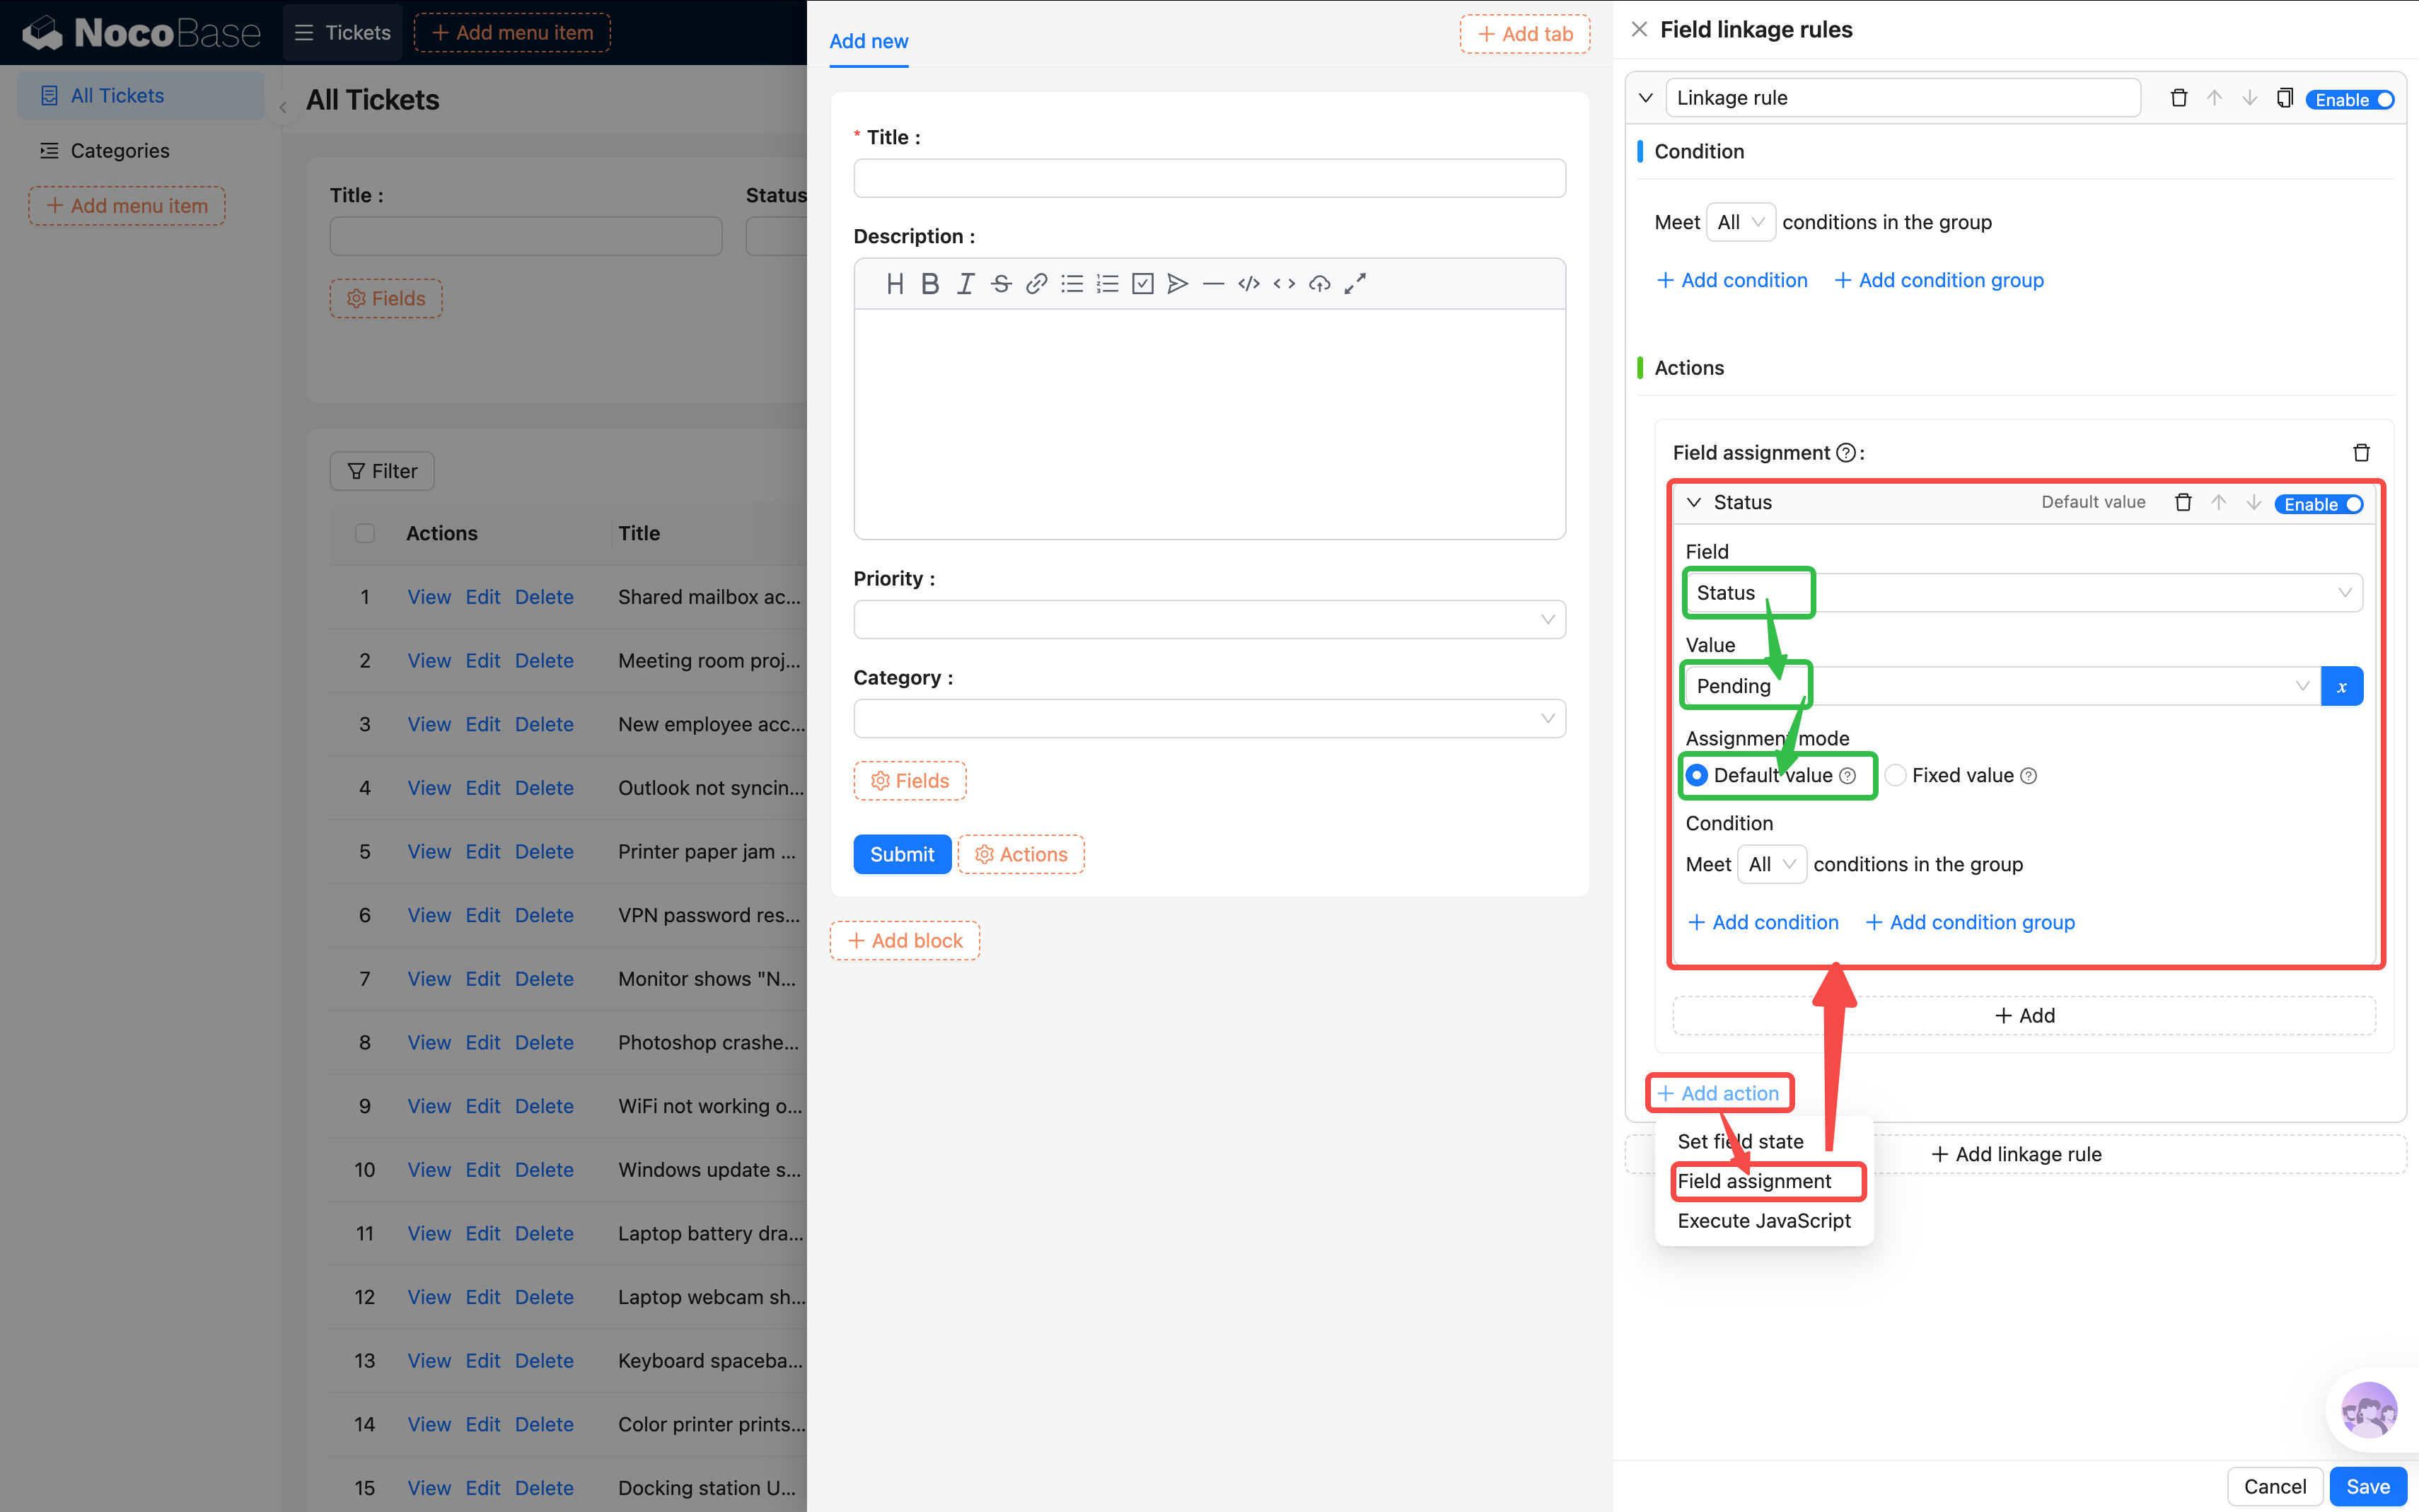
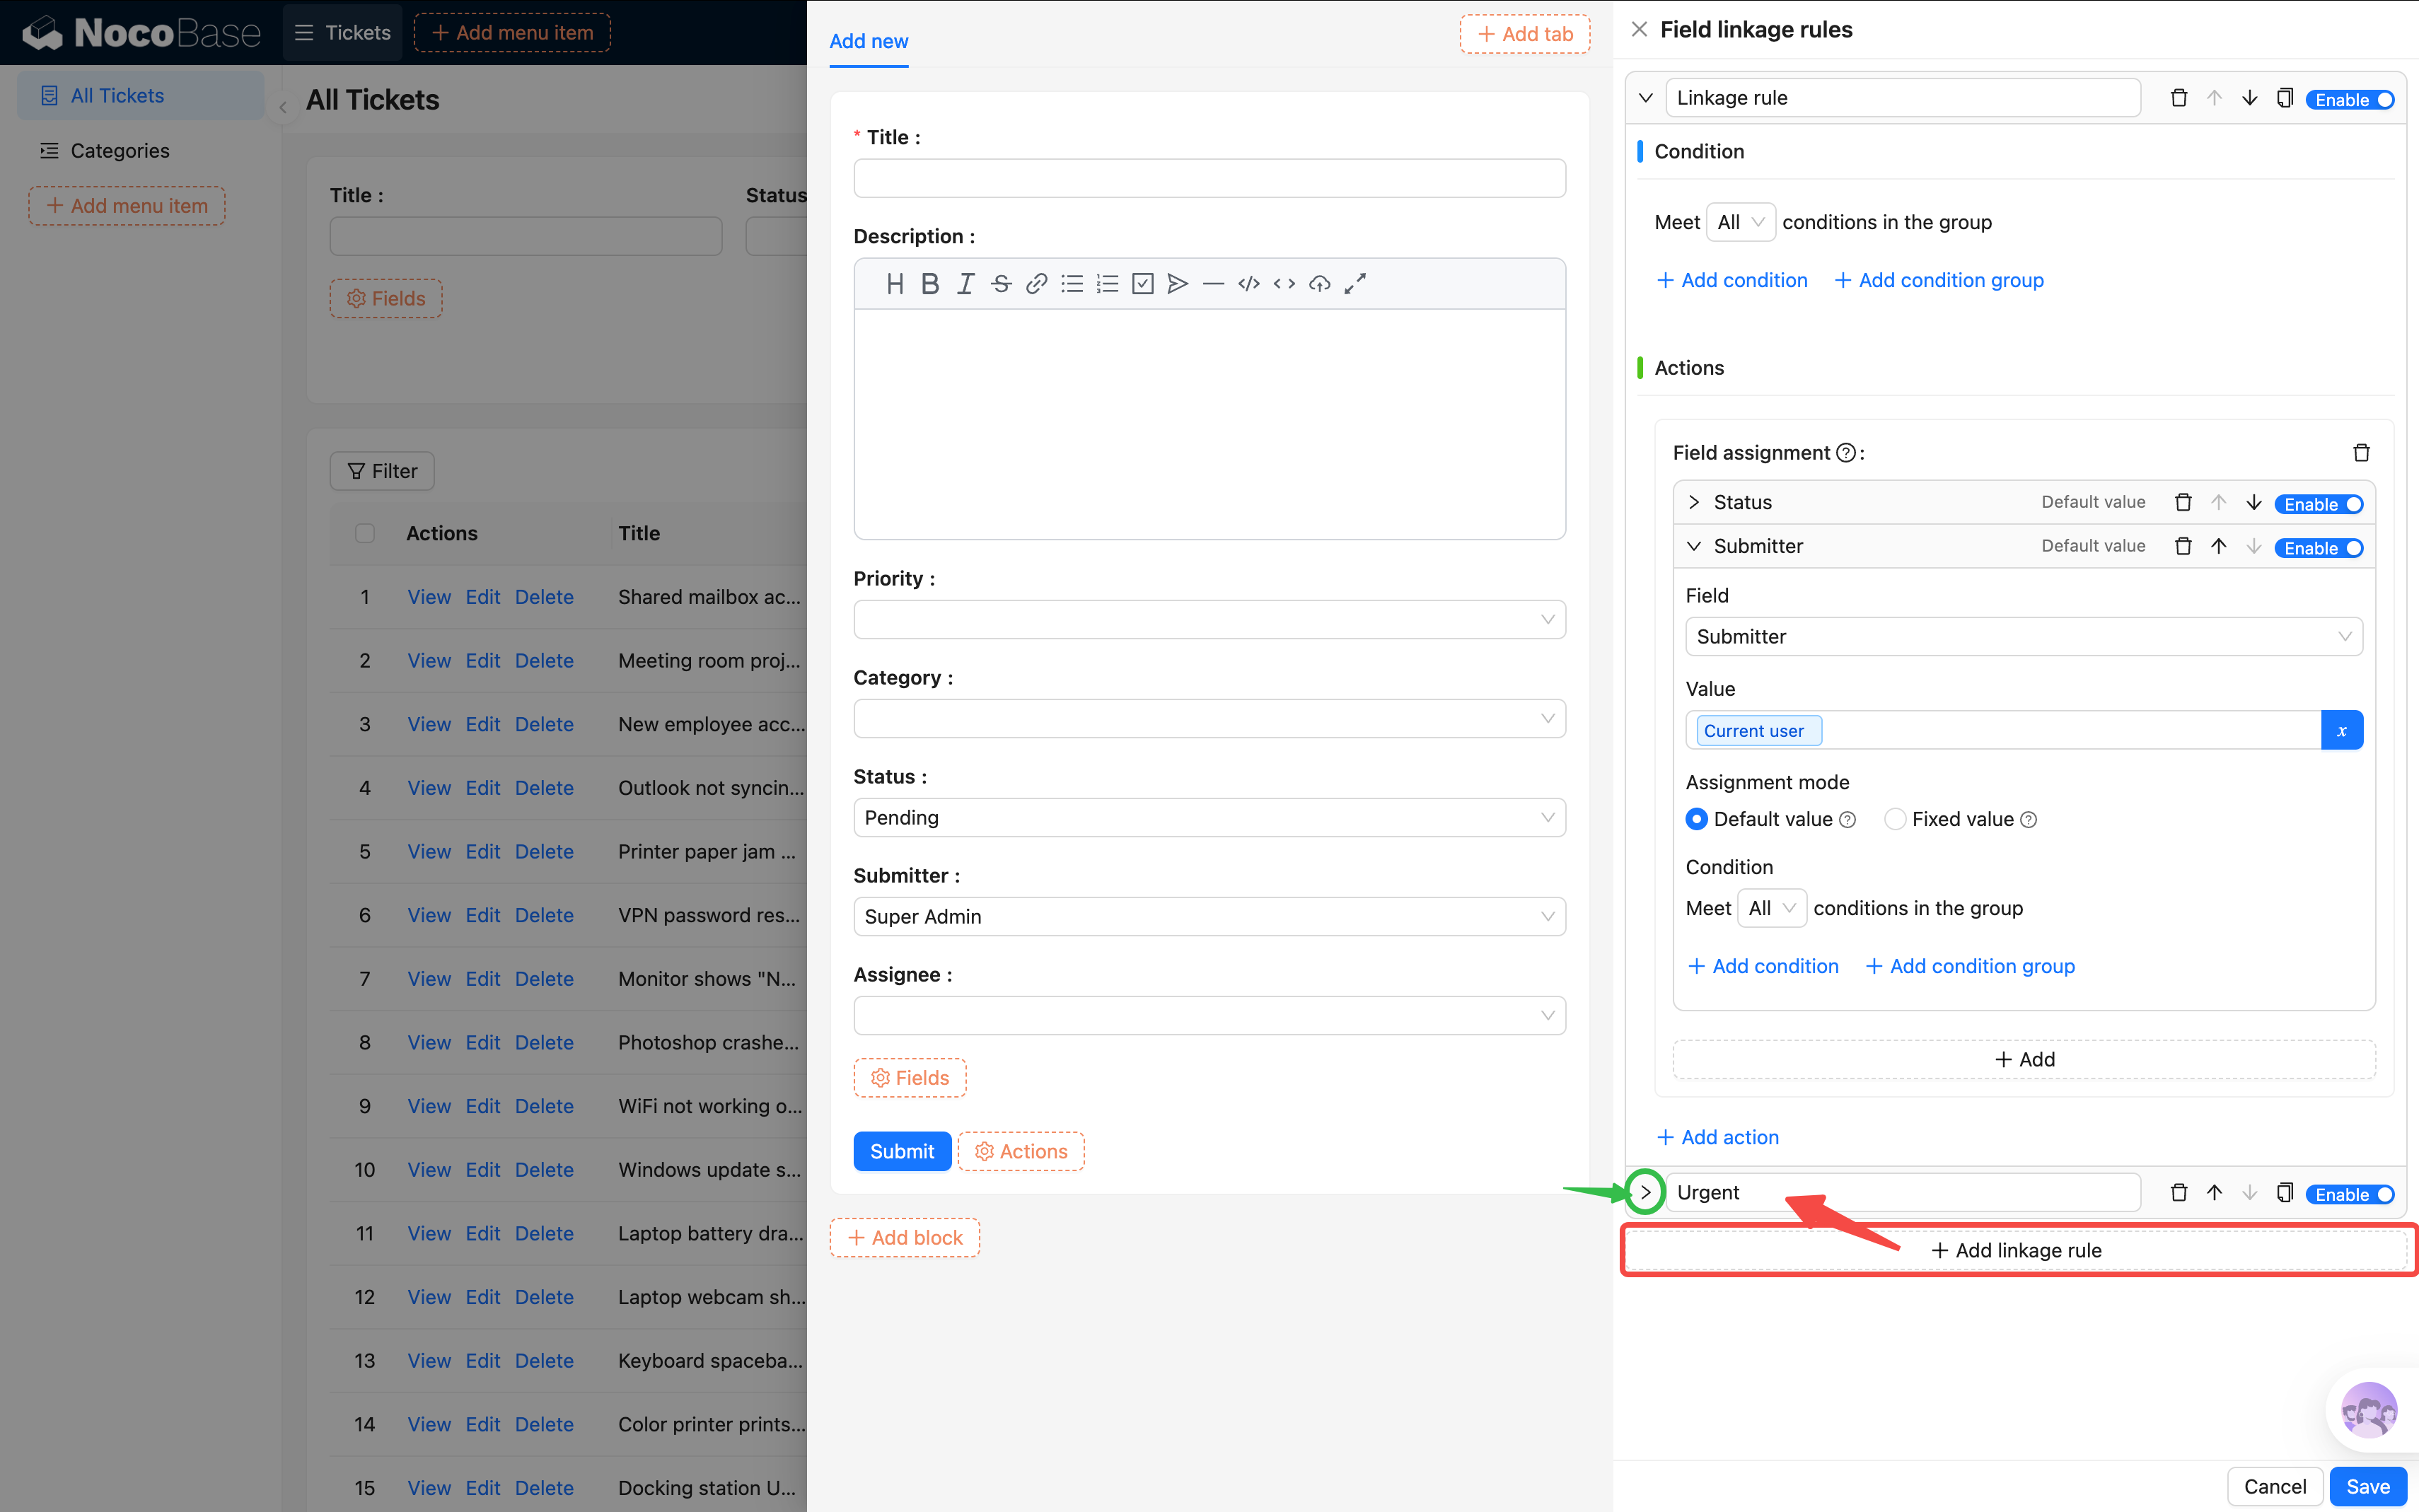
- Configure the Actions:
- Status field -> Set default value -> Pending
- Submitter field -> Set default value -> Current user
Important notes on setting values: Always select "Current form" as the data source first. For relation fields (like Category, Submitter, Assignee — any many-to-one field), you must select the object property itself, not its expanded sub-fields.
When selecting variables (like "Current user"), first single-click to select it, then double-click to fill it into the selection bar.

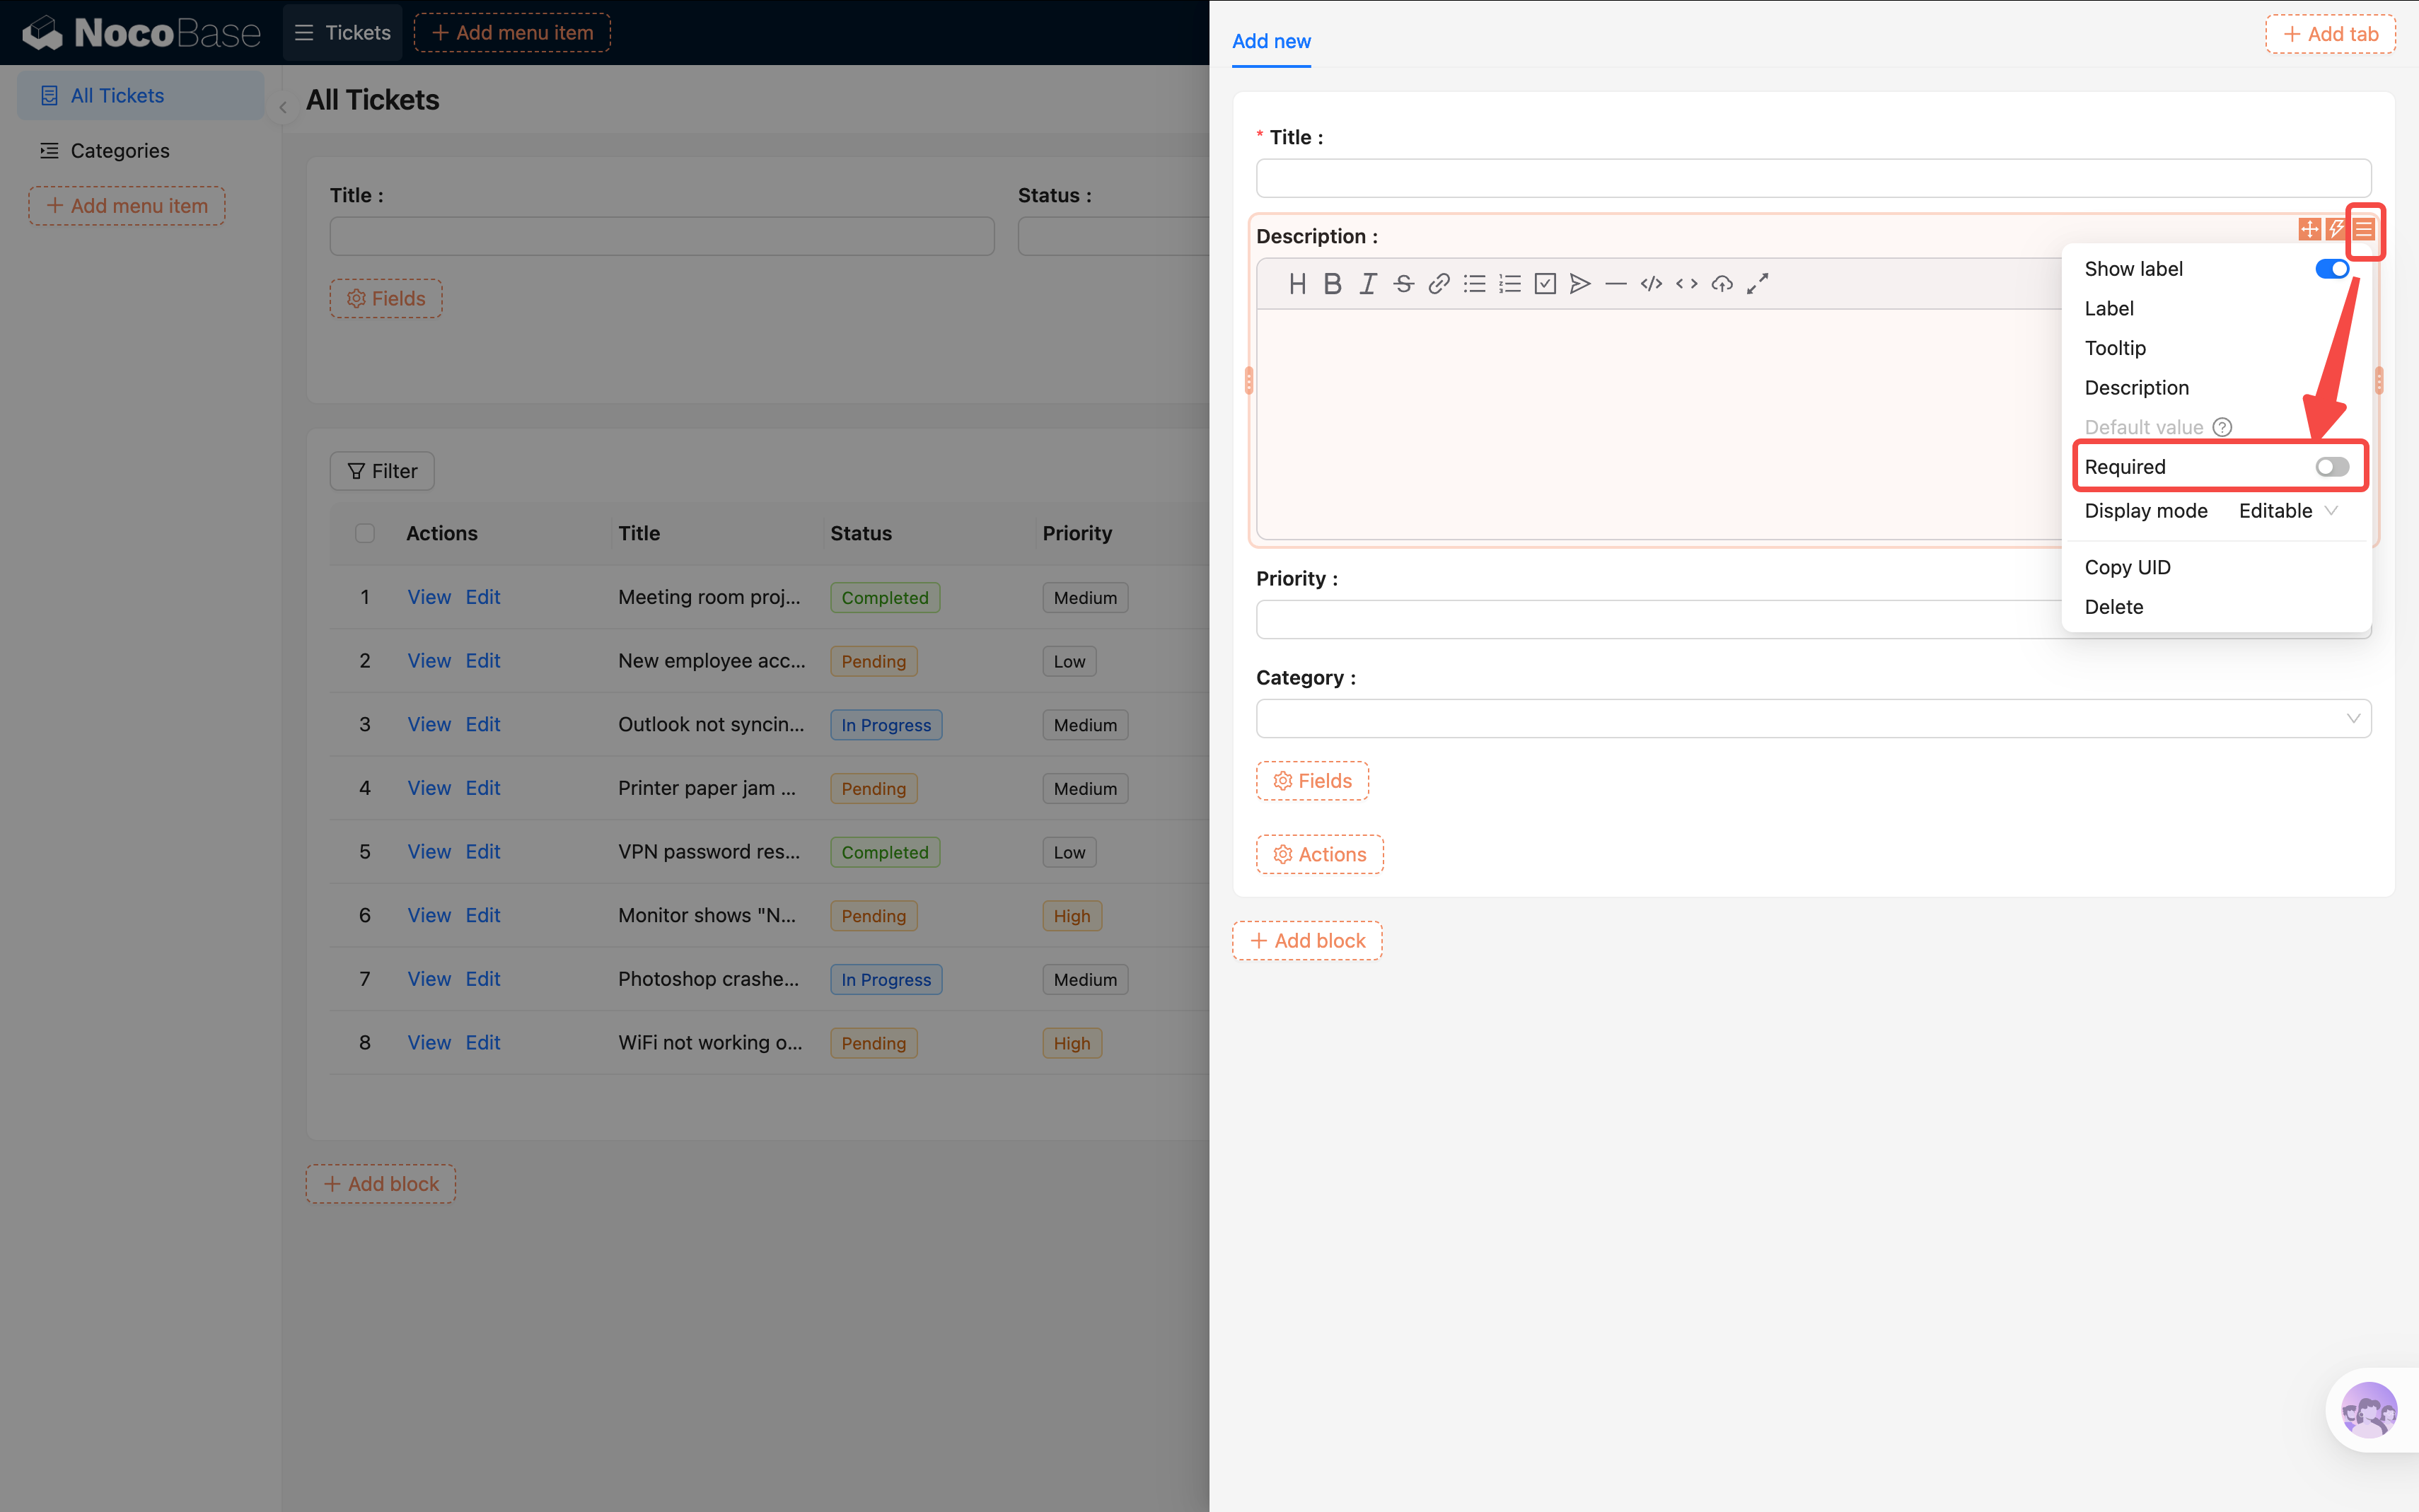
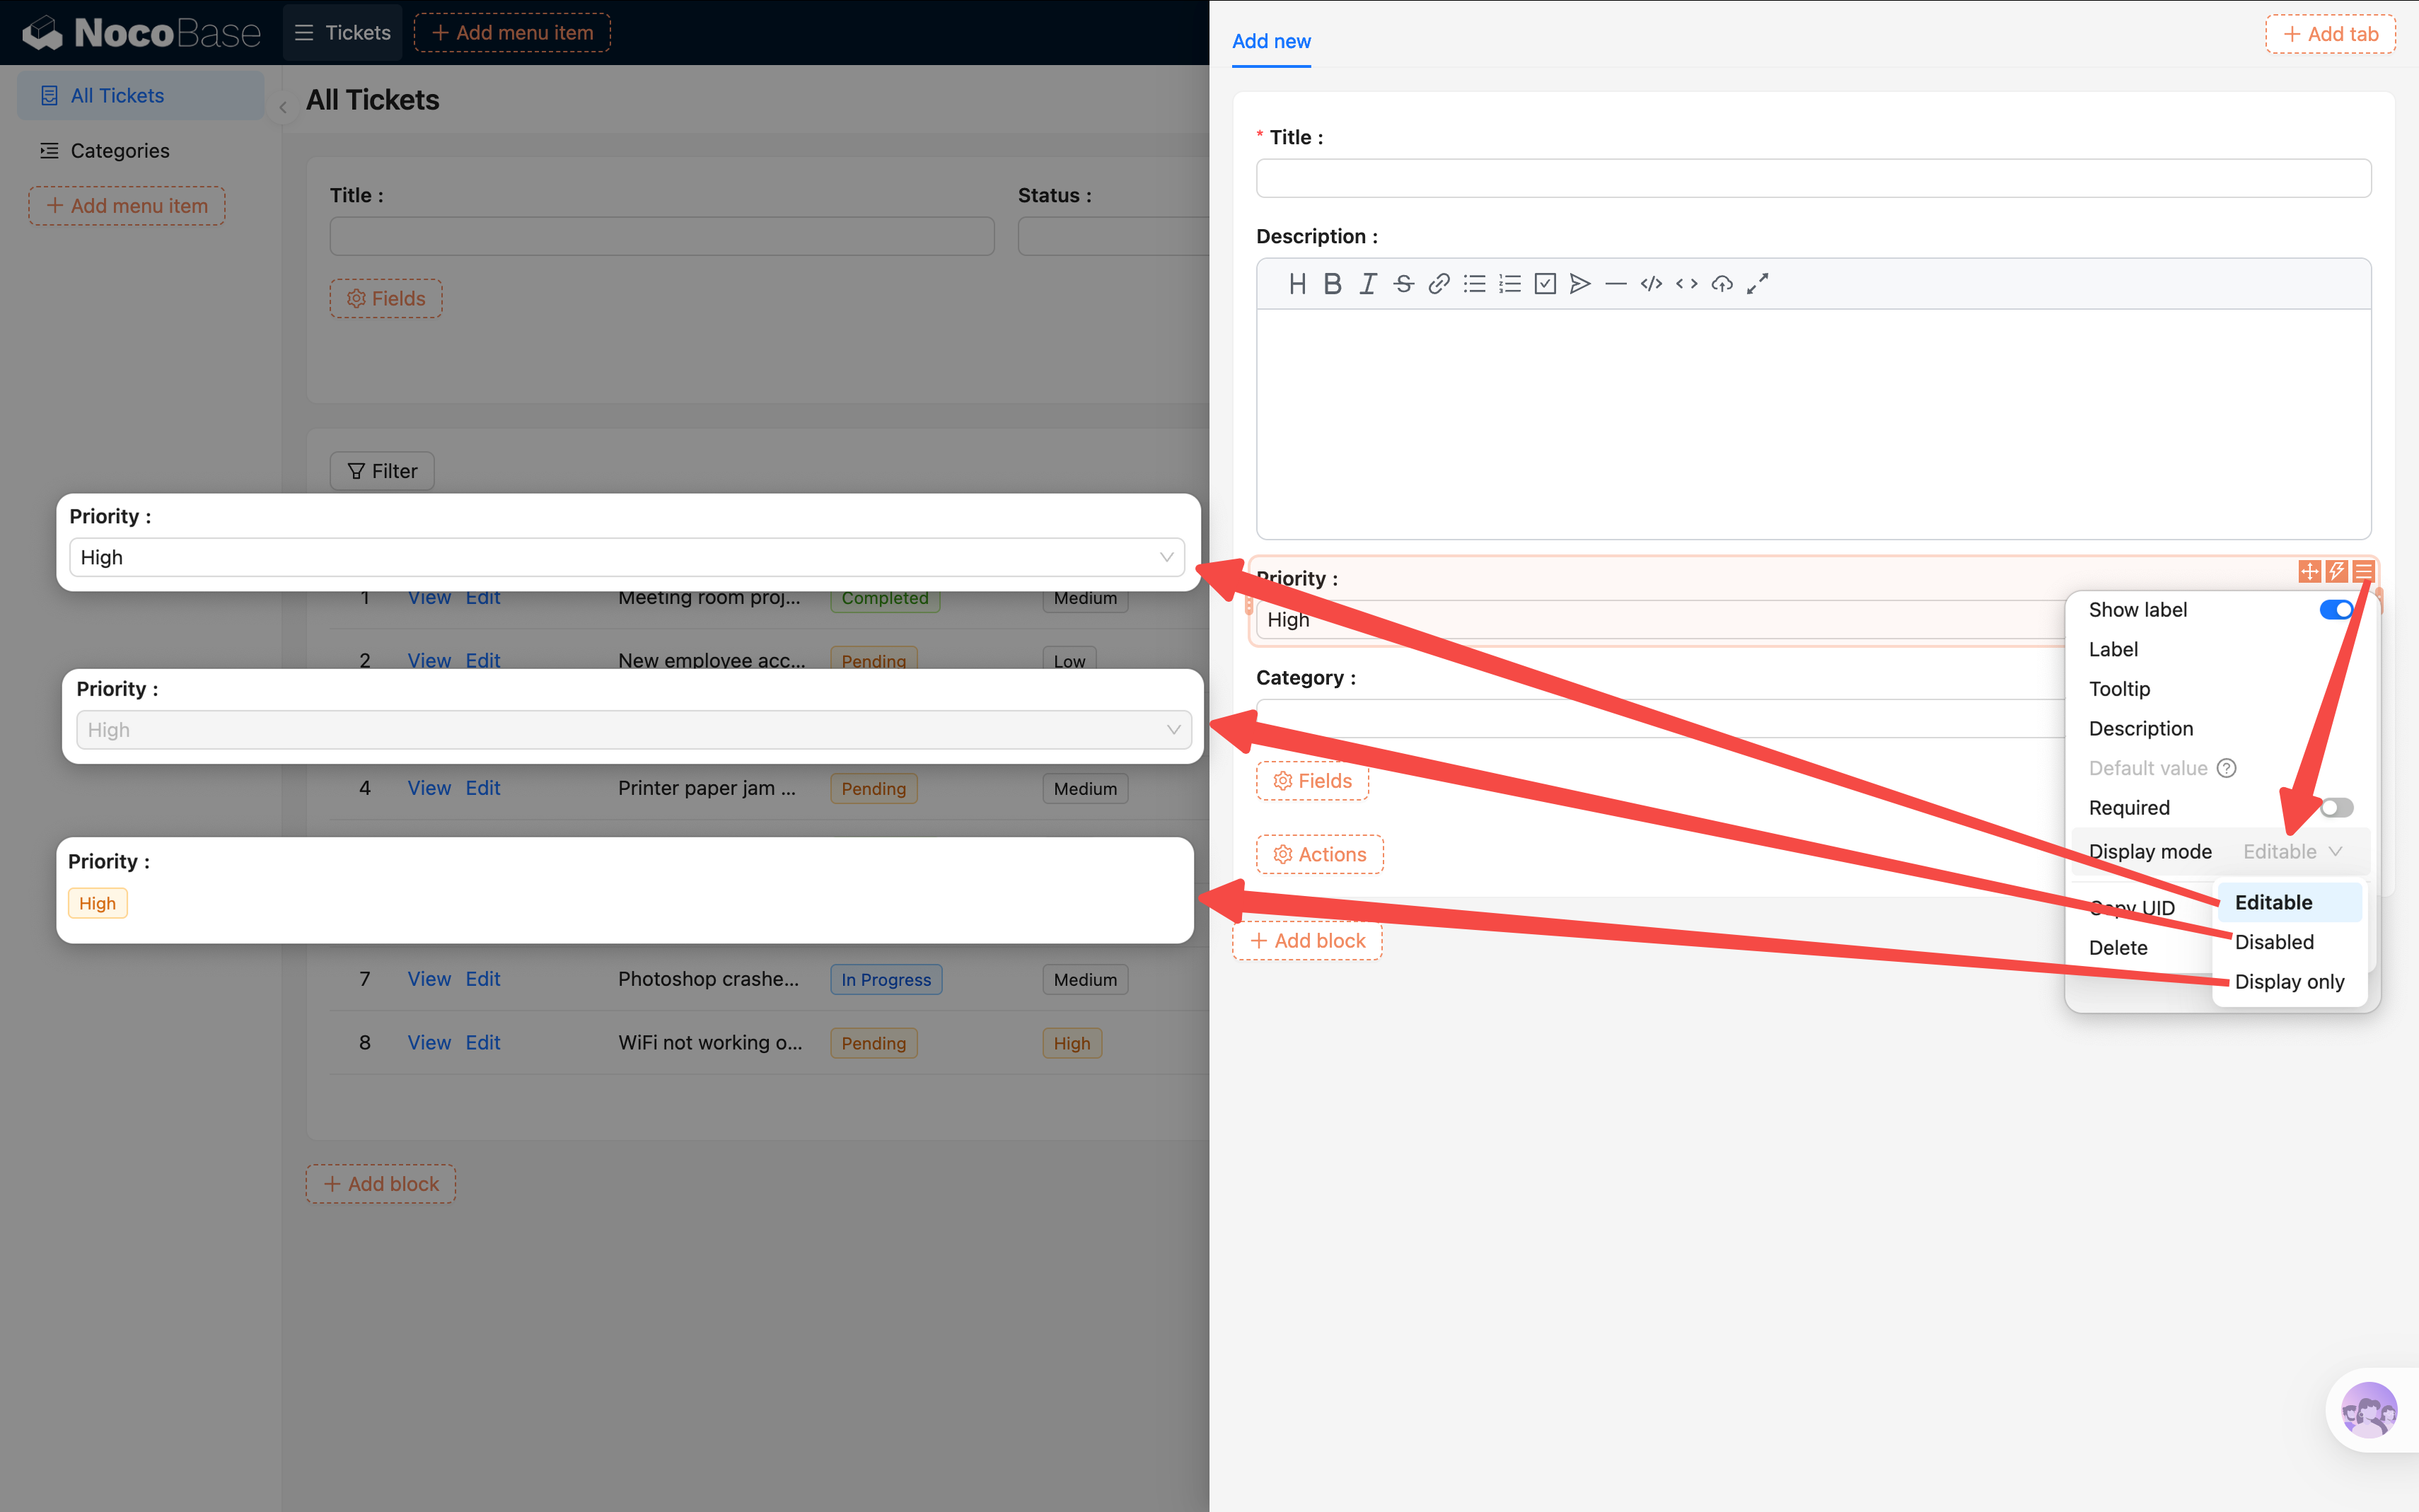
If you want a field to be non-editable by the submitter (e.g., Status), you can set its "Display mode" to "Readonly" in the field settings.
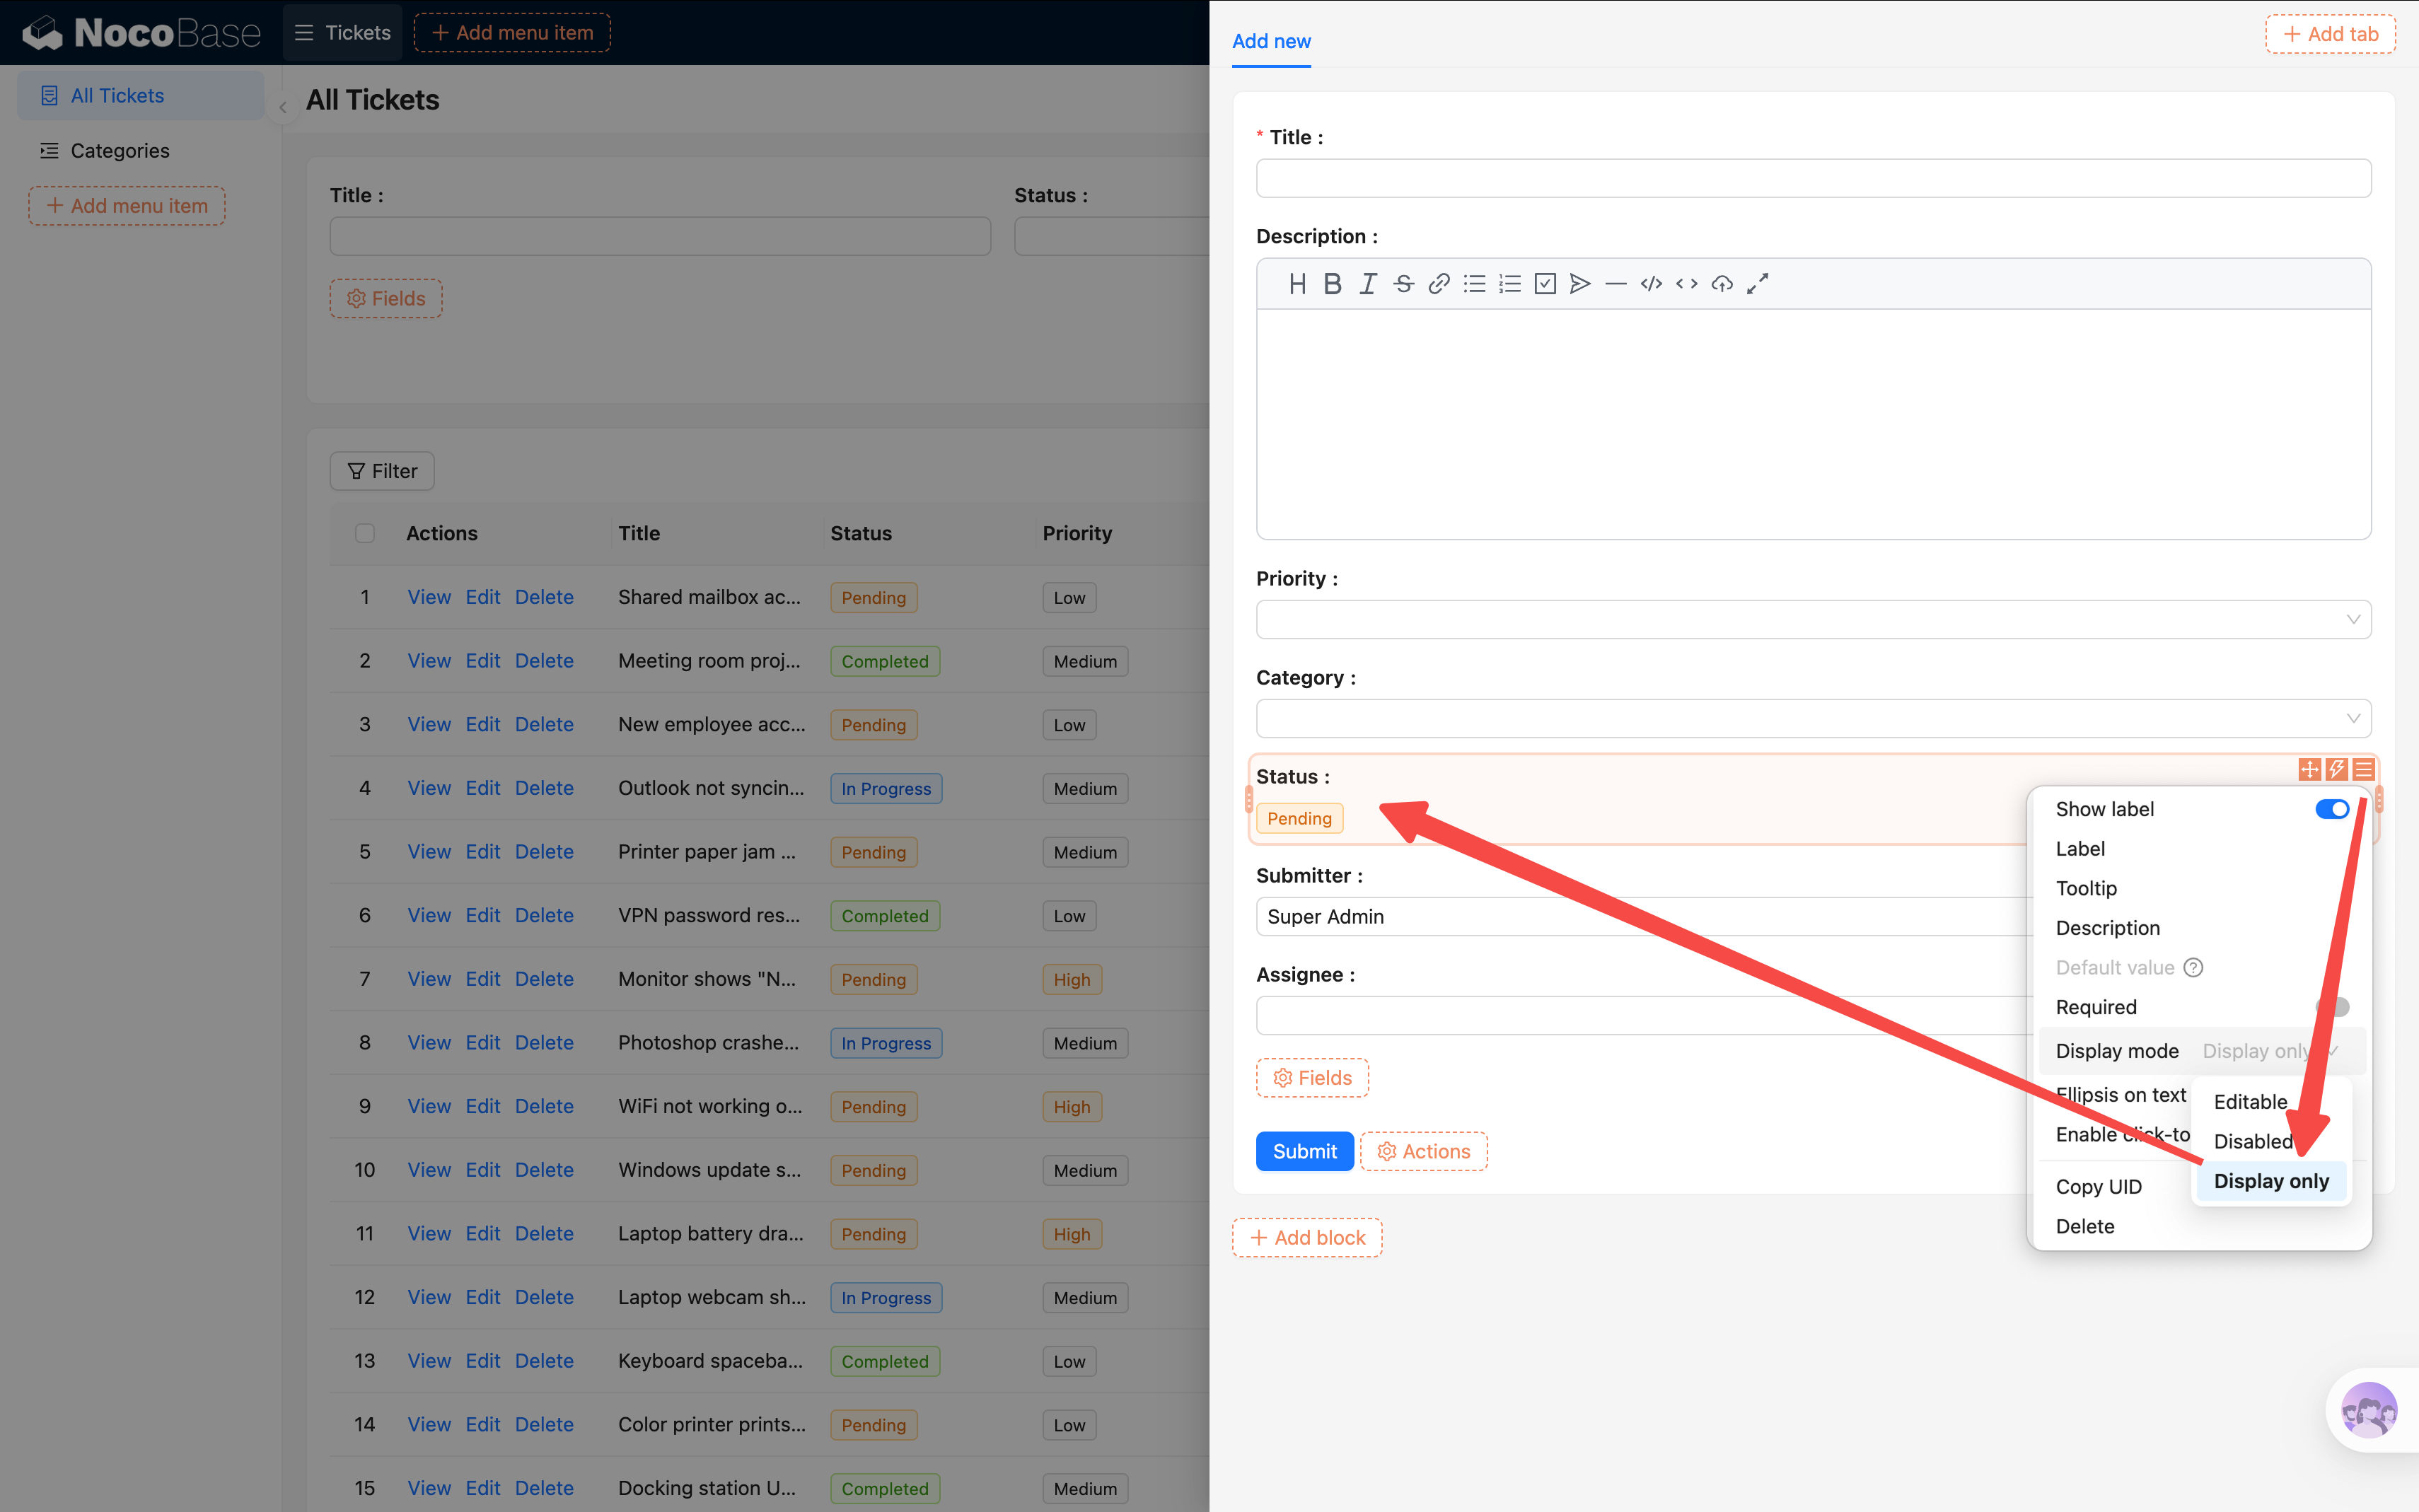
Three display modes: Editable, Readonly (editing disabled but field appearance preserved), and Easy-reading (displays as plain text only).
Urgent Ticket Requires Description
Next, add a conditional linkage rule: when a user selects Priority as "Urgent", the Description field becomes required, reminding the submitter to clearly describe the situation.
- Click "Add linkage rule".
- Configure the rule:
- Condition: Current form / Priority equals Urgent
- Actions: Description field -> set to Required
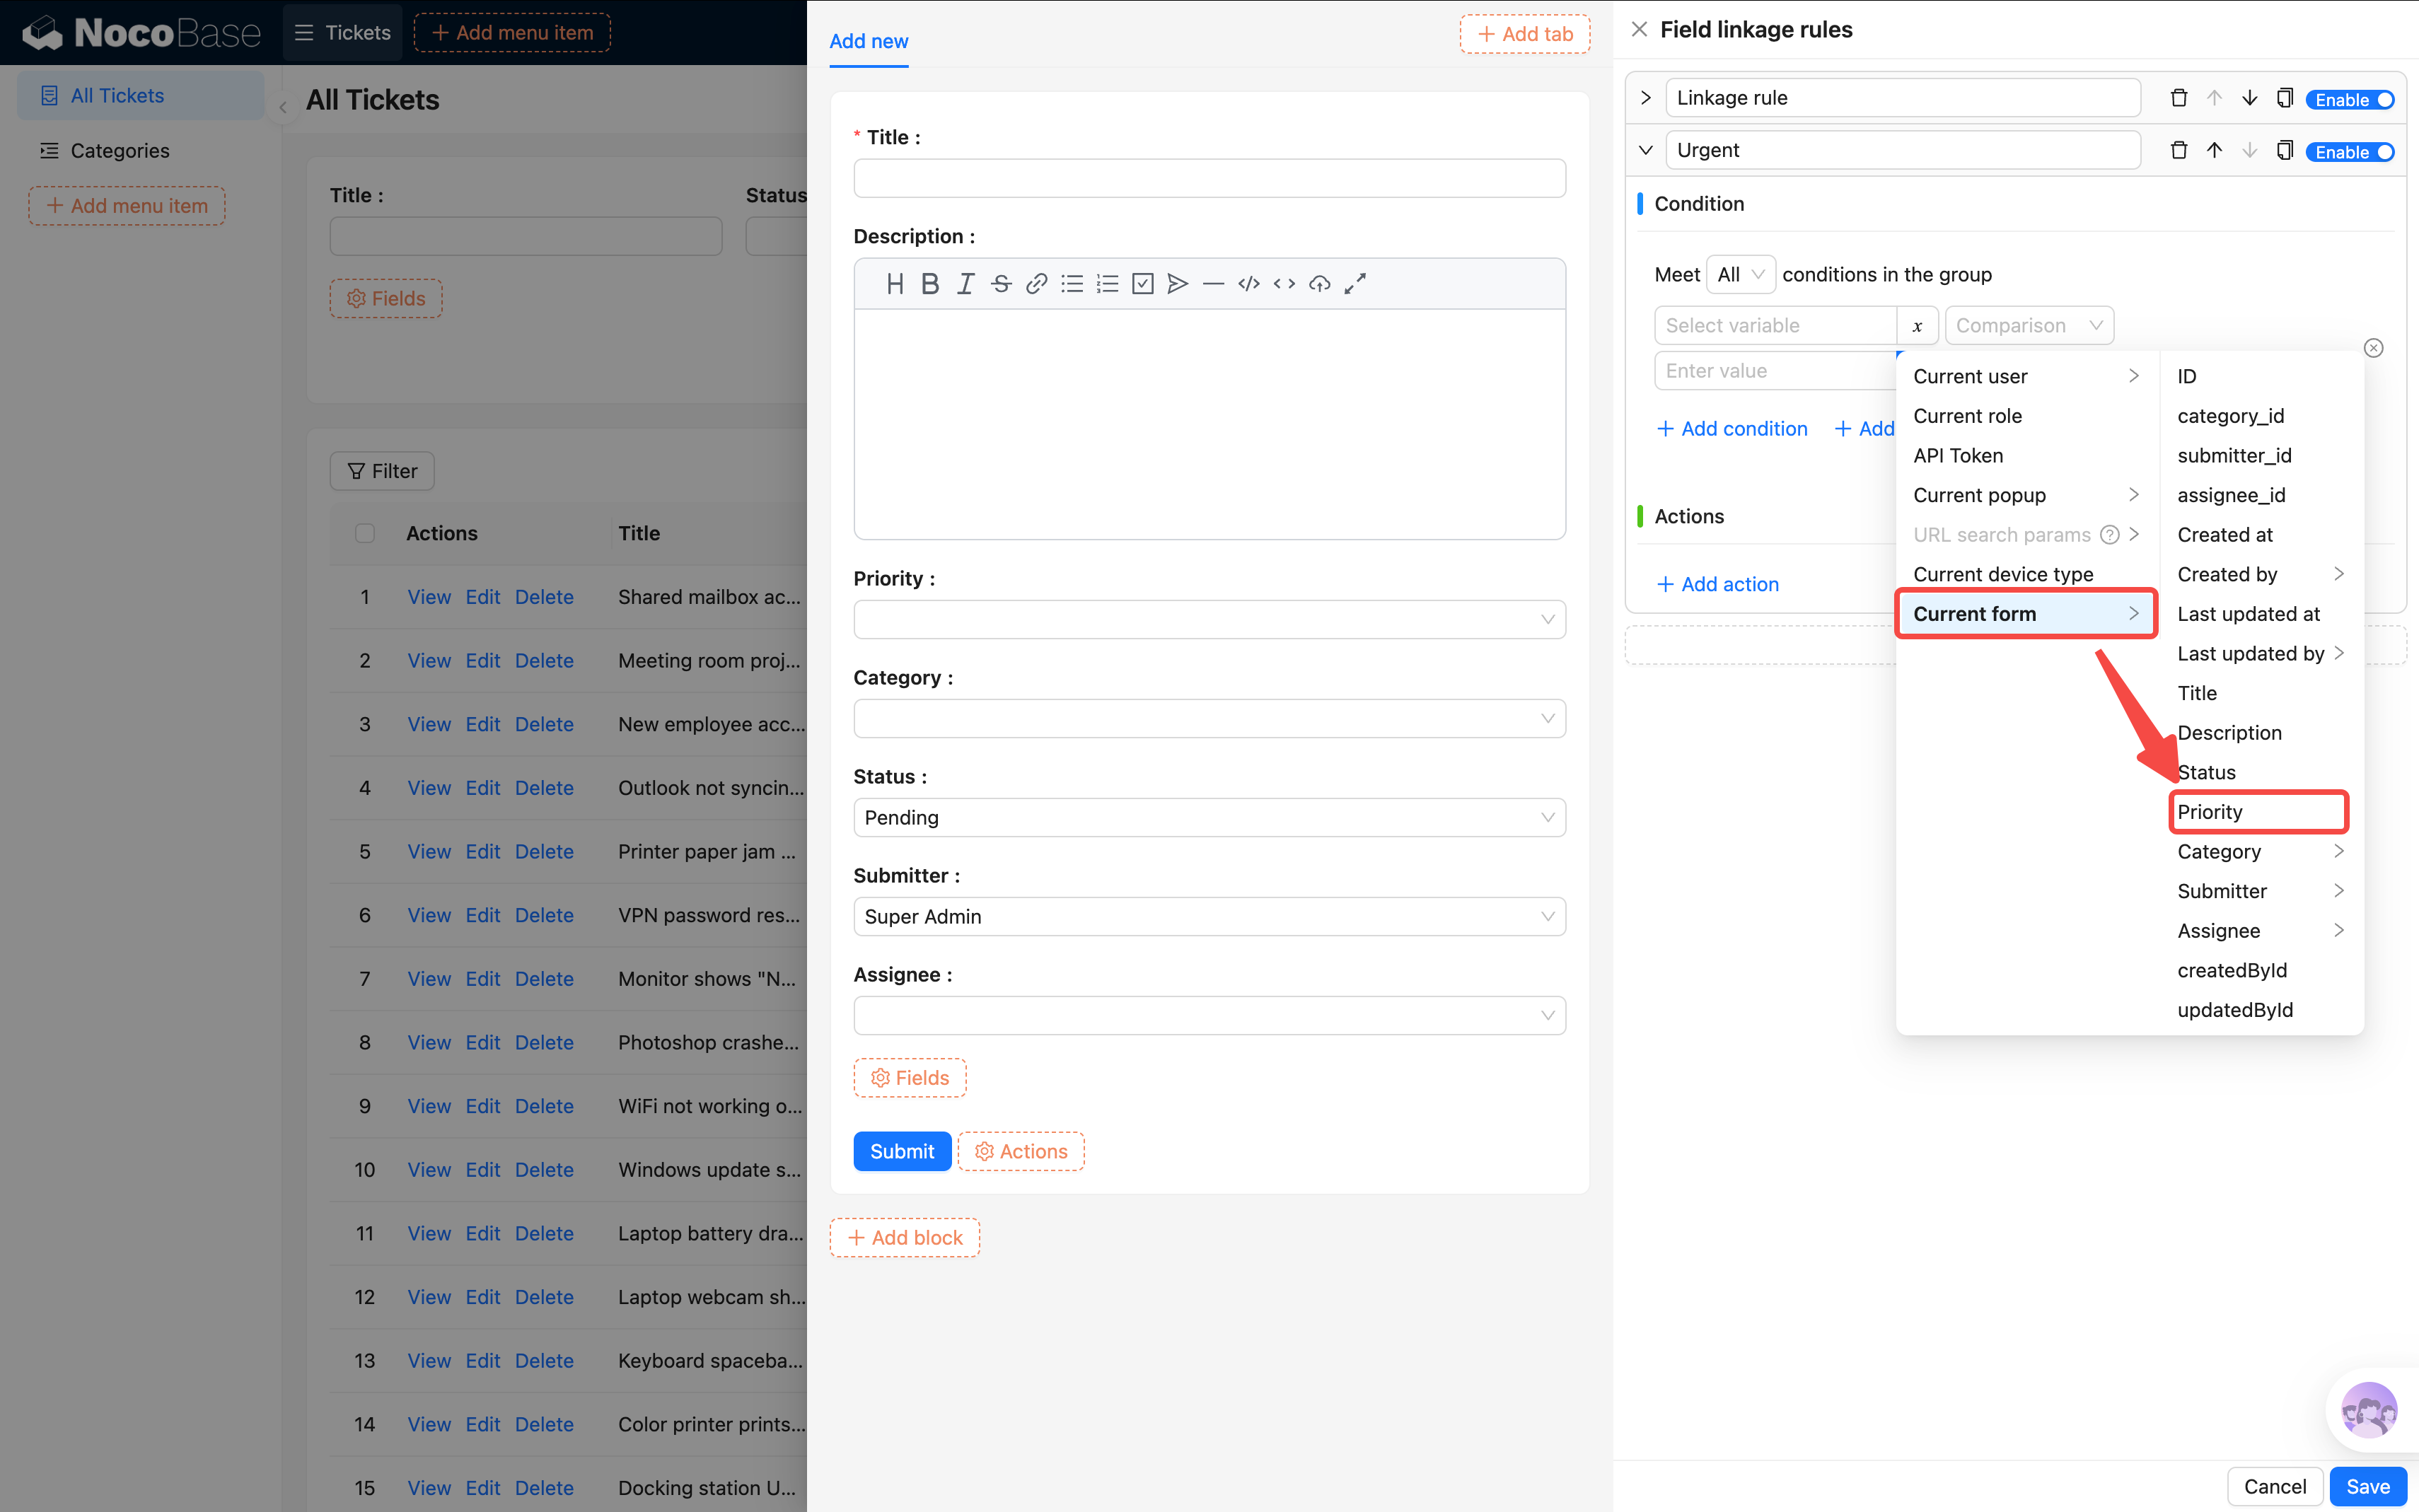

- Save the rule.
Now test it: select Priority as "Urgent" and a red asterisk * will appear next to the Description field, indicating it's required. Select any other priority and it reverts to optional.
Finally, apply what we've learned and adjust the layout a bit.
What else can linkage rules do? Beyond setting defaults and controlling required status, they can also show/hide fields and dynamically assign values. For example: when Status is "Closed", hide the Assignee field. We'll explore more in later chapters as we encounter these scenarios.
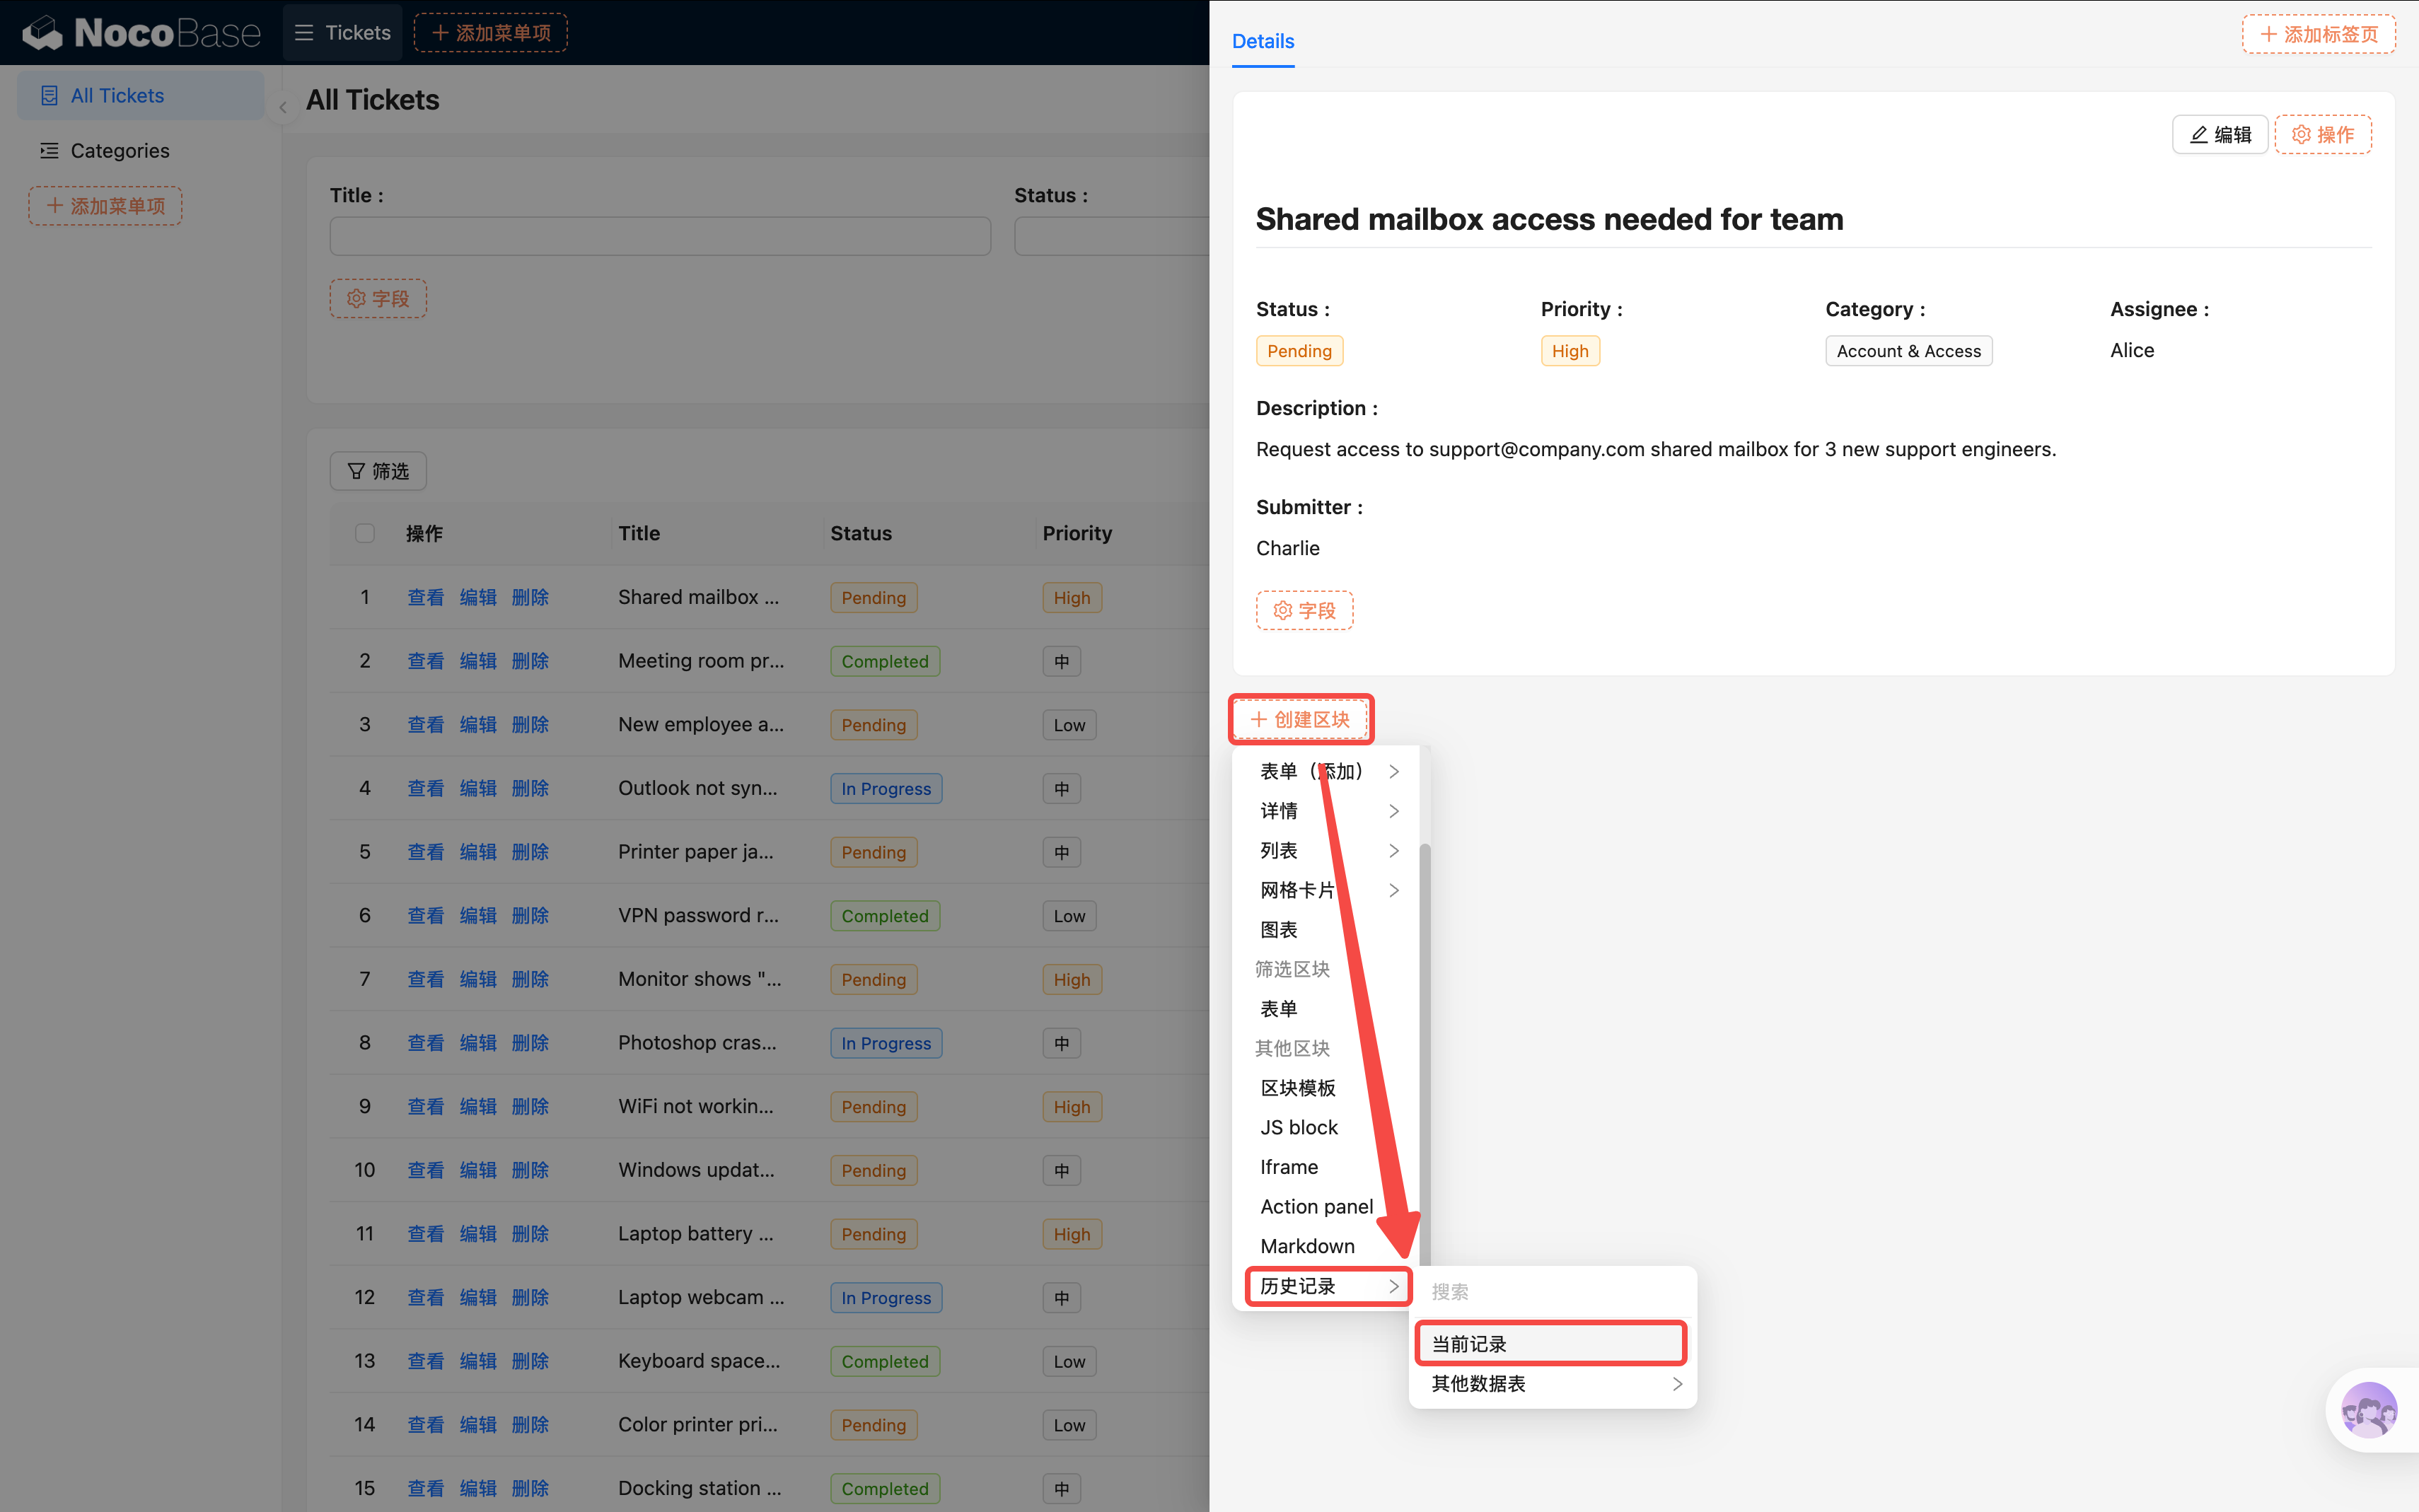
4.3 Details Block
In the last chapter, we added a "View" button to table rows that opens a Drawer. Now let's configure what goes inside the Drawer.
- In the table, click the "View" button on any row to open the Drawer.
- In the Drawer, click "Add block" -> Data blocks -> Details.
- Select "Current collection".
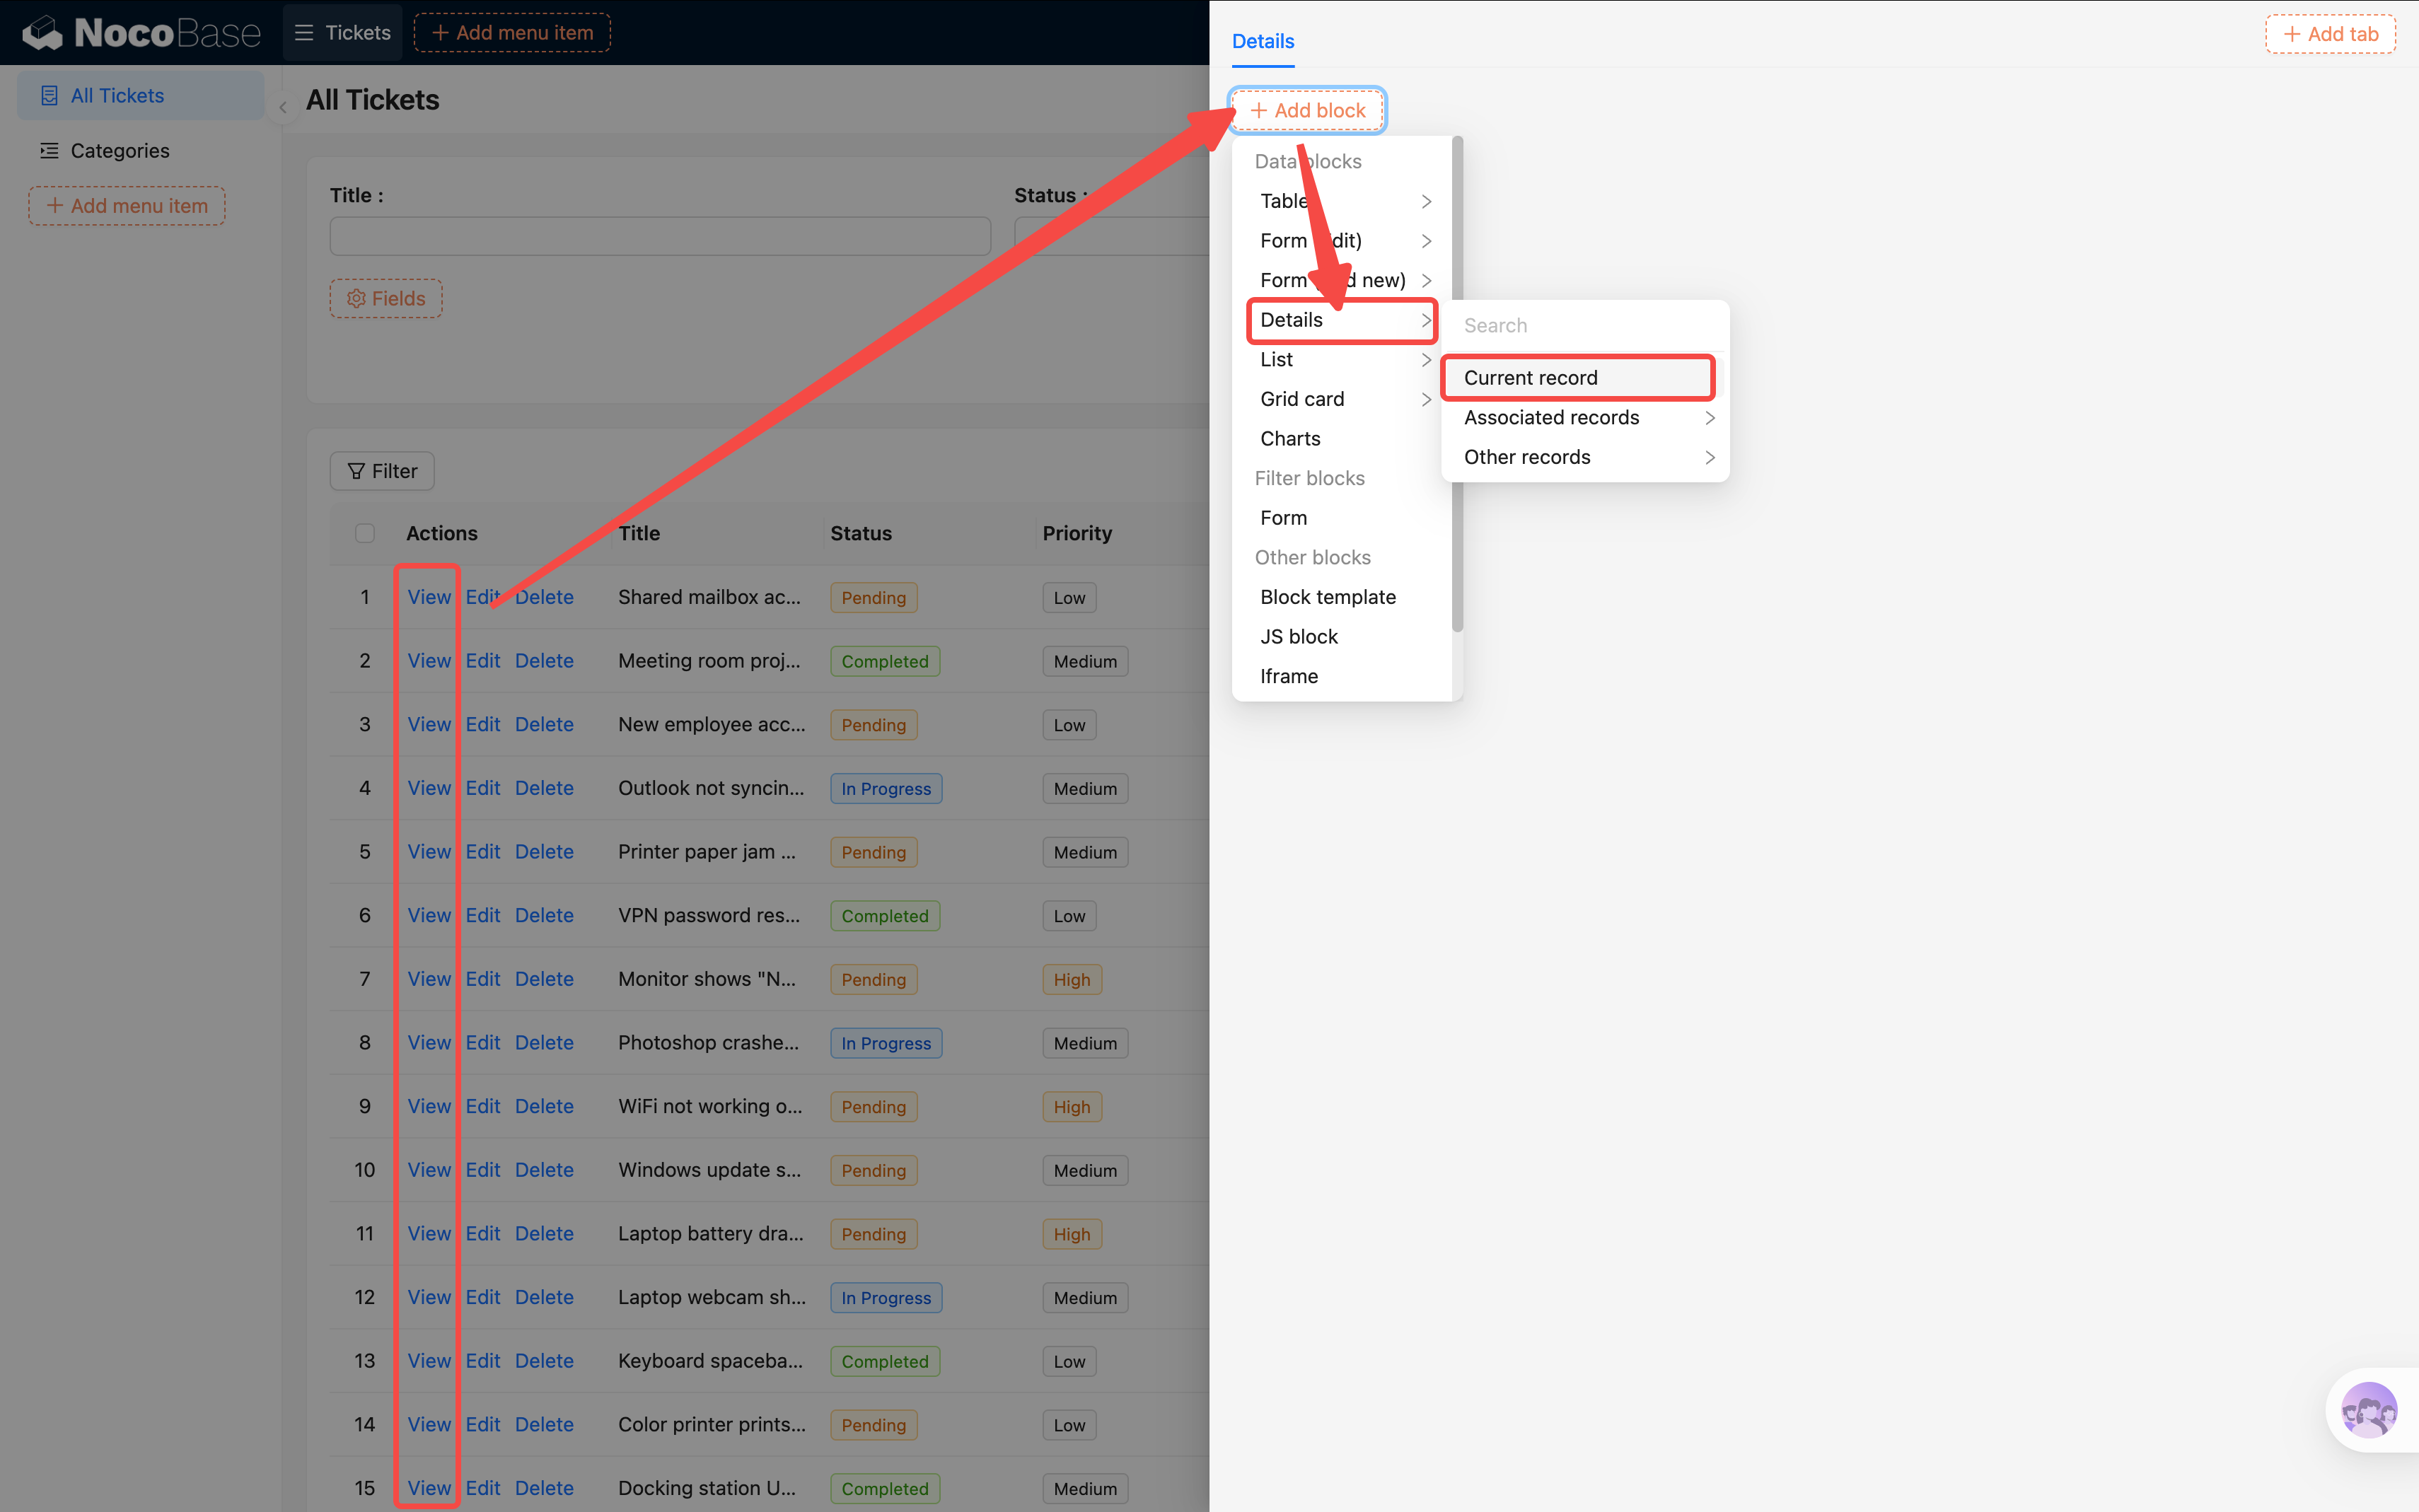
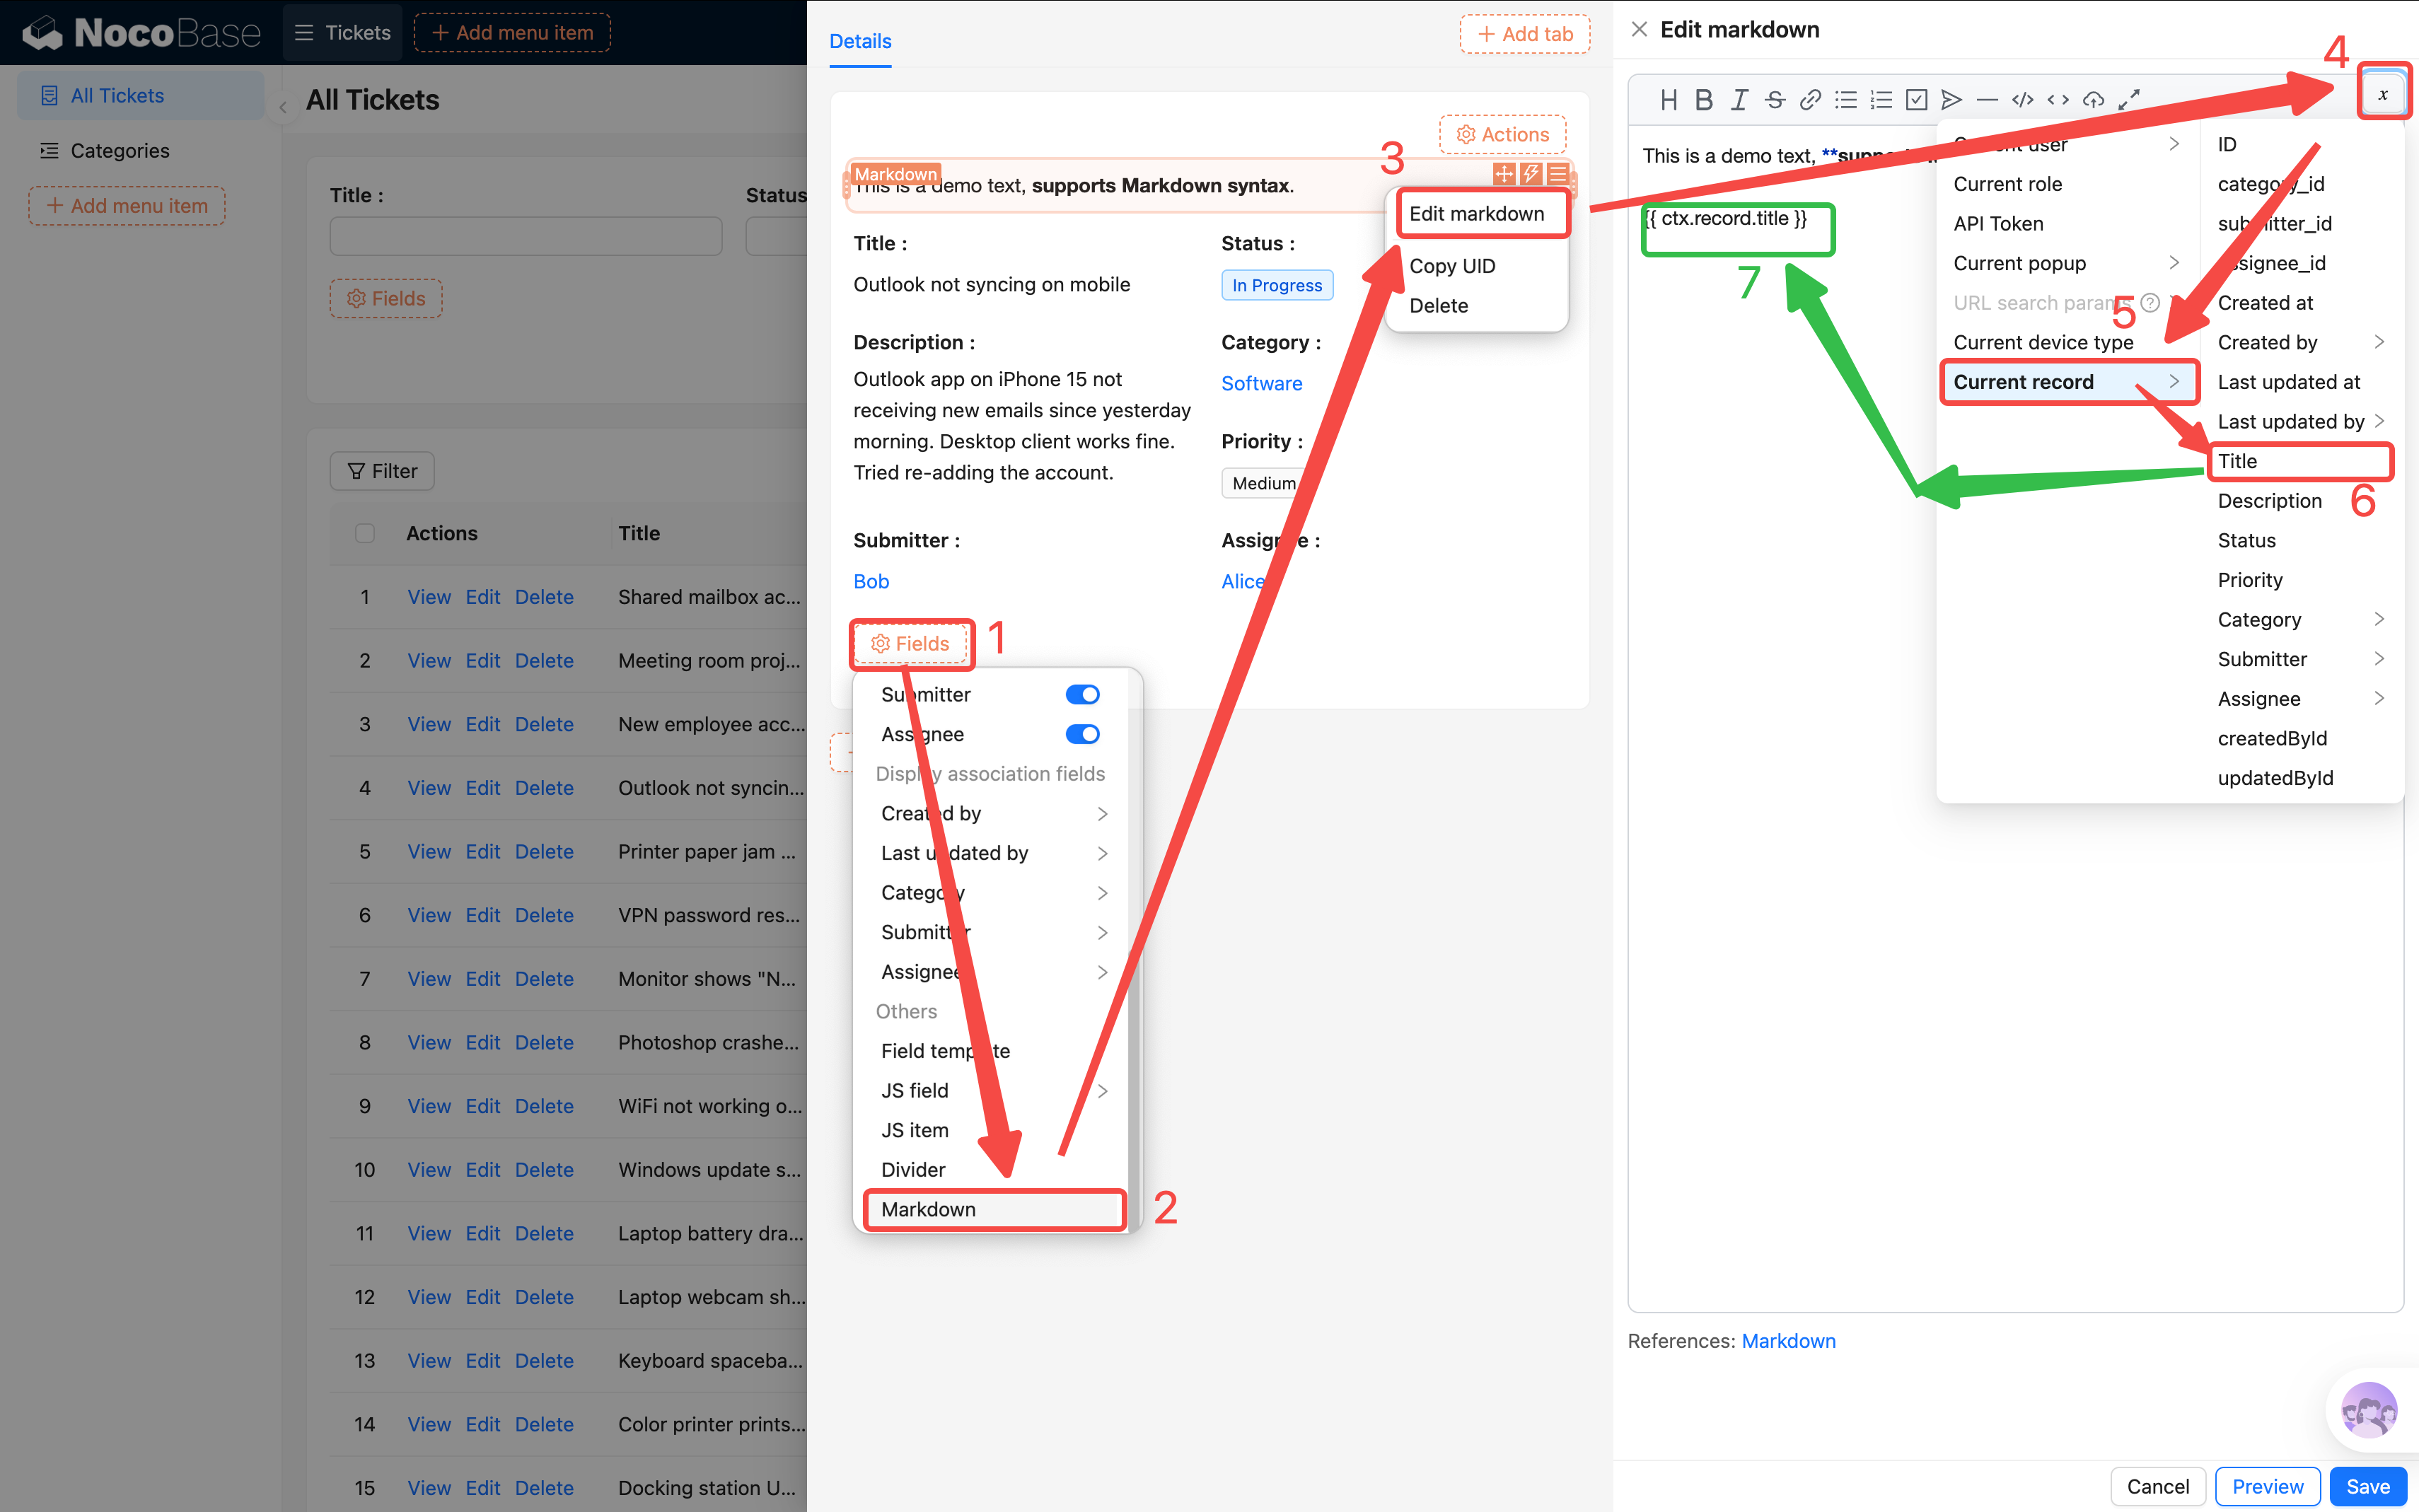
- In the Details block, click "Fields" with this layout:
| Area | Fields |
|---|---|
| Top | Title, Status (tag style) |
| Main body | Description (rich text area) |
| Side info | Category name, Priority, Submitter, Assignee, Created at |
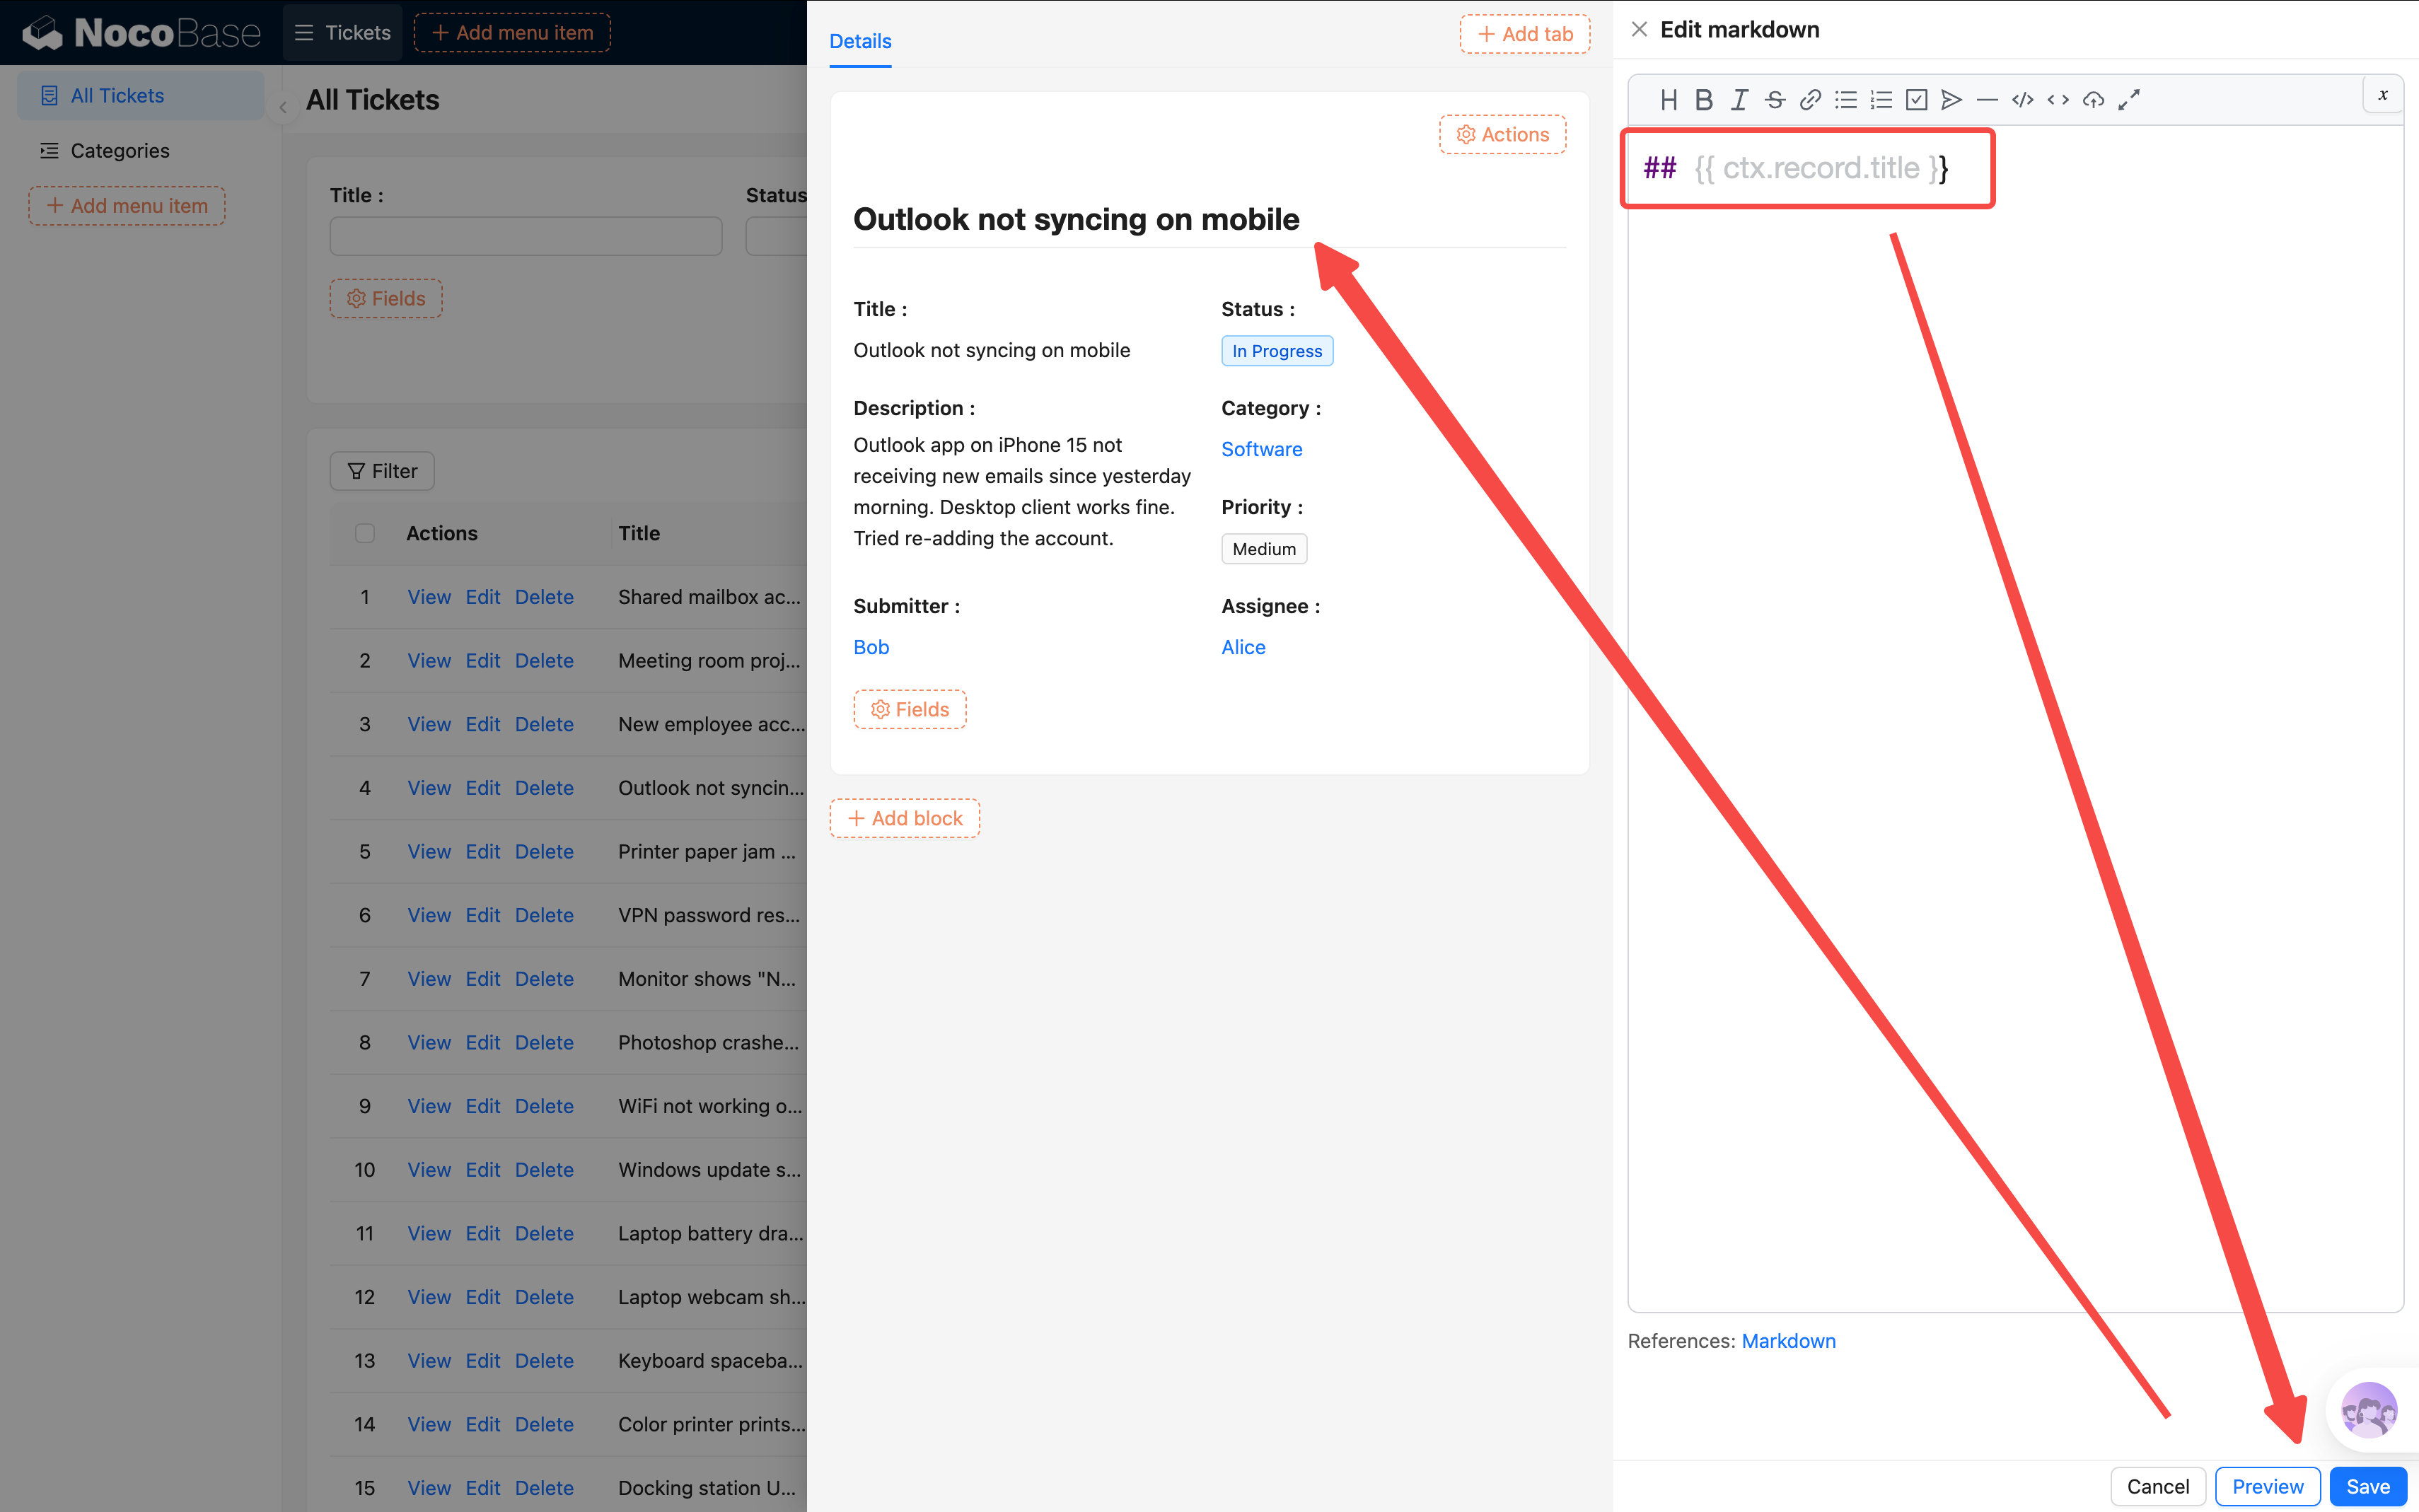
How to add a large title? Select Fields > Markdown > Edit Markdown > in the editing area, select a variable > Current record > Title. This dynamically inserts the record's title into a Markdown block. Delete the default text and use Markdown syntax to make it a heading (add ## followed by a space before it).
Now the original Title field can be removed. Adjust the details layout:
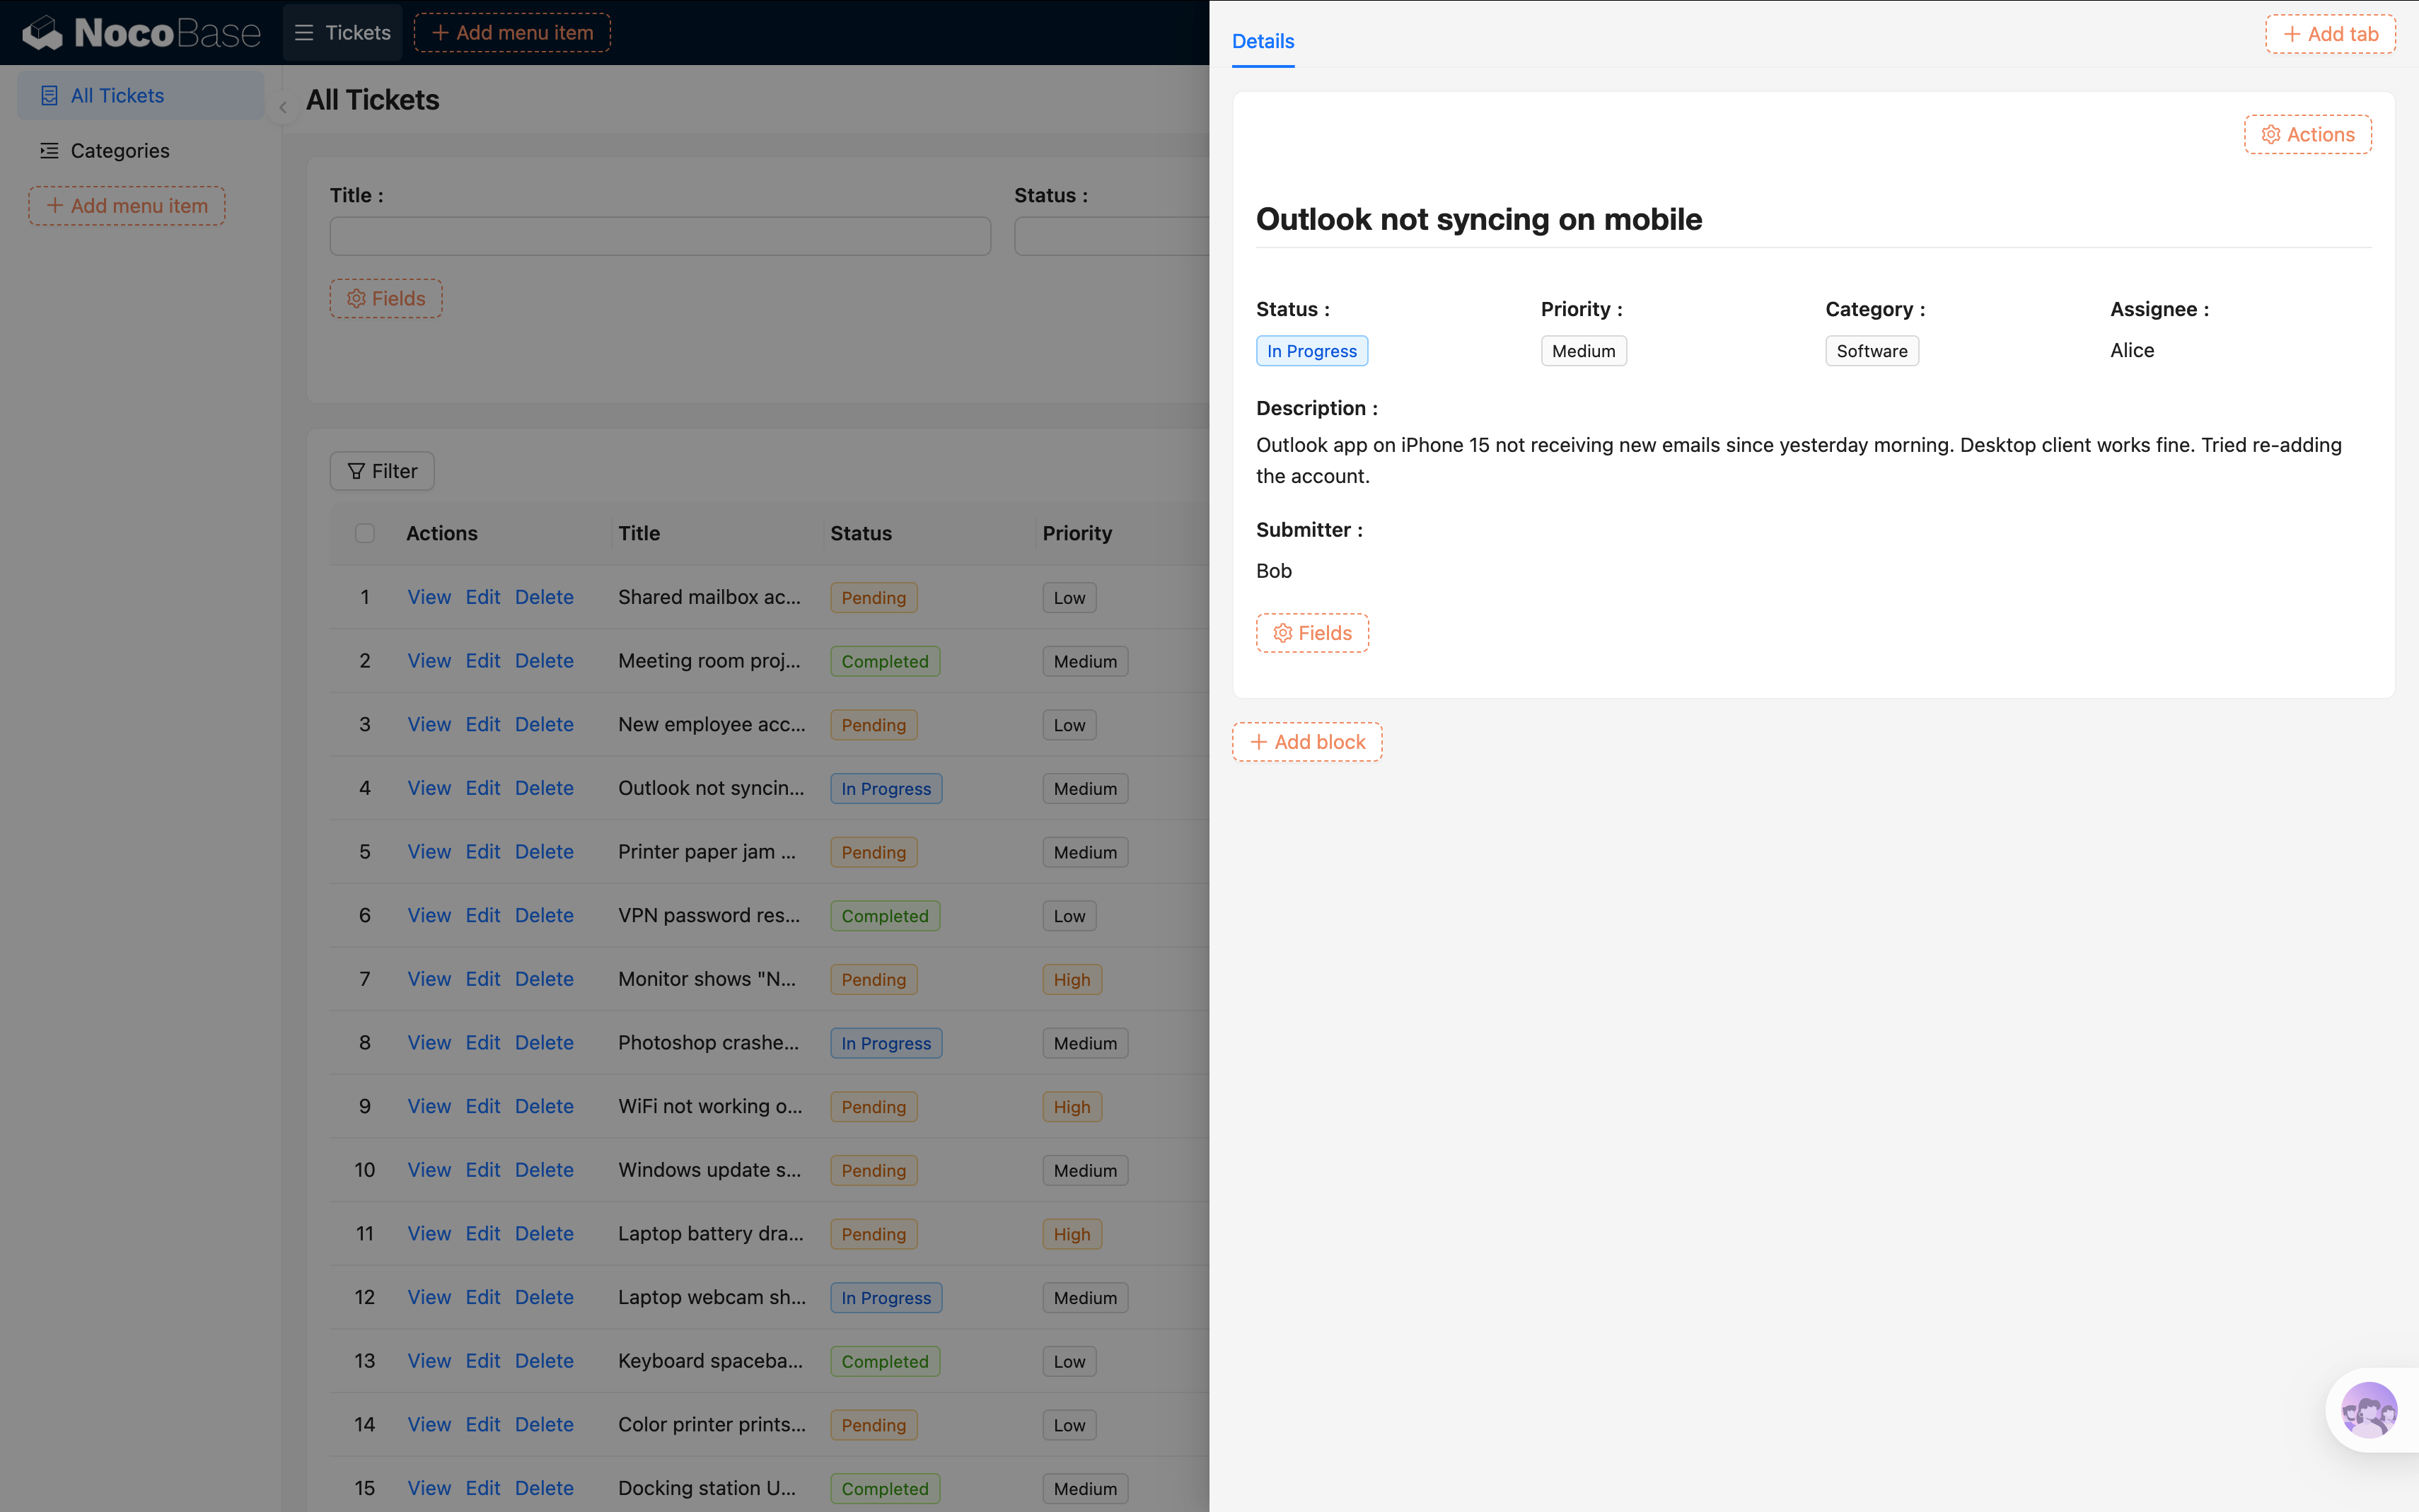
Tip: You can drag multiple fields onto the same row for a more compact and visually appealing layout.
- In the Details block's "Actions", check the "Edit" button so users can jump straight from the details view into edit mode.
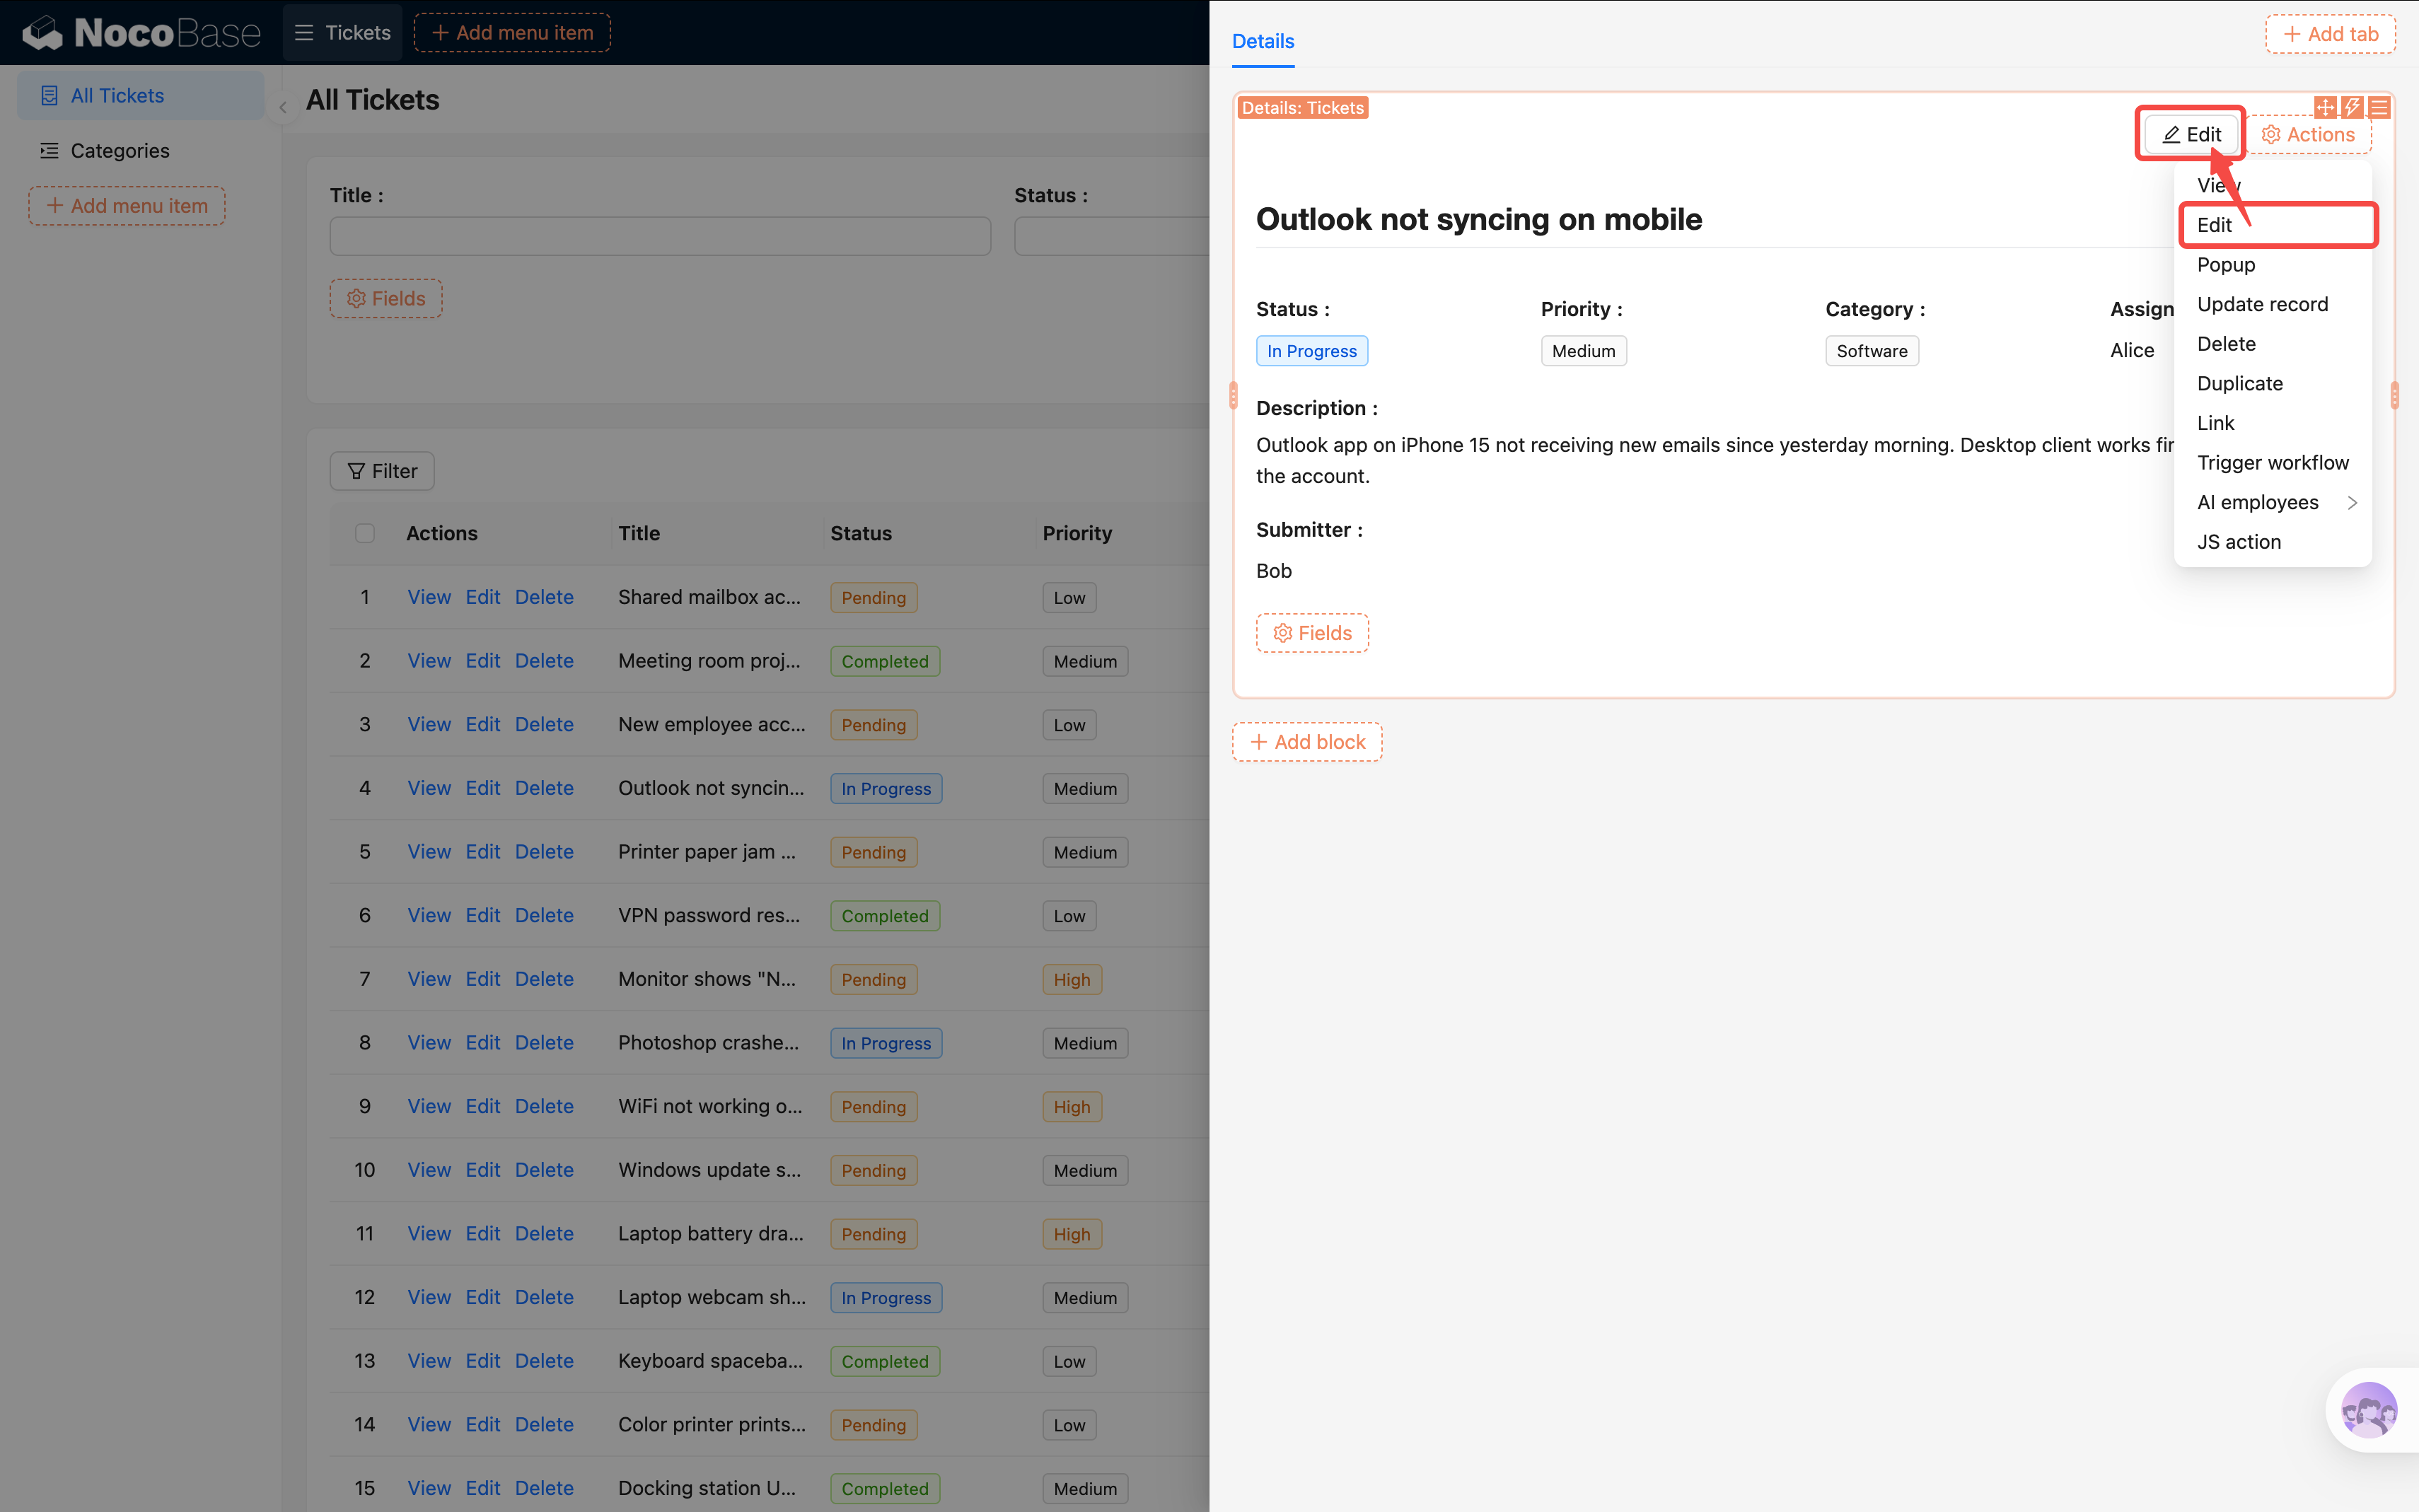
Configuring the Edit Form
Click the "Edit" button and a new popup opens — it needs an edit form inside. The edit form has nearly the same fields as the "Add new" form. Do we really have to check all those fields again from scratch?
Nope. Let's save the "Add new" form as a template first, then the edit form can reference it directly.
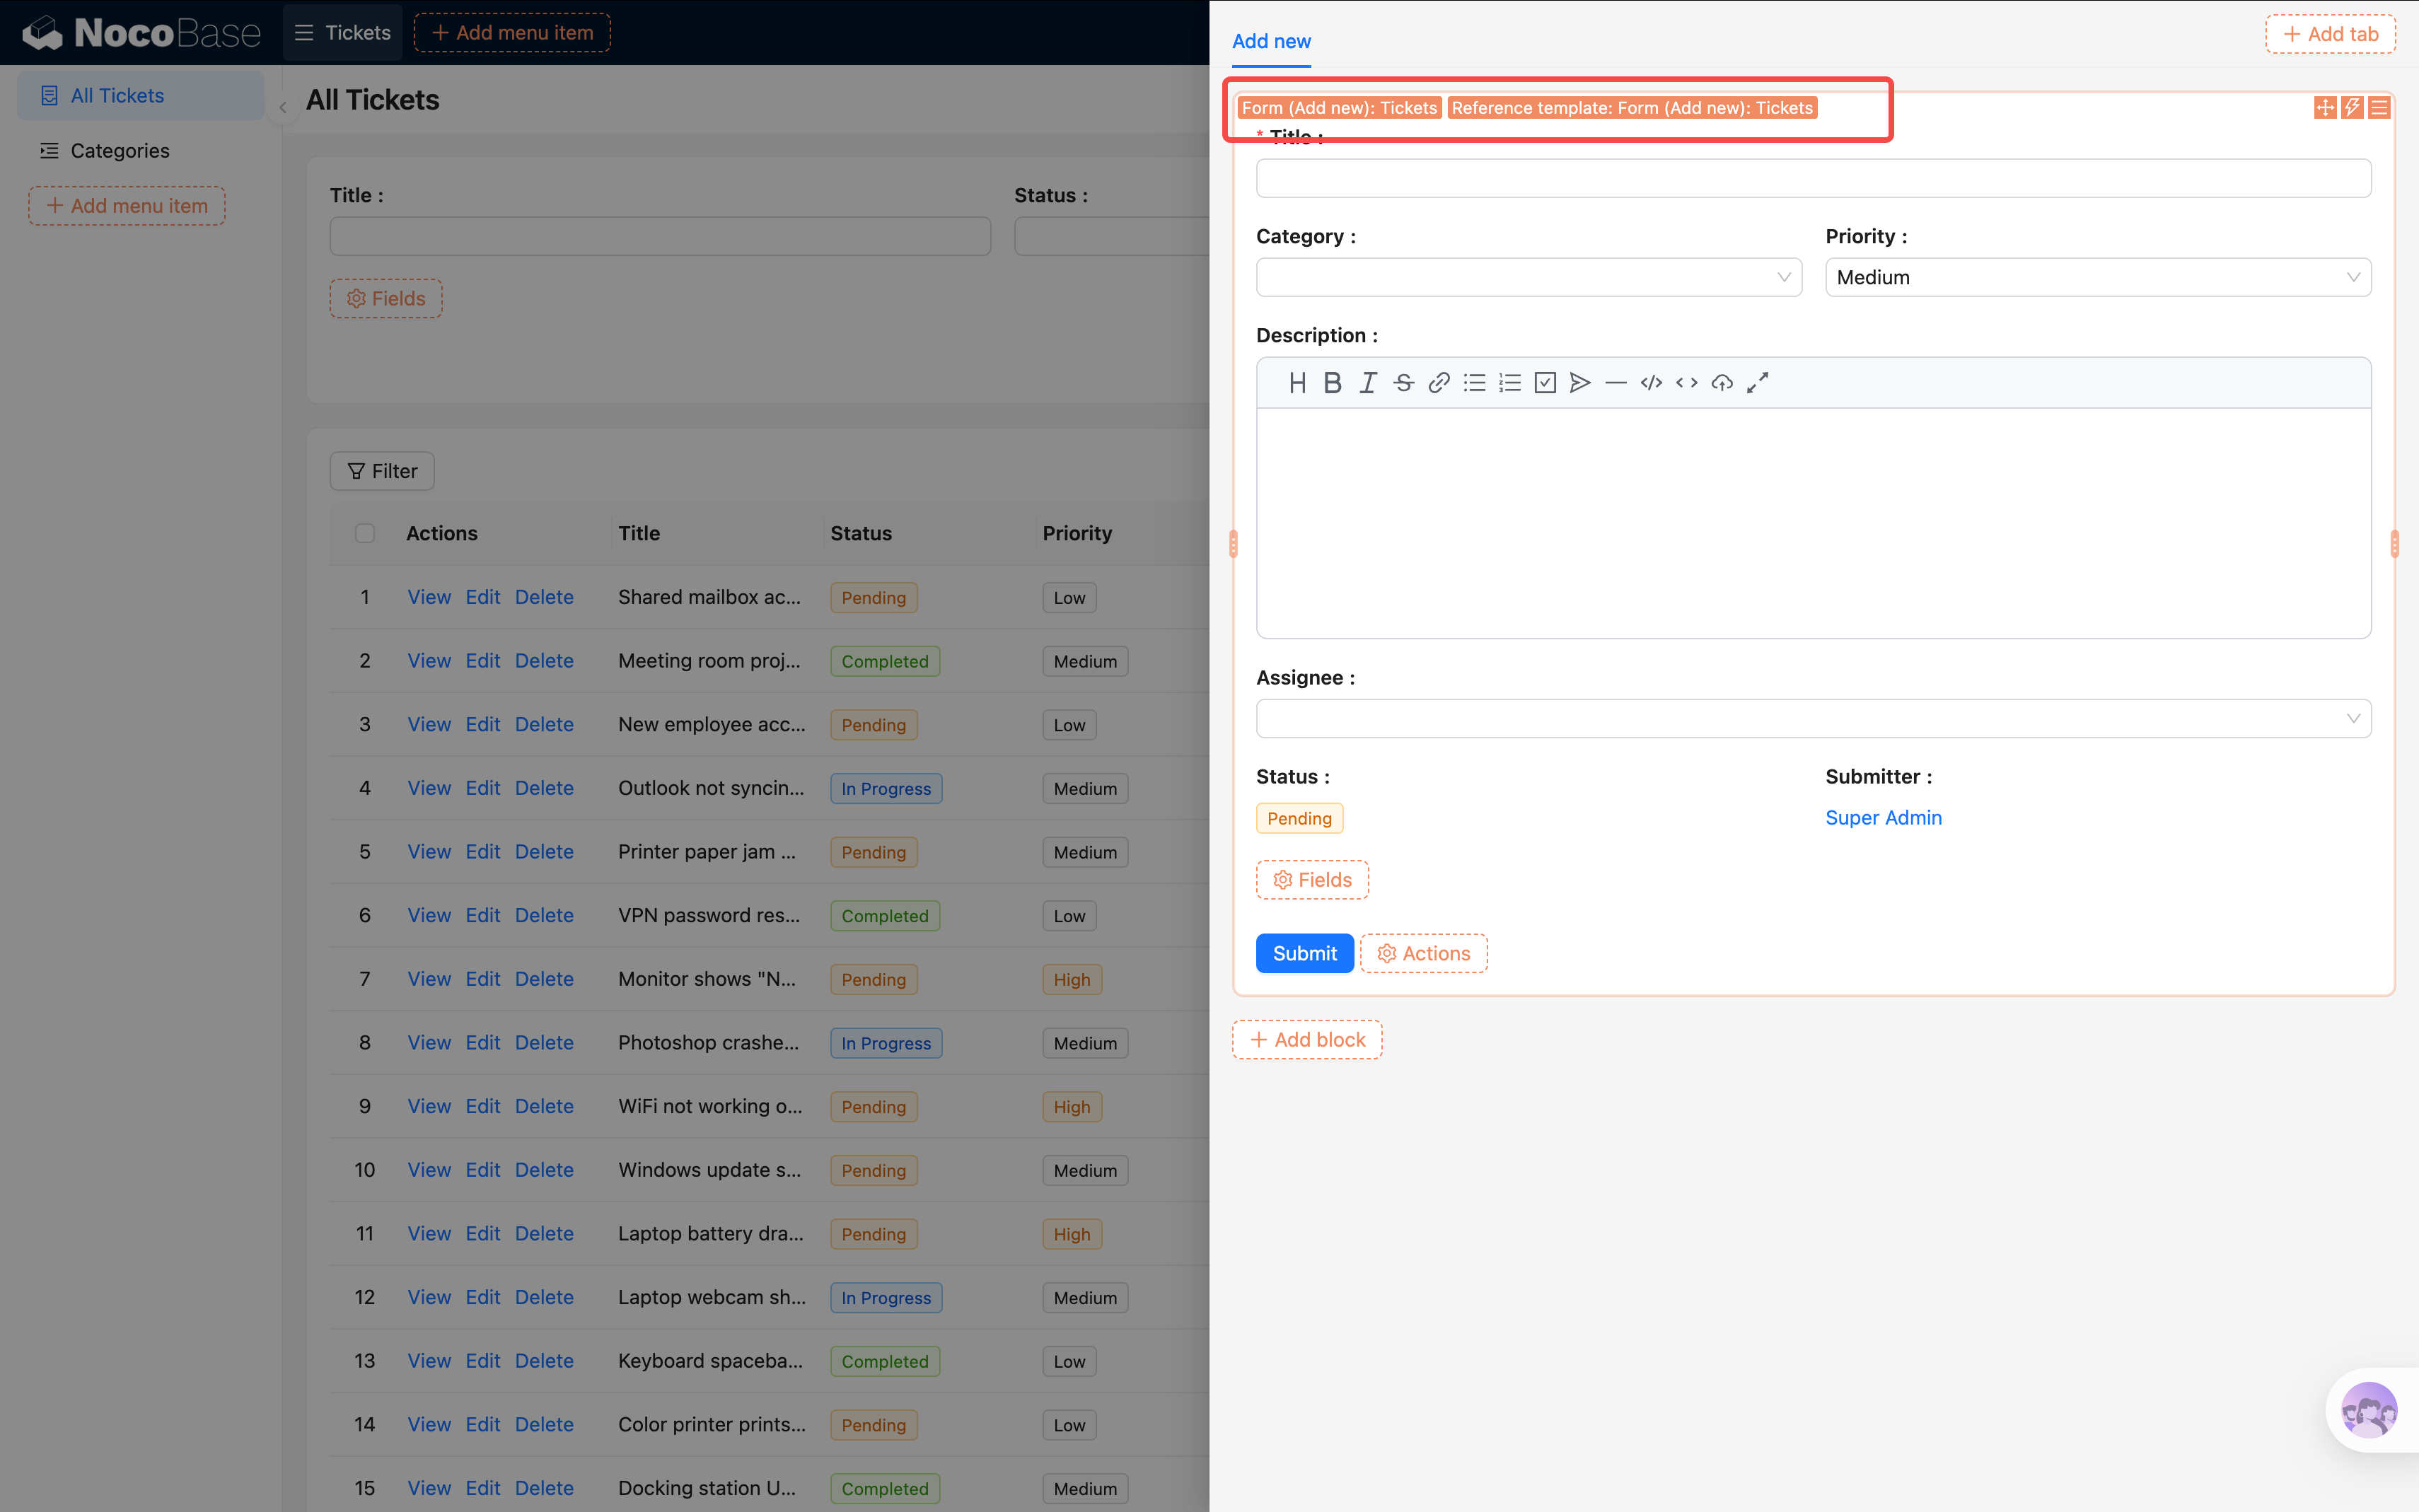
Step 1: Go back to the "Add new" form and save as template
- Close the current drawer, go back to the ticket list, and click "Add new" to open the form.
- Click the block settings icon (three-line icon) at the top-right of the Form block, and find "Save as template".

- Click save — it defaults to "Reference". All forms referencing this template share the same configuration. Update one place and all stay in sync.
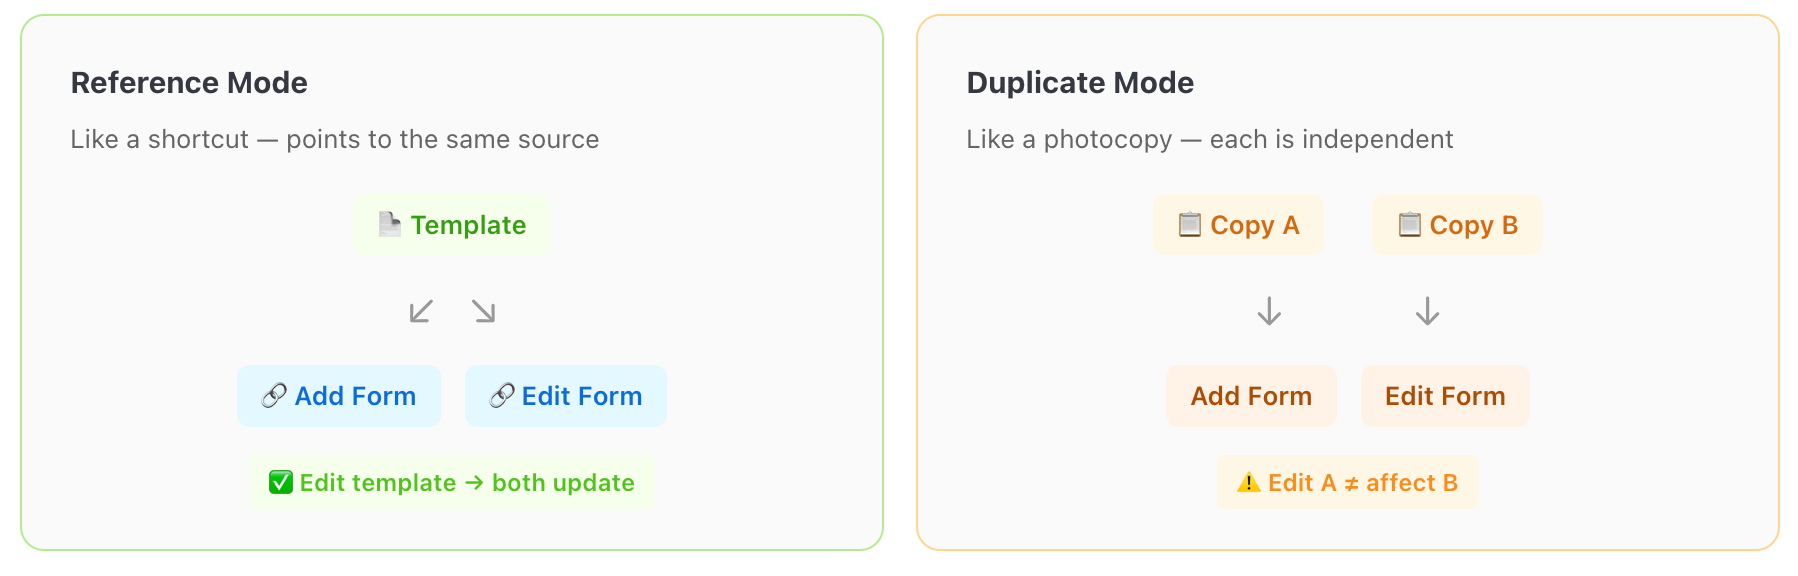
Since our ticket form isn't complex, "Reference" is simpler to maintain. If you choose "Duplicate", each form gets an independent copy that can be modified separately.
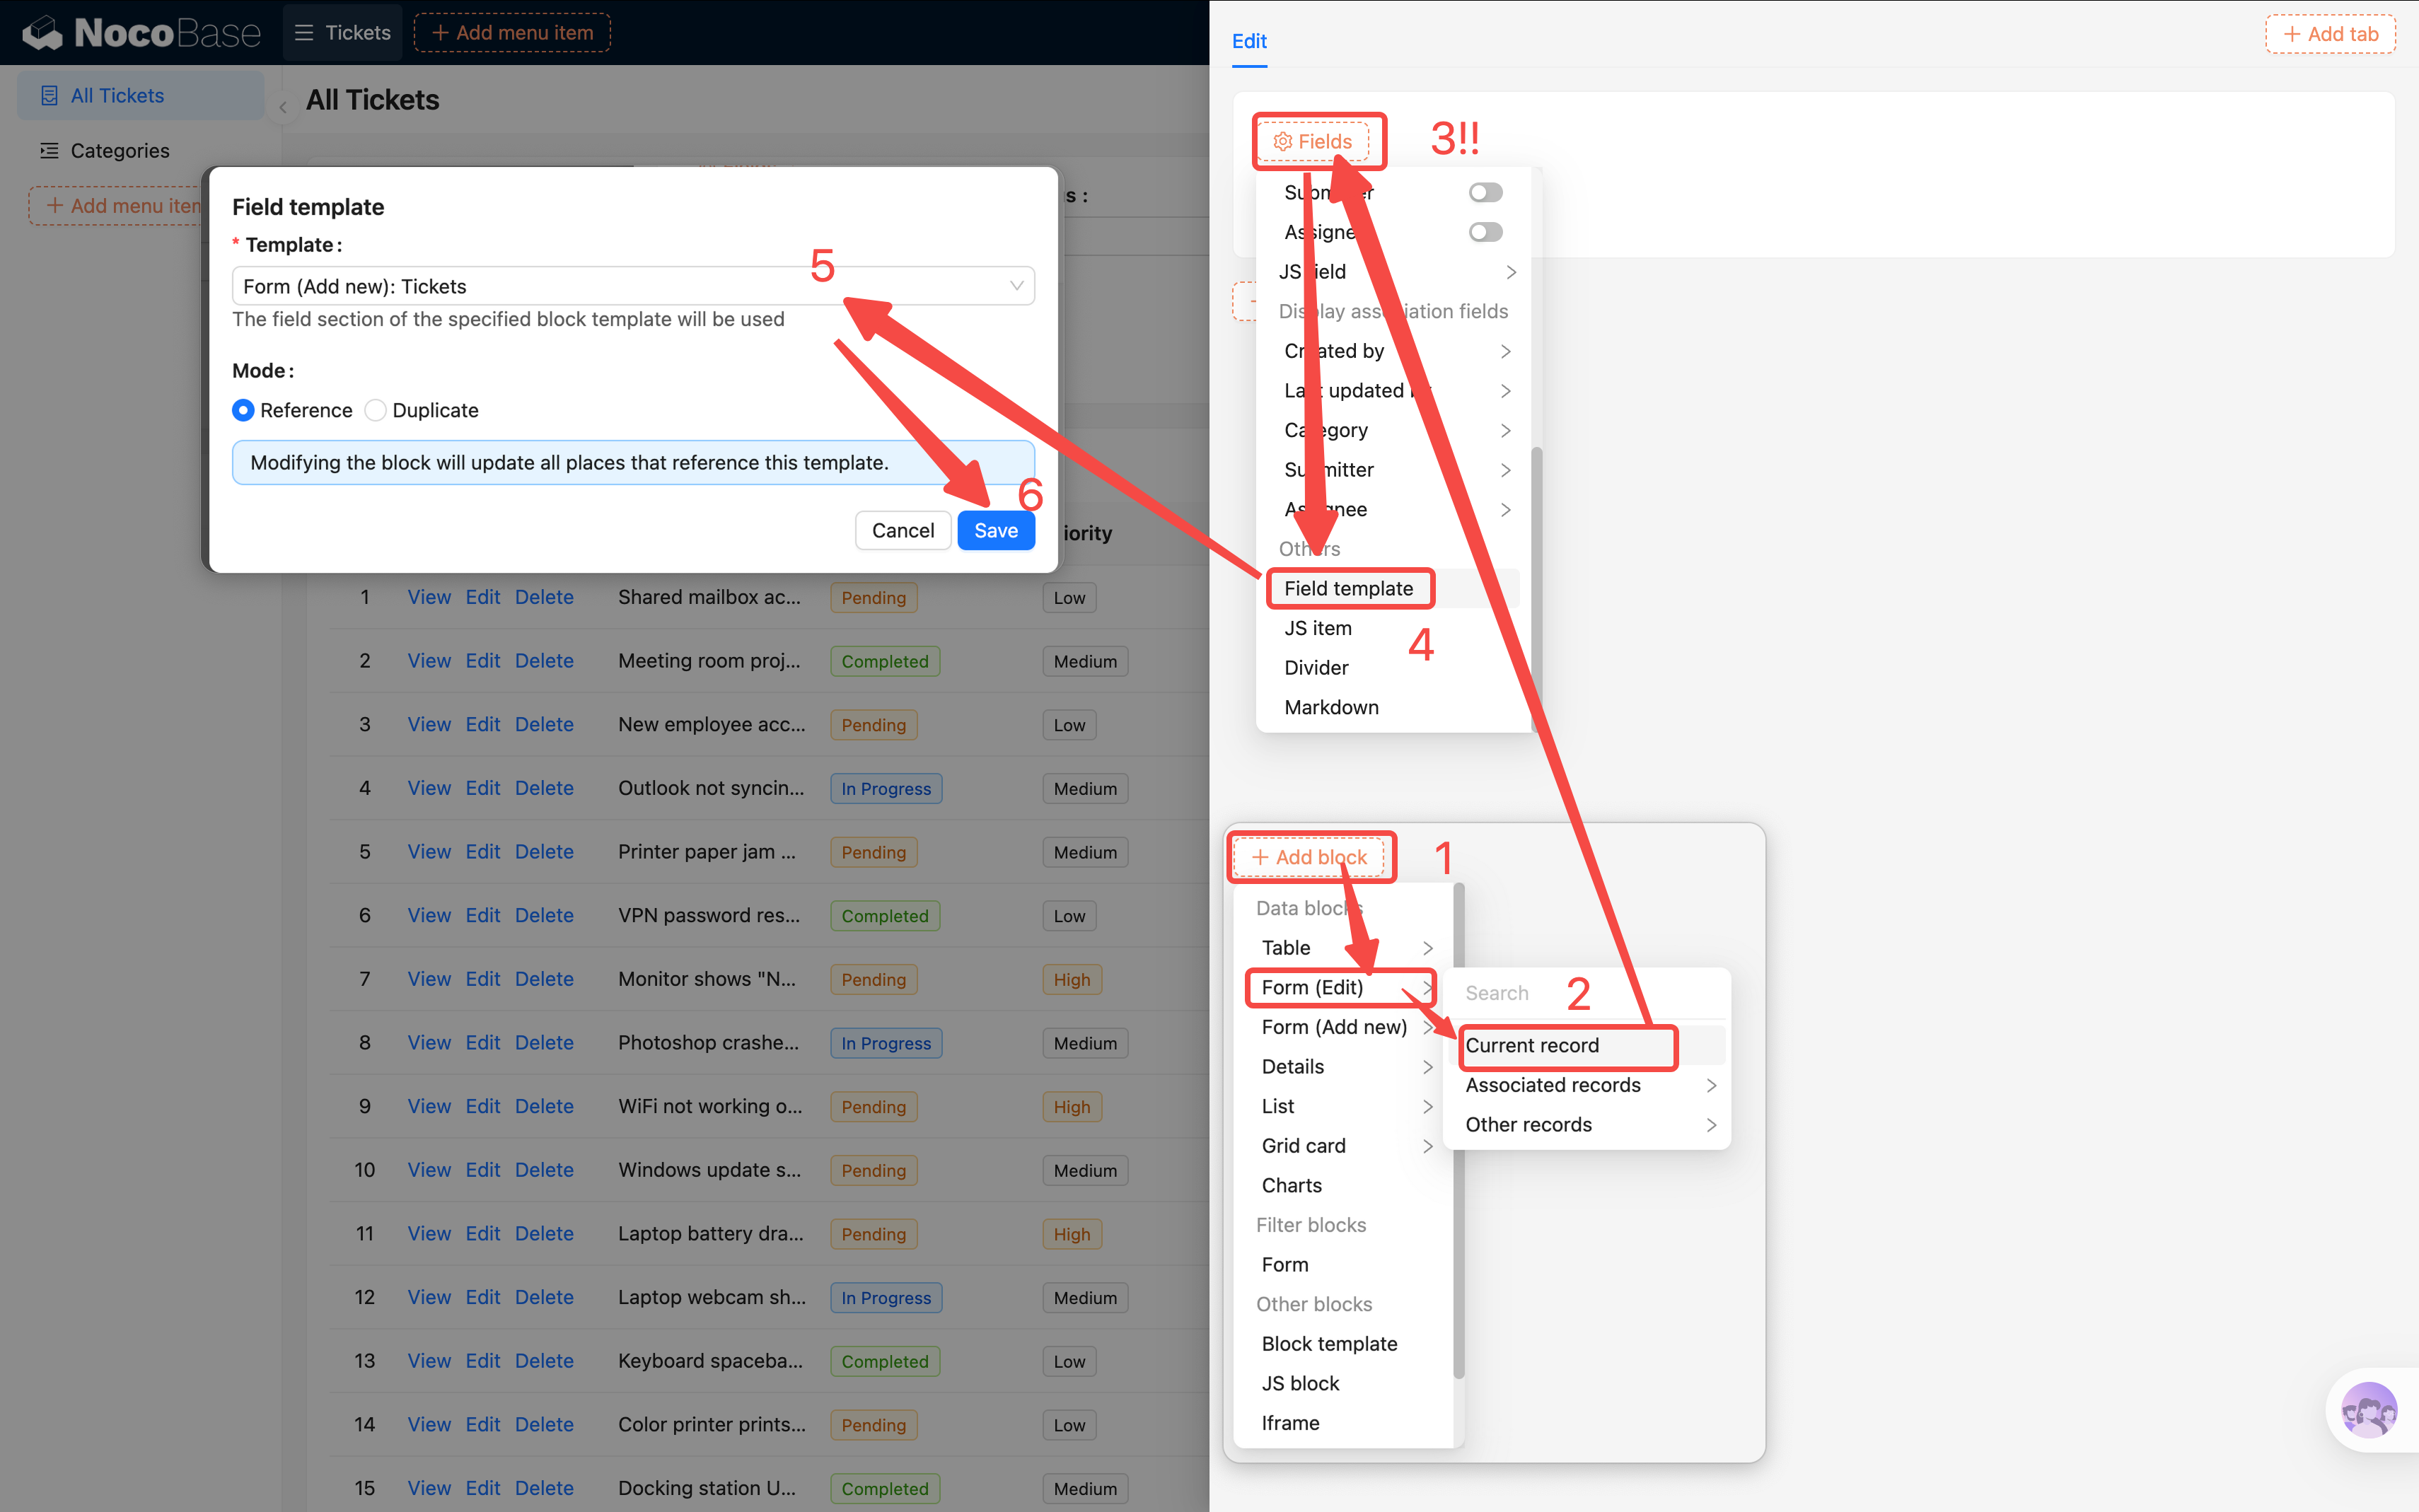
Step 2: Reference the template in the edit popup
- Go back to the details drawer or the table's row actions, and click the "Edit" button to open the edit popup.
You might think: just use "Add block -> Other blocks -> Block templates" to create the form, right? Try it and you'll find — this creates an "Add new" form, and the fields aren't actually populated. This is a common pitfall.
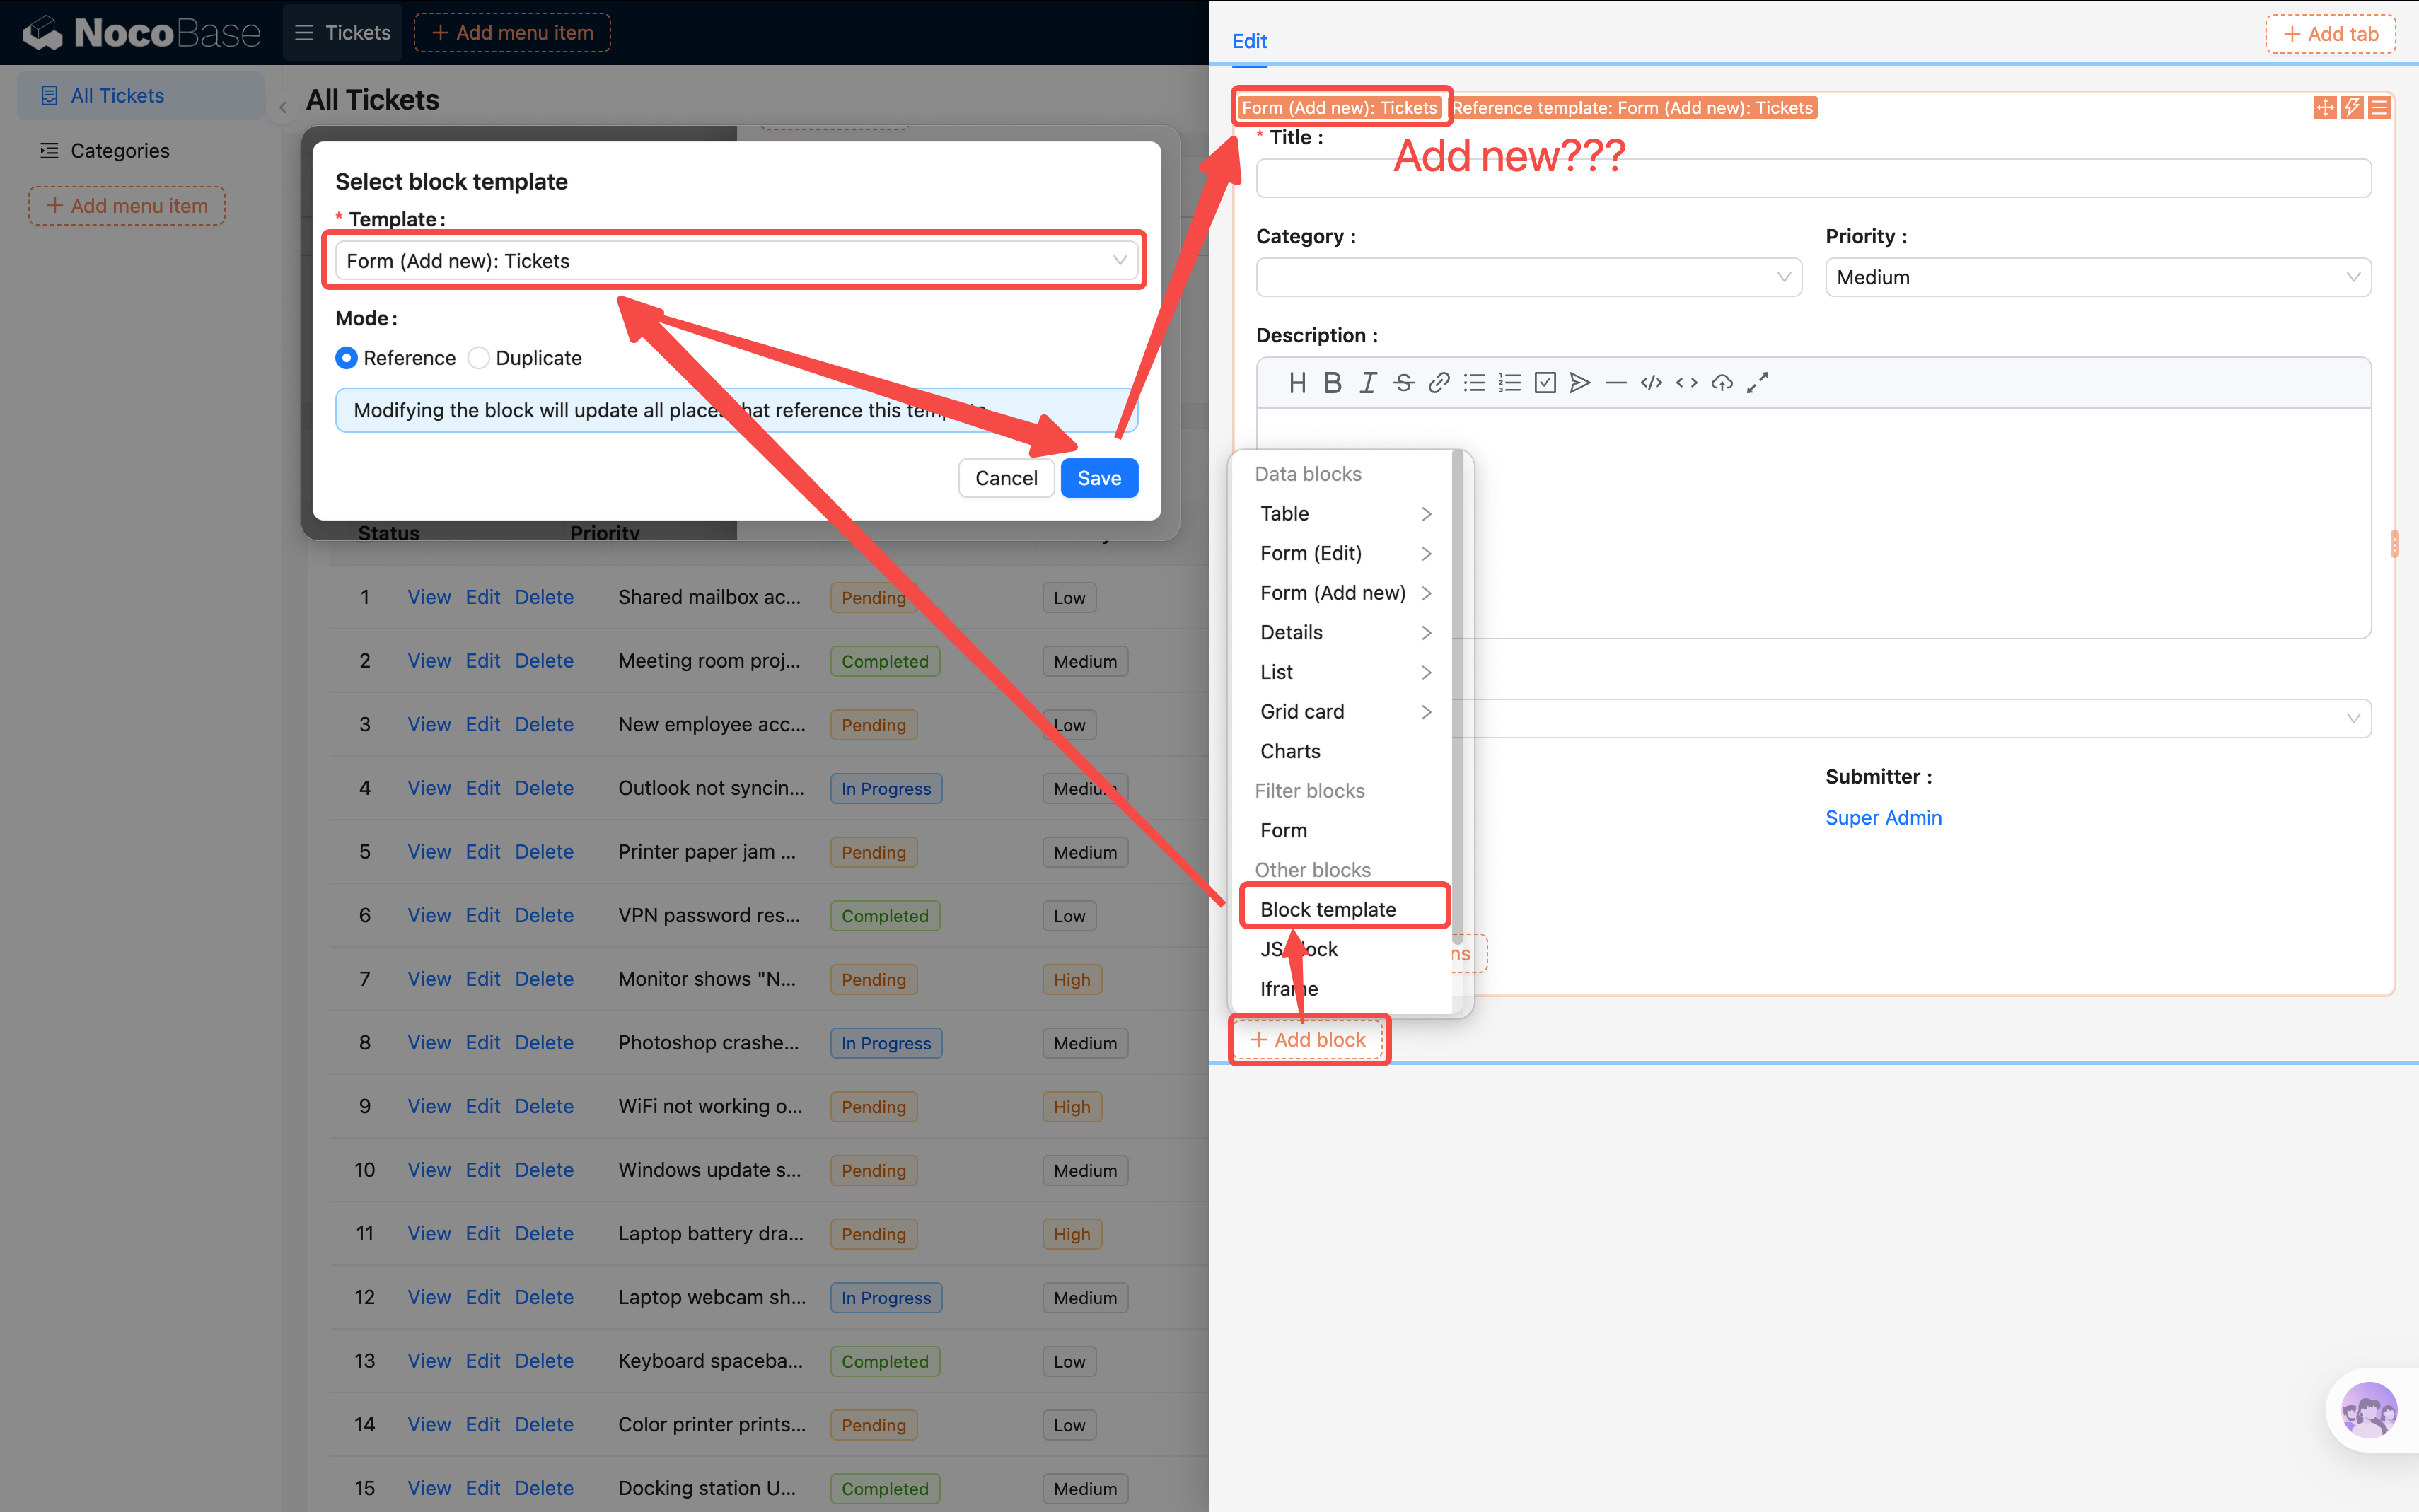
The correct approach:
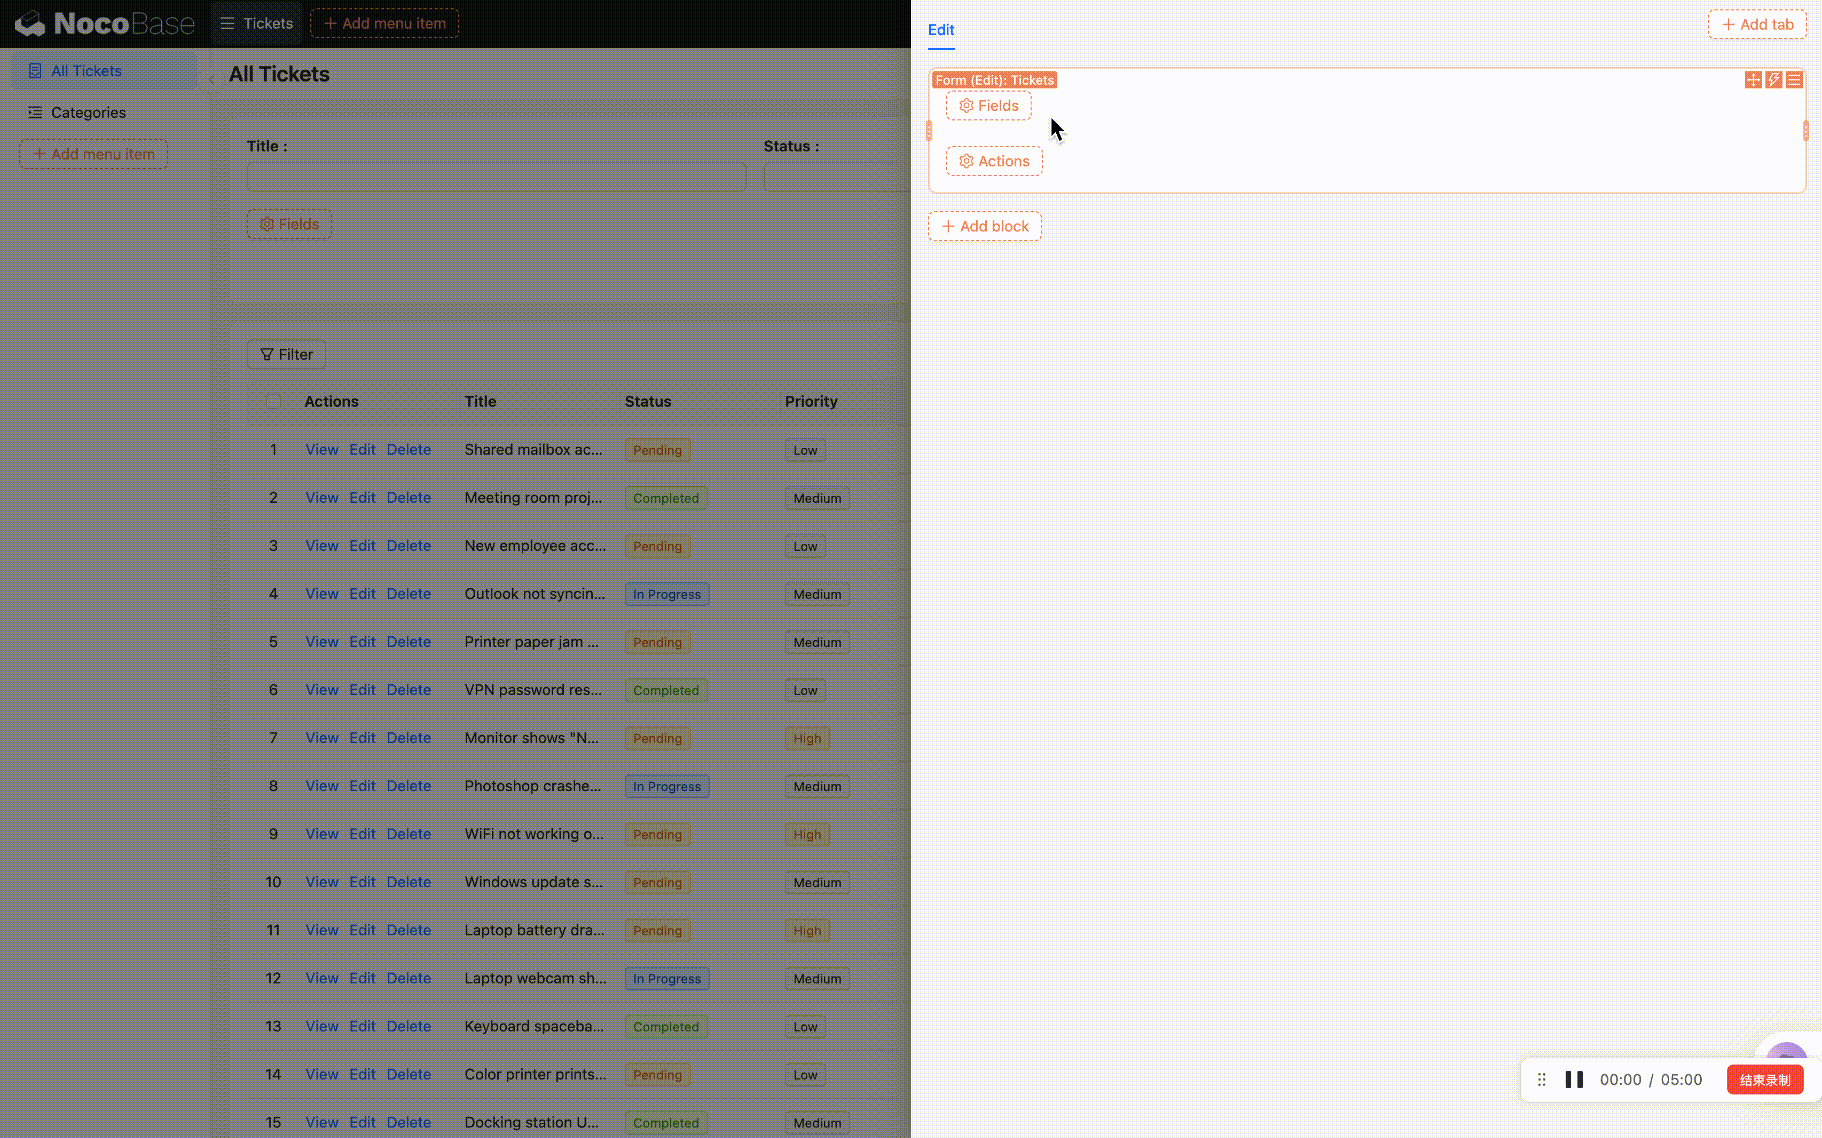
- In the popup, click "Add block" -> Data blocks -> Form (Edit) to create an edit form block first.
- In the edit form, click "Fields" -> "Field templates", and select the template you saved earlier.
- All fields will be populated at once, matching the "Add new" form exactly.
- Don't forget to add a "Submit" action button so users can save their changes.
Want to add a field later? Just modify the template once — both the "Add new" and edit forms update automatically.
Quick Editing: Change Data Without Opening a Popup
Besides popup editing, NocoBase also supports quick editing directly in the table — no popups needed, just hover and click.
There are two places to enable it:
- Table block level: Click the Table block's block settings (three-line icon), find "Quick editing", and toggle it on. This enables quick editing for all fields in the table.
- Individual field level: Click a column's field settings, find "Quick editing", and toggle it on per field.
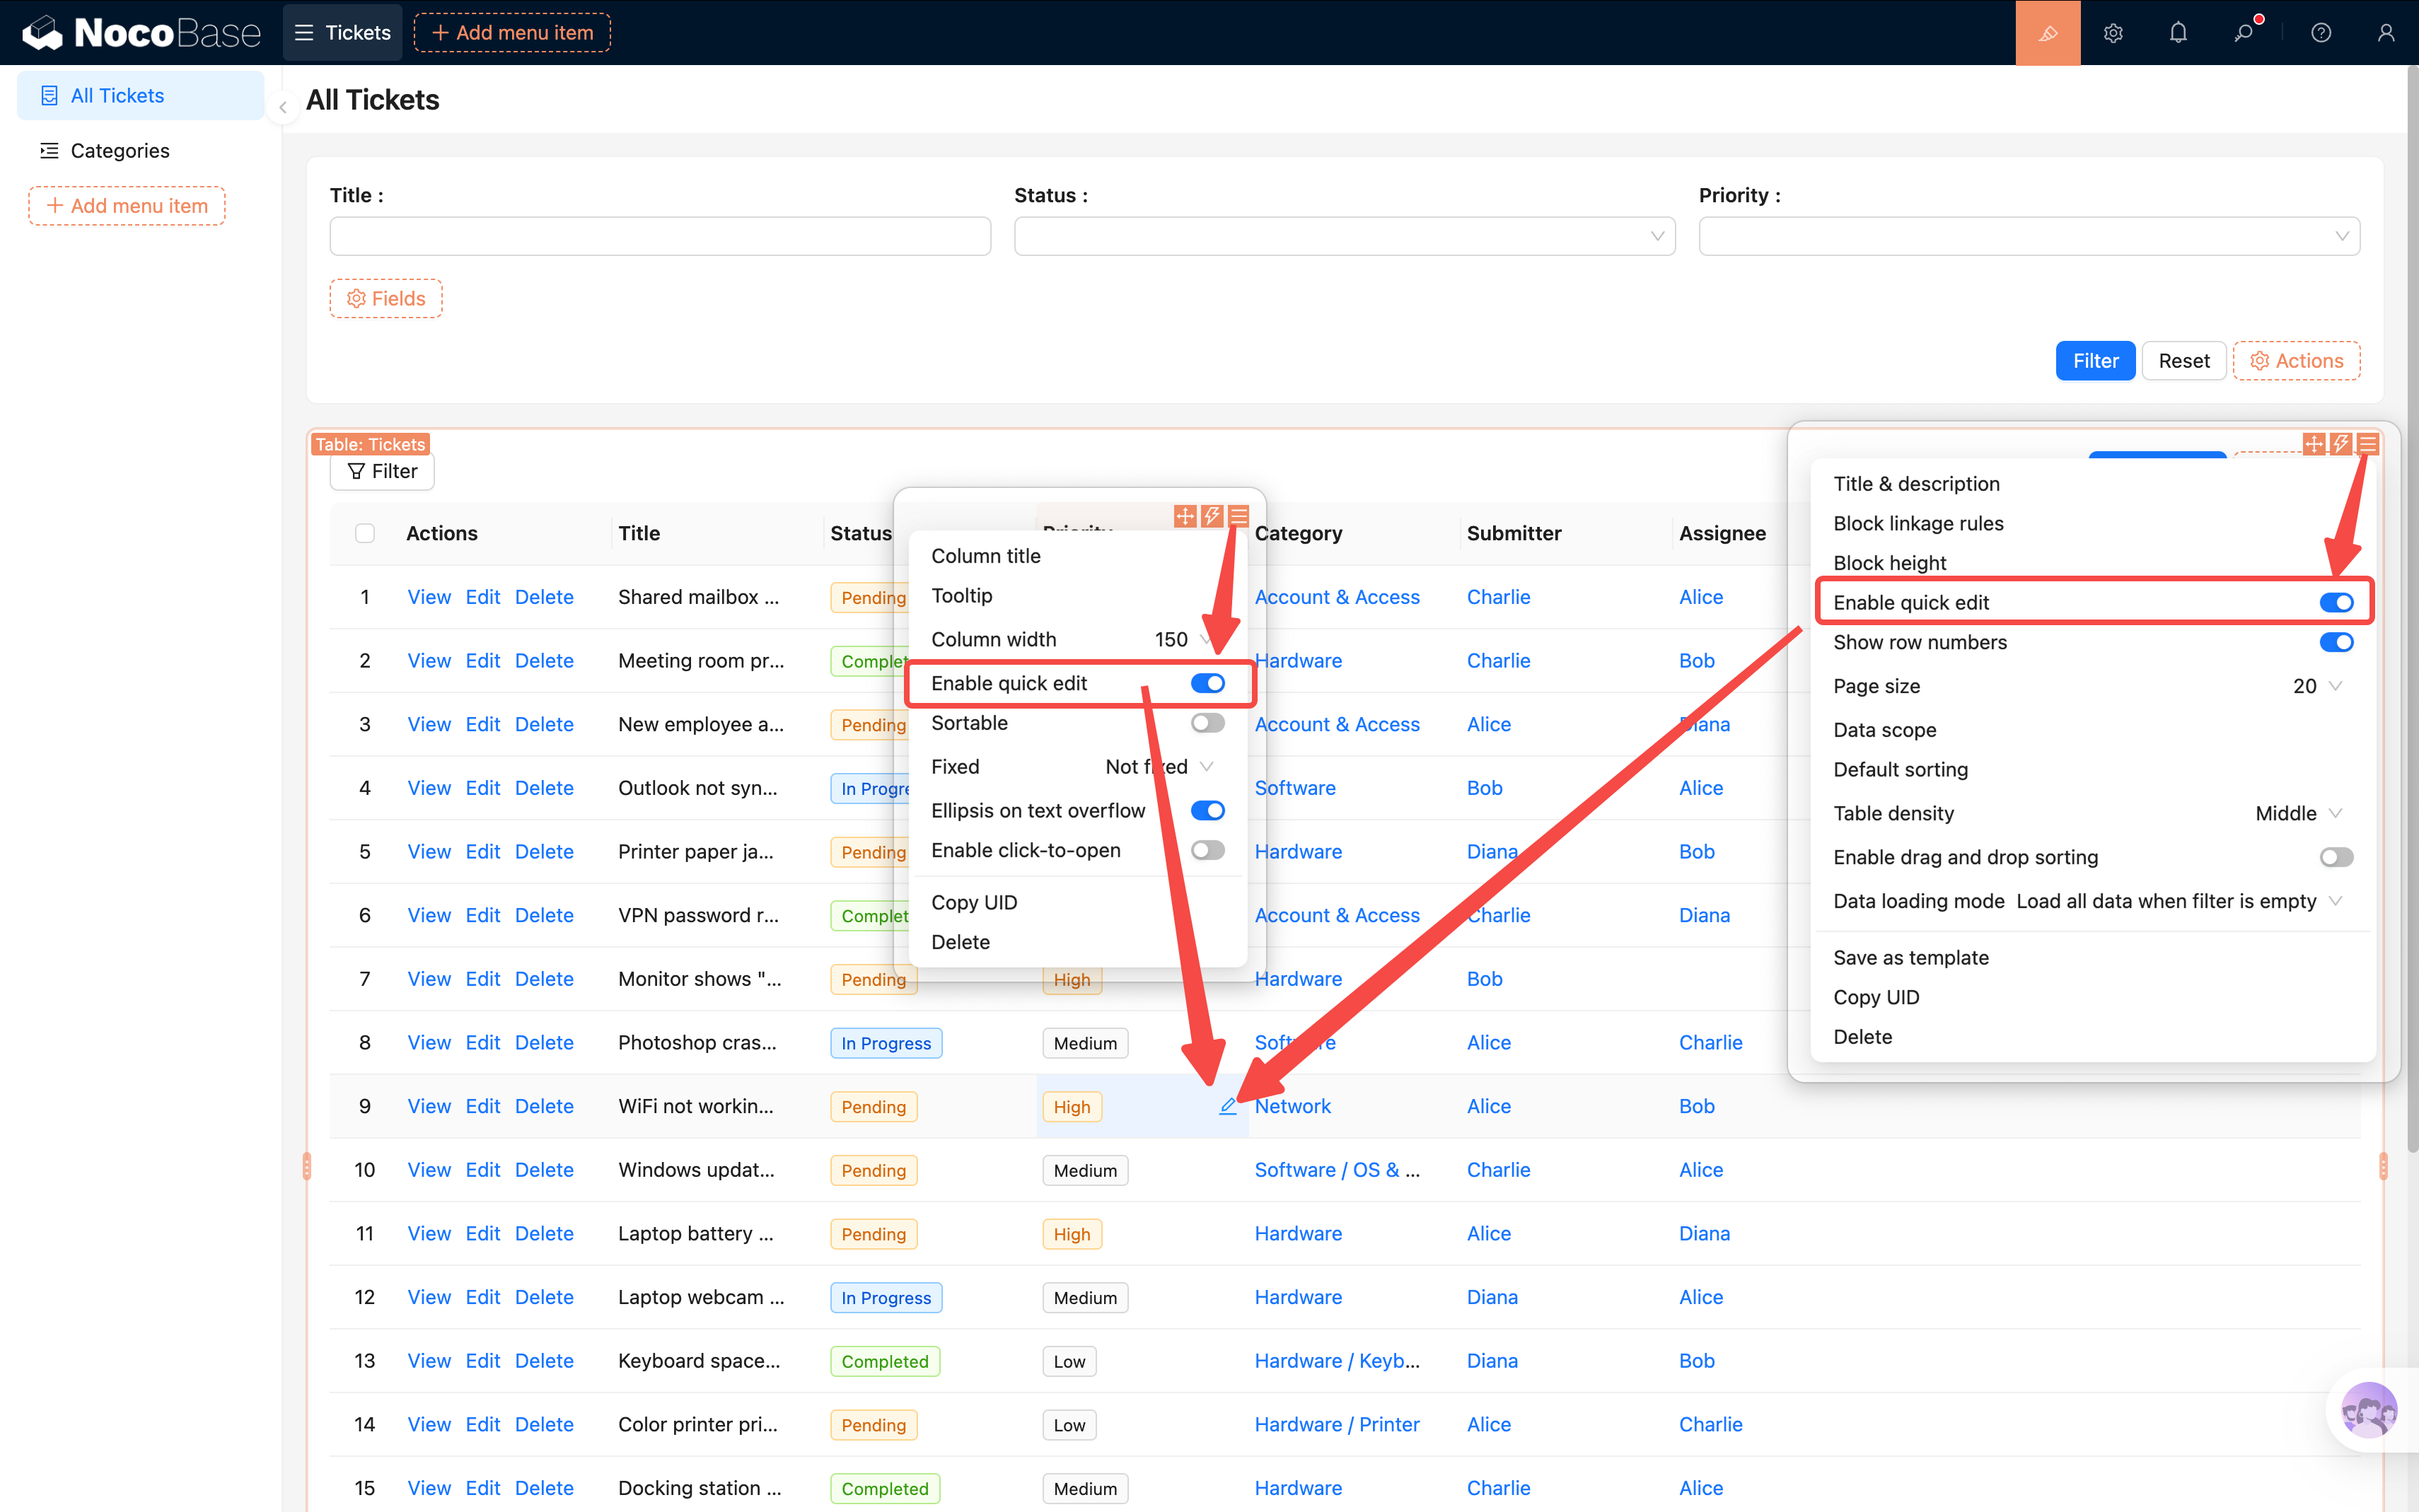
Once enabled, hovering over a table cell reveals a small pencil icon. Click it to open an inline editor for that field — changes save automatically.
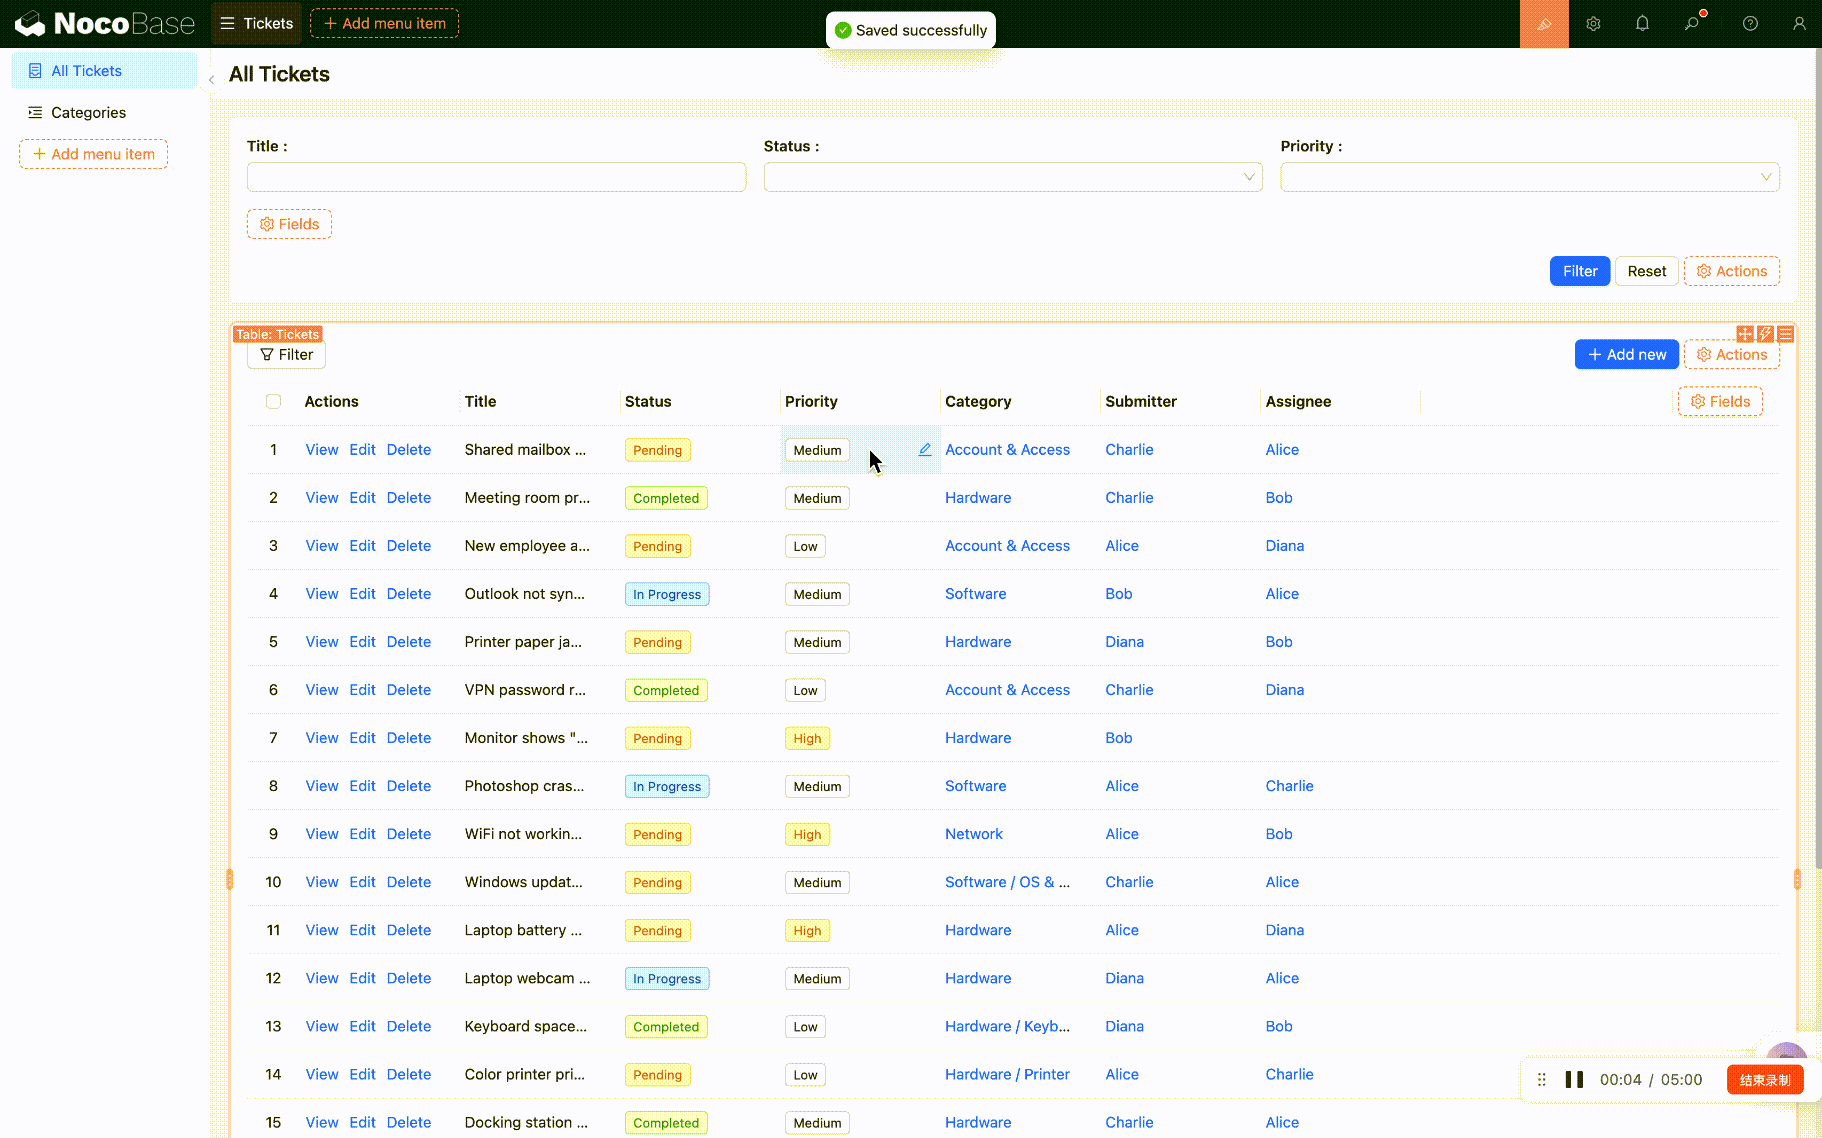
When is this useful? Quick editing is perfect for batch updates like changing status or assignee. For example, an admin browsing the ticket list can click the "Status" column to quickly change a ticket from "Pending" to "In Progress" without opening each one individually.
4.4 Enabling Change History
One of the most important aspects of a ticket system: who changed what and when must be traceable. NocoBase has a built-in "Record History" plugin that automatically logs every data change.
Configuring Change History
- Go to Settings -> Plugin manager and make sure the "Record History" plugin is enabled.
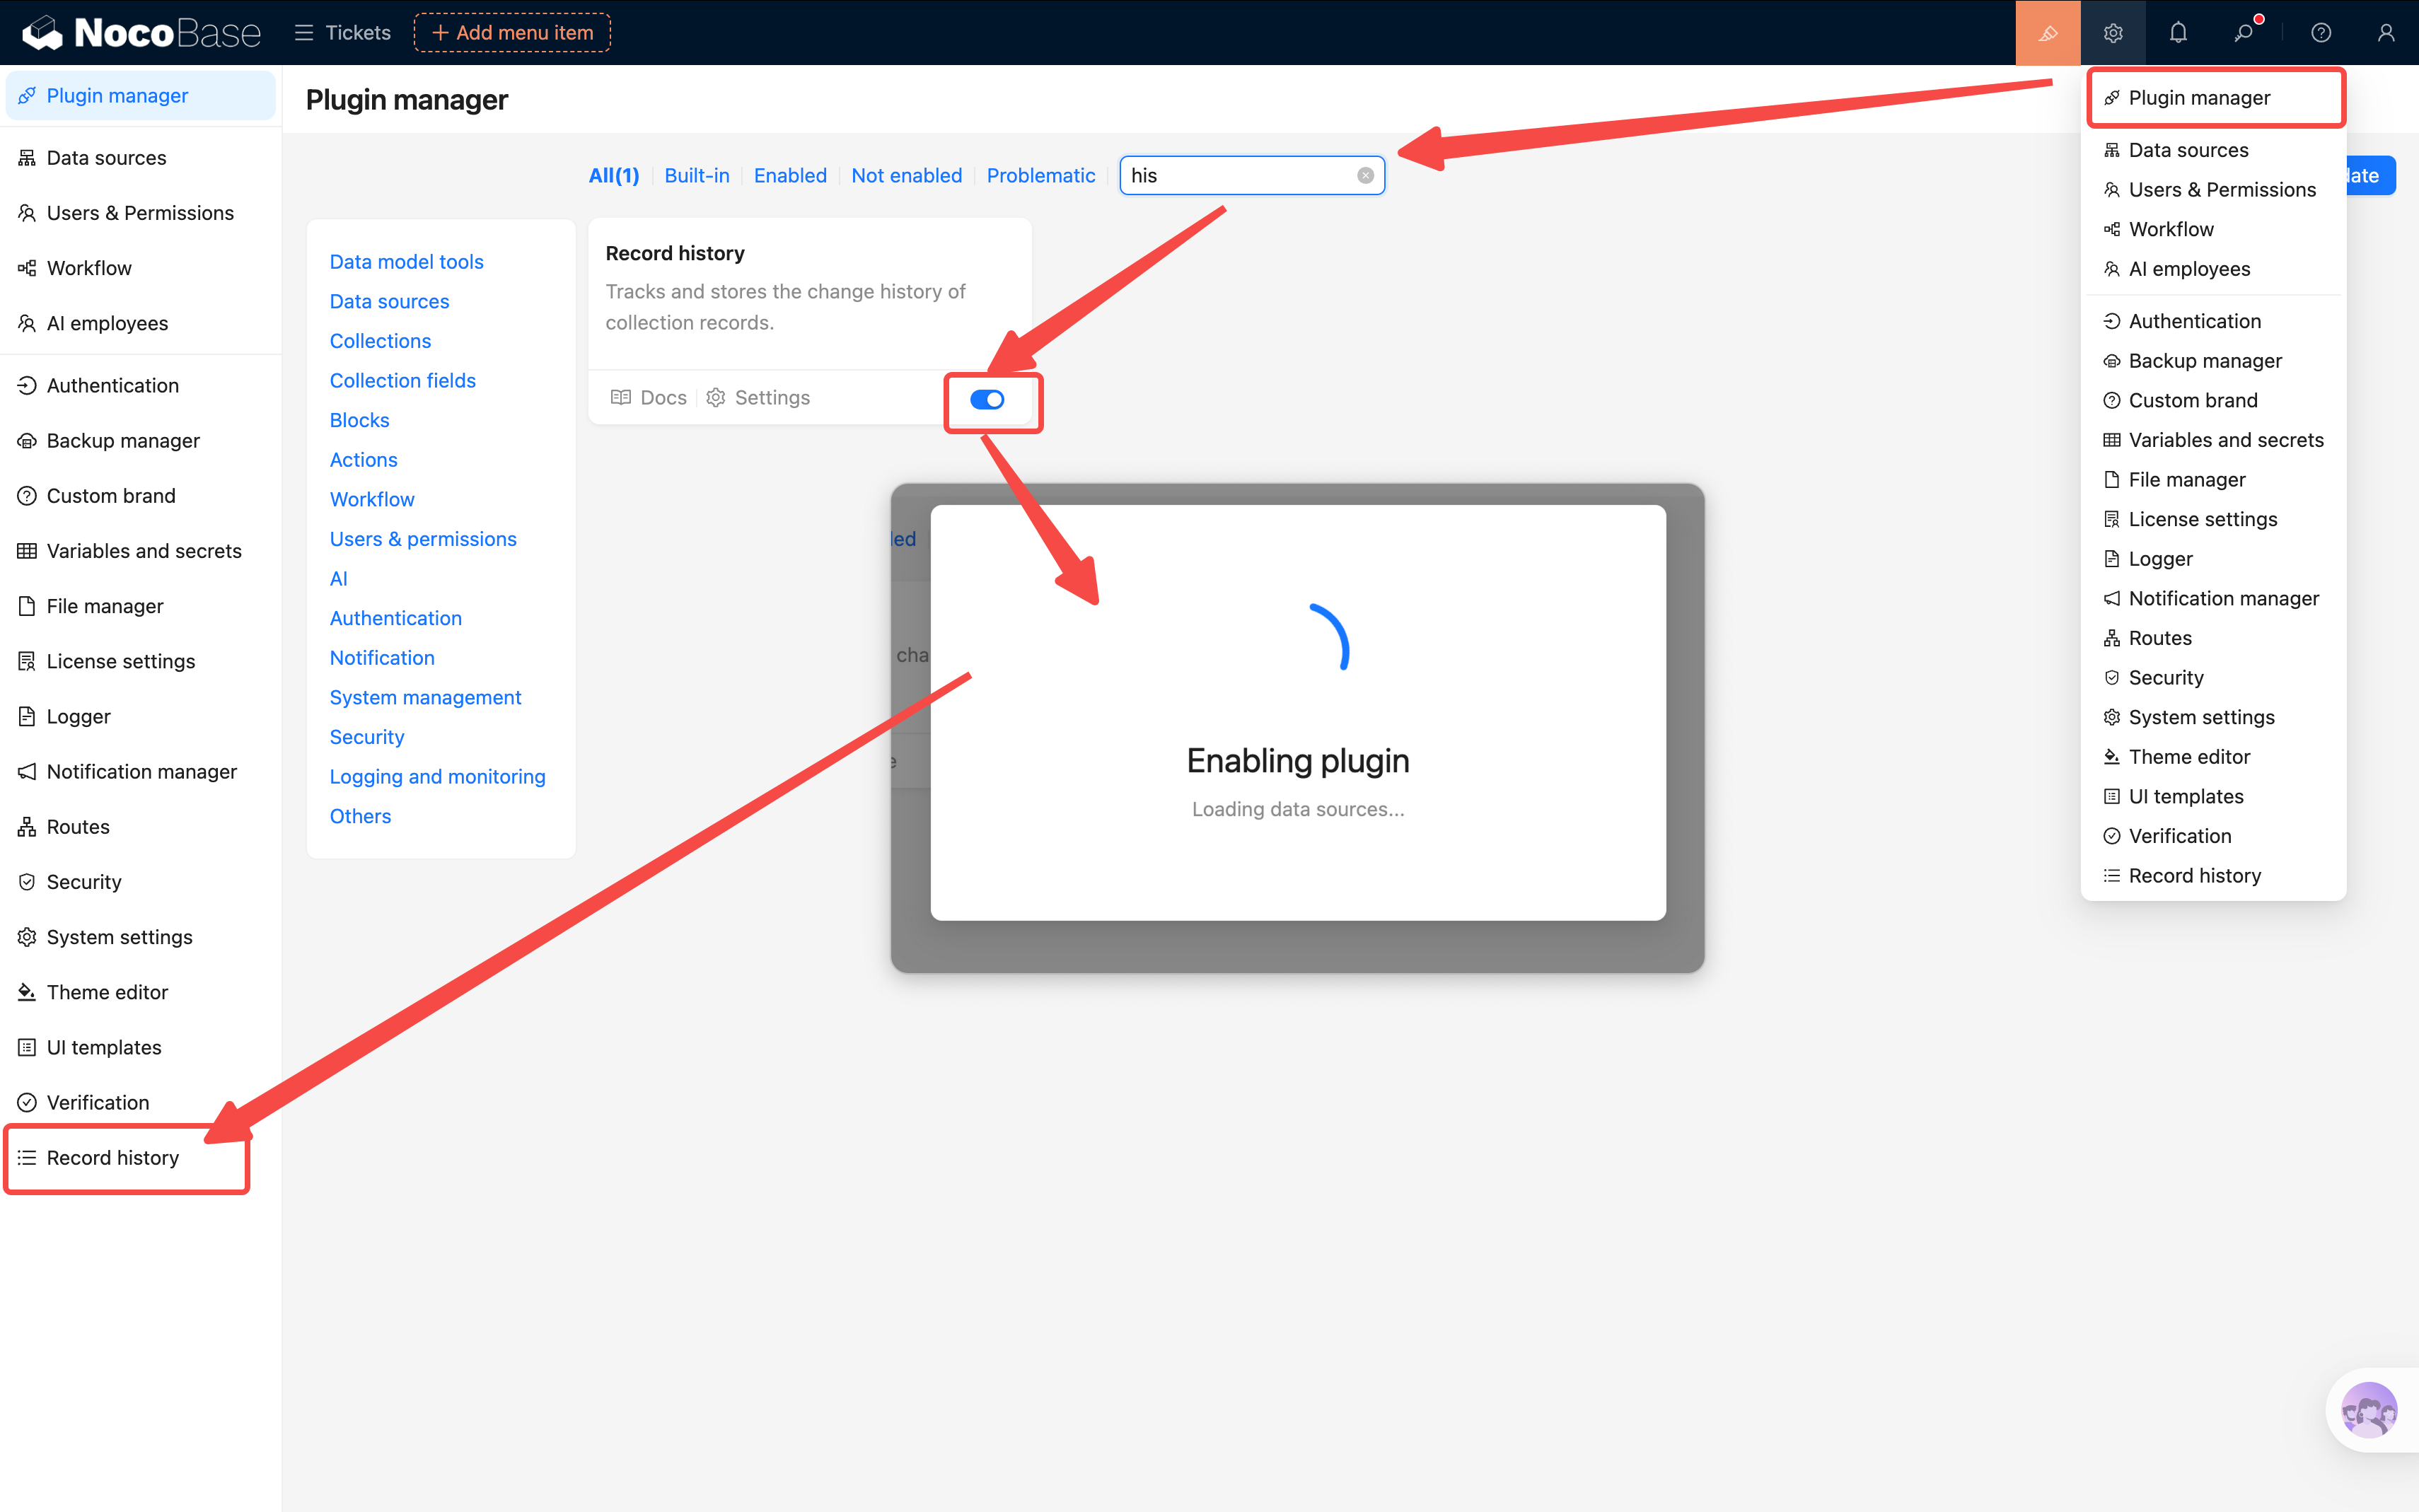
- Enter the plugin configuration page and click "Add collection", then select "Tickets".
- Choose which fields to track: Title, Status, Priority, Assignee, Description, etc.
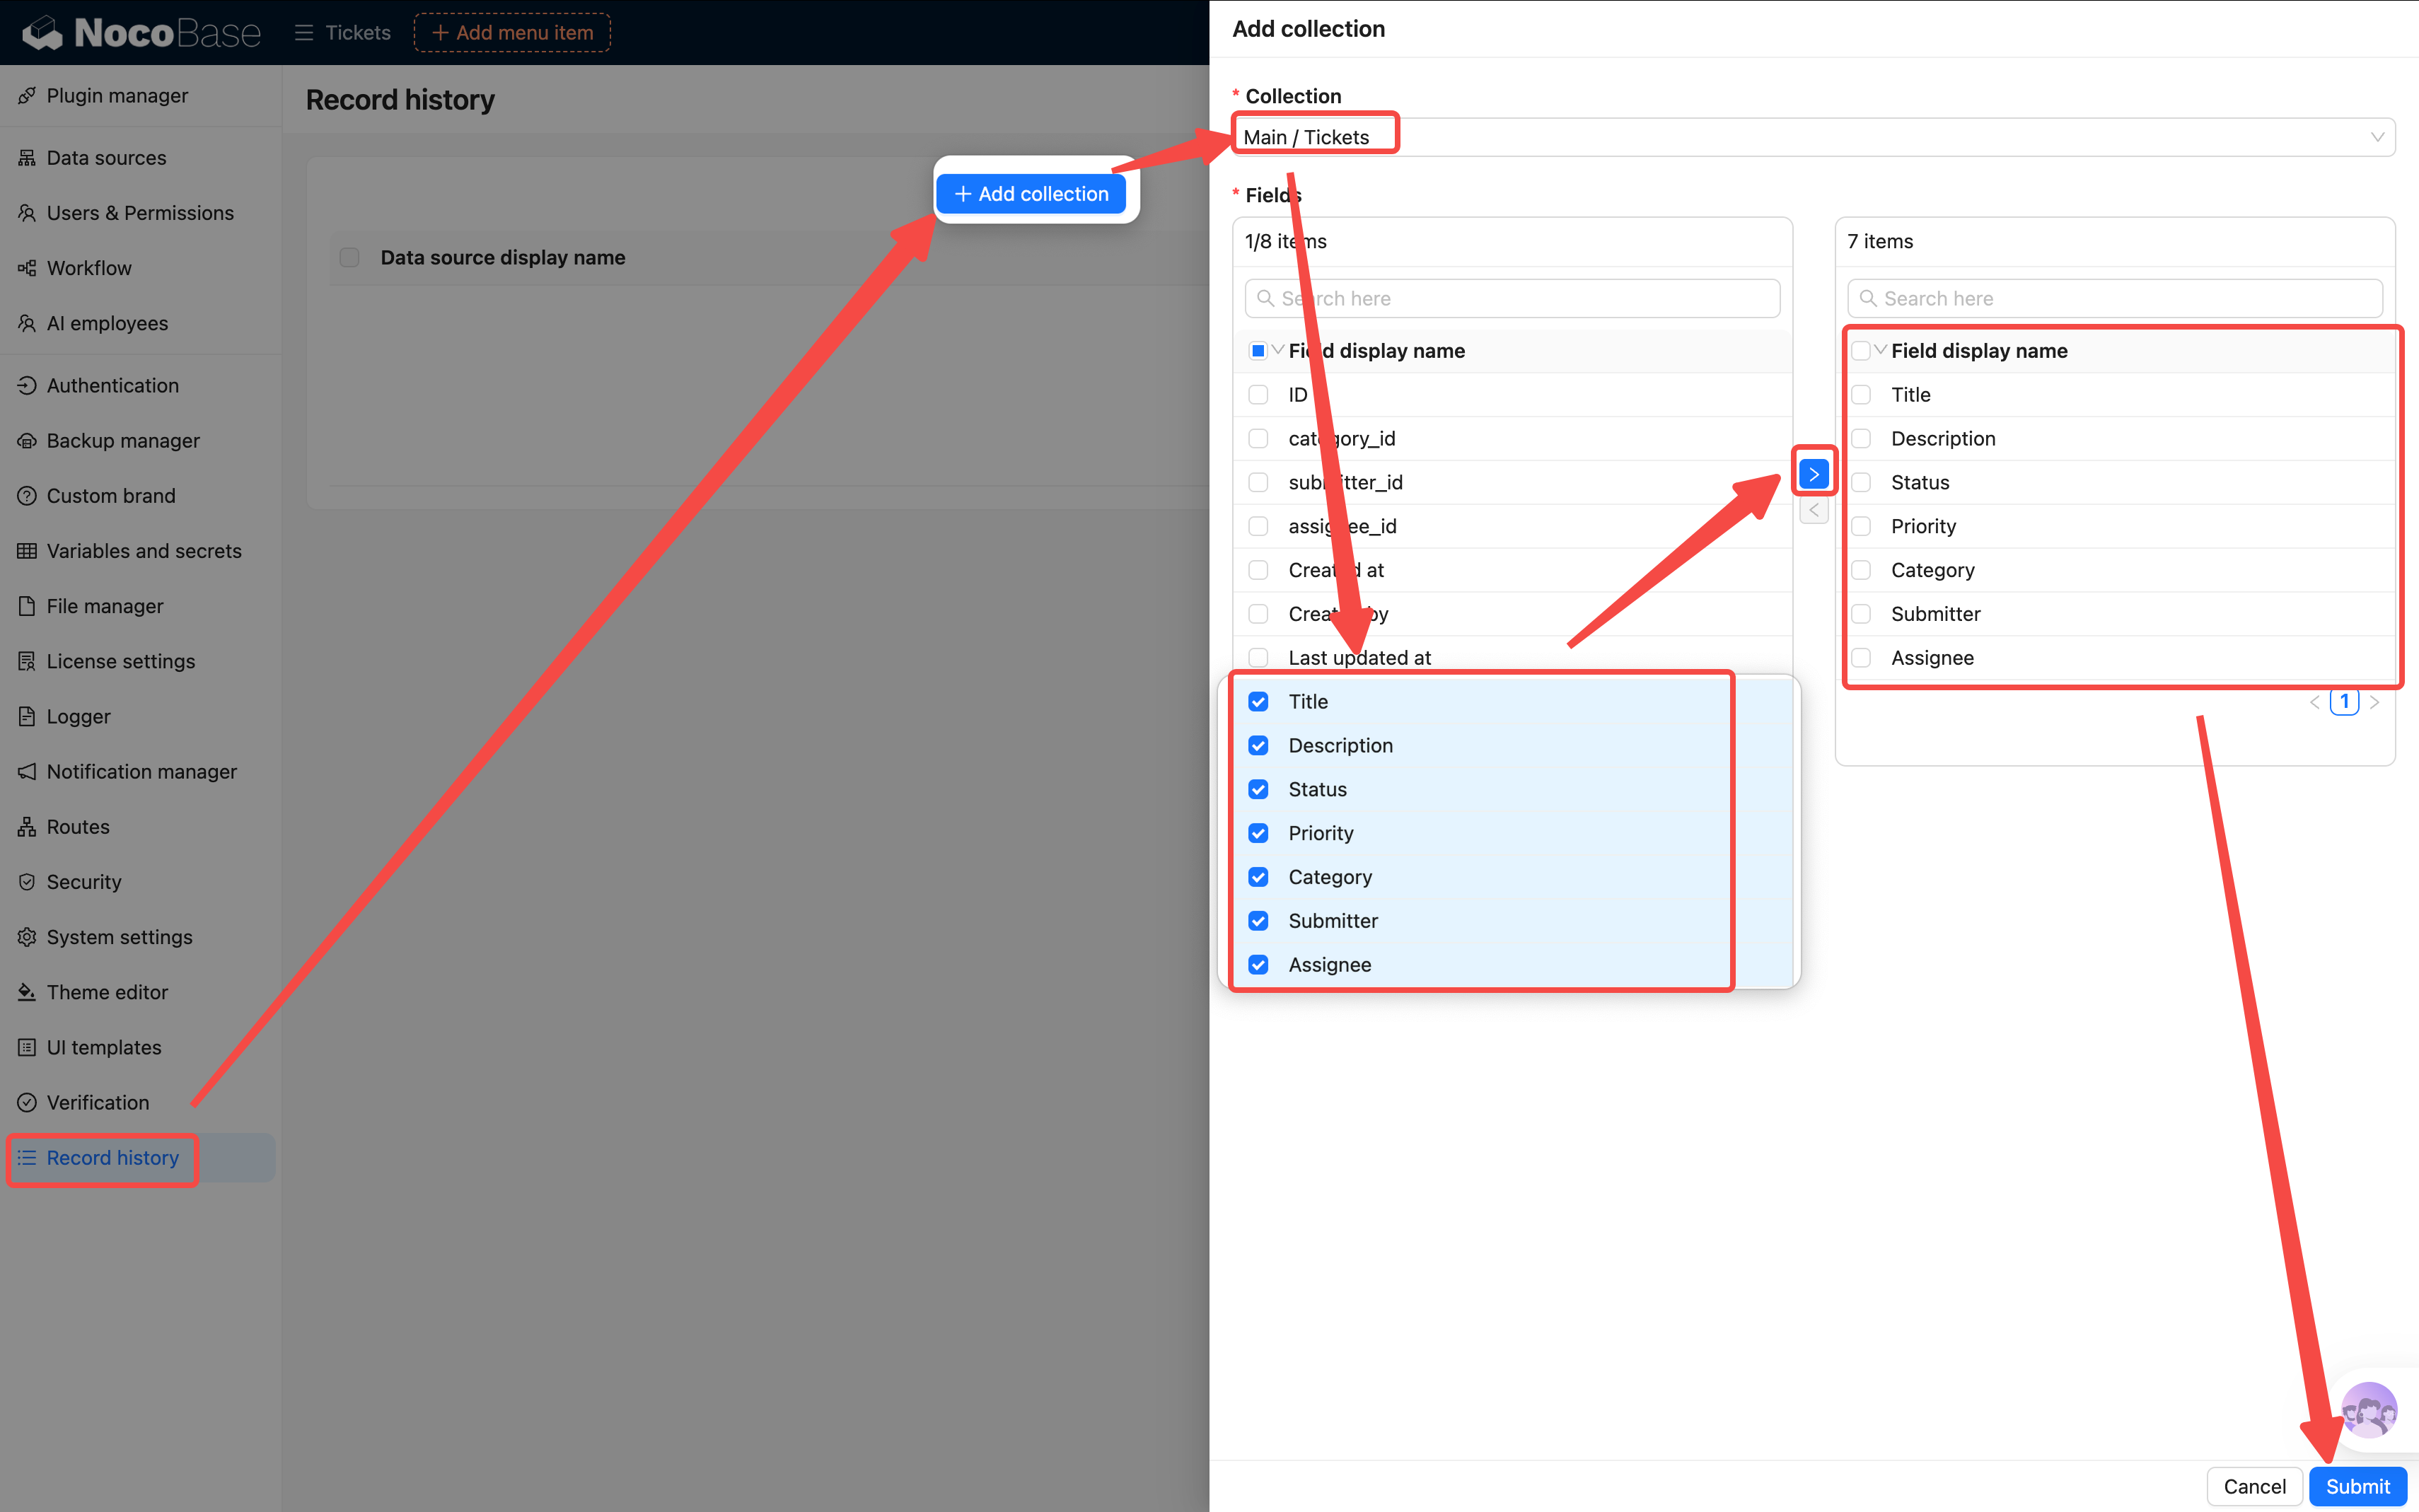
Recommendation: You don't need to track every field. Fields like ID and Created at that are never manually changed don't need to be tracked. Only record changes to fields that matter for the business.
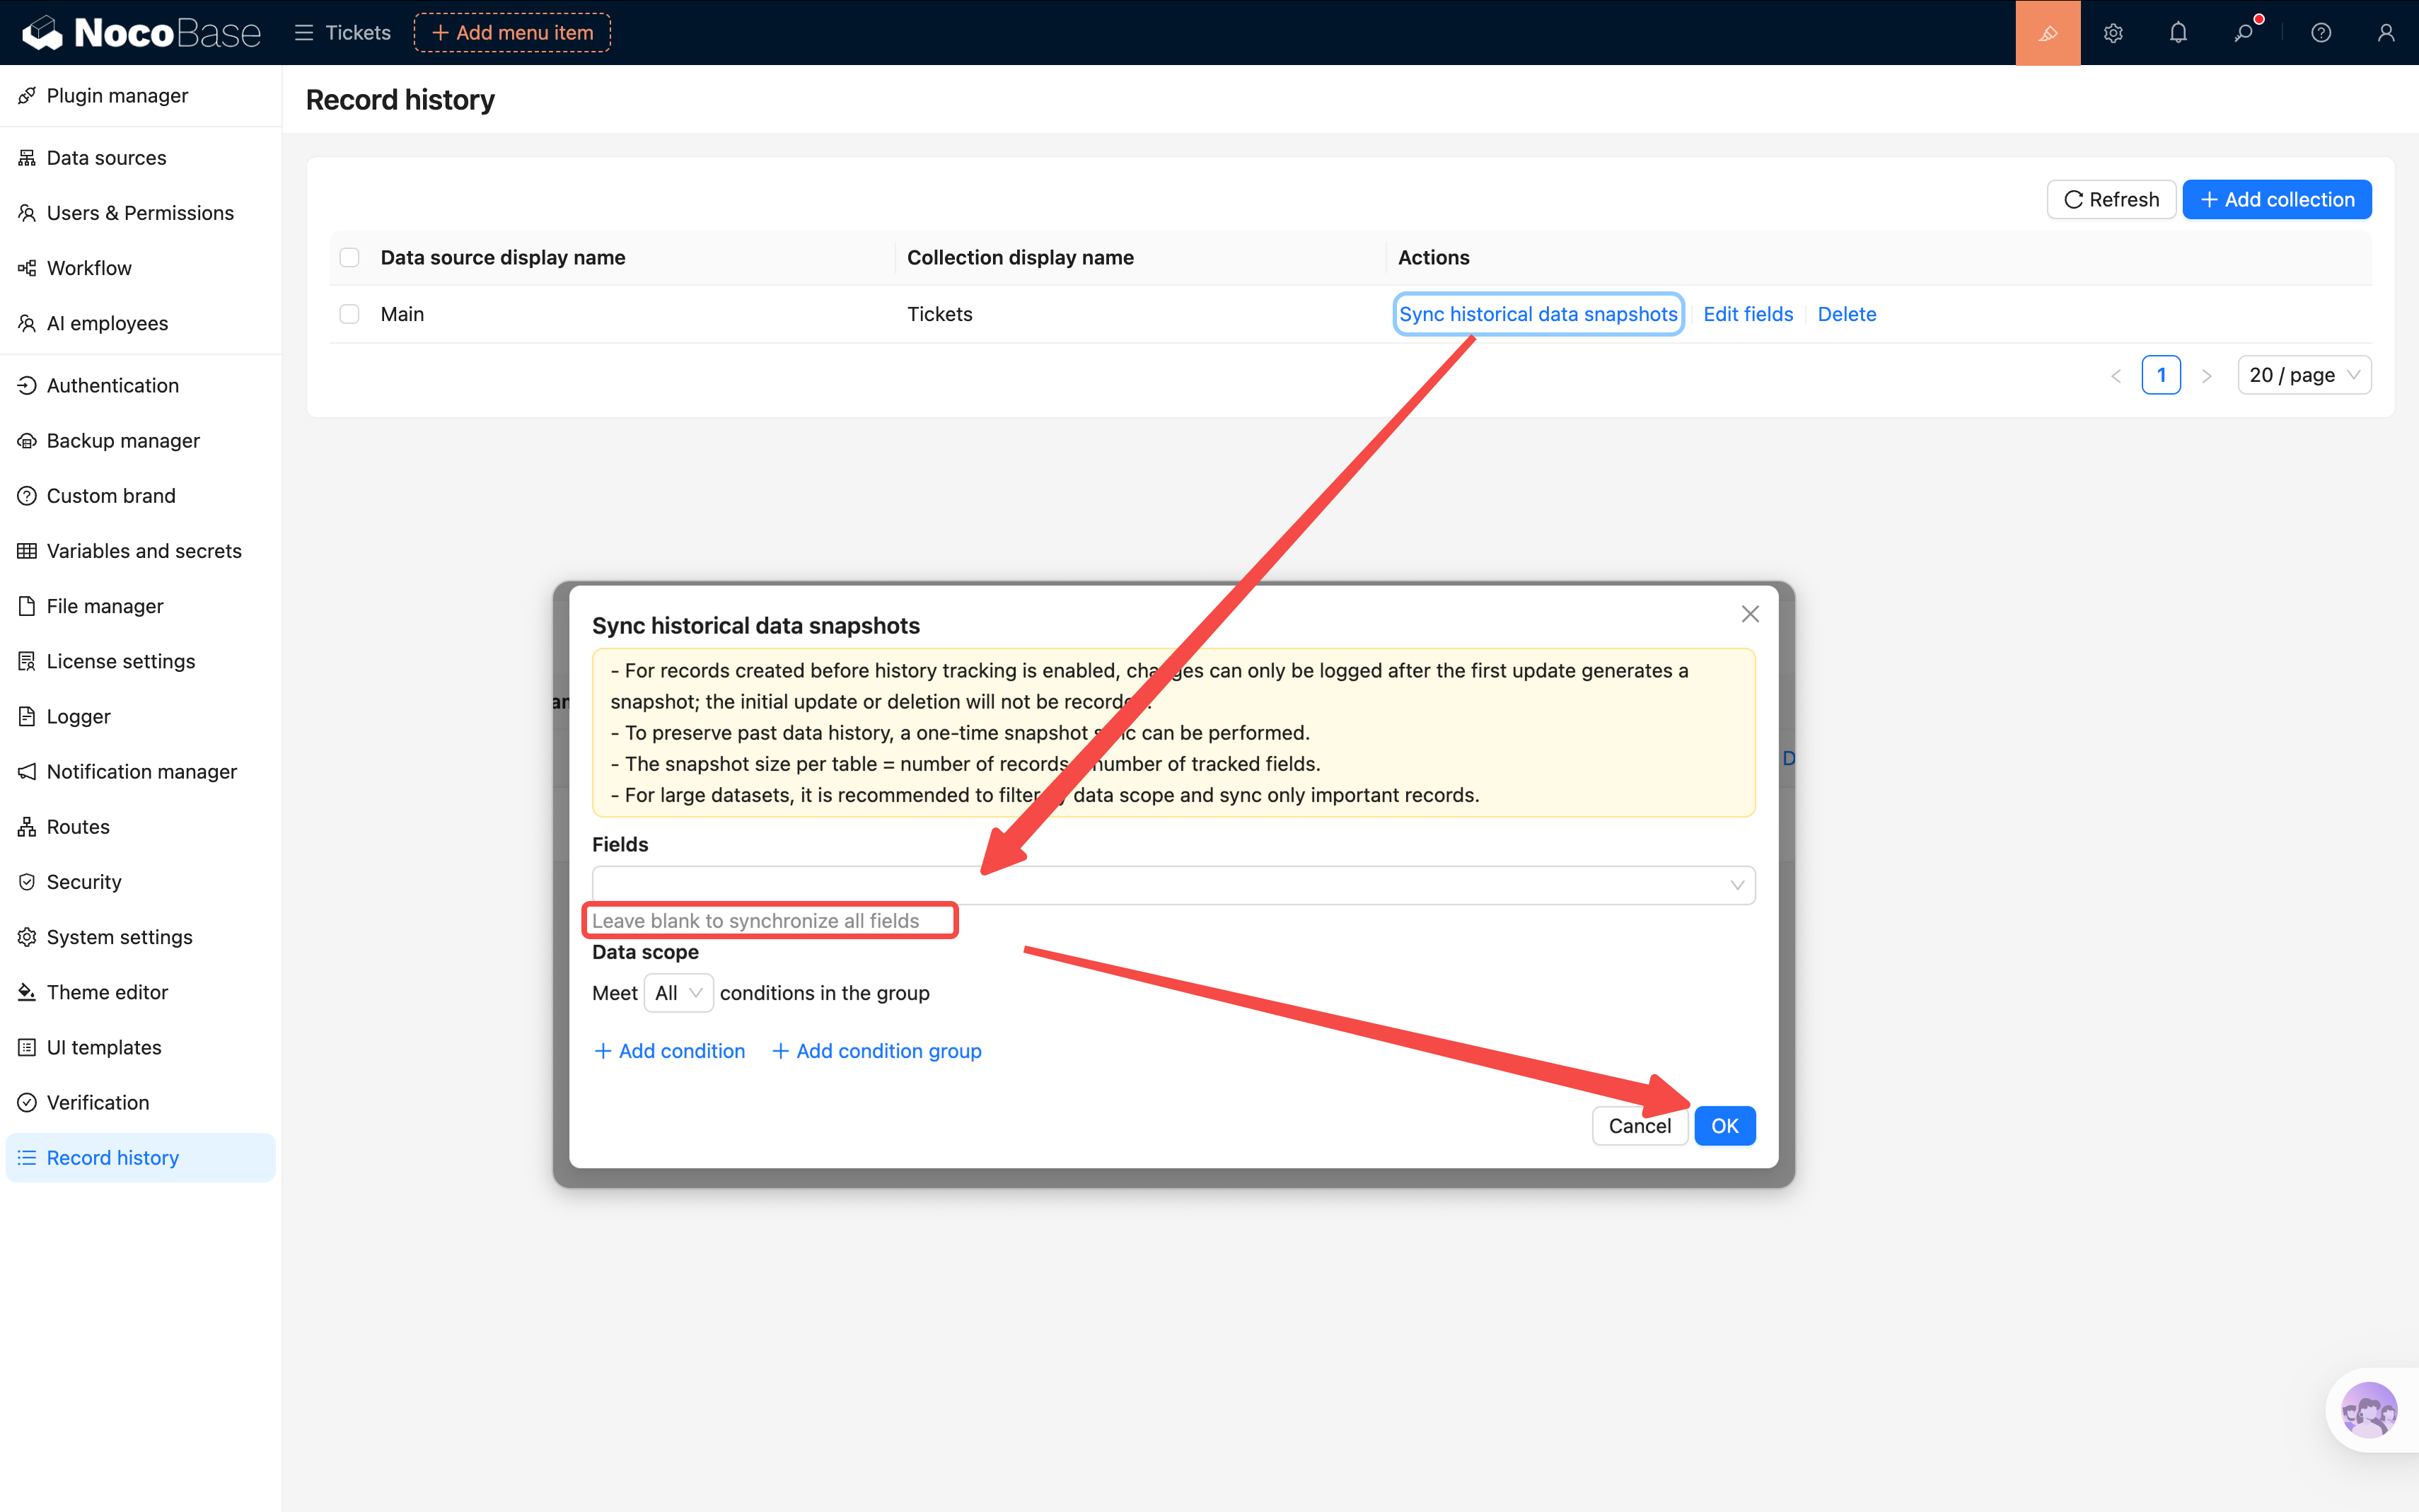
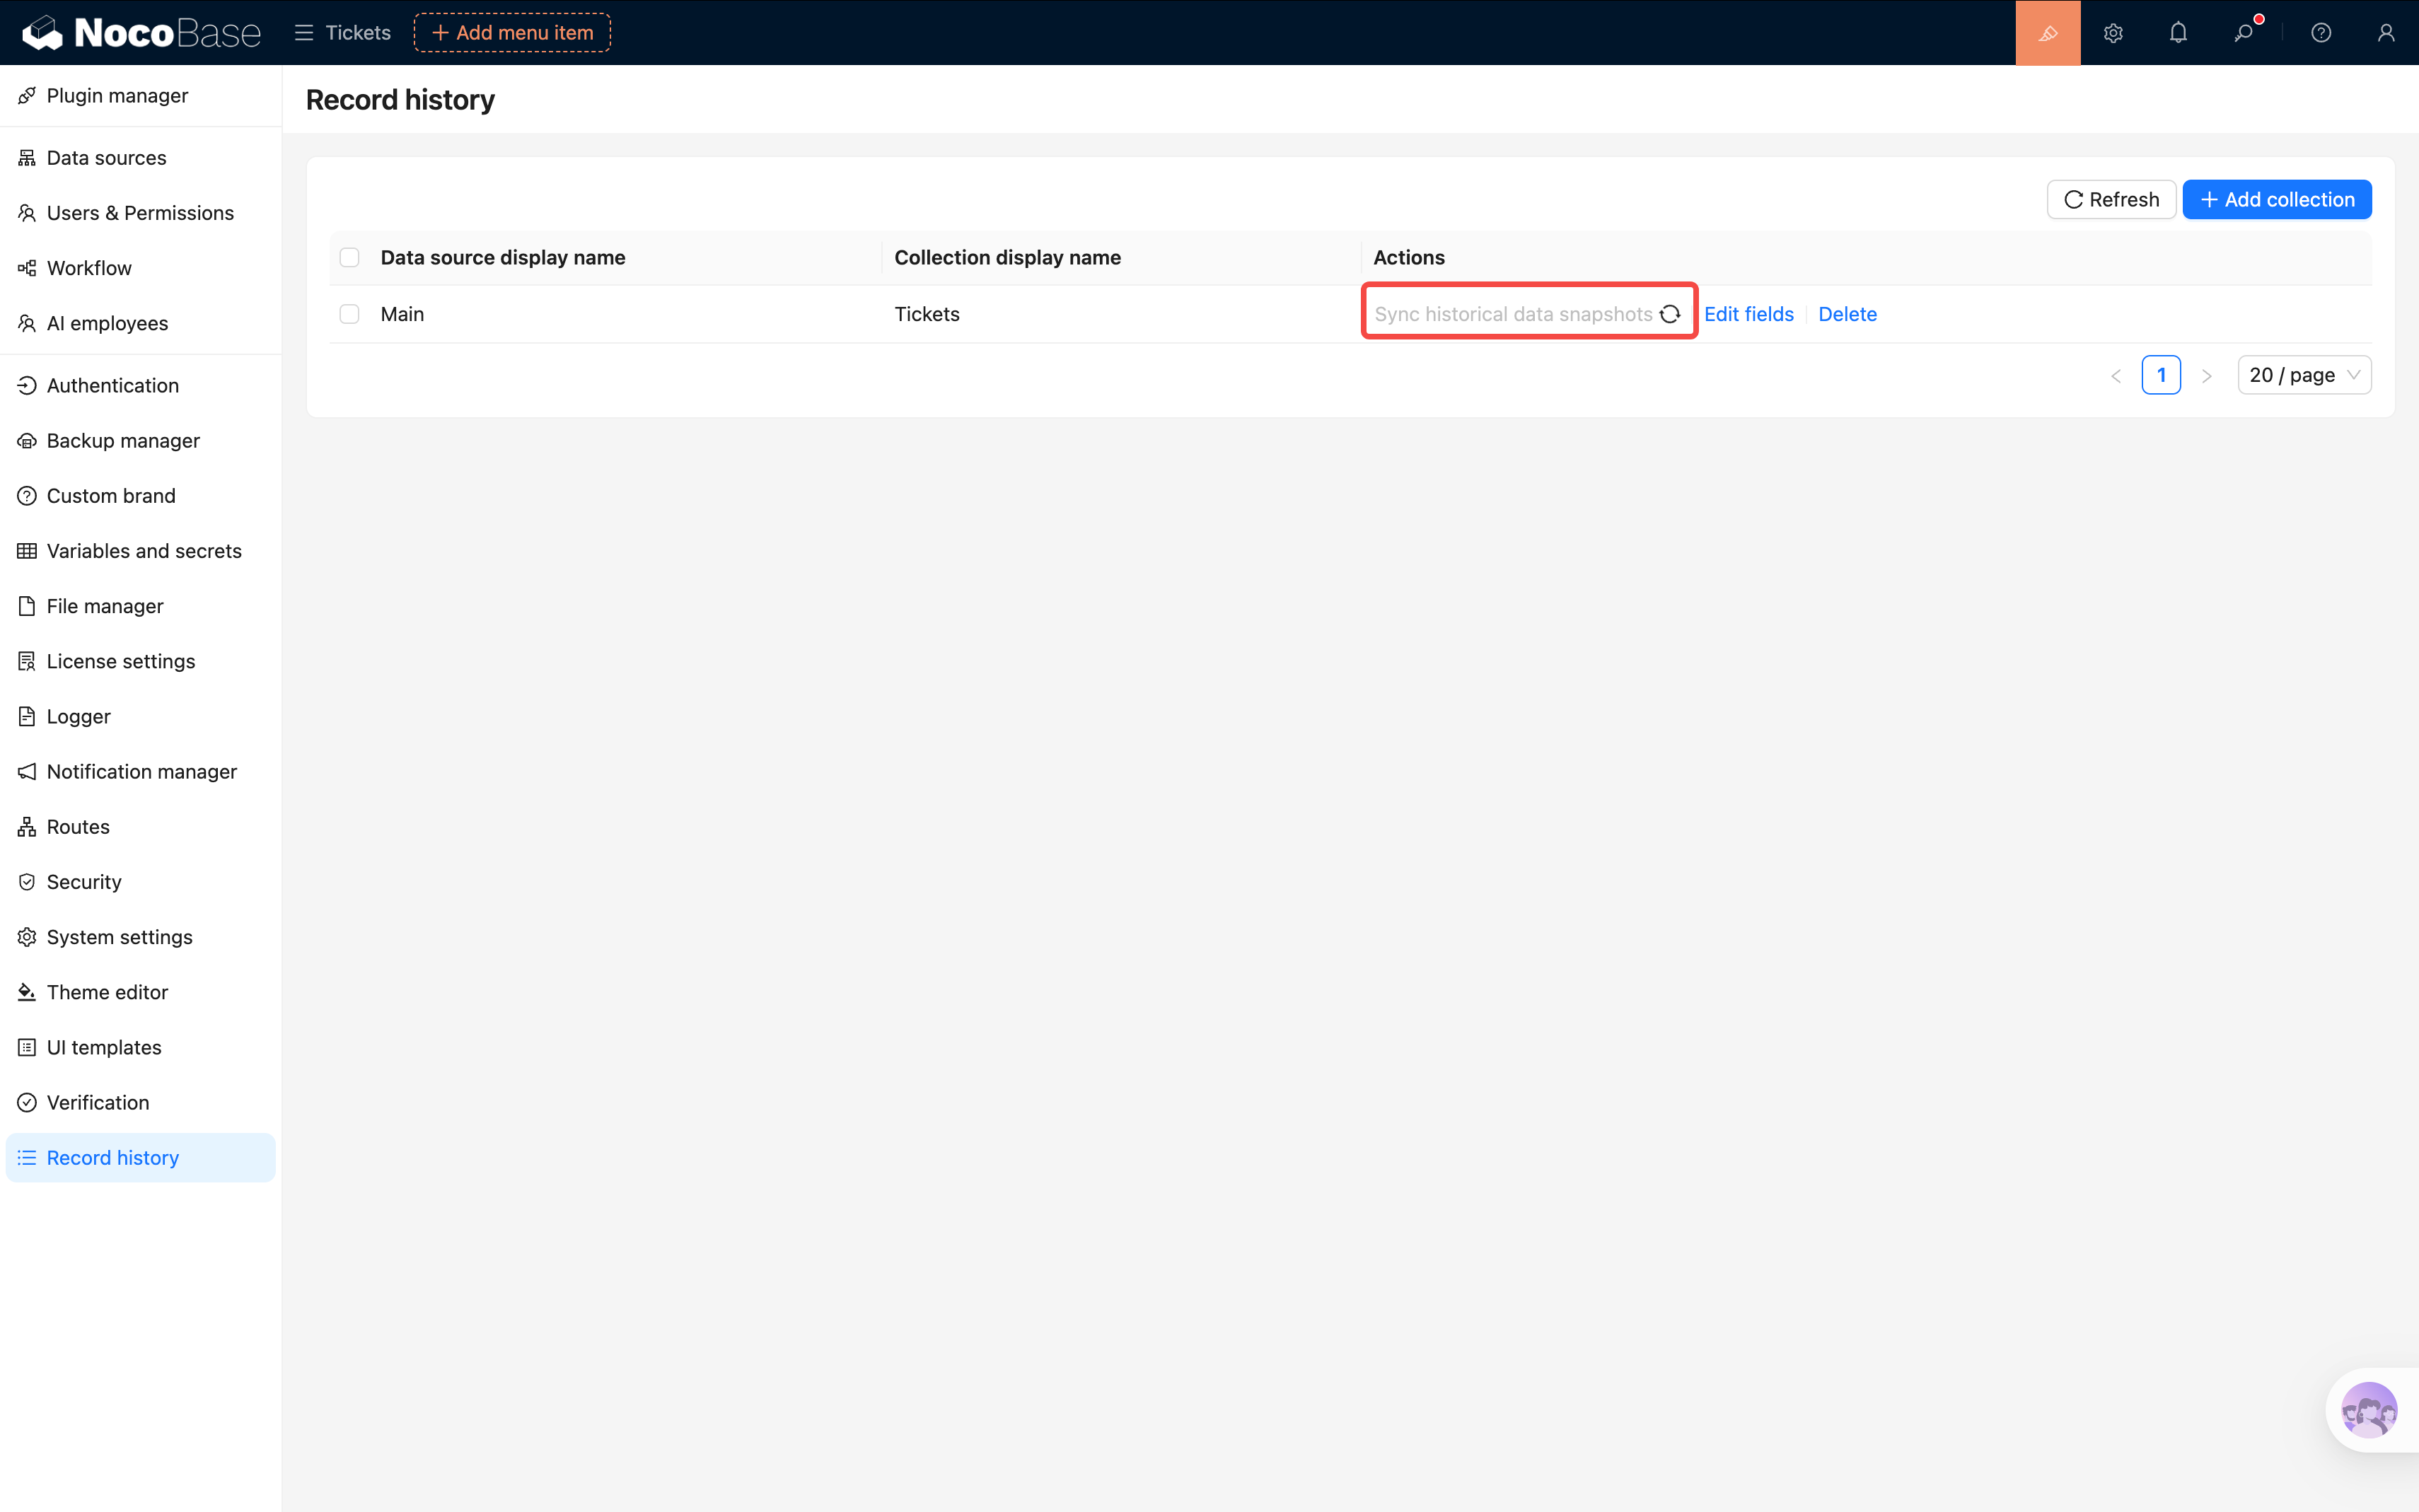
- Back in the settings, click "Sync history data snapshot". The plugin will automatically create an initial history record for all existing tickets. Every subsequent change will add a new history entry.
Viewing History in the Details Page
- Go back to the ticket details Drawer (click the "View" button on a table row).
- In the Drawer, click "Add block" -> Record History.
- Select "Current collection" and choose "Current record" as the data source.
- A timeline will appear at the bottom of the details page, clearly showing every change: who changed which field from what value to what value, and when.
This way, even if a ticket passes through multiple people, every change is crystal clear.
Summary
In this chapter, we completed the full data lifecycle:
- Form — Users can submit new tickets with default values and validation
- Linkage rules — Urgent tickets automatically require a description
- Details block — Clearly displays a ticket's complete information
- Change history — Automatically tracks every modification for worry-free auditing
From "visible" to "enterable" to "traceable" — our ticket system now has basic usability.