logologo
Get Started
Tutorials
Guide
Development
Plugins
API
Home
English
简体中文
日本語
한국어
Español
Português
Deutsch
Français
Русский
Italiano
Türkçe
Українська
Tiếng Việt
Bahasa Indonesia
ไทย
Polski
Nederlands
Čeština
العربية
עברית
हिन्दी
Svenska
Get Started
Tutorials
Guide
Development
Plugins
API
Home
logologo

V2 Tutorial (IT Ticket System)

Tutorial Overview
Chapter 1: Getting Started — Build a Working System in 5 Minutes
Chapter 2: Data Modeling — Two Tables for a Complete Ticket System
Chapter 3: Building Pages — From Blank to Functional
Chapter 4: Forms & Details — Input, Display, All in One
Chapter 5: Users & Permissions — Who Sees What
Chapter 6: Workflows — Let the System Do the Work
Chapter 7: Dashboard — The Big Picture at a Glance

V1 Tutorials (Legacy)

Task Management System Overview
Chapter 1: Getting Started
Chapter 2: Designing the System
Chapter 3: Task Data Management
Chapter 4: Task & Comment Plugins
Chapter 5: Tabs & Dynamic Blocks
Chapter 6: User & Permissions
Chapter 7: Workflow
Project Management Overview
Chapter 8: Knowledge Base - Tree Collection
Chapter 9: Task Dashboard & Charts
Chapter 10: Dashboard Filters & Conditions
Chapter 11: Subtasks & Work Hours
Chapter 12: Meeting Room Booking & Workflows
Implementing User Registration Review
Implementing CRM Lead Conversion
Markdown Blocks Tips and Tricks
CRM Sales Cloud Overview
Lead Follow-up & Status Management
CRM System (Sales Cloud)
Using API Keys to Retrieve Data
Markdown Template Variables
How to Deploy NocoBase Faster
CRM Sales Pipeline Visualization
CRM Demo Deployment Guide
Previous PageImplementing CRM Lead Conversion
Next PageCRM Sales Cloud Overview

#Markdown Blocks Tips and Tricks

Markdown Block is one of the most commonly used and powerful blocks in our system. It can range from lightweight text prompts to simple HTML styling, and can even handle essential business logic—with versatile and flexible functionality.

#1. Basic Functions of the Markdown Block

Due to the flexible, open, and easily modifiable nature of the Markdown block, it is often used to display system announcements. Whether it is a business module, a feature, a block, or even a field, we can post little tips just like using sticky notes.

Before using the Markdown block, it is recommended that you first familiarize yourself with Markdown formatting and syntax. You can refer to the Vditor Example.

Note: The Markdown block on the page is relatively lightweight, and certain features (such as mathematical formulas, mind maps, etc.) are currently not supported for rendering. However, we can implement them using HTML; the system also provides a Vditor field component for you to try.

#1.1 Page Examples

You can observe the use of Markdown on the system’s “Online Demo” page. Specific examples can be found on the home page, the order page, and in the “More Examples” section.

For instance, the warnings and tips on our homepage: 20250227085425

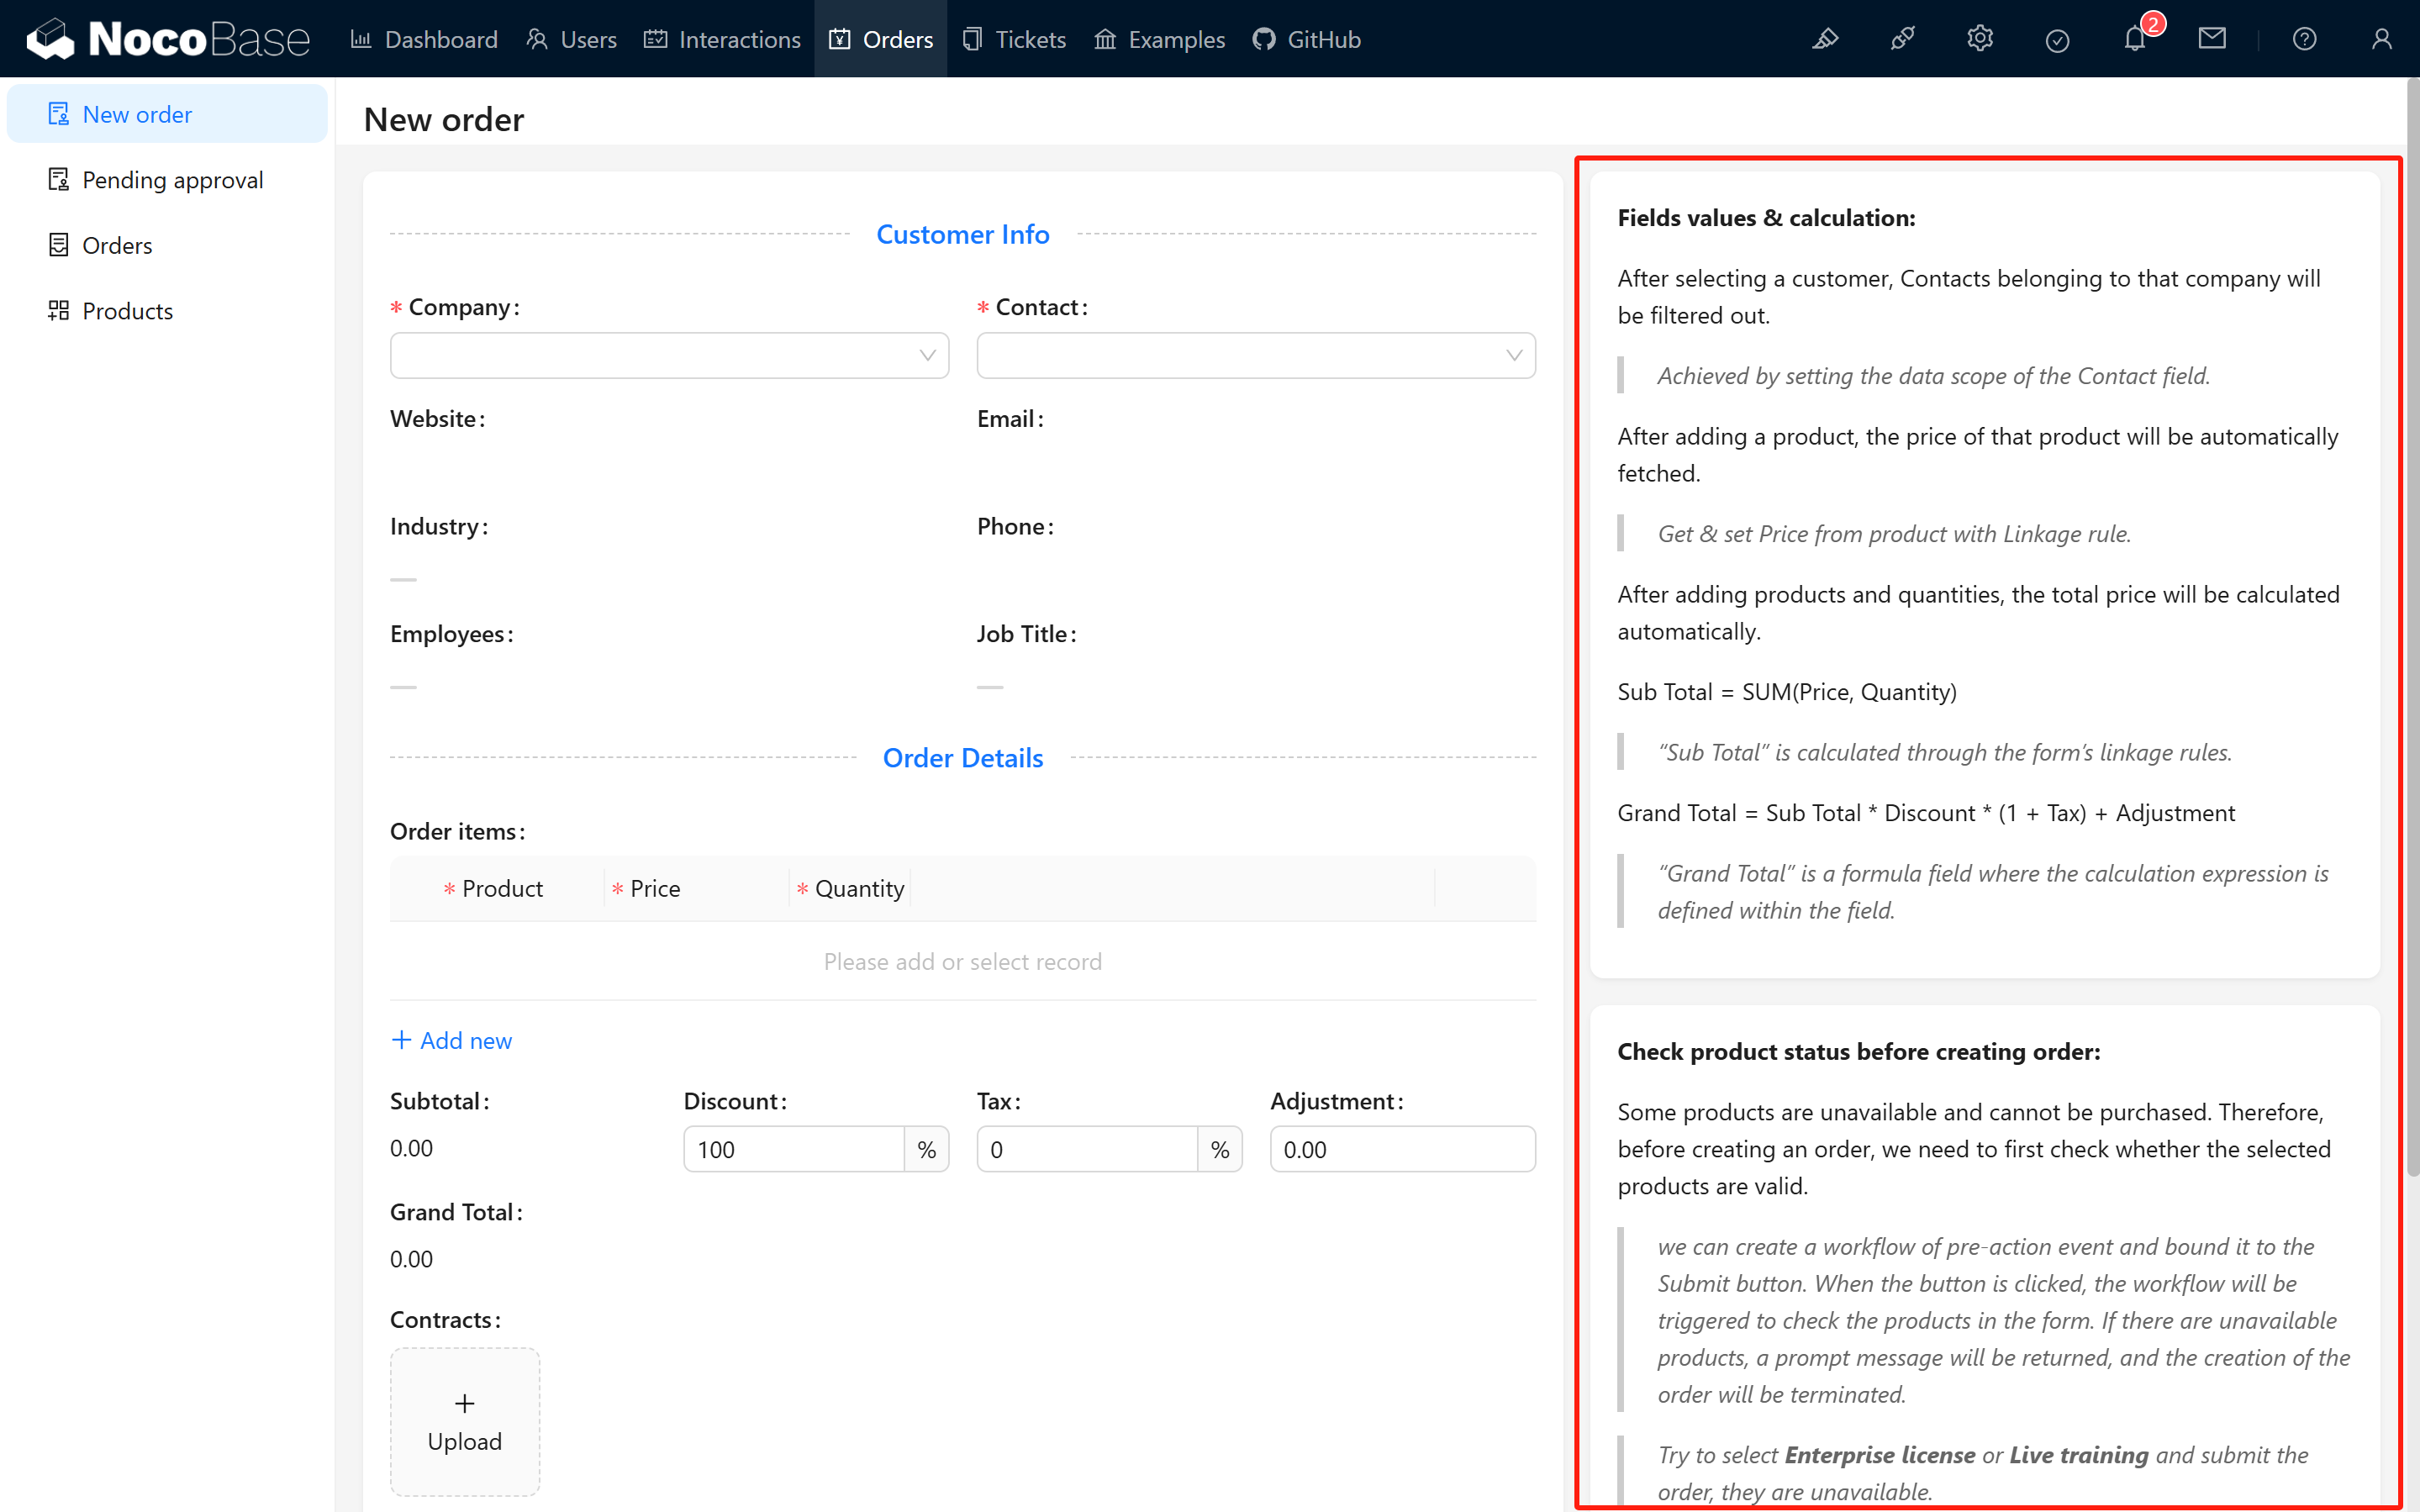
The calculation logic in the order module: 20250227085536

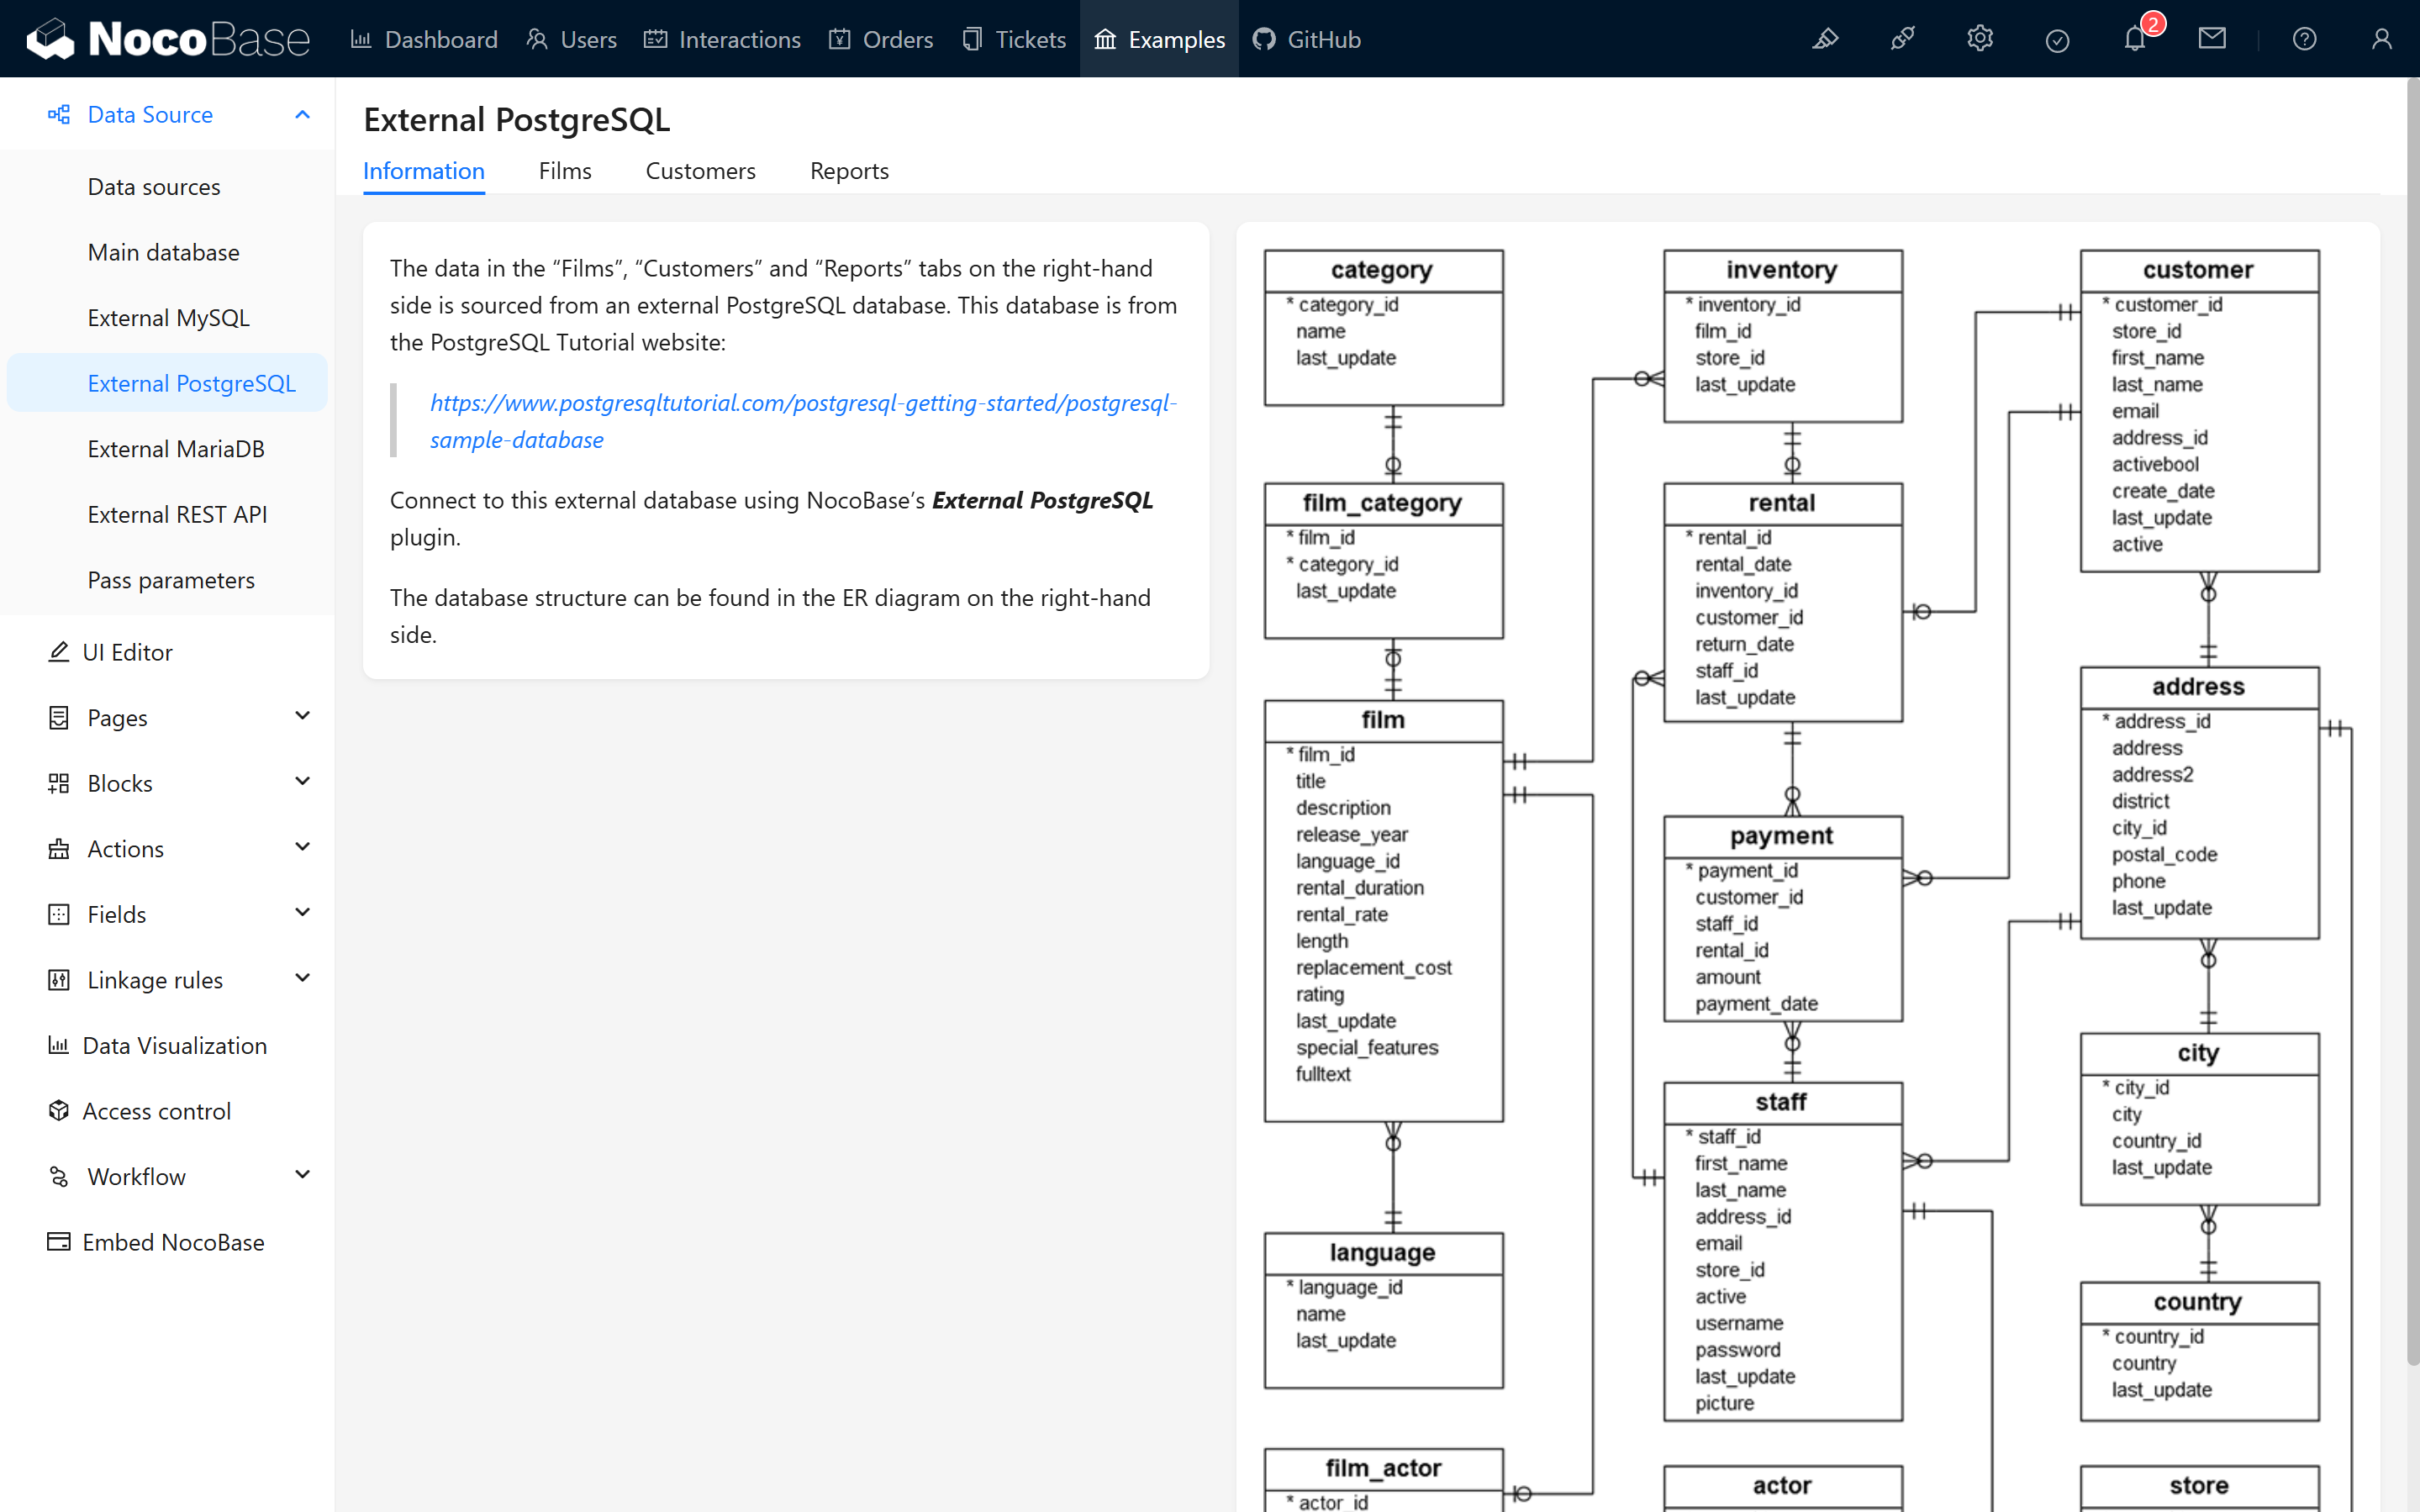
Guidance and images in the “More Examples” section: 20250227085730

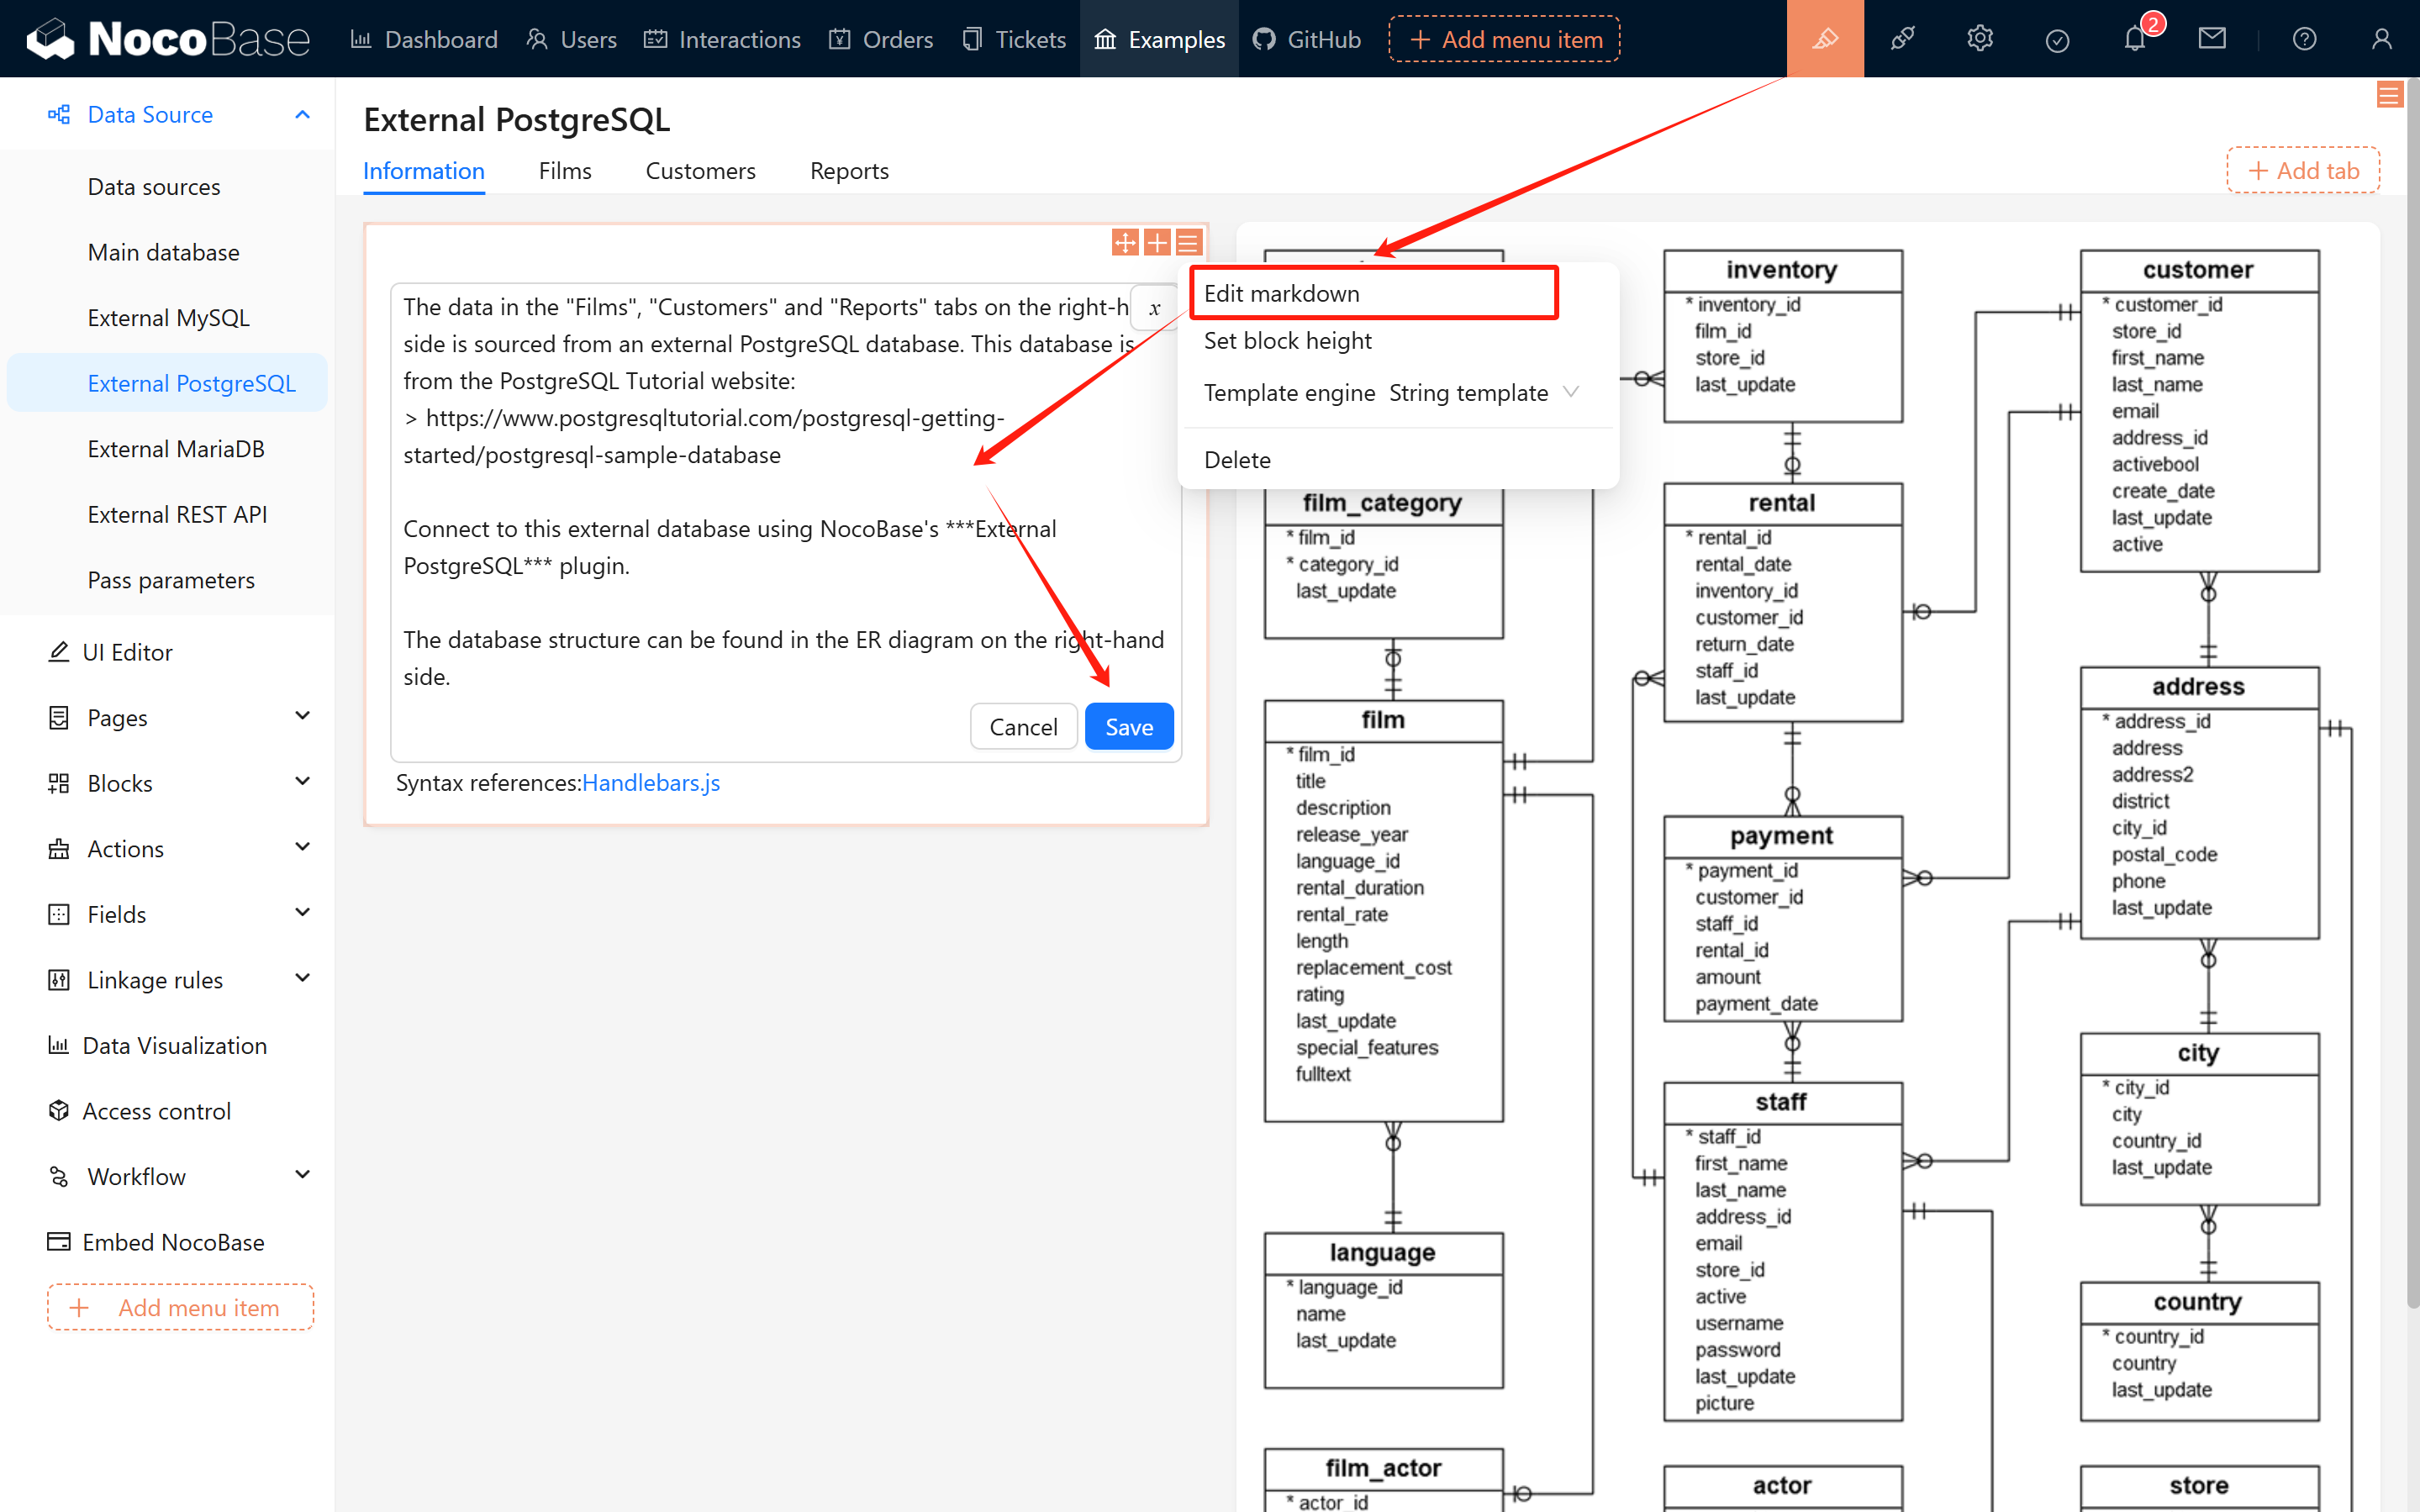
By switching to edit mode, you can modify the Markdown content at any time and observe the changes on the page. 20250227085855

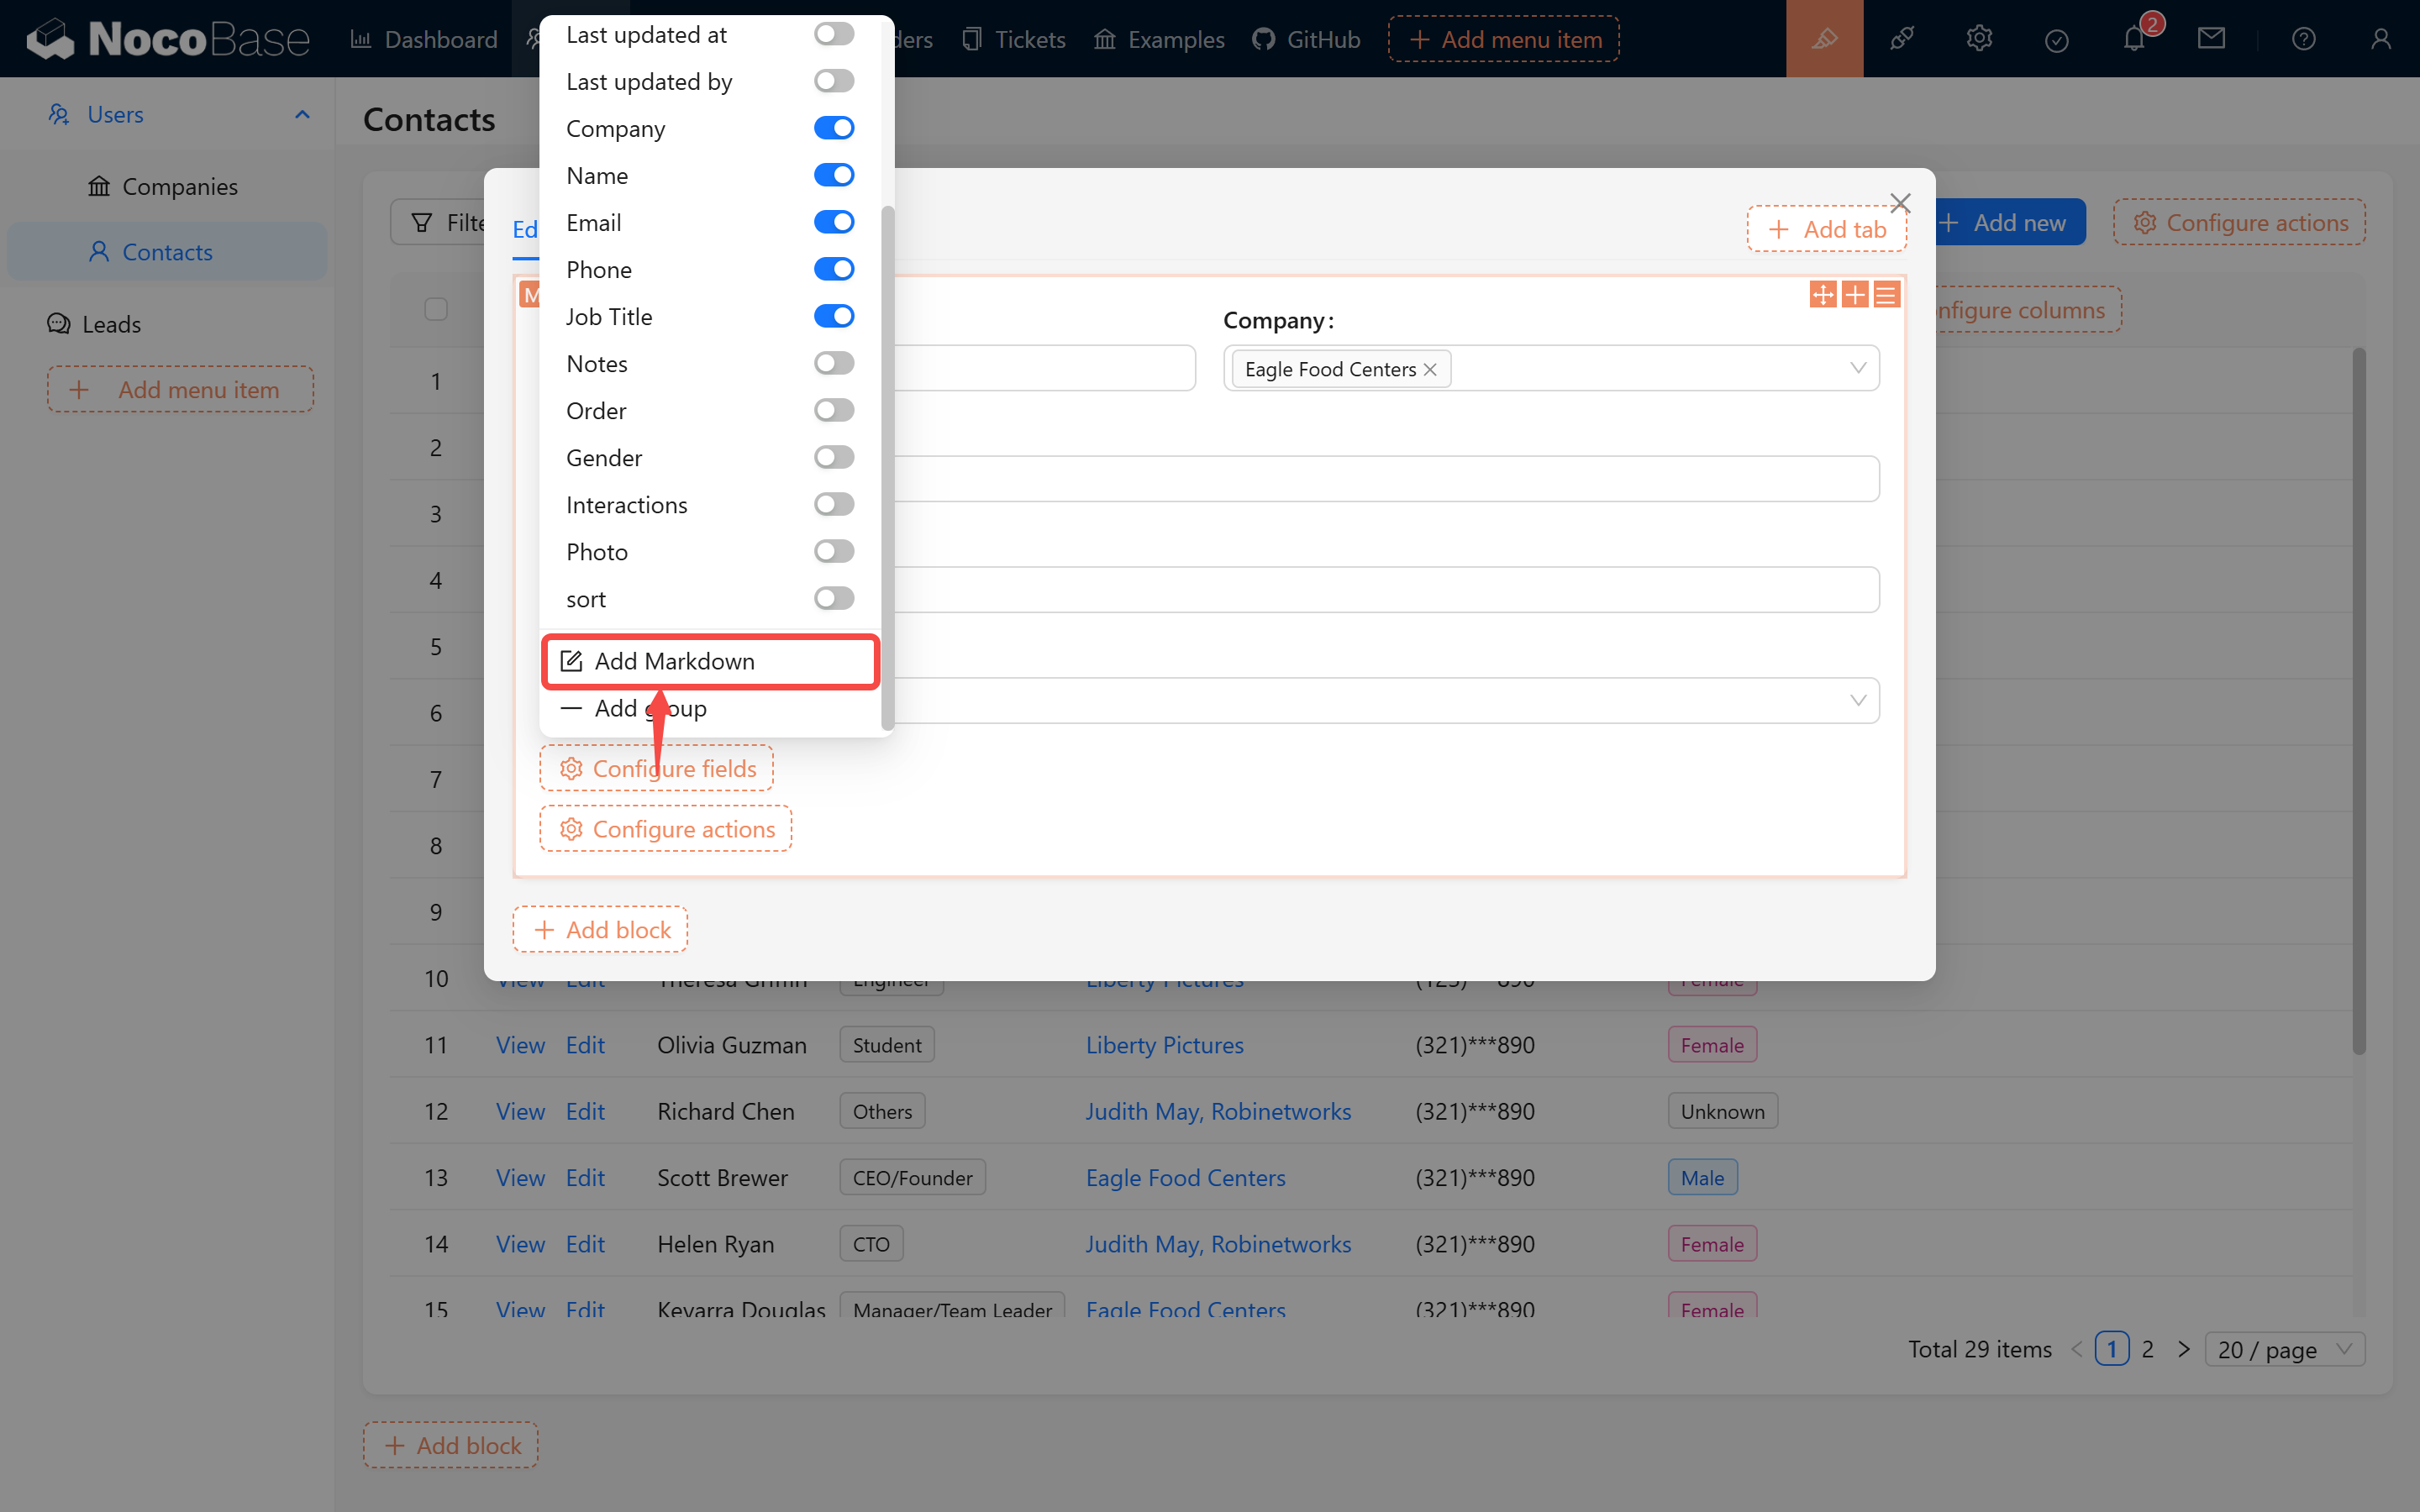
#1.2 Creating a Markdown Block

You can flexibly create Markdown blocks in pages, pop-ups, and forms.

#1.2.1 Creation Methods

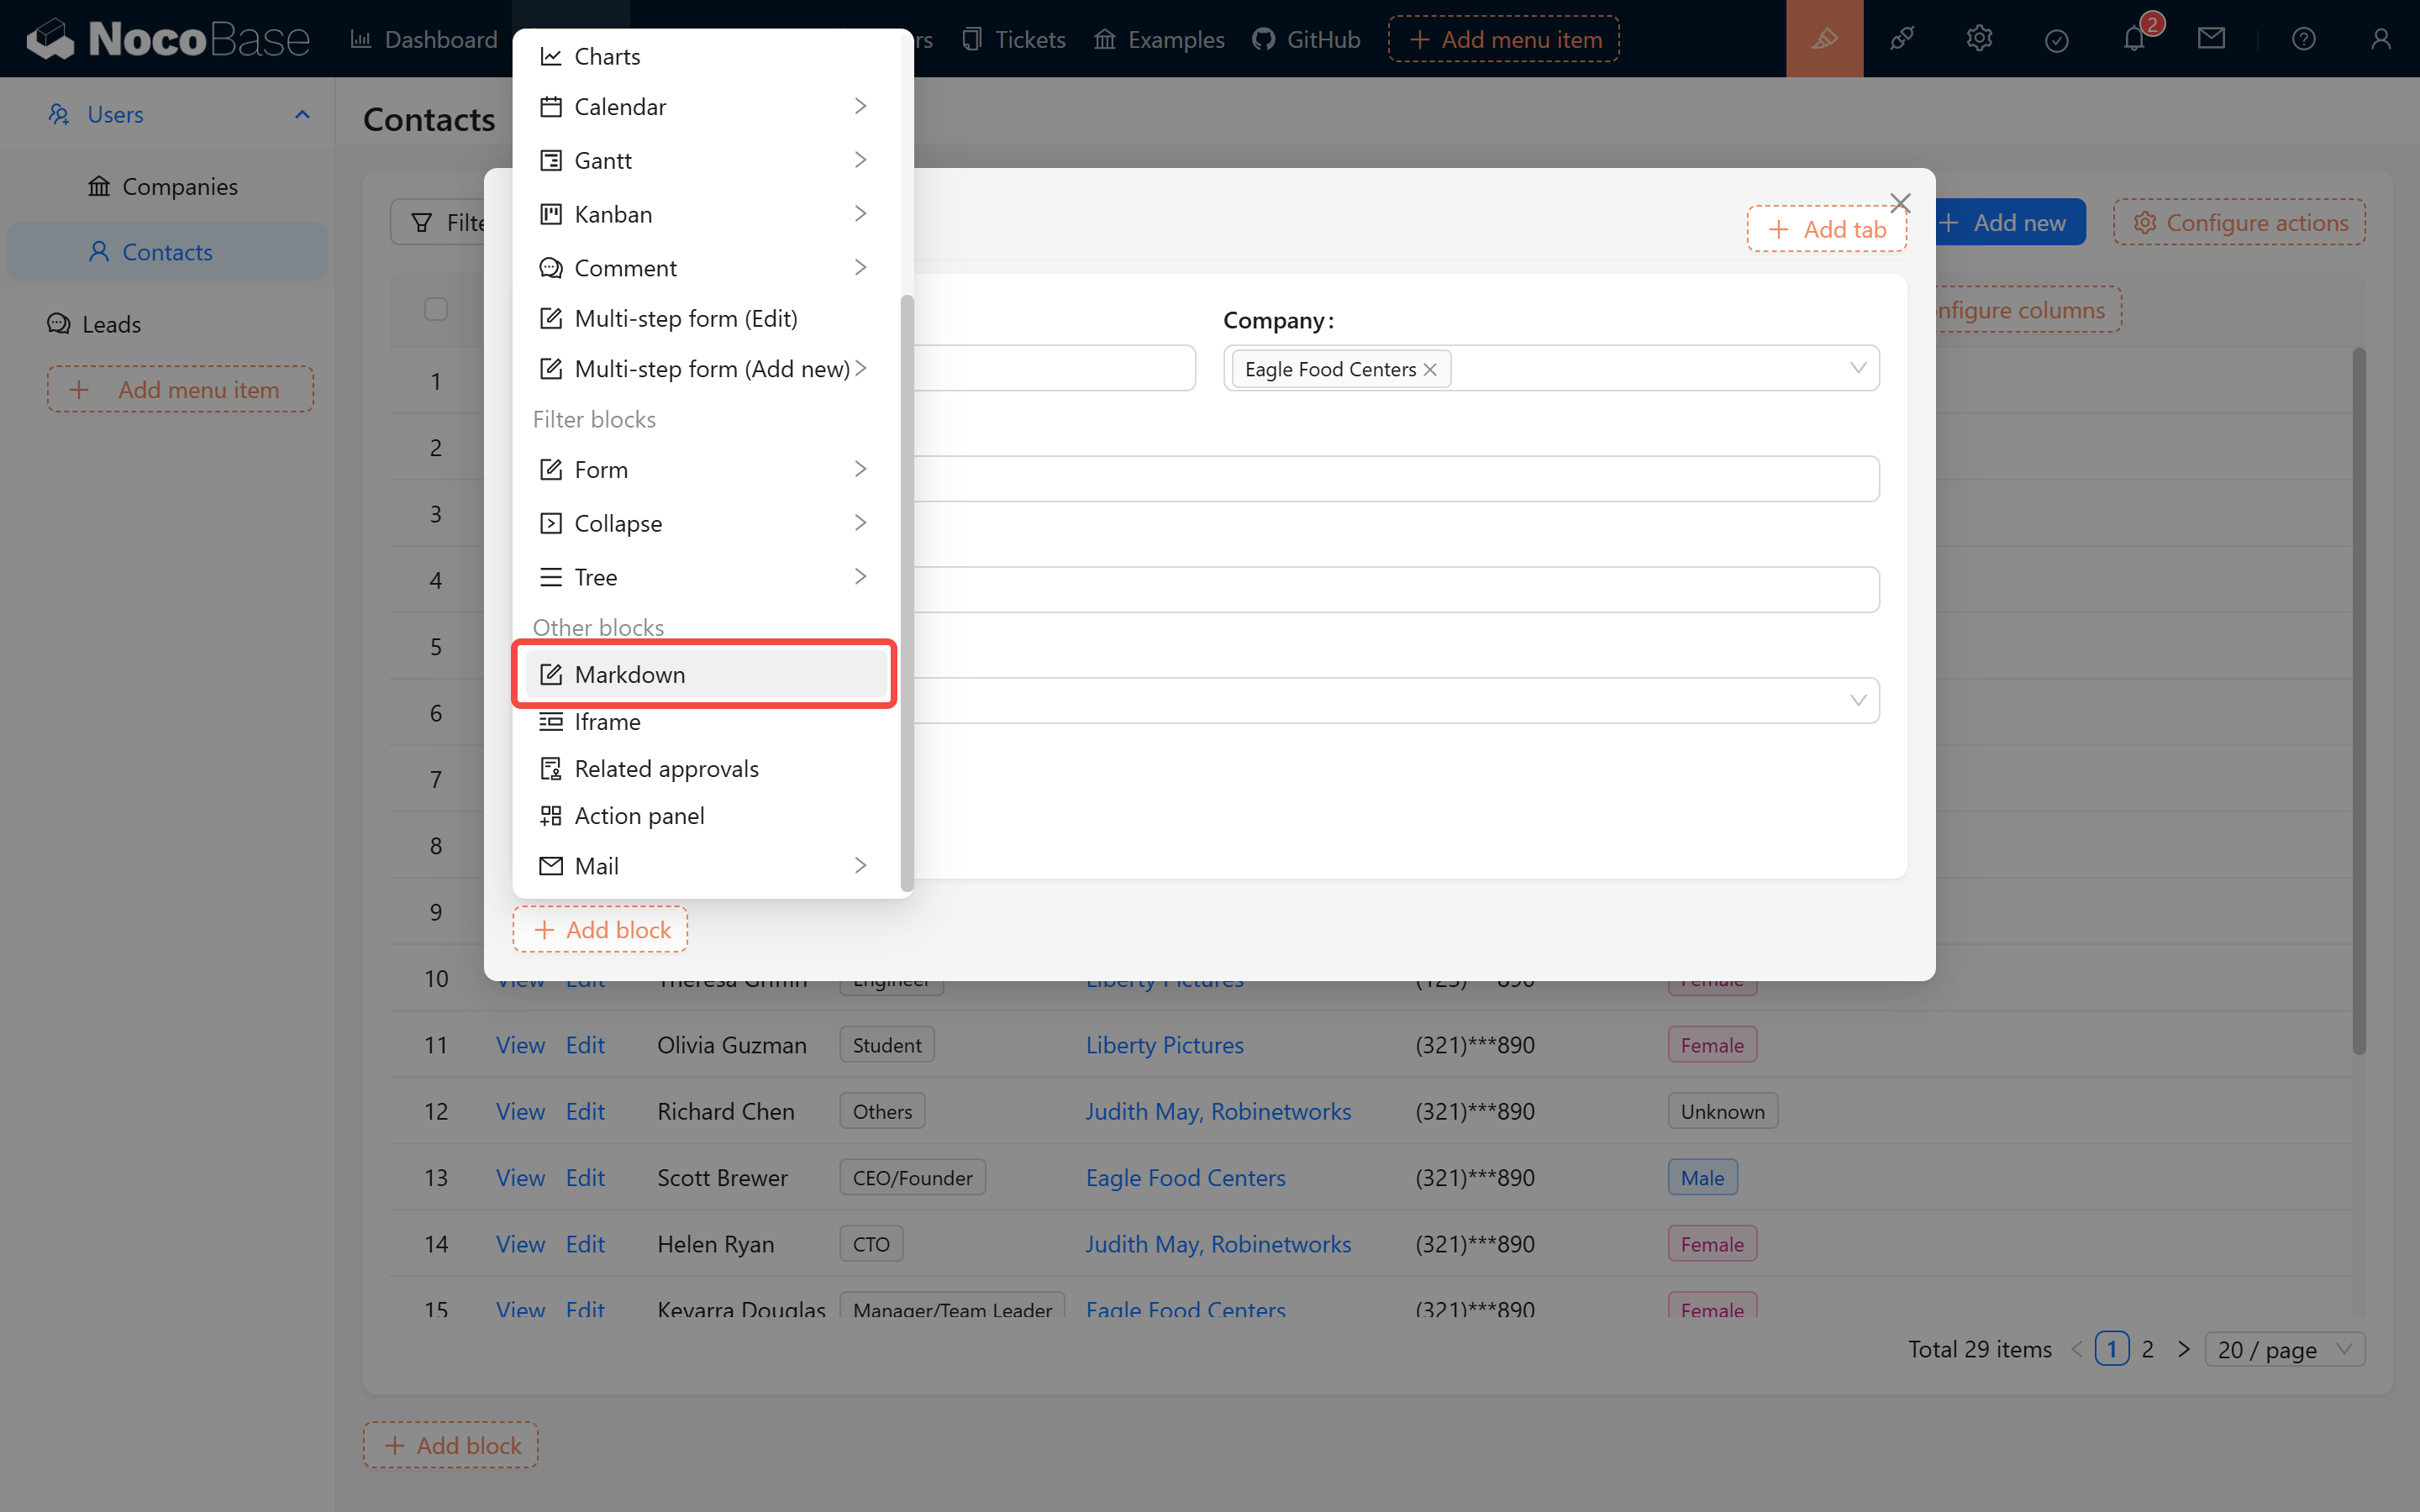
  • Creating in Pop-ups/Pages:

    Markdown Block in Pop-ups/Pages

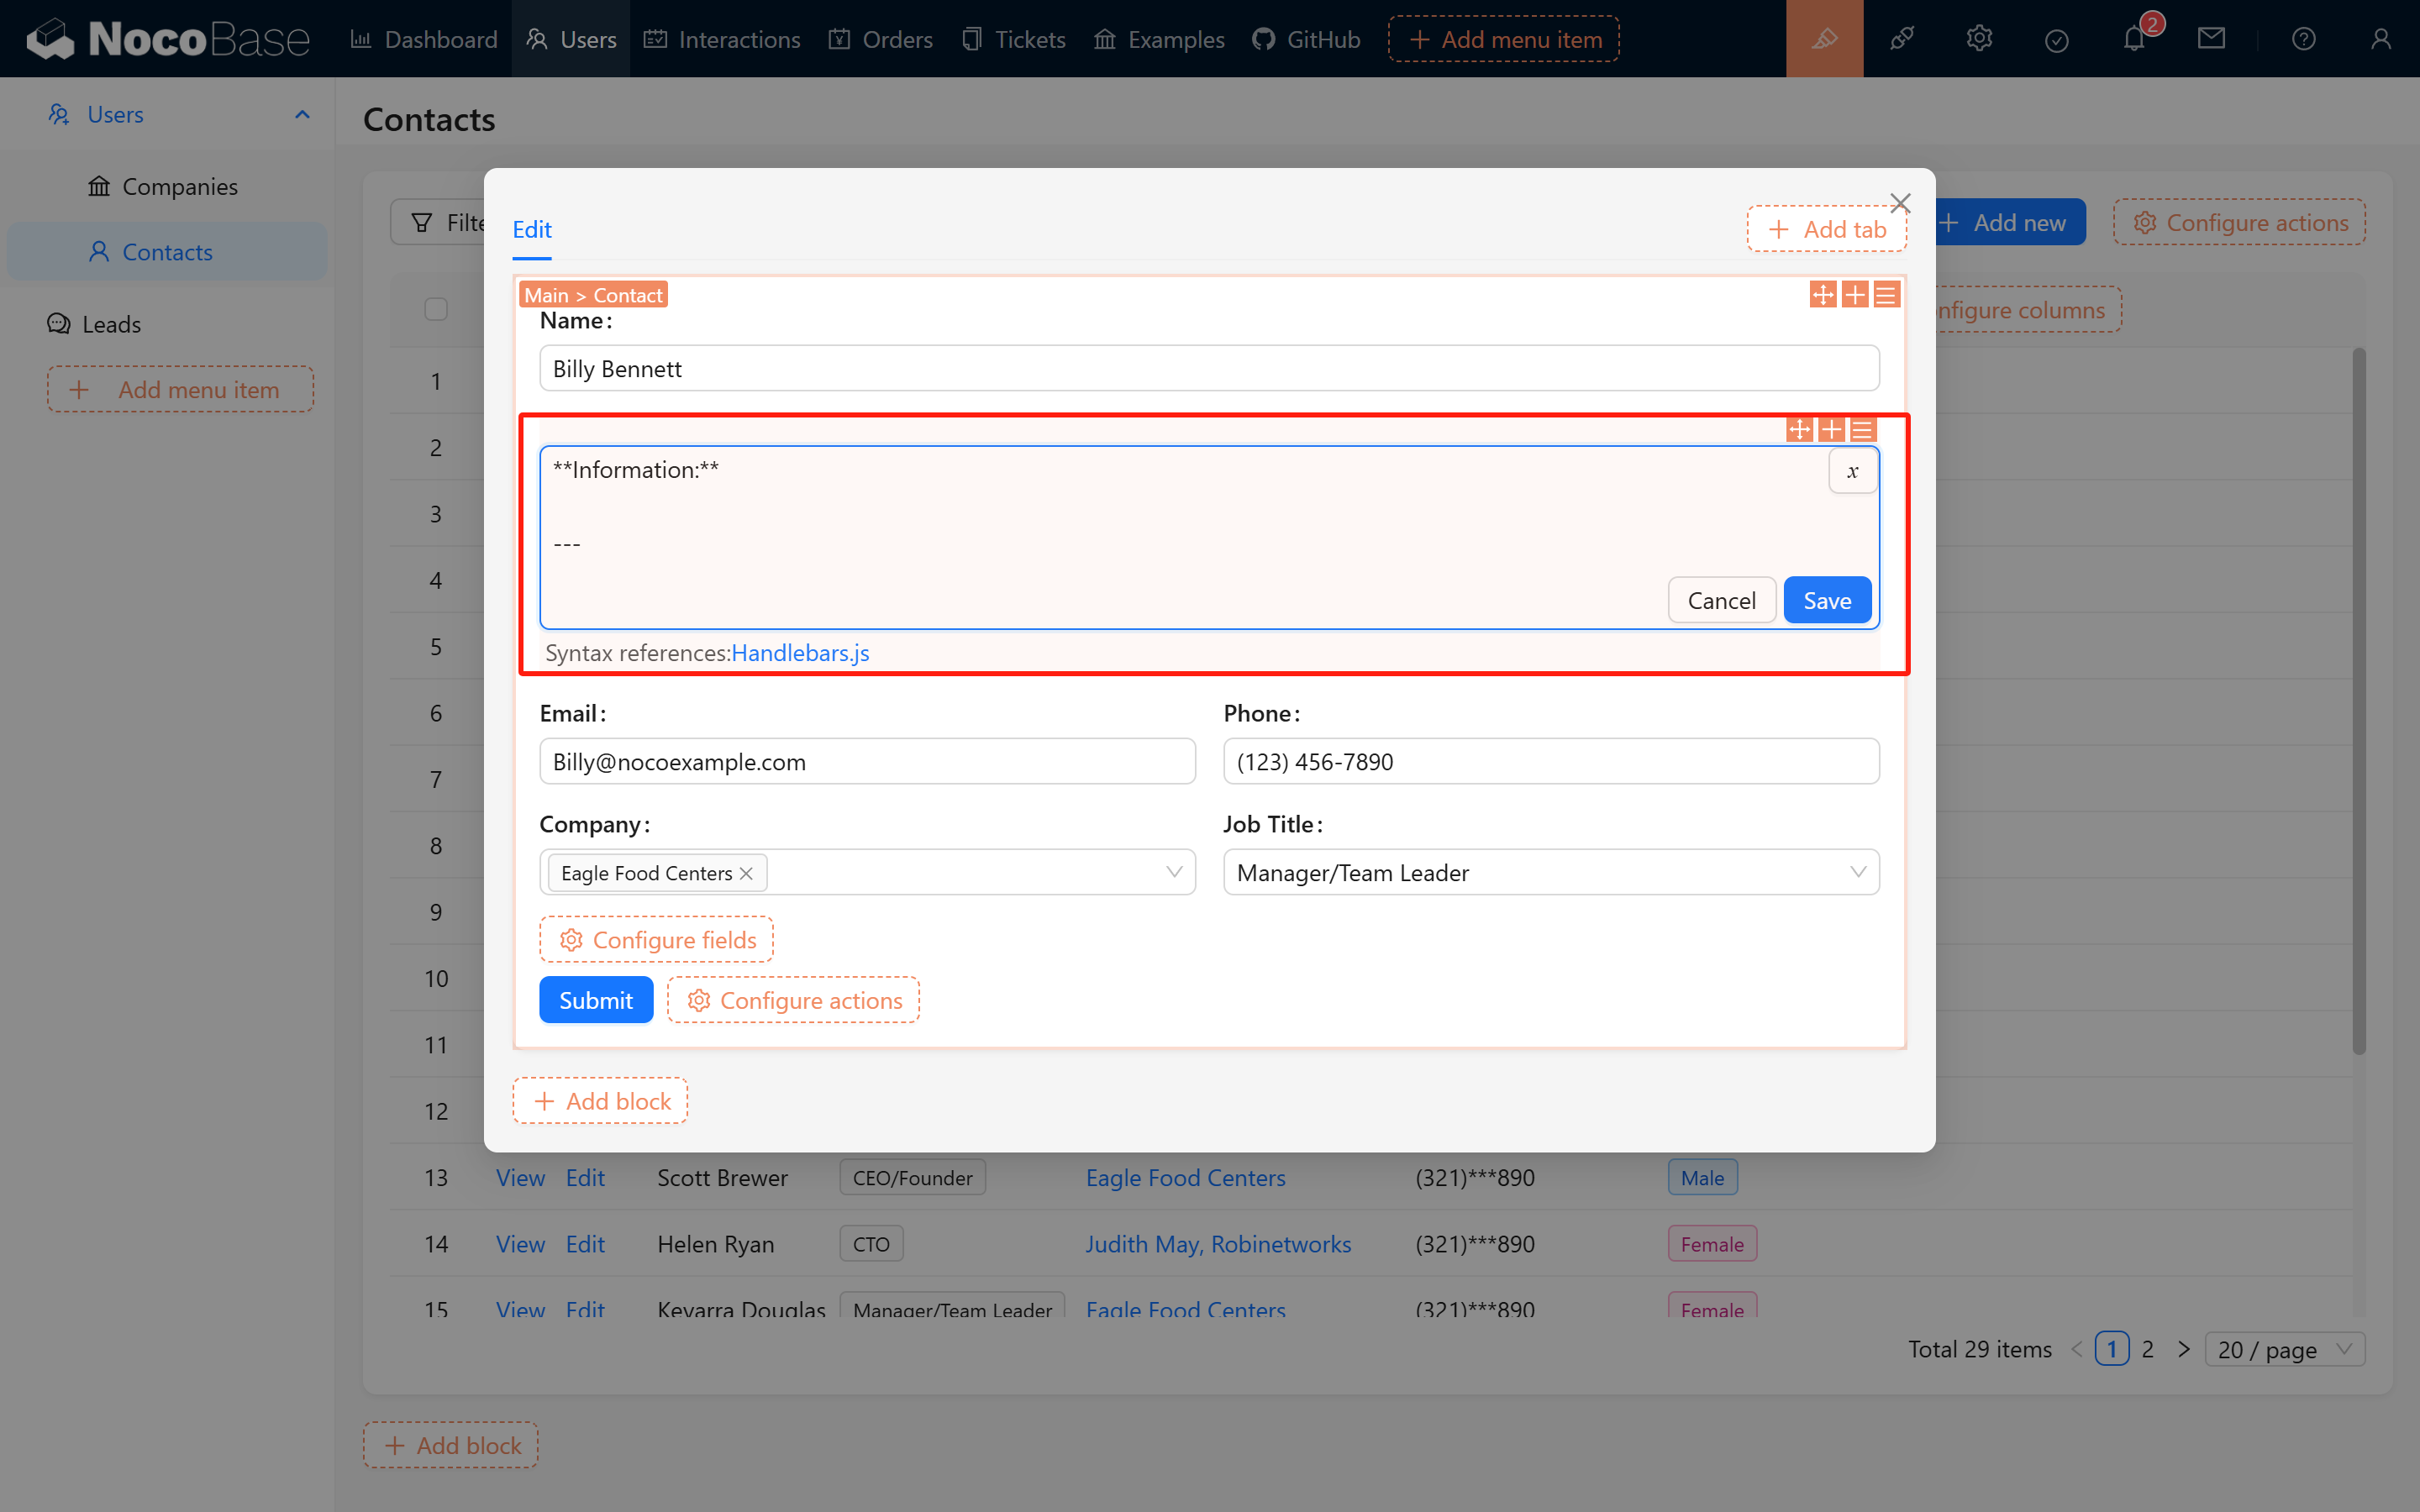
  • Creating in Form Blocks:

    Markdown Block in Form Blocks

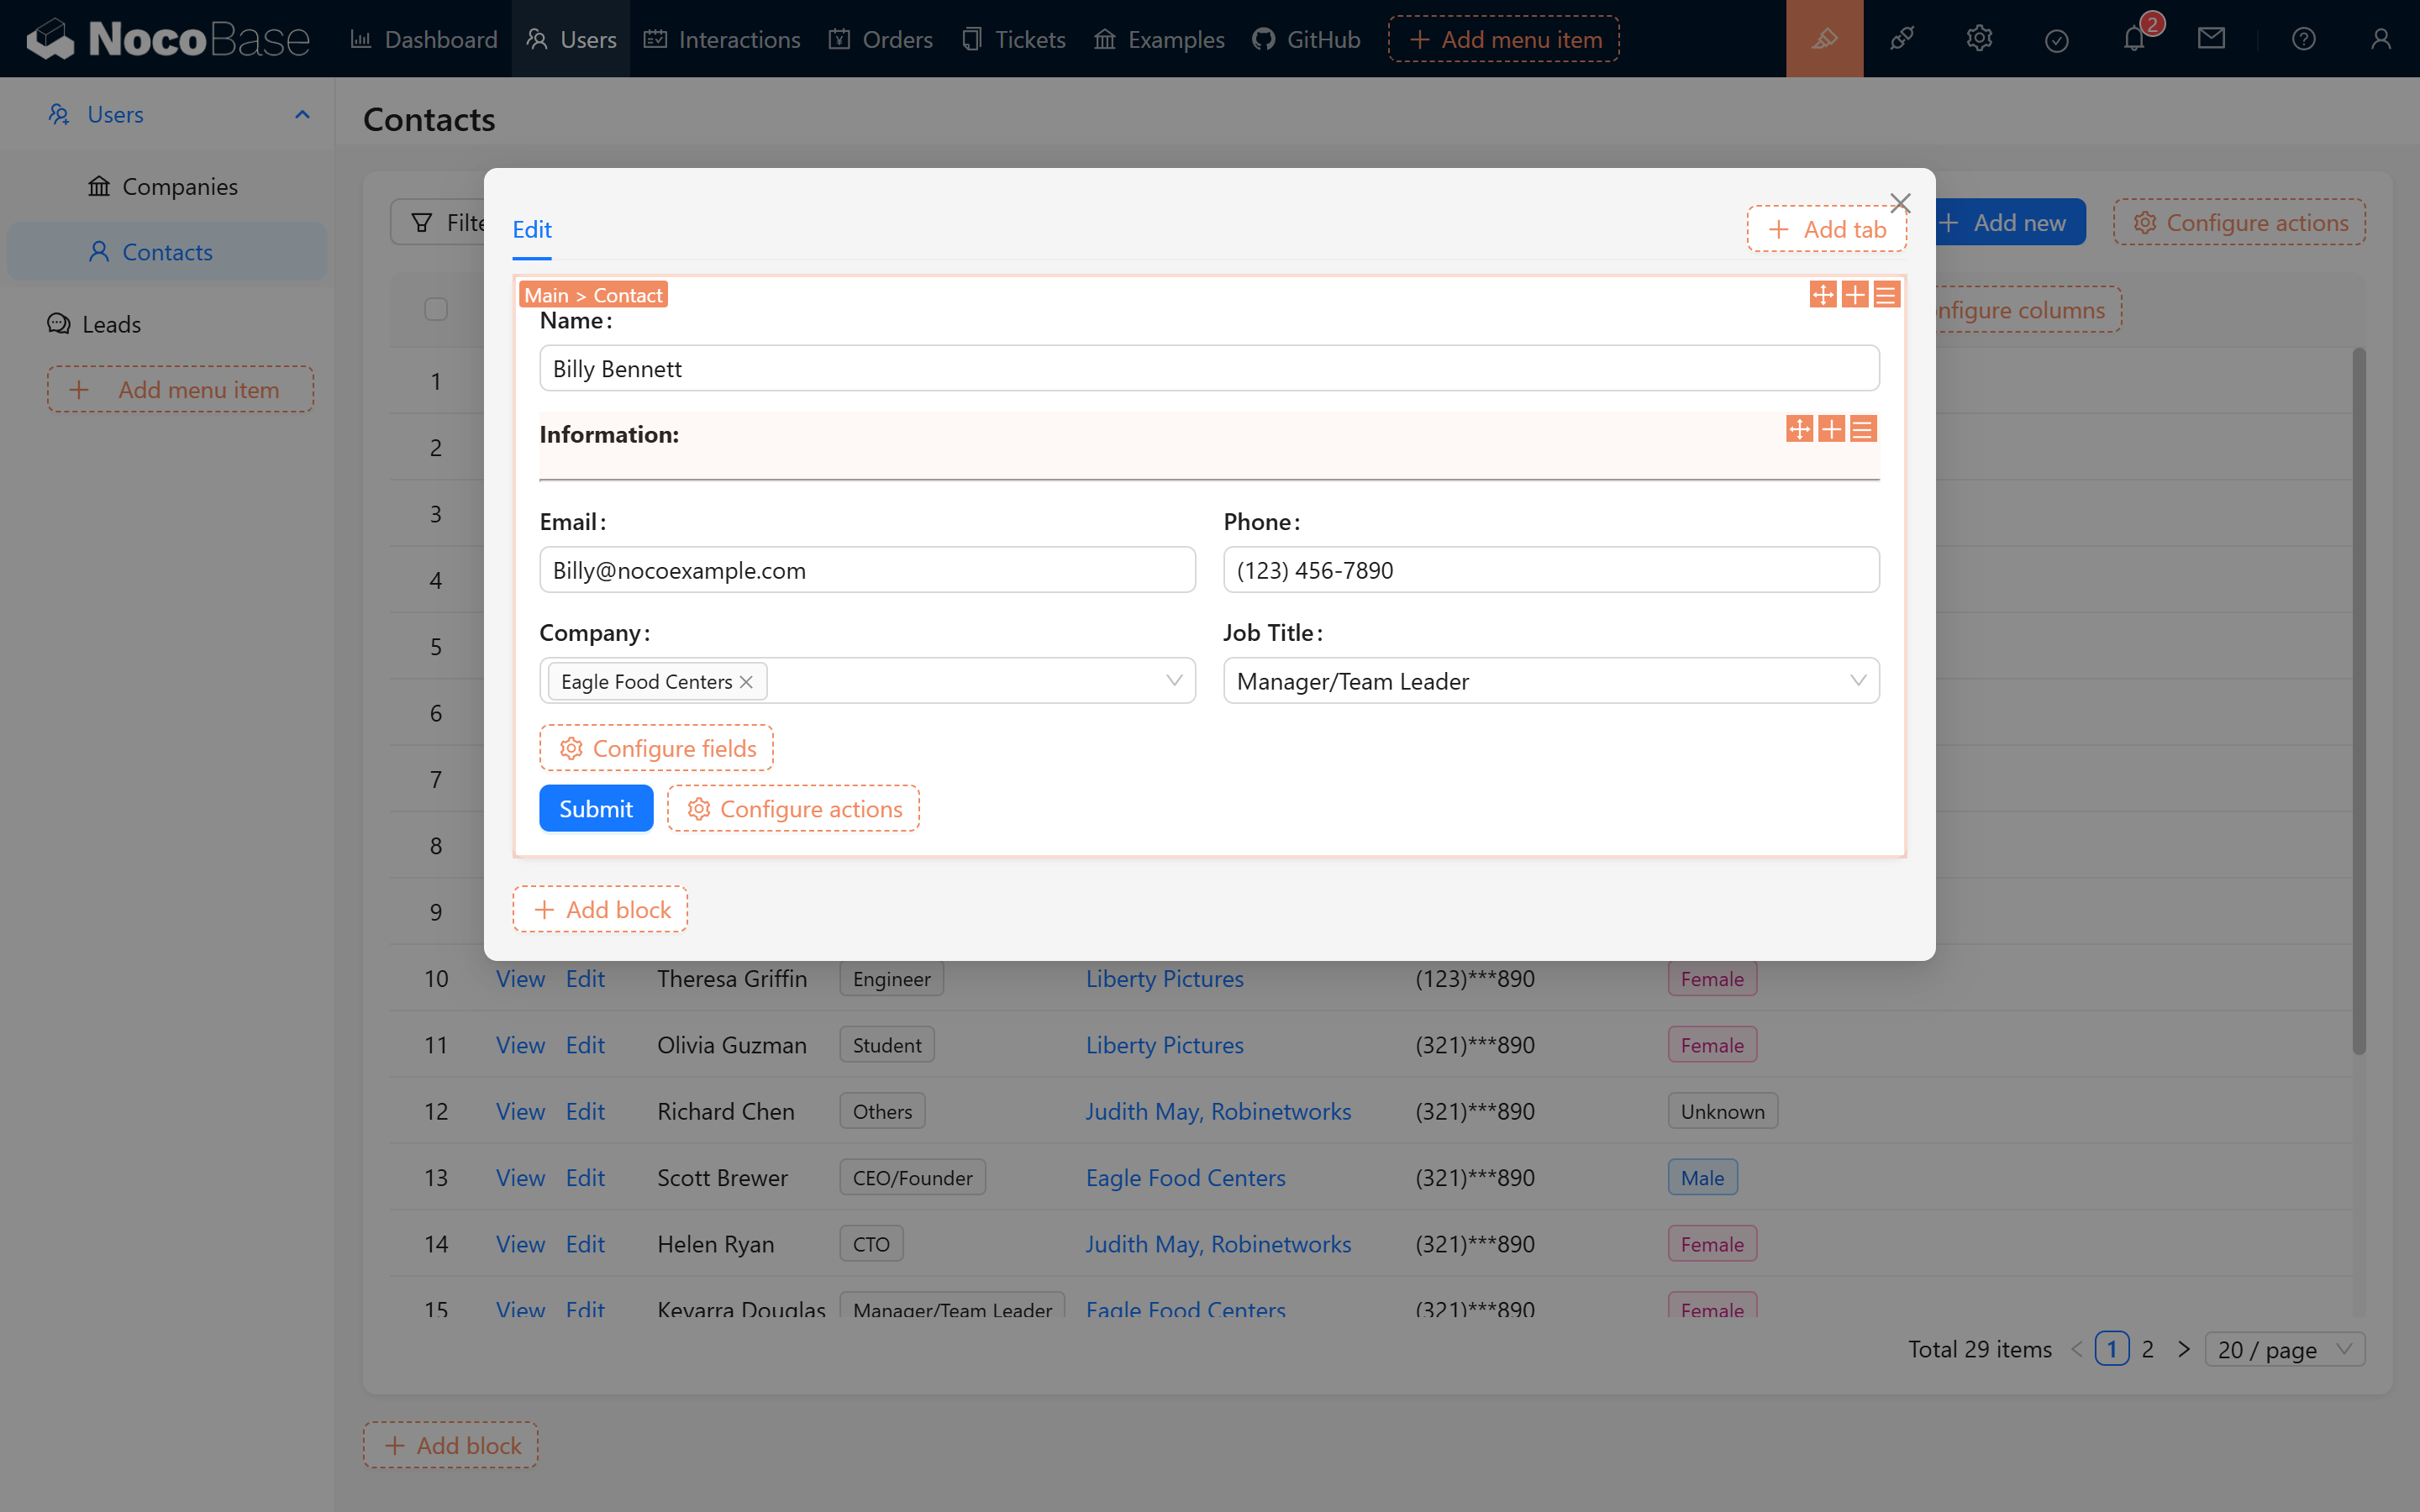
#1.2.2 Usage Examples

By typing --- using Markdown syntax, you can simulate a horizontal grouping line to achieve simple content separation, as demonstrated below:

Separator Example 1 Separator Example 2


#2. Personalized Content Display

Another major advantage of Markdown blocks is that they support system variable interpolation, which helps generate personalized titles and tip messages—ensuring that each user sees a unique display within their form.

Personalized Display 1 Personalized Display 2

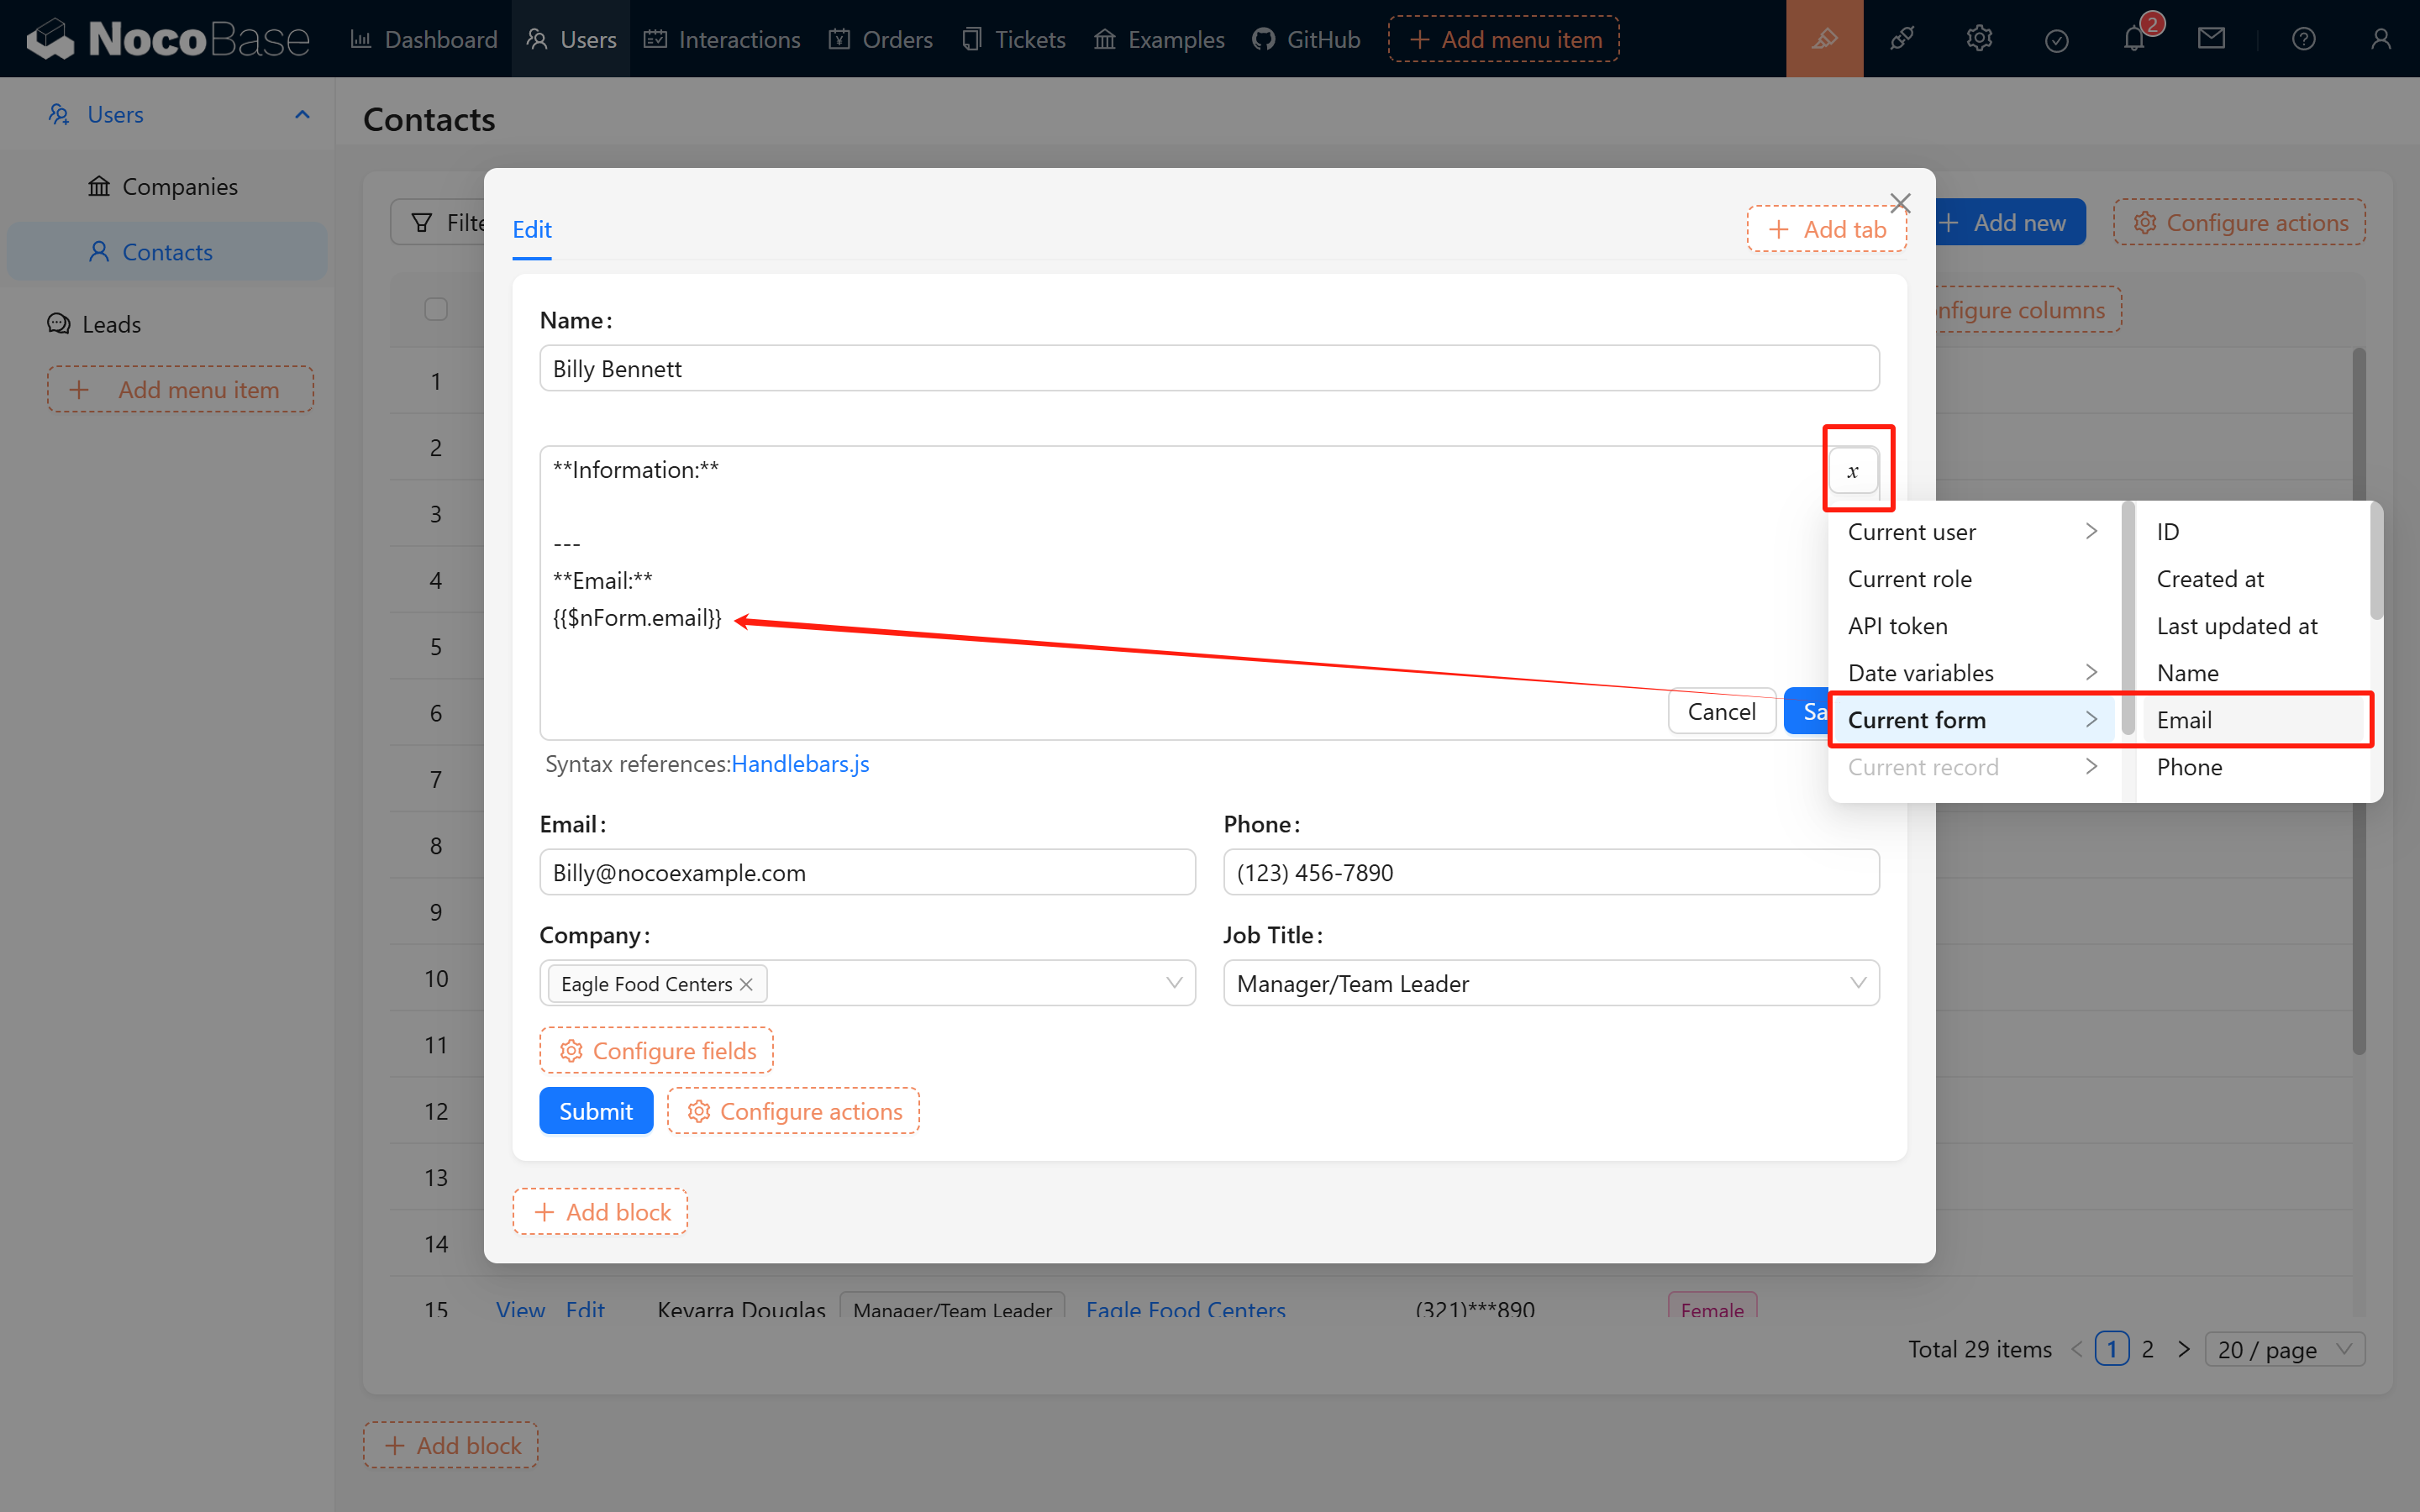
In addition, you can combine form data to perform simple content formatting, as illustrated in the following example:

Highlighted Title Example:

# #{{$nRecord.id}} {{$nPopupRecord.task_name}}

---

Highlighted Title Effect

Centered Divider Example:

Centered Divider Effect

#3. Enriching Content with Additional Elements

As you become more familiar with Markdown syntax and variables, you can also enrich Markdown blocks with additional content, such as HTML!

#3.1 HTML Example

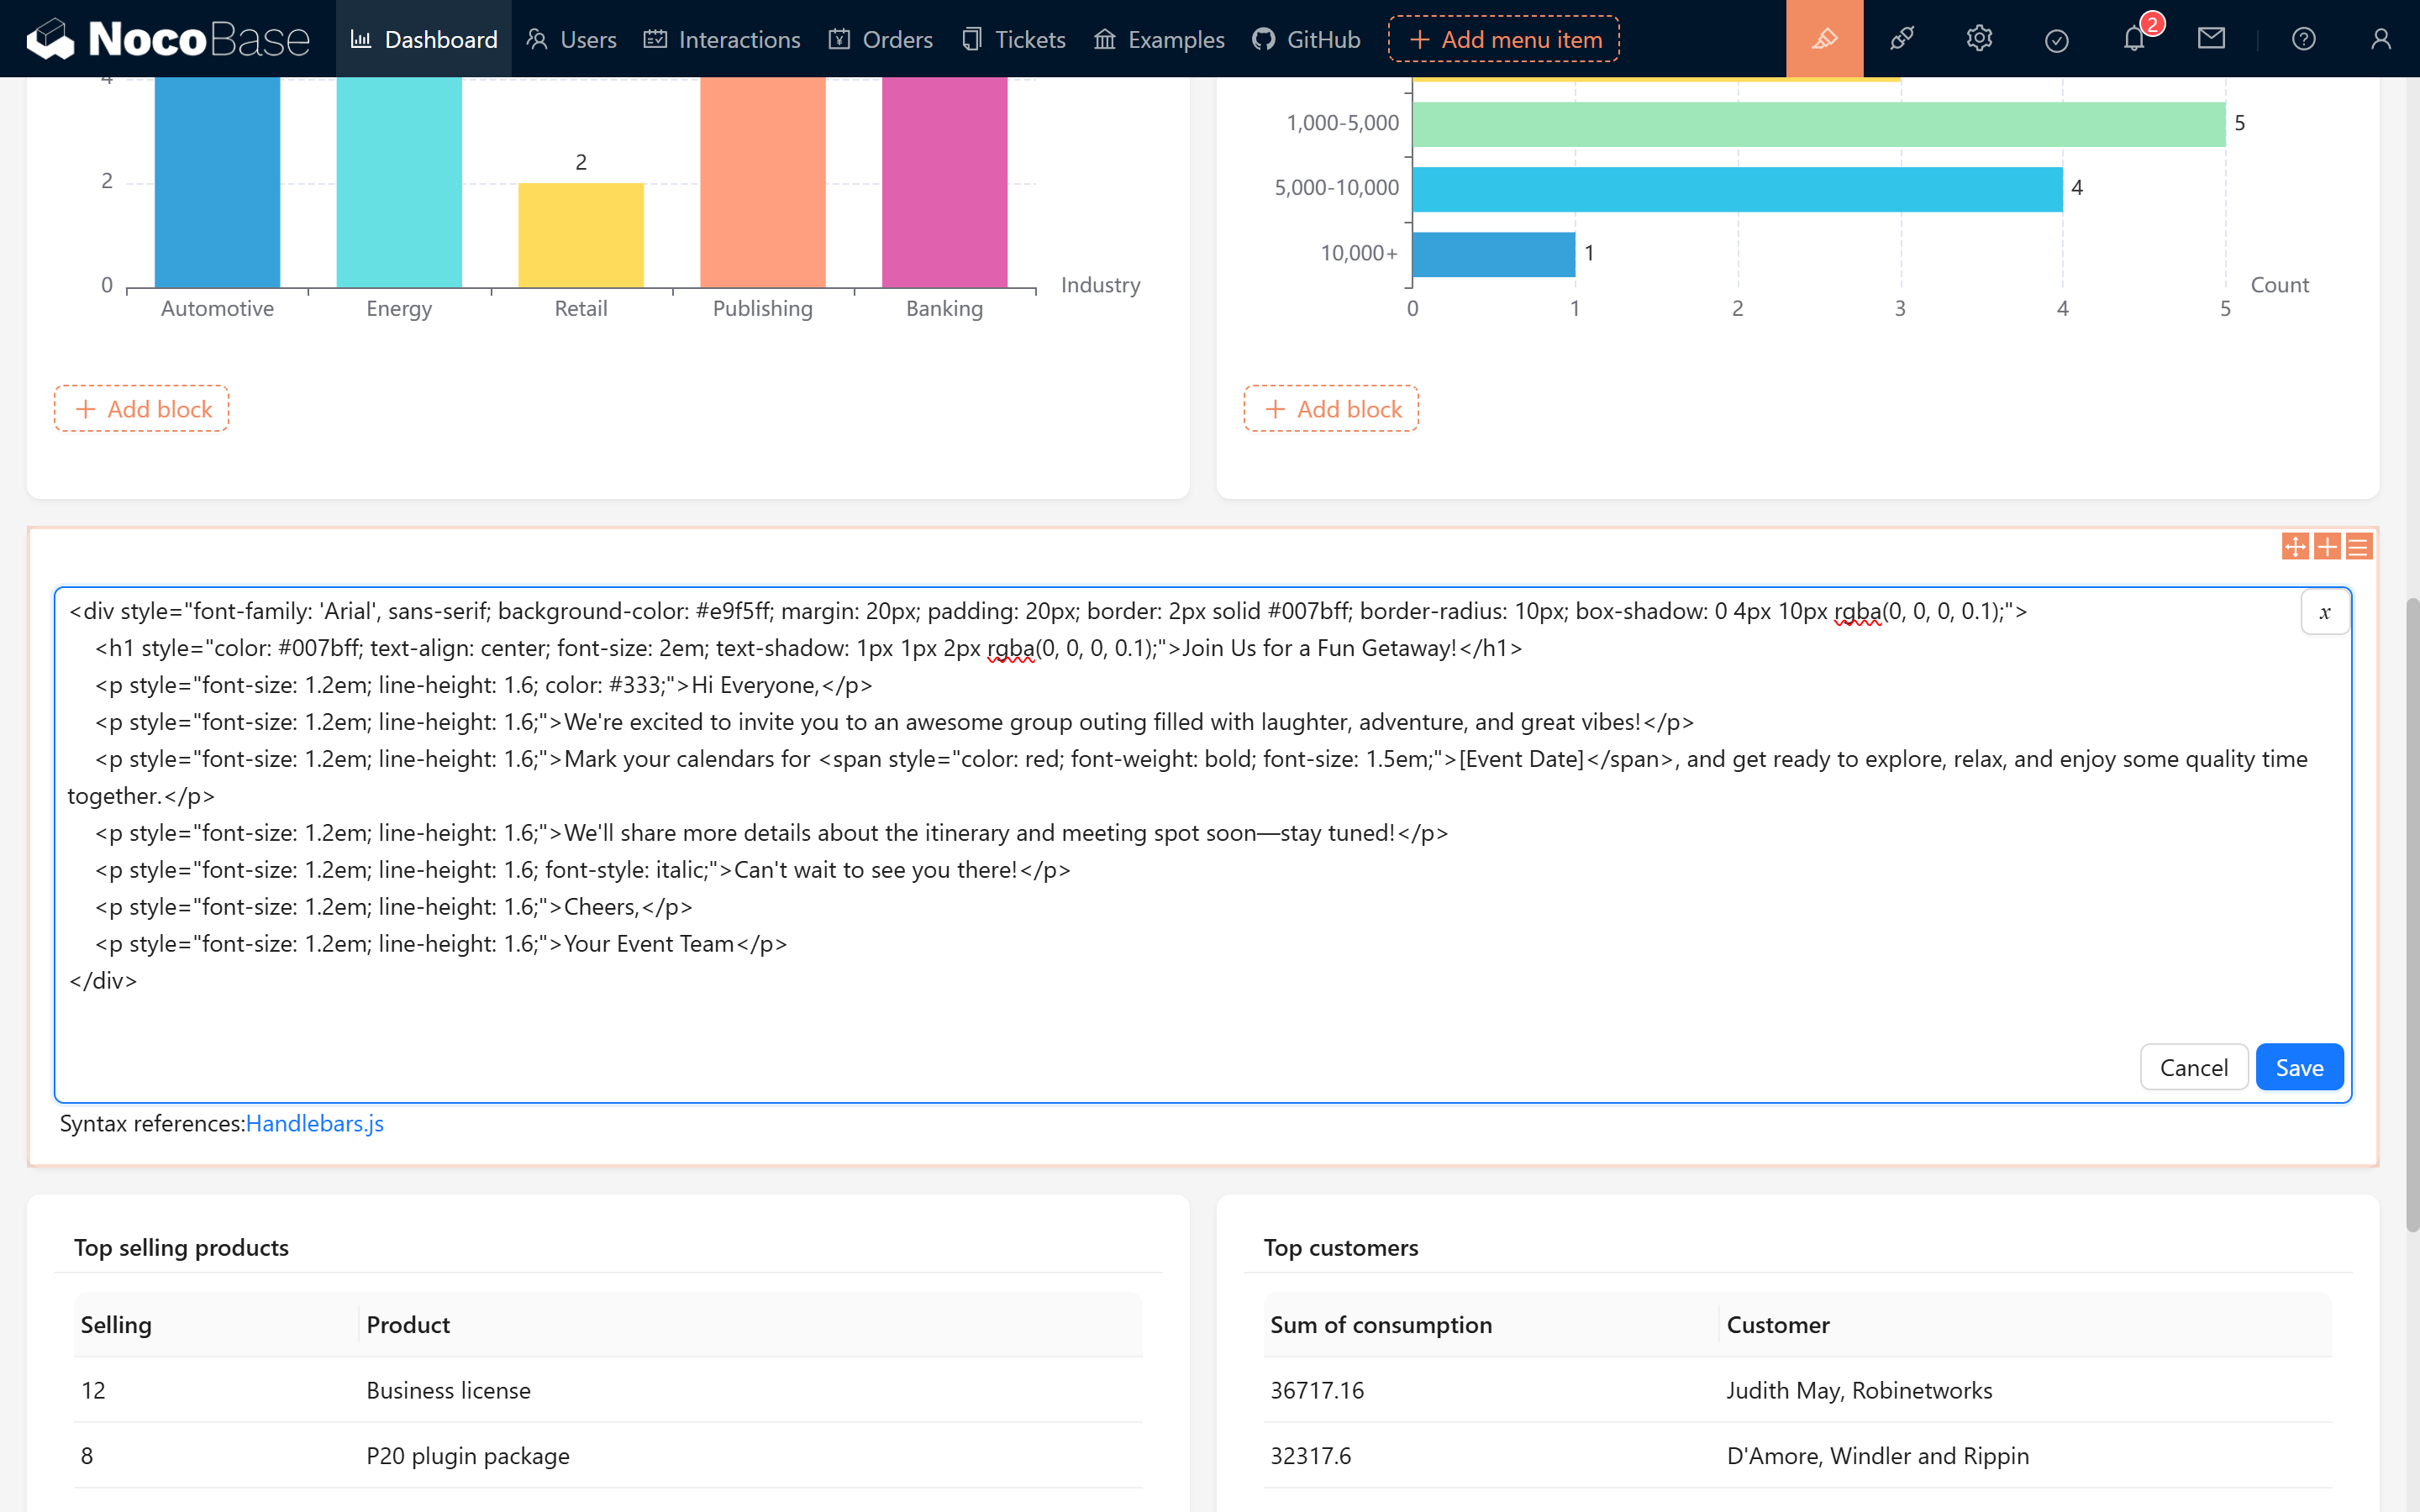
If you are not familiar with HTML syntax, you can let Deepseek help write it (note that the script tag is not supported; it is recommended that all styles be written within a local div).

Below is an elegant announcement example:

<div style="font-family: 'Arial', sans-serif; background-color: #e9f5ff; margin: 20px; padding: 20px; border: 2px solid #007bff; border-radius: 10px; box-shadow: 0 4px 10px rgba(0, 0, 0, 0.1);">
    <h1 style="color: #007bff; text-align: center; font-size: 2em; text-shadow: 1px 1px 2px rgba(0, 0, 0, 0.1);">Join Us for a Fun Getaway!</h1>
    <p style="font-size: 1.2em; line-height: 1.6; color: #333;">Hi Everyone,</p>
    <p style="font-size: 1.2em; line-height: 1.6;">We're excited to invite you to an awesome group outing filled with laughter, adventure, and great vibes!</p>
    <p style="font-size: 1.2em; line-height: 1.6;">Mark your calendars for <span style="color: red; font-weight: bold; font-size: 1.5em;">November 10, 2025</span>, and get ready to explore, relax, and enjoy some quality time together.</p>
    <p style="font-size: 1.2em; line-height: 1.6;">We'll share more details about the itinerary and meeting spot soon—stay tuned!</p>
    <p style="font-size: 1.2em; line-height: 1.6; font-style: italic;">Can't wait to see you there!</p>
    <p style="font-size: 1.2em; line-height: 1.6;">Cheers,</p>
    <p style="font-size: 1.2em; line-height: 1.6;">Your Event Team</p>
</div>

20250227092832

20250227093003

#3.2 Animation Effect Example

We can even combine CSS to implement simple animation effects—similar to a slideshow that dynamically shows and hides content. Try pasting the following code into your Markdown to see it in action!

<div style="background-color: #f8e1e1; border: 2px solid #d14; border-radius: 10px; padding: 20px; text-align: center; box-shadow: 0 4px 10px rgba(0, 0, 0, 0.2); animation: fadeInOut 3s infinite;">
    <h2 style="color: #d14; font-family: 'Arial', sans-serif;">🎉 Special Announcement 🎉</h2>
    <p style="color: #333; font-size: 18px; font-family: 'Georgia', serif;">Thank you for your support and attention! We will hold a special event next Monday, stay tuned!</p>
    <button style="background-color: #d14; color: white; border: none; border-radius: 5px; padding: 10px 20px; cursor: pointer;">Click to Learn More</button>
</div>

<style>
@keyframes fadeInOut {
    0%, 100% { opacity: 0; transform: translateY(-20px); }
    10%, 90% { opacity: 1; transform: translateY(0); }
}
</style>