

Manual
This feature is provided by the plugin «Workflow: Manual node»Introduction
When a business process cannot be fully automated for decision-making, a manual node can be used to delegate some decision-making authority to a person.
When a manual node is executed, it interrupts the entire workflow execution and generates a to-do task for the corresponding user. After the user submits the task, the workflow will either continue, remain pending, or be terminated based on the selected status. This is very useful in scenarios like approval processes.
Installation
Built-in plugin, no installation required.
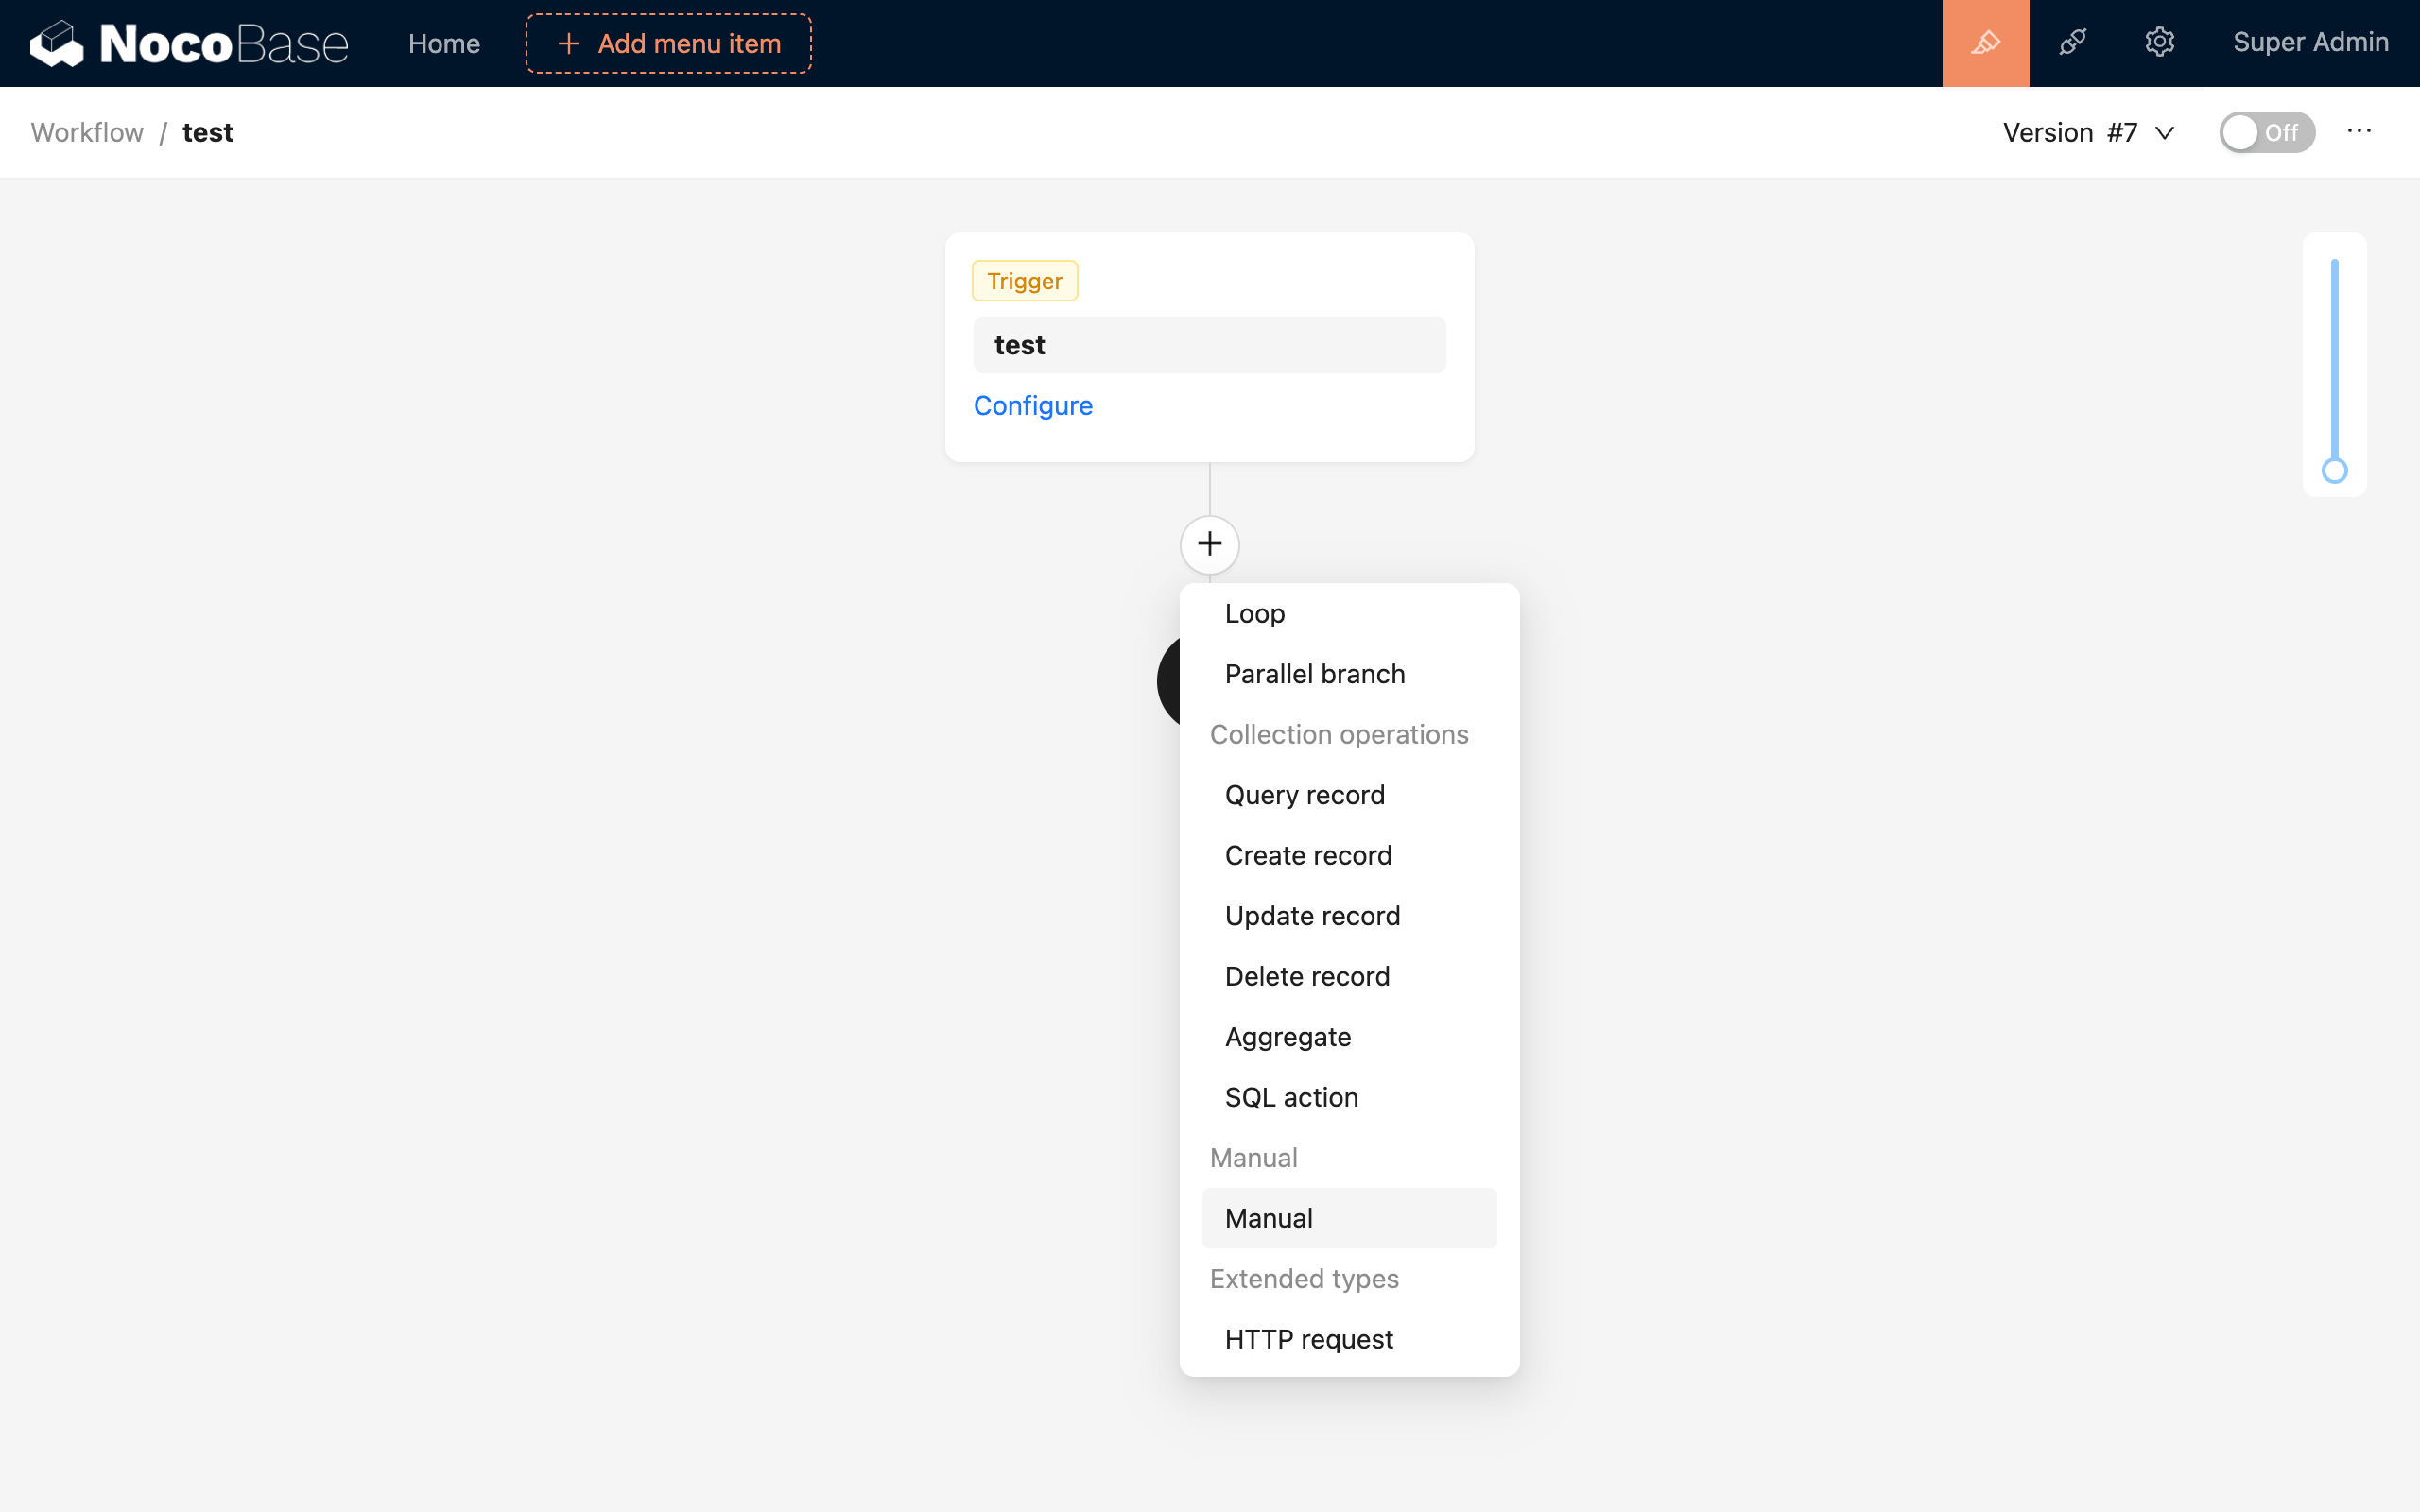
Create Node
In the workflow configuration interface, click the plus ("+") button in the workflow to add a "Manual" node:
Configure Node
Assignee
A manual node needs to specify a user as the executor of the to-do task. The list of to-do tasks can be added as a block on a page, and the content of the task popup for each node needs to be configured in the node's interface configuration.
Select a user, or select the primary key or foreign key of user data from the context via a variable.
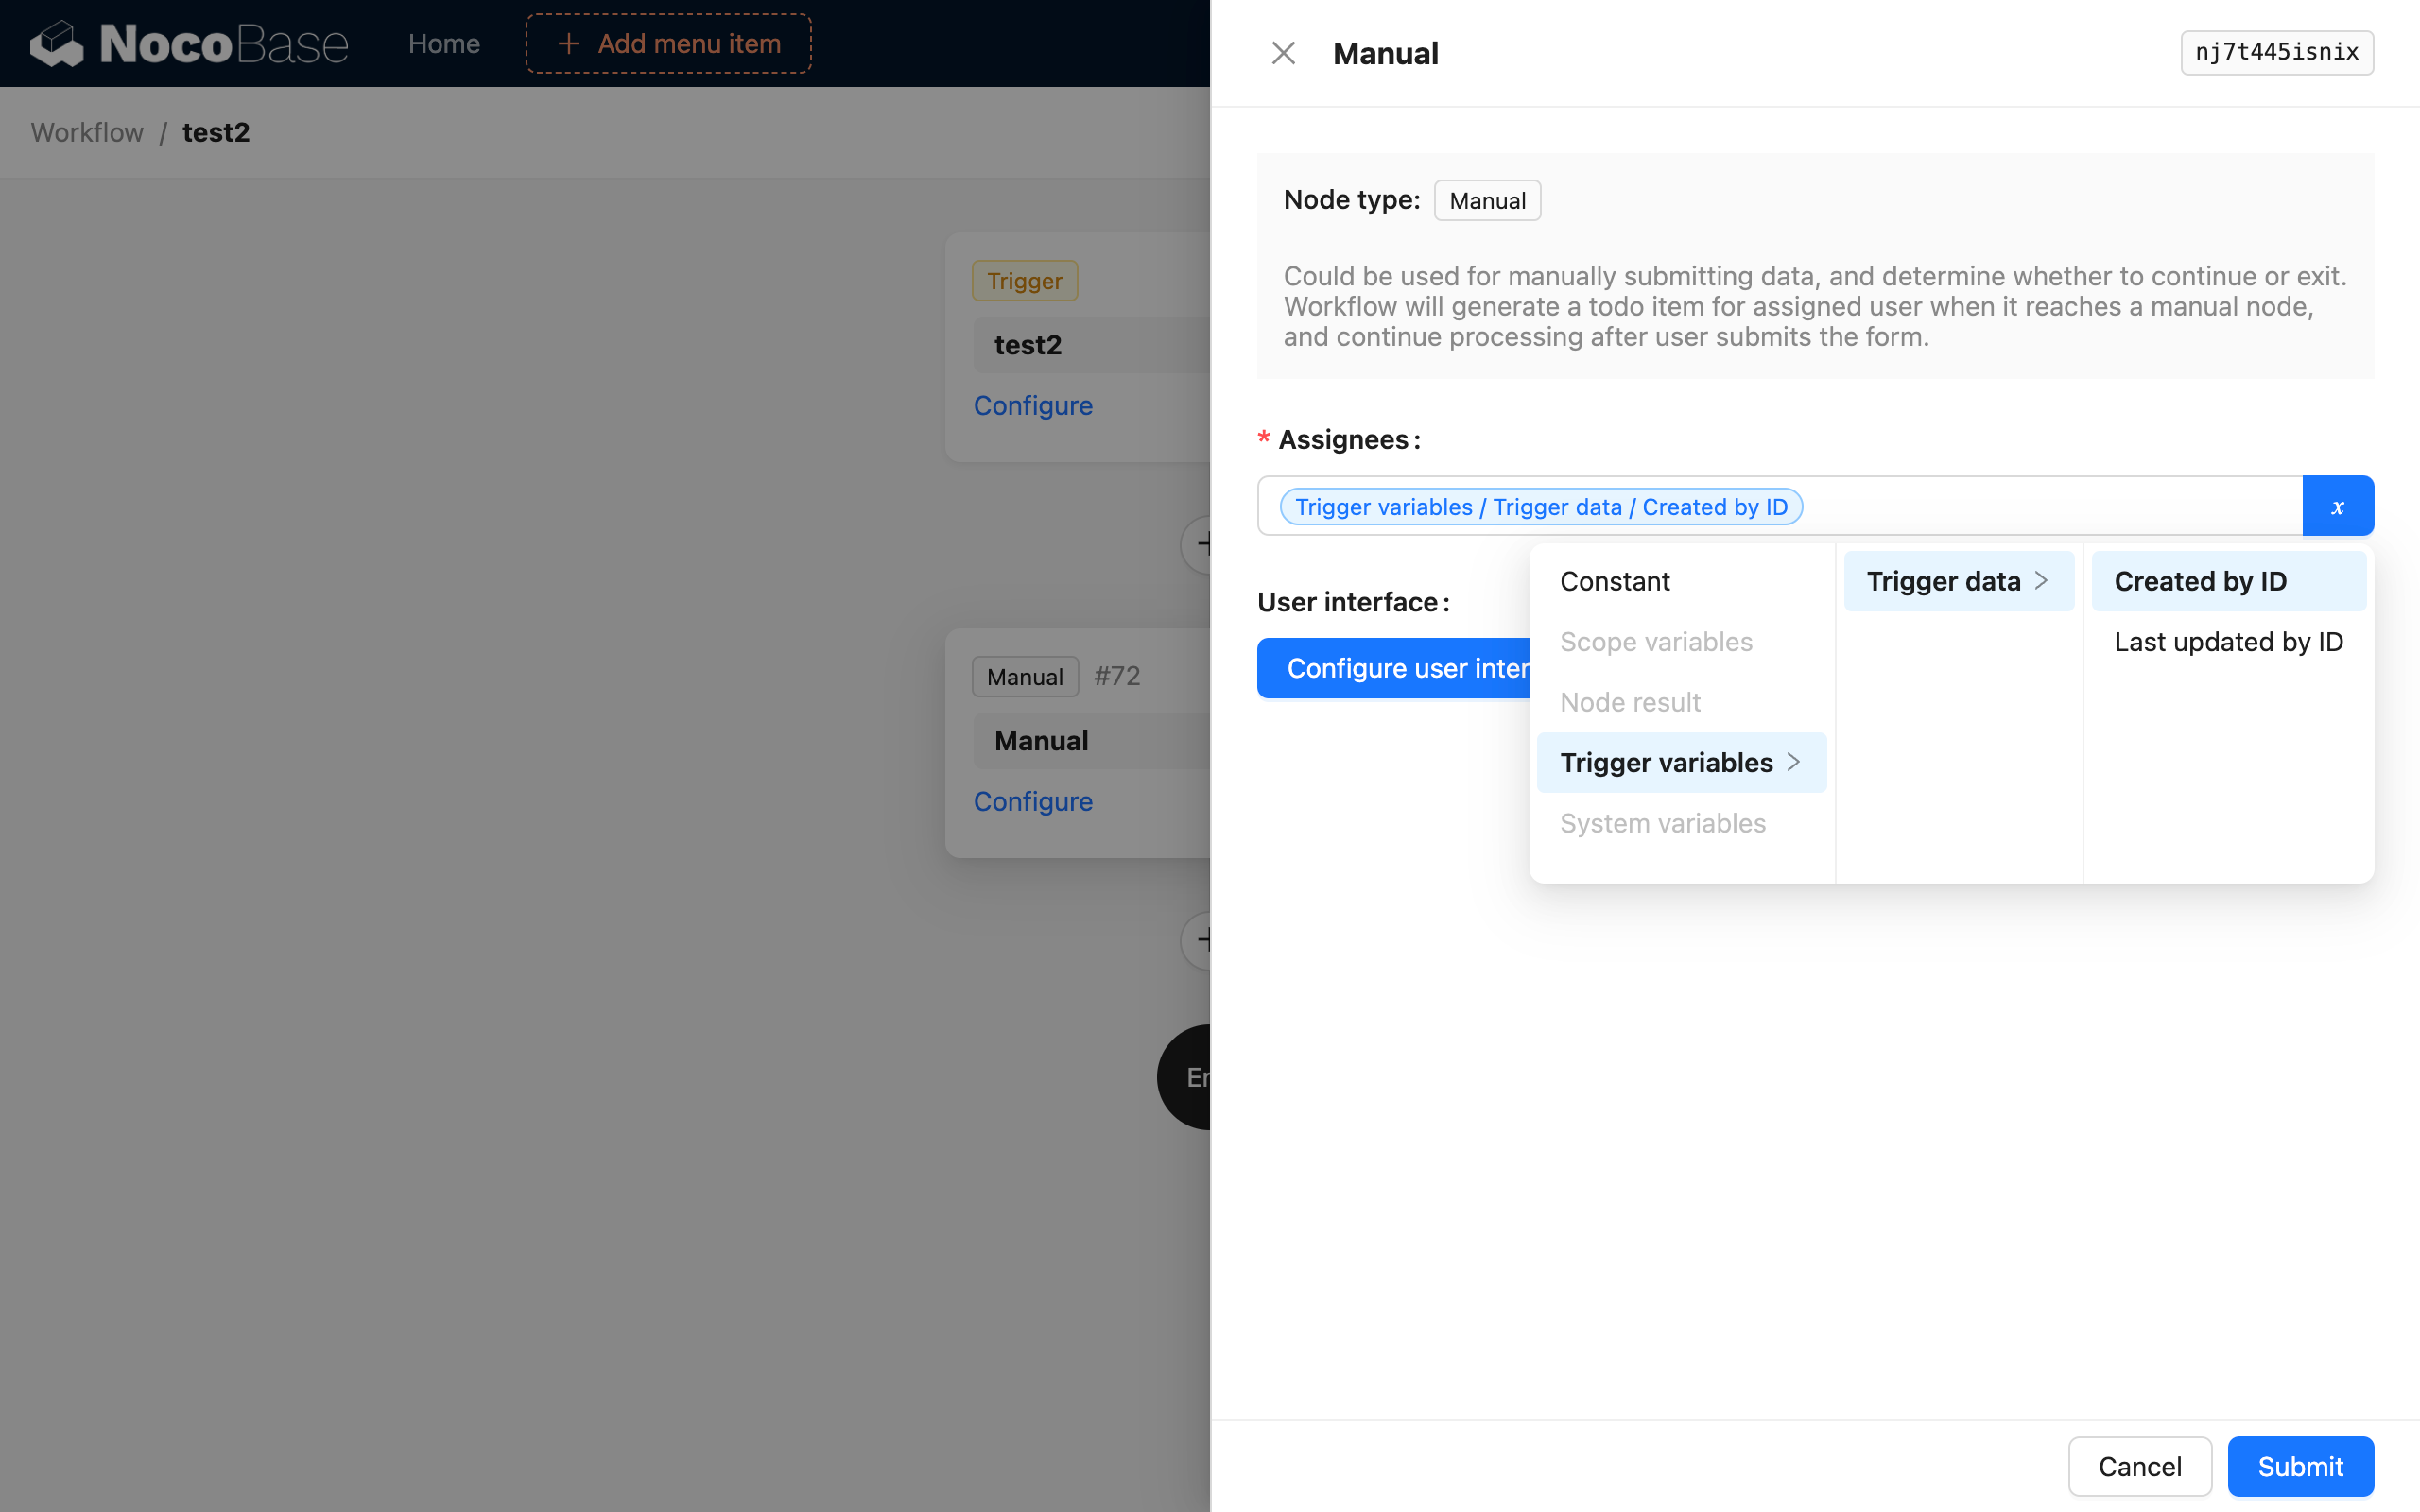
Currently, the assignee option for manual nodes does not support multiple users. This will be supported in a future version.
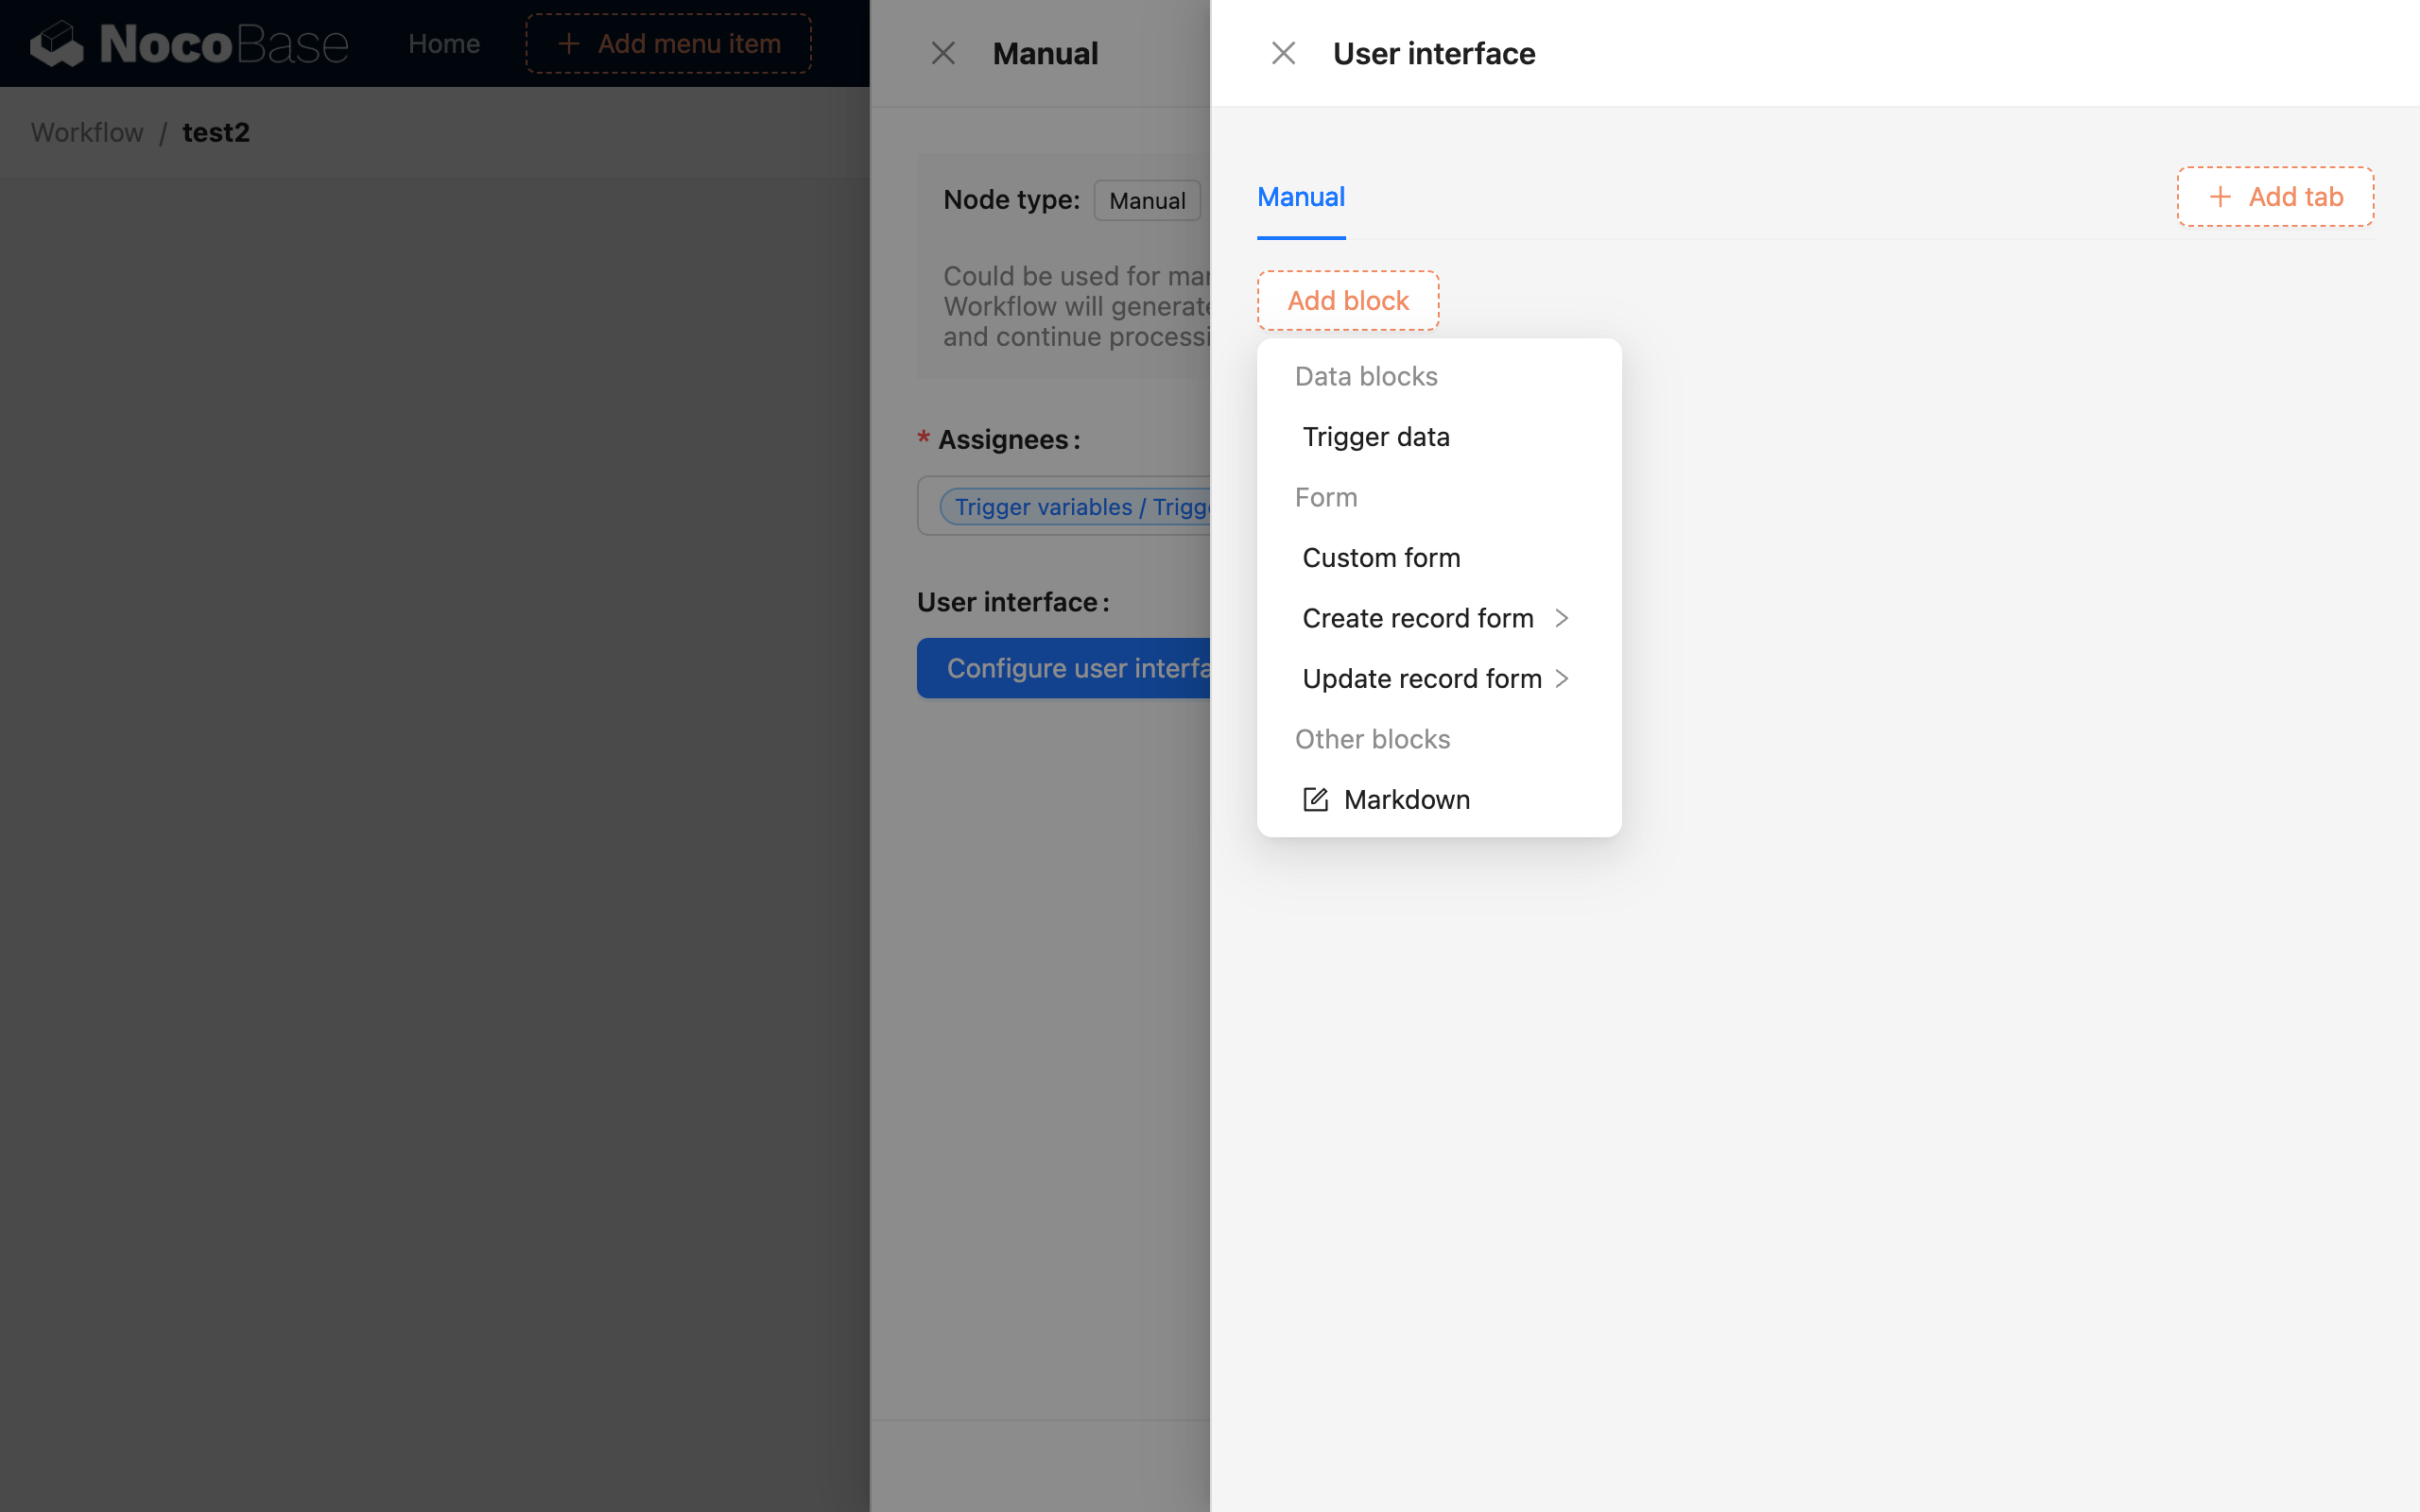
Configure User Interface
The interface configuration for the to-do item is the core part of the manual node. You can click the "Configure user interface" button to open a separate configuration popup, which can be configured in a WYSIWYG manner, just like a regular page:
Tabs
Tabs can be used to distinguish different content. For example, one tab for an approval form submission, another for a rejection form submission, or for displaying details of related data. They can be freely configured.
Blocks
The supported block types are mainly divided into two categories: data blocks and form blocks. Additionally, Markdown is primarily used for static content such as informational messages.
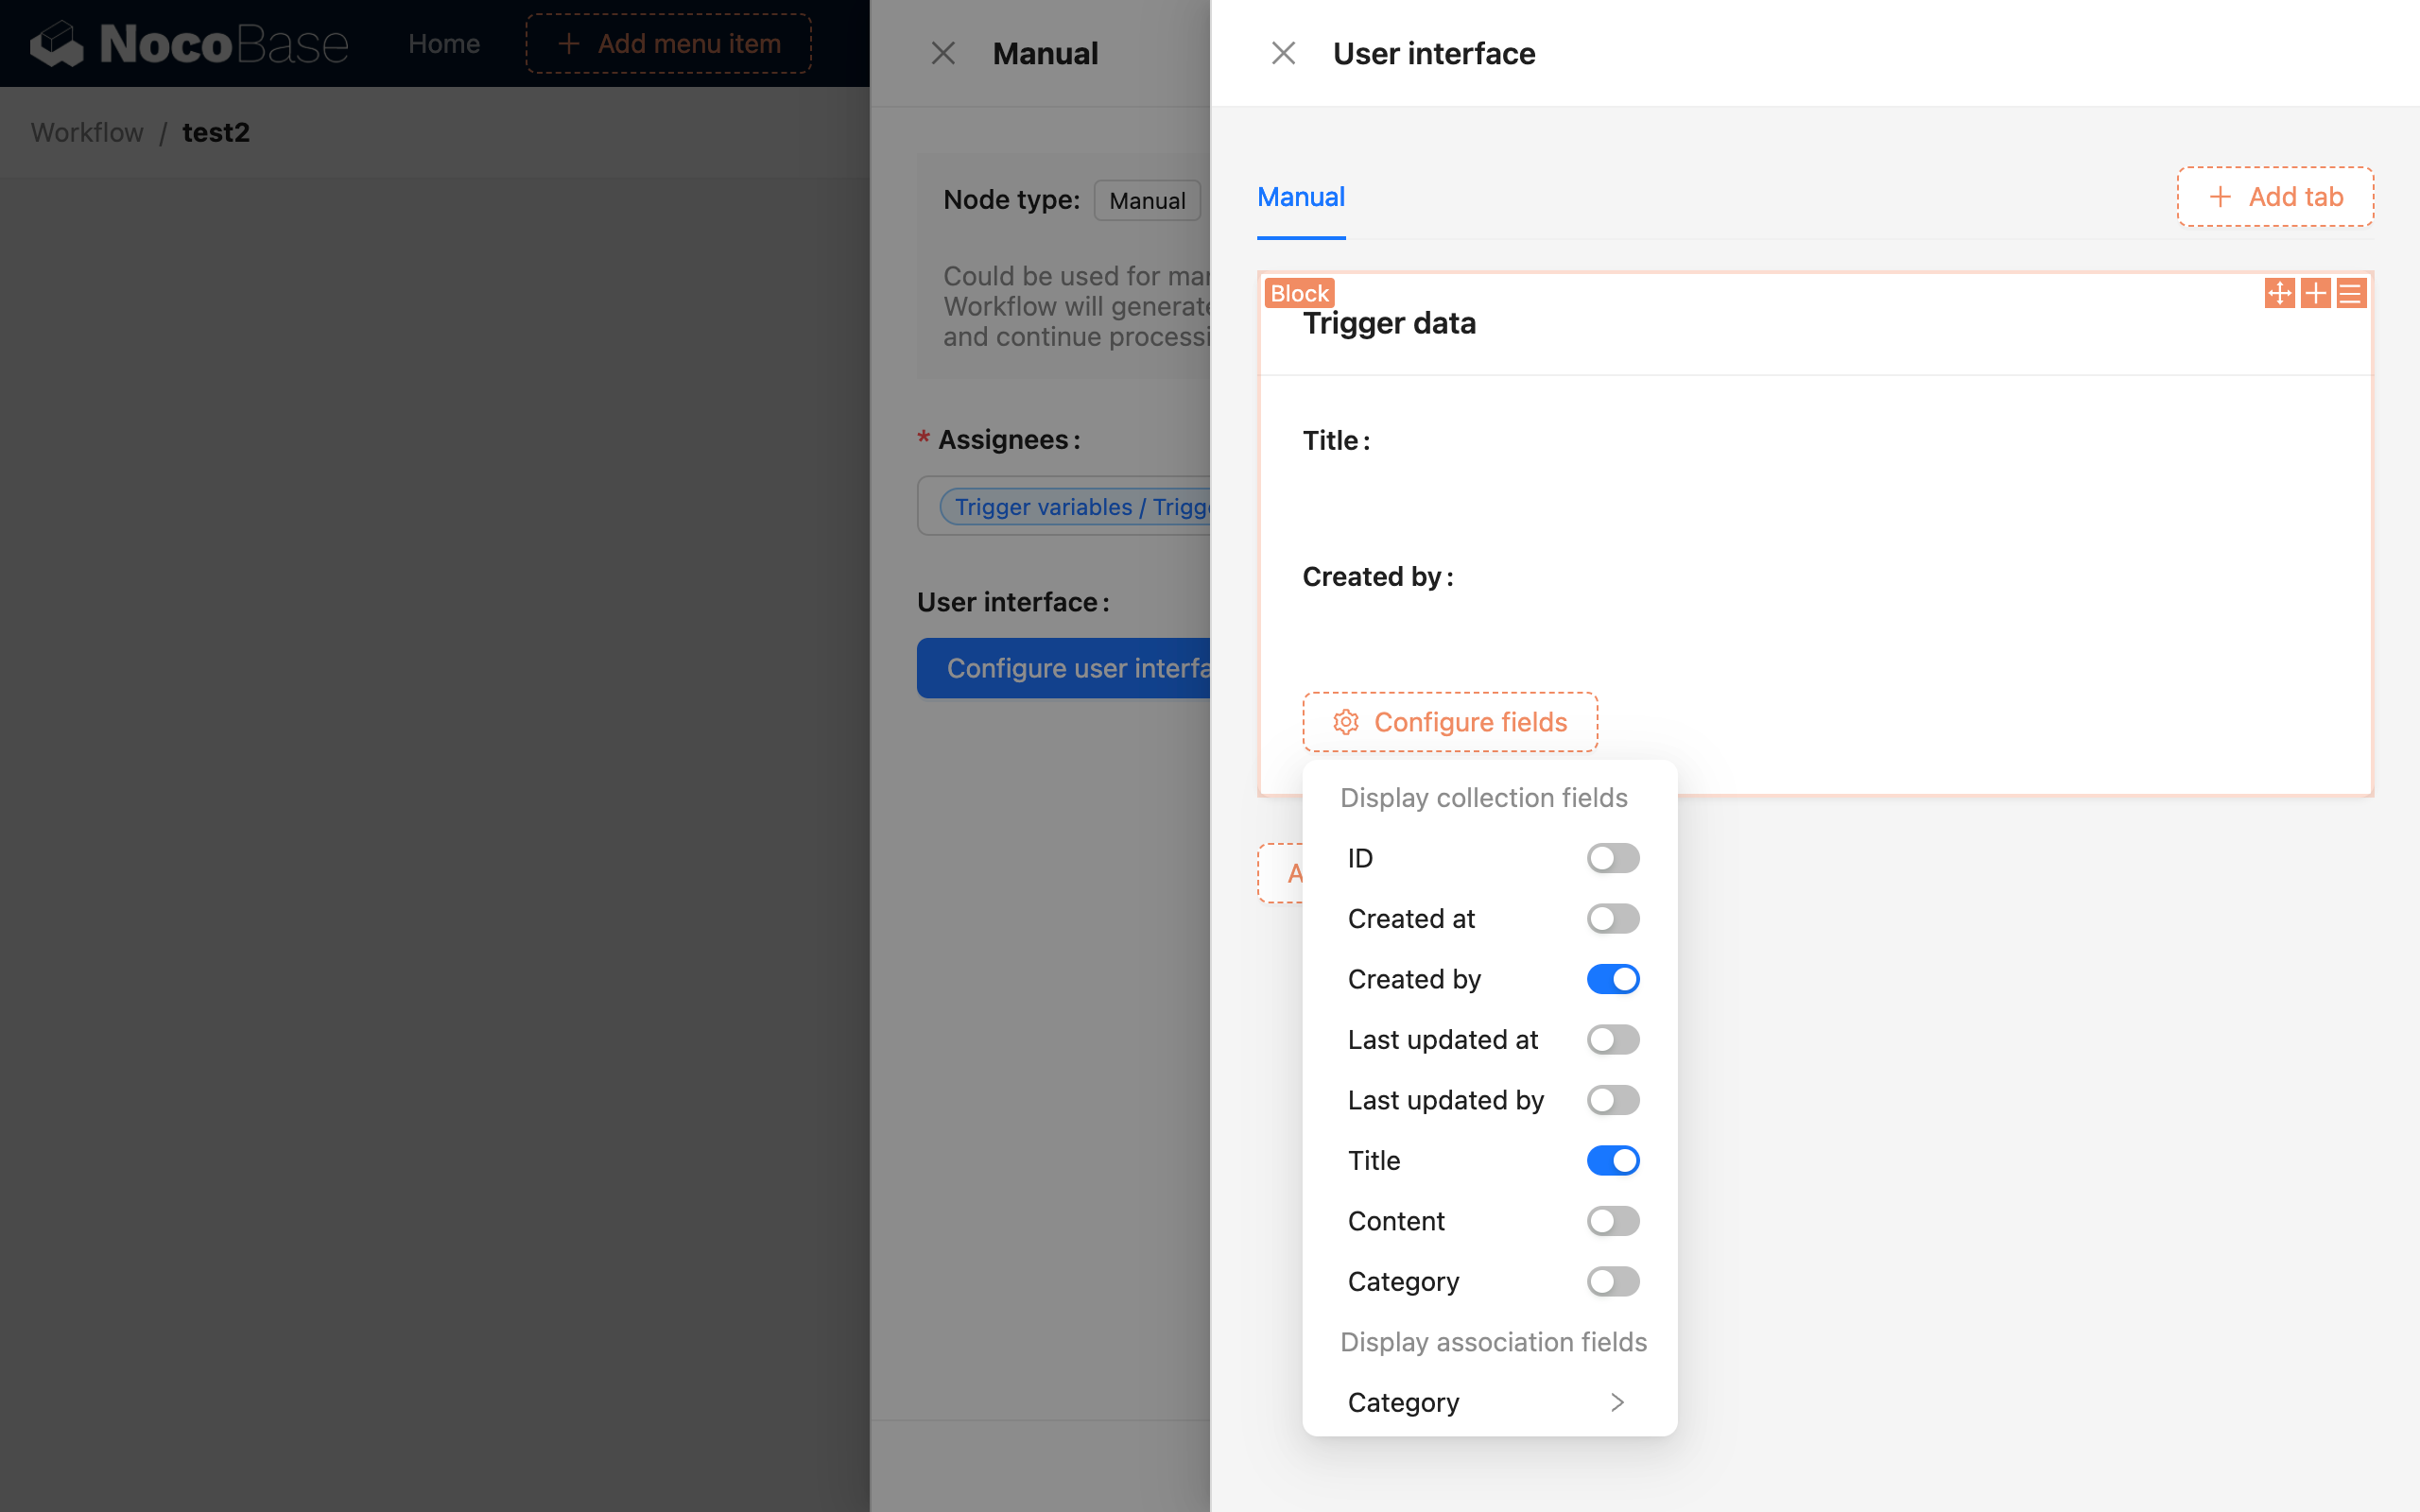
Data Block
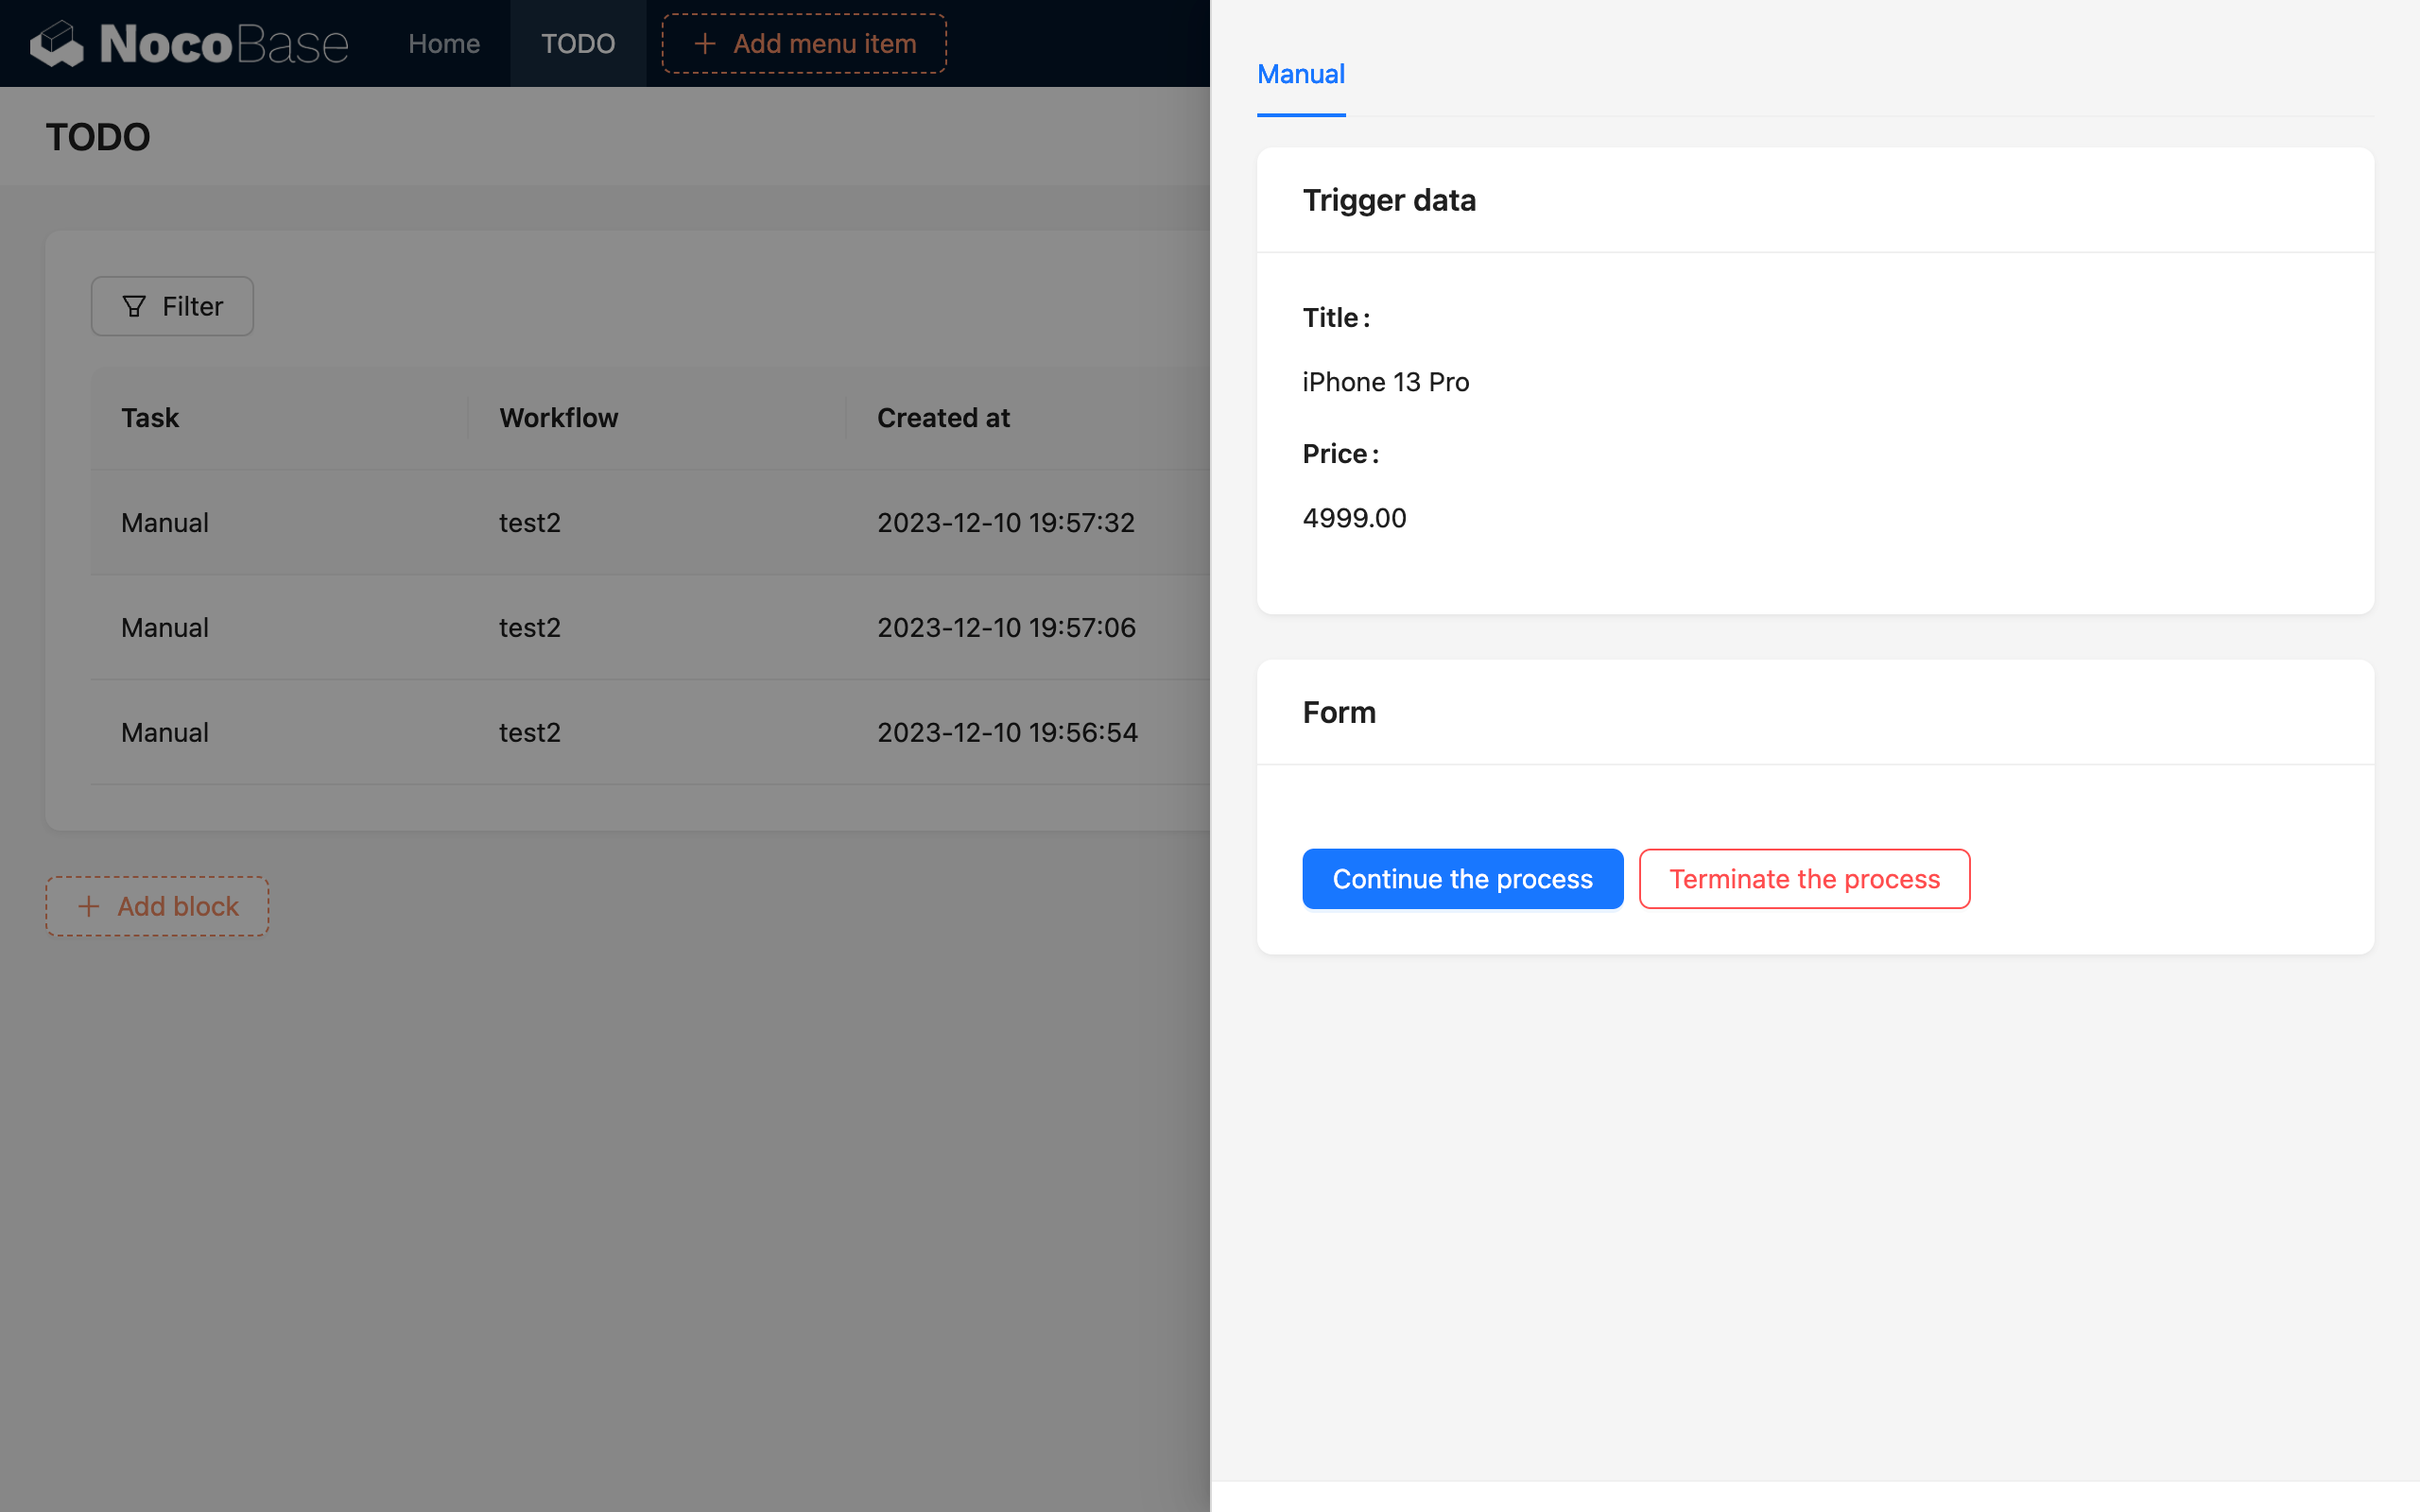
Data blocks can display trigger data or the processing results of any node, providing relevant contextual information to the to-do assignee. For example, if the workflow is triggered by a form event, you can create a details block for the trigger data. This is consistent with the details configuration of a regular page, allowing you to select any field from the trigger data for display:
Node data blocks are similar; you can select the data result from an upstream node to display as details. For example, the result of an upstream calculation node can serve as contextual reference information for the assignee's to-do task:
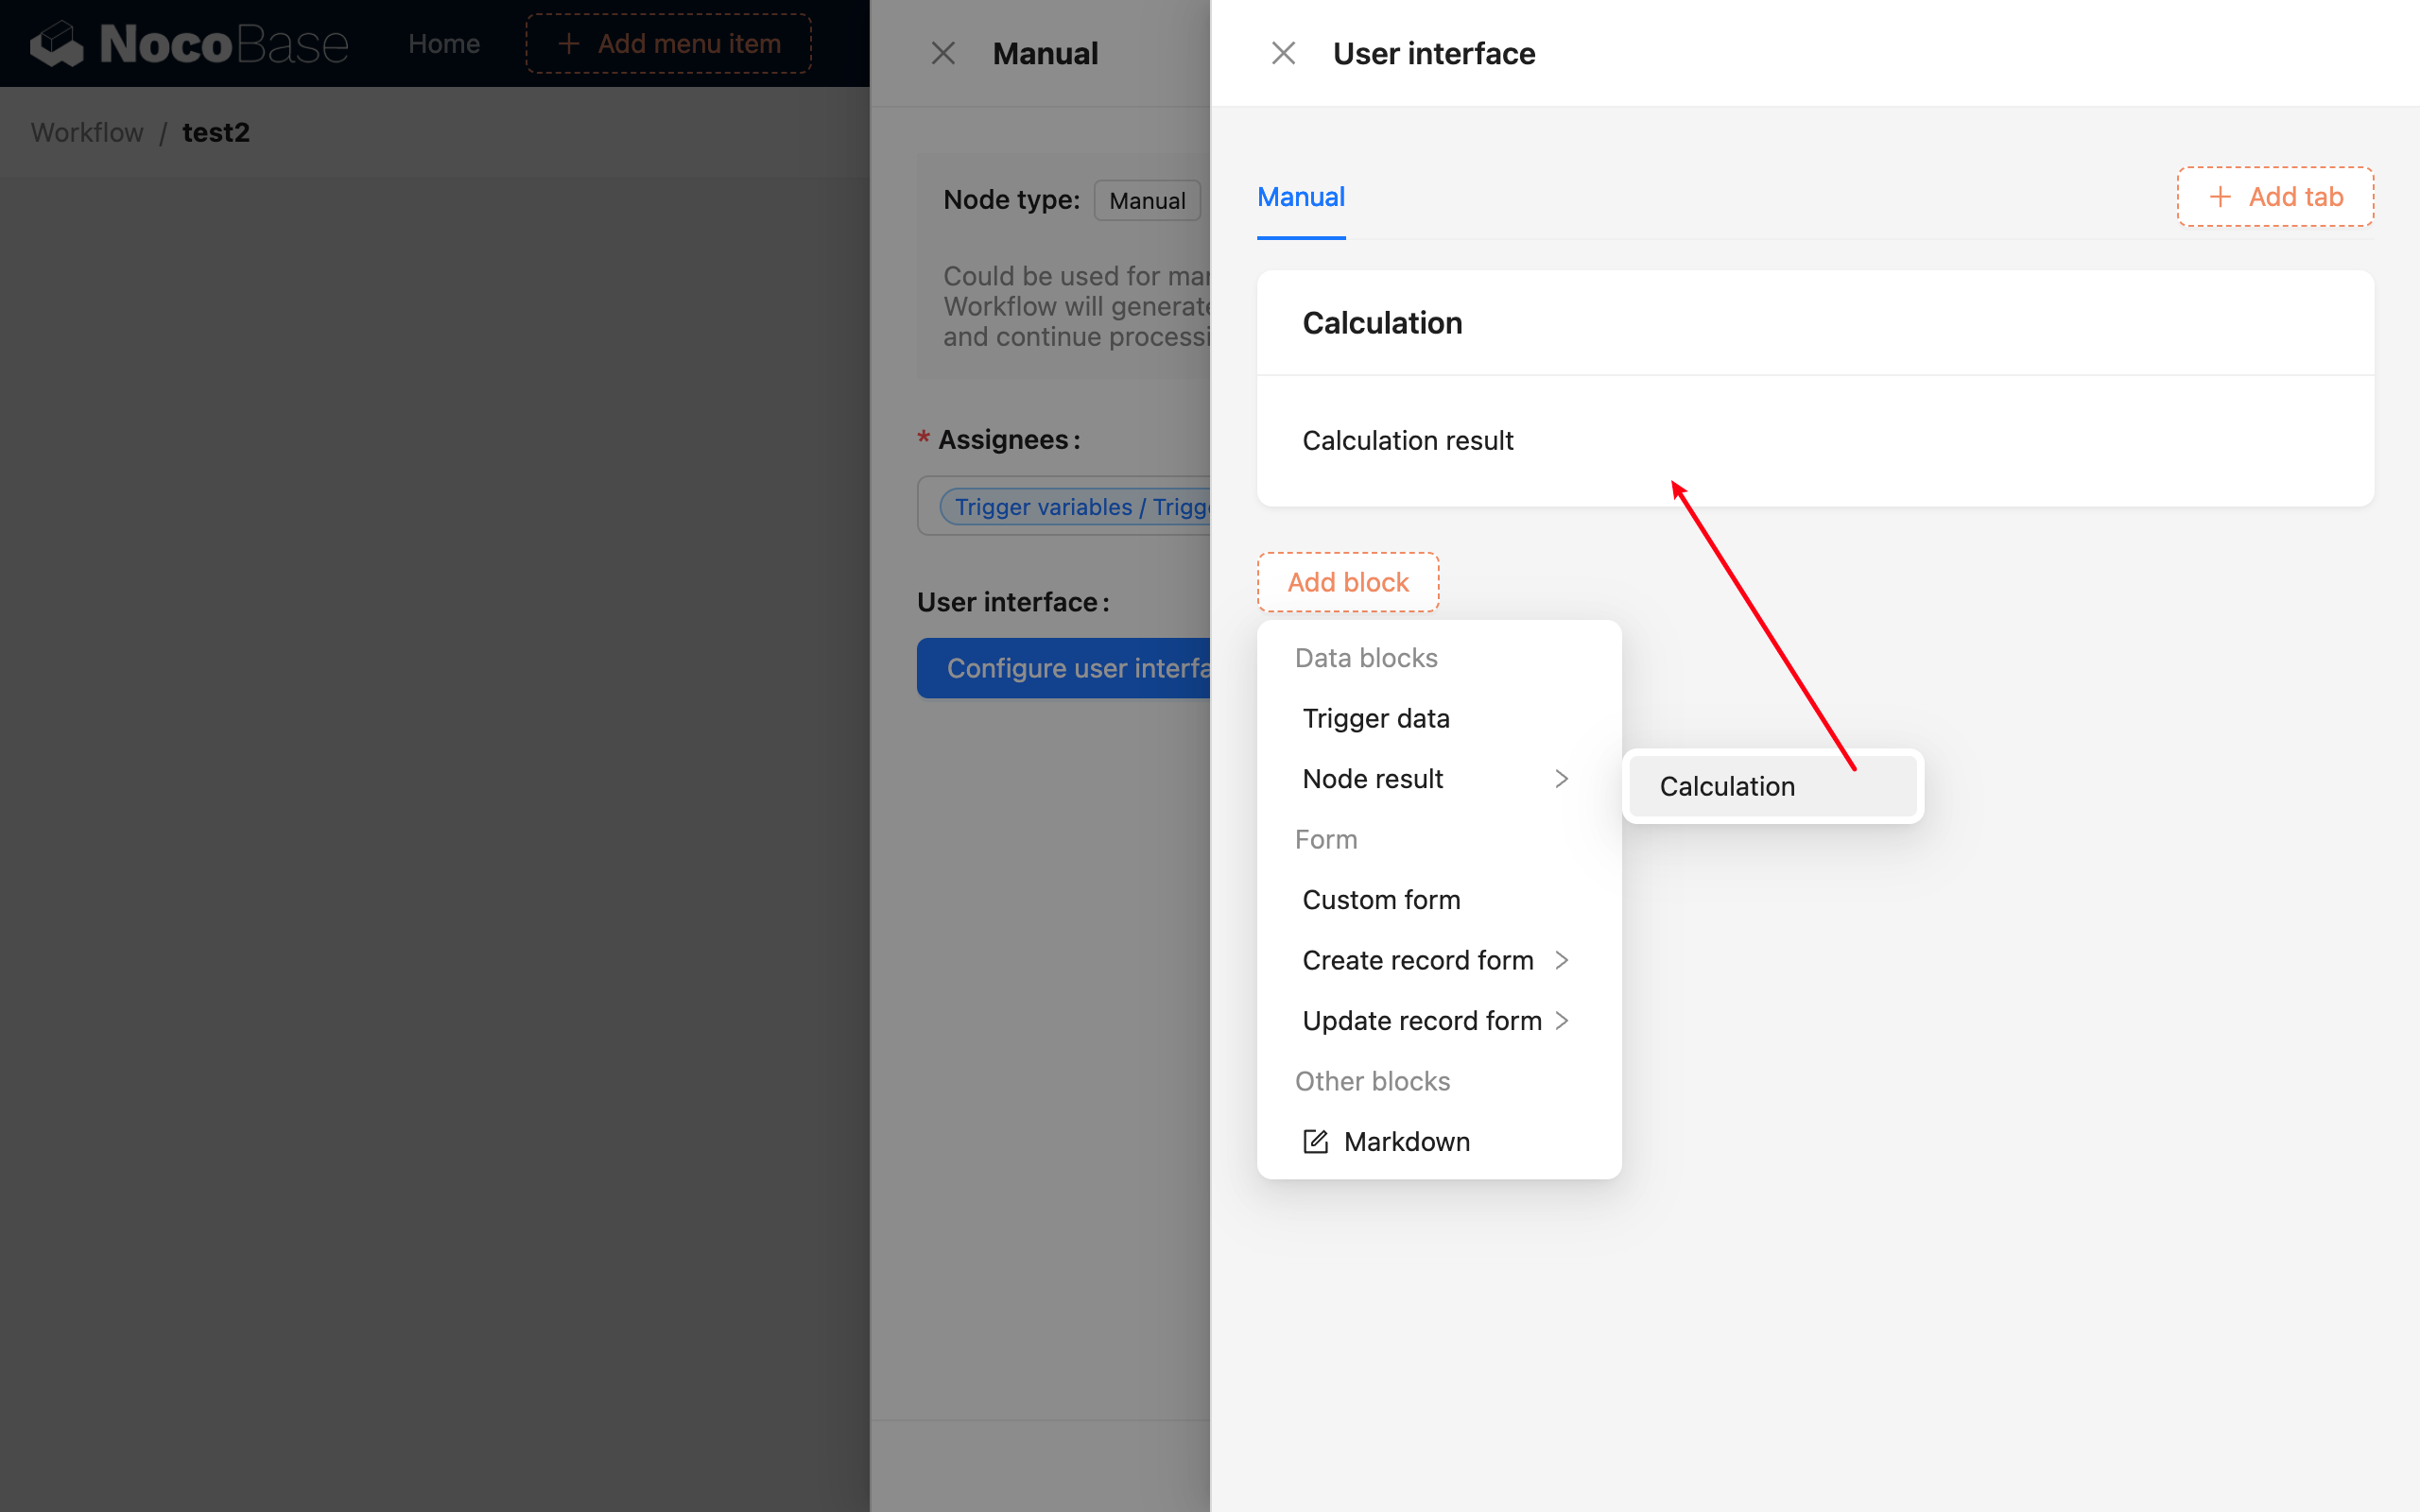
Since the workflow is not in an executed state during interface configuration, no specific data is displayed in the data blocks. The relevant data for a specific workflow instance can only be seen in the to-do popup interface after the workflow has been triggered and executed.
Form Block
At least one form block must be configured in the to-do interface to handle the final decision on whether the workflow should continue. Not configuring a form will prevent the workflow from proceeding after it is interrupted. There are three types of form blocks:
- Custom form
- Create record form
- Update record form
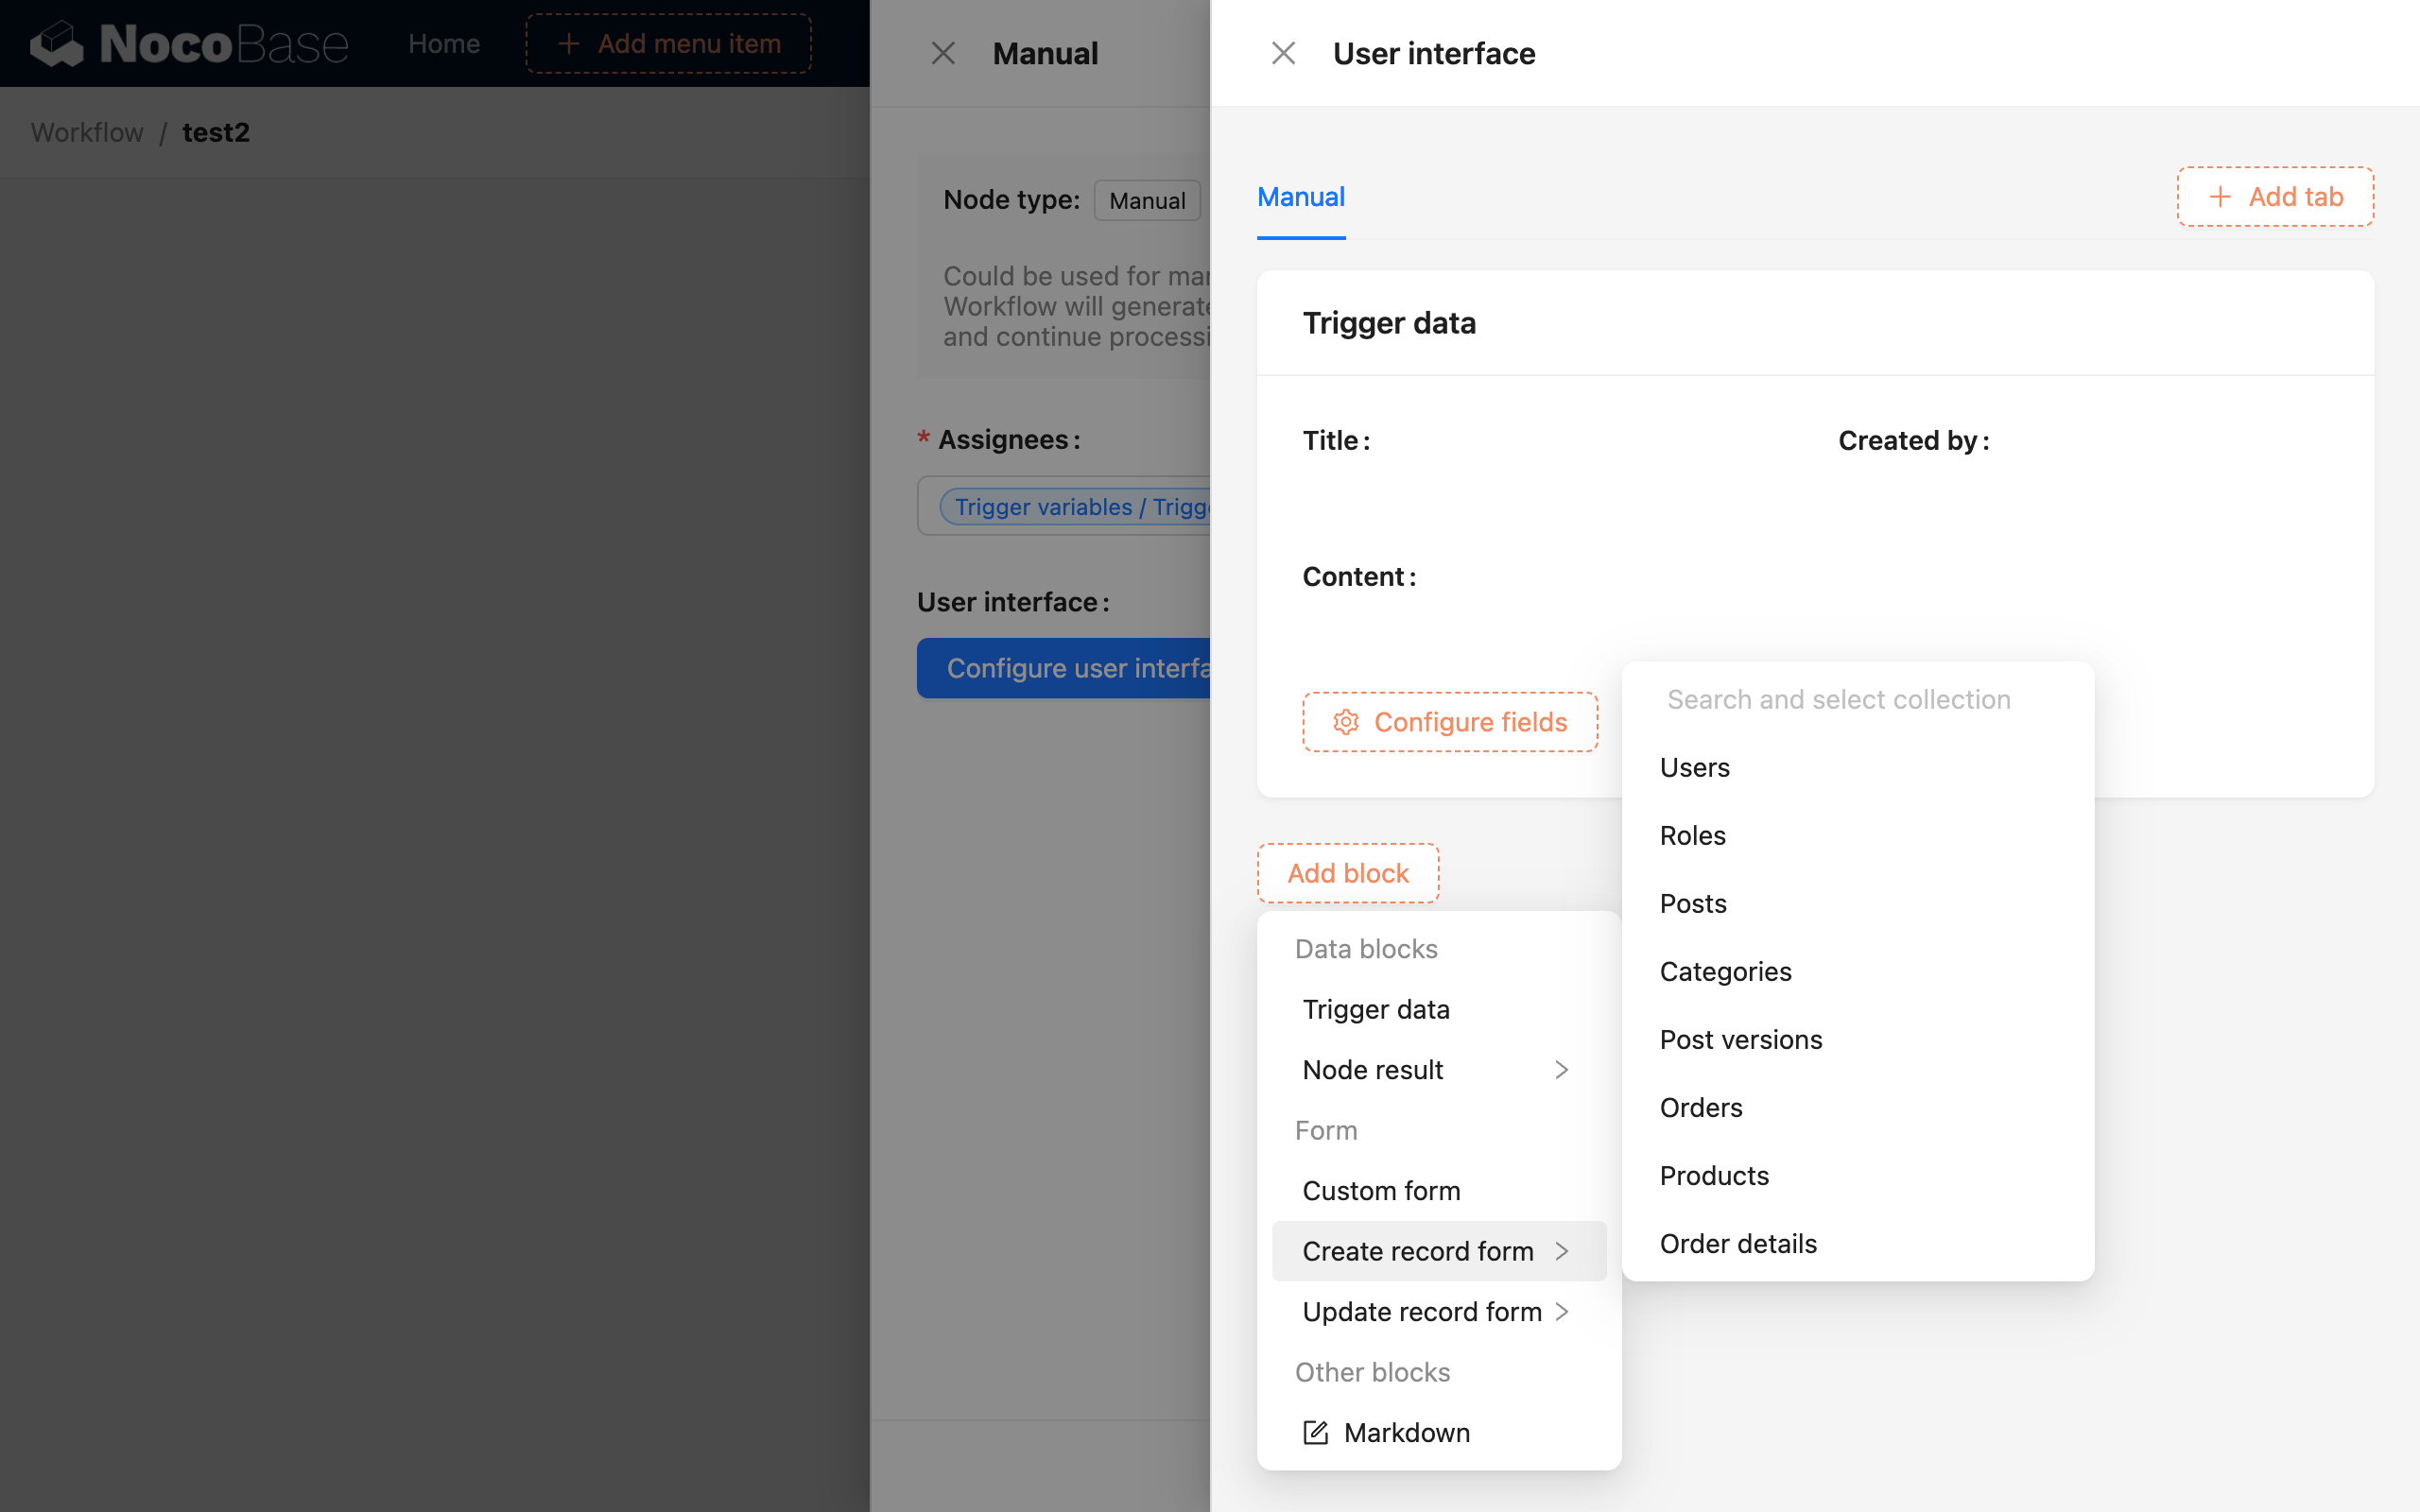
Create record forms and update record forms require selecting a base collection. After the to-do user submits, the values in the form will be used to create or update data in the specified collection. A custom form allows you to freely define a temporary form that is not tied to a collection. The field values submitted by the to-do user can be used in subsequent nodes.
The form's submit buttons can be configured into three types:
- Submit and continue workflow
- Submit and terminate workflow
- Only save form values
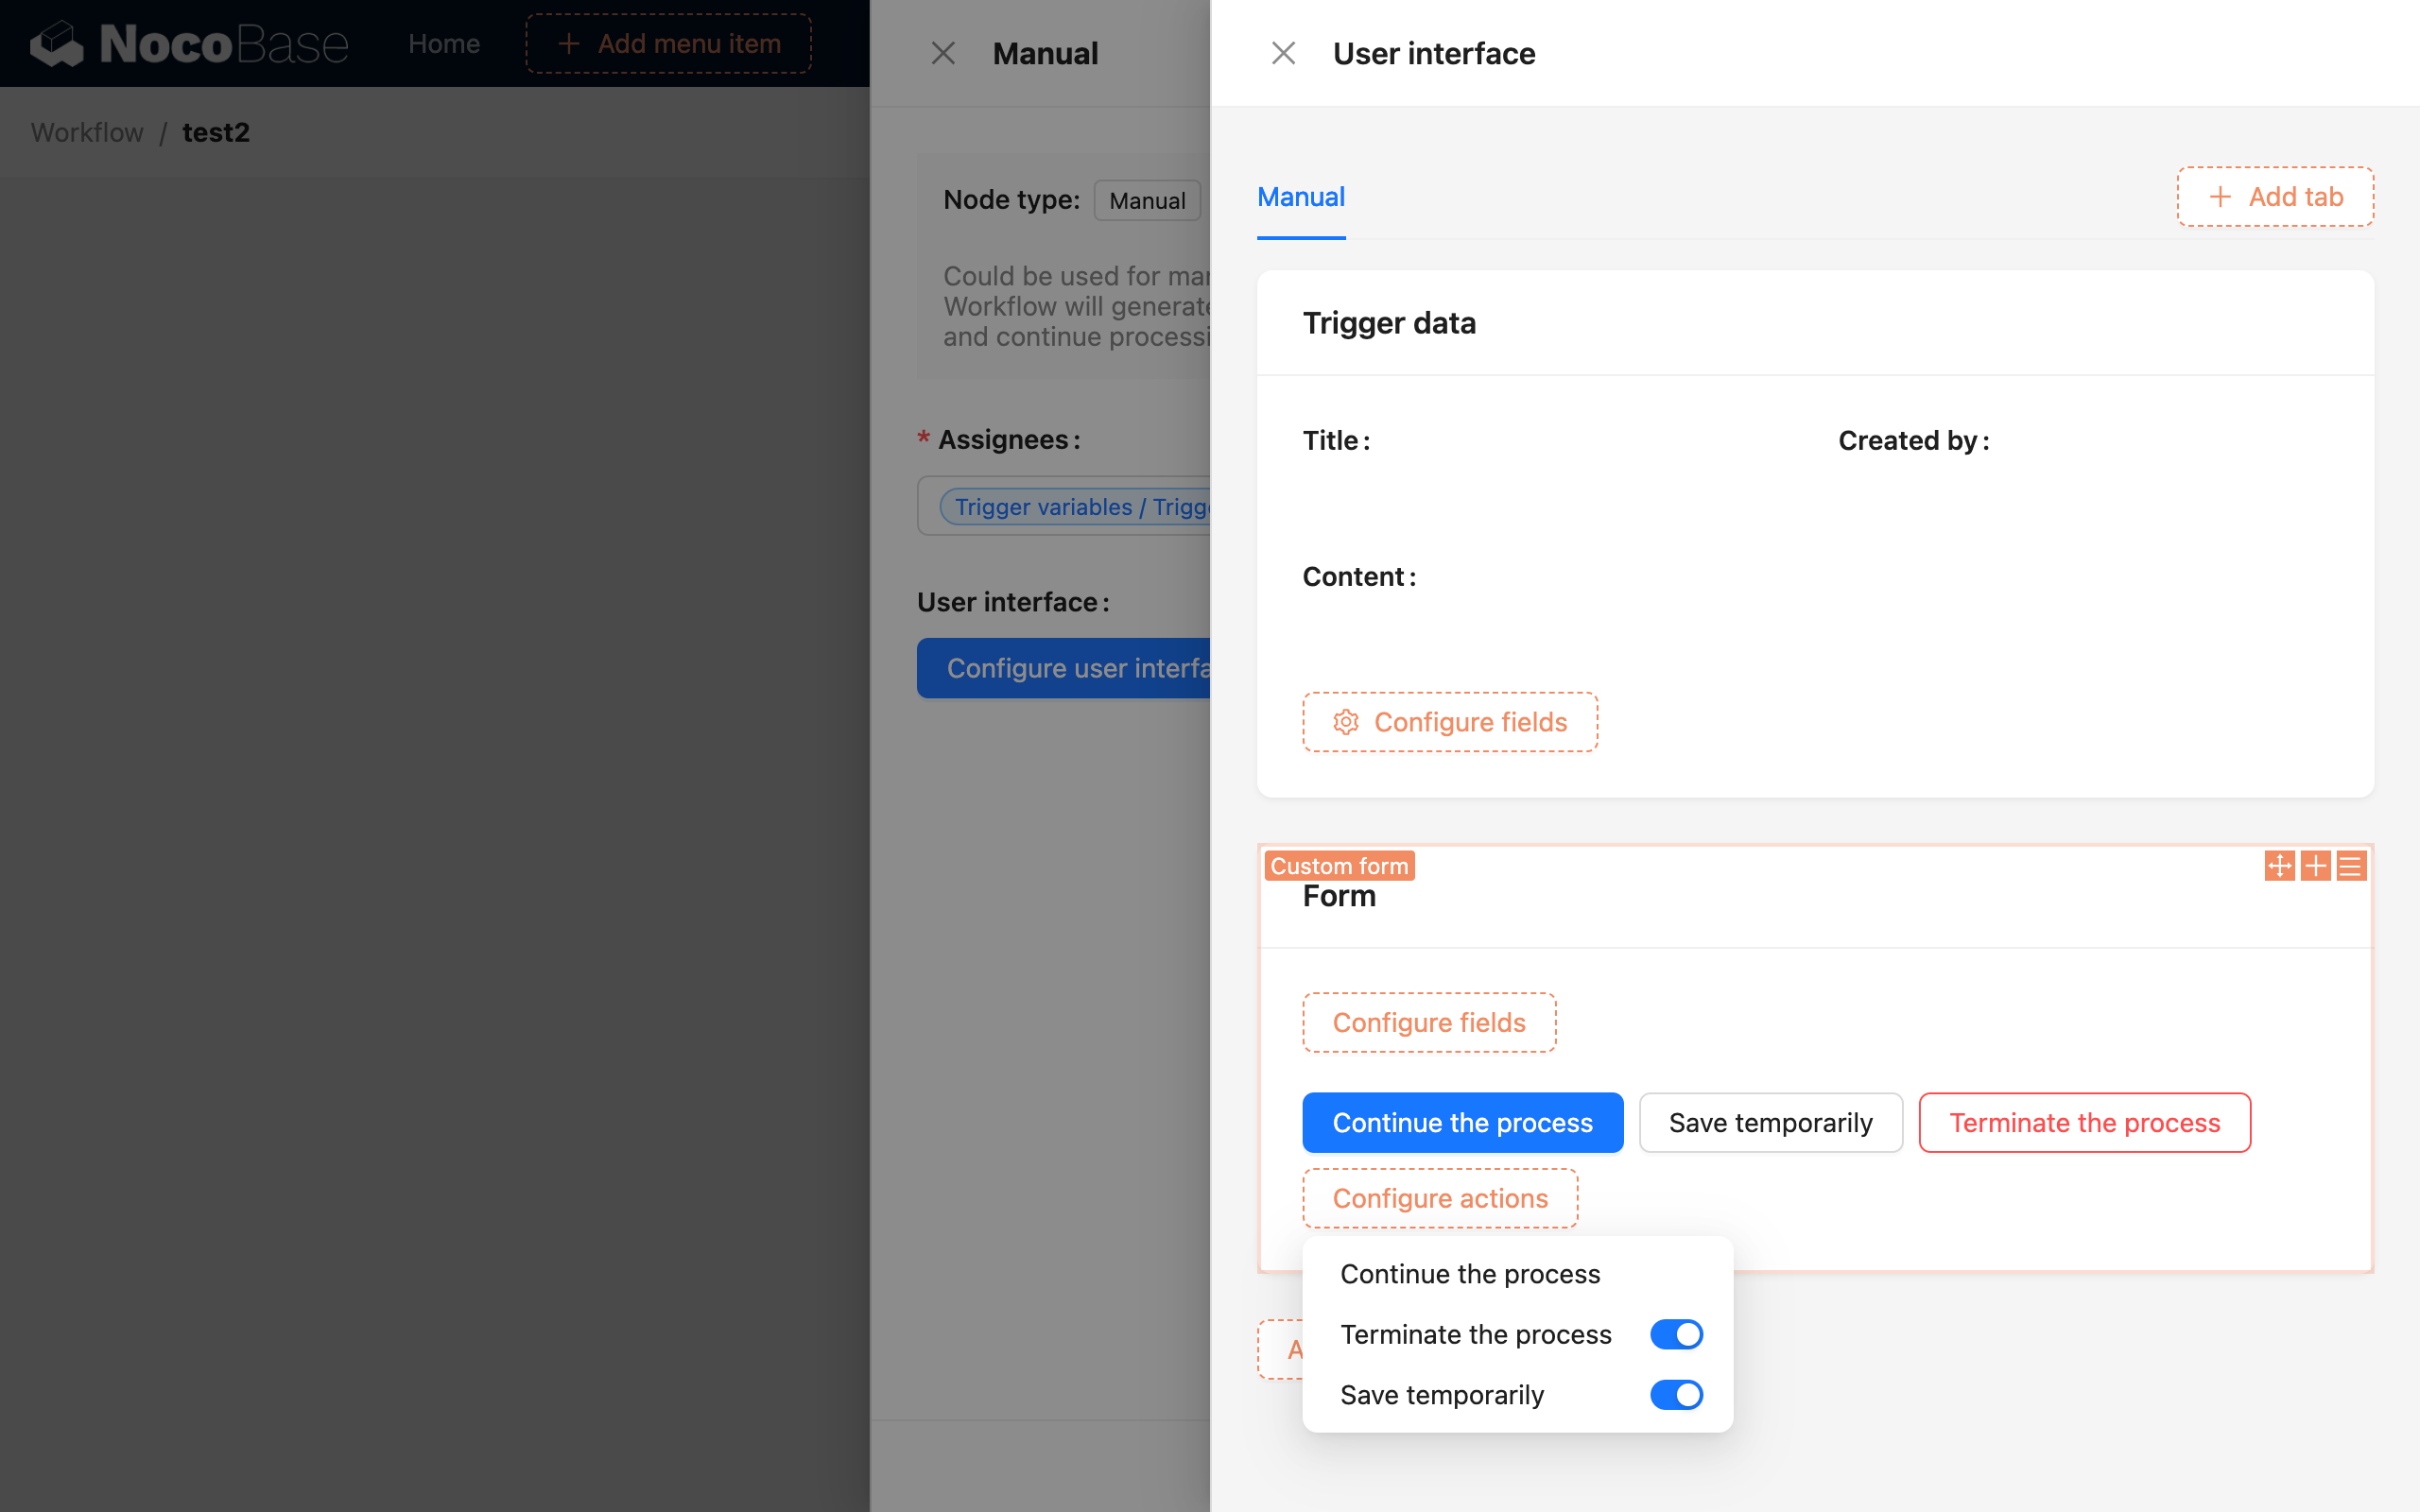
The three buttons represent three node statuses in the workflow process. After submission, the node's status changes to "Completed," "Rejected," or remains in a "Pending" state. A form must have at least one of the first two configured to determine the subsequent flow of the entire workflow.
On the "Continue workflow" button, you can configure assignments for form fields:
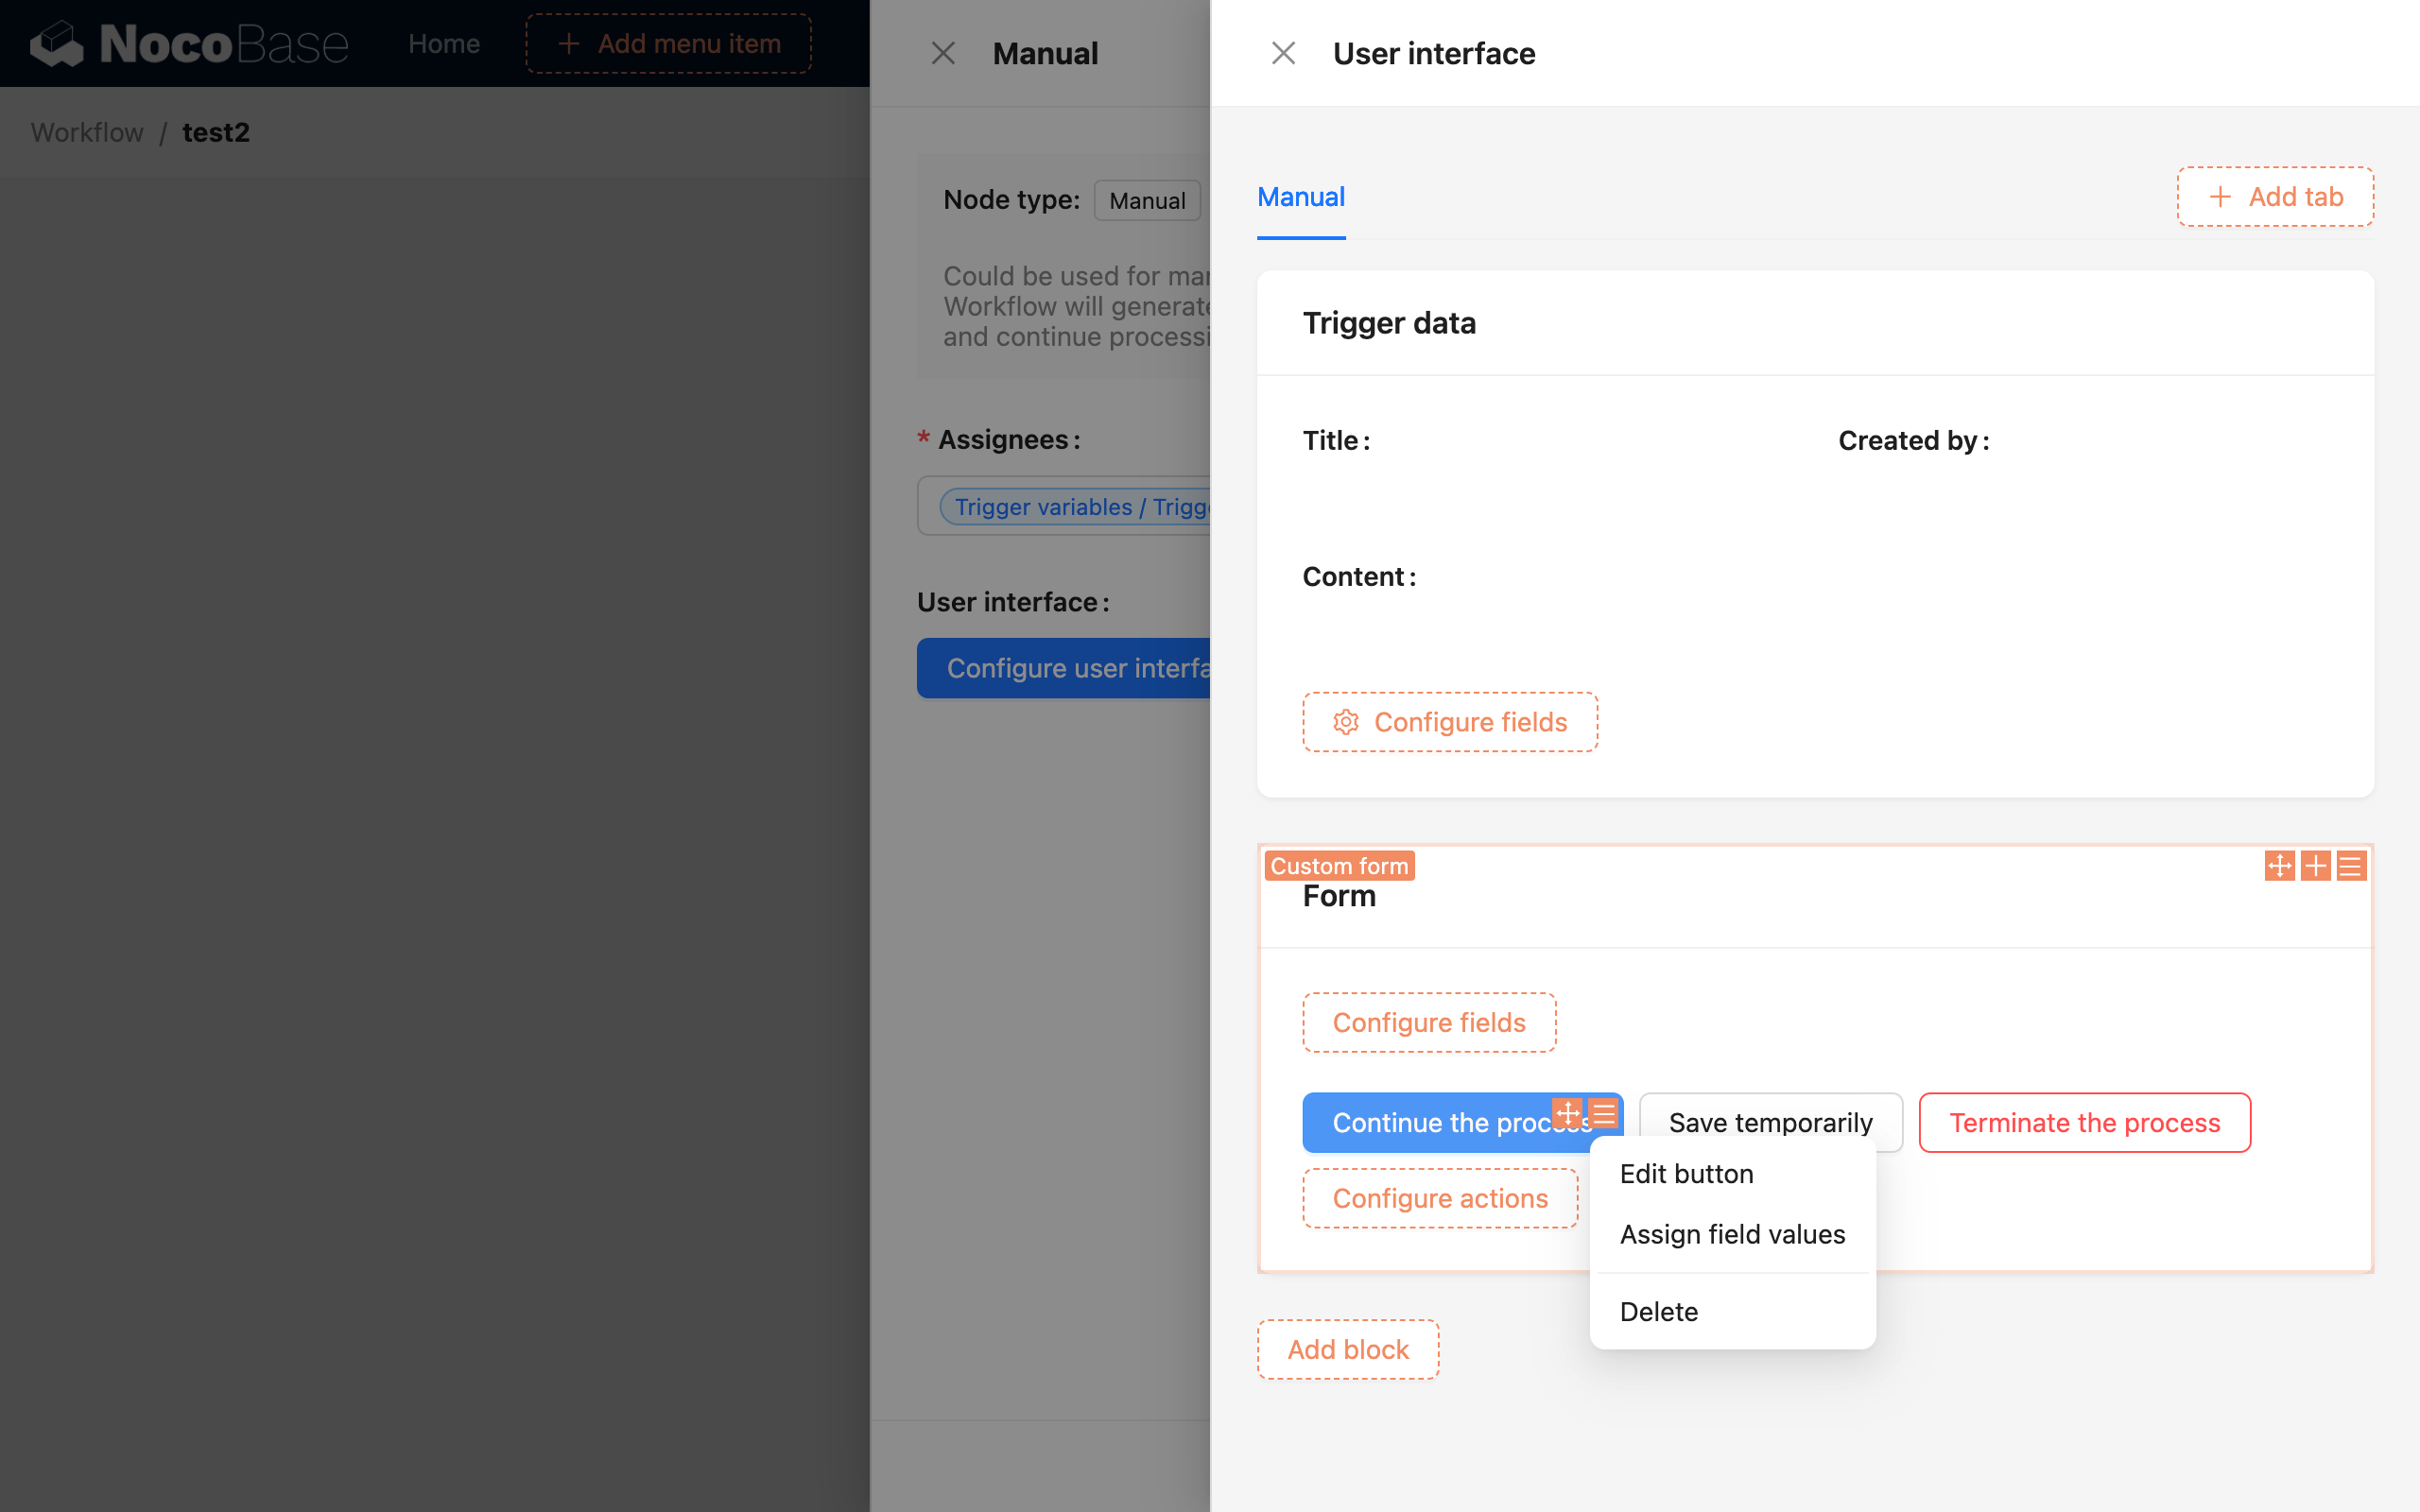
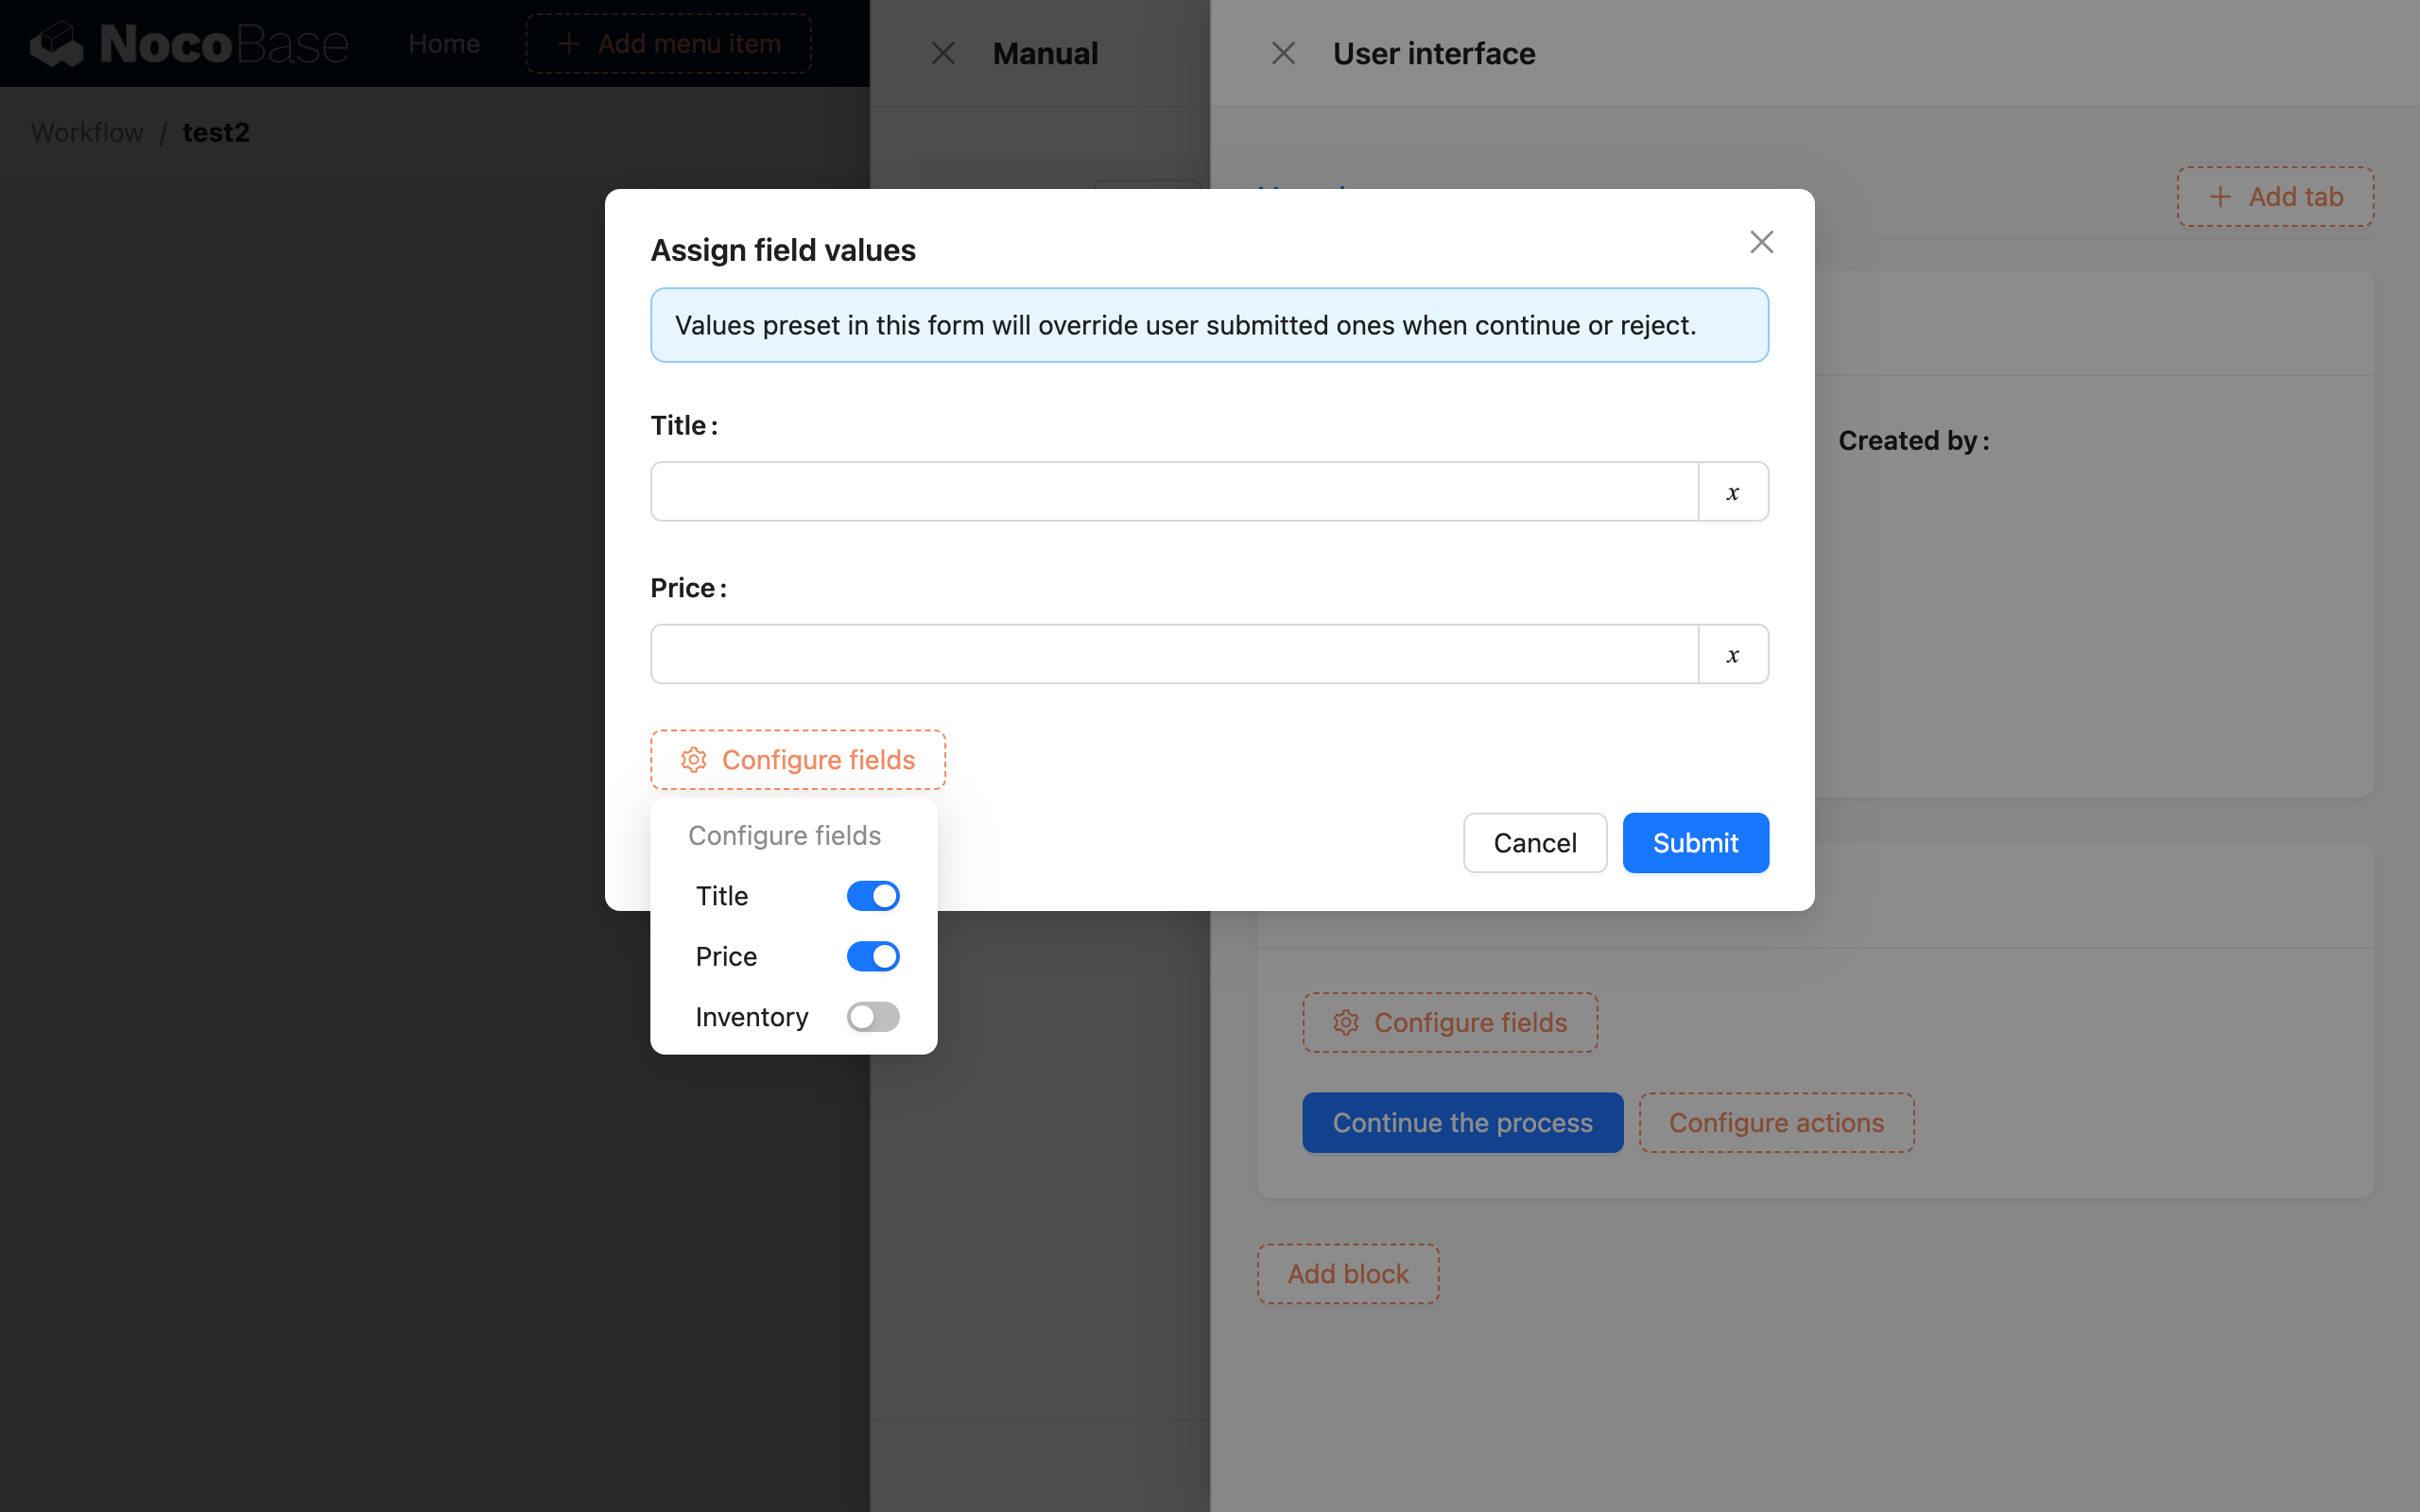
After opening the popup, you can assign values to any form field. After the form is submitted, this value will be the final value of the field. This is particularly useful when reviewing data. You can use multiple different "Continue workflow" buttons in a form, with each button setting different enum values for fields like status, thus achieving the effect of continuing the subsequent workflow execution with different data values.
To-do Block
For manual processing, you also need to add a to-do list to a page to display to-do tasks. This allows the relevant personnel to access and handle the specific tasks of the manual node through this list.
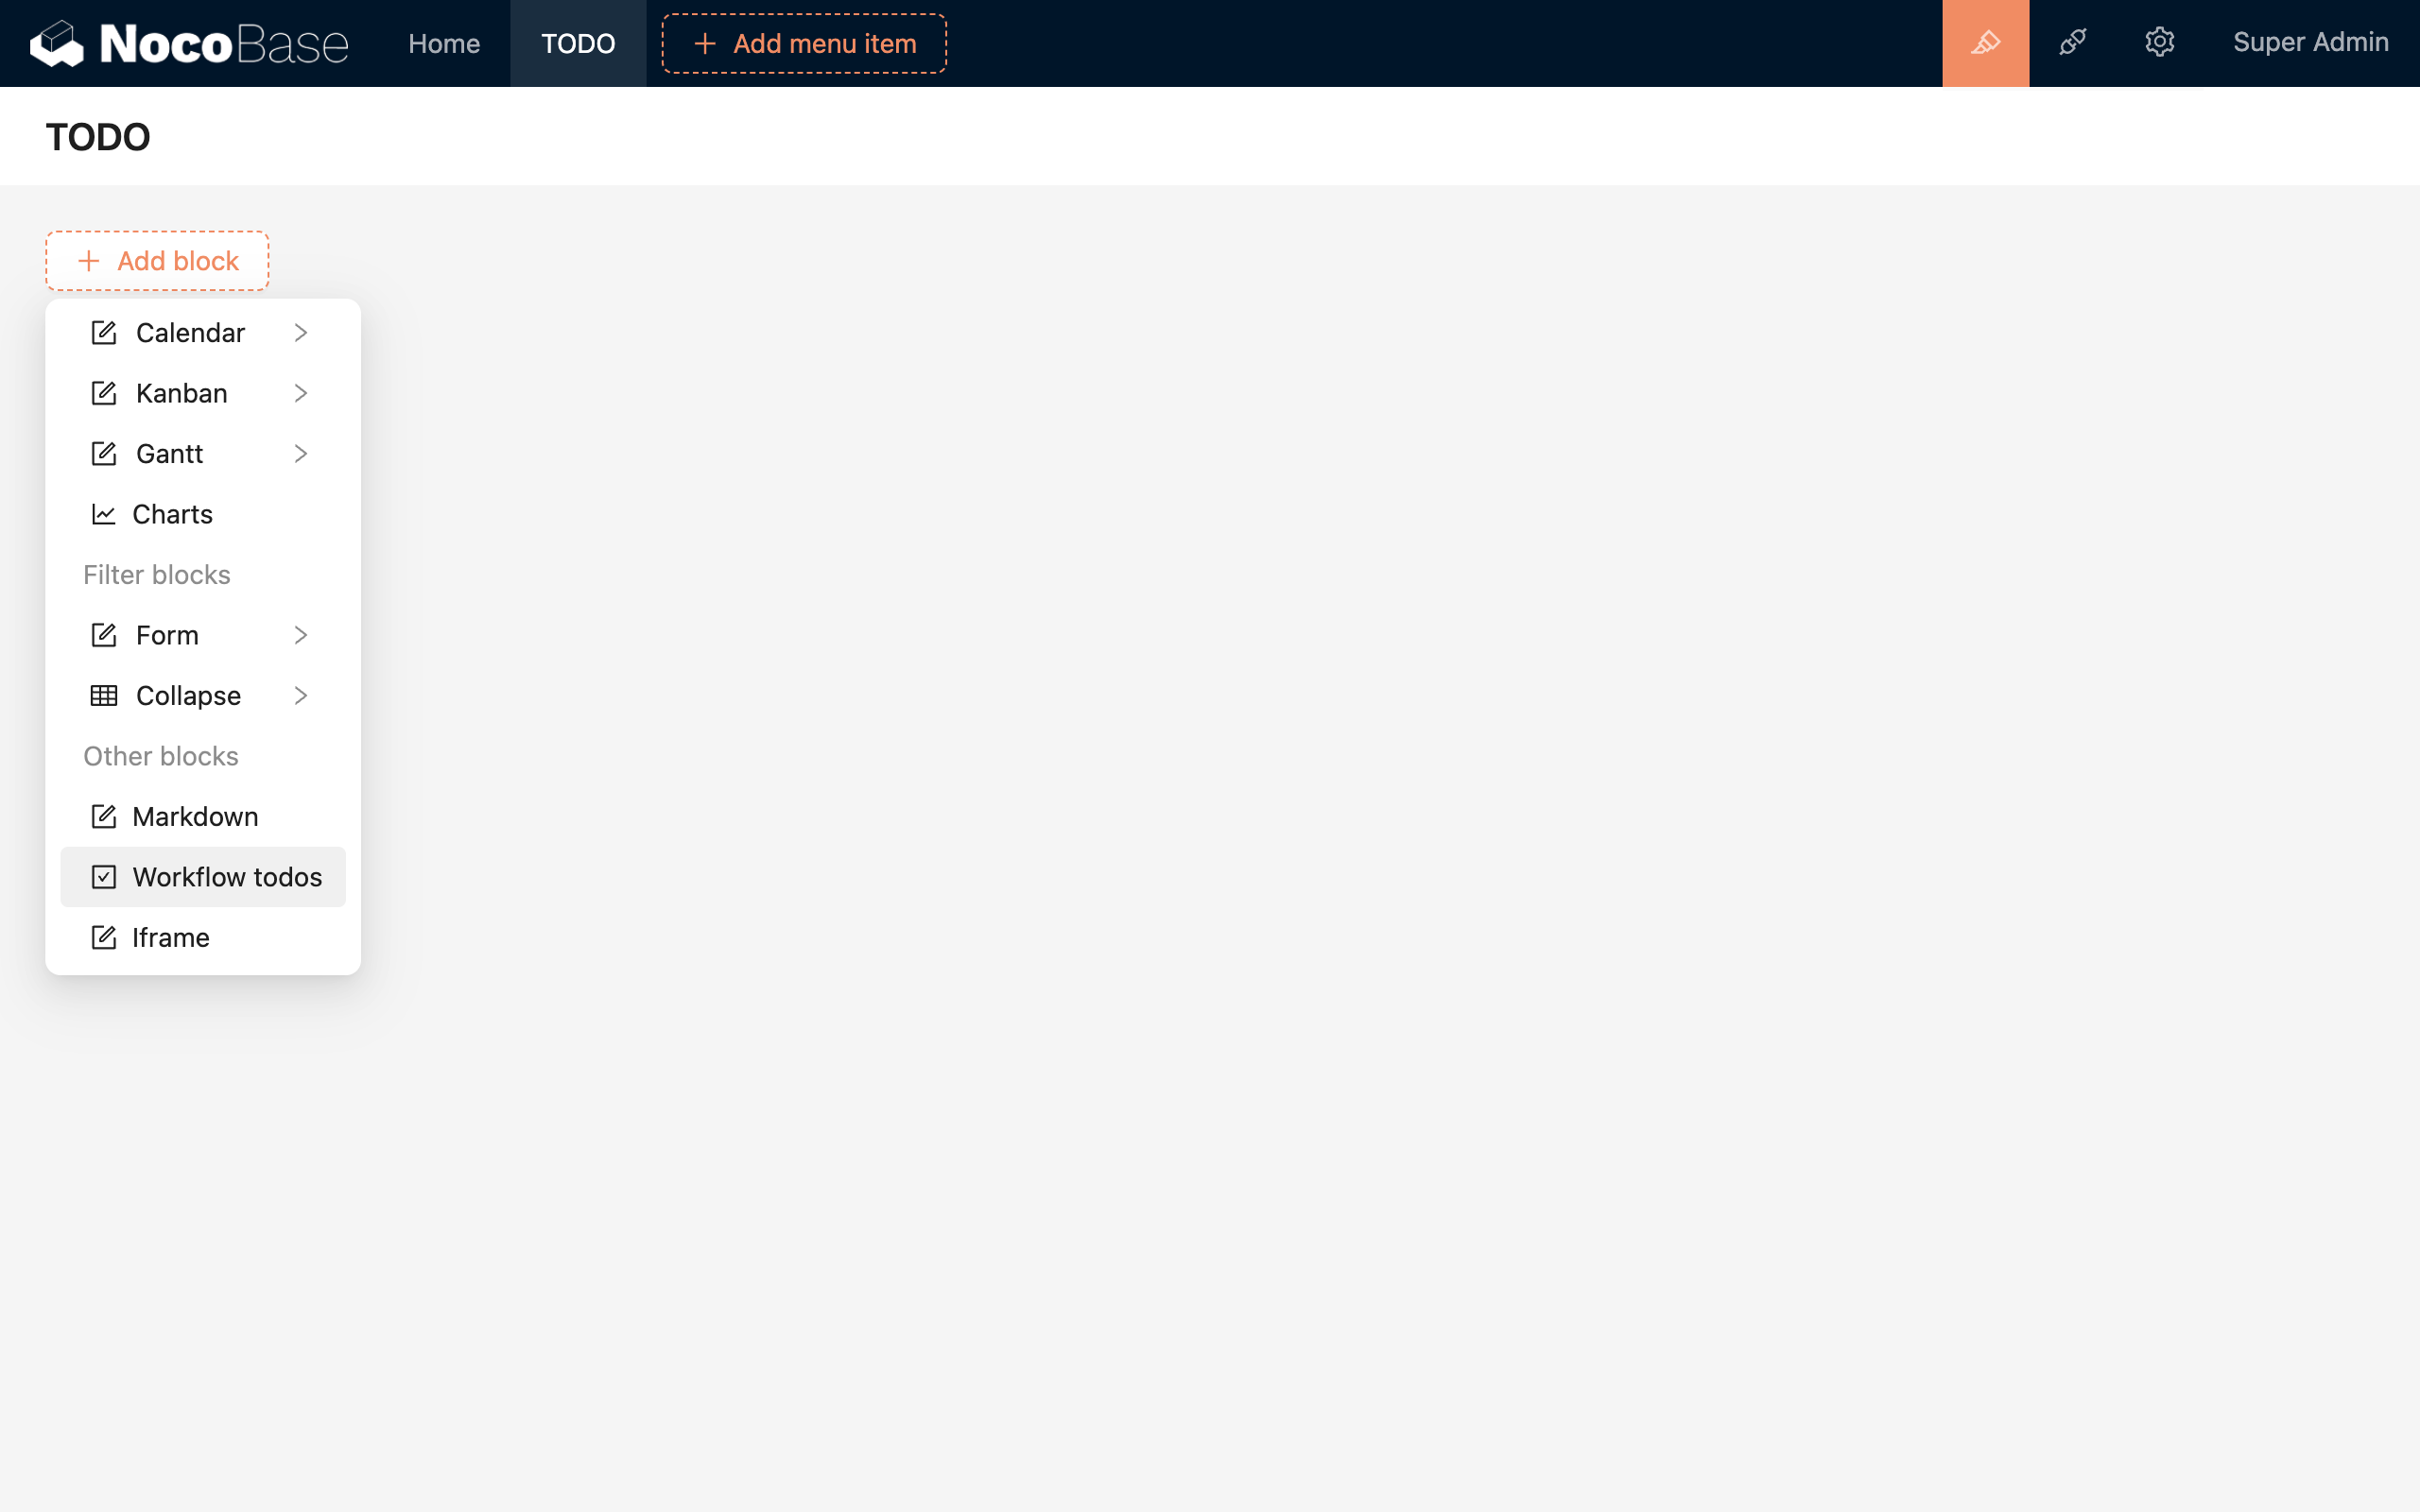
Add Block
You can select "Workflow To-do" from the blocks on a page to add a to-do list block:
To-do list block example:

To-do Details
Afterward, the relevant personnel can click on the corresponding to-do task to open the to-do popup and perform the manual processing:
Example
Post Review
Suppose a post submitted by a regular user needs to be approved by an administrator before it can be updated to a published state. If the workflow is rejected, the post will remain in a draft state (not public). This process can be implemented using an update form in a manual node.
Create a workflow triggered by "Create Post" and add a manual node:
In the manual node, configure the assignee as an administrator. In the interface configuration, add a block based on the trigger data to display the details of the new post:
In the interface configuration, add a block based on an update record form, select the posts collection, for the administrator to decide whether to approve. After approval, the corresponding post will be updated based on other subsequent configurations. After adding the form, there will be a "Continue workflow" button by default, which can be considered as "Approve". Then, add a "Terminate workflow" button to be used for rejection:
When continuing the workflow, we need to update the post's status. There are two ways to configure this. One is to display the post's status field directly in the form for the operator to select. This method is more suitable for situations that require active form filling, such as providing feedback:
To simplify the operator's task, another way is to configure form value assignment on the "Continue workflow" button. In the assignment, add a "Status" field with the value "Published". This means that when the operator clicks the button, the post will be updated to the published state:
Then, from the configuration menu in the upper right corner of the form block, select the filter condition for the data to be updated. Here, select the "Posts" collection, and the filter condition is "ID equals Trigger variable / Trigger data / ID":
Finally, you can modify the titles of each block, the text of the relevant buttons, and the placeholder text of the form fields to make the interface more user-friendly:
Close the configuration panel and click the submit button to save the node configuration. The workflow is now configured. After enabling this workflow, it will be automatically triggered when a new post is created. The administrator can see that this workflow needs to be processed from the to-do task list. Clicking to view will show the details of the to-do task:
The administrator can make a manual judgment based on the post details to decide whether the post can be published. If so, clicking the "Approve" button will update the post to the published state. If not, clicking the "Reject" button will keep the post in a draft state.
Leave Approval
Suppose an employee needs to request leave, which must be approved by a supervisor to take effect, and the corresponding employee's leave data needs to be deducted. Regardless of approval or rejection, an HTTP request node will be used to call an SMS API to send a notification message to the employee (see the HTTP Request section). This scenario can be implemented using a custom form in a manual node.
Create a workflow triggered by "Create Leave Request" and add a manual node. This is similar to the previous post review process, but here the assignee is the supervisor. In the interface configuration, add a block based on the trigger data to display the details of the new leave request. Then, add another block based on a custom form for the supervisor to decide whether to approve. In the custom form, add a field for approval status and a field for the reason for rejection:
Unlike the post review process, since we need to continue the subsequent process based on the supervisor's approval result, we only configure a "Continue workflow" button for submission, without using a "Terminate workflow" button.
At the same time, after the manual node, we can use a conditional node to determine whether the supervisor has approved the leave request. In the approval branch, add data processing to deduct leave, and after the branches merge, add a request node to send an SMS notification to the employee. This results in the following complete workflow:
The condition in the conditional node is configured as "Manual node / Custom form data / Value of the approval field is 'Approved'":
The data in the send request node can also use the corresponding form variables from the manual node to differentiate the SMS content for approval and rejection. This completes the entire workflow configuration. After the workflow is enabled, when an employee submits a leave request form, the supervisor can process the approval in their to-do tasks. The operation is basically similar to the post review process.